If you have been following this blog you will know my husband and I hold special cooking contests called He Said/She Said. This month's contest (announced here) was for each of us to find one ingredient we had not cooked with then use that ingredient to make 2 dishes/recipes. That sounds simple doesn't it, but trust me it is a bit more challenging than it first appears.
I decided to follow my husband's approach of KISS (keep it simple silly). What I did was modify a tried and true recipe to create a new flavour for a lovely dessert to take to a friend's. Now here is where I cheated just a little as I didn't make two stand alone dishes but the cake could be finished using another method and the icing I created could also be used as a topping for other desserts. So technically I used the coconut milk in two ways for this contest.
White Cake
The beauty of my favourite basic white cake recipe is it can easily be modified. What I wanted to create was a cake that wasn't overly sweet yet moist and flavourful. I wanted it to be a little bit different. The recipe calls for ¾ cup of milk so I decided to substitute coconut milk instead. Coconut milk is not the thin watery liquid found inside a coconut but rather it is a sweet, milky white cooking base that is derived from the meat of mature coconuts. Canned coconut milk can be found in most larger grocery stores. If you cannot find coconut milk you can make it yourself by soaking grated coconut in hot water or milk to extract the oil and aromatic compounds then straining. Coconut milk has a fat content of approximately 17%. It should not be left at room temperature as coconut milk spoils quickly so always refrigerate.
Using coconut milk as a substitute in the white cake mixture resulted in a richer flavour and moister testure than the plain white cake. This comes from the higher fat content of the coconut milk. While the cake was baking and cooling I set about looking for an icing thinking something lightly flavoured with pineapple would be nice but then looking at the half can of left over coconut milk I came up with another idea that would give me the not too sweet result I was after.
Coconut White Cake
While I was searching for a topping that would use the rest of the coconut milk I came across a site that said coconut milk could be whipped to use as a replacement for whipping cream for those who can't or don't eat dairy. I decided to test this out and see what I could come up with. I placed the cold coconut milk in the bowl of the KitchenAid® stand mixer. Using the whisk attachment I beat on setting 10 for 3 minutes. The coconut milk did thicken somewhat but not to the same degree that heavy whipping cream does. In comparing the stiffness of the peaks after whipping, meringue is stiffer than heavy whipping cream which is stiffer than coconut cream. The problem was I wanted a topping with a bit more body. The first two additions that came to mind was gelatin and xanthum gum. Xanthun gum is a polysaccharide food additive used as a thickener. It is produced by fermenting glucose or sucrose by the Xanthomaonas campestris bacterium. , gluten free . Xanthan gum is gluten free so is a popular thickener for those on gluten free diets. It is also the ideal thickener for salad dressings. I thought xanthan gum would be quicker and easier so I used that. The main trick when using xanthan gum is using a blender or whisking at high speed while incorporating it into the mixture. I used about one eighth tsp of xanthan gum adding while whisking on speed 10. This gave the whipped coconut milk a nicer body. Then I spread the frosting over the cake and garnished with sweetened flaked coconut. I think it came out quite nice and it did get 2 thumbs up from our friends.
Note: This cake needs to be refrigerated because of the topping.
Welcome to our kitchen that truly is the heart of our home! One of life's greatest pleasures is enjoying good food with family and friends. Here you will find recipes, tips for frugal cooking, how-tos for food preservation especially canning and anything else food related. Tea is brewing and warm cookies are fresh from the oven. Please sit a spell and enjoy your stay.
- Garden Gnome
- Ontario, Canada
- I am a wife, mother and grandma who enjoys the many aspects of homemaking. A variety of interests and hobbies combined with travel keep me active. They reflect the importance of family, friends, home and good food.
--Bobby Flay
For Your Information
- [March 19, 2020] - Effective Mar 17, this blog will no longer accept advertising. The reason is very simple. If I like a product, I will promote it without compensation. If I don't like a product, I will have no problem saying so.
- [March 17, 2020] - A return to blogging! Stay tuned for new tips, resources and all things food related.
- [February 1, 2016] - An interesting report on why you should always choose organic tea verses non-organic: Toxic Tea (pdf format)
- Sticky Post - Warning: 4ever Recap reusable canning lids. The reports are growing daily of these lids losing their seal during storage. Some have lost their entire season's worth of canning to these seal failures! [Update: 4ever Recap appears to be out of business.]
Popular Posts
-
Food manufactures have so convinced us that home cooking is not possible without a ready-made mix that many of us actually believe that myth...
-
I am very much a scratch cooking most of the time. One thing that has always been a concern is coming across a recipe I want to try that ca...
-
I got my first job at A&W and only worked there the summer but that is where I met the love of my life. This sauce was made on site by...
Saturday, October 31, 2009
She Said - Coconut Milk
Friday, October 30, 2009
Sautéed Brussels Sprouts
Good home cooking need not be time consuming or complicated. In fact some of the best meals are the simple meals. Typically these meals have fewer ingredients, nothing fancy just normal ingredients you would find in your pantry, vegetable bin, refrigerator or freezer. I love finding a simple side that just works nicely especially when it is just a bit on the rustic side! When it is a side that can be easily made with ingredients I have on hand that's even better.
Sautéed Brussels Sprouts
There is no doubt that food is a bonding factor in our family. We often call or email other family members with a new recipe we tried. One of our kids called with a way to cook Brussels sprouts that was quite tasty yet very simple involving two ingredients, Brussels sprouts and bacon. Brussels sprouts are one thing I have had problems growing but they are one of my favourite vegetables. I usually steam fresh Brussels sprouts. They don't can well and I don't care for them frozen so fresh it is.
I liked the idea of sautéing with just bacon but had a half of an onion in the fridge so chopped that to add with the Brussels sprouts and bacon. Home made shake & bake chicken legs with backs attached and oven baked potatoes completed the entrée. It was a simple meal, easy to put together with very little prep work just the perfect meal for busy homemakers.
Sautéed Brussels Sprouts
30 Brussels sprouts
½ medium onion chopped
6 slices thick bacon
Wash and trim the Brussels sprouts. Chop the onion. Cut across the bacon slices to form 1-inch pieces. Place in a fry pan on medium high. Sauté until Brussels sprouts caramelize and bacon is golden brown. Remove from pan using a slotted spoon to help drain any grease before serving.
Thursday, October 29, 2009
Kitchen Quick Tips - Reducing Sugar
Wednesday, October 28, 2009
He Said - Ground Turkey
If you have been following this blog you will know my husband and I hold special cooking contests calle He Said/She Said. This month's recipe contest was for each of us to find one ingredient we had not cooked with then use that ingredient to make 2 dishes. That sounds simple doesn't it, but trust me it is a bit more challenging than it first appears.
My husband took the KISS approach to this contest of which I called him up on that. He reminded me the only criteria was to use and ingredient and make 2 recipes using that ingredient. So essentially I could not complain about him keeping it simple. His ingredient of choice was ground turkey. Now here the stores if we are really lucky might have ground turkey but not very often. Anything other than ground beef is rather iffy which is one reason we have a meat grinder attachment for the KitcheAid® stand mixer. A few days ago we stopped for groceries and he spotted ground turkey so that was it.
Three Meat Meatloaf
You certainly cannot get much simpler than meatloaf. The thing with meatloaf is everyone makes it different and there are as many variations as there are cooks. My husband used ground turkey, ground pork and ground beef to make this yummy variation of meatloaf. Paired with Old Fashioned Chili Sauce and an oven baked potato this meatloaf was wonderful. It has a firmer texture than all beef meatloaf but it slices just as nicely the following day for meatloaf sandwiches.
Three Meat Meatloaf
1 lb ground turkey
1 lb ground pork
1 lb lean ground beef
2 eggs
¼ c Heinz 57® sauce
¼ c Diana® sauce
½ c dry bread crumbs
garlic pepper
garlic salt
Mix the ingredients well with your hands. Form into a loaf and place in a loaf pan or baking dish. Bake at 180ºC (350ºF) until golden brown and interior temperature reads 22ºC ( 72ºF). Remove from oven. Drain any grease and let sit 10 minutes before slicing.
Bacon Wrapped Turkey Rounds
His second dish using ground turkey was even simpler yet it didn't look simple. He made bacon wrapped turkey rounds topped with a little cranberry claret jelly served with oven baked potatoes, oven baked acorn squash, home canned green beans along with apple and avocado wedges topped with cream cheese making this a a lovely Sunday dinner. The bacon wrapped turkey rounds while simple were delicious! The bacon kept the rounds nice and moist while adding extra flavour.
Method: Mix garlic pepper and a little onion powder into the ground turkey. Form into for thick patties. Wrap a piece of thick sliced bacon around each patty. Place on Silpat® lined sided baking sheet. Bake at 180ºC (350ºF) until interior temperature reads 22ºC ( 72ºF). Remove from oven and plate.
Tuesday, October 27, 2009
Prime Rib Roast
Prime rib roasts are on sale here so despite having filled freezers my husband couldn't resist picking up one. Then he went online to find a different way to prepare the prime rib. What he found was rather humourous instructions as to how to cook the prime rib to perfection. Well the method looked like it would work so we decided to try it.
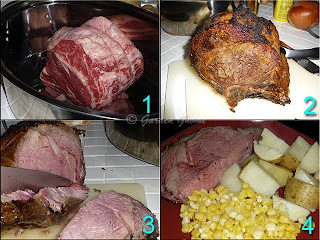
Just look at that beauty of a prime rib roast (1). My husband tubbed it with garlic and onion powder, Lawrey's seasoning salt, garlic pepper. Then he set it on a rack in the roasting pan roasted it for 28 minute 500ºF then turned off the oven for 2 hours as instructed. Here is where things when wrong. Our oven has a fan specifically meant to cool the oven quickly when it is turned off something the instructions did not take into consideration. The instructions said not to open the oven for 2 hours under penalty of death for any reason. After an hour we couldn't smell any roast smell so we left it a bit longer before making the executive decision to change the instructions. So from that point we were on our own. We turned the oven to 350ºF and continued roasting the prime rib until it was medium rare (2). The roast had a nice crust but was moist, tender and cooked to perfection inside (3). We served the prime rib slices (4) with the au jus (not shown), steamed potatoes and niblet corn. The meal was simple enough with a fair amount of prime rib left over.
Monday, October 26, 2009
Frugal Kitchens 101 - Frugal Mantra
One of my favourite television channels is the Food Network Canada. I watch it almost daily and one thing I have noticed that is a common theme amongst most chefs is the importance of being frugal in the kitchen. It is stress that anything you throw out costs you money. Now in a restaurant setting those pennies being tossed away has to be kept in strict check otherwise the restaurant won't see a profit. In the home kitchen every bag of garbage generated costs money including the garbage bag. The topic for today's Frugal Kitches 101 is the manta anything you throw out costs you money.
Every peel, bone, can, jar, bag, box or container has ultimately cost you money because that is all worked into the price of food. The costs of transportation from the farmer to the store are also factored in. I know I've talked about some of these aspects of saving money in the kitchen but this post will extend it a bit further. Here's a few ways to reduce what you throw out:
- reduce packaging - Reduce packaging every chance you get with respect to all foods and kitchen products. This will give immediate savings at the point of purchase. Avoid foods packaged wrapped in styrofoam trays and any kitchen utensil or item packaged in those horrible environmentally unfriendly plastic packaging that is a nightmare to open.
- reuse packaging - Glass jars and dairy tubs can be used for so many things around the house so rather than put them in the recycle bin find household uses for them. Some cardboards can be used under mulch to keep weeds in check in your garden.
- ditch the disposables - The commercial industry has brainwashed us into believing that disposable are the only way to go but that simply is not the case. Instead of buying bottled water invest in a couple of nice refillable water bottles to eliminate the disposable bottle but to also save on the cost of water. I recommend 3 - 4 refillable water bottles each depending on your lifestyle. Invest in a thermos and/or refillable travel mug for hot drinks when traveling to eliminate the disposable coffee cups that are a landfill issue. Truck stops even sell small coffee makers that work in your vehicle and anytime you make your own coffee you save money. The cheap technically disposable plasticware eventually ends up in landfills. There is a lot of issues surrounding using plasticware in the kitchen. Avoid all that with using glass bowls with either glass or plastic lids that do not come into contact with foods and don't use the plastic lids in the microwave oven. Lidded glass containers eliminates or greatly reduces the use of tinfoil, plastic wrap and wax paper saving you money by not having to buy these disposable wraps. Some glassware (eg. Anchor Hocking) can be used in the freezer, refrigerator, oven and microwave oven Invest in one or more Silpats (silicone baking sheets) to eliminate parchment paper.
- utensils - You can't run a kitchen without cooking utensils. What I have noticed is that cheaper quality utensils may or may not last and the same can be said for higher quality utensils. I like heavy duty cooking utensils that work for both non-stick and stainless steel pots and pans. There is less tendency to break. Inexpensive but durable silicone spatulas and scoopulas can be found at dollar type stores. So when it comes to utensils look for durability. The less times you have to replace utensils the better.
- gadgets - Most home cooks have way too many gadgets. Now some gadgets are quite useful but many end up filling up drawers and never being used. Gadgets cost money to acquire but each time you get rid of a gadget you either didn't like or didn't use that money has been wasted. So be very discriminatory when acquiring any kitchen gadget.
- plastic vs paper bags - Neither. The cost of either bag is factored in or a growing number of grocery stores are now charging for either type of bag. The eco-friendly and cheaper choice to bagging your groceries is to use cloth bags that in many cases have a pay back period of 20 - 40 uses. After that the cloth bag has paid for itself. Some stores are putting out a plastic weave type bag while others also have plastic bins for sale or you could even hit the dollar store for milk crate style bins for groceries. If you want even large wicker baskets with handles can be used for bringing groceries home. Invest in a few reusable totes or bags or basket and say no to both plastic and paper bags. If each bag costs 5¢ and you save using 4 bags per grocery trip that 20¢ which isn't much but 5 trips per month is $1 or $12 per year BUT more importantly you've lowered your carbon footprint.
Sunday, October 25, 2009
Slow Cooker Pork Loin Chops
The weather has turned extremely ugly here so that means I'm going into hibernation mode. Well not hibernation as in sleeping the entire winter but finding any excuse as to avoid going outside. That translates into filling, homemade comfort meals using meats from the freezer and ingredients from the pantry. Quite often the evening meal is decided on the spur of the moment starting with an idea I got from something I saw in the pantry or freezers. Now this is actually a good thing in many respects because stored foods are getting used up.
Pork Loin Chops
When we took the turkey our of the freezer we moved a few packages of meat to the top of the freezer to get used up. This is really important to help rotate the food in the freezer and prevent foods from staying in the freezer too long. One of the packages of meat was pork loin chops. Aren't they gorgeous? I removed the package the night before to start thawing in the refrigerator which is one of the safest ways of thawing meats. Unlike some I very seldom use the microwave oven for defrosting meats. The following morning I moved the pork loin chops to the counter to finish thawing before browning. By then I had decided to take the easy cooking method of using the slow cooker. Now the slow cooker is not one of my favourite appliances but it's so grey outside that my mood change that normally happens in November has already started.
Browning
One of the things I really dislike about the slow cooker is it does not brown meats and there is no way to brown meats using a slow cooker. Browning meat aka searing involves using a hot pan just to seal in the juices. My preferred fry pan for this is a stainless steel with copper core bottom but for this dish I reached for a non-stick fry pan. The reason being is I did not want to add any fat to this dish as it would be heavy enough.
Browning serves a couple of purposes. First it seals in the juices keeping the meat tender. Second browning adds to both the flavour and colour of the final dish. Browning give a richness and depth to the final dish that can't be achieved by any other method. I browned the pork loin chops before putting them in the slow cooker.
The Meal
Despite being rich and creamy looking and tasting this meal is actually low fat. I used 4 tins of low sodium condensed mushroom soup mixed with 2 c of skim milk. The pork loin chops where well trimmed too. Then I added about 8 small potatoes cubes, some niblet corn (home froze) and home canned mushrooms. Using a slow cooker for this dish means the sauce doesn't thicken and darken like it does on the stovetop. I thickened the sauce using instant potatoes, stirring in 1 tbsp at a time until I got the right consistency for the sauce. The end result was a very rich yet low fat, low sodium comfort meal perfect for a cold, damp fall evening meal.
Saturday, October 24, 2009
What's in the Pressure Cooker?
After a few meals of turkey we are always ready for something a bit different. Now we have been on this use it up trend since we returned home from our trip. Part of the reason is reducing what's in the freezers in prep for new meats but another part is the weather has turned cold so hibernation is a good thing.
Mystery
These are days I love my pressure cookers mainly because I do feel lazy. Pressure cooking is so easy and so much quicker than slow cooking but with a lot better results than using a slow cooker. A pressure cooker can save as much as 70% in energy usage and it doesn't heat the kitchen. It was the precursor to the microwave oven and remains more energy efficient than the slow cooker. Unlike the microwave oven or slow cooker, any meat can be browned in the same vessel saving time and foods do not need to be thawed although thawing does speed up the cook time. In terms of a cooking utensil a pressure cooker is one of the most frugal items in your kitchen.
Pictured is my Fagor 4 qt pressure cooker. So what is cooking? I pulled 3 nice sized country cut pork ribs from the freeze then let them thaw to where I could pull them apart. They were placed in the pressure cooker and the rest is history :)
Cooked
I started with 3 large country cut pork ribs just browned then added carrots, onions and a bit of stock to do the initial pressure cooking that took 20 minutes. Then I de-pressurized and added Diana Sauce® then brought it back up to pressure and cooked under pressure for 5 minutes. The result was a wonderfully tender meat perfect for a cold night's meal.
Pictured are the country cut pork ribs I made in the pressure canner. Doesn't this just look yummy? The carrots and onions were for flavour only and they really did do their job. Once the sauce caramelized a little the ribs were ready for serving with steamed potatoes, niblet corn and homemade bisquits.
Friday, October 23, 2009
Left Over Turkey
Anytime we have a turkey dinner there are left-overs. It's a given there will be lots of left-overs and always, always a batch of turkey stock. One of the biggest complaints I've heard about turkey left-overs is they are dry. If the turkey was moist to begin with the left-overs will be moist as well however the reheating process can dry out the meat. I like using moist reheating methods for left-over turkey. One of our favourite left-over turkey dishes is creamed turkey casserole.
Creamed Turkey Casserole
A lot of recipes are tweaked or created then handed down from generation to generation. This is a recipe handed down to me from my late mother-in-law. Coming from a large family and raising a large family she was an excellent and frugal cook. What was so impressive was her cooking was never just a recipe; it was I'm making this come and see how I do it. It was very much a hands on learning opportunity! I am extremely lucky that she shared some of her wonderful cooking expertise with me. I will be forever grateful for that.
Creamed turkey casserole is a quick and easy yet frugal meal that we usually make the day after the turkey meal. This is one recipe that I have not really tweaked. It is very much a homey, comfort meal.
Creamed Turkey Casserole
source: Garden Gnomes MIL
2 cans condensed mushroom soup
2 c cubed cooked turkey
2 c cooked rice
1½ c cooked niblet corn
½ small onion
1 c half & half
½ c Asiago cheese
Chop the onion. Mix all ingredients except the cheese in a large mixing bowl. Pour into an oven proof baking dish. Grate cheese. Top with the grated cheese. Bake at 180ºC (350ºF) until warmed though and lightly golden.
Serves 6
Turkey Stock
Every turkey carcass is turned into turkey stock here. Now I have a confession some will find a bit odd. I love the flavour of turkey stock and having a number of jars of turkey stock on hand but I seriously hate the smell of turkey stock cooking! It is one of the very few foods that just don't agree with me while they are cooking. At any rate, I made turkey stock ending up with 16 pints canned and 1½ L for the freezer.
Homemade stock is one of the most frugal products you can make in the kitchen. My turkey stock is never clear and that is because I stuff my turkey so when the bones go into the stock pot there is a small amount of stuffing that stuck to the bones which causing clouding. This is fine with me. I also add the neck bone to the stock pot and cook the giblets separately adding the liquid to the stock. The stock is defatted and strained twice before canning.
As always never put up any food by one method only. In this case most of the stock was canned but some was froze. Using two or more methods of preservation ensures you always have a back-up in the event one method fails. If you do not home can then freezing stock is your alternative. It is not as convenient as opening a jar and using but it still useful and frugal. Just take a container out of the freezer to thaw in the morning.
Thursday, October 22, 2009
Wednesday, October 21, 2009
Thanksgiving 2009 Highlights
The Canadian Thanksgiving is celebrated on the second Monday of October. We normally have our big family Thanksgiving meal on Sunday before on years we are at home. If you recall we arrived home the previous Wednesday after being away for 6 days. The following couple of days I was busy processing corn so I had Saturday to do the menu and prep work for the meal. The meal highlights were the roast turkey and apple pie.
Roast Turkey
I decided to keep the menu simple relying on my freezer and pantry supplies since this was going to be a smaller family gathering. The turkey had already been taken out to thaw and I had plenty of potatoes on hand. The stuffing as in most turkey meals tends to take the place of bread even though I usually make a loaf. Saturday was quite cold and rainy so grocery shopping didn't sound like a very appealing endeavour to either of us so shopping the home supplies worked well.
The star of the show was the turkey accompanied by baked potatoes, niblet yellow corn, stuffing, gravy and freezer pickles. It was a simplified version of our normal Thanksgiving meals but still quite enjoyable. That bird tasted every it as good as it looked!
Apple Pie
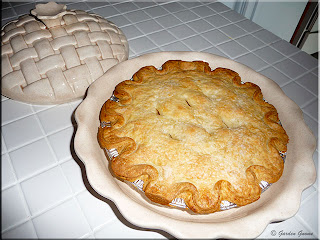
The kids brought an apple pie from Chudleigh's in the spring so I pulled it from the freezer for dessert. These homemade style pies simply need to be reheated in the oven. Pictured is the ready to serve warm pie sitting safely in the homemade ceramic pie keeper.
There are pies and then there are pies. Homemade pies are wonderful! Places like Chudleigh's are selling homemade-style pies that really are about as close to homemade as you can get. They use fresh fruits to make the filling and the pie crust is made from scratch. Just like most homemade pies they can be frozen until you want to use them. This is an excellent and tasty alternative for those who don't like making pies or find themselves in need of a quick homemade quality dessert but don't have the time to make them.
Tuesday, October 20, 2009
Canadian Chef - Michael Smith
A good part of my cooking style has been influenced by family and friends as well as our lifestyle. For the most part it means my cooking style is rather laid back and very much homestyle cooking from scratch. Several years ago I discovered the Food Network and it only took a couple of shows before I was hooked. Like anyone who enjoys food I really wanted to learn how to do some of the fancy things without moving to far from where my cooking heart was.
As you can see the entire meal could be easily duplicated at home. I love his demeanor and style. He is just a very likable person! This is one chef I could seriously watch cook all day and I would not hesitate to make a special trip just to have the pleasure of eating at his restaurant although at the moment he is a globe trotting, roving chef who cooks mainly for his family and friends when home. What I really like about his style is the emphasis is on the food and good times exactly where it should be not the recipe. What doesn't come out in this video is Michael Smith's commitment to humanitarian and environmental conservation efforts, both very commendable indeed. In my books Michael Smith earns 5 Stars as a Canadian chef!
Monday, October 19, 2009
Frugal Kitchens 101 - Quality Counts
When it comes to frugal cooking food quality is very important. Lower quality foods are often high is sodium, sugar and preservatives as well as being lower in nutritional value. Buying quality foods does not mean you have to break the bank either. Quality foods can be quite inexpensive. I want to stress that inexpensive doesn't mean cheap when it comes to foods. Inexpensive quality foods can easily be purchased whereas cheap foods are seldom quality foods. Focus on buying foods with the highest nutritional value for your food dollars. This week's Frugal Kitchens 101 will focus on choosing quality foods to help you get the best value for your food dollars.
- buy locally - This is an excellent way of ensuring you are getting quality produce that has not spent a vast amount of time traveling from the farmer to your table. Local produce is fresher and higher in nutrients than imported produce. Imported produce is often picked when it is under ripe so they are not at their peak of nutritional value and they continue to lose nutrients as soon as they are picked.
- buy in season - The best example of quality is comparing a store bought in season tomato to one that is a hot house off season tomato. Hands down the in season tomato has more flavour, more nutrients and is less expensive. The only tomato that will beat a store bought in season tomato is a home grown one picked moments before use. Be aware of the produce seasonal trends in your area then plan your menus with this in mind.
- preserve your own - Preserving in season, locally grown foods makes good frugal sense and it allows you to avoid the problems and concerns associated with commercially canned, frozen and dried foods.
- fresh produce - When buying produce look for firm, fresh, ripe produce free from bruising that will cause the produce to spoil faster. Avoid buy under ripe, over ripe produce or produce with any signs of spoilage. Smell the produce and avoid any produce with an off smell.
- brand name vs store brand - In most cases the quality of the brand name may be just slightly higher than the store brand. Many food processing plants process both brand and store brands with the higher quality produce going to the brand name and seconds (eg. smaller size) going to the store brands. However, this is not always the case so this becomes a trial and error thing. The problem is if you try a store brand and no one will eat it then both food and money are wasted. When it comes to store brands it is best to buy a small amount (eg. one can), try it first and then if it meets your requirements buy more.
- cooking - The frugal approach for a large variety of produce is to serve raw. This ensures no nutrients are lost through the cooking process giving you the best value for your food dollar. When cooking choose a method such as steaming or baking rather than boiling which leaches nutrients out of the vegetables.
- meats - There is a myth that ground beef is a good bargain but in my experience it isn't. In terms of price it may be but there is also a greater surface area that leads to flavour loss, quicker spoilage and contamination (eg. E. coli). A meat grinder is quite inexpensive and can be used for grinding a wide variety of meats and used for making sausage. Grinding your own meat allows you to trim as much fat as desired. The important thing is you are getting a fresher, higher quality ground meat which is reflected in the taste of the cooked meat.
- cheeses - Cheeses bring up two quality issues both centred on flavour. Commercially shredded cheese is not a good value for your food dollar on several levels. In terms of quality the greater surface area means flavour loss so you end up using more to try and make up for flavour loss. It is cheaper to buy a block of quality cheese (not store brand) and shred it your self in the amount you will use for that particular dish. That way you get the best flavour and can get away with using a bit less. My experience has been that store brand brick cheeses while often on sale are sadly lacking in flavour. If you go with a quality cheese from a cheese factory it will cost slight more but again you can use less so in the end you save money. The exception is cream cheese must meet a certain criteria (eg. same quality) so quite often there is no noticeable difference between store brand and brand name.
- bread products - If you have the option either make your own bread products or buy them from a bakery. These are higher quality breads that are not full of a lot of excess fats, sugars and preservatives. Of growing concern is the impact of high fructose corn syrup something is often found in packaged breads. Making grocery stores now offer fresh baked breads without all the preservatives and homemade bread products eliminates both high fructose corn syrup and preservatives while giving you a high quality product often cheaper than packaged breads.
Sunday, October 18, 2009
Nine Dozen Ears of Corn & Corn Chowder
2 tbspDuring our recent road trip we were rather flexible as to when we would be returning home. We decided to play it one day at a time which made for a rather relaxing trip. On the Monday evening of our trip we received a phone call from one of our friends who had very generously dropped off nine dozen ears of corn at our house. Finding no one home the corn was left by the garage so we called one of our kids to put it in the garage where it would be out of the weather and protected from most critters. Cooler temperatures meant the corn would keep well until we returned but it helped determine when we would return.
Fresh Corn
The corn was a commercial yellow variety that is difficult to find because the current demand for fresh corn on the cob is the peaches & cream varieties. The unseasonably cooler and wetter summer saw a reduced corn yield so prices for a dozen ears of corn did not dip below the $3 mark and even that was a rare find. The yellow corn varieties are better for preserving than the bi-colour varieties.
Nine dozen ears of corn (pictured) doesn't sound like a huge amount until you have to husk it. I was tired from the trip so debated how I was going to put the corn up. I wasn't to anxious to can all the corn as we prefer the taste of frozen corn. Thursday morning I checked the freezer space of which it was basically non-existent. This would mean drying and canning the corn as niblets or cream style. We ended up taking a turkey out of one freezer for our Thanksgiving dinner which freed up just enough room for freezing the corn.
Husking Corn
Husking corn is always a messy job as the silk tends to go everywhere. While husking is a fairly easy job making preparing corn for processing one of the less involved processes it is common to run into a few problems.
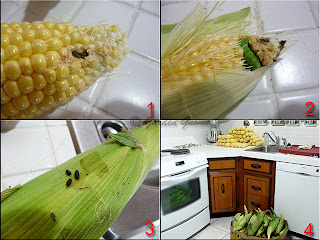
Corn that has sat for any length of time after picking will usually have 'icky' dark silk on the outside. This was not a problem. Another problem is corn can bring in little black beetles (corn flea beetles) that can stick around indoor for a few days. The corn borer (1) is a common find. Simply cut out the borer and any end damage. I came across one cob that actually had a cabbage worm eating it's way through (2). Now this in my experience is quite abnormal. Any corn stored for any period of time outdoors or in outdoor facilities such as garages can and most likely will show signs of rodents (3). Rodents coming out of freshly harvested fields love to get into any fresh produce in storage so it's common to see signs of their gnawing or droppings and occasionally them scurry around. We have a rodent problem when the fields come off. This corn was stored outdoors then put in the garage but we have no idea whether the signs of rodents came from the time from picking to our place (about a day) or from our property. At any rate this is a clear indication for those in areas such as ours to take appropriate measures.
As the husked corn piled up (4) the consensus was to freeze as much as possible. We ended up with 8 gallon bags of frozen corn. I reserved 8 cobs for making corn cob jelly and 6 cobs for that night's dinner. In the end I was rather pleased with the results. I didn't dry or can any corn but there is still a bit of time left yet.
Corn Chowder
Dinner was a lovely corn chowder that cooked while the rest of the corn was being prepared for freezing. A chowder is a thick soup that usually contains a vegetables (corn, potatoes, onions) in a cream/milk base and originally contained some type of seafood. Most chowders still are based on seafoods. This tasty corn chowder eliminated the seafood. It was based on the wonderful flavour of corn.
Corn Chowder
recipe by: Garden Gnome
1 tbsp butter
½ medium Vidalia onion, diced
2 garlic clove, minced
3 sprigs fresh thyme, leaves only
2 tbsp unbleached flour
4 c canned chicken or turkey stock
1 c heavy cream
4 medium potatoes, diced
4 ears corn, cut from cob
salt and freshly ground black pepper to taste
½ tsp garlic pepper
5 - 6 tbsp powdered instant potatoes
fresh parsley leaves
Prepare the vegetables. Heat the butter in a soup pot over medium heat. Add onion, garlic, and thyme and cook until the vegetables are soft about 8 to 10 minutes. Pour in the stock and bring to a boil. Add the potatoes, bring to a boil. Boil about 7 minutes or until the potatoes are tender. Stir in the heavy cream. Cut the corn kernels off the cob. Stir into the soup. Season with salt, pepper and garlic pepper. Simmer until the corn is soft, about 10 to 12 minutes. Mash about ¼ of the potato chunks and stir well. Adjust to desired consistency stirring in 1 tbsp of powdered instant potatoes at a tim
Saturday, October 17, 2009
Cedar Valley Cheese Store, Belgium, Wisconsin
Wisconsin is the dairy state so it just wouldn't do to visit there and not bring home cheeses. We bring a cooler for traveling that keeps drinks and snacks cold on the way there and additional folding cooler. On the journey home we make several stops filling up the coolers as desired. Cheese makes up a good portion of what we bring home but fish and some meats often are added to the coolers.
Cedar Valley Cheese Store
I wrote about the Cedar Valley Cheese Store in Belgium, Wisconsin the first time we visited. This is one of must stop at places when in the area. While the store is small and off the beaten path it is well worth the stop! They make one of the best cheese strings I've ever tasted and they are packaged in bulk so there is none of that pesky individual packaging to deal with.
I really love visiting this cheese store. They have lots of samples to help you with your choices. The store is nicely laid out with cheeses well labeled to help in your in your selection. They also have a wide variety of other food items that pair nicely with cheese including gourmet jams, jellies and pastas. I bought 4.02 lb cheese sticks, .90 lb white cheddar curds, 3.58 lb colby, 3.59 lb cheddar and 4 lb of butter. Butter was on sale for $1.50/lb! I would have bought more but we still hadn't decided when exactly we were returning home. We had freed up the week so there was a very good possibility we would not be home before Thanksgiving Sunday (Oct. 11). That would mean keeping the cheese on ice for almost a week. The cooler weather really worked in our favour!
Friday, October 16, 2009
Cabela's World's Foremost Outfitter
There are always so many great things to see and explore when your travel especially when you are a foodie. The kids are heading on a road trip of their own shortly so wanted to know if we would like to go to Cabela's. Now this is a very large outfitter's outlet so what could a foodie possibly find of interest there. Oh my gosh, I found plenty!
Cabela's
Cabela's is a huge outfitter's outlet chain that has an extremely unique decor consisting of a large number of unique displays and exhibits of preserved animals in very realistic looking natural environments. That in itself makes browsing through the outlet extremely interesting and enjoyable. What is even more interesting is since this outlet caters to hunters, anglers, hikers, campers and so much more they actually carry a lot of food related items of interest to the foodie.
I took a lot of pictures of the animal exhibits as well as some of the food related things I was interested in. Just about any equipment you would need to cook outdoors is available. They also have a lot of those little extras that can increase your outdoor cooking experience.
Seasonings, Sauces & More
Outfitter stores are an excellent place to get things like seasonings, cures and sauces that you might have a hard time finding anywhere else. Quite often there will be sauces and rubs that are in low production, just coming onto the market produced by ribbers (from ribfests) and other award winning food contestants. This is were to find seasonings, rubs, coating mixes and sauces specifically for wild game. This is where you will find a wide variety os sausage making supplies including the casings. This is also where you will find large jugs of oils especially peanut oil for the turkey friers and other large scale friers. At the same time if you are a home canner and want a heavy duty outdoor burner check this type of a store. This outlet is an excellent source for heavy duty cast iron pots and pans. So from a foodie perspective there are a lot of things to explore, get ideas from and expand from there.
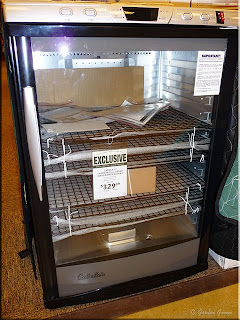
Commercial Grade Dehydrator
When it comes to dehydrating there are the lower cost stand alone models that work reasonably well, homemade solar models, ovens specially designed with a dehydrating feature (Jenn-Air). Each design of dehydrator has its pros and cons. According to some the best stand alone higher cost model on the market is the Excalibur. Well this commercial grade dehydrator will knock the socks off of any Excalibur!
At $329.00 it is very close in line with the price of the Excalibur as well so the cost difference is not a really huge concern. It has an insulated housing, digital thermostat and built-in drain reservoir. At 80 - L capacity it is meant for those who do a lot of dehydrating. It comes with 12 drying trays to get all those foods dried quickly and the glass door allows you to easily see how the drying is progressing. It is about the size of a bar fridge so could easily be fit into smaller rooms and as long as protected from any water would work nicely in an outdoor shed or garage. This commercial grade dehydrator is definitely on my foodie wish list.!
Bayou Classic®
I first saw the Bayou Classic® ceramic grill on the food network and it has been on my foodie wish list ever since. It was love at first sight . If I recall correctly it was chef Michael Smith using one and I think it was a beautiful royal blue tone. The main problem for me since we use our grill year round even in the snow would be whether the ceramic would crack in the cold. Any hairline cracks in ceramic can absorb moisture that will crack with our freezing winter temperatures. The second problem would be getting the grill to temperature during the cold months as charcoal takes awhile to come to proper grillinging temperature. Still it's something I can dream about and perhaps one day actually buy if only for warm weather grilling.
The Bayou Classic® grills, smokes, roasts and barbecues using a cooking method that is 2,000 years old. Each grill individually handcrafted is charcoal operated with a spring-loaded lid-lift assist makes opening the top easy. There are two air vents to help you control temperature. A grill stand in a decorative powder-coated steel finish with rubber wheels and locking casters that makes moving the grill easily is sold separately.
Thursday, October 15, 2009
Kitchen Quick Tips - Using Leftover Pineapple Juice
Mix leftover pineapple juice with a little oil, soy sauce and garlic. Mix well then marinate chicken for several hours. Bake the chicken in the marinade until the juices run clear.
Wednesday, October 14, 2009
The Firefly Buffet - Soaring Eagle Casino
Once we left the kids we headed north to Turtle Creek Casino & Hotel in Traverse City, Michigan where we stayed overnight then left there for Soaring Eagle Casino & Resort in Mount Pleasant, Michigan. We stayed there overnight then headed out mid-afternoon on our final destination of home. Today's casinos are much more than just gambling establishments. Their banquet facilities for special events are top notch. Their restaurants range from the lower end deli [but don't turn your nose up at that either because their offerings are quite good] to the mid-range buffets to the higher end restaurants. Most offer all three dining styles although the smaller one may not. All of the restaurants are open to the general public so you do have to gamble to enjoy their good food. If you want home cooked style foods the buffets really have it. There are very few foods offered on these buffets that could not be made at home which is one of their appealing features. Many of these casinos offer excellent live entertainment also available to the general public. I'm particularly fond of the spa facilities at Soaring Eagle but I'm not sure
The Firefly Buffet
My gosh, I think we have stopped at the Firefly Buffet at Soaring Eagle ever since the resort was built. The general layout of the buffet is quite lovely. I see they are moving away from the green tones to the blue tones with their recent renovation. The ceiling tiles over most of the buffet are studded with a multitude of LED lights to simulate a star light sky giving a lovely ambiance.
To the left and end is the actual buffet. There is the soup, salad and dessert bank tucked into the 'L' formed. Seating is quite pleasant with nice sized tables and comfortable chairs. The wait-staff is always very friendly and accommodating
I take a lot of pictures in restaurants and eateries. My philosophy is to always ask for permission and to not take pictures that can identify people. I have yet to have anyone decline permission. Most like the little bit of a blurb I do on them as well. If you are taking a picture of only your meal than you don't need to worry about asking. Still it is a nice way to strike up a conversation with the chef, cook or wait-staff.
Sculptures & More
The dessert bar had two gorgeous chocolate sculptures (1, 2) so I of course had to ask if it was ok to photograph them. She told me these sculptures came over from the banquet hall. They had been used for an event there then rather than discarding them were added as displays in the buffet. Just look at the beautiful detail! I'm always impressed when food is used as part of the design. A few times we have visited they had some impressive ice sculptures. All this adds to the overall ambiance and dining experience.
Just take a look at those little cherry tarts (3). Aren't they simply delightful? Doesn't your mouth just start watering in anticipation of that pork tenderloin (4)? Both of these dishes can easily be made at home and they can look just as nice!
Crab Legs
I love crab legs so that is always my first choice when they are on a buffet. Pictured is my crab legs meal. Just look at those gorgeous contrasting colours! I had the steamed broccoli one my favourite vegetables paired with king crab legs with drawn butter and Oysters Rockefeller. Again this is a meal that can easily be duplicated at home. The crab legs are usually bought frozen in our area and simply popped into boiling water or steamed to reheat. Oysters Rockefeller are oysters served on the shell topped with parsley or spinach, cheese, butter sauce and bread crumbs. The oysters are then baked.
Crab legs take a bit more effort to eat but the meat is so sweet and tender it is well worth the effort. A crab cracker that looks similar but smaller to a nut cracker is a very useful tool. Crack the leg then use a seafood fork or picker to remove the succulent meat, dip it in hot drawn butter and enjoy. This is a very hands on in the literal sense of eating food :)
Tuesday, October 13, 2009
Papa Murphy's Take 'N' Bake Pizza
Part of the fun of traveling is discovering new eateries! After an afternoon of shopping the we stopped to pick up pizza. This was any kind of pizza parlor as we know them. Instead of the regular pizza parlors where you order your pizza then wait for it to bake to take home this pizza parlor assembled the pizza for you then wrapped it along with baking instructions. The nice thing about this is even if you run into a bit of a delay getting home the pizza is still piping hot when served.
Papa Murphy's
We stopped at Papa Murphy's Take 'N' Bake Pizza located at 815 South Main Street in West Bend, Wisconsin. The pizzeria is located in a small strip mall with plenty of parking (1). It is small and has no baking facilities on site. You can call ahead with your order or order on site. On the wall behind the counter there are racks for prepared pizza dough (2) and orders ready to be picked up (not pictured). Baking instructions are included with your order and for good measure there is a large disclaimer poster on the wall (3). Essentially they are not responsible for burnt pizza due to your cooking skills.
You can watch your pizza(s) being made. That's the start of our stuffed pizza (arrow, 4). Oh my did it ever look yummy! The pizza comes on an oven proof coated cardboard tray so all you have to do is unwrap and pop in the oven. The wrapping is a simple plastic wrap to protect the pizza until you get it home. We ordered 3 pizzas to feed 6 people.
Mediterranean & Cheese Pizzas
Each pizza was cooked individually according to the instructions. I was quite impressed that it was as simple as turning on the oven, unwrapping the pizza then baking. While the pizzas were baking we were able to unwind and relax then eat as each pizza came out of the oven.
The cheese pizza pictured on the top had a medium thick crust. It was topped with a tasty, aromatic tomato sauce and almost a full pound of bubbling cheese. This is a popular choice with the kids' teenagers. We really enjoyed this pizza that shone in it's simplicity. There were no fancy toppings or flavours. It was just the pure essence of pizza that really made this pizza delicious!
The Mediterranean pizza pictured on the bottom had a thin crust and was topped with a tasty, aromatic tomato sauce, Asiago cheese, sundried tomatoes and spinach. The flavours on this pizza were mouthwatering delightful! The thin crust really worked well too. This will be one pizza I will be duplicating at home.
The belle of ball of the pizzas we ordered was the Chicago-Style stuffed pizza. The stuffing consisted of salami, pepperoni, Italian sausage, beef, onion mix and cheese. The top was garnished with roma tomatoes, green onions and cheese. It was interesting watching this pizza being assembled. That fancy crust detail took only a few seconds!
The Chicago-Style stuffed pizza had gorgeous eye appeal after baking (top right). I just love all the detail from the fancy edge to the garnish! Cutting into the pizza (bottom left) it was easy to see this was not going to be any run of the mill pizza. Doesn't that slice (bottom right) look yummy? Let me tell you this pizza was a total taste sensation!
The crust used for this pizza was not quite thin but not quite medium. I'm going to be testing out a few pizza dough recipes to find one that will work for making stuffed pizzas. Please check back for the test results and what I come up with.
Monday, October 12, 2009
Frugal Kitchens 101 - Pressure Cookers
Pressure cooking is the old fashioned way of putting good food on the table quickly preceding microwave ovens and take-out. A pressure cooker is a specialized cooking vessel that instead of cooking at 212ºF under pressure it cooks the food at 240ºF. What this means is the food cooks a lot quicker but because a moist heat is used the food is moist and tender. From start to finish a small roast can easily be cooked to moist and tender in less than 30 minutes! Unlike a slow cooker the meat can be browned in the same pot it will be cooked in and because of the greatly reduced cooking time you can easily pop thawed meat in the pressure canner when you get home from work with it being ready to enjoy less than 30 minutes later with minimal prep work.
In terms of energy usage my large slow cooker costs 4¢ per hour to run so for most dishes that would average 24¢ to 32¢. Using the large burner (2,000 ) W at a cost of 24¢ per hour the cost for the meat (20 minutes) would come out to 8¢. Now the cost savings is not as important as the kWh savings. In short the pressure cooker is considerably more eco-friendly than the slow cooker.
I have 2 pressure cookers (Jasi 6 qt, Fagor 4 qt) and 2 pressure canners (22 qt) that can be used for large batch pressure cooking. Now before I go any further all pressure canners can be used as a pressure cooker but all pressure cookers cannot be used as pressure canners. There are more details on this in this blogs archives. Pressure cookers are classified as 1st or 2nd generation depending on their regulator design. My Jasi is a 1st generation pressure cooker that uses a weight as a regulator. I like it because of the size and the fact the weight makes an audible signal as the cooking progresses. The downside to the Jasi is it is aluminum so cannot be used for acidic foods. The Fagor is a 2nd generation pressure cooker with the regulator built into the handle. It is smaller but it is stainless steel so can be used for acidic foods. I'm used to pressure cookers with the weighted regulators so can tell by the noise they make how things are progressing. The Fagor is pretty much quiet so that took a bit of getting used to.
A pressure cooker will cost you anywhere from $20 to $200 for a dual pressure cooker/canner and then some but if you are looking at a pressure cooker only you should be able to buy a nice stainless steel one for under $60. So figure on the $20 to $60 mark for pressure cooker only.
Tips for buying a pressure cooker:
- buy a larger size than you think you will use as a pressure cooker can only be filled ⅔ full
- stainless steel costs a bit more but gives greater versatility in that you can cook acidic foods
- whether the regulator is separate (1st generation) or in the handle (2nd generation) is purely a personal choice
- watch for the December sales meant for Christmas shopping; some can be as much as half off
- a rack is a really nice extra; if your pressure cooker does not come with a rack see if you can find a small cake cooling rack that will fit your pressure cooker
Sunday, October 11, 2009
Pressure Cooker Pulled Pork
The myth perpetuated by the food industry persists that cooking from scratch takes a lot of time and effort. Unfortunately it is a myth that serves to rid you pockets of hard earned money, discourage you from cooking from scratch all in the interests of lining the pockets of the food industry. The kids were telling us that right now there is not a lot of free time so they want good meals that don't take a lot of time to prepare. The emphasis is on good meals so one kitchen tool they rely on is the pressure cooker.
A pressure cooker cooks under 15 lb pressure raising the cooking temperature to 240ºF in a moist environment. Once the food is prepped the lid is put on and the pressure cooker is brought to pressure then allowed to cook at that pressure for the desired period of time. The vessel is then allowed to naturally depressurize or quickly depressurized using the cold water method. The end result is tender meat from even the toughest cuts and fast cooking times. Unlike a slowcooker the meats can be browned first in the same pot and in terms of energy usage the pressure cooker works out to be cheaper.
Pressure Cooker Pulled Pork
The kids put a nice sized, trimmed pork roast into the pressure cooker then brought it to pressure and let it cook for 20 minutes. While the meat was cooking the vegetables were prepared. The green beans and peas were steamed while the cheesy hash browns were bake. Once the meat was finished cooking it took little more than a quick shredding with two forks and stirring in a favourite barbeque sauce for easy yet very tasty pulled pork.
From start to finish it took 30 minutes to get the meal on the table. This is good home cooking from scratch that clearly shows you that home cooking does not need to take a lot of time. It was a gorgeous, home cooked meal well presented and very tasty!
Saturday, October 10, 2009
Le Gourmet Chef & Woodman's Food Markets
Road trips are always an opportunity for use to explore which sometimes means taking side trips or little jaunts off of our route. We were making excellent time towards our destination thanks to Lucy the TomTom we borrowed from one of our kids. So we decided to make a couple of stops to do a little shopping.
Le Gourmet Chef
Our first stop was at the Prime Outlets at Pleasant Prairie, Wisconsin. The outlet is located at 111211 120th Ave just off of I-294. My husband wanted to check the Nautica outlet so I headed over to Le Gourmet Chef. I love browsing through kitchen stores! Notice the word browsing because I still tend to be quite frugal in my purchases even though there are so many tempting goodies. I splurged on the KitchenAid® food strainer attachment at $49.99 but this will really help me in making sauces by reducing the strain of using the manual food strainer. I also bought a lemon zester and rosette maker but I displayed remarkable restraint at not buying a lot of other really neat kitchen goodies.
Purchases
Our next stop was at Woodman's Food Market located at 2919 N. Lexington Drive in Janesville, Wisconsin. Woodman's is an employee-owned supermarket chain in Wisconsin and northern Illinois. They have thirteen warehouse style stores. These stores are massive in the 200-250,000 square foot range, in comparison to the 50-75,000 square foot size of typical grocery stores. The one we stopped at had to be about 3 times the size of the Sam's Club we shop at. There is no way I could shop this size store on any regular basis. I found it too big, too massive, to over sensory stimulating just too big! I made it through about a third of the store before my husband rescued me.
What I like about stopping at different grocery stores is the variety of foods available. I tend to buy things I can't get at home, regional foods or foods I've seen on the FoodNetwork. When out of Canada I also have to be aware of what I can bring back into Canada. So it really is a very selective type of buying and while I do have a small list there is a bit of impulse buying.
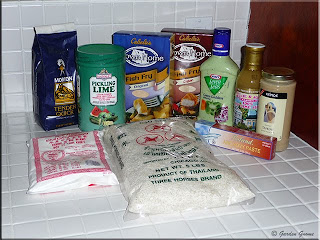
My purchases (pictured): Morton's Tender Quick, pickling lime, rice flour, Thai sweet rice, green goddess deressing 100% pure key lime juice, Tahini and anchovy paste.
Note: The two fry coatings were bought at Cabella's not Woodman's but they insisted on getting into the photo shoot. :)
Friday, October 09, 2009
The Start of Our Recent Road Trip
In the early morning hours on October 2 my husband and I headed out on a road trip to visit our kids. The trip would take us across three US states into a fourth. We planned on leaving their house early Monday morning heading north for another three days of quality down time before heading home. It was dark and cold as we packed the car with everything we needed for the trip. Included in the packing was a case of home canned foods mainly salsa but a few extras. Crossing the border meant I could not pack the cooler the way I normally would for a longer road trip so no fresh fruits for snacking on. We didn't want to use the percolator for coffee as that would mean having to clean it before going and since there is no coffee shop on our way to the border we opted for stopping at a Timmy's on the American side. Sorry guys, the American Timmy's is not the same as the Canadian ones but the double double really hit the spot!
We do a lot of road trips. One thing that is very seldom part of any road trip is fast food restaurants. We would rather pull into a truck stop. According to my husband the more rigs the better the truck stop. Pictured is the TA Travel Center we stopped at en route. The beauty of truck stops is they are very close to your route so you don't have to go more than about a kilometer out of your way. Getting back on the highway is never a problem either.
Truck stops are usually rather interesting places even for browsing through everything the well decked out trucker or traveler needs to the well supplied variety store offerings. There's always a bargain bin for great deals on books, CDs and videos. The washrooms are always quite clean and if you want a shower or laundry both are usually available something quite useful if you are making a cross country trip. Most offer WiFi although it is not always free. Some of them even have movie hour and an arcade to amuse yourself while catching up on laundry or other necessities. The larger truck stops usually offer a choice of a couple fast food restaurant choices along with an actual restaurant that quite often includes a buffet with home cooked style offerings. We have yet to have one of these buffets and been disappointed. The food is considerably better than any fast food meal. The prices are always very reasonable coming in at under $10 per person in most cases. Most truck stops also include 24 hour breakfast complete with coffee for about $5. Now this is just good, home style cooking that can't be beat when traveling!
Both TA and Flying J, the two largest truck stops, have online locators so finding one en route is not difficult. They are well marked as well. At the same time there are many smaller truck stops that offer great food at bargain prices. In general you can locate truck stops along your route using Google Earth, Streets and Maps or your GPS. Planned ahead stops for both fuel and good food makes traveling so much more pleasant.
Thursday, October 08, 2009
Kitchen Quick Tips - Turkey
Don't buy turkey with added ingredients or already stuffed. It is cheaper and fresher to add these ingredients yourself.
Wednesday, October 07, 2009
Just a Quick Note
Tuesday, October 06, 2009
Sneak Preview: Iron Chef First Challenge 2009
I admit to being a Food Network fan. Aside of the favourite show I always watch I quite often have Food Network on to get ideas for new dishes. Here's a sneak peek at the first challenge of 2009's Next Iron Chef America competition hosted by Alton Brown . It looks like it will be a good one!
Monday, October 05, 2009
Frugal Kitchens 101 - Dehydrating Foods
This is the time of year many are focusing on stocking up their pantry for winter. The past several Frugal Kitchens 101 have covered many aspects of home canning. Ideally when you put up foods for storage, no one method should be the sole method of storage. Instead you should use the three basic methods of canning, freezing and dehydrating then if possible add in curing and smoking. You do not have to do each method in equal portions either. For example I freeze approximately 10 to 15 dozen ears of corn because we prefer the flavour of frozen corn to canned. Following my method of not putting all my eggs in one basket I still can 6 to 8 pints of corn and dry a dozen ears of corn. This ensures that if something happened to the freezer we would still have corn. This week's the topic for Frugal Kitchen 101 is dehydrating foods.
Dehydrating foods is simply removing the water content from the food so the food keeps on the shelf for an extended period of time. Dehydrating offers the benefit of fitting a lot of food into a small area. The food packets are light weight with a shelf life of many years. Unlike freezing and much the same as canning, dried foods cost you nothing for storage. No electricity is needed for storage making dried foods an essential part of your emergency preparedness plans. All dried foods should be stored in a cool, dark location away from direct sunlight and heat.
Equipment used can be as simple as string for hanging herbs to dry or homemade wood frames with food grade mesh for drying outdoors to as expensive as the 9-tray Excalibur food dehydrator that will cost about $250. There are several inexpensive dehydrators on the market ranging in price from $25 to $50. Some stoves (eg. Jenn-Air) have a special dehydrating setting but any oven can be used for dehydrating providing it can be set between 125ºF and 145ºF. Some ovens will only go as low as 170ºF making them unsuitable for drying. In addition to screens and/or a dehydrator a food vacuum sealer (~ $100) is in my opinion a must for long term storage. This will keep out any water, humidity and insects. I also recommend once vacuum seal the packets of food be stored in a heavy plastic tote or metal can to protect against rodents that can chew through the vacuum sealed packets. The cheapest source I have found for the vacuum seal bags is The Sweet Attack (no affiliation but a very happy customer). Dried foods can also be stored in vacuum sealed mason jars and recycled food jars that will protect against rodents. The old fashioned canning jars with zinc ring, rubber rings and glass lids are ideal for this purpose. If you have a jar with the ring but no lid a used regular Snap canning jar lid can be held in place with the zinc ring. The rubber rings are still available (at least in Canada) manufactured by Viceroy Rubber & Plastics Ltd. of Toronto.
Most fruits and vegetables are suitable for drying. They can be prepared in such a manner to be used for soups, stews and casseroles later. Many fruits, vegetables and mushrooms can be dried themMany dried fruits are wonderful in baked goods or simply for snacking. Fruit leathers are always a popular snack too. One of my favourite uses for dried apple slices is floating them as a flavourful garnish in hot apple cider. Meats can be dried as jerky or cured then dried as sausage. Some are even drying cooked ground beef into beef rocks that can be rehydrated for later use. There is a wide range of possibilities then as to what you can dehydrate so as with canning before making a large batch of food for drying, make only one tray then test it as to how you like it. If you like the results then go ahead and dry a large batch.
Some foods are dried at a higher temperature than others. For the proper drying temperatures please refer to Bernardin™ Guide to Home Preserving, The Ball Blue Book or the National Center for Home Food Preservation (NCHFP). Some foods need to be treated as part of the prep to prevent discolouration as well. Please refer to the mentioned sources for that information.