My photo
Ontario, Canada
I am a wife, mother and grandma who enjoys the many aspects of homemaking. A variety of interests and hobbies combined with travel keep me active. They reflect the importance of family, friends, home and good food.
Cook ingredients that you are used to cooking by other techniques, such as fish, chicken, or hamburgers. In other words be comfortable with the ingredients you are using.
--Bobby Flay

For Your Information

Please watch this area for important information like updates, food recalls, polls, contests, coupons, and freebies.
  • [March 19, 2020] - Effective Mar 17, this blog will no longer accept advertising. The reason is very simple. If I like a product, I will promote it without compensation. If I don't like a product, I will have no problem saying so.
  • [March 17, 2020] - A return to blogging! Stay tuned for new tips, resources and all things food related.
  • [February 1, 2016] - An interesting report on why you should always choose organic tea verses non-organic: Toxic Tea (pdf format)
  • Sticky Post - Warning: 4ever Recap reusable canning lids. The reports are growing daily of these lids losing their seal during storage. Some have lost their entire season's worth of canning to these seal failures! [Update: 4ever Recap appears to be out of business.]

Popular Posts

Showing posts with label frugality. Show all posts

Saturday, May 15, 2021

Canning Stock

I honestly don't cook with water if I can help it.  Why?  Water adds liquid but no flavour.  Stocks, juices, whey, milk and so many other liquids add that extra nutrition and flavour so necessary in pandemic cooking.  Meat stocks are one of the most frugal and easiest products to can.  It is the one product that I can never have enough of.

All meat stocks are canned basically the same way.  You need bones, filtered water, onion, carrot, celery, peppercorns and bay leaves.  For best flavour, roast the bones for an hour before making stock.  Always add a little apple cider vinegar to increase the calcium content of your stock.  Apple cider vinegar causes calcium to leach out of the bones increasing the nutrient density of the stock.  I use a pressure cooker to actually make the stock because it is a lot quicker but you can make stock in a stock pot or slow cooker.
 

When you buy beef or other meats in bulk, you get thinks like soup and neck bones.  Our friend is raising chickens for us so I get necks and feet.  I'm working on freezer clean-outs because we have new meats coming soon.  This is the time of year that I like canning stocks using bones from the freezer. 


Monday, September 23, 2013

Food Waste Re-visited

From the very beginning of this blog a little over seven years ago, I have stressed the frugal aspects of all things food related.  We are very fortunate in North America to have for the most part a safe and secure food supply.  Yet from farm to table almost half of all food produced is wasted!  The following short video indicates that this food wastage breaks down to farm (8%), food industry (4%), supermarkets (6%), restaurants (15%) and households (25%).


Food waste is obviously a huge concern and one which everyone should be addressing.  Now, in fairness some food waste is unavoidable.  Crops (eg. fruits, vegetables, grains), milk, fish, meats, poultry and etcetera are a spoilable commodity subject to handling damage.  At the farm level, weather conditions and disease contribute towards food wastage.  Food is lost to spoilage during transit from farm to processing plants and even processed foods can be lost in transit from the processing plants to consumer.  Part of the food wastage in supermarkets is due to the sell by or best by dates but can also be due to equipment malfunction.  Supermarkets must discard foods at certain times due to health regulations and it must be discarded in such a manner (eg. into locked waste containers) to meet liability restrictions.  Food wastage in restaurants is two fold, that which occurs as a result of preparing the food which in most cases is minimal and that which occurs via patrons.  As a restaurant patron you can do your part to reduce food waste while there by: declining extras that come with your meal (eg. dinner rolls) if you know you won't eat them, eating what your order, bring home any leftovers and avoiding those restaurants that do not allow you to bring home your leftovers.  The highest level of food wastage occurs in the home and that is where you can actually make a difference that will save you a considerable amount of money.

The figure I have heard recently is that 40% of every food dollar is wasted.  This figure has a bit more meaning to the frugal home cook than the 25% of all food is wasted in the home.  Either way, it helps to visualize the waste.  If you spend $100 on food, you will waste $40 of that food.  If you take a pie and cut it into four even pieces, then toss one piece out, that is 25% of the pie aka food gone.  It cost you money but you got nothing out of it and the worst part is, some of that food that was wasted could have fed someone in need.  All other factors aside, reducing food wastage at home is an easy, no cost, frugal activity for all household members.  Throughout this blog, there are a multitude of ways to reduce food waste and maximize your food dollar, including the regular Frugal Kitchens 101 series.  Here are ten things you can do to reduce food wastage in your home:
  1. serve smaller portion sizes
  2. buy or preserve in smaller container sizes so as to use the contents without left overs
  3. use up leftovers or freeze for later use
  4. don't peel fruits or vegetables unless absolutely necessary
  5. dehydrate fruit and vegetable peelings for homemade powders
  6. compost non-edible fruit and vegetable peelings
  7. store foods in proper storage containers 
  8. vacuum seal dry foods to protect against insect and moisture damage
  9. date all foods in storage especially those you have canned, frozen or dehydrated
  10. rotate your food supplies so that new goes at the back pushing the older stock to the front


Friday, April 12, 2013

Starting the Testing of 4ever Recap Reusable Canning Lids and Gaskets

I have been a high volume home canner for over three decades, reaching well over 1,000 jars of home canned foods annually with closer to 1,400 jars annually over the past 14 years.  I really went into high gear with y2K preparedness then never really decreased the amount but rather added more products each year to avoid buying mass produced canned foods with food additives and BPA in the can liner.  The single use metal snap lids (the only ones recommended by the USDA) have always bothered me because they are not eco-friendly but the cost is a factor as well.  Even with reusing the metal snap lids for vacuum sealing dry foods, many of my used snap lids found their way to the curbside waste collection because until we moved here they could not go into the recycle box.  That meant my used lids were ending up in a landfill something that really did not sit well with me.  The cheapest price for the metal snap lids was 12/$1 (8¢ per lid) at Dollarama but within a two month period the price went to $1.25 then $1.50 (13¢ per lid).  At 1,000 jars my cost went from $80 to $130 annually but in reality more because the old price only had sales tax of 7% added whereas the new price has HST of 13% added.

Back in August of 2010 I was beyond elated to discover Tattler Reusable lids and rings, manufactured by S&S Innovations, Corp. in Fruita, CO and wrote a review of my experience with the Tattler reusable lids.  The Tattler reusable lids have proven themselves to be well worth the cost.  They perform as promised.  I very seldom have a seal failure.  They are second only to my glass inserts that are no longer in production but I have quite a few and am always looking for more.  Once I got used to the Tattler lids, my intentions were to make the switch to mainly Tattler lids, use glass inserts for jars not leaving the house and use as few of the metal snap lids as possible.  A couple of months ago I came across a new brand of reusable canning lids called 4ever Recap, manufactured by 4Ward Industries in Anna, OH.  The caps looked very much like the Tattlers but were less expensive and the rings were silicone so I ordered a 24 pack of 12 each of standard and widemouth lids with rings.

The 4ever Recap lids are used in the same manner as the Tattler reusable lids and glass inserts in that they are tightened then turned back a quarter inch for process then fully tightened immediately upon remove from the canner.  This differs significantly from the metal snap lids that are tightened finger tight then not tightened after removal from canner.  Processed jars regardless of the lid used to seal sit undisturbed for 24 hours after removal from the canner then the bands are removed, the jars and bands washed and dried.  The metal bands can be replaced loosely on the jars for storage for all but the glass inserts.

Tattler Reusable Lids and 4Ever Cap packaging Tattler lids have been in production  since 1976 and yet even with all the canning I do and how involved I was with y2K preparedness, I never heard of them until 2010.  The tattler lids (original packaging is darker blue) come packaged 12 in a box.  Part of the pricing of course is to cover the costs of packaging.  When I ordered three dozen the individual boxes were shipped inside a USPS priority post box.  The Tatter lids are 3 dozen standard lids for $30.95 (85¢ each) with free shipping to US destinations.  Each plastic lid (disc) comes with a rubber gasket that sits on the bottom of the lid during use.  Rubber does wear out, can stretch or harden over time and/or become damaged by sharp objects so Tattler does sell the rubber gaskets separately 12 for $3.50 which is a dollar more than when I first started buying Tattler lids.

I could not find a date when 4Ward Industries began manufacturing but it is likely within the last 4 or 5 years if that.  The 4ever caps were simply stacked inside a heavy cardboard box leaving room for quite a bit of movement especially of the standard size lids.  There is a colour sticker on the box so packaging costs are kept to a minimum.  The 4ever Recap lids and rings are 24 standard size at $17 (71¢ each) or a 24 combo pack (standard/widemouth) for $17.50 (72¢ each) with free shipping to US destinations.  That is a 14¢ price difference compared to Tattler!  Each plastic lid (disc) comes with a silicone gasket.  Silicone does not wear out or stretch over time so properly cared for, there is no need to replace the gasket and as such, 4Ward Industries does not sell replacement gaskets at this time.

4ever Recap lids and rings
I ordered the 24 combo pack for $17.50 and had them shipped to our US postal box.  Their shipping time was good.  The only thing I was not impressed with was one of the widemouth lids was damaged along the edge reaching in towards the centre as if it had been pried down.  Obviously 4ever does not mean forever!  I did email them but they did not offer a replacement although they wanted me to ship the lid back so they could troubleshoot.  Let's see, the lid cost 72¢ but to send back would cost me 42¢ for a stamp, the price of a small padded envelope (25¢) and a trip to the US.  In other words, cutting my loss at 72¢ was the frugal thing to do but I must say I am not impressed.  Leaving enough room in the box for the lids to shift and move around during shipping is likely the cause of the breakage but it could have been due to something else and not noticed during packaging.

Tattler and 4ever recap lids comparison
The Tattler and 4ever Recap lids are similar in function and design but there are some differences.  The Tattler lid (left) is empossed with 'Stieg Tattler reusablecanninglids.com® Made in USA' on the top and 'recycle logo 7 Pat Pending 1' on the underside. There are three raised lines around the rim where the gasket sits.   The 4ever Recap lid (right) is embossed with '4ever recap Made in USA' surrounded by three leaves.  The underside as no embossing but there are 6 circle marks (? from the die) and five raise lines around the outer rim where the gasket sits.  What is clearly missing from the 4ever Recap lid is the burr that Tattler lids have.  This sharp piece of plastic is caused when the piece breaks from the mold.  I find it very irritating and really the only thing I don't like about the Tattler lids as it can cause cuts.  I use an emery board on my Tattlers to remove this burr.  The 4ever recap lids are perfectly smooth which is nice.

The flange (sits inside the jar) on the underside of the Tattler lid is lightly larger in diameter than the 4ever Recap flange.  On the top side, the part of the lid where the flange starts on the Tattler has a gentle slope towards the centre of the lid.  On the 4ever Recap, this portion is raised then has a short, steeper slop.  Clearly the dies for the plastic discs are different. 

The Tattler rubber gasket is a pinky red in colour while the 4ever Recap silicone gasket is an orangy red.  While the Tattler gasket is the same thickness as the 4-ever gasket, it is not as flexible .  A comparison of holding each on one side between thumb and pointer finger, the Tattler gasket has a slight bend while the 4ever Recap has almost twice the bend.  The Tattler gasket sits tight against the flange but there is a bit of play with the 4ever Recap but only on the standard lids.  There is not play on the widemouth lids.  I know there were questions on some of the canning forums regarding the gaskets.  The 4ever Recap gasket does fit the Tattler lids so if 4Ward Industries ever decides to sell the gaskets separately, the rubber gaskets could be replaced with the silicone ones.  I have not tested using a Tattler lid with a 4ever Recap gasket.

According to my husband, 4Ward Industries' business model is not sustainable because it is focused on new customers building their supply of lids and rings rather than building repeat customers.  Their model doesn't support those who may need to buy replacement gaskets.  While the silicone gaskets will last indefinitely with proper care, they are still subject to damage via sharp objects like knives when opening the sealed jar.  The plastic disc becomes useless without the gasket, something we have already seen with glass inserts.  Finding the glass inserts is not the problem, finding the gaskets is.  Currently, home canning is seeing a renewed interest but it is only the hard core home canners that would be interested in reusable canning lids to begin with.  Those are the folk who will quickly note that replacement gaskets are not available so they are more apt to buy Tattler lids that do have replacement gaskets.

I am currently in the testing phase of using the 4ever Recap canning lids so I will be putting them through the paces in both the boiling water bath and pressure canners as well as vacuum sealing, multiple times.  I am not anticipating any problems as in terms of design the 4ever Recap as pretty much the same as Tattler.  The only big difference is the gasket material being silicone rather than rubber but that should not cause any problems, any more than it did going from rubber to plastisol as the sealant on the metal lids.  I will be reporting back each time I use them.  In all honesty, providing the 4ever Recap lids and gaskets perform as well as the Tattler lids and gaskets, I will be buying more.  I currently have 6 dozen Tattlers, 4 dozen glass inserts and 2 dozen 4ever Recap which is a start but I really need to build my supply of reusable lids.  That 14¢ per lid savings is looking very favourable for the 4ever Recap lids.


Sunday, April 07, 2013

Let's Talk About Homemade Bread

Making homemade breads has been a regular practice in our home since our newlywed days.  I am always excited to discover a new bread recipe or breadmaking technique like the no-knead crusty bread baked in a cast iron Dutch oven.  There is no doubt about it, the tantalizing aroma of bread baking is a true delight.  Enjoying a slice of homemade bread still hot from the oven slathered with butter is a divine culinary experience!

The question with respect to homemade bread aside of the pleasure it brings and that cannot be discounted, is "Is making bread frugal?"  In this context I am using frugal to encompass cost, savings, quality, time and social responsibility.  Mixing of the dough takes almost no time.  At one time, bread was made from scratch and hand kneaded but the home cook no longer has to spend a long period of time kneading dough thanks to stand mixers, bread machines and even some food processors all of which make short work of kneading the dough.  So the dough can be ready for proofing in less than 10 minutes.  The real time comes from the proofing and baking.  There usually are two proofings (allowing the dough to rest while doubling in size) which develop the gluten in the flour.  Bake time is usually around the 40 to 50 minute mark.  A bit of planning ahead is needed then if you want a fresh loaf of bread for dinner.  However, there are no-knead breads that proof over night and a novel 5-minute a day bread that I will share my experiences with shortly.  In reality, the proof times are simply that with nothing for the home cook to do other than wait for the dough to double so other things can be done during that time frame.

Iingredients in Prairie Flour Mils LTD white flour
Let's consider the flour used for baking bread.  Canadian flours have a higher gluten level than American flours so it is quite easy for us to get a beautiful loaf of homemade bread with little effort.  Now, a few days ago I was doing a bit of research when I came across a video where the home cook claimed the only thing in their homemade bread was flour, salt, water and yeast yet they named the brand of flour they had used.  Wheat flours in North America are enriched.  That means they contain niacin, thiamin mononitrate, riboflavin, folic acid and iron.  They also contain azodicarbonamide (ADA) which is an oxidizing agent that may or may not act as a bleaching agent while strengthening the dough.  Malted barley is also an oxidizing agent that results in a strong dough.  Unbleached flour contains ADA because it improves the quality even though the mill may not be technically using it as a bleach.  The bottom line is, ADA is in both bleached and unbleached wheat flours.  Benzoyl peroxide is actually used to treat acne but it is also used as a strong bleaching agent for flour.  Flour bleached with benzoyl peroxide has been prohibited in the UK since 1997.  L-cysteine hydrochloride is a reducing agent that breaks the protein structure in the flour resulting in a stronger dough, reduces mixing time, reduces proofing time and increases machinability.  Unless you can find organic flour with no additives (rather difficult even in Toronto) or grind your own flour from whole grains, the flour you use will contain additives.  Prairie Flour Mills Ltd. has an organic flour with no additives but it is difficult to find.  No name flour contains the same ingredients but also has amylase, an enzyme that improves processing characteristics by breaking down the sugars to allow the yeast to act quicker.

In our little corner of Ontario, Canada we can buy the following brands of flour:  Prairie, No Name, Golden Temple, Robin Hood and Five Roses, all made with hard wheat (high gluten).  Prairie is milled by Prairie Flour Mills Ltd. which is owned, operated and supports the wheat growers of Manitoba.  A 10 kg (22 lb) bag of Prarie is $7.97 or 8¢ per cup.  Of note, Prairie Flour Mills Ltd., distributes under their own label (pictured above) as well as private label meaning a company can get the Prairie milled flour but sell it under their own private label.  No Name brand  is owned by Weston Foods and sold through their Loblaws division.  A 10 kg (22 lb) bag of No Name flour costs $9.97 (10¢ per cup).  Chances are the No Name flour is milled by Prairie Flour Mills Ltd. but sold under the private label of No Name.  If so, the higher price is simply to cover the cost of the private label.  Golden Temple is $10.89 for 9 kg (20 lb) or 12¢ per cup, Robin Hood and Five Roses are $13.97 for 10 kg (22 lb) or 14¢ per cup.  Golden Temple, Robin Hood and Five Roses were Canadian owned and they still are made with Canadian wheat but they are now owned by Smucker Foods of Canada, a subsidiary of US owned The J.M. Smucker Company.  There are also several smaller flour mills some of which are organic and non-GMO within the 100 mile radius of our home so I do take advantage of buying directly from them.

Of these brands, all use Canadian wheat so at some level support the Canadian wheat growers.  The No Name brand can be iffy.  The premiss behind the No Name label and this applies to any food with that label is, Weston Foods who owns Loblaws uses whatever they can get the cheapest to pass on the savings to their customers but they don't always disclose the origin so there is no guarantee that the No Name flour is made with Canadian wheat but I suspect it likely is, and probably made by Weston.  Canada has strong labour laws, high minimum wages and wheat boards so the wheat growers are paid fair compensation while workers enjoy decent working conditions earning enough to enjoy a comfortable lifestyle.

ingredients in D Italiano Italian style bread
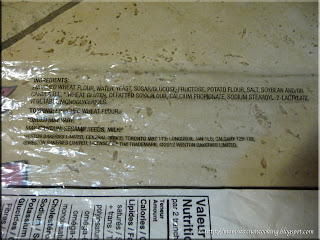
Weston Food's bakery division is Weston Bakeries Limited founded by George Weston in 1882 and still controlled by the Weston family.  It produces a wide variety of baked goods including the popular D'Italiano breads.  Pictured is the label from the D'Italiano Italian style bread.  This is where the chemical components of the ingredients show for commercially made breads.  The label is a bit misleading as the ingredients in the flour (niacin, thiamine mononitrate, riboflavin and folic acid) are not listed in the ingredients although they are included in the nutritional information.  Many bread manufacturers do include the flour ingredients along with the list of other ingredients.  Of note is the canola oil which is definitely GMO!  Calcium propionate is a bacterial and mold inhibitor (aka preservative) which extends the shelf life of the bread.  Sodium stearoyl-2-lactylate is a salt that is used as an emulsifier/plasticizer/surface action agent to ensure consistent product qualtity.  This wonderful cocktail of chemicals only costs $2.27 for a 675 g (1.5 lb) loaf of bread.

ingredients in Walmart bakery Italian style crusty bread
Our Walmart has a bakery section for their fresh baked in store bakery goodies.  Most of their loaves of bread are $2.97 except their crusty Italian and French style that are only 97¢ for a 400 g (.88 lb) loaf of bread.  They are good at including some of the ingredients that are in the actual flourlike ADA but make no mention of the B vitamins or iron.  Ascorbic acid (Vitamin C) is a reducing agent similar to L-cysteine hydrochloride that strengthens the dough and the development of the gluten. Of not is the canola oil which is GMO and the 'contains: milk, wheat, rye, soy" and the 'may contain: tree nuts, peanuts, egg, sesame".  This is especially important for those folks who have food sensitivities to or who are allergic to any of these ingredients. 

crusty bread cut
Let's talk homemade bread!  

A small bakery opened up in town a couple of years ago.  This was a bit abnormal in a time when many small town bakeries have been closing up shop.  I checked it out always looking for ideas and more than willing to buy a loaf or two to duplicate at home.  At first, I didn't think they would stay in business with an average price of $3 per loaf of bread but they seem to be hanging in there and at only a couple of pennies per loaf more than the Walmart bakery and some brand names, there may be hope for this bakery after all. What this bakery has going for it is the bread is about as close to homemade as you can get without making it yourself. 

Homemade breads can save you a substantial amount of money.  While Walmart's Italian style crusty bread (.88 lb) only cost 97¢, my homemade no-knead version cost a total of 29¢ for a 1.5 lb loaf of bread, almost twice the weight of the Walmart bread saving me in essence over $1.50 on one loaf of bread.  Compared to the D'Itananio, (675 g/ 1.5 lb) I saved $1.98.  At three loaves of bread per week and saving at least $1.50 per loaf of bread, it works out to an annual savings of $234.   

In terms of quality, homemade bread is far superior to mass produced breads.  Did you know that bakery and homemade breads are so popular in the Netherlands they don't even have mass produced breads?  Instead they bring in artisan breads from Germany daily to stock the many bakeries.  That says something about the quality and popularity of artisan breads!  I use enriched unbleached flour for any white breads or any breads requiring a portion of white flour that I make.  That means my breads do contain all the additives (ADA, niacin, thiamin mononitrate, riboflavin, folic acid and iron) that are in the enriched flour.  The exception is when I have access to organic, additive free, unbleached flour. I also use dough enhancers (lethicin, gluten flour) from time to time but not on a regular basis.  Other ingredients that I may add tend to be organic, in the case of eggs they are free range, salt is sea salt not iodized, and I prefer using local raw honey, maple syrup, molasses or rice syrup as a sweetener over refined sugar.  If I do use sugar, it is organic.  Unlike some commercially baked breads, my homemade breads have no preservatives or added emulsifiers.  A surprising number of brands of whole wheat and whole grain breads contain artificial flavours or colours and they are HFCS free.  My whole wheat and whole grain breads contain none of these.  My fermented breads (eg. sour dough, crusty breads) develop a natural tang that eludes store bought breads, much more like what you would find in an artisan bakery.

Making your own bread is one of the most frugal things you can do in terms of quality and cost.  You need only a mixing bowl, a baking sheet and/or bread pan, the ingredients and your hands to make good bread.  Both a stand mixer and breadmachine take a lot of the work out of making bread.  The cost of both either can quickly be recovered in the money you save not buying store bought breads.  A Dutch oven is nice is you want to make crusty bread or rolls.  An inexpensive one new will cost about $40 on sale but these are also common yard sale and resale store finds for around $5.  The ingredients for making good bread are inexpensive and simple ranging from only flour, salt, yeast and water to a few other low cost additions if desired.  Even using organic, additive-free flour that is more expensive will still save you money while putting a far superior bread on your table in comparison to mass produced breads.  There are many ways to reduce the actual hands on time it takes to make bread but really most of the time involved with bread-making is waiting for the dough to rise.   At any rate, if you have not tried making your own bread, now is the time to start.  You will be pleasantly surprised!


Monday, January 21, 2013

Frugal Kitchens 101 - Continuous Harvest

Frugal Kitchens 101

Last month I focused on discussing my continuous harvest on my gardening blog.  Growing fruits and vegetables indoors is an ideal way to stretch your food dollar.  It is a very frugal activity that the whole family can enjoy while saving money.  Let's put it in perspective.  A head of leaf lettuce costs somewhere between 80¢ and $1.50 during the winter months.  A packet of leaf lettuce seeds costs about $1 but that packet of seeds will give a much greater yield than one head of leaf lettuce.  Fresh herbs in the produce section cost about $2 and you use them up but a potted herb costs mere pennies if you start from seed or the same $2 if you start from clippings in the produce section or buy an established potted herb.  Now, the beauty with herbs is they are cut and come again edible plants that adapt rather nicely to growing indoors.  Two more examples are potatoes and tomatoes. If you grow tomatoes outdoors, take a few clippings then root in water and plant in pots indoors for  fresh tomatoes.  You won't get a huge bumper crop but those tomatoes taste so much nicer than those available in the grocery stores during the winter months.  Everyone has had a sprouted potato that has gone soft.  Cut the potato into quarters with an eye (sprout) in each piece.  Fill 4 - 5 gal pails with soil then plant a potato quarter in each.  You will be rewarded with 4 pails of new potatoes, about 10 or so per pail, just perfect for a free side from something you were going to toss anyway.  Ok, now you have an idea on what a continuous harvest is (growing a year round indoor garden), here are a few tips setting up growing space.

  • what to grow - In general most herbs, smaller fruiting tomatoes, potatoes, carrots, radishes, leaf lettuce, mesclun mix, mustard, cucumbers, bush beans, some varieties of pole beans, sweet peas, zucchini, sweet peppers, spinach and some varieties of strawberries can be grown indoors.  Hot peppers and most melons don't grow indoors well.  Indoor space is too limited to grow most berries or other fruits, or corn but as you can see, there is a fair amount of produce that can be grown indoors year round.
  • plastic trays - Water from over flowing potted plants can damage furniture and floors.  I bought a few plastic kitty litter trays from the dollar store.  I put potted plants in the trays making it easy to move several plants at one time while protecting surfaces from water damage.  
  • space - Space is of course the limiting factor when growing indoors as everything else (eg. lighting, temperature, humidity, water, nutrients) can all be controlled.  I use a lot of the principles of square foot gardening so I always look at ways to 'grow up not out'.  There are all kinds of shelf units available that can be fitted with grow lights and there are several products on the market for growing small (eg. table top, self contained units) for growing indoors.  Of course, there are hooks for hanging edible potted plants from the ceiling.  Sometime, thinking outside of the box works too.  I turned one south facing window in our second home into a lovely grow space by adding shallow shelves that held 4 - inch potted plants.  The window was still functional but it did eliminate the need for curtains on that window.  A small, rigid plastic kiddie pool (bought at an end of season sale for about $5) can be turned into a stunning indoor garden.  Pop all your edible potter plants into the pool, camouflage the edge with a row of plants in self watering containers, add a couple of grow lights and you have lovely, easy to care for, low maintenance indoor garden that can be the focal point of a room as well.
  • time savers - Growing edible plants indoors need not be time consuming.  If anything it is easier than growing outdoors because there are a lot of time savers available.  Use self-watering pots (dollar store, Wal-mart) or make your own using plastic bins.  Watering a couple of times a month is likely all you will need from there especially if the heat or AC is not on.  Use water bulbs in potted plants, another dollar store find that works quite nicely to lessen the number of times you need to water.  An inexpensive indoor drip watering system can be set up using plastic aquarium tubing.  This clear tubing can be discretely run to water all your plants from a single location.  I use wooden plant dollies with plastic casters (dollar store find) to move larger plants around when needed.  The casters don't mar up our laminate, tile or marble flooring and I don't have to worry about injuring myself moving heavier plants.
  • successive plantings - Some plants (eg. herbs) are cut and come again meaning the plant will continue to grow and produce even though you harvest some of it.  Never harvest more than a third of the plant.  Other plants like leaf lettuce are depleted upon harvesting.  For that reason, grow them in larger pots and treat them the way you would in a square foot garden by repeated sowings.  If it is a plant you use a lot of, plant multiple pots then combine with repeated sowings as a pot is harvested to ensure a steady supply.  For example, plant four pots a day or two apart with leaf lettuce.  As the first one matures to harvest, the next one will be a couple of days behind and so on.  Harvest some or all of the first pot, work up the soil a bit and sow more seeds.  Continue in this fashion for a steady supply.  You can do the same with any vegetable grown indoors, adjusting the spacing between plantings as desired.
  • cost - For very little investment, even as low as $0 you can easily have a rather productive indoor garden set up.  Honestly, most equipment can be found for free and chances are you already have what you need on hand.  The cheapest way to get seeds is to collect them yourself either from your outdoor garden or even from some of the produce you purchase in the grocery store.  Seed exchanges are a cheap source for seeds for only the price of a stamp.  Electricity for lighting should be minimal as well if you use CFL bulbs.  I have spent about $20 so far establishing an indoor garden here that is still very much a work in progress.  A lot of the materials, shelving and planters can easily be found on Freecycle or very cheap at yard sales.  Higher end, self-contained growing stations will cost somewhere between $50 and $80 but there is a return on that investment so they can pay for themselves.  The biggest expense with indoor growing is the energy to operate any grow lights.  Grow lights are necessary indoors to give the proper light spectrum for healthy plant growth.   In general grow lights are incandescent, fluorescent, CFL and LED.  Forget incandescent grow lights.  They are cheap to buy but can increase your hydro bill by $20 or more a month.  LED lights are expensive to buy but very cheap to operate.  The standard in growing indoors has been the fluorescent tube lighting but the newer and cheaper to operate CFL grow lights are now on the market.  CFL bulbs should be in the higher wattage range and despite a bit higher cost of operation as opposed to lower wattage CFL, they are still less expensive to operate than fluorescent tube lighting.


Monday, October 22, 2012

Frugal Kitchens 101 - Keepware

Frugal Kitchens 101

Food storage by default means you must have some type of container to store the food in.  That usually means reusable food grade plastic, glass or metal containers or single use plastic storage bags or metal tray type containers.  In general, food storage containers should be able to be used in the refrigerator, freezer or for dry storage.  The food industry has come up with a simple solution to food storage containers, called keepware.  The term keepware, refers to packaging the manufacturer intends for the consumer to keep as an incentive to buy their product.

Re-purposing of containers is not a new concept because folks have been keeping containers from store bought foods to reuse for storage for years and years.  Back when our kids were young I would frequent a couple of restaurants and doughnut shops specifically to get free plastic margarine containers, large plastic pails with lids and institutional size glass jars for dry food storage.  The price was right - free.  In recent years, some restaurants and doughnut shops charge a small fee (usually well under $1 per container) that is usually donated to a charity of their choice but I still get my industrial size containers there.

The food industry, realizing frugal folks would be more apt to buy their products if they got a free reusable container with the product were quick to react in developing keepware.  Keepware basically comes with the food packed inside but the container is designed to be reused.   These containers are nicer than margarine or dairy containers, as there is little in the way of labeling and are the quality of Ziploc or Gladware storage containers designed for refrigerator, freezer and dry storage.  It is of the same quality that could be purchased without the contents.  Years ago, a brand name peanut butter came packed in bear shaped jars designed to be used as piggy banks when empty.  At one time we had a set of six kids' theme drinking glasses that came packed with peanut butter.  Now, sauces are being packaged in keepware.  Keepware is a wonderful, frugal way of being able to accumulate storage containers without having to pay for storage containers!


Monday, October 15, 2012

Frugal Kitchens 101 - The Waste Not Kitchen Fallacy

Frugal Kitchens 101
I am a rather frugal person who wants the best value for my dollar without overspending.  I tend to follow several frugal forums because sometimes I learn a thing or two.  One of the forums I follow has the philosophy of wasting nothing.  Some are claiming the waste nothing in the kitchen while others are moving in the direction of wasting nothing in the kitchen.  I'm sorry but wasting nothing in the kitchen is a  delusion.  Putting a can or plastic container into the recycle bin is not by any stretch of the imagination wasting nothing.  Energy and resources are wasted cleaning those containers then they are collected at curbside (a colossal carbon footprint) and transferred to a recycling facility (even more waste).  The whole concept of a waste not kitchen is a fallacy.  There never in history has been a kitchen that doesn't produce waste and there never will be.  The only way to have a waste not kitchen is to not have a kitchen!   The fact is kitchens produce waste.  However, the thrifty and frugal person can greatly reduce the waste their kitchen produces.  We have been focusing on reducing our kitchen waste and are seeing the results for our effort.  Here are a few ways we are reducing our kitchen waste:

  • eliminate individually packaged or single serve - This includes single serve yogurts, cheese slices or strings, hard candies, snacks, fruit cups, puddings, and that type of thing.  We never did use much in the way of single serve foods to begin with.  Some like cheese strings or slices and freezies create waste that can't be put into the recycle bin so it does end up in the landfill.  Our one single serve splurge is K-cups for the Keurig but most of the time we use the My K-cup reusable filter system.  K-cups are recycled for crafting projects and starting seeds.  Coffee grinds from both go into the compost.
  • reduce plastic and metal containers - We avoid anything commercially canned in aluminum cans period. We buy in the largest container possible for things like sour cream, cottage cheese and yogurt but normally make these foods from scratch to avoid the plastic container entirely.  We use reusable water bottles and hot drink travel mugs rather than buying bottled water, bottled juices, tea or coffee.  If I have to buy a commercially prepared product I will purposely choose one packaged in a glass container over plastic and always in the largest size possible based on unit price because the jar can be be reused for dry storage.
  • reuse containers - A vast number of the glass jars or plastic containers that come into our home are reused for dry storage or other purposes.  If we can find a use for it, the container doesn't make its way to the recycle bin.  We buy as little as possible foods that have been commercially prepared so we get the industrial sized pickle jars and plastic pails with lids from a local donut shop and local restaurants for dry storage.  So we are actually reusing containers that would have been discarded by these sources.
  • home canning -  Home canning can greatly reduce kitchen recycling waste as the mason jars are reused until they break.  I have jars over 30 years old still being used for home canning now.  The rings are reused unless rusted or bent then they go into the recycle bin.  The single use metal snap lids go into the recycle bin which is one reason why I am making the switch over to using the reusable Tattler lids and glass inserts wherever possible.  Foods being home canned do produce scrap waste, much of which can go into the compost bin.  It takes the same amount of energy to run BWB canner and/or pressure canner at part capacity as it does to run at full capacity so run at full capacity whenever possible.
  • cooking from scratch - Cooking from scratch is a great way to reduce packaging waste (eg. convenience food packaging, take out food containers) plus the waste can be turned into wonderful, rich compost to enrich your garden, container plants and houseplants.
  • nix the box - Store bought convenience mixes (eg. 'Helper", mac & cheese, cake etc) are not only expensive and filled with horrendous additives, they also create a lot of waste.  If you really want these types of mixes in your pantry, take a half hour on the weekend to make up a few mixes.
  • give up grocery bags - Carting home groceries is part of any kitchen but rather than use plastic or paper grocery bags from the grocery store that now in Ontario have a 5¢ surcharge, use reusable cotton grocery bags or plastic totes.  Both can be purchased very inexpensively and will pay for themselves over the years of service.  Even the dollar stores carry reusable grocery bags and plastic totes.  This will also help curb a bit of kitchen clutter.   
  • energy usage - Kitchens by default now include many electrical appliances, ranges (natural gas, propane or electric) and lighting.  By far, a fair amount of energy can be wasted each day.  There are manual versions of many small kitchen appliances and all major kitchen appliances should be EnergyStart rated if electrical.  There are many creative ways for getting more light in your kitchen without using electricity including solar and reusable battery powered task light.  Use CFL bulbs in all overhead fixtures unless they are fluorescent tube fixtures.  Multi-task to save energy.  Cooking extra baked potatoes or an extra casserole or an entire meal plus extras in the oven takes the same energy as cooking one baked potato in the oven so take advantage of that.  If your slow cooker is over 10 years old it might be time to invest in a new one that is more energy efficient and keep the old one for times you may need more than one slow cooker.  A pressure cooker can save you time and energy  For more energy saving tips in the kitchen, consult your local energy provider.


Monday, August 20, 2012

Frugal Kitchens 101 - Grocery Stores

Frugal Kitchens 101
Friends of ours own a large chain grocery store franchise.  They have often told us even though we support their store by shopping there that we are horrible customers.  They said if everyone shopped the way we do, they would have been out of business a long time ago.  Why?  We don't fall into the grocery store fallacy of shopping every week and having to buy the latest gimmick the food manufacturers are promoting.  We shop the outer aisle focusing on Canadian produce spending very little on imported produce, not much in the lines of breads or meats or poultry, a little dairy and occasionally a couple of frozen food items.  We buy raw products like flour, sugars, vinegars, oils, dried beans and dried pastas.  We buy very, very little in the way of commercially preserved anything.  We don't shop weekly but rather pick up the odd item here or there if absolutely needed or cherry pick the sales.  On average, very little of our food dollar is spent in a grocery store.  I'd be surprised if we spent as much of an eighth of of food budget in a grocery store!  Yet we put high quality, nutritious food on the table without spending an astronomical amount of money.  In fact, we spend about a third of the amount on food that a normal couple spends which I think is impressive giving the amount of entertaining and hosting family events that we do.  How do we do this?  Here are a few things we do to basically avoid grocery stores.

  • buy in bulk - Most of our meats are bought directly from the farmer and bought in bulk.  Staples like flours and sugars are bought in the largest size possible at the cheapest unit price or bought at the bulk food store.  I use a lot of citric acid for canning tomato products.  Even at the bulk food store a small bottle is almost $4 but I found going through a local wine making store I could get a 1 kg bag for $9. 
  • grow our own - We grow whatever we can.  Even a small space (eg. patio, balcony) using nothing more than containers can yield a fair amount of produce.  We use edible plants in place of ornamentals wherever possible.  We also grow as much as possible indoors in our continuous garden.  Several vegetables grow nicely indoors including tomatoes, herbs, potatoes, lettuces, chards and celery.
  • buy in season locally - We support our local growers so buy in season and as close to home as possible.  This means shopping at roadside stands, local orchards, farms, fisheries, and wineries.  Even if buying produce at the grocery store our first choice is Ontario grown followed by grown in Canada.  I was seriously shocked the other day to see sweet corn imported from the US when locally grown sweet corn is available now but the worst thing is folks were actually buying it over locally grown.  For shame!
  • buy foods produced locally - We try to adhere as close as possible in buying our food needs grown or produced with locally grown foods within a 100 mile radius of our home.  We shop the local mushroom farms, farmer's markets, local abattoirs, cheese factories and occasionally bakeries.  We use Ontario salt, sugar, milk, eggs, chicken, beer, and wine.  If it is a choice between Ontario grown and an import, we choose Ontario grown.
  • home food preservation - We are very active in keeping a well stocked pantry based on home canned, home dried and home frozen foods.  Our pantry is our grocery store.  We cure some of our meats as well which saves us considerably on the price per pound.  For example, peameal bacon is usually priced at about $6 per lb but I can buy pork loin on sale for $1 to $1.50 per lb, cure it myself and save at minimum $4.50 per pound.  Home canning results in a significant reduction in our annual food costs.
  • from scratch - The number one way to save on the food dollars is to cook from scratch.  It eliminates having to go to the grocery store for convenience products.  If I/we can make it ourselves, it isn't being bought at a grocery store which ultimately saves us a bundle.  Oh sure, we might still have to buy the raw ingredients at the grocery store but it is still a huge savings.  For example, a homemade version of Hamburg Helper costs me about 1/4 of the price in raw ingredients as the store bought version but I get almost three times the amount and it freezes well so I also end up with a homemade convenient meal in the freezer.  That little 99¢ packet of taco seasoning costs me all of about 4¢ to make and it takes only a couple of minutes.  Cooking from scratch does not mean giving up convenience foods only giving up store bought convenience foods in favour of homemade convenience foods.
  • shop online - We live in a rather small town which means some ingredients are simply not available locally.  I buy cost saving necessities like ClearGel and Pomona's pectin online.  If I want a certain variety of seeds for the garden that I can't find locally, I buy online.


Friday, December 16, 2011

Sweet Potato Casserole

During the Christmas holiday season we manage to attend several events that have buffet style dinners followed by entertainment.  It's interesting to see the various foods offered as they tend to be a bit on the fancier side than normal. The nice thing about buffet foods is most of them are easily made at home and for the most part buffet foods tend to be quite economical.

sweet potato casserole
Sweet potato casserole is an easy to prepare, low cost dish that quite often appears on the buffet table during the holiday season.  It can be used as a side dish or topped with a drizzle of maple syrup, fresh whipped cream and chopped pecans as a dessert.  I personally find sweet potato casserole too sweet to use as a side dish.  If you love pumpkin pie but are eating gluten free or are avoiding the crust of pumpkin pie, then sweet potato casserole is a lovely substitute.

Sweet Potato Casserole
recipe by:  Garden Gnome

3 large sweet potatoes
2 large eggs
3 tbsp soft butter
2 tbsp packed dark brown sugar
1 tsp sea salt
½ c milk
½ tsp ground cinnamon
½ tsp ground ginger
1/8 tsp ground nutmeg
1/8 tsp fresh ground pepper
¼ c coarsely chopped pecans (optional)

Scurb the sweet potatoes.  Pierce each potato with a fork the bake at 400° until tender.  Set aside to cool.  Scoop the sweet potato flesh from the skins.  Place in medium bowl and mash until smooth.  Slightly beat the eggs in a separate bowl.  Mix eggs, milk, butter, brown sugar, and seasoning into the sweet potatoes.  Mix until smooth.  Pour the mixture into 8 x 8 - inch a non-stick baking pan.  Sprinkle the top with pecans if desired.  Bake for 30 to 40 minutes until casserole is a bit puffy.  Serve casserole hot.


Sunday, October 16, 2011

Baked Basa Fish

We enjoy a fish dinner at least once a week, usually on Fridays but we often have fish a couple of times a week.  Fresh caught local fish here is bluegill, bass, perch, pickerel and whitefish.  Since I like to fish and we have friends who are very generous with their catch, we eat a lot of local fresh-water fish here but more salt-water fish at our vacation home.  One of the local grocery stores has a few rather good sales on various fish fillets.  I took advantage of the sales to stock up on wild salmon as well as try a couple of fish we haven't had before.  One of those fish was basa.


baked basa fish
Basa fish (Pangasius bocourti) is a type of catfish native to southeastern Asia (Mekong River Delta in Vietnam and Chao Phraya basin in Thailand).  The package I bought was farm raised rather than wild.  The fillets were good sized enough for one serving each.

I baked the basa fish seasoned with lemon pepper.  Sides included roasted mini red potatoes and steamed asparagus.  The basa fish had a light, clean flavour.  My husband really liked it however I found the texture to be a bit mushier than I like in fish.

The package cost me $5 for two fillets, enough for a meal for two.  In comparison to chicken, pork and ground beef the basa fish at $2.50 per serving is a bit higher priced but it is a healthier meat choice.  Fish is lower in calories and fat especially in comparison to red meat.  Fish also has a short cook time making it a frugal meat choice.  In this respect, even though fish costs a bit more per serving, it is still an excellent value for your food dollar.


Monday, December 13, 2010

Frugal Kitchens 101 - My Underlying Principles for Saving on the Cost of Food

Frugal Kitchens 101

I firmly believe that good food does not have to cost a lot.  The problem is the food industry has so brainwashed consumers to believe they need a lot of the expensive, nutritionally poor foods then the fast food industry takes over from there telling people it is too time consuming and difficult to cook.  Throughout mankind, people have been able to feed themselves without relying on the food industry or fast food industry for a good portion of their foods.  This week's Frugal Kitchens 101 addresses some of my underlying principles for cooking good but inexpensive foods.  These principles and practices are used extensively throughout this blog.  

  • realize that cooking does not have to take a lot of time or effort 
  • refer to older cookbooks especially those from the Great Depression era and pre-1970's that use simpler ingredients to create great dishes
  • avoid all packaged foods except for dry pastas, dried beans and basics like flours and sugars, rices and some baking needs that you might not be able to find in bulk
  • make your own convenience mixes (eg. store bought cake mix 99¢, homemade about 17¢)
  • make your own seasoning blends (eg. store bought poultry seasoning $3.29, homemade about 30¢)
  • avoid buying herbs and spices in the grocery store especially those expensive little bottles; buy herbs and spices in bulk from a bulk food store, Amish store or similar type of store where you can control the amount you want to buy
  • home food preservation can save a considerable amount of money and it is not difficult to learn or expensive to find the necessary equipment
  • avoid buying pre-chopped, pre-made anything with the exception of phyllo dough, olives unless you live where they grow,
  • pasta, rice and beans are your true budget stretchers so keep a lot of varieties of each in your pantry so your meals don't get boring
  • try to plan as much as possible for leftover meals by cooking a bit extra for the planned leftover meal while cooking the first meal
  • reserve freezer space for the expensive foods like meats, fish, some vegetable rather than the cheap foods like breads
  • copykat recipes (clone recipes) are a great way to enjoy your favourite take-out food without the expense or leaving your home
  • grow whatever you can grow including any vegetables, fruits, herbs and meats like backyard chickens and rabbits
  • waste not, the vast majority of kitchen waste from peelings to packaging can be reused in some fashion


Sunday, November 14, 2010

Cod with Potatoes and Squash Cooked in Foil

Cooking in foil packets is a frugal method that results in moist, tender foods with a lower cooking time.  Clean-up is minimal with the foil being put into the recycle bin if allowable or tossed.  Individual vegetable sides or an entire entrée can be cooked in foil packets making this method ideal for outdoor cooking on the grill or over an open fire.

foil potato and squash packets
The nice thing about using foil is it can be formed to the shape of the food.  Using a foil packet is my favourite method for cooking acorn squash.  I cut the squash in half and scoop out the seeds.  Then I place about a teaspoon of butter and a little salt in the hollow,  then wrap each half in foil.  Pictured are the squash and potatoes I cooked in foil packets.

I quartered the potatoes then placed on a sheet of tin foil.  I drizzled a little olive oil over the potatoes, added about a tablespoon of butter then sprinkled with sea salt and fresh ground pepper.  I sealed the packet tightly and placed in on a baking sheet along with the squash.  I baked the squash and potatoes at 180ºC (350ºF) for 35 minutes.  Once the squash was cooked I unwrapped in and mashed the resulting liquid in the centre into the squash pulp.

cod dinner with potatoes and squash cooked in foil packets
Squash seems to be one of those vegetables that just doesn't get a lot of attention.  Yet it is an extremely frugal vegetable when bought in season.  Locally acorn squash is priced at 5 for $1.25 or 25¢ each.  Other squash (eg. butternut, spaghetti, crooked neck) are priced anywhere from $1 to $3 each in season.  That makes squash a very frugal side dish but squash can also be used in place of pumpkin (also a squash) to make pies, quick breads or muffins and soups.  Mashed squash can be frozen in muffin tins for individual serving sizes.  Squash soup also freezes nicely.

It was a bit larger meal starting with shrimp cocktail as the appetizer.  I served the foil cooked mashed squash and red potatoes with steamed spinach and pan fried Atlantic cod loins as the entrée with a small side salad.  I have to say these are some of the best cod loins we have ever found!  They are delivered right to our door.  I just bought a second box of them because we enjoy them so much.


Wednesday, April 07, 2010

Eat The Weeds: Episode: 114: Cast Iron and Pig Weed

Awhile back one of the Frugal Kitchens 101 topics was foraging. Foraging is an excellent way to extend your food dollar while increasing the variety of foods you eat. I came across an wonderful video series on YouTube by Green Deane of Eat the Weeds. I highly recommend these videos if you are interested in learning more about foraging. Foraging involves cooking some of your foraged goodies.

The topic of pots and pans hasn't been discussed in great detail here although I have talked about some of the pots and pans I prefer. I will go into greater detail in future posts. A cast iron fry pan and dutch oven are a couple of the best cookware pieces you can possibly have in your kitchen. The great thing is you don't have to spend a lot of money on cast iron just a bit of inginuity and time seasoning to get one of the best non-stick performers possible. Here is one of his videos that shows how to rehabilitate a rusty cast iron pan into a useful pan that can be used for generations if properly cared for. Once he has seasoned the cast iron pan he shows how to cook pig weed, a common garden weed here in Ontario as well as elsewhere.


Saturday, April 03, 2010

Food or Shelter

It is not often that I set aside blog space here for a I pride myself in presenting the best food that I can on this blog. Yes it is home made and yes in many cases it is frugal. In fact I quite often give you the actual numbers to help decide if the dish is a frugal choice for you and frugality is a common theme for this blog. What I haven't gone into is the fact that in Canada alone over 1 million people daily have to choose between putting food on their table or a roof over their heads. As a Canadian food blogger I find this number staggering and appalling. I would ethically be remiss to not mention this growing problem.

In many ways I honestly do believe part of the answer lies with the people themselves. During war times Victory Gardens were encouraged and even seen as a civic duty. Urban gardening is very much in the news recently. It is surprising how much food can be grown in a very small amount of space in containers. It is surprising the vast amounts of foods that can be foraged. In some Canadian municipalities it is now legal to have backyard chickens with certain restrictions but just look at that potential! My husband's Grandma always had rabbits something that is legal throughout most Canadian municipalities. Rabbits are great for roasting and the stew pot! Somewhere along the line some Canadians have realized it is easier to rely on handouts than fend for themselves and that is a downright shame when there are so many ways to alleviate the problem without turning to handouts . Here is a video clip of the ads being shown on Canadian television stressing this problem.


Wednesday, January 27, 2010

Great Depression Cooking - Eggplant Parmesan

It has been awhile since I've done one of these types of posts. Depression era style cooking is coming very much into vogue because this style of cooking uses simple ingredients cooked simply. Depression cooking was built on need not trends or convenience foods. Issues like brand names are out the window. If you watch the video preceding this one, the dandelion salad is from dandelion harvested in Clara's backyard. Put in perspective she is eating something for free that many health conscious people pay for in the grocery stores as part of the gourmet spring salad mixes and others pay even more to rid their yards of creating health problems due to herbicide residues. Home gardeners know that eggplant is one of the frugal plants in their garden. Take a look at this easy eggplant parmesan meal done depression style.


Monday, December 14, 2009

Frugal Kitchens 101 - Paper Products

Frugal Kitchens 101Part of running a frugal kitchen is realizing every single thing you throw out actually costs you money. One of the biggest money wasters in the kitchen is paper products. This includes items like paper towels, paper serviettes, paper plates/bowls, paper lunch bags, paper serving trays, paper cups, coffee filters, baking cups, wax paper and parchment paper. From an eco-friendly viewpoint all paper products should be eliminated in the kitchen. From a convenience and practical view this is not quite as easy as it would appear. Unfortunately the holiday season is the time of the year when you will use more paper products but you can really minimize your use. Here are some of the ways I've reduced using paper products in my kitchen.

  • paper towels - Ideally paper towels should be entirely eliminated in the kitchen but they are ideal for wiping up any greasy spills. Paper towels bought on sale here usually cost about $5 for 8 (SpongeTowels) or 62.5¢ per roll. On the surface that doesn't sound too expensive but if you average 2 rolls of paper towels per week that works out to $65 per year. I invested $15 total in 25 bar towels from Sam's Club to use as t-towels and 25 pk of white wash cloths at K-mart. Both are 100% cotton. These have reduced my paper towel use down to a little less than a roll of paper towels per month or about $7.50 per year.
  • paper serviettes - In general I do not use paper serviettes on a regular basis although I do use them for larger (15 or more) gathering entertaining where cloth serviettes would not be appropriate but use cloth serviettes otherwise.
  • paper plates/bowls/cups - Unfortunately I have not been able to eliminate these entirely for larger gathering entertaining purposes. For get togethers under 28 people I have enough non-disposable dishware. For some entertaining events disposable dishware is almost a must especially when several dishes are served throughout the event not giving you time to re-wash dishes. I minimize the cost by buying paper plates and bowls in bulk at Sam's Club or in large packages at the grocery store on sale. Dixie Ultra 24 pk goes on sale for $2 or 8.3¢ each so a small price to pay for simplifying entertaining. I have eliminated paper cups entirely.
  • paper lunch bags - At one time paper lunch bags were and to some degree remain popular for taking lunches to school or work. They also served to pop microwave popcorn and keep mushrooms fresh in the refrigerator. I eliminated using paper lunch bags by buying a reusable, insulated lunch bag, popping bulk corn kernels on the stove and storing fresh mushrooms for shorter periods of time at the proper crisper humidity setting.
  • paper serving trays - These were never a popular item with me. If you use them they can be elimated by investing $10 at a dollar store to get 10 various sized serving trays that should meet most of your entertaining needs.
  • tea bags - Tea bags present three issues with the first being the use of paper itself, the second being the paper is bleached and the third being the paper imparts an off flavour to the tea. A better solution is use a tea ball and loose leaf tea.
  • coffee filters - Everything that applies to the problem of paper tea bags applies to paper coffee filters. A better solution is to use a re-usable coffee filter basket that will not impart any off flavours to the coffee.
  • baking cups - Paper baking cups are quite inexpensive but are not eco-friendly. A better solution is to use a silicone muffin tin or individual silicone baking cups. Individual silicone baking cups can be found 12/$1 at dollar stores. Silicone muffin tins can be found for quite a reasonable price at most department stores.
  • wax paper - Wax paper is often used for wrapping foods for short term storage. A better solution is to store foods in glass storage containers with re-usable lids. Wax paper is also used to wrap sandwiches for lunch. A better solution is to use re-usable sandwich containers. Wax paper is also used for rolling out pastry doughs and letting no bake cookies set up. A better solution is to use pastry sheets and Silpat® silicone sheets.
  • parchment paper - Parchment paper is used to line cookie sheets, baking sheets, baking pans and to make paper baking pockets. Silpat® silicone sheets and properly greasining/oiling baking dishes will replace parchment all uses for parchment paper with the exception of baking pockets. If you make baking pocket you will want to keep a small roll of parchment paper on hand but if you don't make them then eliminate parchment paper entirely.


Thursday, November 26, 2009

Kitchen Quick Tips - Saving Bones

kitchen quick tips
Larger cuts of meat with bone in and whole birds (duck, turkey, goose) are often served during the holiday season. All of the bones are ideal for making stocks but there may not be time to do so. After the meat or bird has served, debone then pop the carcass into the freezer. Once the holidays are over remove the bones from the freezer and make your stock as normal.


Monday, November 23, 2009

Frugal Kitchens 101 - Baby Food

Frugal Kitchens 101Commercially prepared baby foods have been on the market for quite some time. Manufacturers have convince new mothers that they need to feed their children commercially prepared foods that are not only costly but are eco-friendly. Now there are some commercially prepared baby foods that might be necessary such as baby formula and pablum but for the most part the idea you have to buy commercially prepared baby foods is a myth! Countless children have survived their infant and toddler years without so much as a spoonful of commercially prepared baby food passing their lips! Today's Frugal Kitchens 101 is all about baby food.

When our kids were infants they were breastfed so we never had to deal with the baby formula problem that now costs as much as $30 per week! I only know that figure because youngest grandbaby is on formula. One of our kids started pablum early but other than that our kids right from introducing solid foods ate pretty much the same foods as we did sans any sugar, salt or seasonings. This really was not as difficult to do as some seem to think. By the time children are walking aka toddlers they have enough teeth specialized food should not be necessary although you may have to cut things like meats into smaller pieces.

Key equipment needed for making baby food:

  • blender - An electric blender will allow you to purée foods to the desired consistency for infants. In general start with a very smooth purée then gradually less smooth to add texture for older infants and toddlers
  • tabletop food grinder - This is a specialty item that has come on the market recently making it easy for you to prepare baby food when you are traveling or away from home.
  • fork - It's surprising just how well a fork will work for mashing foods for older infants and toddlers.
  • small containers or ice cube tray - If you want to prepare baby food ahead of time you will need small (4 oz or less) containers for storage or you can freeze the food in an ice cube tray for 1 oz portions. Pop the frozen food out into a zipper style freezer bag then use one cub as needed. If using plastic containers for storing baby food this way it is very important you do not heat the food in the plastic container. Transfer it to a small glass bowl (eg. custard bowl) to heat in.
When our kids were in the infant stage there were very few food restrictions. Rice pablum was always the first to be introduced because there was the least likelihood of any problems. Other than that any food was pretty much fair game. From experience I recommend not giving the following foods to infants under the age of one:
  • honey - There is a recognized risk of developing Botulism if honey is ingested under the age of one year.
  • egg whites - The protein in egg whites can cause a severe allergic reaction in infants under the age of one year. If you would like to introduce eggs to your infant use the yolk only. To make scrambled eggs mix in a little water with the yolk.
  • cow's milk - Cow's milk can cause two problems. The first is an allergic reaction and the second is lactose intolerance. It's best not to give cow's milk to infants.
  • cruciform vegetables - Cruciform vegetables include broccoli, cauliflower, cabbage and brussels sprouts. These vegetables tend to cause gas that will make the infant quite uncomfortable.
  • legumes - Legumes also produce gas that will cause discomfort.
  • refined anything - This includes white sugar, white flour, white toast, corn syrup etc but also includes hidden sugars in fruit juices, processed fruits, apple sauce and yogurt. Older infants can have yogurt but it should be plain yogurt with at most a little fruit purée or unsweetened apple sauce stirred in.
  • citrus - Most citrus is quite acidic so it is best not to give citrus to infants.
  • fatty foods - Fatty foods should be avoided as infants can't digest them well. Any meat should be as lean as possible.
  • seasoned foods - Avoid adding salt, pepper, herbs and seasonings. Keep food on the bland side.


Tuesday, November 10, 2009

Scandinavian Rosette Cookies

It's that time of year where I'm looking for a few new things to add to my gift baskets for gifts from the kitchen. As promised here is one of the cookie recipes I tried out. Now I do have to point out these are one of the most frugal cookies I have come across. They are made from 5 low cost ingredients and despite this they look quite fancy. I really like foods that look like they took a lot of time to prepare when they really didn't!

making rosettes equipmentGetting Ready

These cookies are not baked in the oven but rather fried in oil. Don't let that turn you off though as the are light and fluffy. They are also very versatile as to what topping you want to use and depending which orientation you want the cookies. Bottoms up and the cookies can be filled. Tops up and the cookies are nice simply topped.

Materials needed: deep fryer, rosette mold set, wooden skewer, paper towel lined cake cooling rack.

Scandinavian Rosette Cookies

1 c unbleached flour
1 c skim milk
½ tsp sea salt
3 tsp organic sugar
1 egg

Combine dry ingredients and mix in KitchenAid® stand mixer bowl. In a separate measuring cup combine the egg with the milk. Slowly mix into the dried ingredients then using the whisk attachment whisk until you have a smooth mixture. Heat the mold then dip into the batter into hot oil. Fry just to the point you can pop the cookie off the mold with a skewer. Fry until golden brown then turn to cook on the other side. Using your skewer, remove the cookie onto a paper towel lined cooling rack.

making Scandinavian rosette cookiesThe Steps

When I first looked at all the steps to making these cookies I thought they were just too complicated but really they aren't once you get into a rhythm. First the mold is attached to the handle then the mold is heated for 15 seconds (1). Once the mold is heated it is dipped into the batter (2). I noticed there is always a sizzle sound when the properly heated mold hits the batter. The batter cannot come above the lip of the mold but a little jiggle helps coat the mold well. The coated mold is then placed into the hot oil (3). New molds will need a bit of encouragement to get the cookie to pop off but I really didn't find this to be a huge problem. After using the mold (4) for three or four times the cookie dropped off into the hot oil allowing a reload so I was able to get 3 to 4 cookies cooking at one time. The hot cookies went from the fryer to a paper towel lined cooling rack.

cooling Scandinavian rosette cookiesCooling

There were 3 molds included with the kit I bought - a flower, a butterfly and poker oriented. I had to try all three. The flower one mold worked like a charm once I got the hang of it! The butterfly mold worked just as good but I simply could not get the poker mold to work. The mold was different in that there was more mold if that make sense. It was designed to create small cups shaped in spades, hearts, clubs and diamonds. Now this is really the one I wanted to work because it would fit in so well with our larger get togethers. Apparently I still have to practice!

Despite essentially frying one cookie at a time it took little time to get a nice plateful of rosette cookies. In the end with a little co-ordination I was able to get a nice rhythm going so there were 4 rosettes at a time in the fryer. I thought they looked rather pretty

Scandinavian rosette cookiesScandinavian Rosettes

When making Scandinavian rosette cookies you are supposed to give up a prayer to the Norse Gods dedicating the first batch to them. I tend to be on the frugal side so any mess-ups would get eaten anyway. At any rate and despite being my first attempt at making Scandinavian rosettes the Norse Gods would have got very little.

What is really a neat feature about the Scandinavian rosettes is you can really use them two ways. Turn them over and sprinkle with icing sugar and a chocolate/sugar/cinnamon mix (pictured) and well you just can't get much better! The shells are rich and crispy. However, reducing the amount of sugar added to the batter turns it into nice shells that could be paired with meat or savoury fillings. The shells when turned upside down hold a lot more so work nicely for dips as well.

The rosette cookies will keep at least 2 months frozen. Simply thaw then top or fill as desired. When it comes to gift baskets these cookies look amazing yet cost you very little to make.


Monday, October 26, 2009

Frugal Kitchens 101 - Frugal Mantra

Frugal Kitchens 101
One of my favourite television channels is the Food Network Canada. I watch it almost daily and one thing I have noticed that is a common theme amongst most chefs is the importance of being frugal in the kitchen. It is stress that anything you throw out costs you money. Now in a restaurant setting those pennies being tossed away has to be kept in strict check otherwise the restaurant won't see a profit. In the home kitchen every bag of garbage generated costs money including the garbage bag. The topic for today's Frugal Kitches 101 is the manta anything you throw out costs you money.
Every peel, bone, can, jar, bag, box or container has ultimately cost you money because that is all worked into the price of food. The costs of transportation from the farmer to the store are also factored in. I know I've talked about some of these aspects of saving money in the kitchen but this post will extend it a bit further. Here's a few ways to reduce what you throw out:

  • reduce packaging - Reduce packaging every chance you get with respect to all foods and kitchen products. This will give immediate savings at the point of purchase. Avoid foods packaged wrapped in styrofoam trays and any kitchen utensil or item packaged in those horrible environmentally unfriendly plastic packaging that is a nightmare to open.
  • reuse packaging - Glass jars and dairy tubs can be used for so many things around the house so rather than put them in the recycle bin find household uses for them. Some cardboards can be used under mulch to keep weeds in check in your garden.
  • ditch the disposables - The commercial industry has brainwashed us into believing that disposable are the only way to go but that simply is not the case. Instead of buying bottled water invest in a couple of nice refillable water bottles to eliminate the disposable bottle but to also save on the cost of water. I recommend 3 - 4 refillable water bottles each depending on your lifestyle. Invest in a thermos and/or refillable travel mug for hot drinks when traveling to eliminate the disposable coffee cups that are a landfill issue. Truck stops even sell small coffee makers that work in your vehicle and anytime you make your own coffee you save money. The cheap technically disposable plasticware eventually ends up in landfills. There is a lot of issues surrounding using plasticware in the kitchen. Avoid all that with using glass bowls with either glass or plastic lids that do not come into contact with foods and don't use the plastic lids in the microwave oven. Lidded glass containers eliminates or greatly reduces the use of tinfoil, plastic wrap and wax paper saving you money by not having to buy these disposable wraps. Some glassware (eg. Anchor Hocking) can be used in the freezer, refrigerator, oven and microwave oven Invest in one or more Silpats (silicone baking sheets) to eliminate parchment paper.
  • utensils - You can't run a kitchen without cooking utensils. What I have noticed is that cheaper quality utensils may or may not last and the same can be said for higher quality utensils. I like heavy duty cooking utensils that work for both non-stick and stainless steel pots and pans. There is less tendency to break. Inexpensive but durable silicone spatulas and scoopulas can be found at dollar type stores. So when it comes to utensils look for durability. The less times you have to replace utensils the better.
  • gadgets - Most home cooks have way too many gadgets. Now some gadgets are quite useful but many end up filling up drawers and never being used. Gadgets cost money to acquire but each time you get rid of a gadget you either didn't like or didn't use that money has been wasted. So be very discriminatory when acquiring any kitchen gadget.
  • plastic vs paper bags - Neither. The cost of either bag is factored in or a growing number of grocery stores are now charging for either type of bag. The eco-friendly and cheaper choice to bagging your groceries is to use cloth bags that in many cases have a pay back period of 20 - 40 uses. After that the cloth bag has paid for itself. Some stores are putting out a plastic weave type bag while others also have plastic bins for sale or you could even hit the dollar store for milk crate style bins for groceries. If you want even large wicker baskets with handles can be used for bringing groceries home. Invest in a few reusable totes or bags or basket and say no to both plastic and paper bags. If each bag costs 5¢ and you save using 4 bags per grocery trip that 20¢ which isn't much but 5 trips per month is $1 or $12 per year BUT more importantly you've lowered your carbon footprint.