My photo
Ontario, Canada
I am a wife, mother and grandma who enjoys the many aspects of homemaking. A variety of interests and hobbies combined with travel keep me active. They reflect the importance of family, friends, home and good food.
Cook ingredients that you are used to cooking by other techniques, such as fish, chicken, or hamburgers. In other words be comfortable with the ingredients you are using.
--Bobby Flay

For Your Information

Please watch this area for important information like updates, food recalls, polls, contests, coupons, and freebies.
  • [March 19, 2020] - Effective Mar 17, this blog will no longer accept advertising. The reason is very simple. If I like a product, I will promote it without compensation. If I don't like a product, I will have no problem saying so.
  • [March 17, 2020] - A return to blogging! Stay tuned for new tips, resources and all things food related.
  • [February 1, 2016] - An interesting report on why you should always choose organic tea verses non-organic: Toxic Tea (pdf format)
  • Sticky Post - Warning: 4ever Recap reusable canning lids. The reports are growing daily of these lids losing their seal during storage. Some have lost their entire season's worth of canning to these seal failures! [Update: 4ever Recap appears to be out of business.]

Popular Posts

Showing posts with label eco-friendly. Show all posts

Monday, March 04, 2013

Frugal Kitchens 101 - Green Appliances

Frugal Kitchens 101Kitchen appliances have come a long way from those of our parents.  While I am sure they were concerned about energy usage especially if heating or cooking with wood because let me tell you, that is a lot of work, in today's world we are dealing with energy conservation concerns.  The modern kitchen is a mecca of both large and small kitchen appliances, all demanding their use of electricity or hydro.  That means the frugal homemaker has to decide between the best and lowest energy usage for any appliance he or she is purchasing.  Surprisingly, there is a trend among frugalistas to buy non-electric appliances, and that is certainly an option for small kitchen appliances.  However, with large kitchen appliances you are still left with wood, natural gas, hydro and propane.  We specifically chose to go with a natural gas range when we bought this house because here in our little corner of the world, natural gas is about a third of the price of hydro.  For the amount of cooking we do, buying a natural gas range has pretty much paid for itself and we haven't been here 2 years yet.

Manufactures like Kleenmaid based in Australia are rising to need of eco-friendly, green appliances.  Oh my gosh, I so want their pop-up oven!  That is about the slickest kitchen appliance I have ever seen.   They also have an induction cooktop that I would love to have.  The beauty is both of these appliances are eco-friendly aka green appliances in that they use less energy than similar appliances in their category. Other manufactures are also doing the same thing buy manufacturing eco-friendly appliances.

Energy Star is a rating system that tells you how that appliance performs in relation to other appliances on the market.  A high Energy Star rating really means that is the unit you should buy because it uses less energy than one similar to it.  Essentially, if you are comparing 2 refrigerators - one has no Energy Star rating and the other has an Energy Star rating then the wiser choice is the Energy Star rated appliance and if you have a choice between ratings, choose the higher ranked appliance.

When it comes to large appliances, choose the appliance based on the fuel choice for your area.  If natural gas is less expensive, it may be wise to choose a large kitchen appliance that operates on natural gas.  You have more leeway with smaller kitchen appliances.  They are seldom on long enough to make much of a difference in cost of operation still, manual is more cost effective over electric.  Avoid single use small kitchen appliances.  This will help you in the goal of running an eco-friendly, green kitchen while saving money!


Tuesday, February 26, 2013

Freshly Extracted Orange Juice

I recently wrote about using my new Bella High Power Juice Extractor for the first time.  I really liked the results and quickly saw that I could create unique juices that are unavailable in the grocery stores.  Unless you have a free source of fruits and vegetables for juice or you can find them at a good sale price, you won't realize a savings on the basic juices (eg. orange, grapefruit, cranberry, grape).  However, like jams and jellies, juices can be a blend made by stretching the more expensive fruit or vegetable with less expensive or free ones.  It is possible to make the new fruit and vegetable juices that are now popular for less money than store bought plus you can custom the blend to your tastes. 

orange wedges Store bought orange juice is made from concentrate as are most commercially prepared juices.  Once the oranges are juiced, the juice is stored in holding tanks that have had the oxygen removed for up to a year.  During that time the juice loses flavour.  Many of the popular brands of orange juice use a chemical process (flavour packs) to make the juice taste and smell like oranges.  Pulp and/or sugar may be added to the juice as well.  So, the orange juice you buy in the grocery stores is anything but fresh!

Freshly squeezed orange juice is delightful!  It can vary in flavour from sweet to sour depending on the variety of orange used.  I bought 7 medium sized oranges to test out the juicer. The skins may be left on all produce for juicing except oranges, grapefruit and tangerines as the oils in these citrus fruits is bitter and hard to digest.  I cut each orange into quarters then removed the peel.  The peel need not be discarded if the oranges are organic.  It can be dried and powdered for culinary purposes as well as a natural source of Vitamin C medicinally.  It can also be candied.  There is no need to seed the orange wedges for juicing unless you want to try growing orange trees.  Don't laugh!  I have three small lemon trees started from lemon seeds in a lemon I cut up for Caesar salad.

peeled orange wedges in juice extractor hopper
The peeled quarter wedges fit nicely into the hopper but I did have to refill it a couple of times.  The only thing different with juicing the oranges was needing to peel them.  The juice goes into the pitcher to the right while the pulp goes into the pulp basket (left).  A small amount of pulp can be added to the juice if desired.  The remaining pulp can be dried then powdered or it can go into the compost. 

The seven oranges were quickly juiced on low power..  It actually takes longer to disassemble the juice extractor for clean (less than 5 minutes) than it does to extract the juice.   At this point the juice is ready to be enjoyed!

freshly extracted orange juice
When the juice is first made there is a layer of foam on top of it because the stainless steel blade basket revolves at a high speed.  The juice quickly fills the pitcher which cause the foaming similar to what would happen if you shook a jar of juice.  This foam settles down rather quickly and has no effect on the flavour of the juice. 

The seven oranges gave a yield of almost 750 ml (3 cups).  I paid $2.50 for the oranges so the freshly extracted juice is definitely more expensive.  The taste is definitely worth the extra price!  It is also fresher than juice commercially made from concentrate.  It still is not 'picked that day fresh' as oranges as well as other citrus fruits are shipped to Ontario from Florida or California.  Clementines are an exception as they are usually imported from Morocco. 

orange juice yield
I'm only making the fresh extracted juices in the amount we will use within 3 or 4 days.   store homemade juices in mason jars in the beverage chiller of the refrigerator.  It's an easy and inexpensive solution as I have so many mason jars.  It also means I have taken one more step of reducing kitchen waste by eliminating a large portion of frozen juice concentrate containers (not recyclable) and juice bottles.  I usually use a Bernardin storage lid in the refrigerator by my supply is low so a recycled snap lid and ring was substituted. 

Even though the freshly extracted orange juice is more expensive and the price will fluctuate more than juice made from concentrate, I am confident is a healthier choice for us.  I can't wait to buy some oranges from the Indian River trucks from Florida.  They come up each spring with about as fresh of oranges as you can get here.  There are two drivers so the make the trip from Florida to Ontario within a day.  These oranges are so good, they sell out their truck with a day or two!  In the meantime, I have to use store bought oranges. 

I'm also planning on buying a juice extractor for our vacation home in Florida where I can get inexpensive citrus.  During the orange season, finding free fresh oranges is very easy.  In our resort, residents not wanting oranges from their trees put them in a box free for the taking.  I just found out we can bring oranges back from Florida so will bring some the next time we drive. 


Monday, February 11, 2013

Frugal Kitchens 101 - K-Cup Coffee Shops

Frugal Kitchens 101Single-brew coffee systems have become quite popular because they are convenient and save money.  Like many, I saw the immediate benefits of the single-brew systems especially for entertaining.  We bought a Melitta One:One single brew system that use pods quite similar to round tea bags only coffee.  We were quite happy with it even though it was difficult to find the pods in town but since we were in the US on a fairly regular basis, that wasn't a concern.  Then in early 2011 the Melitta started leaking sporadically gradually getting worse.  Compounding the problem, the pods for the Melitta were getting hard to find in the US as well, or at least where we shopped.  Finally, I had enough and replaced the Melitta with a Keurig single-brew coffee system.  Unlike the propriety pods for the Melitta with no option for using your own coffee, the Keurig had the My K-cup reusable filter system which would allow us to brew coffee using any ground coffee we wanted not just their K-cups.  In the event K-cups were no longer available, the system would still work until the appliance itself died.

I immediately started the cost analysis of the K-cups.  Each K-cup makes one 5.25 oz, 7.25 oz or 9.25 oz cup of coffee, tea, hot chocolate or other speciality drinks.  Depending on where you buy them, K-cups range in price from 35¢ to 79¢ which is a savings on $1.25 for a small take-out coffee and a considerable savings on speciality or gourmet coffees at coffee shops.  There's less waste produced with a K-cup and a lower carbon footprint as you don't have to drive to the coffee shop.  It's an added bonus to grab a favourite gourmet coffee and have it brewed into a travel mug just in time for heading out the door.  By far at 8¢ per cup, the My K-Cup filter with regular ground coffee bought on sale is the cheapest but it doesn't hurt to enjoy a favourite gourmet brew either.  The problem with some of the flavoured and gourmet coffees is you might not like them which has led to K-cup coffee shops which are becoming very popular because you get to sample the flavour of choice before buying a full package.

I just discovered one close enough to stop in when in that community.  The premise is you can pick a K-cup of your choice then have it brewed while sitting and enjoying the coffee shop or you can buy 6 or 30 mix-and-match K-cups or you can buy full boxes of one flavour of K-cups.  The one I went to charges $1.50 for a brewed coffee of your choice, $5 for a mix-and-match 6 K-cups (73¢ each), $22 for 30 mix-and match (73¢ each) and $16 for single flavour K-cups (66 ¢).  Be warned that they don't carry all variety of K-cups as the one we went to did not have any Folger's K-cups but they did have Starbucks.  Of note, if it is important to you, there was one K-cup (pink blend) with proceeds going to breast cancer research and several varieties that were Fair Trade.

Now, clearly the K-cup coffee shops are not cheaper per cup of coffee than Country Style or Tim Hortons BUT they are offering you a chance to taste test before buying a full box of that K-cup and they are giving you an opportunity to buy a wide variety of K-cups to taste test at home at a slightly lower price than you would pay for a full box of K-cups, single flavour, regular price.  The one we went to had sample K-cups of three of the brands that Sam's Club sells.  Sam's Club K-cups range in price from 43¢ to 56¢ but you have to buy a 80 pk which would really be annoying if you found you didn't like the taste of the coffee.  So if you have a chance to test out the coffee first, pay the extra at a K-cup coffee shop then if you like it buy it by the package on sale or at Sam's Club.


Monday, January 28, 2013

Frugal Kitchens 101 - Grass Fed Beef

Frugal Kitchens 101
Years ago well before our kids ever started school, my husband and I always dealt with local beef farming friends for our beef who believed as we did that grass fed beef is healthier for us.  Cannings Free Range Butchers is one larger scale farm producing grass fed beef and free range animals.   We actually took it further because our pork and chicken are free range, locally raised by people we know.  They are small scale producers with only 5 to 10 cattle.  The organic farmer I get my chickens and eggs from only has about 20 chickens and a rooster.  There is a notion that grass fed, hormone free beef is more expensive but that simply is not the case.  We pay about $2.30 per lb across board for all cuts of beef, so one pound of sirloin steak will cost us $2.30 as will one pound of ground beef.  The reality is, overall we pay less for our grass fed, hormone free beef than we would pay for store bought than store bought, farm factory raised beef.  We know the cows were treated in a humane fashion during their life-time.  The bottom line is, grass fed, free range beef is the healthier choice in frugal kitchens.  Here's a few pointers:

  • ethical and humane treatment -  Animals raised for food still deserve good and humane treatment over their life-time.  That means they are not caged in areas so small they can barely move.  The farmer usually is a small time producer with a herd numbering under 20 depending on the animal but it is definitely not large scale farming.  The farmer and/or family is tied to the farm and the welfare of the animals meaning they are the primary care givers for those animals.  In most cases, they don't have hired help and if they do, it is likely a seasonal worker to help out if they are away but more likely it is a family member or neighbour that comes in to help the farmer if needed.
  • grass-fed - I honestly cannot stress enough the importance of free-range grazing aka grass-fed.  That means the livestock is not being fed grain, usually corn.  Corn, as used for livestock feed is most likely GMO and proteins from the corn can be rather problematic for the growing number of folks experiencing severe corn allergies.  Grass-fed livestock tend to have stronger immune systems so are healthier requiring less intervention via antibiotics, another growing concern.  Antibiotics given to livestock can leave trace residue in the meat that later affect humans consuming the meat.
  • no growth hormones - Farm factory raised meats are often given growth hormones to get them ready for market quicker.  That is not the case with local producers raising grass-fed beef or other livestock.  Growth hormones can cause a lot of problems in children and are now implicated in the earlier onset of puberty in young girls.
  • eco-friendly - In general, those farmers using grass-fed and free-range methods are those who are most concerned about the environment.  They tend to use green growing methods that have lower carbon footprints.  In most cases, the livestock they sell is sold locally meaning lower transportation costs from farm to table and they don't use practices that pollute the land or waterways.


Monday, December 10, 2012

Frugal Kitchens 101 - Eco-friendly Tips for Gifting Kitchenware

Frugal Kitchens 101

Last week's Frugal Kitchens 101 discussed a few ways to save on buying small kitchen appliances and equipment, specifically the best time to buy these items.  During the pre-Christmas season, the end of January and the two weeks before Mother's Day, great bargains can be found on all things kitchen related.  This is the best time to buy kitchen items for your home as well as gift giving.  Gift giving usually involves some type of wrapping because let's face it part of the gift includes the surprise of opening it.  Traditionally, the wrapping is some type of themed wrapping paper with a bow and card or tag.  Unfortunately, wrapping paper is not only expensive, it is not eco-friendly.  Wrapping paper can't be curbside recycled and while there are some novel ways to reuse wrapping paper, you are essentially paying for something that you know will end up in the landfill.  The same is true of gift cards.  A frugal kitchen seeks to reduce waste wherever possible including gift giving.  There are many ways to 'wrap' small kitchen appliances and kitchenware without resorting to wrapping paper and cards although a homemade gift tag is still a nice touch.  Here's a few tips for wrapping those kitchen items for gift giving without breaking the bank while being eco-friendly:

  • baskets - Baskets are an ideal way to give small kitchen items like mugs, tea balls, milk frother and those types of things.  Add in a jar or two of homemade jam or coffee mix, or tea bags to compliment the gift.  Tuck in a recipe to go with their coffee, tea or hot chocolate.  The basket can be reused by the receiver for a multitude of purposes.  The best places to find baskets in order of price are: resale shops, dollar stores, department stores (eg. Walmart, IKEA).  Keep in mind, you can spray paint baskets or dye wicker baskets for a personalized touch.  Larger baskets with or without cloth liners are perfect for holding some small kitchen appliances.  Picnic baskets are an ideal way to gift someone with a set of dishes, glasses and cutlery.  
  • metal/plastic containers - Metal containers are usually used for food items like fruit cake or cookies when gift giving.  The dollar stores usually have the best price on these containers.  However, there are metal storage containers with lids meant for the office that could be used to wrap kitchen utensils or gadgets, t-towels, and smaller items.  Plastic totes come in all sizes and colours, just perfect for wrapping all types of gifts in pluse the plastic tote is very useful in the pantry.  Think outside of the box.  One year we bought a stainless steel kitchen waste can then stuffed it with all kinds of kitchen essentials (eg. dish soap, t- towels, dishcloths, garbage bags, etc.) for one of our kids that was just setting up their kitchen.  A new recycle bin can be used much the same way as a basket.  
  • textiles - Textiles (eg. t-towels, tablecloths, cloth napkins) can be used to wrap a kitchen item for gift giving much the same way you would use wrapping paper.  Reusable cloth shopping bags are ideal for wrapping small kitchen appliances.  Smaller cloth bags are available for potpourie, soaps, and wine but you could use them to gift a wide range of kitchen related items.  They are available at dollar and department stores but if you are handy with a sewing machine, make your own.  Be sure to buy the material on sale.  If you crochet, there are several nice, free patterns available online for shopping and gift bags making your gift and wrapping personalized.  If you happen to know the receiver also needs a sheet set, use it to wrap small kitchen appliances or you can use sheets bought on sale to make gift bags.  


Sunday, November 25, 2012

The Simple Sandwich

The guys spent a week with us during our fall vacation in October.  This has become an annual golfing event for the guys, my husband included who would live on the golf course given his druthers.  The guys played a round of golf (18 holes) each day they were there.  There are two award winning golf courses in our resort but unlike some golf courses there is no cart service for food or drinks.  There is however, beautiful eye candy is a gorgeous setting peppered with gators and other wildlife.  Guaranteed, when golfing there you are going to see at least one gator and in fact we see on average three or more gators daily.  

the simple sandwich
The guys take their own drinks and sandwiches.  I have yet to make bread at our vacation home as I don't have a KitchenAid stand mixer and can no longer knead dough by hand.  Publix has a lovely in-store bakery so we end up buying fresh baked bread there.  We tend to buy the sourdough bread but the guys like the butter bread.  We picked up a couple of loaves of butter bread, lunch meat, sliced cheese, romaine lettuce, tomatoes, onions and alfalfa sprouts along with condiments.

Each day they made their sandwiches and drinks just after a home cooked breakfast.  It was rather impressive to see the four guys getting things ready for their round of golf.  It was an assembly line for the sandwiches!  They were simple sandwiches yet healthy and nutritious, perfect for on the golf course.  The sandwiches and drinks were carefully packed in a cooler on our golf cart with the other golf cart carrying any extras.

I'm seriously considering bringing our own sandwiches the next time we visit Disney World.  I already bring a water bottle (Britta with filter) with me when we go there and since we have an annual pass, like most we tend to arrive early and leave late.  I don't mind spending at Disney World but seriously, bottles of water do tend to add up and they are always cold, something I really don't like.  I also don't like that the empty bottles add to waste so bringing my own re-usable water bottle is an eco-friendly solution.  Since we are there all day, a sandwich for lunch is nice because we know we already have reservations for dinner so I really don't mind saving a bit on lunch without having to wait in line or finding somewhere to grab a bit of lunch.

It's hot in Florida or at least it is when we tend to be there so sandwiches are always the perfect lunch meal.  We seldom buy breakfast or lunch when we are at our vacation home because both are always less expensive made at home.  That is always something to keep in mind when on vacation.  If you reduce the cost of breakfast and lunch by making your own, you can splurge on dinner and that's where you really want to do a bit of splurging when on vacation!


Monday, October 15, 2012

Frugal Kitchens 101 - Food Storage Containers

Frugal Kitchens 101
Every kitchen needs food storage containers.  At one time the choice for lunch bags was brown paper bags with sandwiches wrapped in wax paper or tin foil.  The ultimate in food storage was Tuperware and yet before the plastic craze it was glass bowls with glass lids, later followed by glass bowls with plastic lids.  There remains the debate over which is better for food storage between glass or plastic for food storage but one thing that is certain, disposable wraps and zipper style food bags are no longer an in vogue in a frugal kitchen.  While wax paper, tin foil and parchment paper all have a place in any kitchen, the frugal choice is to always use a re-usable container whenever possible for food storage.

The choice between plastic and glass quite often is one of convenience combined with the safety aspect of plastic especially when younger children are helping in the kitchen.  One alternative to plastic is metal although the choice of containers is a bit more limited.  My personal preference is glass, both specific food storage designed (eg. Anchor Hocking storage bowls), recycled jars and mason jars.  However, I do use food grade plastic pails (free from the doughnut shop) with lids in the pantry, non-food grade plastic in the pantry for boxed foods that will not come into contact with plastic, and recycled plastic food tubs (eg. cottage cheese, sour cream).  I also have a very limited amount of Rubbermaid plastic food storage containers.   I also prefer not to use glass in my freezers unless it fits in the door shelves.  This is a safety issue for me.

Here's a few tips on food storage containers, the pros and cons:

  • plastic 
    • pros - In general plastic food storage containers range in price from free (recycled from store bought) to the rather expensive Tuperware.  There's even a lot of cute plastic containers available for storing small amounts of food (eg. 2 oz).  The key thing with plastic storage containers is the seal.  If the seal fails you can have a rather nasty mess in your freezer or lunch bag.  Ziploc has rather nice plastic containers with screw on lids and Bernardin has plastic jam jars with nice seals.  There are also the old fashioned pastel freezer containers still available.  Unlike some food storage containers (eg. Gladware) the plastic does not become brittle when froze so you don't have to worry about a container getting bumped in the freezer then cracking and they won't rip like the freezer bags sometimes do.
    • cons - Plastic food containers should not be used in the microwave oven as all plastics even food safe ones have the potential to leach chemicals into the food when heated.  Heating can also cause pitting of some plastics.  Plastic food containers may discolour when exposed to tomato based foods.  Plastics can allow food odours to escape which can attract rodents and insects.  A hungry rodent can chew through plastic and ineffective seals can allow humidity and insects to contaminate foods.
  • metal 
    • pros - Metal food storage containers are most commonly found as cookie tins, bread boxes, canisters and lunch boxes but there are some sandwich style metal containers available.  Metal containers have the advantage that while they may dent they won't break.  They are quite durable.  They are pretty much rodent proof and for the most part are resistant to insects and humidity depending on the seal.
    • cons - Metal containers cannot be used in the microwave oven.  Metal containers used for food storage but if the coating becomes scratched, rusting can occur.  This happens even with the metal mason jar lids.  For the most part, finding metal containers can be a bit difficult especially if you want something out of the norm.  
  • glass
    • pros - Glass food storage containers don't react with stored foods and they can be rather inexpensive ranging from free recycled jars to more expensive specialty storage jars.  Canadian Tire always puts Anchor Hocking sets (freezer, refrigerator, oven) on sale for about $6 for a nesting set of 4.  The nice thing is you can bake in them then just cool any leftovers, cover with the included plastic lid and pop into the refrigerator without dirtying another bowl.  There really is no need for labels for short term refrigerator storage as you can easily see the contents.  Most glass food storage containers can be used in the microwave oven but check for the heat proof symbol before heating in them.  Glass food storage containers are rodent proof.  Vacuum sealing them will protect the contents from humidity and insects.  Properly looked after glass food storage containers will give years of service making them a very frugal choice.
    • cons - The biggest con with glass food storage containers is breakage which is why I don't like using them in the freezers.  The next biggest con is the weight.  My husband takes his lunch to the office in glass food storage containers but he doesn't have to cart around the container all day or even have far to go.  Breakage and weight make glass food storage containers unsuitable for children in elementary school, taking to the beach (safety issue) and not a convenient for camping or picnics.


Monday, September 24, 2012

Frugal Kitchens 101 - The $10 Challenge

Frugal Kitchens 101One sure fire way to save on your food dollar is to eat local, in season produce.  The Ontario Table has a $10 Challenge: a year of eating local, an incentive by Lynn Ogryzlo, author of The Ontario Table Cookbook.  I highly recommend this wonderful cookbook!  The $10 Challenge ezine is available on her website and you can download the $10 Challenge magazine in pdf format for reading off line.   Her premise is that if every household in Ontario spent $10 a week on local food, we would have an additional $2.4 billion in our local economy at the end of the year.  Keeping our money circulating in Ontario raised those dollars to $3.6 billion and creates 10,000 new jobs.  Now this is a win/win for everyone in Ontario.

This challenge helps the average household save money by buying local.  Why buy imported apples when Ontario apples are available?  They are higher in nutrition and fresher because they have not had to travel the long distances of imported.  Buying local supports our local growers and producers, helping them stay in business and providing a good life for their families.  This in turn results in a stronger community.  Buying local means you get to meet the local growers and producers providing a stronger appreciation from where your food comes from.  It makes us less dependent on imported foods as well.

We have taken the $10 Challenge, have you?


Monday, September 17, 2012

Frugal Kitchens 101 - 25 Ways to Eat Eco-friendly

Frugal Kitchens 101
One of the best places in the home to become eco-friendly is in the kitchen.  The benefit of becoming eco-friendly not only reduces your carbon footprint and reduces your impact on the environment, it can end up saving a substantial amount of money.  This involves becoming a pro-active, informed consumer.  With each of the following points you incorporate into your lifestyle, you will eating healthier while saving money.  You don't need to incorporate all of them at the same time.  Gradually work these tips into your lifestyle as the opportunity arises.  The more you use, the greater the savings.

  1. use reusable shopping bags
  2. choose foods with minimal packaging
  3. choose non-disposable water bottles and hot beverage mugs
  4. avoid anything disposable (eg. paper plates, paper towels, disposable cutlery, food wraps)
  5. shop at eco-friendly places (eg. roadside stands, health food stores, farmer's markets, orchards)
  6. buy local and/or local organic produce
  7. eat at least one meatless meal weekly
  8. eat produce raw
  9. eat in season produce
  10. preserve your produce (eg. home canning, freezing, drying)
  11. grow you own
  12. join a local food co-op
  13. buy locally grown organic meat (eg. no anti-biotics, no growth hormones, free range, grass fed)
  14. check seafood labels for sustainable aquaculture practices (eg. Marine Stewardship Council certification)
  15. avoid CAFO (concentrated animal feeding operation) meats
  16. check seafood labels for source of origin
  17. avoid endangered fish or those posing high contamination risks (eg. Chilean seabass, Atlantic cod, imported king crab, orange roughy, farmed salmon, canned and Bluefin tuna)
  18. avoid farmed fish
  19. choose organic, hormone-free, local dairy 
  20. avoid commercially prepared convenience foods (anything in a box, jar, bottle or can)
  21. choose raw, non-pasteurized milk if possible
  22. compost food scraps except fat, dairy and bones
  23. eat you leftovers
  24. double your recipes - one to eat now, one to store for a later meal
  25. cook one or more local meals per week


Tuesday, July 17, 2012

Sweet Cherry Jam Made With Certo

Things have been a little hectic here as we move into the busier canning season.  Fresh, local produce is trickling in.  After two years of reduced canning between our house being on the market and moving here last September combined with spending more time at our vacation home, I am in high gear home canning to replenish our pantry.  A couple of weeks ago, I made a batch of sweet cherry jam.   This is my husband's favourite jam and at his request I still make it with liquid Certo (pectin).  It's the only jam I make using Certo these days as I like the low sugar, gourmet results using Pomona's pectin. 

sweet cherry jam made with Certo
I used to can sweet cherry jam and most jams in 500 ml (pint) jars.  We went through it quick enough when the kids were at home and we weren't out of the country for extended periods of time like we are now.  Now I can jams and jellies mainly in the 250 ml (half-pint) jars.  Another thing I've changed and you will see more of it on this year's canning posts, is I am switching to using more of the reusable canning lids like the glass inserts (left) or Tattler lids (not pictured) and less of the metal single use lids (right).

The reusable canning lids are an eco-friendly alternative to the single use metal snap lids.  The glass inserts are vintage so are harder to come by.  I only have 5 dozen of them.  They are no longer in production so I won't be using them on any home canned foods that leave the house.  The Tattler lids are readily available and still in production.  I have 6 dozen of them with plans to buy more shortly, at least before tomatoes start.  They too are being used for the most part of home canned foods that won't be given away although a few will make it to our kids as I know they will return them.  As much as I would love to switch entirely to reusable lids it is not feasible for jars that are gifted.  Some are good at returning jars but most have not seen the reusable lids that must be treated a bit gentler than the metal lids.  It is really important to not damage the rubber gasket when remove reusable lids.  The metal single use snap lids are still in production so easy to find.  The cheapest price here is now 12.5¢ per lid plus HST, up a full 4¢ from 18 months ago! 


Tuesday, June 19, 2012

Using Reusable Canning Lids for Home Canning Strawberry Jam

I have talked so much on this blog about canning.  The reason being home canning is a huge part of our lives.  Home canning allows us to keep our food costs low, gives us unique products you could not buy in stores and the products are healthier, not laden with extra preservatives, or artificial colours and flavours.  It is our way of taking responsibility for our own safe food supply as well as preserving the bounty of the harvest.  It is also a way for us to share our blessings with family and friends.

Everyone who home cans is familiar with the single use metal snap lids.  These are the only lids currently approved by the USDA but only because those companies paid big bucks for the endorsement.  A metal snap lid is sealed if the center of the lid is indented so it gives a nice visual along with a ping to let you know the lid is sealed.  There are three problems with the metal snap lids.  First, they can result in false seals because the natural tendency is to touch the lid to see if it is sealed which may push it down creating a false seal.  The second problem is these lids really are disposable meaning they are not eco-friendly.  In some areas, they can be put into the recycle bin but in other communities they end up in the landfill.  The third problem is the metal lids are coated with a plastic containing bis-phenolA (BPA) so they present a potential health risk.  High acid foods (eg. jams, jellies, pickles, fruits) processed in a boiling water bath canner (BWB) are not likely to come into contact with the coating so BPA leaching into the food is low risk.  Those low acid foods (eg. vegetables, meats, soups, dried beans, and some tomato products) will come into contact with the coating during processing resulting in trace amounts of BPA in the food, although it is much lower in concentration than any commercially canned foods.

strawberry jam sealed with Tattler and glass inserts just out of canner
I have been experimenting with re-usable canning lids to circumvent the BPA issue while becoming more eco-friendly.  While I still use the metal snap lids for any product given away, I am using Tattler re-usable plastic BPA free lids and glass inserts.  When you put a metal lid on the jar, you tighten finger tight then process.  When you put a Tattler on, originally the instructions were to tighten finger tight then turn back a quarter inch but now it is to tighten finger tight.  When you put a glass insert on, you tighten fully then turn back a quarter inch.  Immediately out of the canner, the rings of both must be tightened fully.

Here is strawberry jam fresh from the canner.  Note the difference in the bands?  Now that can be a problem with the glass inserts.  Boiling water rests between the lid and the band so you can burn yourself trying to tighten the band.  Make sure you use a thick towel.

strawberry jam sealed with Tattler and glass inserts ready for labeling
Pictured is the jam jars cleaned with rings removed ready for storage.  I really like my Tattler lids, seriously I do.  However, I love my glass inserts!  I have 14 jars with glass inserts in storage without one seal failure and the jars just look gorgeous!  In comparison, it depends on what I am canning but I have a seal failure rate of about .1% with Tattlers and about the same with metal lids, maybe a bit more if I hit a bad box of lids.  False seals are not an issue with the Tattlers or glass inserts.  They are either sealed or they aren't.  If the lid is not sealed it lifts off with no resistance as soon as you remove the band.

Be warned, unlike the Tattler and metal lids, the glass lids will break.  They are difficult to find especially the rubber gasket that is no longer in production.  They are considerably more expensive as they are vintage lids.  On average I have paid $1.50 per lid with gasket in comparison to Tattler lids at 82¢ and Bernardin metal snap lids 14.5¢ each.  Both Tattler and Bernardin lids are still in production but that might not be the case in the future.  For that reason, I continue to increase my stock of all three types of lids. 

This batch of strawberry jam was made using Redpath QUICKSET™ for jam.  This is not a product I have used before and normally would not buy.  The 1 kg package contains sugar, citric acid and pectin mixed together.    The current price is $2.99 but a local grocery store recently had it on sale for $1 as part of their dollar sale. At the regular price, it is more expensive than Pomona's pectin and Certo crystals but less expensive than Certo liquid per batch of jam.  It may work out slightly cheaper per batch considering the sugar is included in the price whereas sugar is in addition to the cost of the other pectin.  Current sugar prices range from 10¢ to 17¢ per cup depending on where you buy it.  Using the Redpath QUICKSET™ is no easier to use than using Certo or Pomona's.  It removes measuring the sugar but increases the boil time by 3 minutes.  The set is comparable to other pectin. 

Method:
Wash and hull the strawberries.  Crush the fruit and measure out 3½ c of crushed fruit into large saucepan.  Add 2 tbsp lemon juice and the entire bag of Redpath QUICKSET™.  Mix well.  Bring to a full rolling boil [Add ½ tsp butter to prevent excess foaming. (optional)] and boil for 4 minutes stirring constantly.  Remove from heat.  Continue to stir for 5 minutes to prevent floating fruit.  Ladle into hot jars.  Wipe the rim and place lids on the jar.  Tighten band according to the type of lid being used.  Seal -> This means to process in a BWB canner for 10 minutes.  Remove from canner.  Let sit undisturbed for 24 hours.  Check seal.  Label and store.


Saturday, April 21, 2012

Using Tattler Reusable Canning Lids

About a year and a half ago, I wrote a review about Tattler reusable canning lids.  I do a lot of home canning and one concern has always been that the two piece metal snap lids were single use.  They can be reused for vacuum sealing and dry storage but not for canning.  On an economic level each lid cost at least 10¢ without any payback.  Now doing low volume canning, that cost wouldn't matter much but I do larger volume canning of 1,200 to 1,400 jars per year meaning my lids were costing me $120 to $140 per year.  On an environmental level, the lids either end up at a landfill or now in the recycle bin.  Both of these cost money for collection and have a high carbon footprint.  When I first discovered Tattler reusable canning lids, I was beyond excited!  Finally, here was a product that would ultimately save me money while being eco-friendly.

The USDA is the leading authority on home canning.  The only approved lid for home canning is the metal two piece snap lid BUT that is because the manufacturers of the metal two piece snap lids paid big bucks for the necessary testing.  There are reusable alternatives including glass inserts and Tattler plastic lids.  Steig has been making the Tattler reusable canning lids since 1976 BUT has not paid big bucks for USDA approval.  Their product is amazing if you ask me.  The lids can be used indefinitely but the gaskets will need to be replaced if damaged or distorted.  With proper care you should get 15 to 20 uses from the gaskets making Tattlers very cost effective for canning.

Tattler lids are used slightly different from the metal snap lids.  The original instructions said to tighten fully then turn back a quarter inch but that has been modified to tight finger tip tight.  Here is a video from Steig demonstrating how to use their lids:


Saturday, April 14, 2012

Homemade Fettuccine with a Blush Fire Roasted Tomato Basil Seafood Sauce

Yesterday I wrote about my first adventure using my new KitchenAid® pasta sheet roller and fettuccine cutter attachments.  Both attachments were beyond incredibly easy to use.  I was at the ease of use and the results!  The next thing on my mind was the taste.  Trust me, there is no need to go through a bit of extra work only to end up with a product that doesn't taste better than store bought.

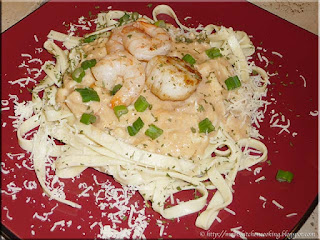
homemade fettuccine with seafood sauce
Earlier this year we enjoyed a delicious meal at a local restaurant that featured a blush seafood sauce topping linguine.  I set out to clone that recipe then I tweaked the seafood sauce slightly to use my gourmet home canned fire roasted tomato basil sauce, crab meat, cod and scallops then up scaled the garnish to use pan seared shrimp and scallop.  The end result is a mouth watering sauce perfect for topping homemade fettuccine.  It is light yet filling,  packed full of rich flavour while being lower in calories than a traditional spaghetti meat sauce.

The fettuccine took about 7 minutes to cook to al dente.  While it looked like cooked dried or store bought fresh in terms of colour and texture, the proof was in the tasting.  The taste of this  fettuccine was incredible!  It had a freshness that dried pasta can't achieve and none of the chemical flavour of store bought fresh pasta.  An added bonus as with many homemade foods, there was no pesky packaging to have to deal with.  In fact, this meal resulted in very little going into the garbage.  There was no packaging and only the shrimp and crab shells had to be discarded although the shrimp shells might have been ok in the compost as there were only six of them.  This is the time of year I keep and grind all egg shells possible for the garden.  They add calcium while controlling slugs and snails.

It is important to realize that home cooking has a positive effect on the environment.  A vast portion of waste from home cooking can go into the compost, resulting in very little going into the landfill.  It really is a win win by home cooking.  You get good, healthy, less expensive food while lessening your carbon footprint.  Nothing wrong with that in my book and quite frankly it is one more reason to cook from scratch at home!


Saturday, November 26, 2011

The Perfect Grilled Cheese Sandwich

My Mom (not biological) was 59 years old when I came to live with her.  She was a fabulous, home style Canadian cook with wonderful dishes all stored in her head.  Then she was diagnosed with diabetes so the cooking slowed to a crawl and Alzheimer's took away all her amazing recipes.  She never had kids of her own and never learned to drive.  Three times a year we took a bus to the nearest city where we always had lunch at the lunch counter at the Metropolitan.  I always ordered the grilled cheese sandwich with a chocolate milkshake with the very few exceptions I ordered my other favourite sandwich, the BLT. 

grilled cheese sandwich cooking in Paderno EcoPan
As a newlywed I was determined to make the perfect grilled cheese sandwich at home.  The thing is grilled cheese sandwiches aren't actually grilled, they are pan fried or cooked on a griddle.  Some use a panini press or electric sandwich maker but the very best, home style grilled cheese sandwiches are made in the fry pan.  It is the only way to get that delicious golden crust! 

Don't even think of using processed cheese slices to make grilled cheese sandwiches!  Always use good quality cheddar or cheese of your choice.  We prefer cheddar for plain grilled cheese sandwiches.  The sandwiches are assembled on a cutting board.  We light butter one side of the bread then put the butter side down, add slices of cheese from the block of cheese, then place another slice of bread on top and lightly butter the exposed side.  That's it.  We use a medium heat then cook until golden brown on both sides.  The Paderno EcoPan outperformed my restaurant grade Teflon non-stick fry pans.  I was extremely pleased!

the perfect grilled cheese sandwich
Just look at that golden, mouthwatering grilled cheese sandwich.  Isn't it gorgeous?  Served with home canned tomato soup, cuddled up on the couch watching Coronation Street together - well that is just the perfect end of a day on a cold autumn evening. 

Home cooking need not be expensive, time consuming or fancy.  It needs to be good, period.  It's those meals that feed the soul embellishing our memories forever.  I'm very blessed to have such wonderful memories of the great food I've shared with my Mom, my family and my extended family and friends.  That's what home cooking is all about!  I dearly hope I have passed that legacy on to our children and now grandchildren.  'Tis a true treasure, that it is!


Thursday, May 26, 2011

Kitchen Quick Tips - Coffee and Tea Stains

kitchen quick tips

Both coffee and tea leave unsightly stains in mugs and cups, tea pots and on reusable coffee machine filters.  Get them sparkly clean by rubbing with a damp cloth coated with baking soda then rinse with hot water.


Friday, February 04, 2011

A Stock Making Week

We arrived home from our vacation home to realize my stock supply with the exception of tomato stock that I guard like gold was at rock bottom.  I had to scrounge through the freezer to find enough chicken stock for the comfort meal I wanted to make!  There are two reasons why my stock supply was low.  First our house has been on the market since March of 2010 meaning I've been reducing canning where I can to allow the house to be shown more often.  Second, I took a total of a case down to our vacation home over the last two trips.  I'm used to cooking with my home canned stocks so wanted a taste of home there as well.

beef and chicken stocks
I had no choice but to get busy making stocks.  Stock making is always a two day event here.  I prefer making stocks in the dead cold of winter because the stock can sit in the sunporch over night for defatting rather than take up refrigerator space.  First on the agenda was beef stock (far left) with a yield of 12 - 500 ml jars.  Next on the agenda was chicken stock (right) with a yield of 14 - 400 ml jars.  Within 4 days total but nowhere near that time length in work 26 - 500 ml jars were stored safely in my pantry.

That very weekend we were having our belated Christmas celebrations complete with a 22 lb turkey.  I knew I would be canning turkey stock the start of the week.  There is absolutely no reason to let a perfectly good turkey carcass go to waste!

turkey stock
My turkey stock is never nice and clear even if I strain it.  One reason for this is the turkey carcass has bits and pieces of meat and stuffing which affects the clarity of the stock.  I always make stuffing (in the bird) rather than dressing (outside the bird).  Another reason is the turkey carcass has a higher percentage of collagen that causes gelatin to be released so the stock gels somewhat that gives a cloudy appearance when cooled.  My yield for the turkey stock was 16 - 500 ml jars.

As far as cost effectiveness goes, homemade stock is always a frugal choice.  I ended up with 42 - 500 ml jars that if bought in the grocery store at $1.49 each would have cost me $62.48.  My costs for 3 batches cooking for 3 hours each (total time 9 hours),  processing time at 20 minutes each (total time of 1 hour),  24 metal snap 2 - piece lids (18 were Tattler reusable lids) and miscellaneous supporting ingredients (onions, carrots, celery, peppercorns, bay leaves, and etc) came out to a total of $3.40 for a grand savings of $59.08.  Now the beauty of making homemade stocks aside of the huge cost saving is you can freeze them if you don't want to can them.  I can mine because it is then ready to use so more of a convenience product.  I use a lot of stock in everything from soups and stews to bread and muffins!

If you notice on each batch of stock I have used the Tattler reusable lids for some of the jars.  At the moment I have 2 dozen vintage glass inserts,  6 dozen Tattlers and about 70 dozen metal snap lids.  I am reusing my Tattler lids as soon as I empty enough jars to get another canner load.  I plan to buy several more dozen Tattler lids this spring in preparation for the busy canning season.  Eliminating the single use metal lids will reduce my canning costs by 8¢ to 12¢ per jar.  At an average of 1,2,00 to 1,400 jars per year that alone will be a nice savings!


Friday, September 17, 2010

A Busy Tomato Canning Session

My husband brought home the fourth hamper of tomatoes last Thursday evening.  I set about canning them.  This canning session spanned over 2 and a half days because this year I started the heaviest of the canning season tired to begin with.  Rather than ruin a batch of food being put up I've been going at a bit of a slower pace.  There was a bit more prep work in peeling the tomatoes and chopping all the great vegetables that go into my signature salsa for this session as well.  Clicking any of the links will get you to the recipe for the product mentioned.  While I don't give out my recipe for my signature salsa I have included an approved salsa recipe for canning that I have also tried.

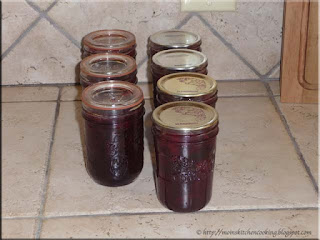
home canned tomato products
Starting at the right there is 1 - 500 ml jar of pizza sauce.  There were 2 but my husband declared it a good batch so made quick pizzas for a snack.  The next three rows (17 - 250 ml jars) are also pizza sauce.  Following that is 14 - 250 ml and 1 - 125 ml jars of seafood cocktail sauce.  This is one of the nicest tasting seafood cocktail sauces, so much nicer than store bought and considerably less expensive.  My signature salsa is in the 11 - 500 ml jars just to the left of the centre of the picture.  Three of the salsa jars have Tattler reusable lids on them.   The next 4 - 500 ml jars are tomato stock, one of my favourite new products from last year's canning.  To the far right is 8 L of raw packed whole tomatoes.  This is the second year I've raw packed whole tomatoes and I'm still not impressed with the aesthetics of the jars!  The whole tomatoes have a deep tomato flavour and good texture but the jars lose a lot of liquid so they just don't look nice.  The next batch of whole tomatoes will be hot packed in water and will still be pressure canned.

The following recipe is one that has been tested and is approved for home canning.  Do not change the amounts of the hot peppers in this recipe as it is important to keep the low acid to high acid vegetable ratio the same.  You can tweak the heat by using a hotter pepper, adding the hot pepper sauce or adding 1 tsp of hot pepper flakes.  You can also substitute white vinegar for the cider vinegar but be sure whatever vinegar you are using is 5% acetic acid.  Be sure to wear surgical or rubber gloves when preparing the hot peppers to prevent your hands from being burned.

Zesty Salsa
source:  Ball Blue Book, 2001. Pp. 81

10 c prepared tomatoes
5 c prepared green peppers
5 c onions, chopped
2½ c prepared hot peppers
1¼ c apple cider vinegar
3 cloves garlic, minced
2 tbsp cilantro, minced
3 tsp salt
1 tsp hot pepper sauce (optional)

Wash, peel, seed and core tomatoes.  Chop and seed all of the peppers measuring out the amount needed.  Prepare onions, garlic and cilantro.  Combine the ingredients in large sauce pot.  Add hot pepper sauce if desired.  Bring the mixture to a low boil then simmer for 10 minutes.  Ladle the sauce into hot jars leaving ¼- inch headspace.  Wipe the rim and adjust two piece metal lids (or us Tattler lids).  Process 15 minutes in boiling water bath canner (BWB).  At altitudes over 1,000 feet above sea level refer to altitude adustment chart on canning information page.  Remove from canner and allow to cool in a draft free location.  Remove the rings and test for seal.  Wash jars and rings.  Dried rings can be loos


Sunday, September 05, 2010

Tattler Reusable Canning Lids Review

Tattler reusable canning lids

I announced that I was experimenting with Tattler reusable canning lids the first week of August.  I have now had a month to test out these lids on various home canned products.  I tested 3 dozen of these lids under various conditions looking at several variables that were important to me.  Here is my full review of these lids.  [This is not a paid review and I have no affiliation with S & S Innovations, Corp.  The opinions expressed here about these canning lids are my opinions. ]

Abstract:
  • product - Tattler reusable canning lids are a BPA-free heavy plastic reusable canning lid made in the USA.  The lid requires a separate rubber ring that is included with the lids.  Additional rubber rings can be purchased to replace damaged rubber rings. 
  • why? - Currently the only approved lids for canning are the two piece metal, single-use snap lids.  The three problems with these metal lids are:  1) single-use which adds to landfills; 2) availability which isn't guaranteed; and 3) BPA content in the plastic coating on the metal lids.
  • test conditions - I tested the Tattler lids under normal home canning conditions using different sizes of jars, boiling water bath (BWB) and pressure canner (PC) processing.  I also tested the lids for ease of use, seal failures, staining, reusing, vacuum sealing, cost, storage and miscellaneous problems.
Results:
  • cost - The metal, single-use snap lids cost me 10¢ per lid at their lowest price.  The Tattler's cost me an 84¢ per lid investment meaning I need to reuse each lid 8 times before realizing a payback but after that they will cost nothing to use saving me about $100 per year.
  • ease of use -  The Tattler reusable canning lids have a slightly different preparation method.  Once the lid is placed on the jar it and the ring tightened it is extremely important to turn back the ring by ¼- inch for proper venting during the canning process.  I used the 'A' in Tattler to gauge this by tightening the ring then turning back the size of the 'A'.  I really did not have a problem adjusting the method for using the Tattler lids.
  • processing method - The Tattler lids performed equally well in BWB and PC conditions.
  • jar sizes - The Tattler lids performed well on all jar sizes I tested on: 125 ml, 250 ml, 500 ml and 1 L.
  • seal failures - I experienced 3 seal failures during the testing period.  All were directly due to learning the proper method and there is a learning curve.  
  • reusing -  I tested using the lids canning water both in BWB and PC.  I then reused the lids to can other foods and I reused the seal failure lids.  Lids that were reused performed as well as new lids.
  • staining - I used the lids on blueberry and several tomato products.  I experienced no lid staining. 
  • storage - Anyone doing larger scale home canning can relate to the storage issues for both filled jars as well as new lids and rings.  I remove the rings, wash and dry rings and jars then replace the rings loosely for storage as per Bernardin's instructions.  Storing large numbers of reusable lids could be a problem especially with larger scale canning.  I plan to store the lids and rings not in use in a large plastic tote.  Not storing the jars with rings on has already created a back-up of rings but in some ways that is good because I can cull out some of the older, well used rings.  However, not storing the jars with rings prevents convenient stacking of filled jars using the ring to hold the next layer steady.  My solution is line the filled jars single layer on shelving and to repack any overflow into the original canning jar boxes to stack. 
  • vacuum sealing - The Tattler lids outperform the metal snap lids for vacuum sealing!
Miscellaneous Problems:
  • the ping - The most notable difference with Tattler lids is there is no audible ping to indicate the lid has sealed!  I'm going to miss that.  If a Tattler lid doesn't seal it simple lifts off the lid so it is quite noticeable eliminating any guess work as to whether the lid has sealed.
  • burr - There is a slight burr on the lid that is annoying.  While this does not affect performance it can cause problems like a slight cut on your fingers.  I solved this problem by using a nail file of the burr.  It's not a huge problem but would be nice if I didn't have to deal with it.
  • labeling - I label my jars using a Sharpie permanent marker on the lid.  It is not possible to use this technique on a Tattler lid.  I tested this on one lid and after 30 minutes of set time even using a Mr. Clean Magic Eraser there was still a ghost mark on the lid.   I don't like using labels on my jars so my solution on Tattler jars is to write the product name and date directly on the jar.  A Sharpie works well but I will be switching to an old fashioned grease pencil to eliminate off gassing from the Sharpie markers.
  • gifting - Cost is an issue when it comes to home canned foods that will be gifted.   Our kids and most of our friends are very, very good at returning my jars for refills so I would not hesitate to send a jar or two of food home with them with a Tattler lid because I know it would get back to me.  However, some of my home canned foods go out to friends that don't know the rule is to return the jar for a refill.  The cost of Tattlers is prohibitive for single use so I will be using the single use metal lid which means my work around is to can foods for home use with Tattlers and those designated for gift giving with the metal snap lids.  
  • shipping -  I do think the shipping is a little high especially since sending to a US address address via Priority Post would cost about $4 while they charged $9.33 so that is just a tad excessive in my book.  I'm sorry but this has to be one of my biggest complaints with the lids! 
Conclusion:

My inital investment on the Tattler lids was $30.28 for 3 dozen lids.  I tested the Tattler lids on several home canned products.   I am extremely impressed with the performance of the Tattler lids!  I actually found myself preferring the Tattler lids over the metal lids.  In my opinion once you get over the learning curve for using these lids they are far superior to the metal lids.

As someone who cans well over 1.000 jars of food annually I am elated to be able to secure a reliable source of reusable canning lids while reducing what is going to the recyclers or landfill.  In my opinion this makes Tattler lids the eco-friendly addition to home canning.  In general I found these lids seal better than the metal lids.  With a metal lid there can be a false seal where it looks like the jar is sealed but later it becomes unsealed.  With the Tattler lids if a lid is not sealed it is immediately apparent so it removes the whole issue of false seals.  Any of the problems I encountered were easily solved other than the shipping costs.

The Tattler lids are one product I will recommend based on my initial testing.  I was impressed enough with these lids that I ordered a second time.  I did not order the larger 500 lid amount because I am really curious as to how these lids will perform under repeated test conditions.  Also there is very little price incentive for ordering the larger amount.  You do get a 5% cost reduction on the lids at 500 lids but there is an larger inital investment however the costs work out to 60¢ per lid giving a lower pay back period.  Once I do the long term testing on reusability for these lids I will place an order for the 500 lid count if the results are favourable.


Saturday, August 14, 2010

Drying Green Beans

Earlier this week I posted about buying 20 lb of organic green beans from the organic farm.  I ended up with 7 L jars and 24 - 500 ml jars of home canned green beans.  I am testing the Tattler reusable canning lids so 11 of the jars canned were Tattler lids while the rest were the regular, single-use, metal Bernardin canning lids.  Of those jars one of the Tattler lids failed but I think I figured out the cause.

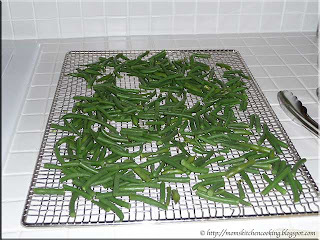
green beans on the tray
About 19 lbs of the green beans were canned.  I reserved about 1½ lb of the green beans for drying.  Green beans are best dried when young and tender.  As with all produce choose organically grown if at all possible.

Method:  Wash and clean the ends from the beans.  Cut into 1" pieces.  Steam blaanch for 4 to 6 minutes.  Arrange on a drying tray in a single layer.  Place the drying tray over a sided baking sheet to catch any pieces that fall through the drying rack as they dry.  Dry at 125ºF until beans are brittle.  The dried beans can be used ins soups, stews and casseroles.

vacuum sealed dried green beans
The green beans took overnight to dry.  Once dried I packaged into a 500 ml mason jar then vacuum sealed.  Vacuum sealing is one of the best ways to ensure dried foods are protected from humidity, rodents and insects.  This provided another good opportunity to test one of the Tattler reusable lids.  According to the package these lids can be used for vacuum sealing as well.  The Tattler lid performed without a hitch when vacuum sealed.  I removed it then replaced with a used metal lid because I have a lot of used lids but only a few Tattler lids to work with.

It will be quite some time before I will need to use Tattler lids for vacuum sealing but it is nice to know that they do seal as promised.  I use canning lids that were previously used for canning for vacuum sealing.  Once they get to a point I can no longer get a seal the lids go into the recycle bin.  It will be quite some time before I run out of used metal canning lids to use for vacuum sealing even with gradually switching to the Tattler reusable canning lids providing I am happy with the results over the testing period.


Monday, August 09, 2010

Frugal Kitchens 101 - Frugal Packaging

Frugal Kitchens 101

Packaging is a necessary evil of getting foods home from the grocery store.  Have you ever noticed that certain foods are available in a variety of packaging?  Some forms of packaging are more eco-friendly than others and the great news is the eco-friendly packaging tends to be cheaper!  This week's Frugal Kitchens 101 discusses frugal packaging in the grocery store.

  • juices - Quite often juices can be found in cans, glass bottles, plastic bottles, tetra packs and cardboard containers in the freezer section.  By far the cheapest and most eco-friendly choice is frozen juice.  You aren't paying for extra water and you don't have  jars or cans to recycle.  In this case you are reducing packaging coming into your home.  At the same time frozen juices tend to be considerably cheaper than any other form of commercial juice.  One of the most eco-unfriendly juice packaging is the tetra pack so avoid that at all costs.
  • produce - Produce can be found in bulk, in plastic or mesh bags, plastic/pressed paper containers, boxes or in plastic clam shell containers.  By far produce in the bulk section is cheaper but some fragile fruits mainly berries only come in plastic/pressed paper containers or clam shell container.  I really dislike clam shell containers because they can't go in the recycle bin and they don't stand up to reusing.  These are the containers I avoid like the plague if at all possible.
  • milk - In Canada we can get milk in plastic bags, cartons and in some areas plastic jugs.  All of this packaging is reusable and there are a wide range of wonderful ways of recycling these materials.  Milk in plastic bags tends to be slightly cheaper because shipping costs are lower due the weight.
  • eggs - Eggs in the grocery store come in clam shell style packaging ranging from pressed paper, to clear plastic lids to styrofoam.  Eggs packaged in the old fashioned pressed paper cartons tend to be the cheapest.  The pressed paper can be recycled into containers for seed starting.  The eggs packaged in clear plastic are usually most expensive and those in styrofoam somewhere in between.  
  • fish - Fish tends to come in cans, vacuum packed plastic bags, foil pouches, fresh or in frozen boxes.  Fish is vacuum packed plastic bags is usually cheaper.  Fish in cans introduces the Bisphenol-A (BPA) an suspected carcinogen issue so is best avoided.  Foil pouches are not recycleable in all areas.  Boxed frozen fish can suffer from freezer burn so the frugal choice is vacuum seal fish.
  • dried foods including cookies - A lot of dried foods come packaged in bags inside boxes that may include plastic trays.  More and more grocery stores are offering these very same items in bulk where you purchase the quantity you want not what pre-packaged says to buy.  Buying in bulk saves money because packaging is not included so the price per unit is cheaper and you buy what you want.  So if you want a certain product that only comes in a 1 pound package but you only want 8 oz then you only buy and pay for the 8 oz.  
  • institutional sized - Some foods like pickles, ketchup, mustard, beans and so much more comes in institutionalized sized containers ranging from cartons to glass, plastic and metal yet smaller sizes may only be available packaged in one type of container.  In general institutional sized containers are less expensive per unit than smaller sized containers.  The institutional sized containers with the exception of cartons are great recycled for dry storage in your pantry.  In general institutional sizes plastic are less expensive than those in glass
  • lunch meats - Lunch meats are usually packaged in plastic pouches or wrapped in butcher's wrap if purchased in the deli section of the grocery store.  Recently lunch meats a coming packaged in reusable plastic containers.  In this case the plastic container lunch meat is a bit more frugal choice because you have the container to reuse however this really is a case where you need to do unit pricing.