My photo
Ontario, Canada
I am a wife, mother and grandma who enjoys the many aspects of homemaking. A variety of interests and hobbies combined with travel keep me active. They reflect the importance of family, friends, home and good food.
Cook ingredients that you are used to cooking by other techniques, such as fish, chicken, or hamburgers. In other words be comfortable with the ingredients you are using.
--Bobby Flay

For Your Information

Please watch this area for important information like updates, food recalls, polls, contests, coupons, and freebies.
  • [March 19, 2020] - Effective Mar 17, this blog will no longer accept advertising. The reason is very simple. If I like a product, I will promote it without compensation. If I don't like a product, I will have no problem saying so.
  • [March 17, 2020] - A return to blogging! Stay tuned for new tips, resources and all things food related.
  • [February 1, 2016] - An interesting report on why you should always choose organic tea verses non-organic: Toxic Tea (pdf format)
  • Sticky Post - Warning: 4ever Recap reusable canning lids. The reports are growing daily of these lids losing their seal during storage. Some have lost their entire season's worth of canning to these seal failures! [Update: 4ever Recap appears to be out of business.]

Popular Posts

Showing posts with label dehydrating. Show all posts

Sunday, November 24, 2013

Dehydrated Apple Slices

As mentioned in yesterday's post, I have been doing a bit more dehydrating this year.  Dehydrating is an easy way to preserve fruits and vegetables for long periods of time.  Apples can be dehydrated anytime throughout the year.  I prefer to dry them when in season.  Apples were just starting shortly before we left on the first leg of our winter vacation in early October.  That gave me just enough time to run a batch of applesauce as well as dry apple slices. 

dehydrated apple slices vacuum sealed for storage
Apple slices are a versatile, easy to make product for the pantry.  They can be used for snacking, reconstituted for baking or added to beverages for a delightful, natural flavour.  One of our favourite fall beverages is mulled apple cider made in the crockpot.  I add dried apple slices to the mulled apple cider for extra flavour.   I also like adding a dried apple slice to a hot cup of tea for subtle flavour boost.

Apples need only be washed well, cored, sliced then dipped in an ascorbic acid solution to prevent browning before drying.  I  dried the apple slices at 135°F/57°C until they were leathery feeling.  Once dried, I vacuum sealed the apple slices in mason jars for storage.  Each mason jar held a dehydrator load of 6 trays.  I will have to dry more as two jars is not enough to last through the winter! 


Saturday, November 23, 2013

Dried Tomato Slices

This past busy processing season, I did a bit more dehydrating than I normally do using my Nesco dehydrator.  Dehydrating is a very easy and inexpensive way to stock your pantry with little effort.  Not only that, dried foods take up less space in the pantry than the same amount of food home canned or frozen.  Like home canned foods, there is no further cost for storage.  Unlike home canned and frozen foods, dried foods are light weight, easily transported if need be.  Dehydrating foods need not be restriction to in season crops either as it is an excellent way to take advantage of produce sales anytime of the year.

using a vacuum sealer canister to seal a mason jar
Fruits and vegetables should be dried at 130°F/55°C to 140°F/60°C which minimizes the loss of heat-sensitive Vitamins A and C.  I dried the tomato slices at 135°F/57°C, the fruit and vegetable setting on my dehydrator.  Drying tomatoes is as simple as washing and slicing about ¼-inch thick.  I find I get better results when the slices are cut to a consistent thickness.  The skins can be removed prior to slicing if desired.  I didn't remove the skins. 

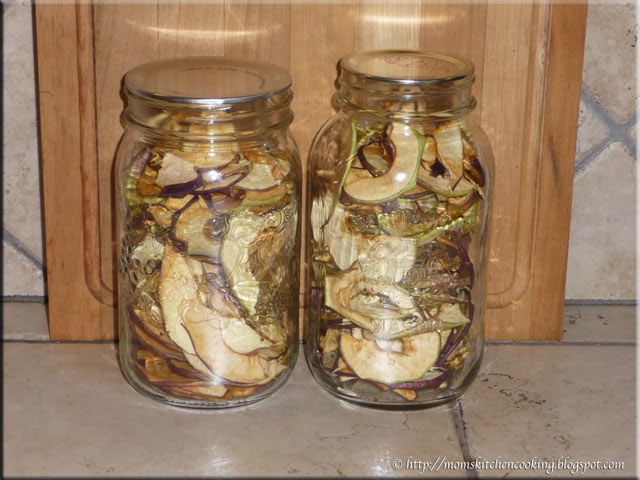
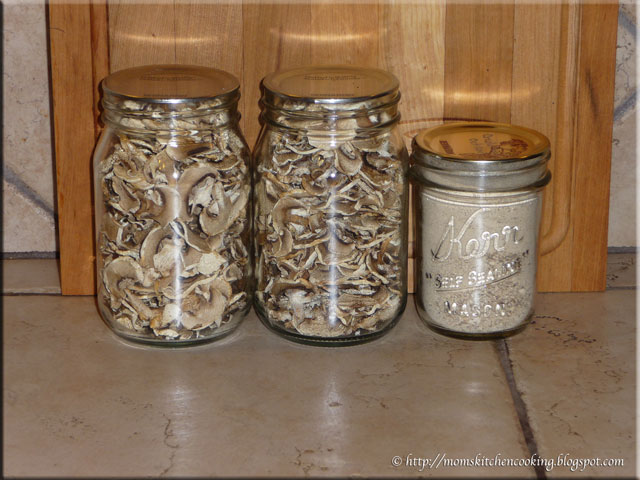
Dried foods are best vacuum sealed to prevent loss due to insects or moisture.  I like vacuum sealing dried foods in mason jars because the glass also protects against loss due to rodents.  An alternative method I have used is to vacuum seal dry foods in the plastic bagging material then place the packets in rodent-proof containers. 

I use either a standard mouth vacuum sealer adapter (pictured) or a wide mouth adapter (not pictured) depending on the style of mason jar I'm using.  I also reuse the metal snap lids that were originally used for home canning.  These lids cannot be reused for home canning but they are still usable for vacuum sealing providing they are not damaged.  I label home canned foods directly on the lid using a Sharpie marker.  I do not remove any writing on used lids until after they have been vacuum sealed.  Normally, the lids seal without a problem although occasionally I need to use the two lid method to get a good seal.  For some reason, one of the lids did not want to seal.  I was using older Bernardin jars so the shoulder could have been the problem.  At any rate, I resorted to another trick for vacuum sealing lids by placing the filled jar with lid in a vacuum sealer canister.

vacuum sealing a mason jar
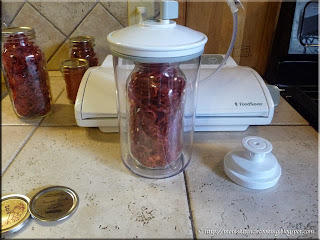
Then I placed the lid on the canister and attached the hose as I normally would.  Essentially with this method a larger volume of air is removed but in the end the jar seals.  This method works nicely for any mason jar with higher shoulders that prevents the adapter from seating properly.  It can also be used for any mason jar in lieu of the adapter.  An adapter costs about $10 for the standard mouth size while the wide mouth size is a bit more and can be difficult to find.  Canisters are a bit easier to find locally even appearing in thrift stores occasionally.  eBay is another inexpensive source for vacuum sealer canisters as well.  Once the vacuum sealer stops, I simply released the vacuum on the canister and removed the vacuum sealed jar.

mason jar successfully vacuum sealed
As pictured, the jar vacuum sealed nicely using the canister method.  There was a noticeable indent in the centre of the lid indicating a good vacuum seal.  At this point, the only thing left to do was clean the marker off the lid then relabel for storage.

As mentioned, I like using a Sharpie marker for labeling just about anything in the pantry or freezers.  It can be used on just about any surface although may not clean off porous surfaces well.  It can also leave ghost marks on some plastics.  The marker comes off easily from metal, glass and some plastics with rubbing alcohol. 

dried tomatoes and tomato powder vacuum sealed for storage
In total, I dried two quart jars and one pint jar of tomato slices as well as enough to make a half-pint of tomato powder.  Each quart jar holds the amount of tomato slices I dried per load in the dehydrator using 6 trays.  The tomato powder is the equivalent of 2 quart jars of tomato slices or a total of 12 trays of dried tomato slices.  You may be wondering why I left some of the tomato slices as is rather than powder all of them.  The main reason is flavour.  I only powder the amount I will use within a reasonable amount of time then powder more as needed.  The second reason is versatility since the dried tomato slices can be used as an ingredient in dips and soups.

Tomato powder is a must have in any pantry!  It can be used to make tomato paste or sauce, add extra flavour to soups, stews and meatloaf, or sprinkled on salad or other vegetables as a seasoning.  Commercially prepared tomato powder is available but it is expensive at as much as $1.10 per ounce or more.  It is not a product that I can find locally, so for me as well as many, tomato powder is a product that would have to be ordered online or by mail order.  Homemade tomato powder can be as inexpensive as only the power it takes to run the dehydrator (my case) or the price of about 30 large paste tomatoes.  Even buying the tomatoes and making your own tomato powder will still realize a savings.  I used paste tomatoes because that is what I had.  Any tomato can be used to make tomato powder although I highly recommend using organic tomatoes.  Cherry tomatoes make a wonderful tomato powder if you find a good deal on them.  Mixing tomato varieties works well too making this an ideal way to use up excess tomatoes from the garden.


Wednesday, September 11, 2013

Dehydrated Mushrooms and Mushroom Powder

Dehydrating foods for storage can help immensely in stocking the pantry.  A larger amount of food can be stored dried than in other forms and properly dried foods have a long shelf life.  I honestly don't do as much dehydrating as I should.  We were getting low on dried mushrooms and mushroom powder so I decided to use some of my recent mushroom to replenish my supplies

loading mushrooms on dehydrator tray
Mushrooms are very easy to dry using a dehydrator with temperature control.  I dehydrated two batches (total of 12 trays) of sliced mushrooms, some to be used for mushroom powder.  This was about four pounds of mushrooms.  I am currently using a Nesco dehydrator expanded to six trays.  The mushrooms were simply brushed off, ends trimmed then sliced thinly.  There is no need to treat them to prevent darkening when dehydrating.  I placed the slices evenly on the ungreased dehydrator trays then dry at 130°F/54°C until the mushrooms are leathery feeling.  Once the mushrooms where dried, I vacuum sealed them for pantry storage.

dried mushrooms and mushroom powder
Dried mushrooms are the perfect addition for soups, stews and casseroles.  The two 500 ml (pint) jars of mushrooms will be enough to use in several dishes.  Mushroom powder is a must have in our home.  It is even more versatile than dried or fresh mushrooms.  A little adds a lot of flavour!
 
Dried foods are susceptible to moisture, insect infestation and rodents.  The easiest way to protect dried foods from this type of damage is to vacuum seal in glass containers.  I used my Foodsaver vacuum sealer with the jar attachment to seal the dried mushrooms and mushroom powder.  This is a perfect way to reuse the metal snap lids that can only be used once for canning. 


Saturday, January 12, 2013

Expanding the Drying Space on My Dehydrator

In August of 2012, I bought a Nesco® All American Harvest® Dehydrator & Jerky Maker at Home Hardware since I no longer have my Jenn-Aire slide-in range as I went to natural gas when we bought this house.  My ancient Mr Coffee Maker stand-alone dehydrator quit back in 2005 and I didn't bother replacing because the Jenn-Aire had a dehydrating setting.  Well, Home Hardware had had the FD-61, 500 W, expandable to 12 trays on sale so I bought one.  It had to be ordered in on a rain cheque but I still got it at the sale price of $65.  I had considered ordering extra trays at the same time but wanted to see how the dehydrator performed.

snackmaster add-a-tray for Nesco dehydrator
The extra trays were $20 for two so expanding to the full 12 trays would cost me an additional $160 plus HST bringing my initial investment close to the cost of a smaller Excalibur dehydrator.  The reality is only a small portion of our food storage goes into home dried foods. Don't get me wrong as I do dry a lot, just no as much as some do.  Now that we are settled into our new home, I will likely do a bit more dehydrating.  One of my projects is to make more home dried foods that could easily be popped into our backpacks when flying down to our vacation home.  Liquids are restricted to a quart bag, 3 oz per container so that eliminates taking any home canned foods.

We stopped at a Bed, Bath and Beyond while we were doing Christmas shopping.  They had my exact same dehydrator and beside it the add-a-trays priced at $9.99 for two.  I popped one box into the cart figuring that it was a good deal and I may not want to fully expand to the 12 trays so reasoned that buying 2 at a time as needed would be the more frugal choice.  My old Mr Coffee was a five tray, round model that served us nicely for several years.

new trays added to dehydrator
My dehydrator has light grey speckled trays but the trays in the package were solid white for the FD-40, FD-50 and FD-60 series.  They are identical in every way except for colour.  They fit perfectly and really, the colour difference might come in handy when drying two or more types of foods.  For the price savings, I can live with two colours of trays!  Besides my husband and I will more than likely be the only ones seeing it and others would realize it isn't supposed to be a stripped effect when assembled.

At that price, I now have $75 into the dehydrator.  If I expand again, it will cost me another $10 for a total of $85 investment, something that would be recouped during the first year of dehydrating depending on use.  Each 2 tray expansion kit gives an additional 1.73 sq feet of drying space meaning each tray is 0.865 sq feet of drying space.  With 6 trays I now have a total of 5.19 sq feet of drying space which is a fair amount of drying space.  Whether or not that is enough drying space for my plans remains to be seen so I will expand further if needed.


Sunday, September 02, 2012

Candied Peach Slices

I like to experiment in the kitchen, always looking for one more great dish or food product that will go on to become a family favourite.  As I was preparing the peaches for canning sliced peaches, I decided to prepare extra for drying.  Fruits and most vegetables to be dehydrated must be blanched first to destroy enzymes that can cause spoilage during the drying stage and storage.

candied peach slices and peach leather
I blanched about the equivalent slices of three large peaches then puréed in a food processor and poured onto the fruit leather tray.  Once dried this is rolled as a fruit roll or can be dried a little crisper to be powdered.  The end result is in the large jar.

I lightly cooked the remaining peach slices in a light syrup then spooned the slices using a slotted spoon onto lightly oiled dehydrator trays.  Cooking in the syrup rather than blanching in water gives a candied effect.  The slices were dried at 135ºF (58ºC) until no moisture beads showed when the fruit was bent in half.  The slices were removed from the trays, packed into mason jars and vacuum sealed for storage.

Candied peach slices are a lovely addition in the pantry.  They can be used as a snack, an ingredient in trail mix or simply presented by themselves in a fancy bowl on a buffet table when entertaining.  These are sure to be a hit with the kids!


Tuesday, August 21, 2012

Nesco Dehydrator

We started camping in tents when our youngest was still in diapers on the Labour Day weekend with good friends of ours.  In October of the same year, we packed up our kids and gear in the pouring rain to head to Pinery Provincial Park.  It rained the entire time we were there but as a family we were hooked on camping.  The following spring we bought a pop-up tent trailer and less than a year later bought a 28' Prowler.  Our kids were fanatics about homemade trail mix and beef jerky as snacks so I splurged and bought a Mr. Coffee 5 tray dehydrator (135 W).  When we bought our Jenn-Aire range in 2005, I switched to using the dehydrating cycle on it as the Mr. Coffee had burned out.  When we moved here, the Jenn-Aire went to one of our kids because I wanted natural gas for home canning.  Since last September, I have been unable to do much in the way of dehydrating as my new gas range does not go low enough in temperature.  It wasn't much of a problem until this spring when I wanted to start replenishing our dried food supplies.

Nesco American Harvest Dehydrator and Jerky Maker
A couple of weeks ago I bought a Nesco® All American Harvest® Dehydrator & Jerky Maker (FD-61).  Home Hardware ordered it in for me, which is one reason I love supporting this local business.  The dehydrator is a 500 W 4 tray model expandable to 12 trays.  It came with one fruit roll-up sheet but extra trays, screens and fruit sheets are available.  Unlike the Mr. Coffee where the heating element and fan were in the base, the heating element and fan are in the lid of the Nesco.  The nice thing about this design is food drippings never come into contact with the heating element or fan making clean-up a lot nicer.  Also, this dehydrator has an adjustable thermostat making it much more versatile than the Mr. Coffee one.  I do plan to expand this dehydrator with at least two more trays if not more depending on how much drying I'm doing.

loading the dehydrator trays with marinated beef strips
I decided to make a batch of beef jerky to test out my new dehydrator.  This is the golden standard in dehydrating for our family.  I use a lean cut of beef (eg. flank or round steak) either thin sliced from the butchershop or hand cut at home from a piece of meat from our bulk beef purchase or venison from my husband's hunt camp score.  The meat is marinated for 4 to 8 hours in the refrigerator.  The beauty of the marinate is it can be a very simple to complex homemade marinade or your favourite bbq sauce.  A curing spice that contains sodium nitrate and salt (eg. Morton's Tender Quick) should be added to the marinade in a ratio of 1 tsp per pound of meat.

beef jerky fresh from the dehydrator
I marinated the beef in Sweet Baby Ray's BBQ Sauce.  I dried the beef jerky at 165ºF (74ºC) setting until it was tough but not brittle.  I wrapped the finished jerky in paper towels to absorb any excess fat before packaging.  Jerky is shelf stable for about 3 weeks or if vacuum sealed longer.  To extend the storage life, I store beef jerky in the refrigerator.  It will keep nicely for 6 months in the freezer, not that a batch of beef jerky would ever last that long around here!

The jerky was delicious.  I do think there was a bit of a borderline sweetness that while quite pleasant needed toning down.  Yet no one complained so it might have been just my tastebuds off a bit.  The next batch I make will be using Blazin BBQ's  Blazin' Nitro BBQ Sauce.  This is an award winning, specialty bbq from Canadian ribbers.  The sauce is only available through their restaurant or at ribfests they are participating in.  I think the sauce will make an amazing beef jerky!


Thursday, August 09, 2012

Kitchen Quick Tips - Storing Home Dried Foods

kitchen quick tips
Vacuum seal home dried foods and store at 15ºC (60ºF) or less in a dry, dark storage area to extend the shelf life and nutritive value.


Monday, August 06, 2012

Frugal Kitchens 101 - Buying a Dehydrator

Frugal Kitchens 101
The ability to dehydrate foods is a fundamental component of home food preservation.  Ideally, any food preservation you do should be in the form of home canned, frozen and dried for any given food.  What this means is, for example, if you are preserving tomatoes - a portion will be froze, a portion will be home canned and a portion will be dried.  The preference as to which is the larger portion will depend on a few factors.  I personally preserve tomatoes in many forms as home canned (about 80%) with drying and freezing at about 10% each.  However the reverse is true with respect to meats where the bulk of preservation is freezing.  Still, I dry and can meats as well because you never want to put your food storage into one basket. 

Food dehydrators come in three forms:

  1. homemade sun trays
  2. part of some ovens
  3. stand alone dehydrators
I have used all three.  There are pros and cons to each.
  1. homemade sun trays -  Homemade sun trays consist of a frame with a screen at their simplest form.  The food is prepared, placed on the screen then the screen set in a sunny spot for drying.  The method is very much at the weather's mercy and does not work well in humid areas where the food will mold before drying.  Drying using this method requires extended periods of time exposing the food to any contaminants in the outdoor air as well as bugs, insects, rodents and marauding pests like squirrels, raccoons and skunks.   Some have put their sun trays in parked cars to take advantage of the heat but it is still not an ideal solution especially if you need to use the car.  The main pro is sun trays are free to operate but the cons by far outweigh this.
  2. oven dehydrators - Some ovens are capable of dehydrating and some even have actual dehydrator settings.  In order to use an oven as a dehydrator it must be able to be set as low as 95ºF/35ºC to a high of 160ºF/71ºF.  Many newer ovens can only be set as low as 170ºF/77ºC which is too hot for dehydrating.
  3. stand alone dehydrators - A stand alone dehydrator ranges in price from $40 to $500.  The cheaper models have no thermostat and round trays.  These should be avoided because different temperatures are required for drying different foods.  For example, herbs are dried at 95ºF/35ºC but meats, fish and jerky are dried at 160ºF/71ºC.  Models without an adjustable thermostat likely dry about 115ºF/46ºC resulting in burning of herbs and under drying of meats.  A mid-range dehydrator with a thermostat, round trays and expandability will cost about $80 but with extras can quickly add up to the $200 range.  The nice thing is you don't have to expand if you don't want to nor do you have to put out all this money at once, just expand as required so the cost is spread out over a few years based on need.  The alternative is to buy a high end model then use it enough to recoup your costs.  Wattage does matter.  Some of the cheap models are 135 W meaning a longer drying time.  Mid-range models are 400 to 500 W so the drying time is greatly reduced.  Higher end models are 830 W - 1,600 W or more meaning even faster drying.  Unless you are drying foods for commercial use, a 500 W to 830 W model is more than sufficient for normal household usage.


Thursday, August 02, 2012

Kitchen Quick Tips - Dehydrating Vegetables

kitchen quick tips
Most vegetables must be blanched before dehydrating to slow the enzyme action that promotes spoiling during drying and storage.  The exceptions are onions, garlic, peppers and mushrooms. 


Thursday, June 07, 2012

Kitchen Quick Tips - Preserving Thyme

kitchen quick tips
Air dry thyme by hanging upside down in bunches.  Once dry squeeze the stems to remove the leaves from the stem.  Leave as is or grind to a fine powder.  Store in an air tight container.


Thursday, May 31, 2012

Kitchen Quick Tips - Preserving Rosemary

kitchen quick tips
Rosemary should be air dried by hanging upside down in bunches.  Once dry the rosemary leaves can be easily removed.  They can be used whole, ground course or ground to a power then stored in an airtight container.


Thursday, May 24, 2012

Kitchen Quick Tips - Preserving Sage

kitchen quick tips

Sage is a hardy herb that lends itself nicely to drying either by air or heat drying.  Once dried, crush the leaves from the stem.  Blend the crushed leaves to a powder.  Store in an airtight container.


Saturday, August 14, 2010

Drying Green Beans

Earlier this week I posted about buying 20 lb of organic green beans from the organic farm.  I ended up with 7 L jars and 24 - 500 ml jars of home canned green beans.  I am testing the Tattler reusable canning lids so 11 of the jars canned were Tattler lids while the rest were the regular, single-use, metal Bernardin canning lids.  Of those jars one of the Tattler lids failed but I think I figured out the cause.

green beans on the tray
About 19 lbs of the green beans were canned.  I reserved about 1½ lb of the green beans for drying.  Green beans are best dried when young and tender.  As with all produce choose organically grown if at all possible.

Method:  Wash and clean the ends from the beans.  Cut into 1" pieces.  Steam blaanch for 4 to 6 minutes.  Arrange on a drying tray in a single layer.  Place the drying tray over a sided baking sheet to catch any pieces that fall through the drying rack as they dry.  Dry at 125ºF until beans are brittle.  The dried beans can be used ins soups, stews and casseroles.

vacuum sealed dried green beans
The green beans took overnight to dry.  Once dried I packaged into a 500 ml mason jar then vacuum sealed.  Vacuum sealing is one of the best ways to ensure dried foods are protected from humidity, rodents and insects.  This provided another good opportunity to test one of the Tattler reusable lids.  According to the package these lids can be used for vacuum sealing as well.  The Tattler lid performed without a hitch when vacuum sealed.  I removed it then replaced with a used metal lid because I have a lot of used lids but only a few Tattler lids to work with.

It will be quite some time before I will need to use Tattler lids for vacuum sealing but it is nice to know that they do seal as promised.  I use canning lids that were previously used for canning for vacuum sealing.  Once they get to a point I can no longer get a seal the lids go into the recycle bin.  It will be quite some time before I run out of used metal canning lids to use for vacuum sealing even with gradually switching to the Tattler reusable canning lids providing I am happy with the results over the testing period.


Sunday, June 20, 2010

Drying Oregano

I love using herbs when cooking so I learned years ago that the best way to get fresh herbs was to grow them myself.  Just like fresh fruits and vegetables picked moments before preparing, fresh herbs cut just before going into whatever is cooking really makes a difference.  The flavour is fresh and vibrant even more intense that fresh cut herbs in the grocery store that may have be cut two or three days before you buy them.  I grow a wide range of herbs both indoors and outdoors.  There were 40 different herbs growing in my last garden.  This garden's herb bed has not reached that stage yet but it is getting close and if we stay here will exceed that. 

fresh cut oregano
Last year I planted two common oregano plants that obviously have not read the square foot gardening manual as this year they are taking up about 2 sq. feet each!  I check my garden beds and containers at least twice daily but quite often am out cutting product for meals so I immediately noticed the fungus gnats on the oregano.  They are a common pest of oregano that does minimal damage.  At the same time I noticed signs of other damage so decided to trim the oregano good before moving to any stronger treatment.  I ended up with a turkey platter piled as high as a turkey of oregano clippings to be cleaned and dried with the exception of a few pieces that were popped into water for rooting.  These will be later planted for growing indoors.

Small insects can hide in herbs so it is important to wash them well under running water that will wash the insects off.  Once washed I give each stem a good flick of the wrist to knock off any insects that might have missed the wash.  Then I place the stems on thick bath towel and blot dry before placing the stems on wire drying racks to be dried in my oven that has a specific, adjustable temperature drying cycle.  

dried oregano
I ended up with 750 ml of dried oregano as pictured.  Please note the difference in colour between the smaller jar and the larger jar.  The reason for this is the temperature at which the oregano was dried.  The larger jar was dried at 110ºF whereas the smaller jar was dried at 140ºF.  While both have excellent oregano flavour the larger jar has nicer colouration and a fresher oregano flavour.  The smaller jar has a deeper but a bit more intense borderline bitter flavour.  The oregano dried at the higher temperature is ok for cooking however oregano dried at a lower temperature is considerably better both in terms of colour and flavour.

Herbs should always be dried at the lowest possible setting.  Unfortunately, lower cost dehydrators will dry in the 140ºF range with no possibility of adjustment.  If you have one of these dehydrators you would get better results by hanging the herbs to dry in a warm, dry, dark place.  Ovens with special adjustable dehydrating cycles and temperature controlled dehydrators should be set to 110ºF for drying herbs.  Tender herbs like basil should only be air dried or frozen as heat drying removes some of the essential oils. 

Growing your own herbs gives you the opportunity to use both fresh and preserve for winter use.  I already have enough oregano dried  for winter storage just with the first cutting.  We have almost 4 months left in the growing season here so there will be a lot more oregano to come.  What a lot of home growers don't realize about herbs is the more you cut them the more they reward you with new growth.  So cut those herbs!  Use what you can fresh with each cutting then dry or freeze the rest.


Friday, October 16, 2009

Cabela's World's Foremost Outfitter

There are always so many great things to see and explore when your travel especially when you are a foodie. The kids are heading on a road trip of their own shortly so wanted to know if we would like to go to Cabela's. Now this is a very large outfitter's outlet so what could a foodie possibly find of interest there. Oh my gosh, I found plenty!

Cabela's Cabela's

Cabela's is a huge outfitter's outlet chain that has an extremely unique decor consisting of a large number of unique displays and exhibits of preserved animals in very realistic looking natural environments. That in itself makes browsing through the outlet extremely interesting and enjoyable. What is even more interesting is since this outlet caters to hunters, anglers, hikers, campers and so much more they actually carry a lot of food related items of interest to the foodie.

I took a lot of pictures of the animal exhibits as well as some of the food related things I was interested in. Just about any equipment you would need to cook outdoors is available. They also have a lot of those little extras that can increase your outdoor cooking experience.

esasonings, sauces & moreSeasonings, Sauces & More

Outfitter stores are an excellent place to get things like seasonings, cures and sauces that you might have a hard time finding anywhere else. Quite often there will be sauces and rubs that are in low production, just coming onto the market produced by ribbers (from ribfests) and other award winning food contestants. This is were to find seasonings, rubs, coating mixes and sauces specifically for wild game. This is where you will find a wide variety os sausage making supplies including the casings. This is also where you will find large jugs of oils especially peanut oil for the turkey friers and other large scale friers. At the same time if you are a home canner and want a heavy duty outdoor burner check this type of a store. This outlet is an excellent source for heavy duty cast iron pots and pans. So from a foodie perspective there are a lot of things to explore, get ideas from and expand from there.

commercial grade food dehydratorCommercial Grade Dehydrator

When it comes to dehydrating there are the lower cost stand alone models that work reasonably well, homemade solar models, ovens specially designed with a dehydrating feature (Jenn-Air). Each design of dehydrator has its pros and cons. According to some the best stand alone higher cost model on the market is the Excalibur. Well this commercial grade dehydrator will knock the socks off of any Excalibur!

At $329.00 it is very close in line with the price of the Excalibur as well so the cost difference is not a really huge concern. It has an insulated housing, digital thermostat and built-in drain reservoir. At 80 - L capacity it is meant for those who do a lot of dehydrating. It comes with 12 drying trays to get all those foods dried quickly and the glass door allows you to easily see how the drying is progressing. It is about the size of a bar fridge so could easily be fit into smaller rooms and as long as protected from any water would work nicely in an outdoor shed or garage. This commercial grade dehydrator is definitely on my foodie wish list.!

Bayou Classic® ceramic grillBayou Classic®

I first saw the Bayou Classic® ceramic grill on the food network and it has been on my foodie wish list ever since. It was love at first sight . If I recall correctly it was chef Michael Smith using one and I think it was a beautiful royal blue tone. The main problem for me since we use our grill year round even in the snow would be whether the ceramic would crack in the cold. Any hairline cracks in ceramic can absorb moisture that will crack with our freezing winter temperatures. The second problem would be getting the grill to temperature during the cold months as charcoal takes awhile to come to proper grillinging temperature. Still it's something I can dream about and perhaps one day actually buy if only for warm weather grilling.

The Bayou Classic® grills, smokes, roasts and barbecues using a cooking method that is 2,000 years old. Each grill individually handcrafted is charcoal operated with a spring-loaded lid-lift assist makes opening the top easy. There are two air vents to help you control temperature. A grill stand in a decorative powder-coated steel finish with rubber wheels and locking casters that makes moving the grill easily is sold separately.


Monday, October 05, 2009

Frugal Kitchens 101 - Dehydrating Foods

Frugal Kitchens 101
This is the time of year many are focusing on stocking up their pantry for winter. The past several Frugal Kitchens 101 have covered many aspects of home canning. Ideally when you put up foods for storage, no one method should be the sole method of storage. Instead you should use the three basic methods of canning, freezing and dehydrating then if possible add in curing and smoking. You do not have to do each method in equal portions either. For example I freeze approximately 10 to 15 dozen ears of corn because we prefer the flavour of frozen corn to canned. Following my method of not putting all my eggs in one basket I still can 6 to 8 pints of corn and dry a dozen ears of corn. This ensures that if something happened to the freezer we would still have corn. This week's the topic for Frugal Kitchen 101 is dehydrating foods.

Dehydrating foods is simply removing the water content from the food so the food keeps on the shelf for an extended period of time. Dehydrating offers the benefit of fitting a lot of food into a small area. The food packets are light weight with a shelf life of many years. Unlike freezing and much the same as canning, dried foods cost you nothing for storage. No electricity is needed for storage making dried foods an essential part of your emergency preparedness plans. All dried foods should be stored in a cool, dark location away from direct sunlight and heat.

Equipment used can be as simple as string for hanging herbs to dry or homemade wood frames with food grade mesh for drying outdoors to as expensive as the 9-tray Excalibur food dehydrator that will cost about $250. There are several inexpensive dehydrators on the market ranging in price from $25 to $50. Some stoves (eg. Jenn-Air) have a special dehydrating setting but any oven can be used for dehydrating providing it can be set between 125ºF and 145ºF. Some ovens will only go as low as 170ºF making them unsuitable for drying. In addition to screens and/or a dehydrator a food vacuum sealer (~ $100) is in my opinion a must for long term storage. This will keep out any water, humidity and insects. I also recommend once vacuum seal the packets of food be stored in a heavy plastic tote or metal can to protect against rodents that can chew through the vacuum sealed packets. The cheapest source I have found for the vacuum seal bags is The Sweet Attack (no affiliation but a very happy customer). Dried foods can also be stored in vacuum sealed mason jars and recycled food jars that will protect against rodents. The old fashioned canning jars with zinc ring, rubber rings and glass lids are ideal for this purpose. If you have a jar with the ring but no lid a used regular Snap canning jar lid can be held in place with the zinc ring. The rubber rings are still available (at least in Canada) manufactured by Viceroy Rubber & Plastics Ltd. of Toronto.

Most fruits and vegetables are suitable for drying. They can be prepared in such a manner to be used for soups, stews and casseroles later. Many fruits, vegetables and mushrooms can be dried themMany dried fruits are wonderful in baked goods or simply for snacking. Fruit leathers are always a popular snack too. One of my favourite uses for dried apple slices is floating them as a flavourful garnish in hot apple cider. Meats can be dried as jerky or cured then dried as sausage. Some are even drying cooked ground beef into beef rocks that can be rehydrated for later use. There is a wide range of possibilities then as to what you can dehydrate so as with canning before making a large batch of food for drying, make only one tray then test it as to how you like it. If you like the results then go ahead and dry a large batch.

Some foods are dried at a higher temperature than others. For the proper drying temperatures please refer to Bernardin™ Guide to Home Preserving, The Ball Blue Book or the National Center for Home Food Preservation (NCHFP). Some foods need to be treated as part of the prep to prevent discolouration as well. Please refer to the mentioned sources for that information.


Wednesday, September 23, 2009

Tomato Wafers and Tomato Stock

We think of tomatoes as a vegetable even though botanically they are a fruit. They are one of the most versatile foods there is. Those who love tomatoes know that the anemic tomatoes sold in the grocery stores during the winter months do not compare with the full bodied flavour of vine ripe tomatoes! I am very fortunate in that I am able to grow tomatoes as well as having a free source for all the canning tomatoes I can use. Still I try to make sure nothing goes to waste.

A few days ago I posted about canning pizza sauce along with drying the tomato waste consisting of seeds and skin for tomato powder. Tomato powder is a wonderful product to have in your pantry. It ads nutrition, colour and flavour to soups, stews and meatloaf. This post is about two more tomato products that are must haves in your pantry.

drying tomato wafersWhen tomatoes are plentiful in the garden there is no choice but to either preserve what you can't eat or they will go to waste. I ran two varieties of tomatoes through the food mill then poured the resulting purée into a plastic container to be stored in the refrigerator until processing. The tomato purée separated into 3 layers (1). Note the yellowish layer as that is what I wanted for the tomato stock. If you use 1 variety you will end up with 2 layers. Removing this layer removes a lot of water from the tomato purée shortening the drying time which is a frugal energy reduction method. If you don't have cheesecloth then the top layer can be carefully removed for drying reserving the yellow layer for canning.

My preferred method is to use a cheesecloth lined strainer. As you can see in (2) the results is a much clearer juice. This raw tomato juice makes a lovely, refreshing summer drink! It does take awhile for the purée (3) to drain the juice. Once the purée stops dripping it is spread onto a parchment line baking sheet and dehydrated at 145ºF until it can easily pull from the paper. The semi-dried purée is then transferred to a drying rack and place back in the oven to continue drying until brittle. The fully dried purée is then broken into wafters about 2-inch pieces and vacuum sealed. The wafers have a deep, intense tomato flavour. They are used much the same way as tomato paste.

vacuum sealing dried foodsI highly recommend sealing any dried foods in glass jars to protect them from moisture, rodents and insects. The canister method can be used for sealing small jars or other jars with 1-piece lids that have a button indicator in the middle. Place the filled jar in the canister. Put the lid on the canister then attach to FoodSaver®. Vacuum on canister setting. When the appliance stops, release the vacuum on the canister at which time you will notice the lid on the jar become concave indicating it is vacuum sealed. Mason jars and any jar that will fit a mason jar lid either widemouth or standard can be sealed with the lid sealer attachment available in both sizes.

tomato stock and tomato wafersTomato Wafers & Stock

I love experimenting to see how many different and unique tomato products I can get in my pantry. These two extremely useful products certainly fit the bill! Both add nutrition, flavour and colour but in very different ways. The tomato wafers are used much the same way you would use tomato paste mainly in soups, stews and chili. I find it best to add a piece or two then mix well then taste adding more if necessary. The wafers can be rehydrated with a little boiling water to form a paste for use in meatloaves if desired. The tomato stock can also be poured into soups and stews to enhance the flavour. One of my favourite ways to use is as the liquid when cooking rice. It makes a nice liquid to cook pasta or meats in. It can also be thickened with a cornstarch or tapioca flour slurry to use as a glaze. So this is a very versatile tomato product to have in the pantry.
Enjoy!


Tuesday, September 22, 2009

Drying Peppers

I have taken a few days off of canning but that doesn't mean things have come to a stand still in the kitchen. The weather is cooler and without the additional humidity of canning it is a perfect time to do a bit of dehydrating. Ideally when preserving foods each food will be processed as canned, dried and frozen. If for some reason you lose your frozen stores then you have your canned and dried stores to fall back on. At the same time if possible add curing and smoking to your food preserving methods. I have to admit to not dehydrating as much as I should. I tend to focus on vegetable flakes, vegetable powders, apple slices and jerky.

Drying foods is desirable because once dried they are light weight and take up a lot less room than other forms of food preservation. Properly stored dried foods have very long shelf life as well. Dried foods should be stored in a dark, cool place preferably in vacuum sealed containers.

tray of prepared sweet peppersSweet Peppers

The garden is producing an abundance of tomatoes and peppers. I decided to dehydrate a couple of trays of peppers, one sweet and the other hot. Dried peppers can be added to soups, stews and chili. They are nice sprinkled on a garden salad as well. The dried peppers can be powdered if desired. The prep work could not be easier!

Method: Wash and dry peppers. Cut in half. Remove core and seeds. Cut into thin strips then across the strips to form small pieces. Place on an unlined baking sheet if dehydrating in the oven or on dehydrator sheet if using a dehydrator. Dry at 52ºC (125ºF) until crisp. Allow to cool then package into air tight containers and vacuum seal.

dried peppersDried Peppers

It is surprising how much volume is lost when you dehydrate foods! This explains why you can store a fair amount of dehydrated foods in a small amount of space. I was able to package the two trays of dried peppers into 2 - 125 ml (4 oz) baby food jars. Pictured are the jars before vacuum sealing using the canister method. The peppers dried nicely retaining a lot of their rich colour.

Method: Place a filled jar in a small vacuum sealer canister. Set the vacuum sealer to vacuum. It will shut off when then canister and jar are sealed. Remove the vacuum off the canister and remove the sealed jar. Label and store.


Friday, September 14, 2007

Dried Apples, Applesauce and Grilled Salmon with Garden Mayonnaise

Local apples and new potatoes are now available at the farmer's market. It has turned into a mecca of wonder fresh fruits and vegetables many of which I will be preserving over the next couple of months. Yesterday I took a break from canning tomatoes to make the first batch of apple sauce and dry apples. The house smelled heavenly! On the menu for dinner was grilled salmon with garden mayonnaise, grilled asparagus and steamed new potatoes.

Dried Apples & Applesauce

By far my favourite apple for baking, drying or making applesauce is the L-star. This is a nice firm, tart apple that holds it's shape well. Cooked apple pieces need only to be run through the food mill for perfectly textured applesauce eliminating the need to boil down further. The method I use for making applesauce can be found in an earlier blog entry here. The only modification I make to the method is to omit the sugar.

Dried apple slices are very easy to make. They can be used for snacking, cooking or garnishing. Be sure to make a lot of these as they will quickly become a favourite treat.

Method: Wash and core apples. Slice into thin slices. Dip into a solution of water with about 2 tbsp of lemon juice added. Arrange the slices on drying trays. Dehydrate at 130º F until the slices are dry to the touch and are pliable. Remove from tray and store in vacuum* sealed mason jars.

* Vacuum sealing will prevent any moisture from getting in that could cause the apple slices to mold. It also protects them from rodents and insects.

Grilled Salmon

I keep a good stock of salmon fillets and steaks in the freezer as it is one of our favourite fish. Grilling salmon is quick and easy, under 15 minutes. When paired with grilled or steamed vegetables I presented the meal as shown in the picture with the salmon sitting on top of the asparagus then topped with Garden Mayonnaise. Steamed red and white potatoes completed the meal.

I came across a recipe called Grilled Salmon with Garden Mayonnaise in the August issue of Better Homes and Gardens. Their method for grilling the salmon fillets and asparagus spears differed from mine so I decided to grill them the way I always do. I also leave the skin on salmon as I find it gives a better result when grilled. Their recipe included Garden Mayonnaise which sounded interesting so I made it and then tweaked a bit (recipe follows).

Grilled Salmon

1 salmon fillet or steak per person
1/2 tsp butter per fillet or steak
2 tbsp fresh lemon juice per fillet or steak
sprig of lemon thyme per fillet or steak
citrus slices (optional)

Pre-heat the grill to medium. Place the salmon skin side down for fillets or brush with half the butter for steaks and place on the grill. Brush the top side with remaining butter. Pour about 1 tbsp lemon juice on the salmon. Place 1-2 citrus slices (optional) and lemon thyme sprig on the salmon. When salmon looks cooked on the bottom side, turn. Brush with butter and lemon juice. Remove from grill. Use citrus slices and thyme sprigs as garnish if desired.

Grilled Asparagus

Wash and trim ends from the asparagus. Dry then place on pre-heated grill on medium heat. Lightly spritz the asparagus with olive oil using a health mister or lightly brush on a little olive oil. Sprinkle on just a light pinch of sea salt. Let cook about 4 minutes, turn and repeat. Remove from grill.

Garden Mayonnaise
adapted from: Garden Mayonnaise, Better Homes and Gardens, August 2007. Pp. 202

1/2 c finely chopped celery
1/4 c thinly sliced green onions
1/3 c mayonnaise
1 tbsp lemon juice
2 tsp snipped fresh tarragon
pinch Old Bay Seasoning
1/2 tbsp finely chopped parsley
1 tsp fresh lemon thyme leaves

Mix the ingredients together in a small bowl. Cover and refrigerate at least one hour before serving. Use as you would tartar sauce to garnish salmon.

My notes: This is a fancier version of tartar sauce with a nice fresh flavour. The first five ingredients are the same as the original recipe. I did just a bit of tweaking by adding the other ingredients. This is one recipe I will continue tweaking a bit.


Saturday, June 09, 2007

It's Strawberry Season!

It's strawberry season for my June bearers. Aside of the herbs, rhubarb and a couple of rogue red lettuce plants, the strawberries will be my final harvest for this garden. As the moving date draws closer I'm saddened at leaving my beloved garden behind but the anticipation of discovering the new gardens as well as creating a new vegetable garden is building.

Garden Fresh Strawberries

My current stawberry patch is a 4' x 8' raised bed and stuffed full of strawberry plants. The strawberries are June bearers but I don't recall the variety. They are very proliferic so I will be taking a few of these plants to start a new strawberry patch at our new house. These plants obviously do not understand the concept of order in the garden but their bright juicy berries smile impishly. They spill over the sides of the bed and root themselves along the paths. They are in cahoots with the other plants that have not read the book on square foot gardening!

When strawberries are in season my number one favourite way to enjoy them is fresh picked and still kissed by the sun. There are ways to preserve that taste for the rest of the year. The most common way is strawberry jam. Jam can be either canned or freezer but I prefer canned. However, strawberry vinegar and drying strawberries also work well along with freezing strawberries (not pictured).

Strawberry Jam

2 quarts strawberries
1 pk powdered pectin
1/4 c lemon juice
7 c sugar

Hull and wash the berries then crush. Combine with pectin and lemon juice in a large saucepot. Bring to a boil, stirring occasionally. Add sugar and stir until dissolved. Return to a rolling boil. Boil hard for one minute, stirring constantly. Remove from heat and skim foam. Ladle hot jam into hot jars leaving 1/4-inch headspace. Adjust two piece lids. Process 10 minutes in boiling water canner.
Yield 8 half-pints

Strawberry Vinegar
2 c strawberries
4 c white wine vinegar

Crush the berries. Place into a mason jar. Pour the vinegar over and let sit at least 3 weeks. Strain before using.

Drying Strawberries
- ideal for topping cereal or ice cream

Wash and hull the berries. Slice to about 1/4- inch slices. Pretreat if desired. Dry at 130º until pliable.