My photo
Ontario, Canada
I am a wife, mother and grandma who enjoys the many aspects of homemaking. A variety of interests and hobbies combined with travel keep me active. They reflect the importance of family, friends, home and good food.
Cook ingredients that you are used to cooking by other techniques, such as fish, chicken, or hamburgers. In other words be comfortable with the ingredients you are using.
--Bobby Flay

For Your Information

Please watch this area for important information like updates, food recalls, polls, contests, coupons, and freebies.
  • [March 19, 2020] - Effective Mar 17, this blog will no longer accept advertising. The reason is very simple. If I like a product, I will promote it without compensation. If I don't like a product, I will have no problem saying so.
  • [March 17, 2020] - A return to blogging! Stay tuned for new tips, resources and all things food related.
  • [February 1, 2016] - An interesting report on why you should always choose organic tea verses non-organic: Toxic Tea (pdf format)
  • Sticky Post - Warning: 4ever Recap reusable canning lids. The reports are growing daily of these lids losing their seal during storage. Some have lost their entire season's worth of canning to these seal failures! [Update: 4ever Recap appears to be out of business.]

Popular Posts

Showing posts with label healthy snacks. Show all posts

Monday, September 28, 2015

Homemade Mini Chocolate Chips

Summer has past, the kids are back in school and Hallowe'en is just around the corner.  That can only mean that folks will soon be gearing up for holiday baking.  I'm sure many are looking for healthier homemade snacks for kid's lunches too.  A little chocolate added to homemade granola bars, snack bars or cookies is always a tasty treat.  Chocolate chips is the usual standby for this purpose but for some uses the biggest problem is chocolate chips are too big.  The second problem is finding organic, high cacao dark chocolate chips.  I came up with this simple solution. 

homemade mini chocolate chips
After considerable looking, I found a Goodliving silicone potholder and trivet with a honeycomb grid.  I melted half of a 90% cacao dark chocolate bar over hot water then poured over the trivet.  I put the chocolate filled trivet into the refrigerator to allow the chocolate to harden.  Once cooled, I popped the mini chocolate chips from the trivet.  They are just the perfect size for adding that extra touch of chocolate in my homemade protein bars!

You can use any plain chocolate bar of choice including the white milk chocolate.  Add a couple of drops of peppermint oil for mint flavoured chocolate chips.  Store in the refrigerator then use as desired.  You can even sprinkle a few over ice cream, plain vanilla yogurt or oatmeal.  The high cacao content adds a lot of flavour so you don't need to use a lot.  These homemade mini chocolate chips are a win win!


Wednesday, April 16, 2014

Frico

Cheese lace or frico is simply baked shredded cheese.  Almost four years ago today, I shared how I make cheese lace bowls.  These delicious edible bowls are an ideal presentation for salad.  Frico can be shaped into simple rounds for a low calorie, no carb crunchy snack or the frico can be crumbled to sprinkle on top of salads and vegetables.  They can also be used as a garnish.  Frico are very easy to make!

weighing shredded cheese for frico
I made a batch of frico for snacking.  Since I was calculating the nutritional value, I weighed 15 g (about 2 tbsp) of the shredded cheese for each frico.  It was important to weigh the unbaked cheese to determine the nutritional value in the finished frico.  I placed each weighed portion of the shredded cheese on a Silpat lined baking sheet in a small mound that I spread into a circle about 2½ - inch diameter leaving space around each for spreading.  I had a total of six prepared cheese circles.  I baked the frico at 350°F until golden brown, just crisping on the edges.

Any shredded cheese can be used to make frico.  Don't worry about mixing the kinds of cheese either.  It is a great way to use up those little bits of left-over cheese.  You can add extra flavour by sprinkling the shredded cheese with seasoning salt or dried herbs of choice.  If you want a little extra crunch, sprinkle a little chia seed on top.  If you want to form the frico into bowls, double the amount of shredded cheese and spread to about 5 - inch diameter.  Form the bowl as soon as the frico is taken from the oven while still warm.

baked frico
As the frico bakes, you will notice oil being released.  The oil will pool around the frico and on top.  It is a bit had to see in the picture but the shiny liquid around the edges of the frico is oil.  This is not a lot but this does reduce the amount of fat in the finished frico which in turn reduces the caloric value.  It is important to allow the frico to drain on paper towel to absorb as much oil as possible.  This ensures the frico are crisp and crunchy. 

Once the frico has been cooled and drained, carefully place them in an airtight storage container.  The frico will be brittle to be careful not to break if you want them for snacks or garnish.  You can crush and store that way as well.

weighing baked frico
I weighed each finished frico.  They were 9 g each so baking resulted in a 6 g weight loss.  Part of this weight loss was oil, effectively lowering the caloric value but part was water.  The 9 g frico has a nutritional val of 33 calories, 0 g carbohydrates, 3 g fat, 2 g protein, 53 mg sodium and 0 g fibre.  The nutritional value will vary slightly depending on the cheese used but not a lot.

Frico are crunchy, tasty snacks that will satisfy your cravings for a salty, crunch snack.  They are surprisingly filling too.  They are the perfect snack for those eating low carb and unlike many snacks have a bit of protein.  Frico are a healthy snack that is sure to please!


Saturday, March 15, 2014

No Bake Chocolate Protein Bars

Protein bars are huge business!  These bars come in at a similar caloric value as a chocolate bar but they are considerably higher in protein.  For example, a Snicker's chocolate bar has 250 calories, 33 g carb and 5 g protein but a Pure Protein chocolate deluxe has only 180 calories, 17 g carb and 21 g protein plus it has Vitamin A that the Snicker's bar doesn't have as well as a higher calcium and iron content.  In short, the Pure Protein bar is a better nutritional value for your food dollar especially since it is only 8¢ more than the Snicker's bar.  The advantage of protein bars aside of their nutritional value is their portability.  Pop one in your purse as a healthy substitute for a chocolate bar.  The downside to protein bars is the long list of ingredients, some of which we try to avoid.  Be sure to read the label if you decide to buy protein bars!

I decided to experiment making my own protein bars.  Homemade protein bars are a practical solution to the ingredient issue.  They are tastier and lower cost.  Trust me, after sampling several brands of mass produced protein bars, taste and texture is not exactly a high priority!  Not only that, homemade protein bars are incredibly simple to make.  Homemade protein bars consist of a base, protein powder, binder and flavour.  They can be baked or no bake.  They are easily modified as desired for you own unique flavour combination.

pressing the protein bar mixture into a block
My first attempt at making protein bars was using whey protein powder.  Whey protein is often used in mass produced protein bars.  Homemade protein bars using whey tend to be sticky even after sitting for a period of time.  I wasn't concerned over this as the bars were intended for after my morning exercise routine.  I had three goals in mind when I started: lower carb, high protein and low calorie so chose the ingredients on that basis.  These bars came in at 98 calories with 12 g carb and 5 g protein, far from ideal or even close to mass produced but it was a start!  The texture was very much like some of the mass produced protein bars so I'll be working on that as well.

I simply mixed the ingredients then formed the no bake chocolate protein bar mixture into a block on a sheet of parchment paper.  It definitely was sticky but workable.  I covered the block with plastic wrap and set in the refrigerator for an hour to firm up.

cutting the chilled protein bar mixture
Once the block had firmed for an hour, I cut the block into 10 equal sized pieces.  Originally I was going to cut into 5 bars but they would have been too large.   A longer rectangle and cut into 8 slightly larger bars would have worked as well.   They could also be cut into smaller bars suitable for children if desired.

I covered the   cut bars and returned them to the refrigerator to continue setting up overnight.  Some using whey protein powder put their bars into the freezer to set up.  Mine set up well in the refrigerator but they still had a bit of stickiness to them. 

drizzling melted chocolate over the protein bars
Chocolate is likely the most popular flavour for mass produced protein bars.  Chocolate and peanut butter is a common combination for mass produced protein bars.  I used cocoa and chocolate flavoured protein powder so kept the chocolate topping to a minimum as an accent flavour.  A lot of mass produced protein bars are coated in chocolate similar to a chocolate bar but that really adds to the carb content.  I melted two squares of Lindt 85% cocoa chocolate then simply drizzled over the cut bars using a spoon and slight sideways movement.  Reducing the topping reduced both the calories and carbs of the finished bars.

chocolate protein bars ready to enjoy
The warm chocolate drizzle quickly firmed on the cold bars.  I removed them from the parchment paper and placed in a storage container for the refrigerator.  Overall, I am pleased with my first attempt.  I plan to decrease the carbs and increase the protein in the next batch.  I also want to tinker with the texture, making it a bit creamier closer to a nougat texture.  I suspect that the caloric value will increase a bit with the modifications but

Each of the ingredients in my protein bars were chosen for a specific purpose.  With the exception of the Truvia, all of the ingredients added protein.  I used Truvia specifically for the natural sweetness of stevia without the calories of sugar.  I'm still sitting on the fence with stevia so may experiment using honey or molasses instead.  I used organic peanut butter because it does not have salt or sugar added. 

No Bake Chocolate Protein Bars
recipe by:  Garden Gnome

1 (42 g) scoop Pure Protein 100% Whey, Frosty Chocolate
1 tbsp Truvia baking mix
2 squares (20 g) Lindt 85% Cocoa chocolate
1 tbsp organic peanut butter
1 tbsp Fry's cocoa
1 tbsp chopped peanuts
 ½ c almond milk
1 tbsp coconut flour
1½ c rolled oats, quick cooking

Mix all ingredients together except for Lindt chocolate.  Spoon the mixture onto parchment paper.  Form into a rectangular block.  Cover with plastic wrap and place in refrigerator for an hour.  Cut into bars.  Cover and return to refrigerator over night.  Place the chocolate squares in a small bowl.  Place the bowl in anther bowl of very hot water to melt the chocolate without getting water into it.  Carefully drizzle the chocolate over the separated bars.  Place the bars in a storage container.  Store in the refrigerator.

Yield: 10 bars

Nutritional value per bar: 98 calories, 12 g carbohydrates, 4 g fat, 5 g protein, 31 mg sodium, 3 g fibre


Tuesday, January 07, 2014

Almond Coconut Kind Bar Copycat (Clone Recipe)

Diet Tip of the Day:  Time your exercise sessions to target your desired results.  Exercise in the morning to burn fat.  Exercise in the afternoon to build endurance.

A few days ago, one of the food producers I follow on Facebook posted a link to Camilla V. Saulsbury's Homemade Kind Bars with a notation that they were going to try them with molasses. I had no idea what a Kind bar was but the recipe looked like a good one for our grandkids.  I bookmarked the recipe to try then forgot about them.  As luck would have it, just before the snow storm hit, I was picking up a few things at Walmart.  I had a couple of dietary supplements on my list and in the same aisle, there are the energy bars.  Normally, I don't even give these a second glance but for some reason I tossed one into the cart likely thinking it may come in handy after one of my exercise sessions.  When I got home, I realized that I had bought an actual Kind bar so pulled up the recipe and was off experimenting.

almond and coconut kind fruit and nut bar
I thought what I had bought was and energy bar, which is basically what a Kind bar is.  It is made with natural ingredients, high in fiber and gluten, wheat and dairy free.  The only thing I found on the list of ingredients that some may choose to avoid is soy lethcithin, only because it is soy aka GMO.  Other than that, the ingredients and nutritional values were good.  At 210 calories, it would be the same as some candy bars but healthier and lower carb.  The $1.79 price tag may deter some.

almond coconut kind bar copycat bar
The recipe on Leite's Culinaria is really just a ratio the ingredients.  The creator of the recipe insists that other sweeteners like agave, honey or maple syrup will not work.  However, I am going to try with molasses and pure sugar cane syrup.  Worse case scenerio, I will end up with delicious chunks to snack on.  I also thought that the nuts and fruits could be substituted with an equal amount of trail mix.  There's really just endless possibilities using the basic ingredient ratio!

I used whole almonds, Rice Krispies and shredded coconut so the result was very close to the Kind bar.  I neglected to line the baking dish with parchment paper and although I managed to save the bars, I will be sure to use parchment paper with the next batch.  My bars were shorter than the Kind bar.  Next time I will cut them into 15 bars instead of 10 though as even the smaller size was a bit too much.  Other than that, I am quite please with the results!  I did calculate the nutritional value for the size bars I made (see below).  The numbers are good but be warned will change depending on the nuts and fruit used.  The cost came in at about 80¢ per bar.


Sunday, November 24, 2013

Dehydrated Apple Slices

As mentioned in yesterday's post, I have been doing a bit more dehydrating this year.  Dehydrating is an easy way to preserve fruits and vegetables for long periods of time.  Apples can be dehydrated anytime throughout the year.  I prefer to dry them when in season.  Apples were just starting shortly before we left on the first leg of our winter vacation in early October.  That gave me just enough time to run a batch of applesauce as well as dry apple slices. 

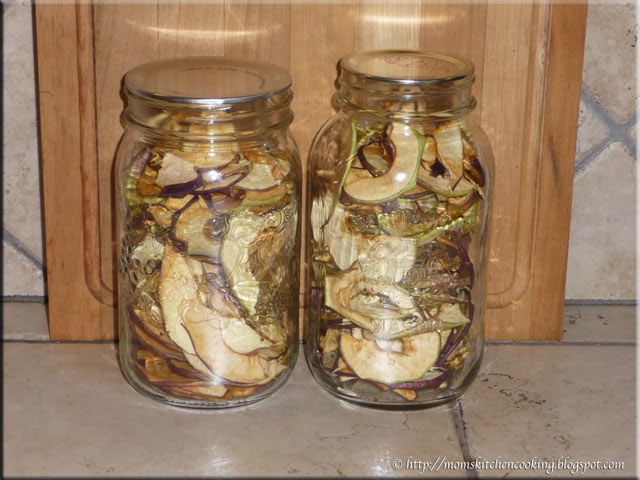
dehydrated apple slices vacuum sealed for storage
Apple slices are a versatile, easy to make product for the pantry.  They can be used for snacking, reconstituted for baking or added to beverages for a delightful, natural flavour.  One of our favourite fall beverages is mulled apple cider made in the crockpot.  I add dried apple slices to the mulled apple cider for extra flavour.   I also like adding a dried apple slice to a hot cup of tea for subtle flavour boost.

Apples need only be washed well, cored, sliced then dipped in an ascorbic acid solution to prevent browning before drying.  I  dried the apple slices at 135°F/57°C until they were leathery feeling.  Once dried, I vacuum sealed the apple slices in mason jars for storage.  Each mason jar held a dehydrator load of 6 trays.  I will have to dry more as two jars is not enough to last through the winter! 


Saturday, August 17, 2013

The Great Smoker Experiment (Part 2)

When I am testing a new method I like to use a tried and true food we like for the comparison.  So it was with my great smoker experiment.  Beef jerky is a family favourite that I have been making since my kids were knee high to a grasshopper.  Homemade beef jerky is a healthier version to mass produced beef jerky.  It is very easy to make requiring minimal equipment and a few simple ingredients.  I normally make beef jerky using a dehydrator and the dehydrator setting on the oven when I had the Jenn-Aire range.

prepared beef slices for jerky
Although beef jerky can be made using ground beef, I don't.  There is a higher risk of contamination using ground beef because of the increased surface area.  Beef jerky is not cooked but rather dried to 160°F/71°C which is a high enough temperature to kill off bacteria and remove moisture to preserve the meat.  I use a lean cut of beef sliced into thin strips either by the butcher shop or myself to make traditional beef jerky. 

A marinade is optional but is usually used to add extra flavour to the beef jerky.   There are numerous marinade recipes ranging from very simple to complex or a commercially made barbeque sauce can be used.  I marinated the hand cut beef strips in Sweet Baby Ray's barbeque sauce overnight.

meat slices in the dehydrator
The main purpose for this cooking experiment was to see what if any differences there were in the finished product by changing the drying method.  For a valid comparison, it was important to use beef strips that had been treated identically up to the actual dehydration process.  That would mean any differences in flavour or texture would be due to the drying method used.   I would be using my Nesco American Harvest dehydrator and the True North smoker for this cooking experiment.

The next morning I divided the beef slices into two portions.  I placed the first portion of the strips on the prepared dehydrator trays and set the temperature to 160°F/71°C.  In all honesty, I love my dehydrator and have even expanded it BUT if I were doing larger scale dehydrating, I would consider buying a dehydrator with rectangle or square racks as they are a bit more versatile.  At any rate the Nesco dehydrator works well for my needs.

meat slices in the smoker
I loaded the second portion of the beef strips directly onto the smoker racks.  The need for a drip tray quickly became apparent but that is the case with drying beef jerky regardless of the drying method.  I loaded up the wood chip pan with mesquite wood chips then set on the burner and plugged the unit in.  Once the smoking began, I removed the door to take a picture then replaced it.  The door was removed again to refill the wood chip pan a couple of times, then finally for the removal of the finished beef jerky.  Of note, when the smoker door is opened you will be greeted with a large puff of smoke meaning your clothes, hair and anything in the general vicinity of the smoker will smell like smoke!

a comparison of smoked to dehydrated beef jerky
This was a rather interesting cooking experiment.  Clearly there are pros and cons to using both methods.  A smoker can only be used outdoors whereas a dehydrator can be used both indoors and outdoors.  Both need to be sheltered from the elements when in use outdoors.

The results:   The drying time was considerably shorter for the beef jerky dried in the dehydrator, with the jerky drying in a little over half the time of that in the smoker.  In terms of colour and texture, the beef jerky dried in the dehydrator was almost identical to that dried in the smoker.  The beef jerky dried in the dehydrator may have been just a little darker.  So, either way the colour and texture is pretty much the same.  The big difference was the flavour!  The beef jerky dried in the dehydrator had a lovely flavour with just a hint of smokiness from the Sweet Baby Ray's.  By hint, it really was barely noticeable, yet a flavour element none the less.  The beef jerky dried in the smoker was heavy on the smoky flavour, over powering the Sweet Baby Ray's that became more of a flavour note.  Two weeks later, test strips of retained their colour, texture and flavours nicely.

The bottom line:  I was quite impressed with the smoker results.  I will definitely be experimenting with more smoked meats and am one step closer to buying a smoker.  The dehydrator gave consistent results in a shorter period of time with less fussing.  There was more fussing to the beef jerky dried in the smoker but I was new to the process and there was no temperature control or wood chip indicator on the basic smoker I borrowed so those were factors.  The smoke gives great flavour that can't be duplicated by the dehydrator.  If using a smoker, I think the marinade can be kept simple.  It is an easy way to get great flavour without any of the calories of barbeque sauce too. 


Tuesday, April 09, 2013

Healthier Versions of Two Family Favourites - Peanut Butter Cookies and Banana Bread

My husband and I have always believed in eating good foods which for us translates in home cooked from scratch.  Over the past few years I have modified many of our family favourites so they are slightly to moderately healthier versions without losing the tried and true flavour of the original dish.  Why would I do this?  The culinary world and that does include home cooking like any discipline is constantly evolving.  New knowledge comes to light that gives insight into the nutritional aspect of cooking, improved cooking methods and in many ways how to use old fashioned methods in an ever changing modern world. 

healthier peanut butter cookies and banana bread
We eat a rather healthy diet by avoiding food preservatives, artificial food additives, HFCS, excess sugar and salt.  We eat hormone free meats, free range chickens and eggs and rely heavily on locally grown produce as well as grow our own.  It is little wonder that about 90% of the baked goods we consume are home made from scratch, including most breads.  There is always room for improvement in healthy cooking. 

Let's face it, cookies are not as healthy of a snack choice as a carrot stick but they are certainly a lot healthier than some snack choices.  Home baked cookies are healthier for you than the chemically laden mass produced cookies.  I've been making the very same peanut butter cookie recipe from the 1969 Betty Crocker's Cookbook.  The recipe calls for either butter or margarine.  I use butter as we do not use margarine in our home.  I substituted organic additive free unbleached flour for the all-purpose flour and organic granulated sugar for the white granulated sugar.   I substituted Kraft light 25% less fat smooth peanut butter for regular peanut butter and reduced the salt (I only use sea salt) because there is salt in the peanut butter.  The cookies tasted the same as always!  The next batch I am going to use homemade peanut butter.  If that works well, I will have reduced the fat in the cookies by a fair amount.  I also want to try making the cookies with spelt, an ancient grain that is healthier.

Mass produced peanut butter is not as healthy for you as the food industry would have you believe.  It is laden with fat and sugar giving it a smoother texture than homemade peanut butter.  It doesn't separate like homemade peanut butter because vegetable oil is added to prevent separation.  It also contains corn dextrin, something of concern to those with a corn allergy or insensitivity.  We are not huge consumers of  peanut butter at under a purchased 1kg jar per year for cookies if that and about half of that in homemade peanut butter.    I'm hoping homemade peanut butter will work in these cookies just as well!

Banana bread is wonderful for breakfast or snacking and it travels well for lunches.  It is my frugal standby for using up over ripe bananas.  I have been making this same banana bread recipe since our newlywed days.  It is handwritten in my very first cooking journal, overwritten with copious modifications to the recipe it has become today.  I have experimented using whole wheat flour in place of all purpose flour which gives the loaf a denser, grainier texture but is still quite good.  The combination that works well for texture is 1 c of unbleached flour and ¾ whole wheat flour, both healthier than all-purpose flour.  I use sea salt rather than iodized salt, organic sugar rather than regular white sugar an butter instead of shortening.  Recently, I have been making this bread with organic bananas that have just recently become available at our local Walmart.  The organic bananas are currently 10¢ per pound more expensive than regular (57¢ per lb) and I doubt they will go on sale the way regular bananas do but time will tell.  Aside of trying this recipe using spelt in place of the unbleached flour, it is about as healthy as it is going to get.

It is surprising how a few simple and inexpensive changes can make a recipe healthier without affecting the taste.  These changes are part of moving towards a healthier diet while still enjoying the comforts of your favourite dishes.  I have found pretty much any organic substitutes without a problem for its non-organic equivalent.  Canola oil (GMO) can be substituted with an non-GMO light tasting oil.  Cane syrup is a good substitution for corn syrup.  Whole wheat pasta and pastas enriched with vegetables pretty much have the same colour and texture as plain pastas although there may be a colour difference.  Through trial and error, it is surprisingly rather easy to find healthier ingredients for your favourite reciepes. 


Saturday, March 31, 2012

Mini Carrot Bran Muffins

We did a lot of camping when our kids were young.  Our favourite camping locations were Pinery Provincial Park (near Grand Bend, ON), Cypress Lake part of Bruce Peninsula National Park system (just south of Tobermory, ON) and Algonquin Provincial Park (near Huntsville, ON).  These are all rustic campgrounds with limited RV connections, something we preferred to the commercial campgrounds.  We also did a fair amount of camping at state parks in Michigan and Ohio.  Our kids were allowed a special treat each time we went into town which really amounted to once or twice  during a camping trip.  They were allowed to spend their camping money as they wanted and yet even back then they did not buy candy or chips.  They would buy something they couldn't get at home.  Well, one camping trip in Michigan, we stopped at a Hostess outlet.  Our kids did not buy the frosted cupcakes, Twinkies, or Snowballs.  They excited bought a snack sized package each of mini blueberry muffins.  At that time, mini muffins was not something I made and they thought mini muffins were better than anything else!  On the way home from the camping trip, I bought a mini muffin pan and the start of mini muffin making began in our home.

mini carrot bran muffins
Easter is quickly approaching so I have been testing a couple of new Easter recipes.  I needed a dessert type muffin for Easter brunch.  I made a test batch of carrot bran muffins that will be perfect for brunch when topped with a cream cheese icing.  This recipe uses home canned pineapple that not only adds flavour, it keeps the muffins moist and tender.  Pineapple does pair nicely with carrot so I was not surprised at the wonderful flavour of these mini muffins.  My husband gave them the two thumbs up!  The cream cheese icing will dress the muffins up for Easter brunch while adding an extra flavour dimension.  The grandkids are going to love these mini muffins!

Mini Carrot Bran Muffins
modified from: Jean Paré, Company's Coming Muffins & More, 1983, Pp, 14.

1½ c unbleached flour
¾ c packed brown sugar
¾ c natural wheat bran
1 tsp baking powder
1 tsp baking soda
½ tsp sea salt
1 tsp ground cinnamon
2 eggs
½ c canola oil
1 c grated carrot
1 cup home canned crushed pineapple with juice

Pre-heat oven to 400ºF/200ºC.  Combine the dry ingredients in a large mixing bowl.  Make a well in the middle.  Stir to mix well.  Put the eggs into the bowl of a stand mixer and beat until frothy.  Stir in the oil, carrot and pineapple. Pour the egg mixture into the well.  Using a fork, mix just until wet.  Spoon into mini muffin cups.  Bake for 20 minutes or until a toothpick inserted is clean.  Remove from oven.  Cool 5 minutes then remove from pan.

Yield: 36 mini muffins


Friday, March 30, 2012

Mini Zucchini Muffins

Our kids were in the kitchen from the time they were born because we have always felt that the earlier you get a child involved in cooking the better.  Cooking with kids is more than just cooking!   It is a family bonding time that provides ample learning moment opportunities both for parent(s) and child.  It can form a life-long interest in food as well as foster healthy eating habits.  Seriously, getting your child involved in food and cooking is one of the best things you can do.  Besides it is just down right plain fun!

mini zucchini muffins
If you go to the donut shop, muffins are so huge that they can actually have more calories than some fast food sandwiches.  We eat a lot of muffins but I like making them small so they are more of a snack size unless making them for breakfast.  Mini muffins make a lot of sense.  They pack nicely for lunches and are kid friendly after school snacks.  Wilton, the leading cake experts has a lovely 24 cup mini muffin tray that you can pick up for under $10 if you watch the sales.

Mini Zucchini Muffins
inspired by:  Jean Paré, Company's Coming Muffins & More, Pp. 33

1 c unbleached flour
1 c whole wheat flour
1½ tsp baking powder
1 tsp baking soda
1 tsp cinnamon
½ tsp allspice
1 tsp sea salt
1 egg
¼ c vegetable oil*
½ c granulated organic sugar
1 c grated zucchini
½ c milk

Measure the dry ingredients into the mixing bowl of a stand mixer or regular mixing bowl.  Mix well.  In a separate bowl, beat the egg until frothy  then mix in the oil*, sugar, zucchini and milk.  Stir the egg mixture into the dry ingredients until just mixed.  Spoon the batter into mini muffin cups.  Bake at 400ºF (200ºC) for 20 minutes or until a toothpick inserted into a muffin tests clean.  Let cool slightly then remove from the pan. 

Yield: 24 mini muffins

*Note: You can reduce the fat in these muffins by substituting applesauce for the vegetable oil.