My photo
Ontario, Canada
I am a wife, mother and grandma who enjoys the many aspects of homemaking. A variety of interests and hobbies combined with travel keep me active. They reflect the importance of family, friends, home and good food.
Cook ingredients that you are used to cooking by other techniques, such as fish, chicken, or hamburgers. In other words be comfortable with the ingredients you are using.
--Bobby Flay

For Your Information

Please watch this area for important information like updates, food recalls, polls, contests, coupons, and freebies.
  • [March 19, 2020] - Effective Mar 17, this blog will no longer accept advertising. The reason is very simple. If I like a product, I will promote it without compensation. If I don't like a product, I will have no problem saying so.
  • [March 17, 2020] - A return to blogging! Stay tuned for new tips, resources and all things food related.
  • [February 1, 2016] - An interesting report on why you should always choose organic tea verses non-organic: Toxic Tea (pdf format)
  • Sticky Post - Warning: 4ever Recap reusable canning lids. The reports are growing daily of these lids losing their seal during storage. Some have lost their entire season's worth of canning to these seal failures! [Update: 4ever Recap appears to be out of business.]

Popular Posts

Showing posts with label snacks. Show all posts

Monday, September 28, 2015

Homemade Mini Chocolate Chips

Summer has past, the kids are back in school and Hallowe'en is just around the corner.  That can only mean that folks will soon be gearing up for holiday baking.  I'm sure many are looking for healthier homemade snacks for kid's lunches too.  A little chocolate added to homemade granola bars, snack bars or cookies is always a tasty treat.  Chocolate chips is the usual standby for this purpose but for some uses the biggest problem is chocolate chips are too big.  The second problem is finding organic, high cacao dark chocolate chips.  I came up with this simple solution. 

homemade mini chocolate chips
After considerable looking, I found a Goodliving silicone potholder and trivet with a honeycomb grid.  I melted half of a 90% cacao dark chocolate bar over hot water then poured over the trivet.  I put the chocolate filled trivet into the refrigerator to allow the chocolate to harden.  Once cooled, I popped the mini chocolate chips from the trivet.  They are just the perfect size for adding that extra touch of chocolate in my homemade protein bars!

You can use any plain chocolate bar of choice including the white milk chocolate.  Add a couple of drops of peppermint oil for mint flavoured chocolate chips.  Store in the refrigerator then use as desired.  You can even sprinkle a few over ice cream, plain vanilla yogurt or oatmeal.  The high cacao content adds a lot of flavour so you don't need to use a lot.  These homemade mini chocolate chips are a win win!


Wednesday, April 16, 2014

Frico

Cheese lace or frico is simply baked shredded cheese.  Almost four years ago today, I shared how I make cheese lace bowls.  These delicious edible bowls are an ideal presentation for salad.  Frico can be shaped into simple rounds for a low calorie, no carb crunchy snack or the frico can be crumbled to sprinkle on top of salads and vegetables.  They can also be used as a garnish.  Frico are very easy to make!

weighing shredded cheese for frico
I made a batch of frico for snacking.  Since I was calculating the nutritional value, I weighed 15 g (about 2 tbsp) of the shredded cheese for each frico.  It was important to weigh the unbaked cheese to determine the nutritional value in the finished frico.  I placed each weighed portion of the shredded cheese on a Silpat lined baking sheet in a small mound that I spread into a circle about 2½ - inch diameter leaving space around each for spreading.  I had a total of six prepared cheese circles.  I baked the frico at 350°F until golden brown, just crisping on the edges.

Any shredded cheese can be used to make frico.  Don't worry about mixing the kinds of cheese either.  It is a great way to use up those little bits of left-over cheese.  You can add extra flavour by sprinkling the shredded cheese with seasoning salt or dried herbs of choice.  If you want a little extra crunch, sprinkle a little chia seed on top.  If you want to form the frico into bowls, double the amount of shredded cheese and spread to about 5 - inch diameter.  Form the bowl as soon as the frico is taken from the oven while still warm.

baked frico
As the frico bakes, you will notice oil being released.  The oil will pool around the frico and on top.  It is a bit had to see in the picture but the shiny liquid around the edges of the frico is oil.  This is not a lot but this does reduce the amount of fat in the finished frico which in turn reduces the caloric value.  It is important to allow the frico to drain on paper towel to absorb as much oil as possible.  This ensures the frico are crisp and crunchy. 

Once the frico has been cooled and drained, carefully place them in an airtight storage container.  The frico will be brittle to be careful not to break if you want them for snacks or garnish.  You can crush and store that way as well.

weighing baked frico
I weighed each finished frico.  They were 9 g each so baking resulted in a 6 g weight loss.  Part of this weight loss was oil, effectively lowering the caloric value but part was water.  The 9 g frico has a nutritional val of 33 calories, 0 g carbohydrates, 3 g fat, 2 g protein, 53 mg sodium and 0 g fibre.  The nutritional value will vary slightly depending on the cheese used but not a lot.

Frico are crunchy, tasty snacks that will satisfy your cravings for a salty, crunch snack.  They are surprisingly filling too.  They are the perfect snack for those eating low carb and unlike many snacks have a bit of protein.  Frico are a healthy snack that is sure to please!


Friday, December 06, 2013

ROLO Pretzel Delight

As promised, today is the first post of a series of posts featuring foodie related topics for the holidays.  Every parent has been there where their adorable little munchkin tells them at the last minute they need a treat for their class party the next morning.  It's nice to have an easy, no muss recipe to fall back on for just such times.  When I think of an easy, no muss recipe it usually means something I can put together quite quickly with few ingredients yet tasty results.

I was browsing through the Walgreens flyer a couple of days ago where I discovered this easy, peasy sure to please recipe for ROLO Pretzel Delight just perfect for the holiday season.  The recipe actually comes from Hershey's on the rolo chey caramels in milk chocolate package.  These delicious treats are made with only three ingredients and take about five minutes total to assemble.  The combination of sweet and salty is sure to please! 

The recipe is quite flexible as far as quantity.  I made 24 (some not pictured) so needed 24 each tiny pretzels, ROLO candies, and pecan halves.  I only use about half a 240 g (8.5 oz) bag of rolo caramels!  These treats are so easy to make and so tasty.  That earns them a spot on my quick, tried and true recipes.   

Rolo Pretzel Delight
source:  The Hersheys Company, Celebrate with Hershey , 2013

small pretzels
pecan halves
ROLO chewy caramels in milk chocolate

Heat oven to 350°F.  Line cookie sheet with parchment paper or silpat.   Place one pretzel for each pretzel treat desired on the prepared sheet.  Top each pretzel with one unwrapped ROLO chewy caramel in milk chocolate.  Bake 3 to 5 minutes or until caramel piece begins to soften*, but not melt.  Remove from the oven.   Top each softened ROLO with pecan half.  Cool completely**.

*I kept a very close eye on the caramels that really don't change drastically as they soften.  I removed from the oven just at the 3 minute mark.

**The treats stay sticky on the bottom so need to cool completely for serving.  I let them cool on the parchment paper that was carefully transferred from the baking sheet to a cooling rack.  Once the treats were fully cooled, I placed them on a serving plate.


Saturday, October 26, 2013

Popcorn at the Campsite

Just as eating at home or our vacation home, the vast majority of meals at the campsite were homemade from scratch, much the same as they were when we were camping with our kids so many years ago.  Even the majority of snacks our kids enjoyed while camping were homemade or simply fruit.  Homemade trail mix was one of their favourites as was popcorn.  The year we camped in tents, I bought Jiffy-pop for one of the kids' snacks.  They loved popcorn, a regular snack at home, usually made in an air popper.  With no hydro, I reasoned that Jiffy-pop would be a good substitute.  It was and the kids loved watching the foil lid puff up!  The following year we bought a tent trailer so popcorn was made in the trailer or in a popcorn popper over the fire.  I never did go back to buying Jiffy-pop but the kids still remember that little bit of magic.

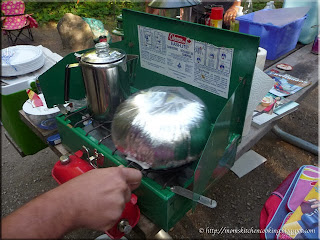
jiffy pop on the Coleman stove
The kids have a Coleman stove that uses naptha (white gas) fuel under pressure.  The fuel is poured into the red canister.  Once the cap (towards top of canister) is tightened, the canister is pressurized by pumping the pressurizer (near bottom of canister).  The burner is turned on then gas lit with a match.  The burner burns with a high orange flame that gradually lowers, tightening towards the centre turning a hot blue flame for cooking.

The kids fired up the Coleman and while a pot of coffee was brewing for the adults, the Jiffy-pop cooked on the other burner.  The grandkids waited patiently in anticipation.  True to form, within minutes the magical puffed up lid appeared giving the sign the popcorn was almost ready to serve.  

jiffy pop ready to enjoy
The is a lot of steam under the foil once the popcorn is popped so the kids carefully opened it, revealing the hot, tender popcorn ready to be enjoyed.   The grandkids climbed up on their camp chairs, happily munching on popcorn while chatting about that day's adventurers.  As the day drew to a close, sitting around a roaring fire was a pleasant ending. 

These days, I make popcorn at home using an electric Whirly popcorn popper.  The grandkids love watching the popcorn pop large, tender morsels that aren't tough or dried out as air poppers can cause.  We are planning on getting back into camping so popcorn will be a staple snack when camping.  I'll go back to using a popcorn popper over the campfire when camping.  Still this brought back pleasant memories of our very first camping trips!


Saturday, August 17, 2013

The Great Smoker Experiment (Part 2)

When I am testing a new method I like to use a tried and true food we like for the comparison.  So it was with my great smoker experiment.  Beef jerky is a family favourite that I have been making since my kids were knee high to a grasshopper.  Homemade beef jerky is a healthier version to mass produced beef jerky.  It is very easy to make requiring minimal equipment and a few simple ingredients.  I normally make beef jerky using a dehydrator and the dehydrator setting on the oven when I had the Jenn-Aire range.

prepared beef slices for jerky
Although beef jerky can be made using ground beef, I don't.  There is a higher risk of contamination using ground beef because of the increased surface area.  Beef jerky is not cooked but rather dried to 160°F/71°C which is a high enough temperature to kill off bacteria and remove moisture to preserve the meat.  I use a lean cut of beef sliced into thin strips either by the butcher shop or myself to make traditional beef jerky. 

A marinade is optional but is usually used to add extra flavour to the beef jerky.   There are numerous marinade recipes ranging from very simple to complex or a commercially made barbeque sauce can be used.  I marinated the hand cut beef strips in Sweet Baby Ray's barbeque sauce overnight.

meat slices in the dehydrator
The main purpose for this cooking experiment was to see what if any differences there were in the finished product by changing the drying method.  For a valid comparison, it was important to use beef strips that had been treated identically up to the actual dehydration process.  That would mean any differences in flavour or texture would be due to the drying method used.   I would be using my Nesco American Harvest dehydrator and the True North smoker for this cooking experiment.

The next morning I divided the beef slices into two portions.  I placed the first portion of the strips on the prepared dehydrator trays and set the temperature to 160°F/71°C.  In all honesty, I love my dehydrator and have even expanded it BUT if I were doing larger scale dehydrating, I would consider buying a dehydrator with rectangle or square racks as they are a bit more versatile.  At any rate the Nesco dehydrator works well for my needs.

meat slices in the smoker
I loaded the second portion of the beef strips directly onto the smoker racks.  The need for a drip tray quickly became apparent but that is the case with drying beef jerky regardless of the drying method.  I loaded up the wood chip pan with mesquite wood chips then set on the burner and plugged the unit in.  Once the smoking began, I removed the door to take a picture then replaced it.  The door was removed again to refill the wood chip pan a couple of times, then finally for the removal of the finished beef jerky.  Of note, when the smoker door is opened you will be greeted with a large puff of smoke meaning your clothes, hair and anything in the general vicinity of the smoker will smell like smoke!

a comparison of smoked to dehydrated beef jerky
This was a rather interesting cooking experiment.  Clearly there are pros and cons to using both methods.  A smoker can only be used outdoors whereas a dehydrator can be used both indoors and outdoors.  Both need to be sheltered from the elements when in use outdoors.

The results:   The drying time was considerably shorter for the beef jerky dried in the dehydrator, with the jerky drying in a little over half the time of that in the smoker.  In terms of colour and texture, the beef jerky dried in the dehydrator was almost identical to that dried in the smoker.  The beef jerky dried in the dehydrator may have been just a little darker.  So, either way the colour and texture is pretty much the same.  The big difference was the flavour!  The beef jerky dried in the dehydrator had a lovely flavour with just a hint of smokiness from the Sweet Baby Ray's.  By hint, it really was barely noticeable, yet a flavour element none the less.  The beef jerky dried in the smoker was heavy on the smoky flavour, over powering the Sweet Baby Ray's that became more of a flavour note.  Two weeks later, test strips of retained their colour, texture and flavours nicely.

The bottom line:  I was quite impressed with the smoker results.  I will definitely be experimenting with more smoked meats and am one step closer to buying a smoker.  The dehydrator gave consistent results in a shorter period of time with less fussing.  There was more fussing to the beef jerky dried in the smoker but I was new to the process and there was no temperature control or wood chip indicator on the basic smoker I borrowed so those were factors.  The smoke gives great flavour that can't be duplicated by the dehydrator.  If using a smoker, I think the marinade can be kept simple.  It is an easy way to get great flavour without any of the calories of barbeque sauce too. 


Wednesday, February 06, 2013

Concession Stand Style Nachos

We hosted a Superbowl party last Sunday and while I would love to tell you everything offered was healthy, it wasn't.  The bottom line is we eat healthy 95% of the time so we can not feel guilty eating unhealthy 5% of the time.  Now hosting an event is very much different than eating in that you want to offer your guests some of the things they enjoy, especially for special events like the Superbowl.  These are the popular pub grub and concession stand foods.  Don't worry though, as there were plenty of healthy choices offered and this year instead of chili I baked a ham for ham buns complete with lettuce and the fixings along with baked beans, and a friend brought a lovely hot potato salad.  I also had vegetable, fruit and pickle trays.  Anyway, we had a lot of fun!

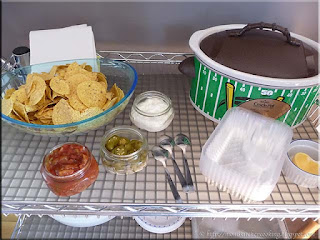
some of the concession stand ingredients needed for nachos
Every single football stadium, hockey arena, ball park and sports event has nacho chips with cheese.  And trust me, we have been to a lot of these venues since my husband is a bit of a sports fanatic.  Concession stand nachos are famous for their thick, round tortilla chips topped with a heavy dose of orange cheese product with jalapeño peppers.  That's it.

The best price I have found for the ingredients for concession style nachos is Sam's Club.  Medellion original round 2-3 lb bags ($7.92).  They used to always be just under $5 but that's inflation.  The Baker's & Chefs nacho cheese sauce, 6 lb at $5.82 is the best tasting nacho cheese sauce we have found.  This is a commercial grade sauce that is what a lot of concession stands use.  It can be diluted with 2 cups of water or 3 cups of whole milk to increase the yield.  I don't dilute it.  The clear plastic nacho trays are for presentation.  A 125 ct bag costs $4.98 and while I know they are not eco-friendly they are a huge crowd pleaser and for home use can be re-used.  I use home canned jalapeño peppers but Sam's Club sells them for $3.24 for 64 oz.  I also add home canned salsa which you may or may not want to do.

the self-serve nacho stand set up
Self-serve works well for several applications when entertaining.  I set up the self-serve nacho station on the snack cart under one of the televisions in the games room.  Of note is how I present it.  I use the small squatty mason jars as serving bowls for the salsa, sour cream and peppers.  That means at any given time I only have at max a cup of each out.  When a refill is needed the jar is replaced with a fresh jar along with the refill.  It does make for a bit more dishes to wash but it is a lot safer than adding fresh to a serving bowl that has been sitting out for a over an hour or more.  I also only use half the can of cheese and about a quarter of a bag of the tortilla chips at a time, replenishing as necessary.  Once I notice the interest in the nacho bar is waning, I just simply clear it out replacing it with the next snack.

concession stand nachos presentation
Concession stand nachos are usually served in plastic, two compartment trays.  Usually they are simple round tortilla chips laden with warm, spicy, gooey nacho cheese sauce .  Extra cheese sauce or peppers is placed in the smaller compartment.  I've never seen sour cream or salsa at concession stands for the nachos.  Not that some don't offer it just I've never run across it.  I added sour cream and salsa just to kick the snack up a notch.  These nachos get rave reviews!

If you want to make authentic concession stand style  style nachos, get your food supplies at Sam's Club or a restaurant supply.  Presentation adds to the snack so be sure to use nacho trays.  The nacho trays will be available at either or you can find them at party stores.  The most important thing is have fun with this type of dish. There really isn't any way you can mess it up so enjoy!


Sunday, September 30, 2012

Prepping Ahead and Slow Cookers

September has notoriously been an extremely busy month ever since we were newlyweds.  Two of our kids were born in September, a year apart.  September signifies the end of summer so it always meant closing the pool, canning copious amounts of tomato products and back then getting kids ready for school.  I began my undergraduate studies the year our youngest started kindergarten.  This involved a daily round trip commute of three hours on a good day.  Yet I was determined to put healthy food on the table and eat dinner as a family each night.  I quickly developed a lot of techniques to help me achieve that goal.

filled vacuum seal canisters
I always took the kids fishing Saturday mornings whenever the weather was nice.  It was a fun way to bond, always with the hopes of a large enough catch for dinner.  On the way home, we would stop at a couple of orchards and roadside stands for fresh produce.  During the winter months, we took the kids to the grocery store on Saturday mornings for fresh produce.  They were allowed to choose what they wanted.  We'd come home and as a family would prep about half of the produce for easy healthy snacking during the week.   Vegetables went into the fridge and fruits into the never-ending fruit bowl.

The kids are grown with kids of their own.  I still prep vegetables for the week ahead of time but now I put them in FoodSaver canisters.  This keeps them fresh longer and they are in plain sight to encourage healthy snacking.  This is a great easy lunch idea for those dreaded school lunches.  The produce is already cleaned and ready to use!

meatballs in Sweet Baby Ray's sauce
Shortly after starting my academic career that spanned a total of ten years including a graduate degree, I started once-a-month cooking then quickly modified the concept to meet our family's needs.  I used my slow cooker to make chili and meatballs.  I would make a large batch of meatballs then freeze them for an easy to warm up, go to meal starter.  I also used the slow cooker to

I have three slow cookers, now used mainly for bulk cooking sessions and entertaining.    However, all of them are in use when doing a bulk cooking session.  They are wonderful for compact cooking.  One of our kids uses their slow cooker almost daily through-out the week.  I'm old school so rely on my pressure cookers but seriously, the slow cooker is the way to go for ready to eat, healthy meals for the busy family.  The meal is basically ready to eat when you walk in the door making the slow cooker an ideal tool for the busy home kitchen

nacho station set-up
My slow cookers really see the most use when entertaining.  That is because I can make a dish in the slow cooker then set it to warm.  My smaller slow cooker is used mainly for entertaining as it is not programmable.  It does do a lovely job of warming cheese sauce and keeping it warm.  It's also nice for cooking smaller batches of chili and soups.

This is a presentation I did for an gathering earlier this year.  The 250 ml squatty Elite mason jars do double duty as serving bowls.  That is home canned salsa and hot peppers as well as homemade sour cream.  The neat thing is you could easily tailor this for a kid's after school snack.  You can put the toppings in containers in the fridge, sauce in the slow cooker and corn chips in a bowl still in the package ready to be used.  Easy, peazy!


Friday, July 15, 2011

Parmesan Popcorn

Almost a year ago, I wrote about my new Cuisinart Popcorn Maker.  This popcorn maker is an electric version of a Whirly Pop.  Unlike hot air poppers, the Cuisinart popcorn maker uses a hot plate with stirring rod so the popcorn is fluffy and tender, never dried out.  Popcorn is one of our favourite snacks at home.  It is high in fiber, low in calories and quite economical if not the cheapest snack to make at home.

Popping corn is cheaper and healthier than microwave popcorn that should be avoided due to health risks.  A 1 kg (1,000 g) bag of yellow popping corn costs $1.49.  A ¼ cup (50 g) of unpopped corn is used for each 5½ cup batch giving 20 batches (110 cups) of popcorn per kilogram bag at a cost of 7.4¢ per batch.  Homemade popcorn is considerably less expensive than store bought potato chips, pretzels and cheese or caramel popcorn.  It can easily be made into candy corn, caramel corn or seasoned as desired at a fraction of the cost of store bought. 

parmesan popcorn
Popcorn is so easy to make either on the stovetop or using a popcorn maker.  Our grandkids are ages four, three and two.  They love watching popcorn pop.  The oldest one could easily operate an hot air popcorn maker with supervision. 
Our favourite way to enjoy popcorn is simply seasoned with butter and sea salt. Omitting the salt then shaking the hot popcorn with fresh grated parmesan cheese gives yummy, full flavoured results with a lower sodium content than using salt.  Unsalted butter can be used to further reduce the sodium if desired.  Parmesan cheese has a natural saltiness combined with the rich cheese flavour so omitting salt and using unsalted butter won't give a noticeable flavourful reduction. 


Tuesday, January 18, 2011

Chicharrones (Pork Skins)

A couple of days ago I posted about our foodies finds during our recent vacation to the sunny south.  I always find it rather interesting what is considered a snack food in other geographical locations.  I am not a snack type person.  Rather I am a grazer who can easily eat almost constantly throughout the day but I tend to go after fruits, vegetables, cheese, beef jerky and believe it or not beans.  My favourite snack food is steamed broccoli with just a little butter followed by hot buttered popcorn or almonds if I want something crunchy.  Years ago, well before we had kids and were just dating I discovered pork rinds.  They never became a staple in my snack choice but then I discovered pork cracklings that I get to indulge in about once couple of years.  Then I discovered chicharrones (pork skins) sold in large bags in the area of our vacation home.

chicharrones (pork skins)
Chicharrones (pork skins) are similar to pork rinds but they are huge!  Just look at how gorgeous they are.  They are delightful so once again I brought a bag home. 

Chicharrones give the crunch you are after but unlike potato chips you can eat a bit because you can snap off what you want and they are filling.  I don't have a bag of plain potato chips to compare the nutritional values to but when compared to sour cream & onion potato chips, a serving size of chicharrones at 14 g (about the size of a normal cracker) while the chips serving is 50 g.  It's important to realize though that the serving size of chicharrones is more than sufficient to satisfy your crunch craving while 20 chips (50 g) is not.  If factoring the chicharrones to 50 g the nutritional value is quite similar to the chips except there is cholesterol, no carbohydrates and more protein. The bottom line is neither chicharrones or potato chips should be part of a regular healthy diet but on occasion it doesn't hurt.

I think this is a really different snack.  The last time I brought home a bag I broke the chicharrones into cracker sized pieces and put it out for the guys when we were entertaining.  It was gone in no time and I got a lot of compliments off of it!  I may just talk to our butcher to see if I can buy pork skin to try to make these at home.  It would be a very interesting experiment!


Wednesday, December 22, 2010

Theme Park Funnel Cake Presentation

I recently wrote about making a popular country fair snack, the funnel cake, at home.   This sure to please, tasty snack is quite easy to make at home.  Pouring the batter into the deep fryer using a squeeze bottle or funnel takes a little practice but the technique is easily mastered.  For best flavour serve warm with desired toppings.

funnel cake
Funnel cakes at some fairs tend to be on the plainer side simply sprinkled with icing sugar.  I ordered a funnel cake at a theme park where there were several additional toppings available.  Toppings included icing sugar, banana slices, chocolate sprinkles, apple pie filling, and glazed strawberries.   Just look at the beautiful presentation! 

The glazed strawberries are easy to duplicate at home as well using instant Clear Jel®.  [Note that this is not the cooking Clear Jel® used in canning pie filling.]  Instant Clear Jel® and similar glazing products can be found in the produce aisle of most grocery stores.


Sunday, December 19, 2010

Tangerines

The best snacks come already packaged by Mother Nature!  Tangerines are a citrus fruit with a loose skin that is easy to peel, perfect for snacking.  They are smaller in size than an orange.  There are several varieties of tangerines available with one of the most popular in our area being the clementine.  Clementines are shipped in small wooden crates usually from Morocco starting in early December ready for the holiday season.  I look forward to clementines for both snacking and home canning.  While these are quite tasty, they are not as flavourable as fresh picked tangerines.

tangerines
Citrus fruits are an important cash crop where our vacation home is.  Like all produce there is a season so for best flavour citrus fruit should be picked within that season at the peak of ripeness. Citrus fruit that will be shipped to other locations like where we live in Ontario is picked slightly under ripe to avoid spoilage during shipping.  As a result the fruit while good never develops as much flavour as a fruit picked fully ripe.

We bought fresh picked tangerines from a rather quaint fruit stand.  These were larger than clementines and a bit smaller than oranges.  The deep orange skin was thick and pebbled rather than thin and smooth.  The stem end was quite pronounced.  They were very easy to peel.

Tangerines can be enjoyed simply peeled as a snack.  The segments can be dipped about half-way in melted chocolate for a nice fruit tray presentation.  Segments can be used whole or chopped in salads and desserts.  Like clementines they can be home canned to be enjoyed as is or in desserts.  The peel can be zested to add flavour to a wide range of foods and the zest can be dried then powdered as a natural flavourant. 


Tuesday, October 19, 2010

Chicharron de Harina (Wheat Pellets)

One of my foodie finds at Bravo during our vacation was Chicharron de Harina (wheat pellets).  I specifically focused on Mexican foods here.  I had bags of really interesting wagon wheel shaped snacks that looked a lot like a fancy cheesee at the flea market on the previous trip.  I asked what they were and the lady explained they were a fried dough like tortillas.  It wasn't practical for me to bring home a bag as we had flown that trip.  This trip I looked for the wagon wheel shape in the hopes of being able to cook the snack at home since I didn't think they would travel well.

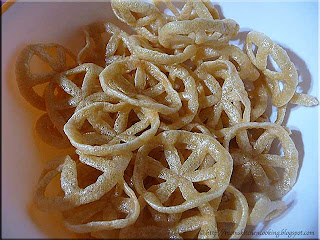
uncooked chicharron de harina
Chicharron de Harina are wheat pellets similar to pasta.  The pellets have a unique wagon wheel shape but can also be found as strips.  The pellets have a shiney, hard candy appearance.  Each wagon wheel pellet is about 1¼ - inch diameter.  Some are made using pork fat but the ingredients in the ones I bought are: wheat flour, iodized salt, corn starch, sodium bicarbonate, vegetable oil, colorant yellow #5, #6 cert and red #40.  I would imagine using pork fat would give a rather nice flaver similar to pork rinds.  Those not made with pork or fried in lard are a favourite vegetarian Mexican snack.

deep fried chicharron de harina
The chicharron de harina were quite easy to prepare.  I heated vegetable oil to 190ºC (375ºF) in the deep fryer.  When the oil was heated I dropped 5 - 6 of the hard wheat pellets into the hot oil.  They initially sink then within a couple of seconds puff up to about double size and rise to the top of the oil.  I gave quick stir to ensure they were cooked through then drained on a paper towel.  The total cooking time for each batch was about 20 seconds.  We enjoyed the chicharron de harina plain but you can sprinkle with salt, chili powder or sugar and cinnamon if desired.  An alternative serving suggestion is to sprinkle with lime juice or a dash or two of hot sauce.

Our grandchildren thought they were quite tasty so I sent some of the uncooked chicharron de harina home with them.  The pellets do go a long way!  I fried about 25 pellets when the grandchildren were here then later that night I fried up about half of the bag for entertaining and I still have almost a full 500 ml jar of the pellets left.  As snacks go this is a very frugal choice at only $1.69 with enough pellets to make several batches of the tasty snack.  I popped the leftover fried chicharron de harina into a storage container just to see how well this snack keeps.  The following day they were still crispy so this is a snack that could be made ahead for entertain, school lunches or picnics.


Friday, October 01, 2010

Boiled Peanuts

A surprising number of snack foods are purchased ready to eat.  Boiled peanuts are a very popular and traditional old southern snack.  They are often found at flea markets and other outdoor events in the southern US states.  The going price is around $4 for about 2 cups of boiled peanuts.

boiled peanuts
The boiled peanuts have a dark shell with a bit of a sheen.  They are a wonderful warm, salty snack well worth shelling!  They are on the wet side so a serviette is recommended.

According to Paula Deen boiled peanuts are quite easy to make at home.  There are only three ingredients - raw peanuts, water and salt.  The unshelled raw peanuts are boiled in the salt water until they are soft, about 2 hours.  They are served warm.  If you can't find raw unshelled peanuts in local stores they can be bought online for about $11 for 5 lb which isn't a bad price at all.


Wednesday, July 28, 2010

New Popcorn Popper

Popcorn has been a  favourite snack right from our dating days.  It's inexpensive and easy to make.  I made popcorn for years using a pot on the stove and occasionally we'd buy a Jiffy Pop to use when camping.  I bought an air popper popcorn maker that made making popcorn easier but noiser.  Much later we discovered microwave popcorn.  I used to pick-up a large box of microwave popcorn at Sam's Club but then discovered the potential health risks associated with microwave popcorn so I switched to a Whirley popper.  I really like my Whirley popper and it did a wonderful job until the gear mechanism on the lid broke.  My immediate thought was to buy another Whirley popper but then I found this little beauty.

Cuisinart® EasyPop™ Popcorn Maker PCM-1800RSA
I liked both the design and functional features of the Cuisinart® EasyPop™ Popcorn Maker PCM-1800RSA at Sam's Club for $25.71 (pictured) so decided to try it.  A new Whirley popper would have cost me $25.19 plus shipping.  The EasyPop™ has all the benefits of a Whirley pop without any of the work.  You simply put the popping plate onto the base then place the bowl on top that doubles as a serving bowl later.  The bowl has vents on the top to keep the popcorn tender and crispy just like the Whirley pop.  When the corn is finished popping you can place the cap over the vents then invert bowl with popping plate.  The popping plate is quite hot so should be returned to the base to allow cooling.  The popcorn in the bowl can then be seasoned and served in the bowl or poured into another serving bowl.  The bowl, lid and popping plate are dishwasher safe.  A measuring cup (not pictured) is included for easy measuring of the popcorn.


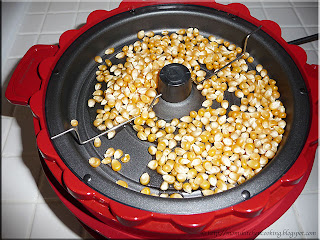
popping plate
The EasyPop™ has a stirring mechanism similar to a Whirley popper except it is motorized.  The popping plate has a non-stick surface.  It is fully immersible and dishwasher-safe.  The popping plate itself locks into place on the base.  If the popping plate is not properly positioned the unit will not operate.  You add the desired amount of oil and popcorn then place the inverted bowl into position on top of the popping plate and turn the unit on.  Unlike hot air poppers the EasyPop™ is quiet.  The main noise is the corn popping.  This popcorn maker makes up to 10 cups of popcorn in under 5 minutes.  It uses 550 W almost a quarter of the energy used by most large stove elements (2000 W).  I like that this small appliance will save money while giving me the same great results.

fresh popped corn
The seasoning possibilites for popcorn are endless.  By far our favourite seasoning is simply butter and salt so that is how I flavoured the first batch of popcorn made with the EasyPop™.  The results were as good as the Whirley popper.  The popcorn was tender and crisp.

The popcorn maker came with an instruction and recipe booklet.  Some of the recipes sound quite interesting - southwestern popcorn, wasabi popcorn, pesto popcorn and even chocolate popcorn!  I will post various popcorn creations as I make them. 


Thursday, June 03, 2010

Kitchen Quick Tips - Storing Popcorn

kitchen quick tips

Store popcorn in the freezer where it will last longer and pop more kernels.


Thursday, April 22, 2010

Kitchen Quick Tips - Popcorn

kitchen quick tips

Give up that chemically laden microwave popcorn for real popcorn popped on the stove. All you need is a pan with a lid. It less than the time of microwave popcorn you will have fresh popcorn that you can top with healthy toppings or eat plain. You will be saving money while getting a healthier product.


Saturday, March 20, 2010

Pork Cracklings

I cannot recall a time that pork has been on sale at such low prices. Thanks to all the hype and misinformation over the H1N1 virus we have seen extremely low pork prices. Nice cuts of pork such as the loin, pork shoulder and butt have been going as low as $1 a pound. Recently the savings has expanded to include smoked, cured cuts of pork as well.

smoked pork shoulderSmoked Pork Shoulder

One of the local grocery stores had smoked pork shoulders on for 97¢ per pound. At that price it was well worth picking one up. The total cost for this pork shoulder was $7.79. It was kryovac packaged so could have been frozen for later use. The meat had a mesh holding it together likely for the smoking process. There was a nice piece of skin on the meat. Most recipes with tell you to cross-hatch cut this skin which helps render out the fat but I had other plans for the meat. The skin portion is what I wanted to make a delicious snack called cracklings. I removed that before cooking at 300ºF, skin side up. Part way through the cooking process I glazed the pork shoulder with home canned apple jelly followed by the occasional basting with the glaze until the meat was cooked through.

defatting the pork skinDefatting Pork Skin

Leaving the meat without cross-hatching the skin resulted in an extremely moist and tender ham. Prior to serving I gently cut between the meat and fat pulling the skin with the fat in tact away from the meat (1). Laying the knife on its side between the fat and the skin then slowly moving on an angle to separate the two layers is the easiest method to use (2). This removes most of the fat. Holding the knife straight up with blade edge lightly resting on the skin then using a slight scraping motion is the best way to clean any remaining larger pieces of fat (3). It is important to not clean off all of the fat as it is needed to cook the cracklings. Once the skin is defatted I cut it into strips then across to form bite sized pieces (4).

Cracklings are called cracklings for two reasons. First they seriously do jump and crackle while they are cooking. It is imperative that you use a splatter screen to prevent possible burns from the jumping pieces. When the pieces pop, they are quite loud and capable of landing a distance from the pan. Here is a short video I made while cooking the cracklings.


The second reason cracklings are called cracklings is because the crackle when you eat them. The taste and texture is a true delight!

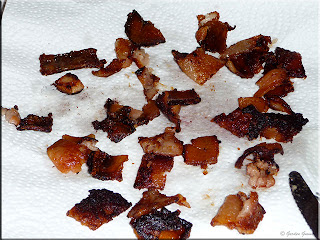
pork cracklingsPork Cracklings

Cracklings are cooked until just crispy on medium high heat. It is important to not over cook to the point of burning but not undercook to where the skin is gummy. The end result should be a crunchy texture that softens slightly when chewing yet holds somewhat together almost gum like. I know this is not a really good description of the texture but it's the best I can think of at the moment.

There is not a lot of shrinkage other than losing the fat. I drain the pork cracklings on paper towels to absorb any remaining fat. The pork cracklings are enjoyed as they are without any additional seasonings. They don't look like much but my gosh are they ever delicious!


Monday, March 01, 2010

Frugal Kitchens 101 - Snack Attack

Frugal Kitchens 101
Snacking is a normal part of daily life for most people. The problem with many snacks is they tend to be calorie rich, nutritionally poor and expensive. Essentially some snacks are not a good value for your food dollar or your health. However, snacking is not going to go away so there are a few ways to make better snacking choices. This week's Frugal Kitchens 101 focuses on snacking.

Snacking tends to fall into a couple of categories. Snacks can be crunchy/salt (potato chips, pretzels), soft/sweet (cookies, squares) to everything in between. The important thing to realize is many snacks can be purchased in bulk cheaper or made from scratch cheaper than store bought packages. To put it into perspective a bag of potato chips could cost as much as $2.79, more than a bag of potatoes that can give a yield of more than 4 bags of potato chips. When you make your own snacks you control the ingredients and omit a lot of food additives. Here's a few ideas:

  • chocolate - Chocolate is actually good for you if you eat dark chocolate. Omit milk chocolate and replace it with a high percentage cocoa. It will cost you more than milk chocolate but you will eat less of it so dark chocolate is the frugal choice. Oh and did I mention it is good for you?
  • popcorn - Replace chemically laden microwave popcorn with old fashioned popping corn. It is cheaper, contains no additives, is high in fiber and low in calories. Add flavour to your fresh popped corn with melted butter, sea salt, fresh grated parmesan cheese or you can even turn it into candy corn (also for a fraction of what you would pay store bought).
  • trail mixes - Make your own. Buy in bulk any nuts, raisins and foods you don't make supplemented with those foods you dry yourself. In most cases it is cheaper to make your own than buy a prepared mix and drying fruits is not difficult or expensive.
  • potato chips - Make your own and for a healthier version make baked chips rather than deep fried. These are ever so easy to make either fried or baked. Try other vegetable chips as well. Zucchini chips are very, very inexpensive to make especially if you grow the zucchini. They are healthier and yet just as satisfying as potato chips.
  • fruits/vegetables - A lot of people don't consider fruits and vegetables as snacks but they can be quite healthy snacks. Aside of grabbing an apple, orange or banana keep a container of prepared, ready to use vegetables in your fridge. Ten minutes of prep can give you almost a week's worth of celery sticks, carrot sticks and green pepper wedges to snack on
  • crunchy snacks - I can't remember when I discovered this little trick but you can cut wong tong wrappers in half corner to corner then deep fry them. After draining sprinkle with sugar cinnamon or other desired flavouring for a great crunchy snack. Pork cracklings while not exactly the healthiest thing are easy to make at home. Rice noodles are another great snack if fried. Just heat a bit of oil in a fry pan then break the noodles and toss them in where they will puff taking on interesting shapes in about 2 seconds. Drain and serve as is or season lightly.
  • cookies/squares - By far the the cheapest and healtiest is to make your own. Focus on the easy to make, no bake versions so you can whip up a batch with little effort.
  • candies - It is surprising how easy it is to make candy at home and the best part is you can use natural flavourings and no high fructose corn syrup. Homemade candies can range from hard to fudge to marshmallows to toffee and so much more. They are extremely inexpensive to make. Homemade will give you a slightly healthier product and definitely a less expensive product.
  • by bulk - One of the best ways to save on snacks like nuts is to buy in bulk in quatities you can control.


Saturday, June 27, 2009

Banana Chocolate Chip Muffins

It is a standing joke with both my family and friends at how many excuses I can come up with to not go to the grocery store. By far a very, very small portion of our food dollar is spent in a regular grocery store. That means I really don't get to see the food trends other than online. Last one of our friends visited with his little 8 yr old who had a package of mini muffins for a snack. There were 6 mini muffins in the package. That idea made a lot of sense to me because sometime you just want a snack and not a whole muffin. So I was off to buy a mini muffin tray. I chose a non-stick Wilton® 24 -cup mini muffin tin to use for mini muffins, cupcakes and tarts.

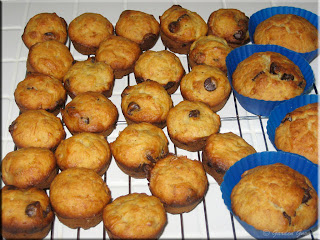
banana chocolate chip muffinsBanana Chocolate Chip Muffins

Banana just pairs nicely with chocolate so I decided to make banana chocolate chip muffins in between storms today. This muffin is easy to put together quickly and is a good way to use up any very ripe bananas. These muffins have a cake like texture and a lovely flavour!

Banana Chocolate Chip Muffins
adapted from: Company's Coming, Muffins & More. 1983. Pp10.

1¾ c unbleached flour
½ c organic sugar'
3 tsp baking powder
½ tsp sea salt
½ c semi-sweet chocolate chips

1 egg
¼ c cooking oil
¼ c milk
1 c mashed bananas

Measure the dry ingredients into a mixing bowl. Mix thoroughly with fork. Make a well in the centre. Beat egg until frothy. Mix in oil, milk and bananas. Pour this mixture into the well. Stir only to moisten. The batter will be lumpy. Fill the lightly greased muffin tins ¾ full. Bake at 200ºC (400ºF) for 20 minutes or until golden brown.


Friday, February 06, 2009

Snack Mix

As promised here is the recipe for the snack mix our friend brought to the Super Bowl party (picture here). The recipe is from our friends as I received it yesterday. Thanks so much for sharing the recipe. It was a huge hit with the guys.

My Notes: Dill weed and dill leaf are the same to distinguish the foliage from the seeds for culinary use. What I like about this version is there is no baking involved so it can quickly be mixed and set aside while you other dishes prepared for entertaining. It is a perfect snack for events like Super Bowl parties. Store in an air tight container.

Snack Mix
recipe by a friend

1/2 cup oil
2 teaspoons dill leaf
1 dry package ranch dressing

Mix these 3 ingredients together and pour over 8 cups mix

Goldfish crackers
Cheese nips
Broken pretzels
Crispex cereal
Cheerios
Mini Breton Crackers
Corn Bran cereal
1/2 mixed nuts

This is the recipe [edited] as we received it. Put whatever you want in it, but just 8
cups. We put 2 kinds of pretzels in it. I bought Presidents Choice mini
crackers for it, they look like Mini Breton crackers but are $1.00 cheaper.
Also we used just peanuts not mixed nuts. It looks really greasy when you
first make it, but after a few hours it all soaks in. Also I used dillweed,
I don't know if there's are difference between the two or not.