My photo
Ontario, Canada
I am a wife, mother and grandma who enjoys the many aspects of homemaking. A variety of interests and hobbies combined with travel keep me active. They reflect the importance of family, friends, home and good food.
Cook ingredients that you are used to cooking by other techniques, such as fish, chicken, or hamburgers. In other words be comfortable with the ingredients you are using.
--Bobby Flay

For Your Information

Please watch this area for important information like updates, food recalls, polls, contests, coupons, and freebies.
  • [March 19, 2020] - Effective Mar 17, this blog will no longer accept advertising. The reason is very simple. If I like a product, I will promote it without compensation. If I don't like a product, I will have no problem saying so.
  • [March 17, 2020] - A return to blogging! Stay tuned for new tips, resources and all things food related.
  • [February 1, 2016] - An interesting report on why you should always choose organic tea verses non-organic: Toxic Tea (pdf format)
  • Sticky Post - Warning: 4ever Recap reusable canning lids. The reports are growing daily of these lids losing their seal during storage. Some have lost their entire season's worth of canning to these seal failures! [Update: 4ever Recap appears to be out of business.]

Popular Posts

Showing posts with label easy recipes. Show all posts

Sunday, September 14, 2014

Crab Cakes for Two

Crab is such a lovely seafood - sweet, tender, low calorie, high protein and delicious with hot drawn butter!  I absolutely love crab, specifically king crab legs.  I am rather picky about crab preferring fresh or frozen to canned.  Canned crab is fine for crabmeat dip but that is about the extent of our use for it.  I will often bring home a few crab legs from a restaurant meal when possible but for most purposes, we buy froze king crab legs from Elite Gourmet Food Service that delivers to the door in southern Ontario.

favourite crab cakes
I thoroughly enjoy sitting down to a plate of king crab legs, leisurely savouring each succulent morsel.  My husband, on the other hand does not enjoy cracking crab legs!  In order to use crab meat as an ingredient, the legs must be cracked open releasing the tender, sweet meat.  This is not a difficult task but it is a bit time consuming.

I bring water to a boil in a roasting pan then add the frozen crab legs.  Most of the leg pieces have the larger knuckle where it was attached to the body of the crab.  I crack the cooked crab legs according to their segments, pulling connective tissue to help release the meat.  I also use a thin tipped fork to help release the meat and kitchen shears to open segment portions that refuse to crack open.  Once all the crab legs have been cleaned, I break the larger chunks up depending on how they will be used.

Crab cakes are a delightfully tasty way to use fresh or frozen crab meat.  Like many homemade favourites, there are as many ways to make them as there are cooks.  The big debate appears to be which is best, baked or pan fried.  Baking reduces or eliminates the butter for cooking but at the same time removes the flavour the butter imparts to the crab cakes.  We prefer pan fried crab cakes.  They are easy to make, a tender and tasty seafood main or make them smaller for an appetizer.  Our recipe gives a yield of four crab cakes just perfect for two.  We like Breton crackers for this purpose but you can substitute with your favourite cracker. 

Crab Cakes for Two
recipe by: Garden Gnome

½ c Breton Bites, original whole wheat, crushed
1 egg
4 tsp fresh squeezed lemon juice
3 tbsp Miracle Whip (or Miracle Whip Clone)
1 tsp garlic pepper
1 tbsp finely chopped green onion
1 tbsp finely chopped parsley (optional)
8 oz (226 g) crab meat pieces
1 tbsp butter

Whisk egg, lemon juice, Miracle Whip and garlic pepper together.  Stir in crab meat and green onions.  Gently mix being careful not to break up crab meat.  Mix in crackers.  Divide into four equal portions (mixture will be stickly).  Heat butter on medium heat.  Place each crab mixture portion in heated butter and flatten.  Fry until golden brown, about 5 minutes each side.  Remove from fry pan.  Drain and serve.

Makes 4 patties
Serves 2

Nutritional Value per serving:
298 calories, 14 g total fat (7g saturated fat), 177 mg cholesterol, 726 mg sodium, 468 mg potassium, 19 g total carbohydrates (2 g fibre, 4 g sugar), 25 g protein


Sunday, December 08, 2013

Meatballs for the Masses

The holiday season is a time for gatherings, large and small.  Quite often they involve bringing a dish.  Immediately logistics come into play such as ease of traveling as some dished travel better than others.  At the same time the setting must be considered as well which will dictate the type of dish you can bring.   My husband was going to a holiday football game with 30 other football fans.  He wanted to bring something for the tailgate party before the game.  Since most of the offerings for the tailgate party would be snack type, we made a large batch of meatballs.  Meatballs are one of my larger gathering stand-by dishes.  Depending on the setting, I make and serve them in the slow cooker or in a large foil baking pan in the oven.  A larger batch can be made using the foil baking pan.  This method is great for those gatherings where using a slow cooking is not possible or for larger gatherings where the meatballs can be kept hot in the oven until ready to serve.

meatballs in the preparation stages
I make meatballs that are just that, meatballs meaning no fillers.  Calculating how much of a dish to bring can be a challenge.  Numbers tend to not be written in stone so even though a gathering may be for 30, there may be more or less.   In this case, there were 30 maximum so at best one or two would not attend.   I planned on 1/4 lb of beef per person, or 4 - 1 oz meatballs each which worked out to 120 oz or 7½ lb ground beef.  I started with 10 lb/160 oz of lean ground beef which would make 160 - 1 oz meatballs, enough extra. 

I started with 10 lb of lean ground beef in two batches for easier mixing.  I sprinkled a little garlic pepper over the meat then mixed well.  Actually, my husband did the mixing so this was a team effort!  I poured a bit of cold milk over the meat to serve as the binder for the meatballs.   Milk allows the meatballs to keep their shape during cooking resulting in firm yet tender meatballs.   My husband formed the meatballs by hand then we fried them using four non-stick skillets.  The cream interior skillets are ceramic non-stick while the darker interior ones are T-fal.  The browned meatballs were transferred to the foil baking pan to finish cooking in the oven as each pan was ready.  I poured  Sweet Baby Ray's barbeque sauce over each addition of meatballs.  I started the meatballs at 120°C/250°F to keep warm until all the meatballs were added to the pan then I made the final addition of barbeque sauce, about a cup of water and increased the temperature to 177°C/350°F.  Had I been cooking the meatballs in the slow cooker, I would have omitted adding the water.

cooked meatballs ready for the party
I cooked the meatballs uncovered at 177°C/350°F until the sauce was hot, bubbling and reduced.  In haste, I neglected to put a baking sheet under the foil baking pan so we carefully maneuvered one under before removing the meatballs from the oven.  Don't they look delicious?

I always make beef or venison meatballs using only meat, milk and either garlic pepper or Montreal steak seasoning.  I keep the seasoning light so the meatballs can be used with any desired sauce, homemade or otherwise.  These meatballs can be home canned in sauce if desired and they freeze nicely.  I like keeping a few pounds of cooked meatballs in the freezer for a quick entertainment dish or using a few for dinner.

meatballs packaged for traveling
I covered the piping hot meatballs with aluminum foil for traveling.  Then we carefully put a T-towel under the foil baking pan on top of the baking sheet (not pictured.  The meatballs would be warm in time to be enjoyed at the tail gate party.  This method works well for meatballs that will be enjoyed within a hour to forty-five minutes of removal from the oven.  If the meatballs will be served after that period they should be kept at 120°C/250°F in the oven.  As always when taking meatballs to an event, I included a package of round toothpicks. 

If you need a simple, easy dish that is sure to please make up a batch of meatballs.  Add a bottle of barbeque sauce of your choice and some toothpicks for a tasty appetizer perfect for holiday entertaining!  Don't forget to make extra for a quick meal start during the busy holiday season. 


Friday, December 06, 2013

ROLO Pretzel Delight

As promised, today is the first post of a series of posts featuring foodie related topics for the holidays.  Every parent has been there where their adorable little munchkin tells them at the last minute they need a treat for their class party the next morning.  It's nice to have an easy, no muss recipe to fall back on for just such times.  When I think of an easy, no muss recipe it usually means something I can put together quite quickly with few ingredients yet tasty results.

I was browsing through the Walgreens flyer a couple of days ago where I discovered this easy, peasy sure to please recipe for ROLO Pretzel Delight just perfect for the holiday season.  The recipe actually comes from Hershey's on the rolo chey caramels in milk chocolate package.  These delicious treats are made with only three ingredients and take about five minutes total to assemble.  The combination of sweet and salty is sure to please! 

The recipe is quite flexible as far as quantity.  I made 24 (some not pictured) so needed 24 each tiny pretzels, ROLO candies, and pecan halves.  I only use about half a 240 g (8.5 oz) bag of rolo caramels!  These treats are so easy to make and so tasty.  That earns them a spot on my quick, tried and true recipes.   

Rolo Pretzel Delight
source:  The Hersheys Company, Celebrate with Hershey , 2013

small pretzels
pecan halves
ROLO chewy caramels in milk chocolate

Heat oven to 350°F.  Line cookie sheet with parchment paper or silpat.   Place one pretzel for each pretzel treat desired on the prepared sheet.  Top each pretzel with one unwrapped ROLO chewy caramel in milk chocolate.  Bake 3 to 5 minutes or until caramel piece begins to soften*, but not melt.  Remove from the oven.   Top each softened ROLO with pecan half.  Cool completely**.

*I kept a very close eye on the caramels that really don't change drastically as they soften.  I removed from the oven just at the 3 minute mark.

**The treats stay sticky on the bottom so need to cool completely for serving.  I let them cool on the parchment paper that was carefully transferred from the baking sheet to a cooling rack.  Once the treats were fully cooled, I placed them on a serving plate.


Wednesday, July 17, 2013

Creamy Tomato Salad

We are officially in the midst of a heat wave and my gosh it's a dilly with extreme heat alerts and severe thunderstorm watches being issued daily.  Ah,  the dog days of summer when you don't really feel much like cooking in the heat let alone eating a hot, heavy meal.  Thank goodness there is a never ending variety of salads to refresh and nourish without heating up the kitchen!

creamy tomato salad
There are really no hard, fast rules as to what makes a salad.  In  their simplest form, a salad is simply salad greens and some kind of dressing but even then the dressing can be replaced with a few spritz of fresh citrus juice.  With that in mind, I love making salads with what's on hand.  In the summer months, that means garden fresh produce.  I often add fresh herbs to my salad creations because I grow herbs year round.  Herbs add a lot of flavour without adding calories while being good for you.

Tomatoes are often included in many salads so I decided to make tomatoes the star of a simple creamy tomato salad as a side dish for our grilled entrée.  It was a light, refreshing salad full of flavour, just perfect for a hot summer's meal.

Creamy Tomato Salad
recipe by: Garden Gnome

20 grape tomatoes
¼ c red onion, chopped
¼ c cooked bacon pieces
¼ c English cucumber pieces
2 tbsp Miracle Whip
2 tsp white vinegar
1 tsp raw honey
¼ tsp celery seed
1 tbsp chopped chives

Cut two slices of bacon across short end to form small pieces.  Fry until crisp.  Drain and set aside.  Wash tomatoes.  Pat tomatoes dry and slice in half.  Rough chop red onion.  Cut about a 2 - inch piece of English cucumber into quarters length wise.  Slice across the quarters.  Stir prepared tomatoes, onion, cucumber and bacon together in mixing bowl.  Combine Miracle Whip, vinegar, honey and celery seed in small bowl.  Whisk to mix.  Pour the dressing over the vegetable mix and stir well.  Pour salad into serving bowl.  Sprinkle with chopped chives to garnish.  Refrigerate before serving if desired.


Friday, June 28, 2013

Jello Shooters

Today marks the start of the Canada Day (July 1) celebrations.  This weekend will be filled with outdoor gatherings, pool parties, camping, fireworks and just plain old summertime fun.  In preparation for a late evening house party we were invited to this weekend I made jello shooters at the request of the host.  The grill will be fired up and as long as the rain holds off the party will meander into the wee hours of the morning.  

jello shooter ingredients
Jello shooters are rather popular with younger adults but they tend to go over well at summer house parties, pool parties, stag & doe parties, and sitting around the campfire.  Quite often jello shooters are sold at a stag & doe to raise money for the engaged couple.  Traditionally, jello shooters are made with some type of liquor, usually vodka as it doesn't conflict with the flavour of the jello.   However, just about any liquor can be used.  Non-alcoholic versions can be made as well.

The ingredients for jello shooters are simply jello, liquor, water and/or alternative liquid.  The jello shooter cups (clear plastic or waxed condiment cups) can be found at party stores as well as at some dollar and box stores.  They are usually sold in a package of 24.  I personally prefer the clear plastic cups for appearance but the paper cups are popular as the jello shooter can easily be squished into the mouth.

jello shooters prepared for refrigerator
I made two kinds of jello shooters, both alcoholic so not for minors.   Here is how I made them.  I've included a non-alcoholic jello shooter recipes below the two alcoholic ones for the younger ones at the party or for those who choose not to imbibe.  Jello shooters need to be supported while setting.  I fill each cup individually then place onto a baking sheet and place in the refrigerator to set.  Once set the jello shooters can be placed on a serving tray.

Vodka Jello Shooters
1 box orange jello (or flavour of choice)
1 c boiling water
1 c vodka

Bring the water to to a boil.  Pour into large measuring cup.  Stir in jello until the gelatin has dissolved.  Allow to cool until luke warm.  Stir in the vodka.  Carefully pour into jello shooter cups.  Chill until set.

Rum & Coke Jello Shooters
2 boxes cherry jello
1 c boiling cola
1 c cold cola
1 c rum

Bring 1 c of cola just to a boil.  Pour into large measuring cup.  Stir in both packages of jello.  Stir until the gelatin has dissolved.  Stir in the rum.  Lightly stir in the cold cola.  Carefully pour into jello shooter cups.  Chill until set.

Non-Alcoholic Jello Shooters
1 box jello flavour of choice
1 c boiling water
1 c club soda or ginger ale

Bring water to boil.  Pour into large measuring cup.  Stir in jello until gelatin has dissolved.  Allow to cool until luke warm.  Pour in the club soda or ginger ale then just lightly stir.  Carefully pour into jello shooter cups.  Chill until set.

jello shooters ready to serve
Pictured are a couple of the rum & coke and vodka jello shooters I made.  Jello shooters are rather pretty with a jewel-like sparkle and the consistency of jello.  Be warned though that those made with alcohol are potent.  They should be enjoyed responsibly.  Jello shooters whether alcoholic or non-alcoholic made with soda are a taste bud sensation!  The soda gives a tingling, very slight almost but not quite burn that is quite pleasant.

Jello shooters can be served simply on a serving tray without garnish.   They should be kept chilled until serving.  I make 2 per guest which is usually enough with a few left over. 


Tuesday, May 28, 2013

Pasta Bar

The clubhouse at our vacation home resort holds a weekly pasta night.  The meal is set up in an L-shape pasta bar with a serve yourself simple garden salad and garlic bread followed by the pasta station where the chef prepares your choice for you.  The pasta station consists of pre-cooked penne and liguini, red sauce, white (béchemel) sauce, sausage, shrimp, mussels, chicken, green peppers, tomatoes, mushrooms, an onions.  The pasta dish is cooked on a portable propane burner.  The chef drizzles olive oil in a small skillet then adds your vegetables and meat of choice.  When that is warmed through, he drizzles a little white wine over the mixture, adds your sauce of choice and flips the pan to mix.  Finally he adds the pasta of choice again flipping the pan to mix. 
 

linguine with white sauce and shrimp
My husband had linguine with béchemel sauce and shrimp.  The shrimp were nice sized.  The sauce  was rich and creamy.  This was a delightfully tasty dish that can easily be duplicated at home.  

When cooking pasta, I like to cook extra for planned leftovers.  I simply cool the cooked pasta then refrigerate it until needed.  It is very easy to whip up a quick meal using pre-cooked pasta.  Pre-cooked pasta warms nicely in a variety of sauces.  It can quickly be turned into tasty homemade pasta cheese dish or other casserole, or used in pasta salads. 

linguine with blush sauce
I had linguine with a blush sauce, a mix of red and béchemel sauces.  I also added shrimp, mussels, tomatoes, green peppers, onions and mushrooms.  I really enjoyed this rich, delicious meal!  With the exception of fresh mussels which are difficult to find at home, this is also a very easy dish to recreate at home. 

A blush sauce is very easy to make but it involves making at least the béchemel sauce to mix with a fresh or prepared ahead tomato sauce.  A rosa sauce is similar to a blush sauce without having to make a béchemel sauce.  A rosa sauce is made by stirring heavy cream into a tomato sauce as it is warming.  Shredded parmesan cheese can be stirred into the rosa sauce if desired. 

A pasta bar is a rather simple idea that can easily be duplicated at home with a few modifications.  Kids love meals that allow them to make the choice of what they want to add.  That is one reason why homemade pizza, tacos and taco salad where always big hits with our kids.  As with other top your own dishes, keep it simple yet interesting.  You don't need a lot of each topping either so a pasta bar is a great way to use up a few leftovers as well.  Presentation can be as easy as setting up various bowls of the prepared ingredients on the table then let each family member top their pasta as desired.


Saturday, April 27, 2013

Grilled Rib Steak & Refried Rice Using Grilled Rib Steak Left Overs

While much of the discussion on this blog throughout the past week focused on my adventures in making no knead breads, it has been a whirlwind of activity here.  We decided to makeover the master bedroom completely including new furniture and at the same time finish the guest room.  The furniture (Vaughan-Bassett) for the master bedroom had an estimated time of arrival of three weeks giving me plenty of time to shop for accessories and work on the crochet bedspreads for each room.  The bedspreads are a huge undertaking given one is king and the other queen size, so a lot of work.  Shopping for accessories meant several shopping trips with many foodie stops!  Much of the focus was stocking up on herbal teas, K-cups, various flours and cherry picking the sales.  I did manage to find a few interesting foods to try so will talk about them as they are used.  Oh, and I just couldn't resist the cute salt and pepper shakers in just the perfect deep red for the kitchen, a new tea ball and a couple of kitchen organizers.  At the same time, I was experimenting with the no knead breads and testing the 4ever Recap canning lids.  Even though it has been rather busy, regular cooking continued.

grilled rib steak with baked potato and steamed broccoli
It has been a cold, wet spring with wet snow a couple of days ago and frost on the roofs yesterday morning.  Still, we have been doing more grilling.  The deck off the kitchen is quite protected from the winds making it perfect for grilling in all but the most unpleasant weather.   Early this week the sun made a rare appearance so I thawed a couple of rib steaks for grilling.  The steaks were grilled to medium rare, served with baked potatoes and steamed broccoli.  It was a delicious meal! 

We seldom marinate or use barbeque sauce on our steaks.  Instead, we let the flavour of the gorgeous, hormone free beef shine!  I love baked potatoes baked in the oven but just can't wait to start baking them on the grill again.  The grill gives a bit of extra flavour yet keeps the skin crispy and flesh tender. 

All of the steaks from our beef on the hoof purchase are large, cut to our specifications of 1 - inch thick.  While the whole steak looks luscious for the photo shoot, it is too much steak for either of us although if my husband is in the right mood, occasionally he will polish off a steak this big.  At any rate, anytime we have steak for dinner we have left overs.  Although steak does reheat nicely to enjoy as is, I also use left-over steak in other dishes.

refried rice made using left over rib steak
The following day, I cooked rice for dinner which is so nice now that I've mastered cooking it on the stovetop.  The rice comes out perfect every time, something I attribute to the gas burners that are considerably easier to control than electric burners that retain residual heat after being turned off.  I used the rice to make refried rice.

Refried rice is an extremely easy and inexpensive way to use left over rice and beef, chicken or pork that can be made in 15 minutes or less.  It uses soy sauce which is incredibly high in sodium content.  Even the low sodium soy sauces have over 500 mg of sodium in 1 tbsp!  I use Rooster Brand Dark Soy Sauce which has 800 mg of sodium per 1 tbsp but because it has a deeper, richer flavour, less is needed.  It does give a darker colour to any dishes it is used in. Neither of us are on a sodium restricted diet however, we do tend to eat fairly low sodium so refried rice is a dish we enjoy only a very few times a year.

Method:  Cook rice or use left over rice.  I used 3 cups of cooked rice.  Cut left over steak (chicken or pork) into strips or pieces.  Heat a little olive oil in a non-stick skillet.  Pour in the rice.  Stir in about 1½ tbsp dark soy sauce, mixing well.  Stir in prepared meat and about 1 c of frozen peas.  Mix.  Make a well in the centre of the rice.  Pour in three beaten eggs.  Stir and continue stirring while incorporating the rice mixture into the eggs as they cook.


Saturday, April 06, 2013

Ham Chowder

One of the reasons I chose our new Italian made Lagostina Collezione Pro cookware set aside of the high quality was it really was a 'set' but rather a mult-material collection of cookware.  One of the pieces of the set was a 4.7L (5 qt)  enameled cast iron Dutch oven, orange no less.  I would have preferred red but the reality for me when it comes to kitchen equipment is colour is always second to quality and function.  In this respect, the Lagostina Dutch oven excels in both quality and function.  The lid has a self-basting design for optimal steam recirculation.   It can be used on the stovetop or in the oven.  The Dutch oven included in the Collezione Pro collection is actually part of Lagostina's Tuscan collection as well so matching pieces can be bought separately.

ham chowder
While the new Dutch oven was the same size as my older Lagostina Renaissance stainless steal Dutch oven, I had reservations on how I would use it.  Seriously, for me it was aesthetics because in my mind the enamel coated Dutch oven did not look like a pot that could be used on the stovetop.  At the same time the idea of searing meat for soups and stews then cooking in the same pot in the oven intrigued me. 

We had a lovely family gathering for Easter so I had left-over spiral ham to use up.   I decided to test out the new Dutch oven with a ham chowder.  The weather has been taking its time warming here so we are still into cold weather foods.  The end result was a delicious, creamy yet chunky chowder perfect for a cold spring night.

Ham Chowder
(recipe by Garden Gnome)

1  ham bone
8 medium potatoes
2 medium carrots
1 small onion
2 c cooked ham, diced
1 c instant potatoes
1 c frozen sweet peas
1 c frozen whole kernel corn
1 c half & half

Place ham bone in large Dutch oven or stock pot.  Cover with water.  Bring to a boil.  Reduce heat to simmer and low simmer for 20 minutes.  Peel potatoes and cut into bite size pieces.  Peel and dice carrots.  Finely chop onion.  Stir potatoes, carrots and onion into the stock pot with the bone.  Return to boil then reduce heat to high simmer.  Cook until potatoes and carrots are tender.  Remove the bone.  Scoop out half of the vegetables and set aside.  Use an immersion blender to smoothly blend remaining vegetables and stock.  Add the instant potatoes slowly while stirring to keep a smooth consistency.  Stir in reserved vegetables, peas, corn and ham.  Return to a low simmer.  Stir in half and half.  Cook until heated through.  Ladle into bowls for serving.

Despite being a bit leery on the new enamel coated Dutch oven, I quickly fell in love with it.  The ham chowder cooked beautifully in this vessel with no over heating and residual heat in the cast iron kept the chowder nice and warm for seconds.  A couple of days later I made a no-knead crusty bread (boule) in the new Dutch oven.  The bread was beyond delicious and was my first successful homemade crusty bread with chewy interior.  The enamel coated Dutch oven cleans up nicely and gives good results.  I'm impressed enough with its performance I plan on buying a matching smaller one the next time they are on sale.


Friday, April 05, 2013

No Knead Crusty Bread

I bake a lot of bread, averaging now about three loaves a week but when the kids were still at home I averaged more.  Over the years, I have developed some of my own bread recipes and we do have our family favourites.  The one bread that has always eluded me is crusty bread.  A good crusty bread has a crispy, crunchy crust with chewy interior.  It is one of the very few breads that I resorted to buying because I couldn't make it.  Crusty bread is not so much about the recipe, it is about the baking method which involves steam.  I was showing my new Lagostina cookware set to a couple of our kids and our daughter said, you know you can bake bread in the cast iron Dutch oven.  Well, my interest was peaked especially since steam would be created if the lid were in place so I reasoned this may be a way for me to get that elusive crusty bread.

An online search quickly brought up several references to Jim Lahey's  no knead crusty bread recipe and method of baking in a cast iron Dutch oven that originally appeared in The New York Time's Minimalist column.   His method is based on fermentation much the same as a sour dough bread to develop the flavour.  He used little yeast (on 1/4 tsp) and a lot of water to make a sticky, wet dough that was then allowed to ferment 12 to 18 hours before being shaped, proofed and baked in a Dutch oven with the lid on.  Several folk have modified his basic recipe, adding a bit more yeast or decreasing the amount of water and the various additions like sharp cheddar cheese take the basic artisan recipe to the artistic level.  The flour can be entirely unbleached or it can be a combination of whole wheat or rye and unbleached flours.  There is even a gluten free version using brown rice flour, potato starch and tapioca starch!  Jim has a video on YouTube (Speedy No-Kneed Bread Revisited)  to modify the fermentation period to only 4 hours but I don't mind the longer fermentation period for flavour development.  So the possibilities for this bread once you learn the basics is endless.  I will warn you now, there are a lot of pictures for this post because I wanted to show you each step I did.

scruffy dough ready for proofing
No Knead Crusty Bread
(modified Jim Lahey recipe)

3 c unbleached flour
1¾ tsp sea salt
½ tsp instant yeast
1½ c luke warm water

Mix ingredients together to form a shaggy dough.  Cover bowl with plastic wrap.  Ferment 12 to 18 hours.  Shape into round on floured parchment paper.  Let proof 30 minutes while Dutch oven pre-heats at 450°F.  Place loaf on the parchment paper into Dutch oven.  Cover and bake at 450°F for 30 minutes.  Remove lid and continue baking for 15 minutes.  Remove from oven.  Place on rack to cool.

The dough takes less than 5 minutes to make.  There is no kneading at all.  Simply mix and set aside for fermentation.  The dough will be quite sticky and it certainly does look shaggy in comparison to other bread doughs that are smooth and elastic looking.  I covered the bowl with plastic wrap and set it on the counter to ferment overnight.
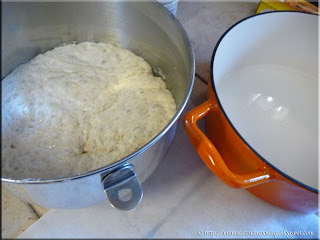
dough sponge ready for second proofing
I started my dough at 8:30 PM figuring it would be ready for baking at 3:30 PM the following day.  The following morning at about 9 AM the dough was nice and bubbly, ready for baking.  This is exactly what the dough should look like before moving to the next step.  I decided to go ahead and make the bread then even though my fermentation period was only 12 hours.  Once the dough is at the bubbly stage, if left too long it can fall because all of the starch and sugar in the flour has been consumed by the yeast.  This commonly happens when making sour dough sponge if left too long so it is important to move to the next stage once the sponge is ready.   If the sponge falls, the fix is to add a bit more flour to feed the yeast.  Once the sponge returns to bubbly, then use. 

I placed about a cup of water in my Dutch oven, put the lid on then put it into the oven at 450°F for 30 minutes.  Some folks are not adding water to their Dutch ovens for this pre-heating but others are as their brand cannot be heated empty.  I decided to err on the side of caution.  After the pre-heat period, the water was completely evapourated so next time I will add more water then empty just before putting the dough in.

shaped dough on parchment paper covered with plastic wrap
While the Dutch oven was pre-heating, I floured a piece of parchment paper then shaped the dough into a ball on the parchment paper and covered with plastic wrap to proof for 30 minutes.  Some folks do not use parchment paper but others find getting the loaf into the hot Dutch oven is a lot easier if using parchment paper.  The paper goes right into the Dutch oven along with the loaf of bread so the loaf itself is not disturbed while being transferred.  With such a sticky dough, the less handling the better for a nicely shaped loaf.  I found the parchment paper method extremely easy and fool-proof.

Some bread doughs can tolerate a heavy hand when shaping but I used a lighter touch to shape this loaf.  I did not notice any remarkable increase in size of the dough during the 30 minute proof although the dough itself did not look quite as shaggy.   Once the dough had proofed for 30 minutes it was time to put the loaf into the heated Dutch oven.

prepared dough in heated Dutch oven
I removed the Dutch oven from the oven and the plastic wrap from the dough.  Then I carefully brought up each corner of the parchment paper to form a sling.  Holding the four corners together, I carefully transferred the dough into the Dutch oven.  I trimmed the corners of the parchment paper so they would not stick out of the Dutch oven or over the dough when baking.  I put the lid on the Dutch oven and put it back into the heated oven.  I let the bread bake at 450°F covered for 30 minutes then removed the lid and baked the bread for an additional 12 minutes rather than the 15 minutes others were using.  The initial bake is what gives the interior of the bread that nice chewy texture.  The final bake turns the crust a golden brown with that wonderful crunchy, crisp texture.  Oh my gosh, did it ever smell heavenly baking!

baked bread in Dutch oven just out of the oven
I had the light on in the oven for the final 15 minutes so I could remove the loaf before it darkened too much.  Ovens vary in temperature so it is always best to monitor the progress carefully during the last few minutes of baking.   I found that the loaf looked quite lovely after a final 12 minutes of baking. 

I carefully lifted the loaf of bread and parchment paper from the hot Dutch oven.  The Dutch oven itself, was still clean as if nothing had ever baked in it!  On the other hand, properly baked yeast breads usually do leave the baking pan quite clean.  Still, the loaf of bread looked good just out of the oven.

With anticipation mounting, I set the loaf of bread on a cooling rack, anxious to cut it for the final taste results.  The loaf of bread was gorgeous with a lovely rise, beautiful golden brown crust and tantalizing aroma.  The piece de resistance was the crust cracking as it cooled.  This is the ultimate sign of a good crusty loaf.  I was so excited that I even took a video to capture that cracking sound.

The loaf had a lovely rustic quality.  I really wanted to cut into that loaf of bread while it was still hot!  However, the bread was destined for dinner last night so I had to resist.   It was only 10 AM and had I cut into the loaf, it would have been gone by dinner time!

crusty bread wrapped in t-towel
Once you have a nice crusty bread, the secret is keeping it crusty.  If you have ever bought crusty bread from a bakery, you will have noticed it is never packaged in plastic.  Plastic traps the moisture causing the crust to soften and lose it's wonderful crunch.  Instead, crusty breads are placed in paper bags usually with the end open to prevent any moisture from becoming trapped.  The easy home solution is to wrap the bread in a t-towel, in this case one of the bar towels I use in place of t-towels.  This prevents moisture from becoming trapped while preventing the bread from drying out too quickly.  The bread sat on the counter, safely wrapped in the t-towel until dinner time. 

Loaves of crusty bread destined for gift given can be place into a t-towel lined basket then covered with a t-towel.  An alternative method is to place the loaf of bread in the middle of a t-towel then bring up the corners and secure with a ribbon.  As such, the t-towel becomes part of the gift so I like keeping a few new t-towels on hand for this purpose.

crusty bread cut
I used a serrated bread knife to cut the loaf of crusty bread.  The pores formed from gaseous bubbles produced by the yeast were nicely formed, large, open and irregular as opposed to the finer small pores found in store bought white breads.  This structure is a result of a high water content combined with the no-knead method.  The final test before giving this bread two thumbs up was of course the taste test.  It certainly excelled there!  There is less of a yeast more of a wheat flavour.  The crust was delightfully crunchy yet the inside tender and chewy.  Finally, I had made a wonderful homemade loaf of crusty bread!

This no-knead crusty bread is very easy to make and is very versatile.  The dough is simply mixed, covered and set aside until bubbly.  If you want fresh bread the following day, just mix the dough the night before which takes less than 5 minutes.  The following day, it will take 2 minutes to shape the dough, 30 minutes heating of Dutch oven and proofing of the dough,  30 minutes initial bake time and 12 to 15 minutes final bake time for a total of 84 to 87 minutes (1 hr 45 min to 1 hr 17 min).  This really is not bad considering there is practically no prep and the resulting bread is beyond delicious!  While there are a lot of variations from Jim Lahey's original ingredients as far as quantity, the basic recipe consists only of flour, salt, yeast and water combined with a long fermentation period.  The fermentation period allows the dough to develop both rise and flavour so while some are trying to reduce the fermentation period, it will not be something I tinker with.  The reason being, I have made enough sourdough breads to appreciate the extra flavour longer fermentation periods impart to the bread.  Some have added butter or oil and/or sugar taking the bread a step away from the original.  Others have added other ingredients like nuts, herbs, cheese, seasonings, cranberries or raisins.  Some of these combinations get rather creative!   Even the baking method has been altered from using a Dutch oven to using a slow cooker, countertop roaster and make shift covered pots.  Still, a Dutch oven is likely the easiest way to get the crispy crust.  I also saw where some used the no-knead recipe and simply baked as a regular loaf of bread without covering.  This of course would not give the crispy crust and for those of us who use a Kitchen Aid stand mixer for kneading bread doughs, it would not save much in the way of time.  It would save time for those who are kneading by hand.

The bottom line is, this bread recipe and method is a real keeper!  The basic recipe is delicious without any further additions but it can also serve as the basis for a wide range of creative breads.   I will be posting more on some of my creations made using the basic recipe.  In the meantime, if you want a few ideas or to see how others have modified the original recipe, search online with the key words "no knead crusty bread" or "no knead bread".



Saturday, February 16, 2013

Slow Cooker Chicken Cacciatore

Meals do not have to be fancy or complicated to be both frugal and delicious.  Simpler meals save on the cost of additional ingredients, they take less prep work and often less clean-up.  They are the perfect go to meals that often become family favourites!

family pack boneless, skinless chicken breasts
Our local grocery store had boneless, skinless chicken breasts on sale so I bought a family pack.  The chicken breasts were quite large so were a good deal for $7.01.  I mentally calculated a yield of four servings from the package.

I really don't like buying any meat in this type of packaging as none of it can be recycled.  The  foam trays cannot be cleaned well enough to prevent an risk of contamination from the raw meat they held.  I wash the trays well, dry then spray with rubbing alcohol to kill off contaminants.  I reuse these types for applications that will not come into anything edible.

browning the chicken breasts
Most meats cooked in the slow cooker need to be browned first.  This seals in some of the juices while adding flavour.  I used organic coconut oil to lightly brown the chicken.  Normally, I would use olive oil as the sauce was tomato based but I'm experimenting with coconut oil.  Coconut oil is very heat stable making it suitable for searing or browning meats.  It adds a light nutty sweetness.

Coconut oil is one of the healthiest oils you can use for both culinary and home made beauty products.  It contains lauric acids that aid in digestion while protecting the body from bacterial and fungal infections.  It is a solid at room temperature.  It can be used as a moisturizer on hair and skin as well.  I highly recommend using it on your hair to keep it healthy and shiny.

preparing the slow cooker
Home canned tomato sauces are our number one homemade convenience food.  I make several different, gourmet tomato based sauces each tomato harvest.  They range from plain and smooth to rich and meaty with everything in between.  One of my specialty tomato sauces started off as a roasted tomato sauce that quickly evolved to several versions of fire roasted sauces.  Fire roasting gives a rich depth to the sauces that can't be achieved by simply roasting.

I placed the browned chicken breasts in the slow cooker then poured a 1 L (quart) jar of fire roasted Italian tomato sauce with mushrooms over the chicken.  I set the slow cooker on low for 2 hrs than increased to high for an hour.  This is a newer slow cooker that does operate at higher temperatures than the old one it replaced.

slow cooker chicken cacciatore
I served the chicken breast on a bed of extra broad egg noodles then ladled with sauce, topped with fresh grated Parmesan cheese and garnished with fresh parsley from my indoor garden.  It was a simple, low cost meal that was easy to prepare.

My home canned tomato sauces cost me nothing more than the canning lid, cooking fuel (fire roasting, processing) and extra ingredients if necessary.  A 1 L jar of sauce without meat or mushrooms averages about 30¢ but I can reduce that cost using a reusable canning lid (glass insert, Tattler, 4ever recap) by 13¢.  Store bought broad egg noodles are quite inexpensive and homemade even less expensive so the only real cost for me with this type of simple slow cooker meal is the meat.  In this case using store bought chicken at the sale price brought the cost per serving to just under $1.80 which is rather frugal.


Saturday, February 09, 2013

Pork Loin Chops in Mushroom Sauce

Here it is the end of the first week of February and we are in the midst of a rather nasty winter storm with freezing rain, heavy snow fall, and high winds creating white out conditions.  These are the days meant for staying indoors, catching up with a few indoor activities and enjoying warm, comfort foods.  One of our long time favourite comfort foods has been pork paired with mushroom sauce.  While the sauce uses commercially condensed cream of mushroom soup, the rest is magic! The lactic acid in the milk tenderizes the meat while the soup adds a rich creamy and comforting sauce.

pork loin chops with potatoes in mushroom sauce
The beauty of pork loin chops in mushroom sauce is after the pork loin chops are browned, the dish can be cooked in the skillet, in the slow cooker or in the oven which makes this a rather versatile dish.  Each give slightly different results but all are very tasty!  In general, the skillet gives a bit richer sauce, the oven in mid-way and the slow cooker slightly less.

I use boneless pork loin cut into about half-inch slices.  Browning the pork chops adds extra flavour and colour.  Sometimes I add in browned sliced mushrooms.  I normally add either cubed or sliced potatoes to the mixture.  From there I only need add a side, a salad and bred for a complete meal.

Here's how to do this dish using each method:

You will need: browned boneless pork loin chops, 3 - 4 tins of condensed mushroom soup, 1 to tins of milk, 1 c browned sliced mushrooms (optional), 4 medium sized potatoes (chopped or sliced)

Methods:
  • skillet - Brown the meat then drain.  Return meat to skillet.  Prepare the potatoes as desired and add to the skillet.  Mix the mushroom soup with the milk and pour over the pork chop and potato mixture.  Cover the skillet with tented foil then cook on medium heat, stirring often until sauce caramelizes and the meat is tender.  Remove from skillet and ladle extra sauce over the pork chops and potatoes for serving.
  • oven - Brown the meat and drain.  Prepare the potatoes as desired.  Pour the potato and pork  chop into an oven proof baking dish.  Mix the mushroom soup with the milk and pour over the pork chop and potato mixture.  Tent the baking dish with aluminium foil.  Bake at 350°F until meat is cooked through, potatoes are tender and sauce is bubbly.  Remove the foil tent.  Continue baking 15 minutes to develop a bit of caramelization.  Remove from oven.  Plate using the extra sauce as a gravy.
  • slow cooker - Brown the meat and drain.  Place the meat and soup mixture into the slow cooker.  Set on low and cook for about 4 hours.  Prepare the potatoes as desired and mix into the meat and sauce.  Turn the temperature setting to high.  Continue cooking until potato are tender.  Plate using the extra sauce as gravy.


Friday, April 13, 2012

Homemade Fettuccine

Just before Easter I wrote about my new KitchenAid® pasta sheet roller and fettuccine cutter attachments.  Easter Monday, I decided to take a bit of time to play with the attachments.  I've made pasta manually so had an idea of what to expect.  Fresh homemade pasta just has such a lovely flavour!  It is more expensive than dried pasta (not bought on sale) and while I initially calculated it to be more expensive than store bought fresh pasta, it actually comes in less expensive.  If you raise your own chickens, the cost of homemade fresh pasta is considerably less expensive than store bought dried.  Homemade pasta can be easily tweaked to make vegetable or herb pastas as well and you can be sure you are using free range eggs if that is important to you, as it is to us.

first pass of pasta dough through the pasta sheet roller
Pasta dough should be firm and leathery to the touch but also pliable.  It should not be sticky or crumbly.  External factors like humidity or brand of flour can affect the dough consistency so small amounts of additional flour or water may be necessary to get the dough to the right  consistency.

I used the basic egg pasta recipe in the KitchenAid® manualI will be honest in that I had serious doubts about the dough.  It did not come together in a smooth ball and did not look like it would hold together well at all.  It was a very stiff dough!  I was almost ready to give up and try another recipe after the first pass through the pasta sheet roller on setting 1.  However, the dough actually came together quite nicely upon further passes through the roller.
 

Basic Egg Pasta
source:  KitchenAid®, KitchenAid® Pasta Sheet Roller and Pasta Cutter Attachments Manual, Pp. 9.

4 large eggs
1 tbsp water
3½ unbleached flour
½ tsp sea salt

Mix ingredients together using the flat beater.  Change to dough hook and knead 2 minutes on setting 2.  Remove dough from blow and hand knead 1 to 2 minutes.  Let rest 20 minutes.  Divide dough into quarters then flatten for processing with the pasta roller.

folding pasta sheet for next pass through the pasta sheet roller
The pasta sheet roller has 8 settings.  The first time through is on setting 1 which is the folding and kneading.   Each time you roll the pasta sheet, fold the ends in as pictured or fold the entire sheet in half then roll again.  If you use the half fold method, alternate how you feed the dough into the roller so you end up with two relatively straight ends.  Repeat the folding and rolling until you reach setting 2.  After that the dough does not need to be folded, simply passed through the roller until you reach the desired consistency.  Fettuccine can be rolled to setting 4/5 or if you want a thinner fettuccine it can be rolled to setting 6 or 7.   Within a couple of passes through the roller the dough took on a very smooth, uniform appearance.  

pasta sheet as it is being made
I was absolutely amazed at how quickly the dough was formed into smooth sheets of pasta.  It was beyond impressive!  Just look how gorgeous that sheet of pasta looks.  I can easily use these sheets as is to make lasagna noodles and ravioli as well as using the fettuccine cutter.

I had no problems passing the sheets of pasta through the various settings on the roller.   I folded the pasta sheets then stacked ready for cutting (bottom left).  By the time I got to the last couple of sheets, they had started drying a bit more than I would have liked so next time will cover them with a damp towel until ready to cut. 

cutting the pasta sheet
I cut each pasta sheet in half to pass them through the fettuccine cutter simply to make the resulting strands easier to handle.  Cutting the pasta was every bit as easy as rolling the pasta.  Each pasta sheet fed through the cutter, easily cutting the sheet into fettuccine. 

For just learning how to use the roller and cutter, the problems were minimal as was the time it took to get the fresh made pasta onto a drying rack.   I dried the pasta (see below) because I wasn't sure how much we would use for dinner and I wanted to try the drying process.  In all honesty, without the drying, rolling and cutting the dough took me about the same time as spooning batter into muffin tins.  With the drying time, it took less time than getting bread ready for baking.  So, in terms of time, homemade pasta takes very little time.

drying the pasta
I used my brand new (when we moved here) clothes drying rack to dry the pasta.  The thing is too flimsy to dry clothes on anyway.  I found the best way to load the rungs was to catch the pasta half-way through the cutter using my hand turned sideways, thumb up so the pasta draped over my hand.  I then transferred it to the rungs and separated any strands that stuck together.  I let the pasta dry about 45 minutes before transferring it ready for cooking and storage.  KitchenAid® warns that foods containing perishable ingredients like eggs should not be un-refrigerated for more than one hour as this is a food poisoning rick that could cause sickness.  While homemade pastas are not suitable for drying as a shelf stable product, they will keep in the refrigerator and can be frozen for longer term storage.  The only thing I would do differently using this rack would be to place a clean towel under it to catch any pasta pieces that break off.

freshly made pasta ready for cooking and storage
Once the pasta had dried, I set out enough for that night's dinner and the rest was vacuum sealed for the refrigerator.  This is where I had to adjust my calculations.  The recipe basically made the equivalent of four packages of store bought fresh pasta.  That would have cost me about $14 but the homemade only cost me $1.44 which really works out to less than the cost of store bought dried pasta.  I won't eliminate dried pastas from my pantry storage but I will stock less.  Dried pastas will become more of what dried milk and cheese are, part of our emergency preparedness.  What the pasta attachments will do is eliminate buying store bought fresh pastas. 

I am very excited!  Tomorrow I will post about the dinner I made with the homemade fettuccine noodles because after all, taste is everything.  I will be experimenting with whole wheat and a variety of vegetable pastas as well as a few herbed pastas.  So watch for that coming in the near future.  I definitely will be buying the attachments to make spaghetti and thick noodles and I am looking into a pasta extruder to make shapes like elbow noodles. 


Tuesday, February 14, 2012

Superbowl Follies (3)

This is the final post on some of the foods I served for our Superbowl party.  Some of the foods served were not featured as I've posted about them previously.  These include the moose meat chili, beef chili, spiral ham, cheesy hash brown casserole and baked beans.  I like bringing out new dishes and combinations for our guests to try.  Some of these end up being duds but some go on to being staples in my repertoire of of entertaining dishes.

fruit tray with dulce de leche dip
So it was with the fruit tray I set out.  Honestly, it was empty within 10 minutes!  I cut the apples then soaked them in citric acid to prevent browning then added strawberries and mandarin oranges to the tray.  The dip was made using dulce de leche.  This is a thick, creamy and very, very thick caramel sauce.  It can be purchased in larger centres or made at home using sweetened condensed milk.  I personally find dulce de leche too rich and sweet but it is great used in baking or fruit dips. 

Dulce de Leche
source: Garden Gnome and Garden Gnome's Daughter

my method:
Remove the label from a can or two of sweetened condensed milk.  Place in a sauce pan on a trivet.  Cover with water.  Bring to a boil on medium-high heat.  Reduce to a low boil and cook for 90 minutes.  Remove the can(s) and allow to cool. The dulce de leche is now ready to be used and unopened will keep for a year in the pantry.

my daughter's method:
Pour the sweetened condensed milk into a microwave safe bowl.  Cook on high for 1 minute then stir.  Repeat until the milk is thickened and caramelized, about 8 minutes.  The dulce de leche made this way will keep in the refrigerator for one week.

Dulce de Leche Fruit Dip
source:  Garden Gnome

1 c sour cream
4 tbsp dulce de leche
sprinkle of ground cinnamon

Place ingredients in mixing bowl or blender.  Mix well.  Pour into serving bowl.  Refrigerate 1 hour.  Serve as a dip for fruits. 


Saturday, October 01, 2011

Spinach Artichoke Parmesan Chicken Bundles

A few years ago I signed up for a free subscription to What's Cooking magazine by Kraft Canada.  I really like this magazine.  While it does promote Kraft products I find it rather easy to substitute ingredients.  The nice thing is the recipes are fairly simple without a long list of ingredients.  I have kept every copy I have received.  I recently found out they will be charging for the magazine only because I went to their site to change my email and address.  Their email service and online recipe resource remains free.

spinach artichoke parmesan chicken bundles
The recent copy of What's Cooking had a recipe for artichoke-parmesan chicken bundles that became the base for the dish created.  I added baby spinach and used marinated artichoke hearts.  I actually used the shake & bake specified but next time will use my homemade shake & bake chicken coating that has a lot more flavour than the commercial version and it's considerably less expensive.  The downside to moving is looking for an ingredient in an unorganized pantry so in this case the commercial version was easier than climbing over boxes.

The spinach artichoke parmesan chicken bundles were very filling and quite tasty.  We really enjoyed them.  The chicken bundles are really quite easy to make  lending themselves nicely to a variety of fillings.

Method:  Prepare your filling of choice.  Pound boneless, skinless chicken breast thin using a food mallet.  Spread your filling in the middle then roll starting at a short side of the meat similar.  Secure with a toothpick.  Coat as desired.  Bake at 375 degrees F for 30 minutes until golden brown and cooked through.  Serve with sides of choice