My photo
Ontario, Canada
I am a wife, mother and grandma who enjoys the many aspects of homemaking. A variety of interests and hobbies combined with travel keep me active. They reflect the importance of family, friends, home and good food.
Cook ingredients that you are used to cooking by other techniques, such as fish, chicken, or hamburgers. In other words be comfortable with the ingredients you are using.
--Bobby Flay

For Your Information

Please watch this area for important information like updates, food recalls, polls, contests, coupons, and freebies.
  • [March 19, 2020] - Effective Mar 17, this blog will no longer accept advertising. The reason is very simple. If I like a product, I will promote it without compensation. If I don't like a product, I will have no problem saying so.
  • [March 17, 2020] - A return to blogging! Stay tuned for new tips, resources and all things food related.
  • [February 1, 2016] - An interesting report on why you should always choose organic tea verses non-organic: Toxic Tea (pdf format)
  • Sticky Post - Warning: 4ever Recap reusable canning lids. The reports are growing daily of these lids losing their seal during storage. Some have lost their entire season's worth of canning to these seal failures! [Update: 4ever Recap appears to be out of business.]

Popular Posts

Showing posts with label kid friendly. Show all posts

Wednesday, December 11, 2013

Candy Cane Christmas Magic

If you have ever did a bit of shopping in the quaint little shops in tourist villages, you likely have seen the creative efforts of enterprising folk.  These little packets of goodies have their origins in holiday bake sales and craft shows.  Some of these are so cute, they have gone into commercial production.  These include the little bags of snowman poop (mini marshmallows), bear droppings (chocolate covered raisins), doughnut seeds (Cheerios) and similar.  They generally have a cute little saying which just adds to their appeal.  A couple of days ago, a friend of mine posted a similar idea for growing candy canes on Facebook.  I don't know where she got the idea but I thought it was cute enough to pass along this little piece of Christmas magic!

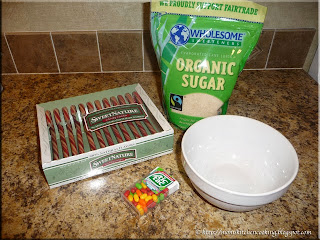
ingredients for candy canes
This project is really cute, easy to make and kid friendly.  Although granulated sugar and Tic Tacs are used, they are not consumed.  Of note, I had to buy the Tic Tacs specifically for this project as they are not a product we use.  Tic Tacs come in a wide range of colours so you should be able to find a colour to match whatever kind of candy cane you use.  The only thing that is eventually consumed are the candy canes.

I used organic granulated cane sugar because that is what I use but regular granulated sugar could be substituted.   I used SweetNature candy canes made using 100% natural flavours from natural food sources and stripes created from natural colouring found in vegetable juice (likely beet).  While these candy canes are a little more expensive they have no artificial flavour or colours  and they are free of major allergens so I feel a bit better giving them to our grandkids.

planting the candy cane seeds
Any type of container can be used so one with a holiday theme would be really cute.  Initially, I was going to use the bowl in the first picture but substituted a juice glass for demonstration purposes.  I filled the glass with sugar as pictured then planted the candy cane seeds (red Tic Tacs).  Filling the container and planting the seeds is meant to be for your child to do but since I was home alone, well you know how that goes :)  Once your child completes this part, the container can be set in a safe spot until a given time.  For example, let your child plant the seeds a few days before Christmas Day then when he or she wakes that morning, there are the much awaited for candy canes.

grown candy canes
Once your child is safely tucked into bed, fast asleep the night before the candy cane seeds are to sprout, carefully remove the Tic Tacs.  Replace them with the same number of candy canes.  Place the container back into the same position for your child to discover when they wake.  Isn't is a cute idea?

I thought this was really a cute way to create a bit of Christmas magic for the little ones.  I'm sure our grandkids will be filled with anticipation waiting for their candy cane seeds to grow!  It might just be the perfect spot for that Elf on the Shelf to rest while the little ones open presents...


Wednesday, August 07, 2013

Ciabatta Sandwiches

Years ago, I relished running about a block from our house to our local bakery.  I could see the roof of the bakery from my bedroom window!  It was one of my favourite local haunts.  I could always tell when they were baking fresh bread as the aroma filled the air.  At that time, a loaf of fresh baked bread cost 50¢.  The local bakery had the best doughnuts I've ever tasted.  They also made a limited variety of buns, mainly dinner rolls and crusty rolls.

ciabatta buns
The beloved bakery of my childhood is no more, having ceased the bakery portion of operations several years ago.  I still love fresh baked breads, most of them homemade.  Our local No Frills brings in fresh made breads (preservative free) from a bakery the next town over.  Their breads are very good, made much the same as I do at home with fresh ingredients and no preservatives, artificial colours or flavourings and no HFCS.

Ciabatta bread (slipper bread) is an Italian yeast bread traditionally formed into elongated, broad, flat loaves.  This bakery makes ciabatta bread but shaped into triangular buns, perfect for sandwiches.

meat and cheese for ciabatta buns
The kids were down for a visit so I used ciabatta buns for make-your-own sandwiches for lunch.  Make-your-own sandwiches always go over well.  I borrowed the idea from various luncheons we have attended.  Instead of actually making the sandwiches then serving, the components are set out on serving trays along with condiments for each person to assemble their sandwich as they choose.  This presentation was quite popular with out kids and continues to be popular with our grandkids as well as guests.

I filled one serving tray with ciabatta buns (above).  Another tray held rolled cooked turkey breast slices, Swiss and cheddar cheeses.  Any lunch meat or cheese slices would have worked.  The meat and cheese tray can be made as simple or as elabourate as desired but I usually keep it simple.

toppings for ciabatta buns
The topping tray can vary as well.  I usually add lettuce, tomatoes and onions. Red or green leaf lettuce adds just the perfect crunch and flavour.  Romain lettuce works nicely too as do other salad greens.  I normally don't  use iceberg lettuce as it doesn't have much flavour.  I also like using red onions as they add a bit of colour along with flavour.  There are so many varieties of slicing tomatoes that add not only colour but also flavour.   I prefer the heirloom slicing tomato varieties but there are a few good hybrids as well.

Not pictured are the additional condiments like mayonnaise, mustard, and horseradish.  Fresh alfalfa sprouts, mustard greens and pickles are also a nice addition but really anything goes.  A separate pickle or vegetable tray works nicely to complete the meal. 
 
The ciabatta buns make rather large sandwiches, larger than a good sized burger.  It is a rather filling sandwich but lower in fat and calories.  The assembled ciabatta bun sandwiches were delightfully delicious served with fresh baby cucumber pieces and Best Bread & Butter Pickles

Little Miss A, our second grandkid really enjoyed creating her own ciabatta sandwich.  Even cut in half, it was still triangular shape like the adults.  Part of the fun for kids is letting them make their own choices as to what they want to put on their sandwiches.  The make-your-own sandwich presentation is very kid friendly!  Simply put healthy choices on the serving platters then let them make their own creations.  It's a fun way to get your kids to eat healthy with very little effort.


Tuesday, May 28, 2013

Pasta Bar

The clubhouse at our vacation home resort holds a weekly pasta night.  The meal is set up in an L-shape pasta bar with a serve yourself simple garden salad and garlic bread followed by the pasta station where the chef prepares your choice for you.  The pasta station consists of pre-cooked penne and liguini, red sauce, white (béchemel) sauce, sausage, shrimp, mussels, chicken, green peppers, tomatoes, mushrooms, an onions.  The pasta dish is cooked on a portable propane burner.  The chef drizzles olive oil in a small skillet then adds your vegetables and meat of choice.  When that is warmed through, he drizzles a little white wine over the mixture, adds your sauce of choice and flips the pan to mix.  Finally he adds the pasta of choice again flipping the pan to mix. 
 

linguine with white sauce and shrimp
My husband had linguine with béchemel sauce and shrimp.  The shrimp were nice sized.  The sauce  was rich and creamy.  This was a delightfully tasty dish that can easily be duplicated at home.  

When cooking pasta, I like to cook extra for planned leftovers.  I simply cool the cooked pasta then refrigerate it until needed.  It is very easy to whip up a quick meal using pre-cooked pasta.  Pre-cooked pasta warms nicely in a variety of sauces.  It can quickly be turned into tasty homemade pasta cheese dish or other casserole, or used in pasta salads. 

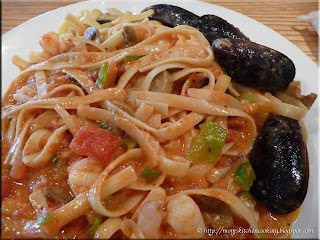
linguine with blush sauce
I had linguine with a blush sauce, a mix of red and béchemel sauces.  I also added shrimp, mussels, tomatoes, green peppers, onions and mushrooms.  I really enjoyed this rich, delicious meal!  With the exception of fresh mussels which are difficult to find at home, this is also a very easy dish to recreate at home. 

A blush sauce is very easy to make but it involves making at least the béchemel sauce to mix with a fresh or prepared ahead tomato sauce.  A rosa sauce is similar to a blush sauce without having to make a béchemel sauce.  A rosa sauce is made by stirring heavy cream into a tomato sauce as it is warming.  Shredded parmesan cheese can be stirred into the rosa sauce if desired. 

A pasta bar is a rather simple idea that can easily be duplicated at home with a few modifications.  Kids love meals that allow them to make the choice of what they want to add.  That is one reason why homemade pizza, tacos and taco salad where always big hits with our kids.  As with other top your own dishes, keep it simple yet interesting.  You don't need a lot of each topping either so a pasta bar is a great way to use up a few leftovers as well.  Presentation can be as easy as setting up various bowls of the prepared ingredients on the table then let each family member top their pasta as desired.


Tuesday, January 22, 2013

Cooking With Kids - Quick Roasted Chicken Dinner

Roast chicken is not something a lot of folks would consider making during the week especially working moms.  However, a roast chicken is a rather frugal meal because there is usually left-overs for lunches the following day plus you have the carcass to make stock if desired.  During the week, time is often at a premium.  If you get home at 4:30 PM, the ideal goal is to have dinner on the table by 6 PM but if you have older kids that get home earlier, popping a roast chicken in the oven is about as easy as it gets so dinner can be ready earlier.

roasted chicken out of oven
My favourite way to roast chicken includes stuffing, cooked in the bird, but when wanting a quick roast dinner the stuffing should be omitted.  The bird will quickly roast with the cavity left empty, usually within about 75 minutes.

I am a strong advocate for getting kids into the kitchen cooking and creating as soon as they can stand!  A young kitchen helper could easily get a bird into the oven ready for the parents to take over when they get home although this is better suited to kids about 10 years old and older.  Mom or Dad should rinse the chicken then cover and place in the fridge ready for the child to take over when they get home from school.  Have a small covered roasting pan ready for the young helper who will put the chicken into it.  I will stress small for two reasons.  First, it is easier for the younger cook to lift and second it cooks the chicken faster.  Add 1 c of water, a couple dabs of butter and sprinkle with salt and pepper then lid.  The oven is set to 350°F and place the covered roasting pan in the oven.   That's it.  In an hour and fifteen minutes the chicken and juices will be ready, just in time for the parents to take over.  The juices can be thickened for gravy.  If the child is old enough, they can wash and poke potatoes for baking, placing them in the oven after the roast has been cooking for 45 minutes.

alt
This is my quick version of a roast chicken dinner but don't get the wrong idea, as it is very flavourful.  The meat is tender and juicy.  The only thing missing is the stuffing.  I usually serve with baked potatoes and steamed vegetables, in this case steamed carrots.  I also use a lighter thickener for the gravy since it will be used on the entire plate.

The beauty of this plan is involving your kids.  Our kids were in the kitchen from day one.  Our grandkids are following suite.  Sure there is a lot of things they aren't capable of doing but you would be surprised at what they can do.  I love cooking with my kids.  One of them will say, hey Mom, have you tried this?  We learn from each other and now I have the great pleasure to learn cooking through the eyes of our grandkids, three generations cooking together.  What a wonderful gift that is!


Monday, April 23, 2012

Frugal Kitchens 101 - Vegetables and Children

Frugal Kitchens 101
There is a perpetual myth that children do not like vegetables.  While some foods are an acquired taste, in reality children will like what they are exposed to at an early age.  A child especially one under the age of six cannot go out and get food on their own.  They are dependent on the parent to do this for them.  If a parent feeds the child a diet rich in heavily processed foods, high in sodium, high in sugars, high in food additives of which we now know some are habit forming, that is more than likely what the child will eat later in life, and worse what the child will feed their children.  However, if a parent feeds the child healthy foods, heavier on the fruits and vegetable side, home cooked meals, as well as a variety of culinary experiences, that child will go on to more than likely foster those same ideals.  In turn, they will go onto pass those ideals onto their children.

The Canadian Food Guide recommends children ages 2 to 3 eat four servings of fruits and vegetables daily, children ages 4 to 8 five servings, children ages 9 to 13 six servings and those 14 to 18 seven servings for girls and eight servings.  Adults ages 19 to 50 should eat 7 to 8 servings for women and 8 to 10 servings for men.  Those over the age of 50 should eat 7 servings of fruits and vegetables daily.  One common complaint made by parents is their child simply refuses to eat vegetables.   Here are a few tips for getting your kids to eat more fruits and vegetables without breaking your food budget.

  • keep fruits and vegetables ready for serving - Keep a fruit bowl on the table to encourage your kid(s) to help themselves.  Pre-cut cucumber, carrots, celery, sweet peppers and even cauliflower and broccoli, then keep in the refrigerator for convenient snacking.
  • variety - Offer a wide variety of fruits and vegetables but buy only the quantity you will use within five to seven days.  It is better to buy less and use them up rather than the fruit or vegetable becoming spoiled before you can use it.  For example, with just the two of us most days, I buy two or three each of apples, bananas and then in add a couple of other fruits like plums or pears depending what is on sale.  That way we don't get bored eating the same fruits all the time.  Be sure to unit price when buying produce.  Recently, a 3 lb bag of whole carrots is less expensive than a 2 lb bag of ready to use baby carrots.
  • raw verses cooked - Quite often the problem in getting kids to eat vegetables is a textural one.  For example, your kids may prefer steamed potato pieces or baked potatoes but refuse to eat mashed potatoes.  Use different cooking methods in addition to raw.  Raw vegetables is the frugal choice but certain cooking methods are less expensive than others.  For example, steaming vegetables is less expensive than boiling them and there is less nutrition lost with steaming.  Avoid over cooking vegetables. 
  • use fruits and vegetables as an ingredient -  Shredded vegetables can easily be used in meat loaf and meatballs, quick breads (eg. zucchini loaf) and muffins, yeast breads and even cakes.  Substitute applesauce for the fat in baked goods for a low fat, healthier version.  If you make your own pasta, add vegetables or vegetable powder to the dough.  Buy or make plain yogurt then stir in fresh fruit or use the yogurt as a healthy dipping sauce for fruits and vegetables.
  • whole fruits and vegetables verses juices - In general whole fruits and vegetables are a better choice than fruit or vegetable juices that may contain colour, artificial flavours, preservatives, salt and sugar.  Whole fruits and vegetables are a good source of dietary fiber that help exercise facial muscles.  Homemade juice can be easily made using a juicer or steam juicer.  Take advantage of produce sales and in season produce to make your own juices.  If buying fruit juices, frozen concentrated juices are less expensive per ml or ounce than canned or bottled juices.  Avoid buying expensive single serving juices.  Use a reusable water bottle filled with juice for lunches or traveling if desired rather than single serving juice boxes, cans or bottles.
  • know what a serving size is - Fruits and vegetables are available in different sizes.  For example, apples may be small, medium or large.   The serving size for an apple is medium, so save a bit of money by buying medium rather than large apples.  The serving size for vegetables other than leafy greens is a half cup and leafy greens is one cup.  The serving size for dried fruits is a quarter of a cup while the serving size for fruits like grapes and cherries is 20 pieces.  Many folks eat more than a half a cup of vegetables as part of their evening and while there is nothing wrong with eating extra, you can save money by reducing the serving to closer to the recommended serving size.
  • set a good example -  Kids love to mimic adults so if Mom says she hates broccoli chances are good the kids won't even try broccoli if offered.   If Mom and Dad don't eat fruits and vegetables the kids are less likely to eat them as well.   Involve your kids in the choice of fruit or vegetable, shopping for produce, and meal prep.  All of these activities offer wonderful learning moments.  I don't believe in forcing a child to finish everything on their plate or making them eat a particular food they don't like.  This type of negative reinforcement can result in life long dietary issues.  At the same time, I don't offer a substitute.  If the meal is meat, potatoes, carrots and salad, a healthy child is not going to be harmed if they don't eat the carrots but it doesn't mean a piece of fruit can be substituted for the carrots.  Let kids serve themselves at the dinner table whenever possible.  Surprisingly, when they can control the amount of fruits and vegetables they can put on their plate, they will actually choose more.  It's the broad picture that is most important and the food guidelines are just that.  There needs to be room to be flexible to account for individual tastes and preferences. 


Sunday, October 24, 2010

Octopus on a Bed of Seaweed

I hope the title peaked your interest!  Since October is National Pasta Month I thought is would be a bit fun to come a very kid friendly pasta dish.  I wanted something that would be easy to make yet a bit of fun for the little ones.  The criteria was quite clear that the dish be fun and kid friendly but I also wanted it to be Mom friendly.  I also wanted everything to be entirely edible so no toothpicks holding things together or any non-edible props.  Our grandchildren are all under the age of 5 so this was important to me. 

children's octopus pasta dinner
Pictured is the octopus on a bed of seaweed I came up with for a kid friendly meal.  I was looking for some type of blue liquid to set this meal up on and I suppose I could have used blue jello but I don't think the sweetness of jello would go well with the other ingredients so I used a blue plate.  The seaweed is organic spinach spaghetti.  I cut the all beef wiener to give 8 legs then cooked the wiener in boiling water that curled the legs slightly.  Mr. Octopus's hat is a hollowed out small plum tomato half.  His eyes and face is spreadable cream cheese.  Swimming around feeding off the seaweed are gold fish crackers.  I though he came out rather cute.  What do you think?

In hind sight there are a few little extras I could have added like a couple of cooked macaroni shells.  Some type of a treasure chest would be rather neat too and I thought about adding a cheese flag on a thin carrot stick flag pole.  The possibilities are really endless.  As the dish stands though I think any little one would enjoy eating it!


Wednesday, June 30, 2010

Porcupine Balls

Casseroles flexible dishes requiring less preparation needed making them the ideal dish for the busy home cook.    Most casserole recipes do not have to be followed exactly.  Slight changes in the amount of the main ingredients will have little effect on the finished casserole.  An appealing aspect of casseroles is they only take a few minutes to put together.  While they are baking your time is freed up to do other things.    Adding to the convenience of casseroles is most of them can be frozen for later use.  I often make two casseroles at a time, popping one into the oven for that night's dinner and the other into the freezer for another night. They are a good way to use up those little bits of leftovers and casserole leftovers reheat well too.

porcupine balls prep
When it comes to casseroles ground beef reigns supreme.  Ground beef is an economical meat choice that lends its well to the use of extenders.  Ground beef can also be shaped into meatballs, patties and loaves adding to the versatility of this inexpensive meat.  For best results, grind lean beef at home or have it ground for you as part of your beef on the hoof or bulk beef purchase.  It is possible to substitute ground pork, turkey, chicken or venison for ground beef in most casserole recipes.

Porcupine balls are tasty meatballs that get their name from the cooked rice sticking out from the surface.  Grated carrot or zucchini can be added to the meat mixture if desired.  They can be baked, cooked in a crockpot or covered frypan.  Once cooked they do freeze well for later use. 

Porcupine Balls

1 lb lean ground beef
½ c uncooked long grain rice
1 small onion, finely chopped
1 egg, lightly beaten
¼ tsp garlic powder
¼ tsp sea salt
¼ tsp pepper
¾ tsp Italian seasoning
2 c (500 ml) jar home canned tomato soup*

Finely chop the onion.  Mix all ingredients except the soup together.  Form the meat mixture into walnut sized meatballs either by hand or using a meatball former.  Place meatballs in a single layer in a baking pan.  Pour the tomato soup over the meatballs.  Cover and bake at 180ºC (350ºF) for 45 minutes.  Remove cover.  Bake an additional 15 minutes.
Yield: 24 meatballs

* If using commercially canned 10 oz soup add ¾ c of water to the soup before pouring over the meatballs.

porcupine balls
The meal pictured consisted of the porcupine balls, baked potatoes and home canned wax beans.  I put two large potatoes in the oven to bake along with the porcupine balls.  This meal would definitely fit into the comfort meal category because it just has that wonderful taste of homemade.  The meatballs are a sure kid pleaser!

My husband said the meatballs tasted a lot like the filling in cabbage rolls and they did.  I found the meatballs a little on the bland side so will be increasing the seasonings the next time I make them.  I will also use home canned roasted tomato soup for a flavour boost.


Friday, June 25, 2010

Kiddie Vegetable Tray

Last Saturday oldest grandbaby and Mom were visiting.  I had a heads up that oldest grandbaby wasn't feeling much like food lately so I decided to make a dip & finger food based meal.  On the menu: chicken strips with honey, homemade potato wedges with ketchup, and a vegetable tray with ranch dressing.  The honey, ketchup and ranch dressing were in individual dipping bowls.  Kids just seem to love dipping foods so I thought this would be a good menu choice.

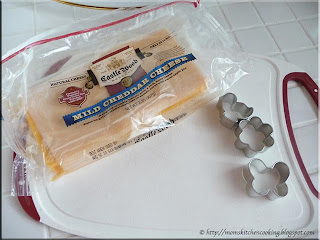
cheese and cookie cutters
I seldom buy American processed cheese unless it is for a special project.  Instead we use pre-cut cheddar cheese slices or simply cut cheese slices ourselves.  The week before we hosted a large event where we served grilled hamburgers, hot dogs and sausages resulting in a few left-overs including cheddar cheese slices.  I decided to use mini cookie cutters to cut out cheese shapes for the vegetable tray. 

Originally I planned to use three shapes but as things progressed I ended up using only the duck shape.  Cutting the cheese shapes was quite easy.  I cut one slice of cheese at a time getting 6 shapes out of each slice of cheese.  The cheese stuck in the cookie cutter but popped right out with a gentle poke.

kiddie veggie tray
I arranged the cheese ducks arround the rim of a serving platter.  I added cut pieces of pepperettes, sliced cucumber, baby carrots and green pepper slices.  I served individual dipping bowls of ranch dressing to go with the vegetables.  I thought the overall presentation came out nicely.  The little one aka oldest grandbaby really enjoyed the vegetable tray and dipping the vegetables.  This is the type of tray that could easily be adapted to meet the likes of the child.  I can get away with using a lot of vegetables because our grandkids love vegetables.

Oh a bigger scale this is an easy way to add a theme to any vegetable tray for entertaining.  It would be a great way to add that special touch for holiday entertaining.  This will be a presentation that I expand on!