My photo
Ontario, Canada
I am a wife, mother and grandma who enjoys the many aspects of homemaking. A variety of interests and hobbies combined with travel keep me active. They reflect the importance of family, friends, home and good food.
Cook ingredients that you are used to cooking by other techniques, such as fish, chicken, or hamburgers. In other words be comfortable with the ingredients you are using.
--Bobby Flay

For Your Information

Please watch this area for important information like updates, food recalls, polls, contests, coupons, and freebies.
  • [March 19, 2020] - Effective Mar 17, this blog will no longer accept advertising. The reason is very simple. If I like a product, I will promote it without compensation. If I don't like a product, I will have no problem saying so.
  • [March 17, 2020] - A return to blogging! Stay tuned for new tips, resources and all things food related.
  • [February 1, 2016] - An interesting report on why you should always choose organic tea verses non-organic: Toxic Tea (pdf format)
  • Sticky Post - Warning: 4ever Recap reusable canning lids. The reports are growing daily of these lids losing their seal during storage. Some have lost their entire season's worth of canning to these seal failures! [Update: 4ever Recap appears to be out of business.]

Popular Posts

Showing posts with label poultry. Show all posts

Tuesday, February 03, 2015

Baked Chicken with Tomatoes and Mushrooms

One of my goals with using up the pantry and freezer surplus is creating minimal left-overs.  This differs from my normal cooking where I intentionally cook extra for planned left-overs for the freezer.  Despite this, there has been a few left overs just enough to use up the following day for lunch or as a side dish for dinner.  On the whole, I have been rather pleased as small pockets of space appear in both the pantry and freezers but there is a long ways to go!

baked chicken with tomatoes and mushrooms
I thawed two chicken legs with backs attached. I browned the chicken legs in a little olive oil then placed them in a baking dish and topped with a jar of home canned tomato pieces that I added about a teaspoon of Italian seasoning.  I baked the chicken covered at 350°F until the chicken was cooked (about 40 minutes).  I sautéed sliced white mushrooms to top the chicken. I served the chicken with left-over seafood pasta noodles and left-over  Greek salad (not pictured). 

It was an easy, tasty meal using what was on hand and while it doesn't seem like much, two more items were used up from the pantry and freezers.  Just as in any type of decluttering, baby steps can make a huge difference when done consistently.  And so the pantry and freezer decluttering continues...


Monday, April 14, 2014

Almond Crusted Stuffed Chicken Breast

I recently wrote about a few alternative flours that I am experimenting with.  Flours like almond, black bean, and rice make it possible to make gluten free baked goods.  Some are suitable for making baked goods that meet the requirements of a Paleo or Primal diet.  However, you don't need to be eating a special diet to enjoy the benefits alternative flours offer.  They add a whole new dimension in creative cooking allowing you to bring a little pizazz to your family favourites,

almond crusted stuffed chicken
There is just something comforting about stuffed chicken breasts.  They are easy to make yet tasty and filling.  Stuffed chicken breasts are quite economical as well.  They can be lightly seasoned and uncoated or coated with seasoned flour or bread crumbs.  I used unblanched almond flour to make almond crusted stuffed chicken breasts.

Almond flour adds a light, nutty flavoured crust to the stuffed chicken breasts.   The almond flour browns nicely.  It adds a little extra protein as well.  These delicious bundles of yummy delight are sure to please!

Method:  Pound out boneless, skinless chicken breasts.  Place a single layer of washed spinach leaves over top of each prepared chicken breast.  Place sliced or shredded cheese on top of the spinach.  Carefully roll the chicken breast jelly roll style.  Secure with wooden toothpick if desired.  Place the prepared stuffed chicken breast into a bowl of almond flour.  Pat the almond flour around the chicken breast to coat evenly.   Place the coated chicken breast onto a Silpat or parchment paper lined baking sheet.  Bake at 350°F until golden brown and cooked through, about 40 minutes.


Sunday, February 16, 2014

Chicken Schnitzel With Provolone and Roasted Tomato Garlic Sauce

Most people have the view that 'going on a diet' means depriving themselves of pretty much everything they enjoy eating.  That view is further distorted by the myth that there are good foods and bad foods which simply is not the case.  The general premise is, if you eat the good foods you will lose weight.  The problem is this approach simply doesn't work.  All you have to do is browse through the everydiet.org site to see how many diets there are that really are not sustainable, so in the end even if you lose the weight you will gain it back when you resume your normal eating pattern.  What does work is eating the foods you enjoy in moderation, getting active and creating a calorie deficit which ultimately results in healthy weight loss that can later be maintained.  The focus with this approach becomes total fitness not just weight loss.  With that in mind, even fried foods can be enjoyed while you are in weight loss mode.  

pounding the chicken breasts for schnitzel
My husband offered to make dinner a few nights ago.  He had seen a dish on FoodTV that he wanted to duplicate.  The dish was a chicken schnitzel.  Schnitzel is simply a piece of boneless veal, chicken, beef, turkey or pork pounded out thin then lightly coated and pan fried.  If the meat is veal, it is referred to a Wiener SchnitzelChicken Parmigiana is chicken schnitzel topped with Parmesan cheese.

He pounded out four 183 g (6.45 oz) boneless, skinless chicken breasts then dredged the meat in milk and lightly seasoned flour.  The traditional coating is flour, beaten egg and bread crumbs.  Eliminating the egg and bread crumbs reduced the caloric value of the cooked chicken schnitzel.

frying the schnitzel
He heated olive oil and a little butter in a ceramic coated fry pan.  Olive oil is a healthier oil for frying while butter adds a lot of flavour.  Coconut oil is another healthier oil for frying.  Both have health benefits.  Vegetable oil blends, canola and sunflower oil should be avoided because they are GMO which  can have negative health effects including gastro-intestinal upsets.

He placed the prepared chicken schnitzel in the hot oil then fried to a golden brown on both sides.  While the chicken schnitzel was frying, he brought a pot of salted water to a boil then stirred in 4 oz of broad egg noodles.  A serving size of broad egg noodles is 2 oz dry weight.  He removed the chicken schnitzel, drained on a piece of paper towel, then placed on a Silpat lined baking sheet.  He topped each chicken schnitzel with 28 g (1 oz) of cheese, two with provolone and two with mild cheddar.  While the chicken schnitzel baked to perfection with bubbly cheese, he drained the pasta and heated the home canned roasted tomato garlic sauce.   
   
chicken schnitzel with provolone and roasted tomato sauce
The entrée was simply the chicken schnitzel with provolone cheese and egg noodles served with a light topping of roasted tomato garlic sauce, garnished with fresh basil.  The chicken schnitzel was moist and fork tender.  The provolone cheese added a lovely richness.  The roasted tomato garlic sauce perfectly complemented the chicken and egg noodles.  It was a simple, delightfully tasty meal! 

This is a low prep, easy to make, under 30 minute entrée.  The nutritional value is based on a 183 g piece of boneless, skinless chicken breast, olive oil, butter, milk, flour, seasonings, provolone cheese, egg noodles, home canned roasted tomato sauce and basil as pictured.   

Nutritional value for entire entrée as pictured: 633 calories, 52 g carbohydrates, 20 g fat, 61 g protein, 535 mg sodium, 4 g fat


Sunday, May 12, 2013

Beer Grilled Chicken Legs

Yesterday, I wrote about cooking with non-alcoholic beer.  Basically, you can have all the flavour and the health benefits of beer without the alcohol content or the higher price of beer.  Be warned that non-alcoholic beer still has caloric content ranging from 35 to 100 calories per 355 ml serving and some brands have added sodium so be sure to read the nutritional label.  If you are replacing regular beer with non-alcoholic beer then you will reduce the calories in the dish as non-alcoholic beers are lower in caloric content than regular beers.  If however, you are replacing water with non-alcoholic beer you will be increasing the calories in the dish.  Calories aside, those non-alcoholic beers containing sodium could be problematic for those on a low-sodium diet so choose a non-alcoholic beer without sodium added.

When it comes to grilling, one way to add flavour without adding calories involves smoke.  The smoke is generally created using wood chips but liquids can be used to extinguish any flames which can impart a flavour to the resulting smoke.  The smell of beer on the grill is amazing imparting a wonderful flavour to the grilled meat.  It has a deep nutty, almost sweet aroma.  That flavour permeates into whatever is being cooked on the grill.  What I was looking for when testing out the non-alcoholic beers was flavour combined with results consistent with using regular beer without the alcohol, getting that same aroma and flavour when grilling with a non-alcoholic beer.

grilled chicken seasoned with non alcoholic beer
Chicken has been a long time favourite for grilling.  Years ago as young newlyweds fiddling with our first charcoal grill, we learned how to control flare-ups when grilling chicken by spritzing beer over the chicken and flames.  Chicken grilled this way remains tender and juicy.   Used in this manner, I highly doubt there would have been any residual alcohol in the food.  The beer adds a wonderful flavour without adding extra calories. 

I grilled four chicken legs on the propane side of our outdoor grill on medium high heat.  Once small flames appeared, I spooned non-alcoholic beer over the legs and continued grilling until flames appeared again and repeated the beer application.  A baster can be used to apply the beer if desired.  I continued in this fashion, turning the legs and applying beer until they were golden brown with nice grill marks and the juices were clear.  Despite being very simple the additional subtle flavour was impressive.  I used about a half can of President's Choice Blonde non-alcoholic beer (355 ml can: <0.5% ABV, 80 cal, 17 g carbohydrates, 55 mg potassium, 3 g protein) to baste the chicken legs as they grilled.  This is a nice, smooth flavoured non-alcoholic beer perfect for pairing with poultry.  PC Blond is brewed for Loblaws by Brick Brewing Co. in Waterloo, Ontario and distributed throughout the Loblaws Companies chain stores (eg. RCSS, No Frills, Zehrs, etc.).  If you cannot find PC Blonde, Our Compliments (Sobey's brand) or O'doul's would be fairly similar in flavour.  Even a stronger flavoured non-alcoholic beer would work for this method.

The chicken was delicious!  It was golden brown with slightly crispy skin, moist and tender flesh nicely flavoured from the beer.  Basting chicken with beer is an excellent way to get extra flavour without the calories.  It is an easy method to see if you like the flavour the beer imparts because it is a bit more subtle than infused beer (eg. beer can chicken) or beer used in part or whole as a marinade for grilling. 


Wednesday, January 23, 2013

Chicken Pot Pies

Years ago as a newlywed, I learned a cardinal rule of frugal cooking that has never failed me.  Left-overs need never taste like left-overs.  They don't even have to look like they were left-overs.  Seriously, one of the biggest mistakes you can make is to serve your family the exact same meal they had the day before just reheated.  That's why left-overs get such a bad rap.  There are so many creative ways to use left-overs that simply reheating can go by the wayside!

the makings of chicken pot pie filling
A couple of days ago I made a quick roast chicken dinner consisting of roasted chicken with baked potatoes and steamed carrots.  I had half of the chicken and the gravy left-over for another meal.   It has been cold and snowy here so last night I de-boned the chicken putting the carcass into the freezer to make stock with later.  I decided to make chicken pot pie with the chicken and gravy.  Pot pie involves a filling thickened to a stew consistency and topped with at least a top crust but can be in a double crust if desired.

There is nothing wrong with mixing left-overs with a bit of fresh cooked or using them as an ingredient in a new dish.  I had no left-over potatoes or carrots so steamed some for the filling then stirred in frozen whole kernel corn and the left-over gravy.  The steamed vegetables were warm which helped mixing in the cold gravy.  Once that was mixed, I stirred in the chicken pieces.

chicken pot pie filling in the casserole pans
Pot pies are usually served in individual serving dishes.  You can buy the aluminium pot pie pans at the dollar store but I prefer to use re-usable oven safe stoneware of which I have a fair number of pieces.  The shape doesn't really matter.  I have round, oval, rectangular and scalloped.  The standard would likely be round the same as you would use for French onion soup.

I poured the chicken mixture into two individual serving size baking dishes and one double serving size one.  At this point the chicken mixture was very much like a thick stew so could have been enjoyed just the way it was but I decided a topping was in order.

cutting the puff pastry
Pot pie has at least some type of topping crust if not double crusted but you can get very creative here.  Anything from biscuit batter to pastry works well.  If I am in a hurry, I like using a drop dough that I would normally use for dumplings.

Puff pastry is a nice topping for pot pies because it is light and flaky.  You can use home made puff pastry but for this dish I used a store bought puff pastry left-over from holiday entertaining.  The rectangular piece of dough was just perfect for cutting into three pieces to fit on top of my filling.

puff pastry on top of the chicken pot pie filling
Trust me, a pot pie topping does not get much easier than using puff pastry sheets.  Simply cut and top even if using home made.  Don't tuck or pinch, just lay the sheet of puff pastry over the filling loosely to allow steam from the hot filling to escape.  It doesn't matter if the dough touches the sides or fully covers the filling because it does puff when it is baking.  If it touches the sides sealing off the filling completely, poke a few holes in the crust with a fork to release some of the steam.  You can lightly brush the dough with melted butter if desired.  This will give a nice golden colour to the crust but it is not necessary if using puff pastry or drop biscuit dough.

chicken pot pie fresh from the oven
Pictured are the chicken pot pies fresh from the oven.  I baked the pot pies until the filling was warmed through, just lightly bubbling and the crust was a golden brown.  The two smaller, individual serving size were served in the baking  dishes as is with a side Caesar salad.  It was a delicious, low cost meal that used up a few left-overs, just perfect for a snowy, winter's day.

Even though I used left-overs, it was fairly easy to make a completely different dish that did not resemble the first.  This is a frugal way to use left-overs.  Did you know that left-overs can actually be hidden in other dishes as ingredients.  For example, if I have a couple of tablespoons of mashed potatoes left, I often use them to thicken soup.  If I have a couple of tablespoons of applesauce left over, I use it in quick breads.  Bits of left-over vegetables find their way into meatloafs.  Get creative with using left-overs if you really want to save money in the kitchen!


Tuesday, January 22, 2013

Cooking With Kids - Quick Roasted Chicken Dinner

Roast chicken is not something a lot of folks would consider making during the week especially working moms.  However, a roast chicken is a rather frugal meal because there is usually left-overs for lunches the following day plus you have the carcass to make stock if desired.  During the week, time is often at a premium.  If you get home at 4:30 PM, the ideal goal is to have dinner on the table by 6 PM but if you have older kids that get home earlier, popping a roast chicken in the oven is about as easy as it gets so dinner can be ready earlier.

roasted chicken out of oven
My favourite way to roast chicken includes stuffing, cooked in the bird, but when wanting a quick roast dinner the stuffing should be omitted.  The bird will quickly roast with the cavity left empty, usually within about 75 minutes.

I am a strong advocate for getting kids into the kitchen cooking and creating as soon as they can stand!  A young kitchen helper could easily get a bird into the oven ready for the parents to take over when they get home although this is better suited to kids about 10 years old and older.  Mom or Dad should rinse the chicken then cover and place in the fridge ready for the child to take over when they get home from school.  Have a small covered roasting pan ready for the young helper who will put the chicken into it.  I will stress small for two reasons.  First, it is easier for the younger cook to lift and second it cooks the chicken faster.  Add 1 c of water, a couple dabs of butter and sprinkle with salt and pepper then lid.  The oven is set to 350°F and place the covered roasting pan in the oven.   That's it.  In an hour and fifteen minutes the chicken and juices will be ready, just in time for the parents to take over.  The juices can be thickened for gravy.  If the child is old enough, they can wash and poke potatoes for baking, placing them in the oven after the roast has been cooking for 45 minutes.

alt
This is my quick version of a roast chicken dinner but don't get the wrong idea, as it is very flavourful.  The meat is tender and juicy.  The only thing missing is the stuffing.  I usually serve with baked potatoes and steamed vegetables, in this case steamed carrots.  I also use a lighter thickener for the gravy since it will be used on the entire plate.

The beauty of this plan is involving your kids.  Our kids were in the kitchen from day one.  Our grandkids are following suite.  Sure there is a lot of things they aren't capable of doing but you would be surprised at what they can do.  I love cooking with my kids.  One of them will say, hey Mom, have you tried this?  We learn from each other and now I have the great pleasure to learn cooking through the eyes of our grandkids, three generations cooking together.  What a wonderful gift that is!


Wednesday, November 14, 2012

Our Thanksgiving Stuffed Chicken (Vacation Home)

The approach for cooking at our vacation home is a bit different than cooking at our permanent residence.  We don't have a well stocked pantry nor do we have storage space for a lot of food.  We don't have a large variety of seasonings and spices to use like we do at home.  We tend to shop for only a couple days of groceries at a time which ends up saving us a bit in food waste.  Quite often eating out is a spur of the moment decision especially when we have company visiting.  We don't have a lot of the small kitchen appliances I am used to using on an almost daily basis (eg. Kitchen Aid stand mixer) and those small kitchen appliances we do have are very much stripped down versions specifically bought with renters in mind meaning they don't have the features I'm used to having.  It is hot there as well so cooking indoors is not as desirable especially baking.  I have become very accustomed to cooking with natural gas and on charcoal for the outdoor grill, neither of which we have at our vacation home.  Instead I'm back to cooking with electricity and propane.  Don't get me wrong as I am definitely not complaining, just saying the the cooking style at our vacation home is rather different and by default adaptive than at home.

stuffed chicken
My husband's sister and our nephew spent the Canadian Thanksgiving with us at our vacation home.  I decided on making a meal that gave us the traditional flavours of home.  I bought a whole chicken then stuffed it as I normally would with turkey or whole chicken.  Unfortunately, I did not have any homemade poultry seasoning so had to buy a packet but it worked for our needs.  I do think I will buy a countertop roaster next trip as it won't heat the house like the oven does.

My stuffing is beyond easy to make.  I just break up bread slices into a bowl.  It is very much a guestimation as to how much it will take to stuff the bird.  Then I add chopped onions, dabs of butter, poultry seasoning, salt and pepper then mix well.  I form the stuffing into fist sized balls and stuff it into the bird in both the main and neck cavity.  Then I tie the legs together, dab the bird with butter and a little salt and pepper then roast as is.  The results are perfect every time with enough drippings to make a nice, rich gravy.  At home, I would normally serve the chicken or turkey with mashed potatoes and whole kernel corn but at our vacation home I substituted baked potatoes.  They cooked along with the chicken making it a frugal use of energy.  I also kept the carcass of the chicken to make chicken stock then froze it to be used during our next trip.  Normally, I would home can it but until I buy a pressure canner for the vacation home, it isn't an option.


Sunday, March 25, 2012

Grilled Chicken Breast with Mango Pepper BBQ Sauce

I have to confess that I buy very little in the way of barbeque sauces.  In fact, the three main ones I buy occasionally are Dianna Sauce and Sweet Baby Ray's simply because I have not cloned them yet.  The bottom line is, homemade barbeques sauces are fresher and can be tailored to your taste buds while saving you a bundle of money.  I understand wanting the convenience of a ready to use bbq sauce though so what I do is work on a recipe until it is just right, then home can it.  That gives me the convenience, cost saving and a lovely, preservative free product that is ready to use.  This is the time of year I like to start experimenting with bbq sauces that may make it to the canning pot.

mango pepper bbq sauce
Mango goes nicely with pork, poultry and fish.  Since chicken was on sale I decided to prep a couple of the chicken breasts for the grill.  This is the time of year here where mangos are fairly inexpensive as well so using them to make a bbq sauce made a lot of sense.

This tasty sauce takes a bit more work but it is worth it.  The sauce would have to be thinned somewhat for home canning and I would pressure can it.  The mango pepper bbq sauce will more likely be a sauce I make fresh to use when mangos are in season.

Mango Pepper BBQ Sauce
inspired by: Better Homes and Gardens, New Grilling Book, 2005., Pp. 35.

1 c red sweet peppers, chopped
1 sm onion, chopped
1 mango, seeded, peeled and chopped
2 tbsp packed brown sugar
1 tbsp rice vinegar
¼ tsp chili powder
1 tbsp green pepper, finely chopped

Heat oil in non-stick skillet.  Stir in peppers and onion.  Cook until just tender.  Stir in remaining ingredients.  Bring to a low boil.  Reduce the heat then simmer about 10 minutes.  Cool mixture.  Pour into food processor bowl.  Process until smooth.  Brush on meat or poultry during the last 10 minutes of grilling.

grilled chicken with mango pepper bbq sauce, zucchini boats and grilled beet
Once you start making your own bbq sauces you will seriously be amazed at how easy and inexpensive it is.  I served the grilled chicken breast with mango pepper bbq sauce with a zucchini boat stuffed with grilled grape tomatoes, carrots and mushrooms as well as a grilled beet.  What is nice about this meal is the absence of starches aka low carb (eg. potatoes, pasta, rice) giving it a nice, clean, healthy approach.  It was very low fat as well with less than a quarter ounce of fresh grated Parmesan cheese used as a garnish and flavour boost.  Beets roasted on the grill are simply delicious too!  All away around, this healthy meal was a real family approved pleaser!


Wednesday, March 21, 2012

Using Left-over Grill Roasted Chicken

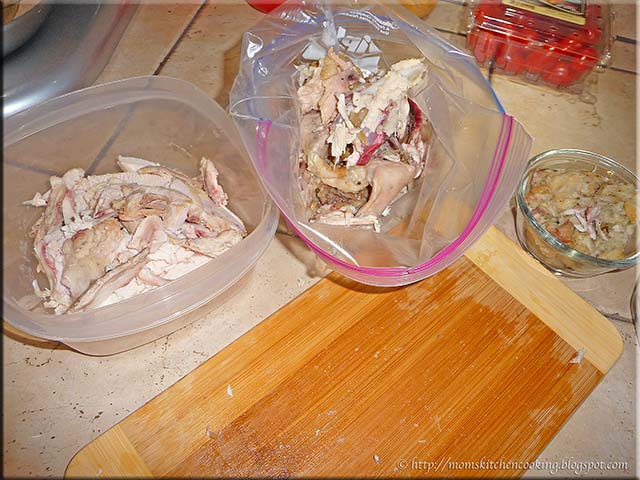
Our Wal-mart had a sale of two whole chickens, regardless of the weight for $10 so I started stocking up.  My goal was 16 whole chickens total but when I stopped yesterday they were sold out so unfortunately I only managed to get 8.  Out of my first purchase of four chickens, one was roasted on the grill.  Half of the grill roasted chicken was for that night's dinner.  The other half was de-boned for wraps and stock.

de-boned grill roasted chicken
Grill roasted chicken has a lovely, light smokey flavour.  I de-boned the chicken reserving fat, cartilage, skin and bones for the stock bag (right).  This is one time where a bit of extra fat is desirable.  It adds a richness and flavour to the stock that can't be beat.  The same is true of the chicken skin.  Since the stock is de-fatted prior to canning anyway, the end result is a lovely flavoured stock without the fat but all the flavour.

The weather has been unseasonably warm here with highs in the 70's (F) and lows in the 50's (F) which is unheard of in Ontario this early in the year.  The only difference between now and early summer is the humidity levels haven't risen.  Still, I am using summer meals to keep the heat from cooking out of the house.  I cut the remaining meat into strips to make wraps for the following night's dinner.

grill roasted chicken wrap
Wraps are a delicious, easy summer meal that can be enjoyed for any meal depending on the filling.  The grill roasted chicken strips were perfect for wraps adding a delicious flavour boost.  I added a little homemade mayonnaise, iceberg lettuce, grape tomatoes cut in half, a little Italian dressing and light sprinkling of grated cheddar cheese to complete the wraps.

Normally I tuck both ends end then wrap and cut in half on a diagonal for presentation.  This time I tucked in one end then rolled, leaving the 10 - in wraps whole, secured with a toothpick for a bit different presentation.  There was just enough chicken left over for my husband's lunch the next day.


Tuesday, March 20, 2012

Grill Roasted Chicken with Grilled Vegetables

I recently posted about the whole chicken sale our local Wal-mart is having.  It is a one week sale of two whole chickens for $10, limit two packages (4 chickens) per customer per visit.  The trick with these types of sales is to get the largest weight possible to reduce the cost per kilogram (pound) as they are sold in multiples of two regardless of the weight.  The second trick is to get their early in the morning to get the heaviest packages possible.  Sunday's purchases were a bit lower in weight (6.492 kg)  because I didn't get there until after lunch.    Monday's purchases came in at 7.236 kg.  I intend to end up with 16 chickens total so the next few posts will discuss what I do with all this chicken. 

stuffed chicken on the grill
The weather has been beyond unseasonably warm with highs in the 70's (F) and lows in the 50's (F).  We have had the furnace off for over a week now and the heat wave is predicted to continue for the rest of the week.  The house has actually been rather on the warm side so I decided to roast on of the chickens on the grill. 

The chickens are trussed so they cook nicely.  I cut away the excess fat without disrupting the leg trussing so I could stuff the chicken.  This is our favourite way to have roasted chicken.  Once the chicken was stuffed, I added about a half cup of water to the bottom of the soaked clay baker, put the chicken in, finished with salt and pepper and butter then placed it on the pre-heated grill (300ºF).  The propane side of our grill has three burners.  I used the two outer burners with the centre one off until it was time to brown up the chicken.

grill roasted chicken with vegetables on the grill
I wanted to add flavour without adding calories.  One of the easiest ways to achieve this is to use a smoking bisquette (blue arrow).  I use 100% organic Bradley Smoker smoking bisquettes The bisquette is placed directly on the pre-heated grill.  After 10 minutes, the grill is ready to use where the smoking bisquette will add a delicious wood-smoke flavour without the calories. 

Once the chicken started browning up a bit, I put the potatoes, zucchini and grape tomatoes on to grill.  Roasted tomatoes are simply delightful!  The flavour is rich and intensive yet smooth.  I hollowed out the zucchini to make grilled zucchini boats.

grill roasted chicken ready for serving
Just look at that beautiful roasted chicken with just a slight hint of apple smoke.  The deep golden colour comes easier using the grill.  The beauty of roasting a chicken or any other meat on the grill is you can infuse it with delicious, natural wood-smoke flavour while keeping the heat outdoors.  In this respect, roasting on the grill is superior to roasting in the oven. 

While the chicken was gorgeous, nicely roasted, there wasn't enough juice to make gravy.  It could have been due to the clay roasted as there wasn't much in the way of tasty yum yums as Emeril Lagasse puts it.

grill roasted chicken with grilled vegetables and stuffing
I served, the moist and tender, wonderfully flavoured grill roasted chicken with grill baked potatoes and zucchini boats.  The meal was beyond delicious!  My husband couldn't stop raving about it so that means it was a really good meal.

Grill Baked Potatoes
recipe by:  Garden Gnome

Wash the desired number of potatoes.  Poke with a fork to allow steam to escape.  Place on the grill on indirect heat.  Bake until tender.

Zucchini Boats
recipe by:  Garden Gnome

Choose zucchini that are about 8 - inches long.  Wash then cut the stem and blossom end off.  Cut the zucchini in half longitudinally from stem end to blossom end.  Use a spoon to scoop out a shallow channel.  Brush with olive oil and sprinkle lightly with salt.  Turn cut side down onto grill on indirect heat.  Wash and cut grape or cherry tomatoes in half.  Place in a small foil baking dish.  Drizzle with olive oil.  Place on the grill on indirect heat.  Cook the zucchini until tender with defined grill marks.  Remove from grill and plate.  Fill the channel with cooked tomatoes.  Sprinkle lightly with sea salt,  fresh cracked pepper and fresh grated Parmesan cheese.


Sunday, March 18, 2012

Wal-mart Chicken Sale

Our last house was rural, about a 30 minute drive from the closest grocery store.  That meant a lot of times I passed by the sales because driving a total of 1 hour just to save a few cents or even a couple of dollars was not justified with the current price of gasoline.  We now live within walking distance of one grocery store and a 7 minute drive from Wal-mart and another grocery store.  It is quite possible to walk or bike to either on nicer days.  What this means is I can easily take advantage of cherry picking the sales without having to drive plus I'm getting a bit of fresh air and exercise at the same time. 

We let our food stock dwindle somewhat while the house was on the market and once the house sold.   We essentially bought only the bare essentials and mind you that wasn't much.  What I did was take any money that I would have spent on groceries to create a restock fund.  We normally spend about $50 per week on groceries if that and that is mainly dairy, fresh produce and the occasion splurge item.   While the house was on the market and during the move we pared that down to about $20 per week so over the 18 month ordeal I managed to stash away a tidy sum for restocking, not that I will use anywhere near that!

whole chicken on sale two for $10
Wal-mart (Canada) has a sale on chicken this week where we live.  The last time they did this it was imported from the USA but this time it is chicken produced in Canada.  We always support our Canadian growers whenever possible.  The chicken is priced at two whole chickens for $10, limit two per customer per visit.  

The total weight for the two packages was 6.492 kg (14.312 lb) which works out to $3.08/kg or $1.40/lb.  This is an excellent price!  In comparison chicken breasts with skin and bones is $6.59/kg ($2.99/ lb) and boneless skinless chicken breasts are $13.82/kg ($6.25/lb).  A cooked rotisserie chicken is $7.47 with clearance after 5 PM but I can easily cook it and still realize a savings of about $2 per chicken.  I am stopping tomorrow to pick up a couple more packages and may even stop again on Tuesday.  Each chicken is enough for two meals for us with a bit of left-overs and bones for stock but the number of meals can be stretched if the chicken is used for soups, casseroles, and stews.

whole chicken cut in half for grilling
I prepared one of the chickens for roasting on the outdoor grill (will post later this week).  Then I cut one chicken in half.  Why would I do this?  Cutting the chicken into pieces as desired is saving me at least $1.50/lb.  While we do have a gorgeous dual fuel (charcoal/propane) grill, it is not equipped with a rotisserie given the design so cutting some of the chicken destined for the grill makes sense.  Half chicken is a cut that is very difficult to find in the stores but it is delicious cooked on the grill.  The trimmings (left) went into the scrap bag I keep in the freezer to make stock when I have enough and time permitting.  The chicken halves will be grilled on the outdoor grill likely on the charcoal side.  I froze them for later use. 

whole chicken ready for freezing
The whole chickens are already tied to keep the wings and legs looking nice when roasted.  I put two of the chickens in freezer bags for later use.  These will end up being roasted either in the oven or more likely on the outdoor grill.

Tomorrow's purchase will be cut into chicken pieces then packaged in meal sized portions.  I will end up with BLSL chicken breasts, chicken legs with backs attached, ribs and wings.  Wings tend to be rather expensive here but using the wings from the sale chicken will give me 16 pieces at a rather inexpensive price per kilogram.

At any rate I am pleased with the price per kilogram for the sale chicken.  With any luck I will be able to pick up enough chicken to last us the summer.  Watch for Tuesday's post of roasted chicken on the outdoor grill.  It was phenomenal!


Tuesday, January 17, 2012

Turkey Chowder

We had a beautiful, almost 24 lb turkey as part of our Christmas dinner feast.  Turkey is always such a versatile and extremely frugal meat!  Not only does it give a lovely main meal the leftovers can be used in so many ways including creamed turkey casserole, one of our family favourites.   You can be sure there is always a canner full of turkey stock after we have turkey as well. 

turkey chowder
There's hot, open faced turkey sandwiches, turkey in salads, creamed turkey casserole, and turkey stock.  This time I decided to make a very quick and easy turkey chowder using leftover turkey.  The end result was a lovely, thick and yummy chowder just perfect for a cold winter's day!

Turkey Chowder
recipe by: Garden Gnome

3 medium baked potatoes
1 medium onion
2½  c cooked turkey
1¾  c turkey stock
2 c niblet corn
2 c milk
2 cans condensed mushroom soup
¼ tsp poultry seasoning
sea salt and fresh ground pepper to taste

Bake the potatoes (or use leftover baked potatoes) then cut into bite sized cubes.  Chop the onion and add to the potato in a large sauce pan.  Add remaining ingredients and warm through stirring often.  Ladle into serving bowls while hot.


Wednesday, October 26, 2011

Easy Pressure Cooker Chicken Noodle Soup

I mentioned previously that I have been relying on tried and true dishes to get to know my new natural gas stove.  I'm also keeping the meals a bit simpler until we get settled into our new home.  So far, I have not attempted canning on the gas stove simply because I'm too tired and the opportunity hasn't presented itself.  The weather has turned cold and rainy so soup season has started!  Tonight I made use of one of my pressure cookers to make a quick and easy chicken noodle soup. 

chicken noodle soup cooked in pressure cooker
Pressure cooking is my preferred method for making soups.  From freezer to stock it only takes 45 minutes for tender meat and rich stock.   I add vegetables if desired then bring the pressure cooker back to pressure to cook them or if using noodles, dumplings, rice or barley I just de-bone then add to the hot meat stock mixture and cook without pressure.

Tonight's soup started with two frozen chicken legs with backs attached.  I added a stalk of celery, a quartered unpeeled cooking onion, and two bay leaves then filled the 6 qt pressure cooker to the 2/3 mark.  I brought the pressure cooker to pressure then cooked for 45 minutes. After de-pressurizing, I removed the lid the de-boned the chicken placing skin and bones in a small sauce pan, covering just barely with water and brought to a rapid, hard boil.  While that was in process I strained the remaining stock adding it to the meat in the pressure cooker bottom.  Once the bones boiled hard I strained the resulting stock into the meat mixture then added one chopped onion and brought the mixture to a boil then stirred in extra broad egg noodles.  When the noodles were cooked, I stirred in salt, fresh cracked pepper and Worchestershire sauce to taste.  That's it.  The whole soup took about 75 minutes from start to finish. 

I was quite pleased with how the pressure cooker performed on the natural gas stove.  It came to pressure quicker and de-pressurized quicker which is a very encouraging sign for running the larger pressure canners.  I am planning on putting the pressure canner through its paces this weekend since the pantry is quite close to being organized.  I likely have another half day's worth of work in there then it will be tweaking as need be.  I'll be posting pictures hopefully on Friday!


Sunday, October 23, 2011

Easy Italian Linguini

I spent much of Sunday just trying to organize my pantry and that was after helping my husband replace a few electrical outlets and switches.  The good news is we bought another industrial metal shelf unit yesterday so he was able to finish the partially assembled one in the pantry.  Hopefully the missing lock clips are found soon but in the meantime, I was able to get a fair amount of food organized.

easy Italian linguini
I mentioned yesterday that due to the pantry chaos we were having rather simple meals embellished with a few fresh gourmet touches.  I'm sorry but I am beyond exhausted so fancy cooking isn't going to happen but at the same time plain meals aren't going to work.   I made an easy Italian linguini using a home canned roasted Italian tomato sauce and boneless, skinless chicken breasts from the freezer topping fresh store bought linguini and garnished with basil from my new indoor herb garden.  The chicken breasts were simply seared then pan fried and seasoned with garlic pepper.  I cut them across the grain, layering them on top of the linguini with sauce.

Homemade egg noodles are very easy to make but when time is lacking, many grocery stores are now carrying fresh pasta.  It is nicer than dried pasta but not as nice as fresh home made.  The basil is not just a garnish either.  Cut into pieces while cutting the chicken makes the fresh basil part of the meal and oh my gosh is it very good that way!  There's no such thing as too much basil so I am quite pleased to get my indoor herb garden underway. 


Tuesday, October 11, 2011

Our Thanksgiving Turkey 2011

We hosted Thanksgiving at our new home this year.  There were a total of twenty-five from our family including ourselves.  Larger scale entertaining takes a bit more planning and prep.  This is one time where I do use menu planning.  We were at our vacation home but thanks to email my husband's sister took care of a lot of the menu details.  We provided the turkey and ham as well as our home.  It only seemed fitting especially since both his parents have passed.  My husband is the eldest of his siblings  and since we do a lot of entertaining we have all the extra needed for larger gatherings. 

turkey just out of the natural gas oven
I am getting used to cooking with natural gas and so far loving it immensely!  The new stove was hooked up just a couple of days before we left for our vacation home so I didn't have much time to experiment.  We've only been home not quite five full days so in total have had less than a week to use the stove.  I made a banana loaf, roasted a chicken, and used the stovetop a bit.

We roasted a 23.7 lb turkey for part of our Thanksgiving feast.  There honestly isn't much difference between roasting a chicken or turkey other than timing.  I always roast both stuffed and covered at a lower temperature until the last fifteen minutes or so when I remove the lid for browning.

A turkey this size would have to be in the oven by 10 AM to be ready for dinner at 6 PM, or a total of eight hours when I was using an electric oven.  I put the turkey in at 11:30 AM and discovered it was cooked perfectly by 4:24 PM, for a total of only 5 hours without the need to remove the lid for browning!  The turkey pop-up timer has sprung with confirmation by a meat thermometer at an internal temperature of 175ºF.  Not only are we saving on the price of cooking fuel, the cooking time is reduced.  Now I have to ponder why as the temperature was the same I always use - 275ºF.  Technically, the cook time should be the same regardless of the cooking fuel.

roasted turkey ready for carving
Pictured is the beautiful beast, and doesn't it look delicious?  We roasted the turkey the day before our Thanksgiving feast.  It is a lot easier to de-bone then reheat for larger gathering.  The stuffing is scooped into an oven-proof baking dish for re-heating.  I made the gravy then as well which worked out nicely for defatting.  I kept the carcass for making turkey stock later.  The ham (not pictured) was warmed through the next day.

Tip:  When warming deboned turkey, pour a small amount of water over it then cover well with tinfoil.  This will prevent the turkey from drying out.

My husband and I thoroughly enjoy entertaining our family and friends.  We have a long standing tradition of sending left-overs from larger events home with our guests.  Yes, we could use up the left-overs ourselves but some of our family and friends travel a fair distance to attend meaning they don't get home until after midnight or later yet have to be up for work the next day.  Some of them have little ones as well.  This is our gift to them to help make the next day just a bit easier for them. 


Saturday, October 01, 2011

Spinach Artichoke Parmesan Chicken Bundles

A few years ago I signed up for a free subscription to What's Cooking magazine by Kraft Canada.  I really like this magazine.  While it does promote Kraft products I find it rather easy to substitute ingredients.  The nice thing is the recipes are fairly simple without a long list of ingredients.  I have kept every copy I have received.  I recently found out they will be charging for the magazine only because I went to their site to change my email and address.  Their email service and online recipe resource remains free.

spinach artichoke parmesan chicken bundles
The recent copy of What's Cooking had a recipe for artichoke-parmesan chicken bundles that became the base for the dish created.  I added baby spinach and used marinated artichoke hearts.  I actually used the shake & bake specified but next time will use my homemade shake & bake chicken coating that has a lot more flavour than the commercial version and it's considerably less expensive.  The downside to moving is looking for an ingredient in an unorganized pantry so in this case the commercial version was easier than climbing over boxes.

The spinach artichoke parmesan chicken bundles were very filling and quite tasty.  We really enjoyed them.  The chicken bundles are really quite easy to make  lending themselves nicely to a variety of fillings.

Method:  Prepare your filling of choice.  Pound boneless, skinless chicken breast thin using a food mallet.  Spread your filling in the middle then roll starting at a short side of the meat similar.  Secure with a toothpick.  Coat as desired.  Bake at 375 degrees F for 30 minutes until golden brown and cooked through.  Serve with sides of choice


Wednesday, September 21, 2011

Roasted Chicken in Gas Oven

Over the next couple of months I will seriously be putting my new gas range through it's paces!  My rule of thumb is whenever switching to a different cooking fuel is to revert to the tried and true recipes.  The reason for this is with a tried and true recipe or dish I know exactly what the results should be.  Using tried and true gives me a gauge to measure the performance of the new cooking fuel against.

Now I am not exactly new to cooking with natural gas.  I grew up knowing nothing else and one of the houses we rented before becoming homeowners had a natural gas built-in range.  While it is not exactly natural gas, over the years I have learned to cook on propane burners in our RV and the side burners of outdoor grills.  Really, I am rediscovering natural gas and adapting my cooking style.

roasted chicken in gas oven
Roasted chicken is an absolute culinary delight!  I always roast it with stuffing usually in the clay baker.  The sad thing is here in beautiful Ontario, Canada the pictured chicken cost us just over $12.  In the meantime we could have bought a rotisserie chicken from Walmart for $5.  Go figure!  The problem is unless I am in a real hurry or have a specific dish to make, I don't buy rotisserie chicken even though they are one frugal meat choice for dinner.

I soaked my clay baker in water for 15 minutes then stuffed the chicken with homemade dressing using homemade poultry seasoning.  I put a few pats of butter on the chicken then sprinkled with fresh ground pepper and Himalayan pink salt.  I roasted the chicken until golden brown and juices ran clear in a natural gas oven.  I was very pleased with the results!  If anything cooking with gas does give nicer results than cooking with electricity.  The chicken was tender and juicy, roasted to golden perfection.  Despite the cost I will be roasting chicken a bit more often in the future.  Isn't it scrumptious looking?


Tuesday, June 28, 2011

Baked Chicken Breasts

There are so many ways to cook chicken and each method gives different results.  Chicken is higher in fat than some alternatives but that can be reduced by removing the skin along with any remaining fat before cooking.  Removing the fat can result in drier meat especially if grilling or baking.  It can also result in a less flavourful meat.  The work around for both is to use some type of sauce that will provide both moisture and flavour when using a dry cooking method (eg. grilling, baking) or use a moist cooking method (eg. braising, slow cooking, pan frying).    It is also important to not over cook chicken especially when using dry cooking methods.  Cook until the juices run clear and/or use a meat thermometer for an internal temperature of 165ºF (74ºC).

baked chicken breasts
Baking chicken is one low fat method of cooking chicken.   I like using a sauce when baking boneless, skinless chicken breasts.  Diana Sauce is always a nice tomato based sauce for oven baked chicken.  An alternative to sauces is chutneys, jellies and marmalades.  I served the baked chicken breasts with home canned Old Vermont beans and baked potatoes. 

I discus home canned foods here quite a bit because that is what is in my pantry.  There is a myth that commercially canned foods are safer and generally better than home canned foods.  That simply is not true.  In fact, home canned foods are safer and better than commercially canned foods.  Government standards for commercially canned foods actually allow a low level of bug parts in commercially canned foods.  The allowable bug parts in my home canned food is zero.  With home canned foods you know the source, control the quality and eliminated food additives that can cause food allergies and other health problems.  

Dried beans are very economical even in comparison to store bought canned beans.  Cooking dried beans takes a bit of planning as they need to soak overnight before cooking.  An alternative method is the quick soak method where the beans are covered with water, brought to a boil then covered and allowed to soak for one hour before cooking.  However, dried beans can also be home canned at a fraction of the cost of store bought canned beans. 


Tuesday, April 26, 2011

Parmesan Peppered Chicken Wings

Good quality Parmesan cheese is one of those wonderful ingredients that add a lot of flavour without having to add much.   Fresh grated Parmesan cheese is just a delight!  When we were at our vacation home we discovered Parmesan chicken wings then my husband found a restaurant that serves them here on Tuesday nights.  My first attempt at  peppered Parmesan chicken was modifying homemade shake & bake coating mix.  The results were quite tasty with an extra crunch but it was not the wings my husband was after. 

parmesan peppered chicken wings
At one time chicken wings were rather inexpensive but cheap wing night has driven their price up.  I bought a little over two pounds of chicken wings, tips attached for $9.78.  This was enough for two nice sized servings for two adults.  My husband and I decided to try duplicating the peppered Parmesan chicken wings at the local restaurant.  The real problem with this plan is this particular restaurant makes them different each time and that includes all of their wings so one night you might get a really nice batch and the next one not.  From a restaurant standpoint this is not good practice.  They have also switched from fresh grated Parmesan cheese to powdered which is more cost effective for a restaurant but lacks the flavour and texture of fresh grated.

Dissecting is common in science labs but if you want to duplicate a restaurant dish at home you have to play detective and do a bit of dissecting.  The chicken wings at this restaurant are coated so we decided to coat the wings.  The Parmesan cheese and pepper are added after frying.  Getting the cheese and pepper to stick to the wings was the question but we came up with a tasty one.  These wings were absolutely amazing with a wonderful flavour, just a bit of crunch and nice tender meat.  They are a real keeper!

Parmesan Peppered Chicken Wings

2 lb chicken wings, tips attached
1 c flour
1 c fresh grated Parmesan cheese
1 tbsp fresh ground pepper
¼ c melted butter

Dredge the chicken wings in the flour to lightly coat.  Deep fry the wings at 375ºF until golden brown.  Drain slightly.  Place the chicken wings in a deep mixing bowl.  Drizzle the melted butter over the wings.  Toss to distribute.  Add cheese and pepper.  Toss to distribute.  Cover mixing bowl with tinfoil to lightly melt cheese.  Serve hot.


Saturday, April 09, 2011

Chicken with Mushroom Fried Rice

There are four Chinese restaurants within about 40 minutes of us, each with their own unique style.  That is something I appreciate because even though it is Chinese it isn't all the same.  We usually get Chinese take-out at our favourite restaurant two or three times a year and eat in at the other two once a year.  The furthest from us has a rather interesting menu with a couple of sides unique to them.  This restaurant is not one we would go out of our way to go to but when in the area take-out is in order.  Most of their dishes have almonds and I've noticed that almonds play a large role in a lot of their dishes.  My husband stopped for take-out there a couple of days ago. 

chicken with mushroom fried rice
Chinese take-out is expensive coming in at about $50 per order for a dinner for three plus extras.  However, it usually gives us two meals each plus a bit of leftovers for another meal.  With respect to other take-out, Chines take-out despite the initial cost tends to be the more fugal choice sine all of it reheats nicely.

There was a bit of mushroom fried rice left over so we sautéed boneless, skinless chicken breast strips to a golden brown.  Then we tossed in the mushroom fried rice to create a new creation with lots of flavour.   This was an easy, peasy meal at it's finest taking about 15 minutes to put together.


Mushroom fried rice is extremely easy to make and there really are no measurements.  Start with mushroom slices then sautée them in butter until nicely browned.  Stir in the desired amount of cooked rice along with about a cup of cubed cooked carrots and sweet peas.  Add just enough chicken stock to give a nice, creamy texture.  I think cooking the rice in chicken stock boosts the flavour as well for this dish.