My photo
Ontario, Canada
I am a wife, mother and grandma who enjoys the many aspects of homemaking. A variety of interests and hobbies combined with travel keep me active. They reflect the importance of family, friends, home and good food.
Cook ingredients that you are used to cooking by other techniques, such as fish, chicken, or hamburgers. In other words be comfortable with the ingredients you are using.
--Bobby Flay

For Your Information

Please watch this area for important information like updates, food recalls, polls, contests, coupons, and freebies.
  • [March 19, 2020] - Effective Mar 17, this blog will no longer accept advertising. The reason is very simple. If I like a product, I will promote it without compensation. If I don't like a product, I will have no problem saying so.
  • [March 17, 2020] - A return to blogging! Stay tuned for new tips, resources and all things food related.
  • [February 1, 2016] - An interesting report on why you should always choose organic tea verses non-organic: Toxic Tea (pdf format)
  • Sticky Post - Warning: 4ever Recap reusable canning lids. The reports are growing daily of these lids losing their seal during storage. Some have lost their entire season's worth of canning to these seal failures! [Update: 4ever Recap appears to be out of business.]

Popular Posts

Showing posts with label 30 minute meals. Show all posts

Sunday, February 16, 2014

Chicken Schnitzel With Provolone and Roasted Tomato Garlic Sauce

Most people have the view that 'going on a diet' means depriving themselves of pretty much everything they enjoy eating.  That view is further distorted by the myth that there are good foods and bad foods which simply is not the case.  The general premise is, if you eat the good foods you will lose weight.  The problem is this approach simply doesn't work.  All you have to do is browse through the everydiet.org site to see how many diets there are that really are not sustainable, so in the end even if you lose the weight you will gain it back when you resume your normal eating pattern.  What does work is eating the foods you enjoy in moderation, getting active and creating a calorie deficit which ultimately results in healthy weight loss that can later be maintained.  The focus with this approach becomes total fitness not just weight loss.  With that in mind, even fried foods can be enjoyed while you are in weight loss mode.  

pounding the chicken breasts for schnitzel
My husband offered to make dinner a few nights ago.  He had seen a dish on FoodTV that he wanted to duplicate.  The dish was a chicken schnitzel.  Schnitzel is simply a piece of boneless veal, chicken, beef, turkey or pork pounded out thin then lightly coated and pan fried.  If the meat is veal, it is referred to a Wiener SchnitzelChicken Parmigiana is chicken schnitzel topped with Parmesan cheese.

He pounded out four 183 g (6.45 oz) boneless, skinless chicken breasts then dredged the meat in milk and lightly seasoned flour.  The traditional coating is flour, beaten egg and bread crumbs.  Eliminating the egg and bread crumbs reduced the caloric value of the cooked chicken schnitzel.

frying the schnitzel
He heated olive oil and a little butter in a ceramic coated fry pan.  Olive oil is a healthier oil for frying while butter adds a lot of flavour.  Coconut oil is another healthier oil for frying.  Both have health benefits.  Vegetable oil blends, canola and sunflower oil should be avoided because they are GMO which  can have negative health effects including gastro-intestinal upsets.

He placed the prepared chicken schnitzel in the hot oil then fried to a golden brown on both sides.  While the chicken schnitzel was frying, he brought a pot of salted water to a boil then stirred in 4 oz of broad egg noodles.  A serving size of broad egg noodles is 2 oz dry weight.  He removed the chicken schnitzel, drained on a piece of paper towel, then placed on a Silpat lined baking sheet.  He topped each chicken schnitzel with 28 g (1 oz) of cheese, two with provolone and two with mild cheddar.  While the chicken schnitzel baked to perfection with bubbly cheese, he drained the pasta and heated the home canned roasted tomato garlic sauce.   
   
chicken schnitzel with provolone and roasted tomato sauce
The entrée was simply the chicken schnitzel with provolone cheese and egg noodles served with a light topping of roasted tomato garlic sauce, garnished with fresh basil.  The chicken schnitzel was moist and fork tender.  The provolone cheese added a lovely richness.  The roasted tomato garlic sauce perfectly complemented the chicken and egg noodles.  It was a simple, delightfully tasty meal! 

This is a low prep, easy to make, under 30 minute entrée.  The nutritional value is based on a 183 g piece of boneless, skinless chicken breast, olive oil, butter, milk, flour, seasonings, provolone cheese, egg noodles, home canned roasted tomato sauce and basil as pictured.   

Nutritional value for entire entrée as pictured: 633 calories, 52 g carbohydrates, 20 g fat, 61 g protein, 535 mg sodium, 4 g fat


Friday, January 20, 2012

Spaghetti with Broccoli-Garlic Sauce

I have been looking for heart healthy, lower cholesterol meals so was quite pleased to find a copy of Weight Watcher's Smart Choices Recipe Collection( 1992) at the local thrift store for 25¢.  This binder style cookbook is chock full of delicious recipes all meeting the Weight Watcher's guidelines for losing weight.  Each recipe has a beautiful colour photograph along with the nutritional information per serving.  At the back of the binder, the previous owner added in several pages from McCall's Cooking School which is a nice bonus!

Neither of us are watching our weight or on any type of diet restriction but we do try to eat mainly healthy, home cooked meals.  There is room to improve our diets though.  Our biggest culinary vices are larger portions of red meat, cheese and butter.  We have been reducing the portion size of red meat as well as having a meatless dinner once a week and fish at least once a week.  Butter adds a lot of flavour and it is only used in cooking for that purpose.  We very, very seldom use butter as a spread.   The cheeses remain a vice but we are cutting back on them as well.   Offsetting our vices is our tendency to eat a lot of vegetables including some type of salad with dinner and often just a salad for lunch.  We very seldom indulge in desserts and for the most part our snacks tend to be healthy (eg. popcorn, nuts, fruits).  That being said, a recipe book full of delicious, healthy and low cholesterol recipes is certainly a welcomed addition to my recipe book collection.

spaghetti with broccoli garlic sauce
One of the first things I do with any new or new to me cookbook is browse through it from cover to cover tagging recipes I want to try with post-it-note.  I doubt I have a recipe book without tags!  I was always very particular about never writing or highlighting in my post-secondary textbooks most of which I still have but take the opposite approach with my cookbooks.  I do record any changes I made, whether we liked the recipe and anything thing I would do different the next time.  Browsing through the Smart Choices Recipe Collection I came across a recipe called linguine with broccoli-garlic sauce (Pp. 28) that had wonderful eye appeal.  I took that healthy meal idea then personalized it into a very tasty, easy to prepare spaghetti with broccoli-garlic sauce.  My version uses butter for the added flavour but I reduced the amount of Parmesan cheese and used home canned defatted turkey stock so the total dietary cholesterol in my version was just slightly lower than the 32 mg even though I used a little butter.

Spaghetti with Broccoli-Garlic Sauce
recipe by:  Garden Gnome

2 c chopped broccoli florets
½ small red onion
¼ small red bell pepper
3 cloves garlic
½ c defatted turkey stock
1tbsp cornstarch
2 tbsp butter
1 tbsp extra virgin olive oil
pinch fresh ground pepper
2 tbsp fresh ground Parmesan cheese
½ tsp dried parsley flakes
6 oz dry spaghetti (about 1/3 of a 450 g package)*

Bring a large saucepan with salted water to a boil.  Add pasta and cook until al dente.   While the pasta is cooking, mince garlic cloves and chop vegetables.  Heat oil and butter in non-stick, ceramic coated fry pan.  Add garlic and heat through.  Stir in vegetables, cooking until the broccoli is a bright green.  Stir in the turkey stock.  Make a slurry with water or stock and the cornstarch.  Stir the slurry into the vegetable mixture cooking just to thicken.  Remove from heat.  Drain the spaghetti.  Place the spaghetti on plates for serving.  Top with the broccoli-garlic sauce.  Sprinkle pepper and parsley flakes on top of the sauce.  Garnish with the Parmesan cheese.

*Note:  I used about half of a 450 g (about 16 oz) package and cooked extra specifically for planned pasta leftovers.


Tuesday, November 08, 2011

Pan Fried Smelt

I am an avid fisherman or should that be fisherwoman.  My husband does not fish and really doesn't like a fresh catch on the boat but a couple of times a year I persuade him with an AutoTrader and a couple of drinks/snacks so I can get to the bigger catch.  Other than that I have to resort to fishing from shore.  Now, I do not use a net unless trying to land a fish but when it comes to smelting, the only way to go is via a fishing net.   Smelt is a very small, about the size of your pointer finger, fresh water fish usually caught off the shores of Lake Erie here but can be found throughout any of the Great Lakes.   I have some rather unpleasant memories of smelt.  A very generous person gave my Mom a whole bushel full of smelt so we got to clean them and all I can say is YUK!  Don't get me wrong as I don't mind cleaning my catch but smelt are tedious at best to clean. 

cleaned fresh smelt
Smelt are seldom found in the grocery stores and when they are available the price is rather high.  Sobey's has them on occasion priced at about $15.50 per kilogram.  A better price can be found at the fisheries along Lake Erie and in Erieau, Ontario.  The price is lower if you clean them yourself. 

I bought a 0.288 kg package of cleaned smelt (pictured) for $4.44.  This was enough smelt for two with a little left over.  Towards the centre is the head of a smelt so you have an idea of what they look like.  Usually when you buy cleaned smelt there are no heads but one occasionally slips through.  Smelt is best lightly coated then pan fried.  Cleaned smelt should be rinsed then patted almost dry before coating.

pan fried smelt dinner
I made a simple coating of flour, cornstarch, paprika, salt and pepper to toss the smelt in.   Smelt cooks rather quickly because of it's small size making it ideal for those meals where shorter prep times are required.  Fry until the coating is a golden brown.   Avoid stirring but rather use a flipper to gently turn the smelt to prevent them from breaking up.  I served the smelt with mixed vegetables and roasted mini potatoes with garlic and shallots.  It was a simple, easy to prepare yet delicious home cooked meal.  This meal from start to finish took about 30 minutes but it could have been shorted by serving another side besides the roasted mini potatoes.  Plain or wild rice would go nicely as a side as a substitute for the potatoes.

smelt backbone
All fish have bones but some are more problematic than others.  Smelt have a small backbone that unlike canned salmon does not soften much with cooking.  The backbone is edible and a good source of calcium.  However, this backbone can be problematic for children causing a choking risk and some simply prefer not to eat it.  The backbone will pull away freely from the cooked smelt.  I recommend removing the backbone after the smelt is cooked before serving it to children.  Children can be quite curious so this presents a wonderful learning moment to see what the backbone looks like, touch it and understand why they shouldn't eat it until they are older.  The backbone is not as fragile as it looks so you can rinse it off, allow to air dry then your child could take it to school for show and tell.


Friday, April 01, 2011

Farfalle with Mushroom Sauce

Pasta comes in such a wide range of shapes and sizes it is impossible not to have a bit of fun with it.  Pasta is frequently served with some type of sauce that can vary from oil to tomato to meat or seafood based to cream based.  Any type of sauce really is fair game for pastas though.  The various shapes of pastas are designed to hold onto and trap all the delicious sauces possible.  Nooks, crannies, ridges and openings help to ensure you get a yummy mingling of sauce and pasta in every bite!

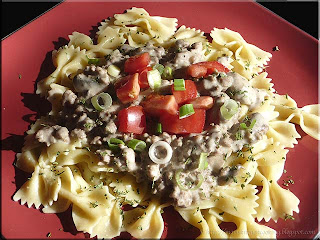
farfalle with mushroom sauce
Farfalle commonly called bow tie pasta gets its name from the distinctive shape that resembles a gentleman's bow tie or for the kiddies, butterflies.  It is available medium and small sizes.  This pasta is best with tomato or cream based sauces.

The only commercially canned soups I buy are those I cannot home can.  Essentially, this is the cream based soups and of those available, cream of mushroom soup is the one I buy a lot of.  Yet I don't use it as a soup.  Condensed cream of mushroom soup is the perfect base for sauces.  The lactic acid along with any added milk helps to tenderize meats cooked in the sauce as well.  It is a good base for pork, stew beef, cheaper cuts of beef and chicken.

I sautéed sliced fresh mushrooms in a little butter then stirred in browned ground beef, condensed mushroom soup, garlic pepper and milk then let the mixture simmer to thicken.  I spooned the hot meat sauce over cooked bow tie pasta, sprinkled with parsley then topped with chopped tomatoes and green onions.  It took less than 30 minutes to prepare making this a keeper dish.  The end result was a delicious creamy, meaty pasta dish full of flavour sure to please. 


Saturday, December 04, 2010

Radiatore al Basil with Chicken

Pasta comes in so many shapes and sizes it is hard to get bored with.  During our turkey runs this year I bought a box of 100% durum semolina radiatore pasta.  Radiatori are small, squat shaped pasta with a ruffled edge that resemble radiators.  This shape works well with thicker sauces.  Tonight's dinner was inspired by a recipe on the back of the radiatore box called Radiatore al Basil.  Rather than a side dish I went with the basil theme to create an entrée.

radiatore al basil with chicken
When cooked the tight curls of radiatori reminded me of snails so I think it would be a fun pasta for kids.  This would be an excellent pasta to use with any cheese sauce too because there are so many nooks and crannies to hold all the sauce.  I was quite pleased at how well the radiatori held the basil pesto giving the pasta a lovely under note to compliment the fire roasted Italian tomato sauce.  This really was a delightful entrée!

Radiatore al Basil with Chicken

16 oz pk radiatore
2 c fire roasted Italian tomato sauce with mushrooms
2 small chicken breasts
1 tbsp extra virgin olive oil
2 tbsp per serving basil pesto

toppings:
small onion, diced
sliced olives
cherry tomatoes, halved
fresh grated Parmesan cheese
fresh ground black pepper

Cook the radiatore in salted boiling water until al dente.  Drain.  While pasta is cooking pan fry the chicken breasts in the olive oil.  Remove from pan and cut into bite sized pieces.  Stir desired amount of basil pesto into the radiatore.  Scoop pasta onto dinner plate.  Ladle a generous amount of the fire roasted Italian tomato sauce with mushrooms over the pasta.  Add desired toppings.


Saturday, April 10, 2010

Low Brow Gourmet Mac & Cheese with Jello Parfait

As many of you know I keep a very well stocked pantry.  Part of responsible pantry management is rotating foods before they have a chance to spoil.  Some of my pantry stock is emergency preparedness items that normally would not be used unless absolutely necessary.  However, these stocks still need to be rotated to prevent spoilage.  Spring is an ideal time to go through the pantry ensuring lesser used items like emergency preparedness items are rotated.

easy mac & cheese
Velveeta cheese is the only processed cheese I keep on hand.  The main reason for this is Velveeta cheese is shelf stable until opened making it an ideal cheese product for emergency preparedness.  A couple of nights ago I came up with a really quick, easy, low brow mac & cheese to use up left over ham, fresh asparagus and some of the Velveeta.  This would be a great 30 minute meal anytime of the year.

Low Brow Gourmet Mac & Cheese

3 c cooked elbow macaroni
1 c diced cooked ham
1 c raw asparagus cut into 1-inch pieces
1½ c Velveeta cheese

Prepare ham and asparagus.  Cut about a 3-inch piece of Velveeta into cubes.  Cook the macaroni until al dente then drain.  Stir in ham, cheese and asparagus.  Put the lid on the pot and place on burner.  Let sit 5 minutes then stir.  Let sit 10 minutes more, give a good stir then serve.

jello parfait
Jello is part of my regular pantry stock as well as my emergency preparedness supplies.  Jello is one of those versatile items to keep in the pantry not only for quick desserts but also to use as a drink when ill.  I decided to make a quick jello parfait that while quite easy to make looked a bit on the fancy side.  Low brow gourmet at its best!

Jello Parfait

1 box jello
1 c boiling water
1 c ice water
1½c Cool Whip
2 marichino cherries

Make the jello as normal.  Place 2 tall glass cappiccino mugs on an angle in a bowl that will suport that angle.  Use a turkey baster to place about a half cup of plain jello into the mugs.  Place the mugs in the refrigerator to set up.  Place the remaining jello in the fridge to set up.  When the remaining jellow is set up blend in 1¼c of the Cool Whip.  Spoon this over the plain jello in the mugs.  Top with remaining Cool whip and a cherry.


Friday, December 18, 2009

Chicken Vegetable Stir Fry

The holiday season begins shortly after the cold weather hits. When the cold weather fits hits our bodies are not acclimatized to the temperature change so we seek warm, comfort foods like thick, rich soups and chowders as well as heavier dishes such as lasagne and roasts with all the fixings. Homemade breads become a norm for most meals and salads get a wee bit plainer. We rely on more of our home canned stores and less on fresh fruits and vegetables. I'm not saying we don't eat fresh fruits and vegetables just we eat less both in quantity and variety. Now overall this wouldn't be a problem for us except this is also the time of year we tend to do a bit more cocooning indoors so our activity levels are down. Knowing that most of the holiday eating we do away from home is going to be packed with extra calories, I try cooking a bit lighter at home for the month of December. A stir fry is an ideal way to cook a bit lighter without it feeling like you are cooking lighter.

Rooster Brand instant noodlesInstant Noodles

When it comes to quick cooking noodles many think of the Ramen noodles that come in the little pouches with a high sodium content seasoning packet. Unfortunately Ramen noodles are also high in fat because they are fried as part of the pre-cooking then packaged to complete the cooking process at home. Now Ramen noodles do have their use but if you can eliminate the nutritional problems of this quick cooking noodle (3 minutes), why not?

I found Rooster Brand Instant Noodles that have all the convenience of Ramen noodles without being high in sodium or fat and they only take 1 minute to cook! Unlike Ramen noodles that has a list of ingredients a mile long the Rooster Instant Noodles ingredients are wheat flour, water, duck eggs, colour. So let's compare the nutritional value of each. Ramen noodles contain: 380 cal per 85 g pk, 22% fat (36% saturated fat), 5 mg cholesterol, 77% sodium, 18% carbs (16% fiber), 4% calcium and 23% iron. Rooster Brand Instant Noodles contain: 300 cal per 1¼c (85 g), 0% fat (0% saturated fat), 0 mg cholesterol, 14% sodium, 21% carbohydrates (8% fiber), 2% calcium and 10% iron. In terms of both fat and sodium the Rooster Brand Instant Noodles is a better choice nutritionally even though they are slightly higer in carbohydrates as well as lower in fiber, calcium and iron. As far as cost goes Ramen noodles (85 g) packages are often on sale 4/$1 or 25¢ per 85 g. The Rooster Brand Instant Noodles contains the equivalent of 4 packages of Ramen noodles at a cost of $1.19 or 30¢ per 85 g which really is not uch of a price difference to get a healthier product.

chicken vegetable stir fryChicken Vegetable Stir Fry

Instant noodles are ideal for adding to soups and into stir frys. The noodles can be cooked directly is soups just before serving. Once cooked which only takes 1 minute, the instant noodles can also be stirred directly into the stir fry coating them with the sauce. As instants go the Rooster Brand Instant Noodles are worth of a spot in your pantry.

Stir frys are always quick, easy and frugal meals. They really allow you to reduce the amount of meat per serving without noticing that there is less meat. They are ideal for those meals when time is at a premium or during the hot summer months because cooking takes only a few minutes. By far the most time spent is the food prep that consists mainly of cutting up a variety of vegetables. It is important to have all your vegetables ready before beginning to cook. If you are using meat or poultry it goes into the pan first as it takes the longest to cook then vegetables are added in the order of longest cook time to shortest. The resulting liquid can be thickened with a cornstarch slurry then if desired stir in cooked instant noodles. Give a toss and voila you have a lovely dinner with little effort.

Pictured is the stir fry I made a couple of nights ago. I served it on a bed of instant noodles that were cooked in turkey stock. The lightly seasoned chicken (lemon pepper) was cooked first then deboned, cut into strips and reserving the liquid. The chicken vegetable mixture consisted red onions, carrots, broccoli, celery, bamboo shoots, water chestnuts and red pepper. The mixture seasoned with a little soy sauce and Hoison sauce. The rich reserve liquid was poured back into the mixture then thickened with a corn starch slurry. The meal was quick, easy, very filling and quite tasty! The best part is the meal was low sodium, low fat, low carb yet quite nutritious :)


Sunday, December 06, 2009

Tuna Croquettes

Food Network Canada is on most days here. I use the shows to get various ideas and learn more about different foods. Alton Brown of Good Eats is one of my favourites because his shows are all about learning all those interesting facts that make being a foodie fun. A few days ago I watched one of his shows that had a segment on tuna. It was very interesting!

Did you know if tuna is labeled as light or chunky is is skip tuna? If it is labeled as white or solid it is Albacore tuna which is a much larger fish than skip tuna. Solid tuna is exactly that, a solid piece of tuna cut from the fish. It is also interesting that james Beard said tuna 'is the one food that tastes better canned". The reason for this is apparent to anyone who home cans and that is because of the high processing time for fish so canned tuna is already well cooked when you open the can.

tuna croquetteTuna Croquettes

During this segment Alton made tuna croquette. I immediately thought that this could be made into a very easy low fat, low sodium and budget stretching meal. I modified his recipe and method a little then served the tuna croquettes with steamed spinach and carrots topped with a little butter and garnished with sesame seeds and a lemon twist.

The meal was good. We were both surprised at the change of flavour in tuna when it is hot. Thinking back this is the first time we have had hot tuna. So if you haven't had hot tuna before be warned it does have a different flavour, not unpleasant just different. There is a fair amount of room for tweaking this recipe.

Tuna Croquettes
modified from recipe courtesy Alton Brown, 2008

12 oz light tuna, drained well
1 green onions, chopped fine
2 teaspoons Dijon mustard
2 large eggs, beaten
1 tsp freshly squeezed lemon juice
¼ tsp sea salt
pinch freshly ground black pepper
¾ cup panko bread crumbs, divided
olive oil

Place ingredients except for last 2 in mixing bowl. Stir in 1/4 cup of the bread crumb. Stir to combine. Divide the mixture into 8 rounds. Set aside on a parchment lined pan. Allow to rest for 15 minutes. Spoon half of the remaining panko over the rounds and pat in. Flip the rounds and repeat to coat all sides. Heat enough olive oil to cover the bottom of a 12-inch sauté pan over medium heat until shimmering. Add the croquettes. Cook 3 minutes on each side or until golden brown. Drain on paper towels. Plate.

Note: Serve with tartar sauce and lemon wedge for an appetizer or vegetable sides as an entré.


Sunday, October 11, 2009

Pressure Cooker Pulled Pork

The myth perpetuated by the food industry persists that cooking from scratch takes a lot of time and effort. Unfortunately it is a myth that serves to rid you pockets of hard earned money, discourage you from cooking from scratch all in the interests of lining the pockets of the food industry. The kids were telling us that right now there is not a lot of free time so they want good meals that don't take a lot of time to prepare. The emphasis is on good meals so one kitchen tool they rely on is the pressure cooker.

A pressure cooker cooks under 15 lb pressure raising the cooking temperature to 240ºF in a moist environment. Once the food is prepped the lid is put on and the pressure cooker is brought to pressure then allowed to cook at that pressure for the desired period of time. The vessel is then allowed to naturally depressurize or quickly depressurized using the cold water method. The end result is tender meat from even the toughest cuts and fast cooking times. Unlike a slowcooker the meats can be browned first in the same pot and in terms of energy usage the pressure cooker works out to be cheaper.

pressure cooker pulled porkPressure Cooker Pulled Pork

The kids put a nice sized, trimmed pork roast into the pressure cooker then brought it to pressure and let it cook for 20 minutes. While the meat was cooking the vegetables were prepared. The green beans and peas were steamed while the cheesy hash browns were bake. Once the meat was finished cooking it took little more than a quick shredding with two forks and stirring in a favourite barbeque sauce for easy yet very tasty pulled pork.

From start to finish it took 30 minutes to get the meal on the table. This is good home cooking from scratch that clearly shows you that home cooking does not need to take a lot of time. It was a gorgeous, home cooked meal well presented and very tasty!


Tuesday, December 09, 2008

Bangers and Mash

This time of year everyone is so busy scurrying around with holiday planning, shopping and social gatherings it is very, very easy to be tempted to pick-up take-out or order in. Both of those temptations will cut into your holiday budget. One easy way to prevent this is to have quick, easy meals sitting in your freezer. Simply thaw the individual components or entrée or casserole, heat and add salad or rolls for quick, easy and an inexpensive meal.

bangersBangers & Mash

Bangers and mash is an English sausage and potato dish served in pub. It's easy and inexpensive to make yet is the perfect example of comfort food. It is traditionally served with a brown onion gravy and often includes a side of mushy peas. Bangers and mash is a very filling meal! Our banger and mash dinner consisted of honey garlic sausages that had been grilled then froze, mashed potatoes and browned beef gravy.

Note: I put this meal under the label of 30 minutes but you really could have it put together in about half that time.

Method:

sausages - I grilled up about 30 large honey garlic pork sausages back in September. Some were enjoyed with sauerkraut and onions on toasted buns and the rest were divided into meal size portions then vacuum sealed and froze. To re-heat I opened the package and placed in a glass baking dish with about ¼ c of water then covered and microwaved on high for about 3 minutes. Microwave ovens vary in power so adjust your timing to get the sausages on the hot side of warm based on your microwave.

potatoes - I cut about 6 medium, unpeeled, washed potatoes into chunks then steamed them until tender. I then put the potatoes into the KitchenAid® stand mixer bowl with about 1 tbsp of butter, 3 oz cream cheese, ¼ c sour cream and just enough milk to smooth the potatoes. Using the mixing paddle I mixed just until smoothing but with smaller chunks due to the peels.

gravy - I used a beef gravy that I had froze earlier but wanted it a bit smoother and glossier not that the way it was would not have been fine. To make the gravy for the bangers and mash I strained the gravy through a fine strainer into a saucepan. Then I added about a ½ tsp of Grace Browning* caramel and brought the gravy to a low boil. I wanted the gravy just a bit thicker so stirred in about 2 tbsp of corn starch** slurry.

* Grace Browning adds a deep brown colour as well as flavour. It is best to add a little at a time to get the effect you want.

** Corn starch as a thickener adds a gloss to gravies.


Thursday, August 14, 2008

Salmon Cakes

Kitchen Update: A glitch yesterday meant removing a part wall of tile and re-tiling :( We are grouting tonight! So we are a bit behind our goal of being finished by Tuesday. We are in it this far so we are going to give the grout the full 3 days cure time meaning the stove and sink will be in place late Sunday night. It is looking good though. Oh and I should mention we haven't killed each other yet and we still have all the body parts we had when we started the project.

I've mentioned before that as a family we send pictures of our meals back and forth to each other by email. These tend to be the meals we were impressed with, not just meal pictures for the sake of sending the picture. We usually include the recipe and method as well so other family members can duplicate and/or tweak. It's really our virtual recipe box to share with each other. The neat thing about this is we get a chance to try dishes we might not have thought about. The picture serves much the same purpose it does in a recipe book, to show you this is what the dish should look like.

Our kids grew up in a home with a lot of emphasis on home cooking. They are all good cooks so it is no surprise that their spouses are also good cooks. I refer to the spouses as my kids also so when I say this recipe is from my kids it could be from anyone of them. The only distinction I use is the © designation on their photos. So far b1 has appeared and now with this entry JD but you will at some point see EJ and JZ. My husband who is also a very good cook uses my ©. So now you don't have to wonder but I usually tell you when it is one of the kids' recipes and usually make some reference as to which ones.

Salmon Cakes

Our kids in Wisconsin sent me several pictures including this one of their salmon cakes. It sure came at a good time too as my kitchen is still torn apart. Don't they look delicious? I love the presentation as well. The tomatoes just beckon to dig in and enjoy. What I really like is there aren't a lot of ingredients. It's simple yet elegant. Thanks guys and I can't wait to try them!

The sauce in Tzatziki sauce and I didn't think to ask if they made it themselves. It likely is as Tzatziki is a yogurt/cucumber sauce that is quite easy to make. A recipe for homemade, authentic Tzatziki sauce can be found here.

This meal likely took under 30 minutes from prep to finish making it an ideal meal for those nights where you need a quick yet nutritious meal. Served with home fried potatoes it makes for a frugal meal as well. I think the cream cheese would be a lovely addition. Portions within [] are my additions for clarification.

Salmon Cakes

~1 cup of Salmon
1 Egg
Bread crumbs (add to thicken)
Cream Cheese (optional)
Onion
Garlic

[Lightly beat the egg. Stir in the salmon. Add bread crumbs, cheese, onion and garlic. Mix well.] Fry like pancakes, top with diced tomatoes & Tzatziki sauce (Gyro)


Wednesday, August 13, 2008

Mediterranean Pasta (Vegetarian)

Sunday was cold and nasty with rain on and off most of the day. It stopped raining long enough for me to cook angel hair pasta on the side burner of the grill. By the time we were eating dinner it was raining again! Doing without the normal kitchen amenities stimulates the creative juices.

Mediterranean Pasta

I decided to make a vegetable based pasta dish that was a bit different. Instead of a heavier sauce I tossed the hot angel hair pasta with a Mediterranean salad dressing containing kalamata olives, feta cheese, sundried tomatoes and herbs. Then I topped the pasta with steamed broccoli, fresh red onions, cherry tomatoes and jumbo stuffed olive slices. The olives are the kind bought in the deli section not in jars. The cherry tomatoes are from one of my tomato plants grown in a container. This plant is producing tomatoes faster than we can use them which highlights what I've been saying all along. A lot of produce can be grown in a small space and even in containers.

Mediterranean Pasta

1 454 g (1 lb) package angel hair pasta
1 tbsp olive oil
salt

½ c small broccoli flowerettes, cooked
½ c cherry tomatoes, halved
¼ c red onions, chopped
8 stuffed jumbo olives, sliced
½ c Mediterranean salad dressing with sundried tomatoes

Fill a large sauce pot half full with water. Add olive oil and a good sprinkling of salt. Bring to a boil. Stir in the angel hair pasta. Boil about 5 minutes or until al dente. Drain. Toss the hot pasta with the salad dressing. Plate. Top with vegetables.


Thursday, May 15, 2008

Easy Beef Stroganoff

Some of the best meals are simply made using basic ingredients, nothing fancy, just basic old fashioned home cooking. These recipes usually evolve from what's on hand and sometimes from how to stretch a little into a lot. At the same time they can be quite inexpensive and quick to prepare. These type of meals tend to become family favourites.

Easy Beef Stroganoff

Don't let the simple ingredients fool you. My easy beef stroganoff is rich and creamy. It is quick and easy to prepare, sure to please. A lower fat version can be made by substituting skim milk for the cream and using low fat sour cream. Don't omit the sour cream entirely as it adds to the flavour as does the butter.

Easy Beef Stroganoff

1½ lb stew beef
1 small onion, diced
2 c sliced mushrooms
2 tins (284 ml/10 oz) condensed mushroom soup
1 tbsp Worcestershire sauce
¼ c cream
2 tbsp sour cream
1 tsp Montreal Steak seasoning
½ c beef stock
olive oil
1 tbsp butter
parsley
375 g (13 oz) bag broad egg noodles

Fill a large sauce pan with water to about 3 inches from the top. Add salt and a splash of olive oil. Bring to a boil. Stir in egg noodles. Cook noodles until al dente*.

While noodles are cooking: Heat oil in heavy fry pan. Sear the stew beef in the hot oil. Remove from heat. Cut any larger pieces into bite size. Return to pan. Add onions, Worcestershire sauce and steak seasoning. Cook until onions are translucent. Reduce heat. Stir in mushrooms and butter. Continue cooking until mushrooms are lightly browned. Stir in mushroom soup and beef stock. Heat through. Stir in cream and sour cream. Ladle over hot broad egg noodles. Garnish with parsley.

Serves 6

* al dente - means to the tooth. When cooked to al dente the pasta should have a slight resistance in the centre when chewed.


Wednesday, January 02, 2008

New Year's Dinner, Vegetable Pizza Appetizer, Potato & Roasted Garlic Soup

We were invited to a house party for New Year's Eve. I took a new appetizer and peanut brittle to the party. The weather had turned nasty with high winds, blowing snow and reduced visibility, definitely not good conditions for the increased potential of an encounter with a drunk driver so decided to stay overnight. The weather continued to worsen the following day but that didn't stop us from our New Year's Day tradition of grilling steaks. Unfortunately our plans for including lobster were dashed due to availability. Snow continued to fall most of today so I decided to modify my potato and leek soup recipe for dinner. Soup is always perfect for snowy, wintery days!

Vegetable Pizza Appetizer

Easy to make appetizers are always in high demand but more so during the holiday season. Three of the events we attended had both the layered taco dip and spinach dip in a bread bowl. These have become party classics. I wanted something different yet easy to make so poured through my cooking idea journal. A vegetable pizza appetizer was just what I was looking for.

I first came across this appetizer at an outdoor event several years ago. It was filed in my idea journal yet I had not tried it. This appetizer is served cold, travels nicely and is just a bit different. It was a huge hit! The short cut here is refrigerated croissant rolls which is what I used for the two pizzas I made. It was a real time saver but I want to tweak the recipe to use a homemade base. I was flying by the seat of the pants on this one trying to recreate what I remembered.

Vegetable Pizza Appetizer
recipe by: Garden Gnome

2 tins refrigerated croissant rolls
2 pk. 8 oz softened cream cheese
1 tbsp Herbs De Provence
3 tbsp Kraft ranch dressing
¾ c Miracle Whip

topping:
½ c finely chopped broccoli
½ c finely chopped green onions
½ c finely chopped raw carrots
¼ c finely chopped celery (optional)
¼ c finely chopped red pepper (optional)

Open refrigerator croissant rolls and carefully open the dough to lay flat. Place the first package on a large cookie sheet with silpat or parchment paper. Divide the other package in half leaving 4 croissants to be baked separately. Press the dough together to form a solid sheet. Bake at 400ºF until golden brown. Remove from oven and let cool. Carefully remove from the pan (dough will be fragile) and place onto a tray for topping.

Mix the cream cheese, Miracle Whip, herbs and dressing until smooth on setting 4 of KitchenAid® stand mixer. Spoon the mixture onto the croissant base and spread evenly. Chop vegetables finely. Stir together to well mell. Sprinkle the vegetables evenly over the cheese layer. Cut the pizza into 2-inch by 2-inch pieces. Keep refrigerated until serving.


Grilling in Winter

Yes that is snow around the grill and yes it was snowing while the steaks were being grilled. The crisp, cleans smell of the snow mixed wonderfully with the aroma of the grilling steak. The water was calm as the snow fell softly to the ground so the sizzling of the steaks seemed to be slightly amplified. Anticipation of the first bite of a mouth watering heightened. Everything seemed magical!

We grill year round regardless of the weather. If you live in an area that experiences snow or colder temperatures in the winter and you have never tried grilling outdoors in the winter, you don't know what you are missing. True you can grill indoors and we do but grilling outdoors is just so much better. Grab a jacket and fire up the grill. It is an experience you won't forget! You will be glad you tried it.

New Year's Day Dinner

I have made several entries on how we cut our own New York Strip steaks for grilling. We like them cut thick, nicely grilled to medium rare for myself and rare for my husband. I took the New York Strip roast from the freezer before we left for the party so it could defrost while we were away. It was sliced shortly before grilling.

The steak was neither marinated or seasoned, simply grilled to perfection allowing the full flavour of the steak to shine. The star of the meal was the steak. Normally sauteed mushrooms or onions grace our steaks but not this time. Even my favourite steak sauce was kept off the table. I kept it very simple to accent the steak. Accompanying the steaks were baked white and sweet potatoes along with home canned green beans. What a wonderful meal to welcome 2008!


Potato & Garlic Soup

Soup is always a good choice when the weather is cold and snowy. Today was just begging for hot woup to warm the tummy. Tonight's dinner was a modified version of my potato & leek soup. By the time I was finished tweaking it was a very different soup. This flavourful soup was rich and creamy. Roasted garlic added a nice balance to the soup. The soup was garnished with shredded cheddar cheese and parsley flakes.

Potato & Roasted Garlic Soup
recipe by: Garden Gnome

2 L homemade turkey stock
1 medium onion
6 medium potatoes, peeled and cut into chunks
1 bay leaf
white pepper to taste
sea salt to taste
1 roasted garlic cube (size of an ice cube)
1-2 drops liquid smoke

4 medium potatoes, peeled, diced and steamed
3 green onions chopped
½ lb side pork, cut to form small pieces, fried and drained
2 tbsp chives, chopped
1 c half & half cream
½ c instant potato flakes


This is a two part recipe. Prepare the 4 medium potatoes then steam. At the same time prepare the side pork by cutting across the strips to form small pieces. Use one full pound of bacon the remaining can be froze or refrigerated for bacon bits on salad. Set these ingredients aside to be used later. Chop the chives and green onions. Set aside.

Prepare the 6 medium size potatoes and onion then put into a large saucepan. Add the turkey stock, salt and pepper to the vegetables. Add bay leaf, roasted garlic and liquid smoke. Bring to a boil. Reduce heat and let simmer until the potatoes are cooked. Remove from heat. Remove bay leaf. Using a stick blender, blend these ingredients until creamy smooth. Return to heat on low setting. Add the prepared potato pieces, side pork, green onions and chives. Slowly pour in the cream while stirring. Continue heating until soup is desired serving temperature, stirring to prevent the soup from burning. Slowly stir in instant potatoes until the soup is the desired thickness. Remove from heat. Ladle into soup bowls. Garnish with shredded cheddar cheese and parsley flakes.


Friday, December 21, 2007

Gingerbread Spritz Cookies & Glazed Chicken

I decided to finish up my Christmas cookie baking today as I will have little time tomorrow. The two most requested cookies for Christmas are shortbread and peanut butter which suits me just fine. So I start off with a few fancier cookies for entertaining and finish off with the shortbread and peanut butter signaling the end to my holiday cookie baking.

I made a batch each of Classic and Gingerbread Spritz cookies this morning. This afternoon I made large batches (10 dozen each) of shortbread and peanut butter cookies. What really helps when making larger batches is my KitchenAid® stand mixer. Don't get me wrong as it makes short work of smaller batches but I really appreciate how well the KitchenAid® stand mixer works for larger batches.

Gingerbread Spritz Cookies

A cookie press is ideal for making several dozen cookies in a short amount of time. If you haven't tried a cookie press you will be pleasantly surprised. They are easy to use and practically fool proof. The smaller yet nicely shaped cookies are a delight.

Now if I made gingerbread cookies my family would make the expected ohs and ahs then ask for peanut butter cookies. However, gingerbread is a Christmas tradition so I make gingerbread and gingerbread spritz cookies. Our family enjoys both and I'm sure you will too.

Gingerbread Spritz Cookies
source: Manual for Wilton Cookie Master™ Plus, downloaded from http://www.wilton.com

1 c butter, softened
⅔ c dark brown sugar
1 egg
3 c unbleached flour
½ tsp salt
½ tsp allspice
½ tsp cloves
½ tsp cinnamon
½ tsp ground ginger

Preheat oven to 375°F (350°F convection). Cream butter, egg and sugar using KitchenAid® stand mixer on setting 6. Stir together flour, salt and spices in separate bowl. Gradually
add to creamed mixture, mixing on setting 4 to make smooth dough. Do not chill. Shape dough into small logs and place in Cookie Max™. Using desired disk, press shapes onto ungreased cookie sheet. Bake 8-10 minutes or until lightly browned around edges; remove cookies from
sheet. Cool on rack.
Makes 6-7 dozen cookies

My Notes: The gingerbread spritz dough is a bit stiffer than the classic dough so expect a bit more resistance when pressing the cookies. The resulting cookies are not quite as spicy as other gingerbread cookies.

Glazed Chicken

During the busy holiday season I like to keep the meals rather simple. This past week boneless, skinless chicken breasts were on sale so we took advantage of that. Last night's dinner was a very simple and frugal meal made under 30 minutes. I served the chicken with home canned green beans and baked potatoes topped with a little butter and chopped parsley.

Method: Place 4 boneless, skinless chicken breasts in a medium hot pan. Sear on both sides. Season with lemon pepper or seasoning of your choice. Continue cooking 5 minutes on medium. Pour in 1½ c chicken stock. Bring to a boil. Reduce heat and continue cooking at a simmer 10 minutes. Add a good dash of Worcestershire sauce and about 1/2 tsp browning. Mix a cornstarch slurry. Slowly pour into the liquid in the pan and cook just until thickened. Stir the chicken to coat with the glaze. There will not be a lot of glaze, just enough to give a nice coating with a little extra.


Tuesday, November 20, 2007

Pressure Canning & Pressure Cooking - Pork

After a very busy weekend, yesterday was a catch-up day for preserving. Once I decided on how I was going to use the food, things progressed somewhat smoothly with the exception of a glitch for dinner. I started with two sweet potatoes, four acorn squash, one rutabaga, one pumpkin, two lb lean ground beef, about a 4 lb ham, 4 chicken thighs with backs attached and about 10 lb of apples. The goal was to get as much processed and use some for dinner.

Unfortunately all did not go according to plan but a good portion got done but the rest will get done shortly so all is well. I managed to process the squash and half the rutabaga for freezing in individual serving sizes. The rest of the rutabaga went for dinner. The ground beef was used for a canning test batch of meatloaf while the ham was canned along with the resulting stock.


Pressure Canners & Cookers

I've talked quit a bit about pressure canning yet have mentioned little about pressure cooking. There is some confusion over pressure canners and pressure cookers. To qualify as a pressure canner according to the USDA there must be a holding capacity (different than total volume) of 4 - 1 quart jars with the ability to adjust the pressure to 5, 10 or 15 lb pressure. So, a pressure canner can be used as a pressure cooker but not all pressure cookers can be used as pressure canners.

I have two pressure cookers (1, 3) that can be used for pressure cooking only. One is a Jasi 6 qt (1) and the other a Fagor 4 qt (3). The Jasi is a first generation, rocker control model whereas the Fagor is a second generation, regulator in the handle model. I find both easy to use but the Fagor is quieter. My two pressure canners (2, 4) are huge beasts. One is an older All American 21 quart (2) and the other a Mirro 22 qt (4). When it comes to pressure canners the quarts stated is total volume not the number of actual jars you can process. At full capacity for either the total number of quart jars that can be processed is 7. With stacking they can process 36 - 250 ml (half pints), 26 - 500 ml (pints) standard or 20 - 500 ml (pints) wide mouth jars. During the busiest canning season, the canners run at full capacity but the rest of the year at half capacity or less.

All pressure canners and cookers with the exception of the All American require gaskets. Weighted gauges (4) do not need to be checked if using for canning but dial gauges (2) do. Gaskets need to be replaced as well for either so be sure to check the availability of replacement parts. With proper care, pressure cookers and canners will give you years of dependable service. Both will save you time and money so are a worthwhile investment.

Canned Meatloaf, Ham & Stock

I belong to a few preserving groups as well as running my own group. There has been some discussion on canning meatloaf so I decided to try it using the 2 lb of ground beef. I canned 3 - 500 ml jars of meatloaf (5) using my normal recipe along with 2 - 500 ml jars of ham (6) and 5 - 500 ml jars of ham stock (7).

Method (meatloaf): The meatloaf was mixed then packed raw into hot, sterilized 500 ml wide mouth jars leaving 1 - inch head space. Wipe the rim. Adjust the two piece caps. Process 75 minutes at 10 lb pressure.

The canned ham once again came out nice looking in the jars but I was not pleased with the look of the meatloaf. This is one reason why test batches are beneficial when preserving foods. When in doubt and before committing a large amount of food to any preserving project, always do a test batch! Test batches allow you to troubleshoot as well as taste the finished product before committing. As far as the meatloaf goes, I haven't opened a jar yet. It definitely will be considered as a convenience food on my pantry shelves. There is little that can be done about the looks in the jar so as long as it tastes good it will be on the pantry shelves. Aesthetics is likely one reason commercial food processors tend to favour tin cans since the consumer is much more likely to buy the product if it doesn't look unappealing.

Pork Chops with Vegetables

A pressure cooker saves both time and money. It is one piece of kitchen equipment that I highly recommend. Unlike other quick cook methods, you can have a nice meal on the table from start to finish within 30 minutes. Unlike slow cookers or microwave ovens, you can brown the meat giving it not only flavour but visual appeal. One of the best online resources for pressure cooker recipes is Miss Vickie's Pressure Cooker Recipes, a site dedicated only to pressure cooking.

I had decided on pressure canning the chicken for dinner but fate stepped in the way. The chicken that was purchased Saturday was off! So I did a quick adjustment using 1 - inch thick pork chops and continued with the meal plan. I paired the meat with rutabaga, onion, potatoes, carrots and corn. When pressure cooking a liquid is needed. For this meal I used 1 c water and 1 c apple juice. I thickened the liquid with a corn starch slurry for serving. This meal from start to finish took 5 minutes for the pressure cooker to come to pressure, 15 minutes cooking and less than 10 minutes prep time so qualifies for an under 30 minute meal. If you want to save the time at the dinner hour, prep the vegetables earlier in the day. Either way you do it, you will quickly appreciate the value of a pressure cooker.

Method:

Brown the pork chops in a little olive oil in the pressure cooker bottom, lid off. Prepare the vegetables. Choose vegetables with similar cooking times. Chop the vegetables and pour over the meat. Pour in at least 1 1/2 c of desired liquid. Shut the lid and bring to pressure. Reduce heat to where pressure can be maintained. Cook at pressure 15 minutes. Depressurize using quick method. Serve.

So if you don't have a pressure cooker or are debating whether you need one, get yourself down to the nearest store and pick one up. If you have one sitting on the shelf collecting dust, get it out. These are the ultimate time savers! I think they are better than slow cookers or microwave ovens too.