My photo
Ontario, Canada
I am a wife, mother and grandma who enjoys the many aspects of homemaking. A variety of interests and hobbies combined with travel keep me active. They reflect the importance of family, friends, home and good food.
Cook ingredients that you are used to cooking by other techniques, such as fish, chicken, or hamburgers. In other words be comfortable with the ingredients you are using.
--Bobby Flay

For Your Information

Please watch this area for important information like updates, food recalls, polls, contests, coupons, and freebies.
  • [March 19, 2020] - Effective Mar 17, this blog will no longer accept advertising. The reason is very simple. If I like a product, I will promote it without compensation. If I don't like a product, I will have no problem saying so.
  • [March 17, 2020] - A return to blogging! Stay tuned for new tips, resources and all things food related.
  • [February 1, 2016] - An interesting report on why you should always choose organic tea verses non-organic: Toxic Tea (pdf format)
  • Sticky Post - Warning: 4ever Recap reusable canning lids. The reports are growing daily of these lids losing their seal during storage. Some have lost their entire season's worth of canning to these seal failures! [Update: 4ever Recap appears to be out of business.]

Popular Posts

Showing posts with label one pot meals. Show all posts

Friday, March 25, 2011

Mom's Cottage Roll

Pork is the remains a popular meat of choice for curing with bacon and ham being the most popular.  What many don't realize is curing meats at home is not as difficult as it would appear.  Curing meats at home is extremely easy and quite low cost.  By curing it yourself you can save substantial money if you can get the uncured meat on sale.  If you indulge in a smoker you can expand to making cured, smoked meats as well.  I recently experimented with cottage roll as a pork cut I would like to cure at home. 

cottage roll and vegetables cooking
C
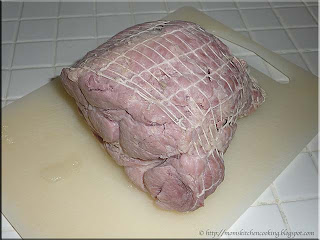
ottage roll is cured pork shoulder cut from the end of the shoulder.  It is similar in colour and flavour to peameal bacon but the texture is somewhat in between ham and peameal bacon.  It is a fattier than peameal bacon that is cut from the loin.  Cottage roll is held together for cooking by string mesh.  It is usually brought to a boil then low simmered for a couple of hours.

Mom's Cottage Roll

1 cottage roll (about 4 kg)
1 bayleaf
1 large onion
4 - 5 peppercorns
4 medium potatoes
2 large carrots
2 parsnips
½ small rutabaga
1 medium wedge cabbage

Place the cottage roll, bay leaf, onion and peppercorns in stock pot.  Cover with water.  Bring to a boil then reduce heat to simmer.  Cook for 1 hour adding water if necessary to keep meat covered with water.  Cut vegetables into bite sized pieces.  Pour vegetables into stock pot.  Cover and cook until vegetables are tender.  Remove meat from stock pot.  Cut mesh from meat and slice for serving.  Serve the vegetables on the side.  Reserve stock and any remaining vegetables for soup made with some of the meat.

cooked cottage roll
Pictured is the cooked cottage roll just out of the stockpot.  The pinkish colouration is characteristic of cured pork.  The mesh is removed at this point then the meat is sliced for serving.  Slice about a half-inch thick.  Trim the fat from any leftover cottage roll slices.  Cube the slices then return to the pot with stock and extra vegetables for soup the following day.  If you find there is not enough leftover vegetables for soup but plenty of meat and stock, get creative.  Stir in a cooked beans (eg. navy, black, kidney) or noodles or add more vegetables or a combination of any of the ingredients mentioned.  The resulting soup is quite nice by itself but would be tasty with drop dumplings as well.

Cooking a cottage roll dinner is one pot cooking that can be done on the stovetop as this one was, in the slow cooker or even in the countertop roaster.  The important things to remember is to keep the cottage roll covered with water and to cook slowly so the meat is tender.  This really is a simple, low prep yet tasty meal that is economical as well.  The cottage roll was 4.39 kg (about 9 lb) for $7.45.  The total cost of the dish came in at just under $10.  It made enough for dinner for two that evening, soup for four the following day with enough leftovers for two. 

I served the cottage roll with the vegetables on the side.  A small garden salad and dinner rolls completed the meal.  I was quite pleased with the results of this one pot meal.  Cottage roll is now on my list of meats to cure at home just as soon as I can find a good sale on pork shoulder roasts!


Saturday, December 11, 2010

Beef and Cabbage with Dumplings

A good portion of the home-style meals I cook have no recipe.  Rather the meal is based on something that caught my attention while in the pantry or freezers.  The number one kitchen utensil I rely on especially for starting soups, stews and chowders is a pressure cooker.  The reason for this is a pressure cooker is the fastest way to make a rich stock while giving tender results for the meat.  All that is needed is to remove the bones and initial stock flavouring vegetables for a lovely base perfect for any soup, stew or chowder.  A couple of days ago it was cold with very light snow flurries so I thought a soup would be a good idea for dinner.  It evolved from a soup to an one pot entrée.  That is another great benefit to using a pressure cooker in that the meal from start to finish can be easily cooked in the same pot.

beef and cabbage with dumplings
I actually started this meal out with the intentions of making a beef based soup.  That is one of the beauties of not following a set recipe.  I put 2 frozen beef soup bones, a carrot, stalk of celery, a small onion and bay leaf into a pressure cooker then opped with water to the ⅔  mark.  It is important that a pressure cooker not be filled above the ⅔ mark to prevent over pressurizing the cooker.  Once the pressure cooker came to pressure, I reduced the heat to maintain pressure and cooked at pressure for 40 minutes.

Once the meat and stock were cooked I removed the bones and vegetables.  I seasoned with Worcestershire sauce, sea salt and fresh ground pepper with just a touch of browning.  Then I stirred in about a quarter wedge of cabbage cut into strips and about 2 cups of a frozen carrot and green/wax bean mixture.  I could have stopped there for a nice hearty soup with adding perhaps rice or pasta but I decided to dumplings add instead.  Dumplings thicken any liquid but they are ever so good!  The end result was a very, very tasty dinner!


Wednesday, January 13, 2010

French Canadian Braised Beef

I love finding new but old recipes that still work well. Old recipes are wonderful in that they don't specify brands and we all know that in some cases brand A may vary in taste from brand B not that it is ever much of a concern for me as I tend to use my home canned or home frozen variants. They also tend to use less ingredients specifically less exotic ingredients. If you want frugal recipes for saving a few dollars when cooking look for the older recipes.

French Canadian Braised BeefFrench Canadian Braised Beef

This recipe really starts out a lot like a stew and believe me I'm not exactly sure what makes this recipe French Canadian either. Likely this was a dish that was popular in French Canada at the time this cookbook was published (1965). In the end the sauce was quite thick, creamy in texture and tasty even thicker than a stew. It was rich, creamy and flavourful, definitely comfort food. In my opinion this dish could be adapted rather easily to using a slow cooker (crockpot) or the pressure cooker.

I made a couple of substitutions in the French Canadian Braised Beef recipe. The recipe didn't call for any oil so I added a bit to help with the searing. I substituted Montréal Steak Seasoning for the salt and pepper and I added a splash of Worcestershire sauce to bring a sparkle to the beef. I also exchanged the new potatoes called for in the recipe with cubed potatoes as I'm quite sure my ancestors would have made this type of dish during the winter when new potatoes were not available. In fairness the recipe does call for condensed cream of mushroom soup so I think my ancestors would have used heavy cream and perhaps mushrooms if they had them. I used the condensed cream of mushroom soup. I also changed the cooking method to add the fresh green beans in a few minutes before serving to keep the beans nice and bright.

French Canadian Braised Beef
modified from: French Canadian Braised Beef, Kate Aitken's Canadian Cook Book, 1965. Pp. 192.

2 lb stewing beef
¼ c corn starch
1 tsp Montréal Steak Seasoning
¼ c olive oil
1 medium onion, finely chopped
1½ c water
splash of Worcestershire sauce
1 c carrots, diced
1 c green beans, cut into 1-inch pieces
6 small potatoes, bite sized pieces
10 oz can condensed cream of mushroom soup

Place the stew been, corn starch and seasoning in a covered bowl. Shake until meat is well coated. Heat oil in Dutch Oven then add onion and cook until translucent. Add the beef. Sear meat on all sides. Add water and Worcestershire sauce. Stir well. Cover tightly. Reduce heat to simmer and let simmer until meat is tender. Stir in potatoes, carrots, and mushroom soups. Continue cooking until vegetables are tender. Stir in green beans. Cook until beans are just tender.
Serves 6


Wednesday, July 08, 2009

Vegetable Stuffed Meatloaf

One pot meals are generally casseroles, slowcooker dishes, soups, stews and pot roasts. The nice thing about one pot meals is this method frees up time for the busy cook. While the food is cooking other things can be done without worrying about cooking additional side dishes. One pot meals are an efficient use of energy as well something we all need to consider.

I took out a pound of extra lean ground beef from the freezer to thaw on Sunday evening for Monday's dinner. I wanted to try an enchilada casserole recipe I had found. My husband took a look at the recipe giving it two thumbs down so I decided to make meatloaf instead. Not just regular meatloaf, a nice kicked up version!

how to make vegetable stuffed meatloafMethod

This really is a fun way to make a familiar meal taste like a new one simply because it is just a bit different! The ingredients aren't written in stone making this a frugal, budget stretching meal. I made my meatloaf mixture then poured it onto a sheet of wax paper (1). Then I formed the mixture into a rectangle and starting with spinach (2) topped it with the fillings (3) much the same way you would top a pizza. After rolling the meatloaf I baked it (full instructions follow).

Ingredients

meatloaf:
1 lb extra lean ground beef
1 tbsp prepared mustard
½ c ketchup
1 tbsp Worcestershire sauce
2 eggs
Montreal steak seasoning to taste
2 c dried bread crumbs

filling:
½ pk fresh spinach
4 med. potatoes, microwaved
10 - 12 button mushrooms
1 c grated Colby cheese

Wash and poke holes in the potatoes. Place on a piece of paper towel and microwave until just soft. Remove from microwave, cut in half and scoop out the flesh. Set aside. Clean, slice and sauté mushrooms in a little butter. Remove from burner and set aside. Grate the cheese. Wash and pat dry the spinach. Make the meatloaf mixture mixing well (see ingredients below) then poured the mixture onto a sheet of wax paper. Form the meatloaf mixture into a flattened rectangle about ½ - inch thick. Cover with spinach first (2) followed by the other filling ingredients (3). Starting at one narrow end and using the wax paper under the meat, carefully lift up and over to start the roll (4). Continue rolling to the other end using the wax paper to help lift. Once the meatloaf is fully rolled carefully place it in a heavy metal loaf pan. Bake at 180ºC (350ºF) until cooked through. Remove from oven. Let rest 5 minutes before slicing.

vegetable stuffed meatloafVegetable Stuffed Meatloaf

When the meatloaf was baked I carefully removed it from the oven then let rest on a cutting board for 5 to 10 minutes. Resting allows the juices to set up so the meatloaf slices cleanly without crumbling. Pictured is the vegetable stuffed meatloaf just after cutting. Doesn't it just look gorgeous?

I was quite impressed with the results! The vegetable stuffed meatloaf was extremely easy to prepare. It was very tasty and filling. If you look at the list of ingredients my most expensive ingredient was the extra lean ground beef at $2.35 per pound (price per pound across all bulk meat purchase cuts). Over all the entire meal cost just under $5 including the electricity (32¢) to cook it. The meatloaf would easily serve 4 to 6 ( 83¢ to $1.25 per serving) people making this meatloaf a lovely, budget stretching and frugal meal! Serve a tossed garden salad as a side.

vegetable stuffed meatloaf dinnerDinner

I plated the vegetable stuffed meatloaf rather simply without any further sides. The spinach really lost its lovely green colour during the baking so adding a bit of green would make the meatloaf sparkle. For proper presentation a spring of parsley would have been nice but I also think the meatloaf would look good on a bed of leaf lettuce. As soon as my leaf lettuce is ready for cutting I will make another meatloaf just to see how it plates up. A ladle of beef gravy would also be a nice addition although the meatloaf is moist enough not to need gravy. This meal received two thumbs up from my husband!


Sunday, May 10, 2009

Ham Roast

One myth that has been widely perpetuated is that cooking from scratch takes a lot of time and effort. However, in many cases this is really the furthest thing from the truth. In reality this myth has been encouraged by the fast food industry and the manufacturers of convenience foods. But both have ulterior motives and that is to sell you a more expensive product to pad their profits. One way they do this is to convince you cooking from scratch takes too much time hoping you will buy into the myth. A nice home cooked meal from scratch can easily be make in short period of time for a fraction of the cost of either fast food or convenience foods.

ham with Diana sauceHam with Diana Sauce

We have been eating mainly from our freezer and pantry stocks to free up some space. Our bulk meat purchases (beef, pork) will be ready to pick up the end of the week, fishing season is starting and fresh produce from the garden is just around the corner. A few nights ago I decided to cook up our last ham.

Ham is one of those meats many don't consider other than lunchmeat outside of special occasions. I don't understand this because any leftover ham can easily be sliced for sandwiches eliminating the need to buy expensive lunchmeat.

I cooked the ham starting from frozen in my countertop roaster in about 75 minutes. Had the ham been thawed it would have take about the same amount of time as the potatoes, 45 minutes so this is quite a doable meal to put together when you get home from work. By the time you have unwound dinner is ready. About 20 minutes before the ham was ready I simply poured a little Diana sauce ( honey garlic) over the ham. I didn't bother thickening the juices either choosing instead to just ladle a little over the ham.

ham dinnerHam Dinner

If you have been following this blog you already know there are a lot of preserving recipes here. What isn't always clear is how exactly we use some of these home canned or home frozen products. How to use some of the home preserved products is rather intuitive but what about the products like Old Fashioned Chili Sauce? So I am going to be making a bit more of an effort to show you how we use these products.

The meal as pictured was entirely from our pantry and freezers. I served the ham with whole potatoes cooked with the ham and home frozen nibblet corn. Topping the potatoes were a couple of generous scoops of the Old Fashioned Chili Sauce. This is a low fat alternative to butter, yogurt or sour cream and it has a lot of flavour! As long as I can remember chili sauce is always served with potatoes because it just pairs so nicely with potatoes whether baked, steamed or mashed. It really is a comfort food pairing on a cold, blustery Canadian winter evening!


Sunday, May 18, 2008

Cabbage Rolls

I think everyone has a favourite recipe for making cabbage rolls. I don't really have a recipe per se but the secret to mine is using roasted tomato sauce. This is one of our favourite sauces so I can a lot of it. Roasted tomato sauce is perfect for so many dishes. In cabbage rolls, it lends a depth and richness you won't find with store bought sauces.

Cabbage Rolls

Originally this post was to be a step-by-step pictorial of how to make cabbage rolls. Unfortunately some of the pictures were not editable so I'm just going to tell you how I make cabbage rolls.

Method: Cook 1 cup of rice in a rice cooker then set aside. While the rice is cooking, brown 1 lb of lean ground beef, drain and stir in 1 small chopped onion and continue cooking until the onion is translucent. Mix the beef mixture with the rice then pour in one 500 ml (pint) jar of home canned unseasoned stewed tomatoes and 250 ml (half pint) of roasted tomato sauce. Cover the mixture and set aside.

Wash one head of cabbage. Bring a large stock pot filled about ⅔ full will water to a boil. Place the head of cabbage into the boiling water. As leaves begin to become translucent, pull the head of cabbage from the water and remove the leaves. Return cabbage to boiling water and repeat until you have enough leaves for the casserole. Pour about 250 ml of sauce into the bottom of a casserole dish to cover. I use a 9" x 9" but you can use larger. Place a couple of tablespoons of the rice mixture into the centre of a leaf. Fold both sides over the filling then starting at the edge near you form a roll. Place the roll into the casserole dish. Continue in this fashion until the casserole dish is filled, approximately 8 for the size mentioned. Pour roasted tomato sauce over the rolls to cover. Top with shredded mozzarella cheese. Bake at 350ºF until warmed through and cheese is bubbly.

Serves 4


Tuesday, March 18, 2008

Corned Beef with Cabbage

Everyone wants a little luck of the Irish on St. Patrick's Day. What better way to celebrate than with a hearty Irish meal. Corned beef and cabbage while thought to be a traditional Irish dish is more likely an Irish-American dish originating from the Jewish and Irish immigrants living on the Lower East Side of New York City who wanted their traditional Irish bacon. They learned to corned beef as a substitute. It has now become a traditional meat served on St. Patrick's Day. Corned beef is one of the most popular delicatessen meats (Rueben sandwiches). Pastrami is smoked corned beef.

Corned Beef

Corned beef gets its name from the term corning which is a form of curing. In Anglo-Saxon times before refrigeration pellets of salt, some the size of corn, were rubbed into the beef to preserve it. Corned beef is usually made from brisket but sometimes round or silverside is used. Today brining (salt water) has replaced dry salt curing commercially but the name remains the same. Spices are added during the cure to give corned beef its distinctive flavour. These spices vary regionally but common ones are peppercorns and bay leaf.

Corned beef is most often pre-seasoned in vacuum packs ready to cook. It's as simple as following the instructions on the package for cooking. It can also be found canned in the grocery store and can be home canned as well. However, corned beef can also be home cured either by brining or dry salt curing (Morton's Salt) both of which are less expensive than store bought. I prefer the dry salt curing method.

The most common way of preparing corned beef is to cover with water then bring to a boil, reduce heat to a simmer then simmer 3 to 4 hours. While simmering removing any scum that forms. After the simmering period add the vegetables and cook about another hour until meat and vegetables are tender. However, I used a pressure cooker to tender meat and vegetables in considerably less time. I used the 5.5 L (6 qt) Jasi pressure cooker

Method: Place the corned beef on a rack in the pressure canner. If you don't have a rack for your pressure canner, use canning jar lids for a make shift rack. A small cooling rack will work as well. Pour 1 cup or the minimum amount for your pressure cooker. Close the pressure cooker and put the regulator on. Bring the pressure cooker to pressure on high heat. When the steam is first released, reduce heat to medium low adjusting so that steam is released 2 to 3 times per minute (10 lb pressure). Continue cooking one hour. Turn off heat and allow the pressure cooker to depressurize by itself (about 10 minutes). Remove lid. Reserve 1/4 c of the cooking juices for mustard sauce (recipe follows). Add enough water to the remaining liquid so there is at least 1 c of liquid in the pressure cooker. Add vegetables* and bay leaf. Put the lid back on and bring the pressure cooker to pressure on high heat. When steam is released reduce heat to medium low, adjusting so steam is released 2 to 3 times per minute. Cook at 10 lb pressure for 7 minutes. Remove from heat and depressurize by placing the cooker under cold water. Remove lid. Remove vegetables and corned beef. Allow the corned beef to rest 5 minutes before slicing.

*Vegetables
I used the following amounts to fill my pressure cooker to the maximum 2/3 full level.
1 medium onion, cut into wedges
1/2 large cabbage, cored, cut into half wedges
6 medium potatoes, cut into large chunks
20 baby carrots

Mustard Sauce

Making your own mustards is very easy with the main components being dried mustard, vinegar and thickener. From there you can tinker with types of vinegar for different flavours. Sugar when added can easily be modified to using another sweetener like honey, maple syrup or brown sugars. So a basic mustard recipe can take you in a lot of directions so don't be afraid to experiment.

A deli style mustard with a bit of kick accents corned beef nicely. I decided to make a deli style mustard sauce to accompany the corned beef. It was a good choice!

Mustard Sauce

¼ c juices from corned beef
¼ c white vinegar
4 tsp dry mustard
4 tsp organic sugar
1 egg

Whisk egg, mustard and sugar together. Whisk in vinegar and corned beef liquor. Heat to simmer on medium while whisking. Do not boil. Remove from heat. Spoon into small serving dish or individual dipping cups just before serving. Can be served hot or cold.


Tuesday, February 19, 2008

Pot Roast Using HamiltonBeach® Roaster

We bought our previous home solely on the basis of location. Unfortunately storage was almost non-existent so I decided to eliminate as many single use appliances as possible. We also bought this house because of location however, there is more than ample storage here. Still I stuck to the decision to not buy any single use appliances. A countertop roaster was tempting after a couple of overnight boat trips as a few of our fellow boaters swore by their Nesco® roasters. While I could see the usefulness of such an appliance, I kept putting it off buying one because of the size as storage on a boat is always limited and because it reminded me too much of a slow cooker, something I'm not really fond of using despite owning two.

A couple of days ago I asked my husband to stop at the hardware for a couple of items needed for doing the preliminary prep work on the kitchen for the remodel. He came home with four appliances! The hardware store was having an appliance clearance and he just had to take advantage. Three of the appliances were stashed for gift giving but I decided to keep the fouth, a HamiltonBeach® countertop roaster, for myself. The HamiltonBeach® countertop roaster had an original price tag of $59.99 on sale for $15.99. Similar savings were on the perculator ($66.99 for $20), hand held blender with chopper ($29.99 for $10) and personal coffee maker ($19.99 for $10).

The Roaster

The HamiltonBeach® countertop roaster is smaller than the Nesco® roaster (18 qt) at 6.5 qt. The outside is a crisp white with black lettering. The white metal lid (not shown) has two small vent holes. The black metal roasting pan is large enough for a 5 lb roast or large chicken and is removable for easy cleaning. It does not have a non-stick surface. The temperature range is 200ºF to 450ºF controlled with an easy grip knob. There is an indicator light as well. I was disappointed that instructions and a recipe book were not included with this appliance. The box was still factory sealed so obviously these were simply not included. I was also disappointed that the temperature markings are in fahrenheit only.

Cost of operation is always something that should be considered for any appliance. Remember every kW counts so we should always be striving to use less electricity. This roaster is 750 W compared to my oven element that is 2400 W. In terms of cost the roaster will cost $0.09 per hour where the oven costs $0.28 per hour. Unlike the calculated costs for my slow cookers that end up being more expensive to operate than using the large burner (2000 W) and a pressure cooker, the roaster appears to be on the money saving end.

I placed a frozen blade roast in the roasting pan, seasoned it with Montreal Steak spice, sliced onions and added about ½ c of water, put the lid on the roaster then set the temperature to 250ºF much the same as I would do if roasting in the oven. After two and a half hours the roast was progressing quite nicely so I added the potatoes, carrots and corn but unlike doing a pot roast in the oven, I did not increase the temperature to 350ºF. It seemed to me that the roast was cooking too fast so I was immediately concerned that it would not be tender. The vegetables took about 40 minutes to cook. Instead of removing the vegetables and roast as I would with oven cooking, I poured the cornstarch slurry directly into the juices and allowed it to thicken about 5 minutes. This eliminated using the large burner (2000 W) on the stove but the real reason for doing so was to do everything in the same dish.

Pot Roast

I have to admit I was very surprised at the results. Normally a roast done this way would take me 4 to 4½ hours (10.8 kWh or $1.29) but it only took 3 hr 15 minutes using the countertop roaster (2.44 kWh or $0.29). So on the green scale for energy use, the countertop roaster used about ⅕ the kWh of the oven.

The next test was the appearance. In comparison to oven cooked the vegetables and roast were more than comparable. There was a bit less caramelization likely because I did not increase the final cooking time. The vegetable colours were bright and enticing with a firm texture without being overcooked and mushy that often happens in a slow cooker . Making the gravy directly in the pan was a simple convenience for me and I often do the same when using a slow cooker. The end result was stew-like vegetables with the meat separate. The final test was of course the taste.

Plated

Unlike cooking this type of dish in the oven or slow cooker, the vegetables and meat were still steaming when being plated even though we let the meat rest for 5 minutes. One notable difference is the house was not filled with the smell of dinner but more of a hint. Despite my reservations, the roast was extremely tender, almost melt-in-your mouth tender. The vegetables were very impressive, cooked perfectly! The gravy was tasty giving a nice addition to the vegetables even though there was not extra for the meat.

So I am quite impressed as I ended up with quite a nice meal while saving a lot of kilowatts, both of which are very important to me. Given this was the first time using this appliance, I was pleased. The results were definitely better than a slow cooking and far superior to a microwave oven. However, next time I will cook the roast at a lower temperature (200ºF) to get the end result medium rare. I will also add a bit more liquid for extra gravy. Mushrooms would have been a great addition to the vegetables as well.

All in all, I'm pleased with the energy savings and cooking results of this countertop appliance. The size is just right as well. Depending on what you are cooking, a meal for four is easily obtainable and I think it will be perfect for baked beans or casseroles. It is also small enough that it doesn't take up a huge amount of room for storage. We often have fresh baked bread with dinner so that means juggling the oven space sometimes so this is an easy solution as well. It will also be ideal for my bulk cooking sessions.


Tuesday, February 05, 2008

Three One Dish Budget but Comfort Meals and Oven Baked Ribs

By now anyone reading this blog knows we were on vacation in the sunny south. I shared a few foods we ate there but since the majority of the food pictures include my husband and I smiling broadly, playing tourist before we indulged a lot of the food pictures I took won't appear here. We arrived home to very nasty weather that took twice as long for us to make the final drive home. It was early morning and I was ready too cook but being tired caught a few z's then went about catching up. Thankfully one of our kids who was housesitting had picked up a few fresh vegetables for us as there wasn't a chance I was going out in that weather. If you recall, I'm working through a lot of freezer foods to make room for the beef that will arrive shortly, considerably shorter time frame than anticipated. Apparently the beef will be ready the first part of next week! Yikes!

Ok, so it was cold and we were tired so comfort foods were a must. At the same time, easier to prepare meals that used foods from the freezer were and continues to be the primary dinner fare. I should note that all the following meals were served with side salads. Heavy dressings were replaced with simple, fresh lemon juice that really enhances the flavour of the vegetables without adding calories.

Chicken Stew

The first day home I was running on about three hours of sleep but was anxious to get things back to normal. Vacations result in a different kind of tired and there's always the extras like laundry, putting away luggage and restocking the fresh fruits and vegetables. We were lucky as one of our kids restocked the kitchen for us just before we arrived home. While we were away condensed soups were on sale and even though I don't use a lot of these the price was where our kid thought a case was warranted as well. Our first meal was chicken stew using what was on hand. The chicken and bacon were pre-cooked in the freezer so ready to use. The end result was a rich, creamy one pot meal.

Chicken Stew

4 washed, unpeeled and cubed potatoes
1 small onion, chopped
1 bag steamed spinach (about 14 ounces)
1 c homemade chicken stock*
1 can (10 ounces) condensed mushroom soup*
1 ½ c cooked boneless, skinless chicken breast, cubed
½ c cooked bacon pieces
1 tsp Tone's garlic and onion seasoning
1/2 tsp sea salt
1/2 tsp fresh ground pepper

Prepare the potatoes, steam and drain. Clean and steam spinach. Cook chicken and bacon**. Combine all of the ingredients. Mix well. Pour into a casserole pan. Bake at 350ºF until slightly browned and warmed through.

* Substitute about 2 c of homemade cream of mushroom soup, slightly thickened.
** Use pre-cooked from your freezer stores.

Chicken Pot Pie

Any kind of stew base can be used for making pot pie. My normal pot pies have a bottom and top crust. However, flipping though a couple of magazines during the flight gave me the idea to use store bought puff pastry for the top crust. This was an ideal dish because it used up three packages of food from the freezer, a jar and half of home canned food from the pantry, a can of condensed soup and it was oh so easy to prepare. I actually started out following a recipe then went off on my own tangent. As always please read my notes on this recipe.

Chicken Pot Pie

3 chicken breasts, bone and skin removed
1 c clarified home canned chicken stock
2 c condensed cream of mushroom soup
2 c home canned carrot coins
1 c frozen peas
1 c frozen niblet corn
1/2 tsp paprika
1/2 tsp Old Bay Seasoning
1 10"x10" sheet puff pastry

Thaw the puff pastry according to instructions on the box. Cube the chicken and brown. Stir in the stock and soup then add the rest of the ingredients except the pastry. Mix well and warm through. Pour into baking pan. Place the puff pastry over top. Cut four holes in the crust for venting. Bake at 400ºF until pastry is golden brown. Remove from oven. Rest for 5 minutes then cut and serve.

My notes: The flavour of this pot pie was wonderful. It was rich and creamy playing a lovely contrast against the crust. The next time I will thicken the filling a bit as I thought it was just a bit too runny even though the pie got two thumbs up from all.
Pork 'n' Noodles

In keeping with the theme of using foods from the freezer while making comfort foods, I made a filling dish aptly named pork 'n' noodles. It really was a one pot meal almost a home made version of boxed meat extenders.

Method: Cut the pork into cubes then brown in a little olive oil in a large sauce pan. Stir in about 1/2 c of water to deglaze the pan. Add enough water to bring the level about 2 inches above the meat. Toss in 1/2 chopped onion and broad egg noodles (about 450 g). Cook the noodles until el dente. Stir in about 1 c each of frozen peas and corn niblets. Stir in 2 cans condensed mushroom soup and 1/4 c chicken broth. Mix well and heat thoroughly. Plate.

Oven Baked Ribs

Ribs are one of my favourites so I have a few ways of preparing them. I've previously gave my methods for grilling (my favourite method) and crockpot ribs. With several inches of snow on the ground and more threatening to come down, I decided to do oven baked ribs. Now the real secret to delectible ribs is slow cooking. You want low heat and a long cooking time. Oven baking gives a much nicer result than using a crockpot. I served the ribs with frozen peas, steamed cauliflower and a side salad.

Method: Place a rack of ribs in a large roasting pan. Add about 1 1/2 c of water. Add a few thin slices of onion. Cover. Bake at 250ºF for about 3 hours. Remove from oven. Drain most of the liquid leaving about 1/4 c and remove onion slices. Pour barbeque sauce of your choice over the ribs covering entirely. Cover and return to oven for 1 hour. Increase the temperature to 350ºF for about 1 hour. Remove the lid and lightly caramelize. When done properly the meat will literally fall off the bones!


Tuesday, November 20, 2007

Pressure Canning & Pressure Cooking - Pork

After a very busy weekend, yesterday was a catch-up day for preserving. Once I decided on how I was going to use the food, things progressed somewhat smoothly with the exception of a glitch for dinner. I started with two sweet potatoes, four acorn squash, one rutabaga, one pumpkin, two lb lean ground beef, about a 4 lb ham, 4 chicken thighs with backs attached and about 10 lb of apples. The goal was to get as much processed and use some for dinner.

Unfortunately all did not go according to plan but a good portion got done but the rest will get done shortly so all is well. I managed to process the squash and half the rutabaga for freezing in individual serving sizes. The rest of the rutabaga went for dinner. The ground beef was used for a canning test batch of meatloaf while the ham was canned along with the resulting stock.


Pressure Canners & Cookers

I've talked quit a bit about pressure canning yet have mentioned little about pressure cooking. There is some confusion over pressure canners and pressure cookers. To qualify as a pressure canner according to the USDA there must be a holding capacity (different than total volume) of 4 - 1 quart jars with the ability to adjust the pressure to 5, 10 or 15 lb pressure. So, a pressure canner can be used as a pressure cooker but not all pressure cookers can be used as pressure canners.

I have two pressure cookers (1, 3) that can be used for pressure cooking only. One is a Jasi 6 qt (1) and the other a Fagor 4 qt (3). The Jasi is a first generation, rocker control model whereas the Fagor is a second generation, regulator in the handle model. I find both easy to use but the Fagor is quieter. My two pressure canners (2, 4) are huge beasts. One is an older All American 21 quart (2) and the other a Mirro 22 qt (4). When it comes to pressure canners the quarts stated is total volume not the number of actual jars you can process. At full capacity for either the total number of quart jars that can be processed is 7. With stacking they can process 36 - 250 ml (half pints), 26 - 500 ml (pints) standard or 20 - 500 ml (pints) wide mouth jars. During the busiest canning season, the canners run at full capacity but the rest of the year at half capacity or less.

All pressure canners and cookers with the exception of the All American require gaskets. Weighted gauges (4) do not need to be checked if using for canning but dial gauges (2) do. Gaskets need to be replaced as well for either so be sure to check the availability of replacement parts. With proper care, pressure cookers and canners will give you years of dependable service. Both will save you time and money so are a worthwhile investment.

Canned Meatloaf, Ham & Stock

I belong to a few preserving groups as well as running my own group. There has been some discussion on canning meatloaf so I decided to try it using the 2 lb of ground beef. I canned 3 - 500 ml jars of meatloaf (5) using my normal recipe along with 2 - 500 ml jars of ham (6) and 5 - 500 ml jars of ham stock (7).

Method (meatloaf): The meatloaf was mixed then packed raw into hot, sterilized 500 ml wide mouth jars leaving 1 - inch head space. Wipe the rim. Adjust the two piece caps. Process 75 minutes at 10 lb pressure.

The canned ham once again came out nice looking in the jars but I was not pleased with the look of the meatloaf. This is one reason why test batches are beneficial when preserving foods. When in doubt and before committing a large amount of food to any preserving project, always do a test batch! Test batches allow you to troubleshoot as well as taste the finished product before committing. As far as the meatloaf goes, I haven't opened a jar yet. It definitely will be considered as a convenience food on my pantry shelves. There is little that can be done about the looks in the jar so as long as it tastes good it will be on the pantry shelves. Aesthetics is likely one reason commercial food processors tend to favour tin cans since the consumer is much more likely to buy the product if it doesn't look unappealing.

Pork Chops with Vegetables

A pressure cooker saves both time and money. It is one piece of kitchen equipment that I highly recommend. Unlike other quick cook methods, you can have a nice meal on the table from start to finish within 30 minutes. Unlike slow cookers or microwave ovens, you can brown the meat giving it not only flavour but visual appeal. One of the best online resources for pressure cooker recipes is Miss Vickie's Pressure Cooker Recipes, a site dedicated only to pressure cooking.

I had decided on pressure canning the chicken for dinner but fate stepped in the way. The chicken that was purchased Saturday was off! So I did a quick adjustment using 1 - inch thick pork chops and continued with the meal plan. I paired the meat with rutabaga, onion, potatoes, carrots and corn. When pressure cooking a liquid is needed. For this meal I used 1 c water and 1 c apple juice. I thickened the liquid with a corn starch slurry for serving. This meal from start to finish took 5 minutes for the pressure cooker to come to pressure, 15 minutes cooking and less than 10 minutes prep time so qualifies for an under 30 minute meal. If you want to save the time at the dinner hour, prep the vegetables earlier in the day. Either way you do it, you will quickly appreciate the value of a pressure cooker.

Method:

Brown the pork chops in a little olive oil in the pressure cooker bottom, lid off. Prepare the vegetables. Choose vegetables with similar cooking times. Chop the vegetables and pour over the meat. Pour in at least 1 1/2 c of desired liquid. Shut the lid and bring to pressure. Reduce heat to where pressure can be maintained. Cook at pressure 15 minutes. Depressurize using quick method. Serve.

So if you don't have a pressure cooker or are debating whether you need one, get yourself down to the nearest store and pick one up. If you have one sitting on the shelf collecting dust, get it out. These are the ultimate time savers! I think they are better than slow cookers or microwave ovens too.