My photo
Ontario, Canada
I am a wife, mother and grandma who enjoys the many aspects of homemaking. A variety of interests and hobbies combined with travel keep me active. They reflect the importance of family, friends, home and good food.
Cook ingredients that you are used to cooking by other techniques, such as fish, chicken, or hamburgers. In other words be comfortable with the ingredients you are using.
--Bobby Flay

For Your Information

Please watch this area for important information like updates, food recalls, polls, contests, coupons, and freebies.
  • [March 19, 2020] - Effective Mar 17, this blog will no longer accept advertising. The reason is very simple. If I like a product, I will promote it without compensation. If I don't like a product, I will have no problem saying so.
  • [March 17, 2020] - A return to blogging! Stay tuned for new tips, resources and all things food related.
  • [February 1, 2016] - An interesting report on why you should always choose organic tea verses non-organic: Toxic Tea (pdf format)
  • Sticky Post - Warning: 4ever Recap reusable canning lids. The reports are growing daily of these lids losing their seal during storage. Some have lost their entire season's worth of canning to these seal failures! [Update: 4ever Recap appears to be out of business.]

Popular Posts

Thursday, November 28, 2013

Kitchen Quick Tips - Keep Critters Away

kitchen quick tips Place a bayleaf in flour, rice and pasta when storing to keep critters out! 


Sunday, November 24, 2013

Dehydrated Apple Slices

As mentioned in yesterday's post, I have been doing a bit more dehydrating this year.  Dehydrating is an easy way to preserve fruits and vegetables for long periods of time.  Apples can be dehydrated anytime throughout the year.  I prefer to dry them when in season.  Apples were just starting shortly before we left on the first leg of our winter vacation in early October.  That gave me just enough time to run a batch of applesauce as well as dry apple slices. 

dehydrated apple slices vacuum sealed for storage
Apple slices are a versatile, easy to make product for the pantry.  They can be used for snacking, reconstituted for baking or added to beverages for a delightful, natural flavour.  One of our favourite fall beverages is mulled apple cider made in the crockpot.  I add dried apple slices to the mulled apple cider for extra flavour.   I also like adding a dried apple slice to a hot cup of tea for subtle flavour boost.

Apples need only be washed well, cored, sliced then dipped in an ascorbic acid solution to prevent browning before drying.  I  dried the apple slices at 135°F/57°C until they were leathery feeling.  Once dried, I vacuum sealed the apple slices in mason jars for storage.  Each mason jar held a dehydrator load of 6 trays.  I will have to dry more as two jars is not enough to last through the winter! 


Saturday, November 23, 2013

Dried Tomato Slices

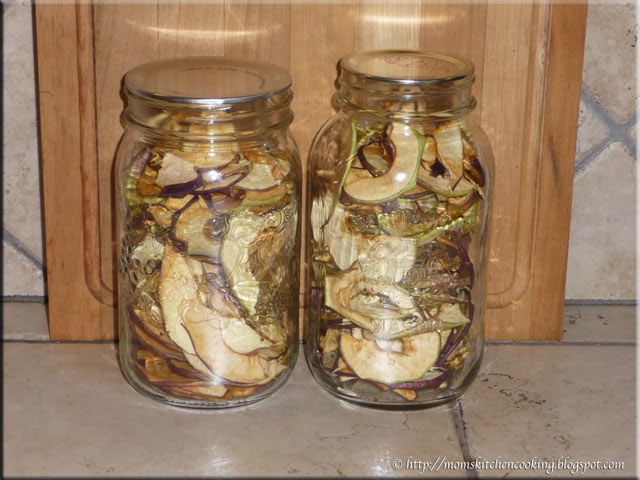
This past busy processing season, I did a bit more dehydrating than I normally do using my Nesco dehydrator.  Dehydrating is a very easy and inexpensive way to stock your pantry with little effort.  Not only that, dried foods take up less space in the pantry than the same amount of food home canned or frozen.  Like home canned foods, there is no further cost for storage.  Unlike home canned and frozen foods, dried foods are light weight, easily transported if need be.  Dehydrating foods need not be restriction to in season crops either as it is an excellent way to take advantage of produce sales anytime of the year.

using a vacuum sealer canister to seal a mason jar
Fruits and vegetables should be dried at 130°F/55°C to 140°F/60°C which minimizes the loss of heat-sensitive Vitamins A and C.  I dried the tomato slices at 135°F/57°C, the fruit and vegetable setting on my dehydrator.  Drying tomatoes is as simple as washing and slicing about ¼-inch thick.  I find I get better results when the slices are cut to a consistent thickness.  The skins can be removed prior to slicing if desired.  I didn't remove the skins. 

Dried foods are best vacuum sealed to prevent loss due to insects or moisture.  I like vacuum sealing dried foods in mason jars because the glass also protects against loss due to rodents.  An alternative method I have used is to vacuum seal dry foods in the plastic bagging material then place the packets in rodent-proof containers. 

I use either a standard mouth vacuum sealer adapter (pictured) or a wide mouth adapter (not pictured) depending on the style of mason jar I'm using.  I also reuse the metal snap lids that were originally used for home canning.  These lids cannot be reused for home canning but they are still usable for vacuum sealing providing they are not damaged.  I label home canned foods directly on the lid using a Sharpie marker.  I do not remove any writing on used lids until after they have been vacuum sealed.  Normally, the lids seal without a problem although occasionally I need to use the two lid method to get a good seal.  For some reason, one of the lids did not want to seal.  I was using older Bernardin jars so the shoulder could have been the problem.  At any rate, I resorted to another trick for vacuum sealing lids by placing the filled jar with lid in a vacuum sealer canister.

vacuum sealing a mason jar
Then I placed the lid on the canister and attached the hose as I normally would.  Essentially with this method a larger volume of air is removed but in the end the jar seals.  This method works nicely for any mason jar with higher shoulders that prevents the adapter from seating properly.  It can also be used for any mason jar in lieu of the adapter.  An adapter costs about $10 for the standard mouth size while the wide mouth size is a bit more and can be difficult to find.  Canisters are a bit easier to find locally even appearing in thrift stores occasionally.  eBay is another inexpensive source for vacuum sealer canisters as well.  Once the vacuum sealer stops, I simply released the vacuum on the canister and removed the vacuum sealed jar.

mason jar successfully vacuum sealed
As pictured, the jar vacuum sealed nicely using the canister method.  There was a noticeable indent in the centre of the lid indicating a good vacuum seal.  At this point, the only thing left to do was clean the marker off the lid then relabel for storage.

As mentioned, I like using a Sharpie marker for labeling just about anything in the pantry or freezers.  It can be used on just about any surface although may not clean off porous surfaces well.  It can also leave ghost marks on some plastics.  The marker comes off easily from metal, glass and some plastics with rubbing alcohol. 

dried tomatoes and tomato powder vacuum sealed for storage
In total, I dried two quart jars and one pint jar of tomato slices as well as enough to make a half-pint of tomato powder.  Each quart jar holds the amount of tomato slices I dried per load in the dehydrator using 6 trays.  The tomato powder is the equivalent of 2 quart jars of tomato slices or a total of 12 trays of dried tomato slices.  You may be wondering why I left some of the tomato slices as is rather than powder all of them.  The main reason is flavour.  I only powder the amount I will use within a reasonable amount of time then powder more as needed.  The second reason is versatility since the dried tomato slices can be used as an ingredient in dips and soups.

Tomato powder is a must have in any pantry!  It can be used to make tomato paste or sauce, add extra flavour to soups, stews and meatloaf, or sprinkled on salad or other vegetables as a seasoning.  Commercially prepared tomato powder is available but it is expensive at as much as $1.10 per ounce or more.  It is not a product that I can find locally, so for me as well as many, tomato powder is a product that would have to be ordered online or by mail order.  Homemade tomato powder can be as inexpensive as only the power it takes to run the dehydrator (my case) or the price of about 30 large paste tomatoes.  Even buying the tomatoes and making your own tomato powder will still realize a savings.  I used paste tomatoes because that is what I had.  Any tomato can be used to make tomato powder although I highly recommend using organic tomatoes.  Cherry tomatoes make a wonderful tomato powder if you find a good deal on them.  Mixing tomato varieties works well too making this an ideal way to use up excess tomatoes from the garden.


Thursday, November 21, 2013

Kitchen Quick Tips - Easy Lettuce Coring

kitchen quick tips To quickly core head lettuce, rap the core hard on the counter.  The core will then be easy to pop out leaving the lettuce ready for cleaning and prep.


Thursday, November 14, 2013

Kitchen Quick Tips - Sticky Spoons

kitchen quick tips Spray a spoon with non-stick cooking spray before using it to scoop honey or peanut butter.  The spoon will clean-up easily with no sticking.


Monday, November 11, 2013

Home Canned Picante Sauce

I am constantly looking for as well as developing new, safe home canning recipes.  This fall I added home canned picante sauce to my ever growing list of must make recipes.  Picante means hot but the recipe I used was mildly pungent and stimulating.  The results were delicious!  I will do a bit of tweaking for the next batch but overall, I am quite pleased with the sauce.  This one is a keeper!

home canned picante sauce
I decided to try the picante recipe in Bernardin's Tomatoes Canning & Specialty Recipes.  This easy sauce has the texture of a chunky salsa but different flavour notes.  Parsley can be substituted for the coriander if desired.  It can be served with a rice or meat dish, or used as a dipping sauce for chips and seafood.  This sauce can be puréed for use as an enchilada sauce.  It can be home canned chunky or puréed so be sure to make a batch or two of each!

Picante Sauce
source: Bernardin Ltd., Tomatoes Canning & Speciality Recipes (2000), Pp. 64

7 c coarsely chopped tomatoes
1½ c coarsely chopped Spanish onion
½ c finely chopped jalapeño pepper
2 cloves garlic, minced
1 c malt vinegar
1 can (5½ oz) tomato paste
1 tbsp pickling salt
1 tsp red pepper flakes
1 tbsp finely chopped coriander
1 tsp cumin

Prepare vegetables.  Leave ingredients as is for picante sauce or purée mixture if making enchilada sauce.  Place all ingredients except coriander and cumin into large saucepan.  Bring to a boil over medium heat.  Boil gently for 45 minutes.  Stir in the coriander and cumin.  Continue boiling for 15 minutes for picante sauce or 30 minutes for enchilada sauce.  Ladle sauce into hot 250 ml (half pint) jars.  Wipe rims and cap with metal snap lids, Tattler reusable canning lids or glass inserts as per instructions for type of lid used.    Process in boiling water bath for 20 minutes.  Remove from canner.  Tighten bands fully if using Tattler lids or glass inserts.  Allow to cool undisturbed for 24 hours.  Remove bands and test for seal.  Wash jars and label for storage.

Yield: about 8 - 250 ml (half pint jars), 7 enchilada sauce


Sunday, November 10, 2013

4ever Recap Reusable Canning Lids Warning

I am a high volume home canner with over 30 years of experience.  In addition to the two piece metal snap lids, I also use reusable canning lids (eg. glass inserts, glass lids, Tattler, and 4ever Recap).  I ordered one dozen standard and one dozen wide-mouth size of the 4ever Recap lids.  The 4ever Recap lids came in at 10¢ less per lid than the Tattlers and promised the lids with gaskets (treated properly) would last forever.  As a high volume canner, I knew that savings would make a difference.   I contacted 4 Ward Industries immediately upon receiving my 4ever Recap lids who did not resolve my problem or address my concerns.

I started testing the 4ever Recap lids in April of 2013, wrote about sealing problems with the 4ever Recap lids the same month, and wrote a review of the 4ever Recap lids in May.  I left the remainder of the jars using 4ever Recap lids in the pantry which is both cool and dark.  During the midst of the busiest of my canning while putting newly canned foods in the pantry I noticed a jar of stock with a 4ever Recap lid that looked strange.  Upon closer inspection I discovered the lid had actually popped up and the contents obviously spoiled.  I immediately checked through all my jars of stored food, no easy task given the volume.  Every jar with a 4ever Recap lid had come unsealed.  I have to tell you, I was beyond furious!

4ever Recap reusable canning lid seal failures
I have used the reusable lids often enough that I can tell just by a quick glance whether the seal has failed.  It is very, very subtle but there is less compression between the lid and the jar (orange arrow).  What caught my attention though was the clouding of the turkey stock (yellow arrow left).  What I found with the remaining jars with 4 ever Recap lids were clear signs of spoilage (yellow arrow right).  I carefully brought the jars to the kitchen for further investigation, taking pictures.  Of note, jars of the same stock canned on the same day in the same batches using Tattler reusable canning lids and metal snap lids were fine with no sign of spoilage or seal failure.  All of the jars were stored in the same pantry in the same conditions.

4ever Recap reusable canning lid popped right off and the other had no resistance at all
I know the jars using the 4ever Recap lids were sealed when they went into storage.  They were removed from the pressure canner, bands firmly tightened immediately then sat undisturbed for 24 hours as per normal.  In fact, I noted seal failures at a rate of 25% during this initial period but after reprocessing all had sealed and were sealed when put into the pantry.  I removed the bands and tested those seals before the jars went into the pantry.  The beauty of the reusable lids aside of being eco-friendly is they are either sealed or they aren't.  If a lid is not sealed it easily slides or lifts off the jar with no resistance.  It is would be impossible to miss a lid that wasn't sealed.

4ever Recap reusable canning lid defective gasket seating
In my initial correspondence with Jackie Ward of 4 Ward Industries, I asked about the apparent gasket seat flaw that allows the gasket to move somewhat on the lid.  She did not address my concerns but rather brushed them off.  Pictured is a comparison of a Tattler reusable lid to the 4ever Recap lids.  The gasket sits firmly on the gasket seat of the Tattler lid.  It is tight against the flange (green arrow) with no possible room for movement.  The gasket sits loosely on the 4ever Recap lids with a fair amount of room for movement (red arrow).  It does not sit tightly against the flange but rather if the gasket is pushed tight against the flange it leave a wiggle room of 1/8 - inch. This movement makes placing the prepared lids on filled jars more difficult and definitely explains the higher percentage of initial seal failures fresh from the canner because the gasket actually has enough room to shift so as to not cover the rim of the jar properly.
 
Yesterday, a reader who wished to remain anonymous left the following comment on the 4ever Recap review post:
You may be interested in knowing that after finding out that their "superior silicone' rings will not stay sealed longer then 3 weeks, 4Ever Recap is now selling nitrile rings. Now if you have a superior product, why would you exact copy your competitors tried & true (which you claim to be inferior) product? Also interesting, if you type 4Ever Recap Trademark into your search engine you will find that the company is actually owned by Kang Investments LLC. You form your own opinions on that one!  
I decided to do some investigation:

According to their website, 4 Ward Industries LLC in Anna, Ohio "is the company that brings" you 4ever Recap owned by Jackie Ward (President).  Brandon Ward, her husband, is Director of Marketing and Sales.  The website 4everrecap.com is a GoDaddy domain with the registrant set as private and their IP 64.29.151.221 points to InternetNamesForBusinesses.com in Fort Lauderdale, Florida.  I could find no real information on 4 Ward Industries LLC other than what is on their website which is rather odd.  Of note, Anna is a village of under 1,600 people and the Village of Anna Businesses does not list 4 Ward Industries as a business in Anna, Ohio but City Squares listed 4ever Recap (not 4 Ward Industries) at 114 West North Street in Anna.  It's interesting that Google Street View shows nothing that appears to be a building for manufacturing the lids but perhaps it is a small enough operation to fit in a large shed.  The 4ever Recap trademark is definitely owned by Kang Investments LLC (also not listed in the Village of Anna Businesses) in Anna, Ohio, filed by Matthew H. Swyers who appears to be a trademark lawyer for The Trademark Company in Vienna, Virginia.  The address given for Kang Investments is 12800 Wengler Rd. which appears on Google Street View as two rather impressive homes on a dirt road across the road from an empty field. .  My conclusion is that 4 Ward Industries is not who they say they are and may possibly be portraying themselves in a deceptive manner.  I don't feel they are actually manufacturing the lids themselves as their website indicates 'the company that brings you' not manufacturers of 4ever Recap lids.  It is unclear where these lids are made and may or may not be BPA-free.  At any rate there is evidence that 4 Ward Industries is simply selling someone else's product that mimics Tattler. 

According to their website, 4ever Recap is offering silicone (red) and nitrile (black) gaskets.  If the silicone gaskets were superior in the first place, inquiring minds would like to know why they are suddenly offering nitrile gaskets?  Nitrile is an oil-resistant synthetic rubber that has recently been used in the manufacturing of medical gloves as a less expensive alternative to latex gloves.  It is also used in applications such as gaskets where oil resistance is necessary.   Clearly, there have been seal problems with the 4ever Recap both immediately and during storage which is why 4ever Recap is again copying Tattler by offering nitrile gaskets BUT they are still offering silicone gaskets despite the gasket seating defects which would lead to seal failures and the problem in general with the seal failures using silicone.  My conclusion is both Jackie and Bruce are aware of the high level of seal failures AND have relayed that to whom ever is manufacturing the lids.  Rather than correct the problem, an alternative gasket is being offered.  Clearly, an alternative nitrile gasket would not be offered if there weren't known seal problems with the silicone gasket!  Based on the numerous complaints over seal failures using the 4ever Recap lids and the multitude of canning sites and forums recommending against their use, I would not be surprised to see a class action lawsuit in the near future!

The bottom line:

Regardless of the confusion over who actually manufactures the 4ever Recap reusable lids, there is sufficient evidence to indicate that they are not manufactured at the location implied by the Wards.  There is a question on the feasibility of a business built on a non-sustainable business plan selling a product designed to last forever meaning they are only interested in first time buyers not maintaining existing customers.  There is reasonable evidence to speculate that these lids may not manufactured in the USA which brings their safety into question.  There clearly is a recognized problem with the silicone gaskets that leads to a higher rate of initial seal failures as well as increased seal failures during storage.  Of note, all negative comments regarding the 4ever Recap lids have been removed from their Facebook page, something they do blame Facebook for but I have my doubts.  It's their page so they have the power to remove any comments as they see fit.  I fully believe they have removed the negative comments to prevent perspective buyers from seeing them which could influence them not to buy the faulty lids.

On a personal level, I was not happy with the correspondence from Jackie who failed to resolve my problem or address my initial concerns over the gasket seating.  Despite several emails, she did not answer my concerns at all!  She blamed seal failures on being a new user of 4ever Recap lids even though they are used exactly the same way glass inserts and Tattler reusable lids are used, both of which I have been using on a regular basis for a few years.  Every single jar with a 4ever Recap lid in storage had lost the seal by September.  While this is longer than the 3 week in storage failure some are reporting, it is still unacceptable.  I currently have a little over 12 dozen jars in storage using Tattler and glass inserts.  Some of those jars have been in storage over a year.  To date the only seal failures I have experienced during storage has been using the 4ever Recap lids.   I definitely will not be using these shoddy reusable canning lids!  I am not willing to waste my time, effort, cooking fuel and food using what is clearly a substandard, defective product!  I do not recommend these lids!


Saturday, November 09, 2013

Homemade Roast Beef Lunch Meat Packets

The Earl of Sandwich was clearly on to something with his culinary invention that remains a dietary staple today.  Basically a sandwich is a filling between two pieces of bread, quite often including some type of meat.  Commercially prepared, thin and evenly sliced lunch meats are only as far away as the nearest grocery store.   Packages often go on sale or are regularly priced at very low prices to encourage consumers to buy them.  This type of lunch meat is not without fault.  Sure, you are getting it for a very low price but like most commercially processed foods, lunch meat is laden with preservatives, food additives and sodium.  One slice of roast beef lunch meat contains as much as 300 mg of sodium in comparison to 6 oz of home cooked roast beef that contains 92 mg of sodium.  A sandwich made using two slices of roast beef lunch meat contains 600 mg of sodium in just the lunch meat without adding in the sodium content of the bread, condiments or extras.  In perspective, those two pieces of roast beef lunch meat contain almost 30% of the sodium RDA set by Health Canada.  Clearly, if you are on a sodium restricted diet lunch meat is not a food that you should consume on a regular basis.  However, the problem with commercially prepared lunch meats  is more than just sodium.  Sodium nitrate, a known carcinogen, is used as a preservative in commercially prepared lunch meats.  Expectant mothers are advised not to consume lunch or deli meats due to risk of Listeria to the feotus.  Commercially processed lunch meats may also contain a number of food additives including high fructose corn syrup.  All that aside, I have to admit not liking commercially prepared lunch meats and never have.  My work-around is simply making homemade versions of lunch meats using whole cuts of meat, home cured meats and cooked meat loafs, all thinly sliced.

slicing cooked roast beef for freezing
When I am making roast beef, I usually cook two.  It takes the same temperature and time to cook two as it does one.  Part of one roast is used for dinner with the remainder for planned left-overs.  The other roast is typically prepared for homemade lunch meat.  Commercially prepared lunch meat is typically thin sliced.  Using a chef's knife to slice cold roast beef will give nice, thin slices with a bit of practice.  A meat slicer has been on my list of kitchen wants but I haven't bought one yet, so a chef's knife it is.  I slice across the grain, trimming any fat if necessary. 

In general, I find leaner roasts work best for lunch meat slices.  I generally do not add a lot of seasoning other than garlic pepper, onion and Worchestershire sauce although sometimes I add tomato stock.  Once the roast is fully cooked, I let it cool then refrigerate until cold.  The cold meat is easier to slice thinly.

sliced roast beef vacuum sealed ready for freezer
I package the thinly sliced meat in the amount we will comfortable use within three or four days into vacuum bags then vacuum seal for freezing.  Vacuum sealing prevents freezer burn.  The packets thaw nicely in the refrigerator.  We use one sometimes two packets of homemade lunch meat a week.

This method of freezing and storing lends itself nicely to thinly sliced turkey breast, meat loaf, home cured summer sausage, home made pastrami, and wild game.  I have found the price per pound of the home made lunch meats to be generally less expensive than commercially prepared lunch meat.  The quality of the product is significantly higher though with lower sodium content, no preservatives or additives, and it tastes better.  Prep time for freezing the meat is minimal at only slicing and vacuuming time.  Overall, homemade lunch meats are a healthier, cost effective alternative to commercially prepared lunch meat!


Thursday, November 07, 2013

Kitchen Quick Tips - Saving Left Over Wine

kitchen quick tips
Pour left-over wine into an ice cube tray then freeze for the perfect size to add a bit of extra flavour in sauces and gravies.


Wednesday, November 06, 2013

Freezing Butternut Squash

Winter squash is always a bargain in season!  It's high in nutritious and taste but low in calories and price.  Just before we left for Florida, one of the kids brought me two large, home grown butternut squash, a type of winter squash.   Winter squash keeps nicely in a cold, dark location but I decided to freeze the squash instead.  Part of the reasoning was for later convenience but the main reason was not leaving any food that may spoil while we were away. 

preparing the butternut squash for baking
Winter squash have hard outer rinds that many find difficult to remove.  This can be particularly problematic for those with motility issues.  As a result, winter squash is often passed over for another vegetable that is easier to prepare.  There are three work around for cooking winter squash that do not involve peeling.  They do however involve cutting the squash in half and cleaning out the seeds.  The squash can then be covered and baked or cooked in the microwave oven.  My personal preference is steaming on the stove top followed by baking larger quantities in the oven or on the grill.

I uses a chef's knife to cut the butternut squash in half starting at the top on one side then slowly working towards the base of the squash.  Once I reached the base, I continued cutting up the other side.  The seeds are found inside the round base of the squash.  I scooped out the seeds and set aside to be cleaned then air dried for next year's garden.  Of note, saving seeds from produce even store bought is one way to accumulate free seeds for the garden. 

cooked butternut squash
I wrapped the squash pieces in aluminum foil.  I placed the prepared squash on a baking sheet then baked at 350°F until the squash was soft to slight pressure.  When the squash was cooked (pictured), I removed it from the oven and removed the foil.  I then scooped the cooked squash from the skin, leaving the skin for the food disposal or compost. 

This method really is a no mess, no fuss method for cooking squash.  It lends itself nicely for cooking larger winter squash or larger quantities however, I often use this method to cook acorn squash.  When cooking acorn squash, I add a little butter and salt in the cavity.  I didn't add butter or salt for this batch of butternut squash so it would be more versatile for later use.

draining the butternut squash
Wrapping in foil then baking essentially steams the squash in it's own juices.  Even though no water was added, there was a fair amount of liquid draining from the squash (pictured).  There is no reason why the juice cannot be left in the cooked squash for freezing but it will give more watery results when thawed and reheated.  I drained the squash simply by pushing the squash to one corner of the casserole dish then raising that corner slightly allowing the liquid to drain by itself.  I reserved the liquid to freeze separately.  The liquid can be added to soups and stews for added flavour.  Once the squash was drained it was ready for freezing.
 
butternut squash ready for freezer
There are several ways to package squash for the freezer.  My preferred methods are individual serving sizes (4 oz muffin cups) and meal size containers.  I froze this batch of buttermilk squash in meal size containers.  The containers were 4 c (32 oz/946 ml) Ziploc containers with screw on lids.  I filled the containers leaving about an inch headspace.  This space allows for the expansion of the squash when frozen.  There were four servings per container.  That is a good yield for one butternut squash.  The squash in the glass bowl went into the refrigerator for use the following day.

Winter squash will be plentiful and low cost for another month so I plan to freeze a bit more.  It can also be dehydrated and canned.  When dehydrating the squash is shredded then steamed lightly before dehydrating.  It can then be hydrated much the same as you would instant potatoes or the dried flakes can be added as an ingredient in dishes for extra flavour.  Winter squash cannot be safely canned as a purée because it is too thick for proper heat penetration during process.  It can be safely canned in chunks processed in a pressure canner.  Be sure to put up plenty of this budget stretching, versatile and delicious vegetable!


Tuesday, November 05, 2013

Mom's Pizza Sauce Ready for the Pantry

Shortly before leaving on the first leg of our fall vacation, I was busy canning, freezing and dehydrating. Despite having a large, walk-in pantry (formerly a bedroom), I still need to use the space frugally.  All foods in the pantry are rotated including home canned foods.  This requires an organized approach to storage but it ends up saving both time and money in the long run. 

pizza sauce ready for pantry
I canned four dozen 250 ml jars of Mom's Pizza Sauce a few days before leaving.  Once the jars cooled for 24 hours I removed the bands, tested the seals then labeled and packed the jars into their original cases.  Berardin, formerly Canadian owned now owned by Jarden Home Brands has recently changed the way they package jars for sale.  Jarden Home Brands now manufactures Bernardin, Ball, Kerr and Golden Harvest canning jars. 

I really dislike the new packaging which consists of lids and rings on the jars that are in a half case then shrink wrapped.  I understand that this method of packaging reduces the amount of cardboard used and that the plastic wrap is less expensive for the manufacturer but it is less than ideal for the home canner.  As a high volume home canner, I use the cardboard cases for storage of both filled and empty jars.  The new packaging offers no protection to the tops of the jars even when stacked and the cardboard portion is not as sturdy as the old cases.  As far as the new packaging being eco-friendly, although less cardboard is used, the original plastic cannot be recycled so ends up in the landfill. 


Sunday, November 03, 2013

Our Vacation Home Kitchen

We are incredibly blessed to own a vacation home in sunny Florida where we try to spend three months a year over three trips.  This past year we also bought a co-op in Aruba, so in essence we have three fully equipped kitchens.  We are very much firm believers of eating healthy, home cooked meals even when on vacation.  The only difference in our eating style on vacation is we tend to eat out more.  While discovering new restaurants and revisiting our favourites is a wonderful culinary experience that we truly enjoy, we also enjoy home cooked meals.
 

vacation home kitchen view from family room
Our vacation home is a two bedroom with den, two bathroom manufactured home (2007).  We bought it in 2010 after it had sat a year and a half empty.    The house is in a 55+ retirement community with a lot of nice amenities.  The club house is very nice, a place to meet up with other members of our community, enjoy a bit of entertainment or a meal.

Our vacation home kitchen is fairly similar in size to our home kitchen with a similar layout except the vacation home kitchen is open to the small family room.  It is an eat-in kitchen.  The patio doors lead to the lanai where we often enjoy morning coffee and meals.  The cabinets are standard white, nothing fancy.  The counter tops are basic formica but the backsplash is ceramic tile.  There is a bit less actual counter workspace  than our home kitchen, not significantly less but enough to be noticeable.  The appliances are Whirlpool with the stove being electric and the next step down from the natural gas Whirlpool Gold range at home.   The sink is a heavy plastic double sink with food disposal.  We replaced the original taps with the set pictured last spring.  The floor is a textured sheet flooring in a tile pattern.

vacation home kitchen second view
The refrigerator wall of the kitchen has a narrow but deep pantry.  A door leading to the small utility/laundry room separates the refrigerator wall from the sink wall.  The refrigerator has an ice maker but other than that is fairly basic especially compared to our home refrigerators.

Our vacation home kitchen is light, bright, quite functional and easy to maintain.  It has the distinct disadvantage of being what you see is what you get.  That is the entire storage available for food, kitchen appliances and kitchenware.  There is no extra storage space in the rest of the home to store extra kitchen equipment or food although larger pots and pans could be stored in the golf cart shed.  In all honesty, longer stays require being a bit more creative but we will never be living there full time and we will likely continue to rent our vacation home out from time to time so the kitchen more than meets both needs.

Our vacation home while considerably smaller than our home still requires interior maintenance, repairs and updating.  This is fairly consistent with any vacation home or cottage.  As mentioned we have already replaced the faucet set as the old one sprung a leak that continued to get worse despite repairs.  We are planning a few upgrades to increase the value of our vacation home while adding more durable, lower maintenance materials that will withstand the intended purpose of our vacation home.  We are planning on replacing existing carpeting with laminate flooring or ceramic tile next spring.   Ceramic tile is likely our best choice so we would end up tiling the entire house at that time.

Now when I note we are at our vacation home or show a meal prepared there, you will have an idea of what the kitchen there looks like.  Our vacation home kitchen is equipped with the basics - blender, slow cooker, toaster, coffee maker (mainly for tenants), Keurig (our use only), can opener and hot air popcorn maker.  I took the stainless steel Lagostina pot and pan set we recently replaced from home to the vacation home so we are set that way.  So, it is fairly well equipped suitable for any of the cooking and baking we will be doing there.  We also have an outdoor grill that just as at home gets a lot of use.  Tenants at most will be there a total of 3 months but that is very rare.  So far, we have had tenants stay a month or two, most commonly one month.  Next week I will share some of our foodie highlights during this portion of our fall vacation.


Saturday, November 02, 2013

A Taste of Home at Our Vacation Home

We arrived home last Wednesday night after spending three weeks at our vacation home in sunny Florida.  We spend three months each year at our vacation home spread over three separate trips, usually flying.  Flying is inexpensive and gets us there the same day unlike driving that ends up taking us two days with an overnight stop-over.  That means I am very restricted as to what food I can bring from home to our vacation home since liquids are restricted to 3 oz or less only in the quantity that will fit in a one quart zipper bag, one bag per traveler.  Thank goodness, I am not a make-up person!  We have also found that certain powders like Morton's Tender Quick will result in extra screening at the airport security checkpoints.  Now, as funny as that one was, and it was funny as the very friendly screening had never met someone who cured meats which led to an interesting conversation, I quickly decided in future to either mail these types of items to our vacation home or bring them with me when we drive.  We can bring dried foods as long as they fit in our backpack, more dried foods if driving but it isn't feasible to try bringing meats or fish by either mode of travel.

home canned goodies from home
I was elated to find out that my husband had planned on this being a driving trip with a bit of sight seeing and a planned meal at Lady and Son's in Savannah, Georgia.  The plans were to drive down, stay for awhile, fly home, fly back then finally drive home towards the end of the year.  In total, we planned on spending a little over two months of the fall, early winter in the sunny south.

I brought a few jars of home canned foods with us for a taste of home.  It is surprising how much I've had to modify my cooking style at our vacation home simply because I don't have a lot of the ingredients, especially the home canned foods I am so accustomed to using.  I brought salsa, Old Fashioned chili sauce, zesty bread & butter pickles, Mom's pizza sauce, picante sauce, roasted tomato garlic sauce, beef stock, pork & beans, whole kernel corn, black cherry jam, Italian garden sauce with mushrooms (not pictured) and low sugar chocolate raspberry sauce (not pictured).  In hindsight, I should have brought another case of home canned foods so I may even mail more down before our return to our vacation home this year.

Eating at our vacation home is quite different than at home but I am finding that the more we are there, the more cooking from scratch we do.  The biggest problem we face is not being able to store much in the way of food with the exception of the fall trips as food can be left in the cabinets and refrigerator.  However, we rent the house out mid-January through mid-April, so all food that can not be safely stored in our homeowner's closet has to be cleared out.  We also leave the house tenant ready after our spring stay just in case.  Basically, we are restricted to storing a large Rubbermaid tote of food, mainly dried and commercially canned foods that will not be affected with the closet at room temperature.  I don't store any home canned foods in the homeowner's closet. 

Driving to our vacation home and back has a lot of benefits even though it takes longer.  We are able to bring a taste of home with us and take back some of the new foods we discover while there as well as along the way.  We also get the opportunity to do a bit of sight seeing along the way.  Of course, there are a lot of foodie stops!  Stay tuned for the foodie highlights of this leg of our fall stay at our vacation home...