My photo
Ontario, Canada
I am a wife, mother and grandma who enjoys the many aspects of homemaking. A variety of interests and hobbies combined with travel keep me active. They reflect the importance of family, friends, home and good food.
Cook ingredients that you are used to cooking by other techniques, such as fish, chicken, or hamburgers. In other words be comfortable with the ingredients you are using.
--Bobby Flay

For Your Information

Please watch this area for important information like updates, food recalls, polls, contests, coupons, and freebies.
  • [March 19, 2020] - Effective Mar 17, this blog will no longer accept advertising. The reason is very simple. If I like a product, I will promote it without compensation. If I don't like a product, I will have no problem saying so.
  • [March 17, 2020] - A return to blogging! Stay tuned for new tips, resources and all things food related.
  • [February 1, 2016] - An interesting report on why you should always choose organic tea verses non-organic: Toxic Tea (pdf format)
  • Sticky Post - Warning: 4ever Recap reusable canning lids. The reports are growing daily of these lids losing their seal during storage. Some have lost their entire season's worth of canning to these seal failures! [Update: 4ever Recap appears to be out of business.]

Popular Posts

Monday, May 31, 2010

Frugal Kitchens 101 - Food Safety in the Kitchen

Frugal Kitchens 101

Food spoilage and contamination not only cost money but can lead to food borne illness.  Much of this can be avoided by using effective ways to reduce harmful bacteria in the kitchen by developing good kitchen safety practices. When it comes to food safety an ounce of prevention is worth more than a pound of cure!  This weeks Frugal Kitchens 101 focuses on food safety in the kitchen.  Most of these tips are very low cost but they are in combination quite effective.

  • wash your hands -  Wash your hands before, during and after any food prep in hot, soapy water for at least 20 seconds.  I keep a pump bottle of liquid soap by the sink for easy use while doing kitchen duties.  Using a soap with antibacterial properties is not necessary and the use of these types of soaps have been shown to be detrimental.
  • clean your cutting boards - Plastic cutting boards can be put in the dishwasher for effective, safe cleaning.  Wood and bamboo cutting boards can be bleached to kill germs.  Undiluted vinegar is an eco-friendly way to kill germs on cutting boards as well.  I prefer using a 50% to 70% rubbing alcohol in a spray bottle that effectively sanitizes most surfaces.  Of note bamboo cutting boards are not only eco-friendly but have antibacterial properties that help kill bacteria so if replacing a cutting board consider buying bamboo.
  • sanitize your sink - Did you know the kitchen sink can have more bacteria per square inch than a garbage pail or even a toilet?  It's true!  Sinks should be washed after each use with hot soapy water to eliminate bacteria.  I use a 50% to 70% rubbing alcohol in a spray bottle to bring the sink and tap to a sparkly shine while killing off any germs that escape washing.
  • sponges vs dishcloths - Sponges are second to the sink for bacteria levels.  While microwaving or boiling sponges are often recommended for sanitizing sponges I feel it is too easy to overlook sanitizing them often enough.  I do not use sponges in the kitchen.  Instead I have an amble supply of 100% cotton dishcloths both purchased and handmade that I use.  I use a fresh dishcloth each time I do dishes.
  • wash produce - All produce whether store bought or home grown including those with inedible rinds and peels should be washed before consuming.  Spray with a 3:1 vinegar to water solution then rinse under tap water.  This is as effective as the expensive commercial fruit and vegetable washes.
  • don't rinse meats unless brined - Rinsing meat and poultry is more likely to spread any contaminants around the sink area.  Brined meats should be rinsed before cooking.  Clean the sink and surrounding area before and after rinsing brined meats.
  • use mis en place bowls - Placing ingredients for a recipe into small glass bowls rather than using directly from the larger container helps prevent cross-contamination.
  • use barriers - Kitchen items (eg. cutting board, scales) that come into contact with both raw and cooked foods should be lined with a protective barrier such as plastic wrap or tin foil.  An eco-friendly alternative is to wash these items in hot soapy water.
  • don't recycle used marinade - Used marinade is contaminated with raw meat juice so is not safe to consume as a sauce unless cooked.  A small amount of unused marinade can be set aside to used as a sauce. 
  • defrost in the refrigerator or microwave - Meats and poultry should be defrosted in the refrigerator or microwave not on the counter at room temperature. 
  • reheat rapidly - Foods should being reheated should be brought through the danger zone (40ºF - 140ºF) as quick as possible.  Sauces, soups and gravies should be brought to a boil while casseroles should reach an internal temperature of 165ºF or higher. 
  • use a refrigerator/freezer thermometer - The refrigerator compartment of your refrigerator should be set to 35ºF - 40ºF and the freezer set to 0ºF or lower.   Higher settings risk food spoilage and possible food borne illness.  Lower settings can result in some food spoilage in the refrigerator as well as waste electricity.
  • use a food thermometer - Use an instant read thermometer to ensure cooked foods reach the proper temperature before consuming.


Sunday, May 30, 2010

Ling's Buffet in Lakeland, Florida

What impresses me most about vacation eating is how very quickly it differs from our eating habits at home.  At home there is a big emphasis on red meat and local caught fresh water fish.  At the same time there is the emphasis on cooking from scratch and not eating out much.  When we are on vacation the emphasis becomes seafood and depending on accommodations eating out is the norm.  With the purchase of our vacation home in the sunny south there will be more of an emphasis of homecooked focusing on seafoods (more on this to come) but for the first couple of days of our vacation we ate out.

Ling's Buffet is located at  4947 U.S. 98, Lakeland, FL 33809-3610  in a small plaza.  There are 3 other locations in the Lakeland area.  Ling's is a sushi bar combined with Chinese buffet.  The atmosphere is extremely friendly.  The buffet was $11.75 each that included all-you-can-eat with refillable drinks.  There are no alcoholic drinks available at Ling's but the food more than makes up for that.  The food offerings were more than substantial.  This restaurant is one we will be visiting again and one I would recommend if you are in the area.
crablegs
Crab legs are one of my absolute favourite foods!  The only thing better is all you can eat crab legs.  Just look at this beautiful plateful of crab legs.  Ling's buffet had both hot a cold crab legs and let me tell you I did have a crab leg feast.  They also had hot and cold shrimp, shrimp dishes, raw oysters and shushi.

Sushi is a bit misunderstood in that sushi does not mean raw fish as some think it does.  Shushi refers to the presentation and surprizing may not even contain fish.  To the top on the left is the Californian sushi with avocado and to the right is a crab meat coated sushi of the day.  Both were quite good and something that would be easy to duplicate at home.  I've made sushi a few times so will share the how-tos shortly especially the Californian sushi. 

One of the most important things to remember when cooking crab legs, lobster or shrimp at home is to not over cook it.  Overcooking will cause this type of seafood to turn rubbery.  The shell will be a greyish blue when raw.  Place in boiling water until the shell turns an orangish red and no longer.  The colour change is like a built-in doneness indicator.  As soon as the shell turns colour, remove from the pot for serving.  Serve with drawn butter or in the case of shrimp serve with home canned seafood cocktail sauce.


Saturday, May 29, 2010

Our Vacation Home Kitchen

Over the next few days I will be sharing some of the great foods we ate while recently on vacation.  This was a bit of a different vacation for us because we were setting up our vacation home.  That meant buying everything needed in a kitchen for home cooking.  While we were on vacation and wanted to eat out we also wanted to experiment cooking at home as well.  This differed from our normal vacations where we are forced to eat out the entire trip.  Don't get me wrong as we really do enjoy eating out and discovering new foods but as foodies doing a bit of home cooking is always welcomed!

vacation kitchen
Our vacation home is a manufactured home in a gated community located in the southern USA.  This presents the problem of us not being able to bring certain food products that we are used to using into the US either due to Custom's regulations or logistics (especially when flying) and visa versa .  Driving gives us more leeway as to what we can take but the drive itself is long, costing us about 2 days in travel time.  At the same time relying on local foods in our new home away from home gives us an amazing opportunity to explore new foods!

The kitchen is spacious but compact.  The appliances are Maytag and include refrigerator, self cleaning range, microwave oven and dishwasher.  To the right of the refrigerator there is a small counter then door leading to the laundry room.  The patio leads to the only access to the lanai (screened in porch).  The kitchen opens onto the family room.  It is actually a bit larger than my current home kitchen (move still in progress).  It is amazing light, bright and airy so I know I will enjoy cooking in it.

As far as the colour them for the house goes I think we really lucked out!  Most of the colours are the same as our permanent home except the valances highlight hunter green rather than navy blue so anything I bring from home will match right in.  The former owner left the dinette, patio furniture, tv/stand, family room furniture, one bed and a bedroom set.  When we arrived we quickly realized a shopping trip was in order as we didn't even have a glass!  We had been up well over 24 hours and were exhausted from entertaining the night we left so shopping was not a real welcomed idea but it was one we could not put off.

ham steak
We hit the clubhouse for lunch then headed out to do a bit of shopping.  We picked up cleaning supplies, a lot of kitchen essentials and enough groceries to make coffee and breakfast the following morning.  Breakfast was a simple coffee, eggs, toast and ham steak.

We bought a drip coffee maker which gave noticeably different results from our accustomed percolator so will be buying a percolator our next trip.  We bought a set of non-stick Wearever pots and pans.  If we were going to be the only ones using this house I would have went with stainless steel but we intend to rent the house out from January through March or April so I'm taking that into consideration when making our purchases.

The non-stick flat pan did a reasonable job of cooking the ham steak.  Ham steaks are generally inexpensive coming in around the $4 mark that is enough meat for 4 adults.  They can be used as the meat component for any meal.  We like ham steaks for breakfast or dinner either pan fried or grilled.  This ham steak had the bone in but some have the bone out.  We fried the ham steak in a little butter turning just as it started caramelizing.  It was a simple meal to start our new kitchen in our vacation home.


Friday, May 28, 2010

Turkey Club House Sandwich

We have spent the last several days at our vacation home.  We left here in the wee hours of the morning after a night of entertaining so we were both exhausted when we arrived.  The discouraging thing was we arrived to basically an empty home needing cleaning and with no kitcheware, not so much as a glass.  Somehow after being up for well over 24 hours neither of us were impressed but that really is when it hit home this place was ours.  We headed down to the club house for a quick bite before going shopping for the necessities.

turkey sandwich
The club house menu has been reduced to mainly sandwich.  Quite frankly eating much more than a sandwich would not have sat well on tired tummies.  We each ordered the turkey club house sandwich on honey whole wheat. This is a very easy summer sandwich to duplicate at home. 

You will need homemade 100% whole wheat bread with honey substituted for the sugar.  Spread each slice with a little mayonnaise then top with turkey (lunchmeat or thin sliced cooked turkey breast) slices, tomatoes, fresh spinach, and a little salt and pepper.  Serve with a side of potato chips for an easy, low cost, 15 minute summer meal.


Thursday, May 27, 2010

Kitchen Quick Tips - Declutter the Kitchen

kitchen quick tips

Spring is the perfect time to declutter your kitchen.  Get rid of all those kitchen gadgets you aren't using.  Clean out the kitchen junk drawer and the silverware drawer.  Then marvel at your new found kitchen space.


Wednesday, May 26, 2010

RV Cooking Show - Tucson's Greatest Guacamole

By far the smallest kitchen I ever cooked in was in our self-contained travel trailer aka RV. The kitchen counter was about 6 feet long and included a small double sink and cooktop effectively removing work space for food prep. The total work space available worked out to about 4 square feet. Surprisingly I was able to get a lot of good food coming out of that tiny kitchen.

RV cooking presents a few more problems besides space issues because they are self-contained units meaning you are essentially hauling all your needs (cooking fuel, electricity, water). The fuel used is propane. We had 2 - 30 lb propane tanks on our unit designed to equalize. Running out of propane in the middle of cooking dinner is definitely not on my top 10 favourite things to do.  All water used in the unit (toilet, shower, sinks) goes into a holding tank.  A water pump provides pressure.  Running out of water while cooking or clean-up is not a lot of fun either.  Used water goes into a holding tank that must be emptied at the dumping station or into a portable tag-a-long blue container.  If the holding tank gets full it will start backing up in the sink and shower stall.  When not plugged into electricity the unit runs off of battery power so you do learn to be quite conservative with energy usage.  An RV refrigerator differs from a normal refrigerator in that it uses ammonia as the cooling agent.  To aid in cooling a solar powered fan is often needed.  Heating up an RV via cooking is always an issue but more importantly moisture from cooking can cause a lot of problems given the design of RVs.

Here is a video I found of a full time RVer. Full time means she lives in her RV year round so this is the kitchen she has to work with. This kitchen is fairly typical of most RVs. The white cover towards the wall is the stovetop cover that covers the propane burners typically 3 or 4 burners depending on the model and some units do not have this cover.  Most sinks have some type of cover to increase the working space or a large cutting board will work.  I do not recommend using a glass cutting board as shown in the video as glass cutting boards will dull your knives.  I like the grocery bag tip for cutting the jalapeno pepper.  Leaving the seeds and pith in the chopped jalapeno pepper will add to the heat.  The recipe for the guacamole is at the end of the video.  Enjoy!


Tuesday, May 25, 2010

Gelato

Frozen desserts are a family favourite whether they be homemade or store bought.  An ice cold treat just tastes so good on a hot summer day!  I can  still remember running down to the Tasty Freeze with my quarter held tightly in my hand to get a frozen yogurt cone.  Over the years there has been a variety of homemade ice creams, homemade popscicles, sherberts and freezer pies along with store bought versions.  We recently discovered another frozen treat, gelato.

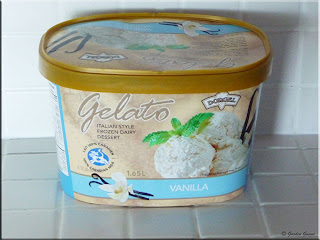
gelato
I first heard about gelato on the food channel.  Gelato is Italy's version of ice cream so most of the ingredients found in ice cream will be found in gelato.  However, gelato has a considerably lower butterfat content of about 4-8% versus 14% for ice cream and a lower sugar content.   This results in gelato having less than half the calories of ice cream.  The Dorgel gelato vanilla (pictured) has 90 calories per half cup verses 230 calories Ben & Jerry's vanilla bean icecream.  The sugar content is balanced with the water content in gelato, acting as an anti-freeze to prevent the gelato from freezing solid.  The mixture used for gelato is made using a hot process, which includes pasteurization.  The mixture is then aged for several hours after pasteurization is complete then the gelato is frozen very quickly in individual small batches in a batch freezer that incorporates air or overage into the mix as it freezes.

gelato with berries
As a result of the pasteurization and aging process the ice crystals in gelato are quite small giving a smooth, creamy texture.  Gelato has an overage of20% to 35% so is denser than ice cream with an
overage up to 50%.  It also has a more intense flavour than icecream. 

I served the gelato with mixed fresh berries in a light vanilla syrup made by sprinkling vanilla sugar over the fresh berries and letting them sit in the fridge for an hour.  This really was a lovely dessert with the berries providing a nice contrast to the rich, creamy gelato.


Monday, May 24, 2010

Frugal Kitchens 101 - Cooking Disasters

Frugal Kitchens 101

Anyone who has cooked at one time or another has experienced a cooking disaster.  I'm talking about the type of cooking disaster that there is really no way to salvage.  I don't care what you try to do or add or whatever woobie joobies you wave at the dish it is clear cut it is a disaster.  Today's Frugal Kitchens 101 discusses cooking disasters and what to do.  Sometimes this simply falls under the toss it rule.  Learn from the mistake(s) made in the dish and move on. 

Smaller disasters happen in my kitchen on a fairly regular basis because I like to experiment.  I've always said one of the beauties of cooking is you can eat your mistakes.  That is not always true!  A few years ago I made a beef burgundy.  It was absolutely stunning looking, perfectly plated AND that's where it ended.  Neither of us could eat it as it was about as horrid tasting as it could get to the point the garburator would not eat it.  So what was supposed to be a great romantic, candlelight dinner for my husband and I turned out to be a disaster.  The thing is in this case there is absolutely nothing I could have done to salvage the beef burgundy.  It would have been spending good money after bad so the frugal choice was to toss the dish.  Looking back at the whole experience I can laugh but then it was horrible because wasting food goes against all of my principles and besides we had no dinner!  Actually we did not have the dinner I had planned but rather a quick put together pantry meal.


Sunday, May 23, 2010

Debreczinger Sausage

Meats and fish that are smoked are packed full of flavour.  You can buy a wide variety already smoked or smoke your own meats using a stand alone smoker or a grill with a smoker attachment or smoking box.  Wood chips are soaked in water then placed in a smoker box or foil packet with holes poked for use on the grill.  This is fine for small cuts of meat or to add a bit of extra flavour when grilling.  However larger cuts of meat such as turkey, hams and sausages are generally smoked in a smoker or if smoking a lot of meat in a smoke house.  At one time most farm houses had a smoke house and many still do in our area.   Urban dwellers also interested in smoking meats, poultry and fish can buy stand alone smokers ranging from small to quite large.  Smoking adds that extra flavour so is well worth doing.

debreczinger sausageDebreczinger (debreziner) sausage is mild, precooked, smoked beef and pork Hungarian sausage that can be eaten as is or warmed on the grill.   They are ideal when cubed for using on a party tray with an assortment of cubed cheeses.  Debreziner sausage will keep for 2 months frozen or 1 month refrigerated.

When buying sausage it is important to realize that each sausagemaker has their own recipes that they tweak so there is a slight variation from butcher shop to butcher shop and between brands.  Ingredients in the debreczinger sausage I bought were: water, liquid smoke, pork, salt, spices, paprika, garlic, sodium nitrate and sodium bicarbonate.  These sausage were a bit more expensive than breakfast or oktoberfest but the price was a direct reflection of buying them at the abattoir's that out out in the middle of noman's land.  At any rate $4.49 for meat for two dinner is not a bad price at all.

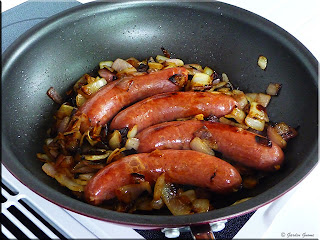
cooking debreczinger sausage
The weather had turned cold and rainy so we decided to re-heat the sausages on the stovetop.  We could have used the indoor grill but warmed on a bed of sautéd onions sounded even easier for a somewhat lazy day dinner.  I served the sausages and onions on sausage buns topped with honey mustard and sauerkraut.  The end result was an easy yet tasty 15 minute meal.

I was impressed with the flavour of the debreczinger sausage.  This will be a sausage I buy again to use as is or warmed for on buns.  The sausage makes for a quick, easy meal that would be perfect for those hot summer days when heating up the kitchen is not desirable.  I think the sausage would also be good chopped into cubes then used in salads or as part of the topping for pasta salad.  


Saturday, May 22, 2010

Popovers

It is surprising how many foods can be made using a few basic ingredients!  More impressive is some of these very simple foods look a lot more complicated than they are.  I am always on the look-out for quick, easy recipes using few ingredients for those times I want something a bit different but still using basic ingredients that I have on hand all the time.   The best place to look for recipes using basic ingredients are older cookbooks especially those from the Depression era.  I came across a recipe for popovers, a type of dinner bread.  This recipe uses 4 very basic ingredients but tastes and looks a lot more complicated.

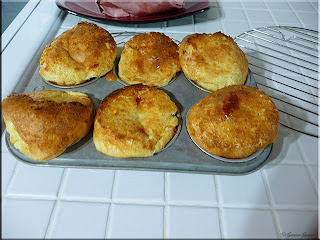
popovers
Popovers get their name from their spectacular appearance while baking.  When the batter is baking it literally pops up and over the baking cup giving popovers a unique but characteristic look.  The popover batter can be baked as is for plain popovers or baked in the meat drippings where it is known as Yorkshire pudding.  Despite the looks these delectable, chewy treats are ever so easy to make.

Popovers
modified from:  Betty Crocker's Cookbook (1969), Pp. 50.

2 eggs
1 c milk
1 c unbleached flour
½ tsp sea salt

Heat oven to 230ºC (450ºF).  Grease 6 custard cups or large muffin tins.  Crack eggs then place in stand mixer bowl and beat about 30 seconds.  Stir in milk, flour, and salt.  Beat until just smooth but don't over beat. Fill cups ¾ full.  Bake  25 minutes.  Lower temperature to 180ºC (350ºF) and bake 15 to 20 minutes longer or until deep golden brown.  Remove from pan and serve hot.

The night before we went to get our bulk beef purchase (beef on the hoof) for this year we grilled the last two steaks from last year's purchase.  I was actually quite impressed as they were the only remaining pieces of beef in our freezers so I would not have to worry about mixing any old beef with the new.

I served the popovers with the grilled blade steaks, oven baked new potatoes and left-over imitation crabmeat salad.  It was a simple, easy to make dinner with little prep work.  The popovers got rave reviews.  They are ideal for sopping up meat juices according to my husband.  The popovers have a wonderful outer crust with chewy insides so they are quite different than your normal dinner bread.  They will definitely be appearing at more meals here!


Friday, May 21, 2010

Homemade TV Dinners

Back in 1953 the original Swanson TV Dinners came to be when the novelty of television shows was still a novelty.  The premise was you could eat a tv dinner in front of the television enjoying both a meal and entertainment.  TV dinners were produced by C.A Swanson & Sons although meals on trays were produced by other companies prior to that.  Swanson-brand became the standard frozen meal that came in foil trays with a foil lid to reheat in the oven.  Here's a short video clip of a Swanson tv dinner circa 1960's as a reminder.


TV dinners gained popularity because they provided a quick, supposedly well balance meal.  They were inexpensive and allowed each family member to have their own choice of meal.  Frozen tv dinner meals continue to be a popular quick meal especial for those cooking for one and senior citizens.  The problem is these meals tend to be quite high in sodium and preservatives.  The price has gone up as well although they are still less expensive than take-out or eating out.  Homemade tv dinners are inexpensive to make and just as convenient as store bought.  All that's really needed are freezer safe divided containers and left-overs.

divided containers
Divided freezer containers are available in a variety of sizes and styles.  Pictured are two of the styles that I have.  To the right are 2 Ziploc® divided freezer containers and to the left are 2 divided plate style containers that can be used in the freezer as well.  You will need a divided freezer container for each tv dinner that you want to make.  The next thing you will need is left-overs so this is a great way to use up those little bits that are only enough for one person.

If you need ideas as to what freezes well for homemade tv dinners look through the freezer section of your grocery store.  I use left-over meats with or without gravy, frozen vegetables, mashed potatoes, cooked rices, beans, prepared pasta left-overs, various sauces and even soups.

homemade tv dinner
I like to make up a couple of tv dinners for the freezer any time we have a larger meal like roast beef or turkey as part of keeping ready meals in the freezer.  Pictured is the tv dinner I made for my husband's lunch using left-overs from a recent roast beef dinner.  Had I been preparing this plate for the freezer I would have used already frozen mixed vegetables and mashed the potatoes instead of leaving them in chunks.  Other than that the meal as pictured would freeze and reheat well.

In general potatoes tend to get a bit grainy if frozen in large pieces but if mashed with butter/cream or stock with or without another vegetable like carrots mashed in they freeze nicely.  I find I get better results pouring in already frozen vegetables like corn, carrots, broccoli and cauliflower than using already cooked vegetables mainly in terms of texture.  However, left-over cooked vegetables can also be used.  I don't recommend using cooked fish as the meat portion.  Uncoated fried chicken works well as does grilled chicken but coated chicken will get a little soggy.  While bakery products can be used in homemade tv dinners, I don't use them other than something like quiche.


Thursday, May 20, 2010

Kitchen Quick Tips - Dishcloths & T-towels

kitchen quick tips

Kitchen dishcloths and T-towels should be 100% cotton for best absorbency.  To maximize the absorbency wash separate from the main wash and do not use fabric softener.


Wednesday, May 19, 2010

Dark Chocolate

I'm sorry but I am not a chocolate lover by any stretch of the imagination.   Yes I am female but chocolate really doesn't do it for me.  In fact for many years I avoided chocolate like the plague.  Over the years everyone in our family knew chocolate was not not going to be a featured ingredient in any dish I made.  Then one day one of our kids said maybe it wasn't the chocolate taste that I didn't like it was the mouth feel of milk chocolate and suggested I try a dark chocolate.

dark chocolate
The main problem appears to be my adverse reaction to milk chocolate.  For that reason I avoid mild chocolate at all costs.  I picked up a bar of dark chocolate and oh my gosh it is good.  It still is not something I would eat much of but it is something I would use as a garnish or in cooking.  The higher the cacao per cent the better for a deep, rich flavour of chocolate.

Dark chocolate is more expensive than milk chocolate.  Expect to pay $3 for a 100 g bar on the low price end to $36 on the higher end organic dark chocolate (Landies).  Dark chocolate is actually good for you.  It is high in anti-oxidants.    A recent study published in the European Heart Journal a 1 - inch square of dark chocolate can lower your blood pressure and reduce your risk of heart attack.  Now you have a good excuse to indulge in chocolate!


Tuesday, May 18, 2010

Snickerdoodles

As a foodie I have a fair number of cookbooks that I browse through to find new recipes to try.  It's become a standing joke that most of my cookbooks look like they have feathers because of the numerous small post-it notes I use to tag a recipe I want to try.  One thing that catches my attention is the name of a recipe.  I simply could not resist a name like snickerdoodles!

snickerdoodles
Snickerdoodles fall under the category of molded cookies.  They are some of the most fun cookies to make because there is no limit to their shape or appearance.  Other favourite molded cookies I make are peanut butter and shortbread

Snickerdoodles are ever so easy to make!  Once the dough is made it is scooped out by the spoonful, rolled between the palms to form balls then rolled in a sugar cinnamon mixture and placed on cookie sheets to bake.  The balls form flattened cookies as they bake.  The end result is a tasty, crunchy delight sure to please.

Snickerdoodles
modified from: Betty Crocker's Cookbook, circa 1970's, Pp. 144.

½ c butter
½ c shortening
1½ c organic sugar
2 eggs
2¼ c unbleached flour
2 tsp cream of tartar
1 tsp baking soda
¼ tsp sea salt

Pre-heat oven to 200ºC (400ºF) regular or 190ºC (375ºC) convection.  Place butter, shortening, sugar and eggs in stand mixer bowl.  Mix well on setting 3.  Combine dry ingredients in separate bowl, mix well.  While still mixing on setting 3 slowly add in the dry ingredients until well incorporated.

2 tbsp organic sugar
2 tsp cinnamon

Mix sugar and cinnamon together in small bowl.

Shape dough by the rounded teaspoonful into balls.  Roll in the sugar cinnamon mixture then place 2 inches apart on ungreased baking sheet.  Bake 8 to 10 minutes or until set.  Immediately remove fromb baking sheet.

My Notes:  I found it easier to roll all the dough into balls at one time then coat in the sugar cinnamon mixture just before loading onto the baking sheets. 


Monday, May 17, 2010

Frugal Kitchens 101 - Novel Uses for Left-overs

Frugal Kitchens 101

There are very few times that there aren't left-overs after a home cooked meal.  The problem is sometimes there is such a small amount that they can't be used as is for the next meal but rather the left-overs must be worked in as an ingredient for another dish in the next meal.   With this in mind I am always looking for ways to use those little bits of left-overs up.  In this week's Frugal Kitchens 101 I will share a few of the novel ways I use up small amounts of left-overs.

  • applesauce, pearsauce - Applesauce and pearsauce are an ideal fat replacement in breads, cakes and muffins.   Simply replace the fat with an equal amount of either.  Applesauce and pearsauce can be stirred into homemade yogurt for fresh use or to dry into fruit roll-ups.  A tablespoon of either also makes a nice ice cream topper.
  • coffee, coffee grinds - Coffee left-over from the morning is ideal for certain breads (eg. pumpernickel, dark rye) and can replace the water in cake recipes especially chocolate cake.  I also freeze left-over coffee in an ice cube tray for use with iced coffee drinks.  The frozen coffee cubes keeps the iced coffee cold without diluting it.  Coffee grinds can actually be added to homemade ice cream!  They are a natural pest deterrent and soil amender in the garden and for plants grown in containers.  I also make an all natural soap with coffee grinds added.  This is one of the best gardener's soaps for removing vegetation stains from hands I've found.
  • potatoes - I use small amounts of potatoes to thicken cream style soups and make potato bread.  I've even added a small amount potatoes to meatloaf.  Left-over baked potatoes are great for making baked potato soup.
  • mashable vegetables - Mashable vegetables like carrots, asparagus, cooked cabbage, and spinach blend in nicely with mashed potatoes.  I freeze left-over mashed vegetables like squash and rutabaga in muffin tin (4 oz) for later use.  After having a few meals with these left-overs there are enough squash or rutabaga frozen muffins for another meal or two.  Left-over squashes can also be used in breads, muffins and cakes.
  • milk, creams - I often substitute all or some of the water in bread recipes with the last little bit of milk.  It adds a nicer texture to the bread.  Then I rinse the carton or bag and use that to water my asparagus fern.  The reward for the diluted milk drink is a lush, green and healthy asparagus fern.  I also like freezing the last 4 oz or so of milk in ice cube trays then using a cube or two in soups and gravies as needed.
  • fruit and vegetable juices - These are great substitutes for the water in bread recipes.  They also can be used to cook rice in, add flavour to meats either as a marinade or part of the cooking liquid and can form the basis of homemade salad dressings.  Left-over bits of fruit juices can be poured into the homemade popsickle forms even if only enough for one at a time.  Continue adding more left-over juice as it becomes available to the other wells until the tray is full.  Substitute fruit juice for the water in jello or use small amounts of left-over fruit juice in fruit smoothies.
  • tomato paste - Quite often a recipe will call for a tablespoon or so leaving a good part of a small tin or home canned jar of tomato paste left-over.  I like adding a teaspoon of tomato paste to a couple of homemade breads I make.  I either freeze left-over tomato paste in ice cube trays or I dry it into tomato wafers.
  • rice and noodles - Small amounts of rice and noodles usually end up in the soup pot or in home canned soup as it is reheating.  I often stir in small amounts of left-over rice into meatloaf as well.


Sunday, May 16, 2010

How to Clone a Big Mac & McDonald's Secret Sauce Clone

The fast food industry would have us believe that they and they alone have the secret recipe for the foods they serve.  The reality is that someone, somewhere created the recipe or method they use for their super, duper delight.  That means with a little experimentation combined with trial and error any home cook can duplicate their favourite take-out or fast food burger and more.  The question immediately becomes why would you want to duplicate fast food?

In honesty we are not huge fans of fast food and I can count on one hand the fast foods I've cloned.  They are: the Big Mac, Subway assorted sub, Wendy's now retired chicken caesar wrap, and White Castle cheeseburgers. Fast food in general is not healthy food.  It is laden with sodium, sugar, fat and high in calories.  A homemade clone can easily be made that reduces all of these things without compromising in taste.  The real advantage is being able to control the ingredients.  At the same time the homemade clone will cost about the quarter of the cost of the fast food version.  Another advantage to cloning a fast food recipe is the food can be made anytime you want in the comforts of your home and for those of us living in rural areas there's no travel involved making homemade versions an eco-friendly alternative.  In the following video Todd Wilbur of Top Secret Recipes shows how to clone a Big Mac sandwich.  Following the video are my comments and the McDonald's secret recipe clone that I use.


Quite often in cooking the method is as important as the ingredients especially when cloning a recipe.  Pay particular attention to the way Todd makes the burger patties then freezes them before cooking.  This is an important step in making fast food style burgers.  Freezing helps to reduce thickening in the middle and the thinness of the patty ensures quick, even cooking.  These types of burger patties are suitable for cooking on a griddle or in a fry pan.

When you are attempting to clone a fast food recipe stop for a moment to think of what logical food items that restaurant would have on hand to make something like their secret sauce.  Then do a quick online search for clone recipes as one may highlight an ingredient you didn't think of.  In this case the Top Secret McDonald's special sauce version [search their site then agree to terms before you can see the recipe] differed significantly from the Copykat McDonald's special sauce version and that recipe differs significantly from a lot of other cloned versions. Once you have gather a few clone recipes you will see a pattern emerging of the dominate flavours.  The McDonald's special sauce is a Thousand Island variant so expect those flavours to dominate.  Use those then tweak from there.

McDonald's Secret Sauce Clone
modified slightly from recipe by: John Mitzewich of About.com: American Food

¼ c Miracle Whip®
¼ c mayonnaise
3 tbsp French salad dressing
½ tbsp sweet pickle relish
1½ tbsp dill pickle relish
½ tsp sugar
1 tsp dried, minced onion
1 tsp white vinegar
1 tsp ketchup
pinch salt

Mix the ingredients together well.  Microwave 25 seconds.  Cool.  Pour into squeeze bottle for easy application.   Refrigerate.


Saturday, May 15, 2010

Broiled Round Steak

Most ovens have broil a broil setting.  Broiling is a way to cook meats and other foods with desired browning or charring indoors without using a grill.  Like grill foods the food is cooked using infrared radiation heat to the heat source but the heat source with grill is above rather than below the food.  The temperature setting for broiling is 260ºC (500ºF).

oven racks
In order to broil you need a two piece broiler pan.  The food to be broiled usually meat or fish is placed on the top piece of the broiler pan that sits on top of the lower piece.   The top piece has holes in it so juices from the broiling meat can drip down into the bottom pan without getting the oven dirty.  There will be some splatter on the oven walls as the meat broils so either wipe the oven down after it cools or run the clean cycle.  Wiping down the oven after broiling will lessen the number of times you will have to run the oven clean cycle on self cleaning ovens and lessen baked on build-up for manual clean ovens. 

To broil move an oven rack to the highest level in your oven as pictured then select the broil setting on your oven.  Place prepared meat or fish on the broiler pan.  Place the broiler pan on the top oven rack and shut the door part way leaving it open by a couple of inches.  Check food often to prevent excessive charring and turn when necessary.  Broiling does generate smoke much like a grill does so turn on any ventilation system and open a window or door if possible. 

broiled round steak
A couple of nights ago we decided to broil a round steak for dinner.  The weather had turned cold and raining so cooking indoors was a bit more appealing.  At the same time cleaning up from the indoor grill did not sound appealing so rather than set that up we broiled.  I have to admit the broil setting on our oven does not see a lot of use especially for beef mainly because the outdoor and indoor grills give better results.  We use the broil setting mainly for fish.

The most notable difference is beef that has been broiled does not have the lovely grill marks.  Charring is not as even either.  However, the flavour and texture is still quite good.  Round steak is quite a large cut so there was enough for two meals for two.  I served the meal with steamed potatoes and asparagus.


Friday, May 14, 2010

Our Bulk Beef Purchase for 2010

We picked up our bulk beef purchase from the beef purchased on the hoof last year.  Each year we buy a calf then a friend of ours raises it for us.  When the cow reaches a certain weight it is ready for the abattoir's.  We usually split the cow with 3 other couples with each getting a quarter but this year decided to keep half for ourselves.  Going to pick up the meat is always a pleasant drive through the beautiful countryside.  You would think I would tire of traveling through the countryside  since we live in a rural area but I don't.  Ontario has some of the prettiest country roads you will ever see!

full large freezer
We try to arrange to pick the meat up on a cooler spring day because the abattoir's is about a 45 minute drive from us and we don't want any thawing problems on the way home.  Before we left to pick up the beef we cleaned out the larger freezer moving everything to the smaller freezer. 

We ended up with 340 lb of dressed beef.  The beef came cut to our specifications then wrapped in butter's wrap and frozen ready for the freezer.  Most of the meat fit in the larger freezer, filling it to the brim to the point one of the baskets won't fit in!

full small freezer
The remainder of the beef went into the smaller freezer that really does need to have the frost removed from the sides.  The smaller freezer is also stuffed leaving little room for any extra but it is a bit deceiving as there are two turkeys and two hams that are taking up a fair amount of room.  There's also two bags of cheese sticks that will be used for entertaining this Saturday. 

This may seem like a lot of meat but it isn't for our family.  Most meals are home cooked from scratch, do a fair amount of entertaining, and our kids are home a couple of weekends each month.   Our family is not getting any smaller.  The only problems with getting this much meat at one time is I have little freezer room to take advantage of any good sales and there isn't the room for the pig we were going to buy so that will have to wait until later in the year.  At any rate we are well stocked for meat!


Thursday, May 13, 2010

Kitchen Quick Tips - Nix the Paper Coffee Filters

kitchen quick tips

If you use a drip coffee maker invest in a re-usable coffee filter basket to replace paper filters.  Not only will you save on the costs of paper filters but you will eliminate any off flavours from the paper.  A re-usable coffee filter basket is eco-friendly and will last you for years.


Wednesday, May 12, 2010

Imitation Crab Meat (crabmeat) Salad

Unless you ask what the ingredients are when you are eating out chances are very good you are going to consume imitation foods of some type.  Anyone who has eaten crab meat salad has likely eaten imitation crab meat.   I am not a huge fan of anything imitation especially when it comes to food.  Imitation foods tend to be chuck full of preservatives as well as artificial colourants and flavours. One of the grocery stores had flake style crab flavoured seafood aka imitation crab meat as one of their items in their $1 sale so my husband picked up 2 packages to try.  I admit to being extremely critical when it comes to trying this type of food.

imitation crab meatSurimi which means fish slurry (Chinese) or ground meat (Japenese) is a fish-based food product intended to mimic the texture and color of the meat of lobster, crab and other shellfish.  The fish is usually a white fish that has been pulverized into a paste, flavoured and shaped as desired.  It has a rubbery texture when cooked.  Surimi is extremely popular in Asian countries.  Imitation crab meat is the most common surimi product in Western markets.  It is availabe as chunks or artificial crab legs. 

The brand he purchased was Green Ocean Seafood Products.  Each package was 227 g of fully cooked, ready to serve flake style crab flavoured seafood.  According to the package it is low in fat at only 2% fat per 3 oz serving and is suitable for use in salads and pastas.  The ingredients were whitefish, water, starch, sugar, salt, mirin, soybean oil, sorbitol, crab extract, crab flavour seasoning and natural colour.  The type of whitefish was not specified but typically fish used to make surimi include milkfish, swordfish, tilapia, big-head pennah croaker, golden threadfin bream, cod, bigeyes, pacific whiting, Alaskan pollock and various shark species.

imitation crab meat salad
The imitation crab meat came frozen so I thawed one package to make a crab meat salad.  Despite being labled as "flaked" the meat did not flake as suspected.  I was however extremely impressed with the flavour.  I definitely picked up the sweet notes of the meat.  The meat had a nice, slightly rubbery texture that did pair nicely with the crunchy vegetables added to make the salad.  Overall this product did perform nicely.  The salad was quite good and definitely a keeper.  The next time I make it though I will be using real crab meat as it really is a tasty salad that we both enjoyed (please see notes below recipe).

Imitation Crab Meat Salad

1 - 227 g (about ½ lb) imitation crab meat
¼ c diced red onion
¼ c diced green bell pepper
¼ c diced celery
1 generous dessert spoon mayonnaise
3 generous dessert spoons plain yogurt

Thaw meat then pull or cut into chunks.  Prepare vegetables and stir into meat.  Add mayonnaise and yogurt.  Mix well.  Chill about 1 hour then serve as a side salad or use as a sandwich filling. 

The attracting feature of imitation crab meat is the price.  The reality is when trying to reduce food costs using a product like imitation crab meat is one more way to get the taste without the high cost of crab meat.  This is a good product for this purpose and it does give rather good results.  However, two things stand out in my mind and that is the addition of sugar and sorbitol (a sugar alcohol) which accounts for the immediate sweet notes.  At about 6.9% carbohydrate content it's not surprising the imitation crab meat tasted sweet.  Fresh cooked and canned crab meat have 0% carbohydrates.  In addition to the carbohydrate content, the imitation crab meat had more than double the sodium content but was surprisingly lower in chloresterol.

Over all I certainly cannot fault this product in terms of performance or taste.  It is in my opinion a great product for what it is essentially a clone of something it isn't.  On a scale of 1 to 10 I would rate this product a 7.  In terms of a cheaper product to replace fresh crab meat, I feel canned crab meat would be a healthier choice.  A word of caution when buying imitation crab meat some brands do contain MSG so if you are avoiding MSG for any reason look for one that doesn't have it added.  This product also is not a good choice for those watching carbs.


Tuesday, May 11, 2010

Cheery Spring Salad

Raw fruits and vegetables are rich in nutrients, fiber and beneficial anti-oxidants aka they're good for you.  Salads are one of the easiest ways to serve raw foods.  We eat a lot of salads because every meal should include raw foods.  The brighter and deeper the colour of raw fruits and vegetables the better they are for you so I like using salad blends with a lot of colour and then add more colour. 

cheery spring salad
I make this cheery spring salad using a baby garden blend.  This blend consisted of baby lettuces (green romaine, red romaine, red oak, green oak, tango, lolla, red leaf, green leaf) and baby greens (muzura, arugula, tatsoi, mache, red chard, green chard).  I sprinkled in snow peas, onion slices, raspberries and almond slices drizzled with raspberry vinaigrette.  The beautiful red raspberries shone against their bed of green!

Raspberries are always expensive because they are a very delicate fruit that is difficult to ship and spoils quickly.  I paid $3.97 for a pint of raspberries used for this meal.  About half were used for the salad.  In season I pay $2.25 per pint from the raspberry U-pick.  This year I have finally decided it is time to invest in my own raspberry canes.  They should grow nicely here [if we decide not to move] even in partial shade giving me several locations [and at the new house if we move] where I can plant them.  Each cane will cost about $8 and give a yield of 4 to 6 pints in the second season. 


Monday, May 10, 2010

Frugal Kitchens 101 - Ten Food Refrigeration Mistakes

Frugal Kitchens 101
Everyone is concerned with rising food costs so frugal purchasing is a must.  However a hidden cost of food is food spoilage.  Last month I came down with a horrid case of food poisoning that had me out of commission for a good week.  I'm not kidding, I was so sick it was a good week before I could eat anything solid!  We narrowed possible suspects to accidently ingesting mozzarella cheese that may have been part of the recent recall due to Listera monocytogenes and a commercially purchased salad dressing.  Foodborne illness is most often caused by food spoilage.  A considerable amount of food spoilage can avoided by proper refrigeration and storage methods.  Today's Frugal Kitchens 101 discusses 10 refrigeration mistakes that cause food spoilage but can easily be corrected.

  • sloppy wrapping - Air, especially the drying air of refrigeration and moisture are food's worst enemy.  The solution is to be be sure all lids and caps are on tight.  Squeeze out as much air as possible in resealable bags or vacuum seal.  Avoid using foil wrap and plastic wrap as both can cause air leakage as well as being expensive and environmentally unfriendly.
  • not removing store wrap - Any original plastic wrap should be removed or other packaging should be removed from produce, meats, poultry and cold cuts.  There could be holes you can't see or a slightly lose flap that exposes food to air. 
  • storing in oversized containers - Leaving too much space at the top of the container can speed up spoilage and freezer burn.  Use the smallest sized re-usable container possible for refrigerator storage.
  • incorrect refrigerator temperature - A few degrees temperature fluctuation can mean food spoilage in the refrigerator.  The refrigerator should be set to 4ºC (40ºF) or lower; freezer set to -18ºC (0ºF) or lower.  Use a separate thermometer to confirm your temperature settings.  Too low of temperature settings in either compartment are energy wasters.  Avoid temporary overloading of unchilled food of either compartment that can cause temperatures to rise above the safe levels.
  • storing the wrong foods in the refrigerator door - The refrigerator door compartments are 3 to 5 degrees warmer than the shelves inside so will cause food stored there to spoil faster.  Perishables like eggs, milk and fresh deli condiments should not be stored in the door compartments.  Reserve this space for foods such as mustard, relish, and ketchup or other sauces.
  • refrigerating hot leftovers - Hot leftovers should be cooled before refrigerating to prevent warming food around it that increases the rate of bacterial growth.  Larger pots of soup and chili can be cooled in  a sink filled with ice water or transfered to smaller containers for cooling.  Be sure to get leftovers into the fridge within two hours to prevent any bacterial growth.
  • relying of the sniff test - The reality is some spoiled (eg. Listeria, botululin)  foods do not have any odour yet can make you very sick.  The number one rule of food storage is if in doubt throw it out! I cannot stress this rule enough.  Do not rely on the sniff test and never taste any food you may think is spoiled!
  • losing track of leftovers - Hey this has happened to everyone.  We live busy lives and sometimes are forgetful.  Any leftover that has been in the fridge for more than 3 - 4 days should be discarded.  I find it useful to have a leftover shelf in my fridge so I check what needs to be used there first.  If I immediately know a food on that shelf won't be used within the safe period I freeze it if possible.
  • not repackaging bulk quantities of food - Any family or club pack of meats, poultry or other food should be repackaged in the amount you will use within a 4 - 5 day period with remaining perishable foods being repackaged for freezing, canning or drying if appropriate for longer term storage.  If raw bulk perishable foods cannot be repackaged as per the latter they should be cooked then frozen.
  • not using appropriate food storage containers - Food containers such as take-out cartons, margarine tubs and yogurt containers may be suitable for very short term refrigerator storage but they are not suitable for longer term refrigerator or freezer storage.  Ideally use glass storage containers with lids in the refrigerator rather than plastic to prevent any potential leaching issues while the food is cooling or when reheating.


Sunday, May 09, 2010

Toads-in-the-Hole

Happy Mother's Day
Years ago when I was knee high to a grasshopper my Mom made hot breakfasts on Sundays something we continued with our kids.  We very seldom eat a hot breakfast at home unless it is on a Sunday morning although we do indulge on hot breakfasts when on vacation.  Mom's hot breakfasts were porridge, cream of wheat, Red River cereal, pancakes or toads-in-the-hole.  Toads-in the-hole was my favourite!  Our kids were introduced to toads-in-the-hole pretty much as soon as they were able to sit in a highchair.   This is not the British Toad-in-the-hole which is a sausage in a Yorkshire pudding batter, usually served with vegetables and onion gravy which is surprising as my Mom (not biological) was born in England.  Rather this is a egg dish likely creatively named by Mom to get us kids to eat eggs.

toads in the hole
I have no idea where my Mom learned to make toads-in-hole and she never said.  For all I know she just came up with this idea on her own.  She had a lot of neat kid friendly foods that she would make.  Toads-in-a-hole really is just a novel way to cook dipped eggs and toast.  The presentation is cute and kids love them!

My Mom simply used a round water glass to cut out the middle of the bread then buttered the the bread slice and the piece cut out on both sided.  The bread was toasted on one side then flipped and an egg cracked into the opening.  She placed a lid over to help the egg cook.  The cut-outs were toasted in the fry pan at the same time.  Pictured is a bit of a dressed up version using a flower shaped cookie cutter for the hole with a little chocolate raspberry sauce in the centre of the flower cut-outs.  Toads-in-the-hole are still one of my favourite breakfast meals.  Thanks Mom for this wonderful breakfast memory!


Saturday, May 08, 2010

White Castle Burgers - Clone Copycat Recipe

Earlier this year I blogged about White Castle® cheeseburgers affectionately known as Slyders™.  Searching through online sources I found a lot of clone recipes that actually came nowhere close to Slyders™.  Some even have the audacity to bake the burger to form patties!  Obviously they missed one of the fundamental rules of cloning a recipe and that it to clone the method as well.

White Castle clone burger patties
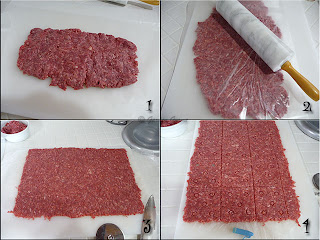
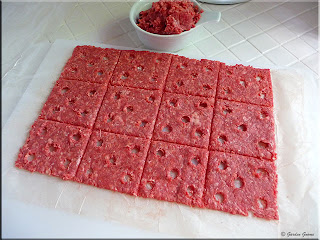
White Castle® burgers start out with thin frozen burger patties with a characteristic 5 hole pattern to help them cook quickly without flipping.  I started with lean ground beef (1) then rolled it with a rolling pin (2) between two pieces of wax paper.  I kept rolling until the ground beef was thin and squishing out the sides of the wax paper sheets.  The next step was trimming the ground beef into a rectangle (3) which actually sounds a lot easier than it is because raw ground beef simply does not cut easily.  I used a combination of a chef's knife and pizza cutter.  After the the rectangle was formed I used the pizza cutter to score the actual patties and a clean marker top to mark where the holes would go (4).

burger patty holes
One of the characteristics of White Castle® burgers is each frozen patty has 5 holes.  The holes serve the specific function of ensuring the patty cooks all the way through without flipping.  At the same time they let the steam from the onions waft through the cooking burger to permeate the bun.

Pictured are the burger patties after I removed the holes.  Each patty was about 4 - inch square.  Removing the holes involved a toothpick and a slight swirly motion that wasn't quite as bad as it sounds.  It was a bit tedious though.  The finished patties were then covered with wax paper and placed in the freeze to freeze solid before cooking. 

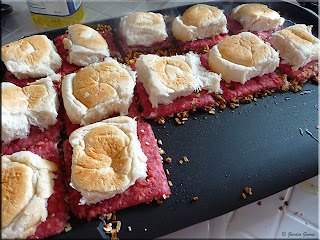
burgers on griddle
I used the griddle similar to the cooking surface used at White Castle®.  The frozen patties are  placed on a bed of onion (traditionally reconstituted dehydrated onions) then topped with the bottom of the bun.  When the burger is cooked it is removed, a slice of American cheese is added with optional but traditional pickle slice and the top bun is added at White Castle® so that's what we aimed to duplicate.

The patties look huge compared to the bottom of the buns but as you can seen with the middle burger at the top the patty shrinks considerably.   I made a fundamental error during the cooking process by using the onion flakes as is rather than reconstituting so that will be something to consider for the next attempt.  The result was still good just not exactly right so a bit of tweaking there and they will be about as close to the perfect clone for White Castle® burgers as you can get.

homemade sliders
I used store purchased dinner rolls for this clone recipe.  Each mini burger was topped with a half slice of American processed cheese. I omitted the traditional pickle slice because my husband does not like dill pickles so we never get them even when getting Slyders™ at White Castle®.

Overall I am extremely pleased with this first attempt at cloning Slyders™.  The only real tweaking that needs to be done is the onions and I already figured out what I did wrong.  Watch for the second attempt later this year with the onion problem corrected. 


Friday, May 07, 2010

Homemade Puff Pastry Dough

Puff pastry is the basis of croissants as well as  appetizers like filled puff pastry shells and desserts such as napoleons.  The pastry dough is comprised of dozens of layers of chilled butter rolled between sheets of pastry dough.  It is labour intensive and time consuming to make.  I have always used store bough puff pastry dough because of this.   A few days ago I was browsing through my much used Betty Crocker's Cookbook (1969) and came across an recipe for puff pastry dough that really looked easy to make without a lot of work.  The only time involved was mixing then refrigerating the dough.  I don't know how I missed this recipe other than thinking this would not be the same as real puff pastry dough,  So I decided to try it and compare to store bought puff pastry dough.

homemade puff pastry dough
I honestly was quite doubtful about this dough as to whether it would give similar results to store bought puff pastry dough.  The dough was quite easy to make using the stand mixer but could easily have been made by hand.  Once the dough was made I gathered it into an oblong log shape and wrapped in wax paper for the refrigerator (1).  The instructions said to divide in half but I didn't.

The following morning I cut about a quarter of the dough from the dough log to run a test batch.  The dough was surprisingly  easy to work with.  I rolled the dough to about ⅟16 -inch thick (2) and cut with a mini cookie cutter.  I re-wrapped the scraps and baked the prepared tray (3) as per the recipe instructions.

Streamlined Puff Pastry Dough
source:  Betty Crocker's Cookbook (1969)

1 c butter
1½ c unbleached flour
½c sour cream

Cut the butter into the flour until thoroughly mixed.  Stir in sour cream and blend well.  Divide the dough in half.  Wrap each half.  Chill at least 8 hours.  Roll dough and cut as desired.  Bake at 180ºC (350ºF) 20 minutes or until golden brown.

homemade puff pastry baked
Anytime I am making a homemade version of a store bought food item, I am rather critical.  The homemade version is judged based on how closely it resembles the store bought version, how it tastes and the cost.  In this case the homemade version of puff pastry performed quite nicely!

The homemade version took less than 5 minutes to mix and form into a log for refrigeration.    Store bought puff pastry contains enriched wheat flour, water, unsalted butter, vegetable oils (canola, modified palm and palm kernel), salt.  I liked that only 3 common ingredients were used for the homemade version greatly reducing additional fats and salt.  Rolling the dough out was not difficult or time consuming.  The dough despite being in the refrigerator for over 8 hours was still a bit sticky but was easy to handle on a well floured board.    The pastry did puff and brown much the same as store bought if not a bit better.  The baked results were light, flaky and had a wonderful flavour.  I was extremely impressed!

The homemade puff pastry passed the taste test and excelled at being slightly better than the store version so the next test was the cost.  I usually pay $3.99 for PC brand butter puff pastry for 450 g (.99 lb).  The homemade version made just a little over a pound of dough so is quite comparable.  The homemade version cost 12¢ for flour, $1.15 for butter and 25¢ for the sour cream for a grand total of $1.52.  This is a savings of $2.47 that could be increased if butter and sour cream are on sale.  This is one more product I will not buy store bought again!


Thursday, May 06, 2010

Kitchen Quick Tips - Clean-up As You Cook

kitchen quick tips

Get into the habit of cleaning-up as you do any prep work and while cooking.  This will save both time and energy in the long run as well as reducing after meal clean-up.


Wednesday, May 05, 2010

Vanilla Puffs

Puff pastry dough is quite a versatile dough that can be use in a variety of ways ranging from appetizers to deserts to meat pie tops.   I buy puff pastry dough in the freezer section of the grocery store.  However, I recently came across an easy sounding recipe for puff pastry so will try that shortly and report back later this week on how it compares to the store bought.  I used store bought puff pastry to test cheddar and bacon coins for a new appetizer.  The results were good but with a bit of tweaking I should be able to come up with a nice version in a smaller appetizer size.

cutting puff pastry
There were two rolls of puff pastry in the box so I used the remaining roll to make vanilla puffs.  These little delights are extremely easy to make especially since with purchased puff pastry there is no rolling of the dough needed.  The total prep once the dough is thawed takes about 5 minutes!

Method:  Thaw puff pastry dough in refrigerator.  Pre-heat oven to 190ºC (375ºF).  Unroll the thawed dough on to a pastry sheet or cutting board.  Sprinkle with vanilla sugar.  Gently roll the short ends of the dough inwards to form a scroll.  Use a serrated knife to cut across the scroll creating pieces about ¼ - inch thick.  Place the cookies on a Silpat® lined (or lightly greased) baking sheet.  Bake until golden brown.  Allow cookies to cool on rack.

vanilla puffs
Vanilla puffs are delightfully flaky cookies with a slightly crunchy bottom.  They have a light sweetness to them with just a hint of vanilla.  I think they are rather cute, looking a lot more complicated than they really are.  Vanilla puffs are sure to be crowd pleaser!

I like using puff pastry because of the versatility it offers.  Friday's post will compare homemade puff pastry to store bought.    If you have been following this blog you will know that I prefer homemade to store bought for to just about everything.  I quite excited at the prospects of trying a scratch recipe for puff pastry!

Tuesday, May 04, 2010

Peameal Bacon and Asparagus Pockets

I have posted before on various ways that I use my home cured peameal bacon.  Peameal bacon can be used pretty much the same way as you would use ham.  It does a different flavour and texture than ham but it is still a good substitute for ham.  Peameal bacon is either sliced and fried or left whole and baked.  Frying gives a bit of browning that adds to the flavour.  It is important to not overcook peameal bacon regardless of the method you use.  Once cooked it can be used hot as is as the meat main, in soups and chowders, and in casseroles or peameal bacon can be used cold in sandwiches, wraps and salads.

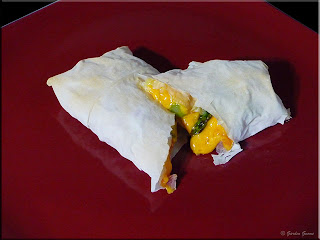
peameal bacon pocket
Sometimes those little bits of left-overs can help create an interesting dish.  I had a little peameal bacon left over from baked peameal bacon earlier in the week.  I cut it into cubes then added fresh asparagus cut into pieces and shredded cheddar cheese to create a filling for phyllo pastry pockets.  Brushing the pockets with butter would have given a nicer result.   The end result were tasty pockets that were a little on the messy side eat.

Phyllo pastry dough gives a lovely, flaky texture perfect for appetizers.  I buy the dough pre-made as it is rather time consuming and tedious to make from scratch.  The dough is quite fragile to work with because it is so thin.  The dough has to be thawed for about 5 hours in the refrigerator then rested at room temperature before using.   The filling should be made before opening the dough.  Melted butter is brushed or sprayed between the dough layers that are formed into various shaped filled pockets.  Phyllo pastry dough can also be cut into smaller squares then brushed with butter and layered into muffin tins to form a flaky tart shell ready for filling. 


Monday, May 03, 2010

Frugal Kitchens 101- Opening Jars and Cans

Frugal Kitchens 101

Just a quick show of hands, how many of you routinely wash the lids of every jar and can you open prior to opening?  If you don't this Frugal Kitchens 101 post may just change your mind.  Before jars and cans get to your grocery store they are stored in large warehouses where there more than likely will be rodents and other pests like roaches.  True they can't get into the cans or jars but they can still leave their mark.  If you home can you still cannot be 100% sure they have not come into contact during storage with rodents or other pests especially if your home canned foods are stored in a location that may come into contact with any little critters.  Rodent contamination can be a huge problem even if you don't see them as can other critter contamination.  My rule of thumb is to wipe down any tin cans  and the lids of home canned foods I open with a dish cloth spritzed with a 50% ethanol (rubbing alcohol)  solution.  Alcohol is the ideal sanitize for any biologicals assuring no organisms that will contaminate the foods opened.  Always, always, always wash or sanitize the lids of cans and home canned foods prior to opening them.