My photo
Ontario, Canada
I am a wife, mother and grandma who enjoys the many aspects of homemaking. A variety of interests and hobbies combined with travel keep me active. They reflect the importance of family, friends, home and good food.
Cook ingredients that you are used to cooking by other techniques, such as fish, chicken, or hamburgers. In other words be comfortable with the ingredients you are using.
--Bobby Flay

For Your Information

Please watch this area for important information like updates, food recalls, polls, contests, coupons, and freebies.
  • [March 19, 2020] - Effective Mar 17, this blog will no longer accept advertising. The reason is very simple. If I like a product, I will promote it without compensation. If I don't like a product, I will have no problem saying so.
  • [March 17, 2020] - A return to blogging! Stay tuned for new tips, resources and all things food related.
  • [February 1, 2016] - An interesting report on why you should always choose organic tea verses non-organic: Toxic Tea (pdf format)
  • Sticky Post - Warning: 4ever Recap reusable canning lids. The reports are growing daily of these lids losing their seal during storage. Some have lost their entire season's worth of canning to these seal failures! [Update: 4ever Recap appears to be out of business.]

Popular Posts

Showing posts with label pastry. Show all posts

Sunday, June 13, 2010

Rhubarb Tart

Rhubarb is the first fruit (technically a vegetable) here.  This is such a common home garden plant in our area that it is quite difficult to find it in the stores.  Even if the home owner doesn't have a vegetable garden chances are still very good they have a rhubarb patch!  Rhubarb can be eaten fresh dipped in a little sugar, stewed then canned or made into delicious fresh pie or the pie filling can be canned for later use as well.  Not only that but rhubarb is a great extender fruit when making jams using more expensive berries like strawberries.  In fact strawberry/rhubarb is a very popular combination!

rhubarb tart
Friends of ours brought a lovely cutting of fresh rhubarb.  I have been trying to get a rhubarb patch growing since we moved here.  It was nicely taking off then someone emptied their cigarette tray near it resulting in it's demise.  Nicotine is quite toxic to some plants.  So I'm back to square one restarting the rhubarb and relying on the generous gifts of others.

I used homemade puff pastry to make a quick, easy to make rhubarb tart for dessert.  The filling was a simple rhubarb pie filling.  The end result was a nice rhubarb tart perfect for a spring dessert.  This dessert would pair nice with vanilla ice cream.

Rhubarb Tart Filling
3 c fresh rhubarb
1 c organic sugar
¼ c Clear Gel*
1 tbsp butter

Wash and trim rhubarb.   Cut into half inch pieces.  Pour sugar and Clear Gel over the rhubarb and mix well.  Pour the rhubarb mixture onto the puff pastry dough in the centre.  Dab with butter.  Pull the edges up of the dough up and over the filling.  Bake at 220ºC (425ºF) until pastry is golden brown and filling is bubbly.

*This is the Clear Gel used in cooking and canning not the instant Clear Gel.  It gives nicer results than flour or regular corn starch.


Friday, May 07, 2010

Homemade Puff Pastry Dough

Puff pastry is the basis of croissants as well as  appetizers like filled puff pastry shells and desserts such as napoleons.  The pastry dough is comprised of dozens of layers of chilled butter rolled between sheets of pastry dough.  It is labour intensive and time consuming to make.  I have always used store bough puff pastry dough because of this.   A few days ago I was browsing through my much used Betty Crocker's Cookbook (1969) and came across an recipe for puff pastry dough that really looked easy to make without a lot of work.  The only time involved was mixing then refrigerating the dough.  I don't know how I missed this recipe other than thinking this would not be the same as real puff pastry dough,  So I decided to try it and compare to store bought puff pastry dough.

homemade puff pastry dough
I honestly was quite doubtful about this dough as to whether it would give similar results to store bought puff pastry dough.  The dough was quite easy to make using the stand mixer but could easily have been made by hand.  Once the dough was made I gathered it into an oblong log shape and wrapped in wax paper for the refrigerator (1).  The instructions said to divide in half but I didn't.

The following morning I cut about a quarter of the dough from the dough log to run a test batch.  The dough was surprisingly  easy to work with.  I rolled the dough to about ⅟16 -inch thick (2) and cut with a mini cookie cutter.  I re-wrapped the scraps and baked the prepared tray (3) as per the recipe instructions.

Streamlined Puff Pastry Dough
source:  Betty Crocker's Cookbook (1969)

1 c butter
1½ c unbleached flour
½c sour cream

Cut the butter into the flour until thoroughly mixed.  Stir in sour cream and blend well.  Divide the dough in half.  Wrap each half.  Chill at least 8 hours.  Roll dough and cut as desired.  Bake at 180ºC (350ºF) 20 minutes or until golden brown.

homemade puff pastry baked
Anytime I am making a homemade version of a store bought food item, I am rather critical.  The homemade version is judged based on how closely it resembles the store bought version, how it tastes and the cost.  In this case the homemade version of puff pastry performed quite nicely!

The homemade version took less than 5 minutes to mix and form into a log for refrigeration.    Store bought puff pastry contains enriched wheat flour, water, unsalted butter, vegetable oils (canola, modified palm and palm kernel), salt.  I liked that only 3 common ingredients were used for the homemade version greatly reducing additional fats and salt.  Rolling the dough out was not difficult or time consuming.  The dough despite being in the refrigerator for over 8 hours was still a bit sticky but was easy to handle on a well floured board.    The pastry did puff and brown much the same as store bought if not a bit better.  The baked results were light, flaky and had a wonderful flavour.  I was extremely impressed!

The homemade puff pastry passed the taste test and excelled at being slightly better than the store version so the next test was the cost.  I usually pay $3.99 for PC brand butter puff pastry for 450 g (.99 lb).  The homemade version made just a little over a pound of dough so is quite comparable.  The homemade version cost 12¢ for flour, $1.15 for butter and 25¢ for the sour cream for a grand total of $1.52.  This is a savings of $2.47 that could be increased if butter and sour cream are on sale.  This is one more product I will not buy store bought again!


Wednesday, May 05, 2010

Vanilla Puffs

Puff pastry dough is quite a versatile dough that can be use in a variety of ways ranging from appetizers to deserts to meat pie tops.   I buy puff pastry dough in the freezer section of the grocery store.  However, I recently came across an easy sounding recipe for puff pastry so will try that shortly and report back later this week on how it compares to the store bought.  I used store bought puff pastry to test cheddar and bacon coins for a new appetizer.  The results were good but with a bit of tweaking I should be able to come up with a nice version in a smaller appetizer size.

cutting puff pastry
There were two rolls of puff pastry in the box so I used the remaining roll to make vanilla puffs.  These little delights are extremely easy to make especially since with purchased puff pastry there is no rolling of the dough needed.  The total prep once the dough is thawed takes about 5 minutes!

Method:  Thaw puff pastry dough in refrigerator.  Pre-heat oven to 190ºC (375ºF).  Unroll the thawed dough on to a pastry sheet or cutting board.  Sprinkle with vanilla sugar.  Gently roll the short ends of the dough inwards to form a scroll.  Use a serrated knife to cut across the scroll creating pieces about ¼ - inch thick.  Place the cookies on a Silpat® lined (or lightly greased) baking sheet.  Bake until golden brown.  Allow cookies to cool on rack.

vanilla puffs
Vanilla puffs are delightfully flaky cookies with a slightly crunchy bottom.  They have a light sweetness to them with just a hint of vanilla.  I think they are rather cute, looking a lot more complicated than they really are.  Vanilla puffs are sure to be crowd pleaser!

I like using puff pastry because of the versatility it offers.  Friday's post will compare homemade puff pastry to store bought.    If you have been following this blog you will know that I prefer homemade to store bought for to just about everything.  I quite excited at the prospects of trying a scratch recipe for puff pastry!


Tuesday, May 04, 2010

Peameal Bacon and Asparagus Pockets

I have posted before on various ways that I use my home cured peameal bacon.  Peameal bacon can be used pretty much the same way as you would use ham.  It does a different flavour and texture than ham but it is still a good substitute for ham.  Peameal bacon is either sliced and fried or left whole and baked.  Frying gives a bit of browning that adds to the flavour.  It is important to not overcook peameal bacon regardless of the method you use.  Once cooked it can be used hot as is as the meat main, in soups and chowders, and in casseroles or peameal bacon can be used cold in sandwiches, wraps and salads.

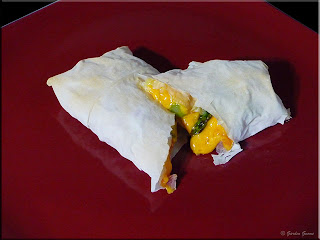
peameal bacon pocket
Sometimes those little bits of left-overs can help create an interesting dish.  I had a little peameal bacon left over from baked peameal bacon earlier in the week.  I cut it into cubes then added fresh asparagus cut into pieces and shredded cheddar cheese to create a filling for phyllo pastry pockets.  Brushing the pockets with butter would have given a nicer result.   The end result were tasty pockets that were a little on the messy side eat.

Phyllo pastry dough gives a lovely, flaky texture perfect for appetizers.  I buy the dough pre-made as it is rather time consuming and tedious to make from scratch.  The dough is quite fragile to work with because it is so thin.  The dough has to be thawed for about 5 hours in the refrigerator then rested at room temperature before using.   The filling should be made before opening the dough.  Melted butter is brushed or sprayed between the dough layers that are formed into various shaped filled pockets.  Phyllo pastry dough can also be cut into smaller squares then brushed with butter and layered into muffin tins to form a flaky tart shell ready for filling. 


Friday, June 26, 2009

Truly Canadian! - Butter Tarts

A lot of readers have likely been wondering when I would write about another truly Canadian treat - butter tarts. For those who do not know what butter tarts are they are a gooey, sweet filling inside a rustic flaky pastry crust. They are available commercially but trust me on this they are considerably better homemade.

pastry doughTart Shells

The basis of butter tarts is the crust. I was always told that cold hands make the best pastry as well as meaning a warm heart. Pastry crust must be flaky! My favourite pastry crust recipe works nicely for this recipe. The important thing to remember with any pastry dough is to not overwork it as that will make. You want to get the dough just to the point that it hold together. Roll the dough on a chilled surface if possible or use a chilled marble rolling pin. Cut the dough into 4 - inch circles (left). Hold the circle using both hands. With the thumb and forefinger pinch lightly together forming a cup then lightly push into the muffin tin. Lightly push the sides to fit the opening. Do not trim the crust! The crust should look wrinkled, uneven and rough.

butter tartsButter Tarts

Once you have your tart shells prepared you need to prepare the filling. If you have not tried butter tarts you are in for a real Canadian treat! Just look at how gorgeous these tarts are!

Butter Tarts
adapted from Kate Aitken's Canadian Cook Book, 1965. Pp. 230

pastry for 12 lg tart tins
1 c corn syrup
⅔ c brown sugar
2 eggs slightly beaten
¼ c butter
¼ tsp sea salt
⅔ c raisins
½ tsp vanilla

Prepare pastry and line tins. Pre-heat oven to 232ºC (450ºF). Mix corn syrup with brown sugar in saucepan. Cook over medium low for 5 minutes. Cool slightly. Pour over slightly beaten eggs, beating continuously. Stir in the remaining ingredients. Fill unbaked tart shells ⅔ full. Bake at 232ºC (450ºF) for 10 minutes. Reduce heat to 180ºC (350ºF) and bake 15 - 20 minutes or until filling is set.
Yield: 12 tarts


Sunday, June 07, 2009

Rhubarb Pie Filling & Rhubarb Pie

I grew up with a rhubarb patch and have had one at every house we've owned. Rhubarb grows almost like a weed once it is established. We moved here almost 2 years ago just as the rhubarb patch was starting to produce nicely in our former garden and too late to put in a patch that year. Last year we were still in the process of ripping out a lot of the overgrowth so we didn't plant rhubarb although in hindsight we should have. So our rhubarb patch did not get planted until this spring which means if we are lucky it might be big enough to get a pie or two out of next year. Instead we have been getting rhubarb from family, friends and neighbours. That means I'm being very frugal in using some fresh rhubarb and preserving rhubarb for later use.

rhubarb pie fillingRhubarb Pie Filling

My husband loves rhubarb pie so the primary use for rhubarb is making pies. Normally I either freeze or can stewed rhubarb for later use. This year I decided to make a ready to use rhubarb pie filling. The problem was I couldn't find a plain rhubarb pie filling for canning so I relied on my canning knowledge to create one. The end result was a tasty, gorgeous looking, ready to use pie filling testing in at pH 2.9 suitable for boiling water bath canning. If you make this pie filling do not substitute the Clear Jel® with flour or corn starch. Clear Jel® is currently the only USDA approved thickener for canning.

Rhubarb Pie Filling

9½ c prepared rhubarb
2 c water

2 c organic sugar
⅝ c ClearJel®
1 c water

4 tbsp lemon juice

Wash rhubarb then cut into ¾ inch pieces. Place in stock pot. Pour the 2 c of water over the rhubarb. Bring to a boil. Remove from heat. Drain the rhubarb reserving the liquid. Set hot rhubarb aside. Combine sugar, Clear Gel®, 1 c water and reserve liquid in sauce pan. Heat on medium high while whisking until mixture thickens. Remove from heat. Stir in lemon juice. Stir the thickened mixture into the hot rhubarb pieces. Ladle into hot jars leaving 1-inch headspace. Remove air bubbles. Wipe rims. Adjust two piece lids. Process in boiling water bath canner for 15 minutes.

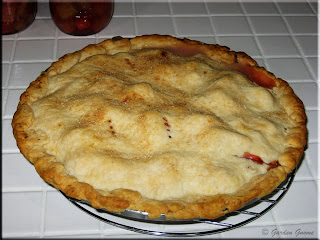
rhubarb pieRhubarb Pie

My husband would have been very upset had I not made him a rhubarb pie. I have made the same rhubarb pie from my aged Betty Crocker cookbook that includes my favourite pie pastry  for as long as I've had the cookbook. This time I made a couple of changes. First and this has always been a problem with my pies is I changed the thickener. The recipe calls for flour but I substituted Clear Jel®. This is a modified corn starch that tolerates high heat without breaking down and doesn't thicken until the pie starts cooling down. By the time the pie had cooled enough to slice the filling had nicely thickened unlike my normal runny results.

Rhubarb Pie

pastry for 10-inch two crust pie
2 c sugar
½ c Clear Jel®
1 tbsp lemon juice
5 c fresh cut rhubarb
3 tbsp butter
organic sugar

Heat oven to 219ºC (425ºF). Prepare pastry. Wash and cut rhubarb into ¾-inch pieces. Mix Clear Jel® and sugar together then mix with rhubarb. Pour the rhubarb mixture into the prepared pie shell. Drizzle the lemon juice on top. Add the butter in small pieces over the rhubarb. Top with pastry top. Crimp the edges. Poke a few holes in the pastry top with a fork. Sprinkle organic sugar on top of the pastry top. Cover edges with aluminum foil to prevent excessive browning. Remove during the last 15 minutes of baking. Bake 40 to 50 minutes or until crust is brown and juice begins to bubble through the crust.


Sunday, April 26, 2009

Family Beef Pot Pie

If you have been following this blog you will have already read several posts regarding homemade soups. The reason being homemade soups are one of the most frugal meals you can make. A soup can easily be turned into a thick, stew consistency simply by adding a thickener. The thicken "stoup" as Rachel Ray would call a soup that eats like a stew, can then be used as the basis of a casserole. A thicken stew-like consistency can be used as the filling for meat pies. This allows you a lot of creative leeway when it comes to making meat pies!

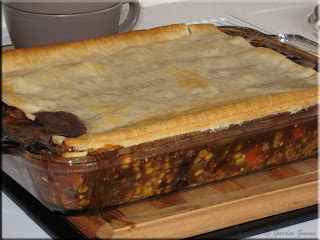
family beef pot pieFamily Beef Pot Pie

Meat pies consist of either one crust or two crust pies with meat and/or vegetable filling with the consistency of a thick stew. For a two crust meat pie I recommend my Favourite Pie Crust. This dough freezes nicely either formed into shells, rolled or ready to roll. If you are making a one crust meat pie you can also use the same pie crust recipe or you can cheat a bit by using a pre-made puff pastry dough found in the freezer section of your grocery store. Do keep a few packages of puffy pastry on hand as it is a very versatile dough that can be used for both savoury and sweet dishes. While I have made puff pastry from scratch it is one convenience food that I recommend buying pre-made simply because making homemade puff pastry is a bit more tedious and time consuming than making a standard pastry dough. If you would like to try making your own you can try this method.

Pictured is the family sized beef pot pie I made a few nights ago using puff pastry for the top crust. I should have used a smaller casserole dish but wanted to use up all of the filling. Using a smaller casserole dish would have given an even, rolled edge around the pot pie something that is desirable. This is something I will avoid the next time simply for the visual effect.

beef pot pieBeef Pot Pie

Pictured is the cut pot pie. The crust serves as a substitute for bread in this meal. It is nice and flaky, perfect for this purpose. I used a ground beef filling for this pot pie.

Two thing I look for in any stew or stew based filling aside of flavour is texture and colour. In general corn, carrots and green beans pop on the background of meat, potatoes, mushrooms and gravy. Here's how I made the filling:

Method: Brown two pounds extra lean ground beef. Wash and steam unpeeled potato pieces. Sautée portebello mushrooms in butter. Place browned ground beef in large mixing bow. Stir in cooked potato pieces and mushrooms. Stir in 1 - 500 ml jar home canned green beans or equivalent. Stir in about two cups of frozen corn niblets. Pour about 3 cups homemade gravy oven the mixture and stir in. Pour the mixture into a casserole dish. Cover with puff pastry. Bake at 180ºC (350ºF) until the crust is golden brown and filling bubbles.