My photo
Ontario, Canada
I am a wife, mother and grandma who enjoys the many aspects of homemaking. A variety of interests and hobbies combined with travel keep me active. They reflect the importance of family, friends, home and good food.
Cook ingredients that you are used to cooking by other techniques, such as fish, chicken, or hamburgers. In other words be comfortable with the ingredients you are using.
--Bobby Flay

For Your Information

Please watch this area for important information like updates, food recalls, polls, contests, coupons, and freebies.
  • [March 19, 2020] - Effective Mar 17, this blog will no longer accept advertising. The reason is very simple. If I like a product, I will promote it without compensation. If I don't like a product, I will have no problem saying so.
  • [March 17, 2020] - A return to blogging! Stay tuned for new tips, resources and all things food related.
  • [February 1, 2016] - An interesting report on why you should always choose organic tea verses non-organic: Toxic Tea (pdf format)
  • Sticky Post - Warning: 4ever Recap reusable canning lids. The reports are growing daily of these lids losing their seal during storage. Some have lost their entire season's worth of canning to these seal failures! [Update: 4ever Recap appears to be out of business.]

Popular Posts

Showing posts with label gardening. Show all posts

Monday, January 21, 2013

Frugal Kitchens 101 - Continuous Harvest

Frugal Kitchens 101

Last month I focused on discussing my continuous harvest on my gardening blog.  Growing fruits and vegetables indoors is an ideal way to stretch your food dollar.  It is a very frugal activity that the whole family can enjoy while saving money.  Let's put it in perspective.  A head of leaf lettuce costs somewhere between 80¢ and $1.50 during the winter months.  A packet of leaf lettuce seeds costs about $1 but that packet of seeds will give a much greater yield than one head of leaf lettuce.  Fresh herbs in the produce section cost about $2 and you use them up but a potted herb costs mere pennies if you start from seed or the same $2 if you start from clippings in the produce section or buy an established potted herb.  Now, the beauty with herbs is they are cut and come again edible plants that adapt rather nicely to growing indoors.  Two more examples are potatoes and tomatoes. If you grow tomatoes outdoors, take a few clippings then root in water and plant in pots indoors for  fresh tomatoes.  You won't get a huge bumper crop but those tomatoes taste so much nicer than those available in the grocery stores during the winter months.  Everyone has had a sprouted potato that has gone soft.  Cut the potato into quarters with an eye (sprout) in each piece.  Fill 4 - 5 gal pails with soil then plant a potato quarter in each.  You will be rewarded with 4 pails of new potatoes, about 10 or so per pail, just perfect for a free side from something you were going to toss anyway.  Ok, now you have an idea on what a continuous harvest is (growing a year round indoor garden), here are a few tips setting up growing space.

  • what to grow - In general most herbs, smaller fruiting tomatoes, potatoes, carrots, radishes, leaf lettuce, mesclun mix, mustard, cucumbers, bush beans, some varieties of pole beans, sweet peas, zucchini, sweet peppers, spinach and some varieties of strawberries can be grown indoors.  Hot peppers and most melons don't grow indoors well.  Indoor space is too limited to grow most berries or other fruits, or corn but as you can see, there is a fair amount of produce that can be grown indoors year round.
  • plastic trays - Water from over flowing potted plants can damage furniture and floors.  I bought a few plastic kitty litter trays from the dollar store.  I put potted plants in the trays making it easy to move several plants at one time while protecting surfaces from water damage.  
  • space - Space is of course the limiting factor when growing indoors as everything else (eg. lighting, temperature, humidity, water, nutrients) can all be controlled.  I use a lot of the principles of square foot gardening so I always look at ways to 'grow up not out'.  There are all kinds of shelf units available that can be fitted with grow lights and there are several products on the market for growing small (eg. table top, self contained units) for growing indoors.  Of course, there are hooks for hanging edible potted plants from the ceiling.  Sometime, thinking outside of the box works too.  I turned one south facing window in our second home into a lovely grow space by adding shallow shelves that held 4 - inch potted plants.  The window was still functional but it did eliminate the need for curtains on that window.  A small, rigid plastic kiddie pool (bought at an end of season sale for about $5) can be turned into a stunning indoor garden.  Pop all your edible potter plants into the pool, camouflage the edge with a row of plants in self watering containers, add a couple of grow lights and you have lovely, easy to care for, low maintenance indoor garden that can be the focal point of a room as well.
  • time savers - Growing edible plants indoors need not be time consuming.  If anything it is easier than growing outdoors because there are a lot of time savers available.  Use self-watering pots (dollar store, Wal-mart) or make your own using plastic bins.  Watering a couple of times a month is likely all you will need from there especially if the heat or AC is not on.  Use water bulbs in potted plants, another dollar store find that works quite nicely to lessen the number of times you need to water.  An inexpensive indoor drip watering system can be set up using plastic aquarium tubing.  This clear tubing can be discretely run to water all your plants from a single location.  I use wooden plant dollies with plastic casters (dollar store find) to move larger plants around when needed.  The casters don't mar up our laminate, tile or marble flooring and I don't have to worry about injuring myself moving heavier plants.
  • successive plantings - Some plants (eg. herbs) are cut and come again meaning the plant will continue to grow and produce even though you harvest some of it.  Never harvest more than a third of the plant.  Other plants like leaf lettuce are depleted upon harvesting.  For that reason, grow them in larger pots and treat them the way you would in a square foot garden by repeated sowings.  If it is a plant you use a lot of, plant multiple pots then combine with repeated sowings as a pot is harvested to ensure a steady supply.  For example, plant four pots a day or two apart with leaf lettuce.  As the first one matures to harvest, the next one will be a couple of days behind and so on.  Harvest some or all of the first pot, work up the soil a bit and sow more seeds.  Continue in this fashion for a steady supply.  You can do the same with any vegetable grown indoors, adjusting the spacing between plantings as desired.
  • cost - For very little investment, even as low as $0 you can easily have a rather productive indoor garden set up.  Honestly, most equipment can be found for free and chances are you already have what you need on hand.  The cheapest way to get seeds is to collect them yourself either from your outdoor garden or even from some of the produce you purchase in the grocery store.  Seed exchanges are a cheap source for seeds for only the price of a stamp.  Electricity for lighting should be minimal as well if you use CFL bulbs.  I have spent about $20 so far establishing an indoor garden here that is still very much a work in progress.  A lot of the materials, shelving and planters can easily be found on Freecycle or very cheap at yard sales.  Higher end, self-contained growing stations will cost somewhere between $50 and $80 but there is a return on that investment so they can pay for themselves.  The biggest expense with indoor growing is the energy to operate any grow lights.  Grow lights are necessary indoors to give the proper light spectrum for healthy plant growth.   In general grow lights are incandescent, fluorescent, CFL and LED.  Forget incandescent grow lights.  They are cheap to buy but can increase your hydro bill by $20 or more a month.  LED lights are expensive to buy but very cheap to operate.  The standard in growing indoors has been the fluorescent tube lighting but the newer and cheaper to operate CFL grow lights are now on the market.  CFL bulbs should be in the higher wattage range and despite a bit higher cost of operation as opposed to lower wattage CFL, they are still less expensive to operate than fluorescent tube lighting.


Tuesday, January 04, 2011

Vacation Home Tomatoes

We are extremely blessed and very much spoiled living in an area of Ontario where tomatoes rein supreme!  We are very much accustomed to enjoying some of the very best tomatoes you can ever taste.  They are rich, full of flavour and have a depth of colour not readily available in other parts of the country.  We came down to our vacation home right in the midst of the heavy tomato season last year.  Silly me, I thought tomatoes there would be pretty much the same.  My gosh was I wrong!

vacation home tomatoes
Pictured are two tomatoes I bought while there.  Both were very good size with the largest one being almost 5 inches at its widest.  The first thing I noticed is compared to my home grown or locally grown tomatoes, these tomatoes were downright anemic looking!  I had been canning tomatoes and my garden was overflowing with beautiful tomatoes when we left on vacation.  I took one look at these tomato-wanta-bes and immediately wanted to go home!

Notice the tags on the tomatoes?  I hate those stupid little stick on tags on every piece of produce bought in a grocery store!  What I found very interesting though was on the larger tomato if you look close you can see the words uglyripe and heirloom.  Why anyone would call a tomato ugly ripe is beyond me but that is indeed its name.  The ugly ripe tomato developed by Joe Procacci is named for the deep wrinkles in its shoulder and misshapen shape.  The ugly ripe does have a lovely tomato flavour despite its appearance.  It is an heirloom tomato which means you can collect the seeds from this tomato to grow in your garden the following year.  What is interesting is Florida Agriculture will not let this tomato be sold outside of Florida because it is too ugly!  Being a home gardener, I diligently fermented then collected seeds from the ugly ripe tomato and brought them home.  I won't know how well this tomato will perform until next growing season but here's hoping it does perform nicely for me. 


Wednesday, August 04, 2010

Pasta Surpreme

Garden fresh produce is now in full swing here.  My garden is producing nicely with cucumbers, zucchini and the starts of tomatoes.  The weather has been hot, humid with a fair amount of rain but a bit too hot slowing the ripening of tomatoes.   I discovered an amazing organic farm a short distance from us to supplement the foods I grow, produce I don't grow and secure a second source for organic, free range eggs.  The first trip to the organic farm I bought zuccini, Armenia cucumber, sweet peas, beets, sweet green pepper, sweet purple pepper, dill, and rainbow chard.

pasta supreme with steak vegetables
Once my garden starts producing combined with local in season produce it becomes more important to use up as much as possible home canned foods from the pantry canned the previous year.  Pasta dishes are a great way to use both garden fresh and home canned products as well as a leftovers.  There was a half of sirloin steak leftover so I decided to make a pasta dish using   home canned marinara sauce and home canned mushrooms as the base.  I chose organic raw sweet peas and a home grown zucchini (sautéed) for the additional toppings.  I garnished the pasta dish with fresh grated baby parmesan cheese.  The end result was Pasta Supreme!

The beauty of this type of dish is there is no real measuring.  It is very flexible too so is a great dish to use what you have on hand including the type of pasta.  Omitting the meat is quite easy for a vegetarian version.  Adding something raw like the sweet peas really makes the dish sparkle and the fresh grated cheese adds depth. 


Tuesday, July 27, 2010

Using My First Marketmore Cucumber

The garden is starting to produce nicely!  Like many home gardeners I await rather impatiently for the garden beds to start producing.  Patience is not my strong suit so it has been sorely tested this year with the 2 largest beds planted late followed by the 2 newest beds planted even later.  While most of the planting was within the range of local farmer's planting their crops I missed out on the cold weather crops.  I didn't plant those because I knew we would be away for a couple of weeks checking out our vacation home. So the garden is now producing :)

marketmore cucumber
I picked a marketmore cucumber last week and it sure was a beauty coming in at just over 9½- inches.  The diameter was a little over 2 - inches.  This is a thick, straight cucumber that matures in about 60 days.  The vine is laden with cucumbers so I can see a lot of fresh eating as well as a batch or two of sweet relish in the future.

Part of the satisfaction of growing your own fruits and vegetables aside from knowing they were grown organically is freshness.  When the garden is producing I quite often make a mental note of what is ready for picking during my morning garden check.  Then I try to work that produce into that evening's meal, picking moments before prep is needed.  That way I get the freshest possible produce.  I also note any produce that is in excess for preserving picking for freshest possible.

marketmore cucumber sliced
This is my first year growing marketmore cucumber but rest assured it will not be my last.  I will definitely be saving a few seeds from this excellent performer!  The cucumber was nice and straight with good diameter.  I sliced it in half them peeled and sliced into beautiful, fresh smelling slices.  I repeated with the other half.  The cucumber taste and aroma was just delightful!

The marketmore cucumber is ideal for slicing and fresh eating.  It also lends itself well for making quick summer refrigerator pickles.  If you are interested in growing marketmore you won't be disappointed.  It is a very good performer free of most cucumber plant problems.

chicken wing dinner
Summer meals need to be a bit lighter especially in calories simply because our bodies don't need all the heavy calories for the cold winter months.  Our summer meals tend to reflect that usually with more of an emphasis on raw foods.  We've had a period of several hot, humid days with rather nasty thunderstorms late afternoon through the evening, not really ideal grilling weather.  I took advantage of a break in the hot, humid weather to make sweet & sour chicken wings with Basmati rice for dinner.  Rather than have a full side salad I used cucumber slices instead.  This was a nice, simple, light meal accented by the cucumber slices. 


Tuesday, May 11, 2010

Cheery Spring Salad

Raw fruits and vegetables are rich in nutrients, fiber and beneficial anti-oxidants aka they're good for you.  Salads are one of the easiest ways to serve raw foods.  We eat a lot of salads because every meal should include raw foods.  The brighter and deeper the colour of raw fruits and vegetables the better they are for you so I like using salad blends with a lot of colour and then add more colour. 

cheery spring salad
I make this cheery spring salad using a baby garden blend.  This blend consisted of baby lettuces (green romaine, red romaine, red oak, green oak, tango, lolla, red leaf, green leaf) and baby greens (muzura, arugula, tatsoi, mache, red chard, green chard).  I sprinkled in snow peas, onion slices, raspberries and almond slices drizzled with raspberry vinaigrette.  The beautiful red raspberries shone against their bed of green!

Raspberries are always expensive because they are a very delicate fruit that is difficult to ship and spoils quickly.  I paid $3.97 for a pint of raspberries used for this meal.  About half were used for the salad.  In season I pay $2.25 per pint from the raspberry U-pick.  This year I have finally decided it is time to invest in my own raspberry canes.  They should grow nicely here [if we decide not to move] even in partial shade giving me several locations [and at the new house if we move] where I can plant them.  Each cane will cost about $8 and give a yield of 4 to 6 pints in the second season. 


Tuesday, September 29, 2009

Habanero Gold Jelly

My garden is starting to slow down a bit. Rather the unseasonably cool, wet weather is forcing the slow down. I'm doing clean picks weather permitting. The hot peppers are still producing nicely so I'm working on putting them up in various forms. I will be bringing in a couple of the hot pepper plants for the winter for a ready fresh supply during the winter.

habanero gold jellyHabanero Gold Jelly

It's nice to have a few varieties of hot pepper jellies in your pantry. Hot pepper jellies are wonderful for making quick appetizers or using as a condiment for meats. They can also be used as a glaze for meats. This particular hot pepper jelly pairs Habanero peppers with apricots for a uniquely pleasant flavour that will pair nicely with cream cheese as an appetizer. This hot pepper jelly like most of my jams and jellies has been converted to use Pomona's universal pectin. With regular pectins to prevent floating fruit the recommendation is to stir for 5 minutes before putting into jars. Pomona's continues to gel as it cools so the work around is occasionally shaking gently from side to side as the jelly cools. The alternative is to stir the jelly just after you open it before serving. The yield was 3 - 250 ml jars processed and almost a full jar for fresh use. I think the jelly is quite pretty in the jars.

Habanero Gold Jelly
modified from: Bernardin® canning jar insert Taste the Harvest, 2006.

⅓ c (75 ml) finely sliced dried apricots
¾ c (175 ml) white vinegar (5% acidity)
⅓ c (75 ml) finely chopped onion
⅓ c (75 ml) finely chopped sweet red pepper
2 finely seeded, chopped Habanero peppers
1 finely seeded, chopped Jalapeno pepper
3 c (750 ml) granulated sugar
1 tsp Pomona's universal pectin
1¼ tsp calcium water

Prepare the dried apricots and place in medium covered glass bowl. Pour the vinegar over the apricots and let sit 4 hours. Prepare onions and peppers. Stir pectin into the sugar. Pour the apricot mixture into large saucepan. Stir in onion and pepper mixture. Stir in the calcium water. Bring to a boil. Stir in sugar/pectin mixture. Bring to a boil stirring to dissolve the sugar. Ladle into prepared 250 ml jars leaving ½-inch head space. Wipe rims and adjust 2 piece lids. Process in BWB for 10 minutes at altitudes below 1,000 feet above sea level. For higher altitudes adjust processing according to altitude chart (here).


Tuesday, September 22, 2009

Drying Peppers

I have taken a few days off of canning but that doesn't mean things have come to a stand still in the kitchen. The weather is cooler and without the additional humidity of canning it is a perfect time to do a bit of dehydrating. Ideally when preserving foods each food will be processed as canned, dried and frozen. If for some reason you lose your frozen stores then you have your canned and dried stores to fall back on. At the same time if possible add curing and smoking to your food preserving methods. I have to admit to not dehydrating as much as I should. I tend to focus on vegetable flakes, vegetable powders, apple slices and jerky.

Drying foods is desirable because once dried they are light weight and take up a lot less room than other forms of food preservation. Properly stored dried foods have very long shelf life as well. Dried foods should be stored in a dark, cool place preferably in vacuum sealed containers.

tray of prepared sweet peppersSweet Peppers

The garden is producing an abundance of tomatoes and peppers. I decided to dehydrate a couple of trays of peppers, one sweet and the other hot. Dried peppers can be added to soups, stews and chili. They are nice sprinkled on a garden salad as well. The dried peppers can be powdered if desired. The prep work could not be easier!

Method: Wash and dry peppers. Cut in half. Remove core and seeds. Cut into thin strips then across the strips to form small pieces. Place on an unlined baking sheet if dehydrating in the oven or on dehydrator sheet if using a dehydrator. Dry at 52ºC (125ºF) until crisp. Allow to cool then package into air tight containers and vacuum seal.

dried peppersDried Peppers

It is surprising how much volume is lost when you dehydrate foods! This explains why you can store a fair amount of dehydrated foods in a small amount of space. I was able to package the two trays of dried peppers into 2 - 125 ml (4 oz) baby food jars. Pictured are the jars before vacuum sealing using the canister method. The peppers dried nicely retaining a lot of their rich colour.

Method: Place a filled jar in a small vacuum sealer canister. Set the vacuum sealer to vacuum. It will shut off when then canister and jar are sealed. Remove the vacuum off the canister and remove the sealed jar. Label and store.


Saturday, September 19, 2009

Garden Goodies

One of the best ways to get excellent quality, organic produce is to grow it yourself. This is a wonderful time in the outdoor garden! Despite the late start getting the beds in this year they have been quite productive. Our ADFF (average day of first frost) is quickly approaching so there is a lot to be done in the garden.

vine ripe tomatoesVine Ripe Tomatoes

I only put in 13 tomato plants this year, down considerably from my normal numbers. Despite all of the canning I do, I grow very few tomatoes specifically for canning purposes. The majority of the tomatoes I grow are those that are either unavailable in the stores or those that tend to be expensive.

The tomatoes are coming in heavy right now. Pictured is yesterday's harvest consisting of beefsteaks, Lemon Boy, slicing and cherry tomatoes. I ran the cherry and slicing tomatoes through the food mill for purée because there were too many for the two of us to use in a reasonable amount of time given that more will be picked today.

Picking tomatoes and preserving tomato products is only part of this time of year. I've also been busy saving seeds for next year's garden as well as taking a lot of clippings (16 so far) for growing tomatoes indoor through the winter months. This is part of my continuous harvest plan for year round gardening. I will be writing more about that on my gardening blog if you would like to follow my year round gardening efforts.

hot peppersHot Peppers

I planted one variety of sweet peppers and three variety of hot peppers this year, also down from my normal amount. The peppers have done well so we are enjoying a nice daily harvest now.

Pictured is yesterday's pepper harvest. Most of the hot peppers find their way into various home canned products. I also like freezing and drying prepared hot pepper pieces.

Peppers grow nicely indoors during the winter months then can be replanted outdoors. They will fruit indoors by manually pollinating. Closer towards the end of the month I will be potting some of the pepper plants for growing indoors.

cucumbers and pearsGarden Gifts

Gardeners by nature tend to be rather generous with their excess produce. Most families in our area put in some type of vegetable garden. I was gifted 3 nice cucumbers by one of our elderly neighbours. She is well into her 70's yet still gardens and cans so we have a fair amount in common. Another neighbour has a pear tree but doesn't like pears. They heard I did a lot of canning so generously offered whatever I could use. I have also been gifted with all the corn (not pictured) I can use so will be working on that shortly along with more hampers of tomatoes. I will be making extra goodies this year to give as thank-you baskets for these wonderful garden gifts.


Wednesday, August 26, 2009

Creamy Penne with Vegetables

If you have been following this blog you likely read about the foodie road trip I made recently. While the trip was mainly a produce gathering trip I managed to make a stop at one of my favourite places to shop, the Bulk Barn®. It was at a different location than the Bulk Barn I wrote about in this post but basically all of the Bulk Barn® stores offer pretty much the same selection. There always seems to be something new to try too!

organic penne product of ItalyOrganic Penne

The current buzz word of the day with respect to food is organic. Now the problem I have with this term is unless you grow the food yourself you are trusting someone else's definition of organic. It's very difficult to look at two tomatoes side-by-side and determine which one is organic. It becomes more difficult when assessing the organic label on processed foods. So there is the trust factor.

At any rate, Bulk Barn® is now carrying a limited variety of organic pastas from Italy. They are on average 69¢ per pound in comparison to the regular pastas at 39¢ per pound. I bought enough penne rigate for a meal just to try it.


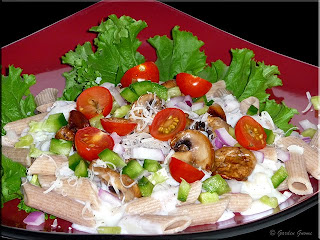
creamy penne with vegetablesCreamy Penne Rigate with Vegetables

Penne is a cylindrical shaped past that gets its name from Latin penna meaning feather or quill. There are
two variants: "penne lisce" (smooth) and "penne rigate" (furrowed). Penne is traditionally cooked to al dente then served with pasta sauces such as marinara. The shape makes penne a versatile pasta because the hollow centre allows it to hold sauce, while the angular ends act as scoops. The ridges on penne rigate
allows it to hold still more sauce while providing texture to the dish.

I cooked the penne rigate to al dente and drained. Then I place the hot penne on Chinese mustard and topped with a basic béchamel sauce lightly seasoned with Herbs de Provence, sautéed mushrooms, sweet green pepper, sweet banana pepper, Sweet Millions cherry tomatoes, red onion and fresh grated Parmesan cheese. The warmth of the penne released some of the peppery warmth of the Chinese mustard. The end result was a delightfully simple, home style meal that really came in on the frugal side despite the additional cost for the organic pasta.

Would I buy organic pasta again? I have to say that I would likely buy this particular brand of organic pasta again but not necessarily because it is organic but rather for the flavour. The penne had a nice almost a mild nutty flavour and texture that is quite often missing from some of the newer whole wheat pastas. As a specialty pasta this one is well worth buying!


Thursday, August 20, 2009

Kitchen Quick Tips - Potatoes

kitchen quick tips
Potatoes should be stored in a cool, dry place. Do not refrigerate. Place an apple in the bag to prevent budding. If budding occurs, cut the potatoes into quarters with 3 - 4 eyes per chunk. Plant in garden to enjoy new potatoes in a couple of months.


Tuesday, August 11, 2009

Pickerel with Summer Garden Salad

We are very lucky to enjoy locally caught fish year round where we live.  We can fish from our dock and boat.  If we don't catch enough fish ourselves we have several friends that will keep us in stock of locally caught fish.  The most commonly caught here are smelt, perch, pickerel, bass and blue gill but there are others depending on the time of year. 

pickerelPickerel

Pickerel is the common name for three closely related carnivorous, soft-rayed fishes in the Pike family (Esocidae). The fish pictured was purchased frozen from a food distributer and identified only as wild caught pickerel but appears to be Chain pickerel (Esox niger). Pickerel is a popular fish for anglers.

Pickerel is a lean boney whitefish with nice flavour. The Y-bones should be removed when cleaning. There may be bones remaining in the fillets especially in commercially cleaned fish so use caution when eating. The fillets are small so it is easy to overcook them. This fish really is best cooked by lightly coating then pan frying although larger fillets can be coated and deep fried if desired.

pickerel dinnerPickerel Dinner

I used the electric griddle to cook this meal. An electric griddle is a very useful kitchen appliance that can be used to prepare food in a series eliminating extra pots and pan. The meal consisted of herbed hash browns, seasoned pickerel and a summer salad.

Method: Washed and cut 6 medium small potatoes into cubes. Steam until al dente. Remove from heat. Place the steamer basket with potatoes on a plate. Pour the steaming water and set aside to cool for watering plants. Pour a little EVOO and a add a couple of pats of butter to the griddle. Heat to 325ºF. Pour the potatoes onto the griddle. Fry until golden brown. Season lightly with salt and pepper if desired. Push the potatoes to one side. Place the thawed fish fillets on the empty side of the griddle skin side down. Sprinkle lightly with Old Bay Seasoning or seasoning of your choice. Fry until the fillets are just turning opaque. Turn and sprinkle lightly. Cook until just golden brown. Garnish fish and potatoes with fresh herbs.

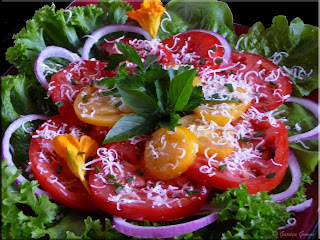
garden saladSummer Garden Salad

My garden is producing nicely despite the below average temperatures. The last couple of days have been quite warm causing a growth spurt in the garden! Anything growing in my garden with the exception of inedible weeds is fair game for the salad bowl. It will be a few more days yet before we can enjoy fresh sweet/hot peppers and peas. I just re-seeded radishes and pole beans so will be enjoying those as they become available.

I made a simple garden salad, dinner plate sized plate with what I could find ready for picking. The salad was made in layers beginning with Chinese lettuce, red leaf lettuce, red onion (store bought), red slicing tomato (store bought), Lemon Boy tomato and nasturtium flowers. I drizzled EVOO over the salad and added a few splashes of lemon juice. Then I sprinkled with fresh chives and fresh rated Parmesan cheese and finally garnished with basil and mint. To serve the salad I cut into wedges pizza style. I thought the colours were quite summer looking!


Thursday, July 23, 2009

Kitchen Quick Tips - Egg Cartons

kitchen quick tips
Keep your egg cartons for starting seeds for you garden. Individual cardboard egg carton cups with seedling can be planted directly into the garden. Avoid styrofoam or plastic egg cartons but if you find yourself with some, they can be re-used several times for seed starting as well. Just pop the seedling out and plant.


Saturday, July 18, 2009

Salad Greens and Steak Rub

My husband arrived home late Wednesday from an event he had organized. As a side benefit the left over food was split amongst the guys who wanted it. This meant an influx of foods like processed lunch meats, pre-sliced cheeses, store bought bread and a few snack type items. While the cheeses and unopened snacks will keep for a couple of weeks the opened packages and lunch meats won't. So we are in sandwich mode!

salad greensSalad Greens

My raised garden beds have been progressing nicely despite a late start. Pictured are my four square feet of salad greens. Aren't they gorgeous? In the top left corner is Chinese mustard. Next to that is Grand Rapids leaf lettuce. The two squares at the bottom is mesclun mix. Look at how much produce is coming out of 4 square feet! With reseeding after each cutting we will have more than ample salad greens to last us until first frost. This is a huge savings considering we eat salad almost daily! More importantly the greens are fresher than anything you can buy in the grocery stores. The taste is unbeatable! I snip the greens as I need them within minutes of serving. I rinse well with a light spray so as to not bruise the greens. Then I pat dry between two t-towels before using.

sandwichesSandwiches

During the summer months we love power sandwiches. These are sandwiches made with home grown produce on homemade whole grain breads using home cooked meats with cheese but the real focus is on the vegetables. Garden fresh vegetables include cucumber, tomatoes, onions and salad greens. Fresh from the pantry is alfalfa sprouts.

Well, thanks to the influx of food I had almost a loaf of whole wheat bread to use up along with the cheeses and lunch meats. So I made a modified version of power sandwiches. I paired turkey breast lunch meat with Swiss cheese and Grand Rapids lettuce for my husband sandwiches pictured in the top picture. I would have added tomatoes if I had them but mine are setting fruit and I'm not buying store bought if at all possible. Why? Home grown tomatoes taste so much better so I'll wait with much anticipation!

I made a roast beef and cheddar cheese sandwich on whole wheat with Grand Rapids lettuce and Chinese mustard. The Chinese mustard adds a nice mild, peppery flavour. It's important when growing Chinese mustard to not let the plant leaves get too large or they will be bitter and to let one plant go to seed to collect for the following growing season.

steal rubPrep & Cooking

Thursday night we had New York Strip steaks for dinner. Normally steaks are grilled and served without sauce or seasonings to let the flavour of the organic, hormone free beef shine though. This time I decided to get a bit creative with mine by using a rub. A rub is a mixture of dry ingredients consisting usually of salt, sugar, spices and/or herbs. What a rub does is adds a lot of flavour similar to a marinade. You can use a pre-made mixture or make your own.

I used Dean Jacobs's Savory Mesquite rub for this steak that was part of a gift package I received. Ingredients in the rub blend are "salt, spices, onion, garlic, mesquite flavor, caramel color, natural flavorings and silicon dioxide". This is precisely what I don't like about some commercial blends as the spices and natural flavourings are not specified which could be a problem for anyone with food sensitivities or food allergies. I am going to start experimenting with homemade rubs so watch for more on that in future posts.

Using a rub is rather easy. The prepared rub is simply sprinkled onto the meat then rubbed in. The meat is then refrigerated to let the seasonings penetrate throughout the meat. Once the meat has been seasoned it is time to grill. As you can see there is a definite difference between plain meat and meat with a rub on the grill. Both steaks were cooked to medium rare.

Method: To use a rub, place the meat on a cutting board. Sprinkle the rub over the meat then with a gentle rotating motion rub it into the meat covering all sides. Place in a zipper style bag and refrigerate for 3 to 4 hours.

savory mesquite steakSavory Mesquite Steak

Both the seasoned and unseasoned New York strip steaks were grilled to medium rare. Sides included home canned green beans, frozen cauliflower and pickled beets. The steaks were garnished with caramelized onions.

In a comparison taste test my husband preferred the unseasoned steak. His two complaints were the salty taste and the mesquite flavour. I liked the flavour but not the salty taste. One reason both of us immediately noticed the salt is because we use so little of it and when we do it is sea salt (Mediterranean, French Grey, Alaca Hawaiian) or Himalayan pink salt depending on the food. Unlike regular iodized salt that adds that salty taste the aforementioned salts add flavour as well.

This experiment gave me an idea of where to start with homemade rubs. I know the salt I use will likely be a sea salt and only in the amount to add flavour without being overpowering. Experimenting with homemade rubs should be a lot of fun!


Monday, June 15, 2009

Frugal Kitchens 101 - The Kitchen Garden

Frugal Kitchens 101
One of the easiest ways to save on your food dollars is to put in a garden. There are a few problems with this recommendation in the minds of many. First there is the idea that in order to have a successful garden that will put food on your table it has to be big and that means land. This belief causes those living in apartments or rental property and those with small urban lots to give up on the idea of gardening because they think there is not enough room to garden. It is surprising at how much produce a small 4' x 4' raised bed can produce. A raised bed planted in the square foot gardening method is an ideal gardening solution for tenants and small lot owners because it can easily be removed. It is also surprising at how much produce can be grown on a small urban balcony using containers. Herbs and greens can easily be grown in pots indoors year round. Make use of hanging planters for strawberries and herbs. Even cherry tomatoes can be grown in hanging planters. A few years ago we knew we were moving the first part of June. That year I planted our garden in large containers filled half way with Styrofoam packing peanuts then filled the rest of the way with soil to reduce their weight. When moving day came, we loading all the containers into a pick-up truck and simply brought our garden with us. It took three truck loads but we still had a very successful garden that year! So really where there is a will, there's a way.

A popular gardening trend is to plant a kitchen garden. Ideally this small garden will be just outside your kitchen. It usually includes cherry and/or beefsteak tomatoes, radishes, green onions, leaf lettuce and herbs or it may simply be all herbs. There is no restriction on what vegetables you can grown although some plants do not grow well with others. It is meant to supply you with produce for salads and fresh herbs for cooking. Using the square foot gardening method is ideal for a kitchen garden. A 4' x 4' bed will hold 16 different plants. Any sprawling plants are trained to grow upwards by staking making use of vertical rather than horizontal space. The bed does not need to be square either. Run a 2' x 8' bed along the side of your house and plant your kitchen garden there.

There are many ways to save money when setting up your kitchen garden. Containers for growing do not need to be fancy or expensive. Look for discarded 5 gal food grade pails or ask for them at doughnut stores and restaurants. Quite often they are free but some may charge a small fee of $1. You can even use an old kiddie pool or tires to make raised garden beds! Growing from seed can greatly reduce your costs. Seeds are quite inexpensive but if you get involved in a seed exchange group they will cost no more than postage. Get to know other gardeners who will gladly give you clippings.

How much can a kitchen garden save you? Your savings will really depend on what you grow and how you use your produce. We eat salads almost daily. Leaf lettuce usually averages about $1.29 at the grocery store. On average we use 4 heads of leaf lettuce per week or $5.16 per week. Over the course of the outdoor growing season, growing lettuce saves us $103.20 which is a pretty good return on the cost of the seeds at about $3.95 (5 pk 79¢ each). A flat of strawberries cost $15. An established bed will produce at least 3 flats so a savings of $45 less the cost of the initial plant. Yes, that is one plant because strawberries spread rapidly and they come up every year. Considerable saving can be seen with growing herbs as well. About the only thing I do not grow in my gardens is corn because it does take up a lot of space for the yield. Essentially anything edible you grow is going to save on your food dollars!


Monday, August 11, 2008

Organic Produce & Freezing Blueberries

Last Thursday I had to take a short road trip and as always I was on the look-out for places to stop for farm fresh produce. Even though the kitchen is not functional at the moment if I really had to I could can a batch of jam or prepare a small amount of food for freezing using the side burner on the outdoor grill. I stopped in at an orchard on the way home to find that the orchard is now owned by the same owners who operate two nearby health food stores. Everything is being grown using organic methods. The produce is chemical and pesticide free. Not only that but they are supporting local organic growers by buying produce they do not grow from them and selling it in their store. They have two key criteria that must be met. First the produce must be chemical and pesticide free, grown using organic methods. Second the produce must be local grown. I'm elated! One of the organic farmers I bought from decided there was no longer enough money in organic farming so has moved on leaving me looking for other organic growers.

How does this relate to this blog? Anyone who has been following this blog knows that I grow as much as possible using organic methods in raised gardens planted in the square foot gardening method using companion planting. What produce I can't or don't grow myself, I prefer organically grown local produce. Organic means I'm not getting those chemicals I work so hard to avoid. Locally grown means lower prices and keeping local area farmers aka friends, family and community members earning an income to support their families. This results in a stronger community. So the short answer is organic, locally grown produce fits in with my value system.

Organic Berries

Pictured are the organically grown blueberries, blackberries and raspberries I purchased. Now what I noticed is the organically grown raspberries were $1 per quart cheaper than where I normally buy them. Now I'm hit with a delimna as where I normally buy them is considerably closer to where we live. It is a small mom & pop operation and we know the family. What I will end up doing is supporting both as you really can't have too many raspberries.

The organically grown blackberries are huge! They have a wonderful flavour as well. The first quart is destined for topping plain homemade yogurt for breakfast. I will pick up enough for low sugar blackberry jam my next trip. I will also be picking up other berries to make a low sugar, tri-berry jam.

Blueberries are one of the healthiest berries you can eat. They are rich in anti-oxidants that neutralize the damaging free radicals in your body. The organically blueberries are large and sweet. At $4 per quart they are less expensive than those in the grocery store! I will be buying blueberries for canning syrup, jam and pie fill but blueberries are ever so easy to freeze!

Method: Pour ripe, unwashed blueberries onto a sided baking sheet in a single layer. Flash freeze. Pour the desired amount (1 c or 2 c) frozen berries in a vacuum freezer bag or zipper style bag. Vacuum seal. To use, pour the berries into a food strainer. Rinse with cold water then use in your recipe of choice.