My photo
Ontario, Canada
I am a wife, mother and grandma who enjoys the many aspects of homemaking. A variety of interests and hobbies combined with travel keep me active. They reflect the importance of family, friends, home and good food.
Cook ingredients that you are used to cooking by other techniques, such as fish, chicken, or hamburgers. In other words be comfortable with the ingredients you are using.
--Bobby Flay

For Your Information

Please watch this area for important information like updates, food recalls, polls, contests, coupons, and freebies.
  • [March 19, 2020] - Effective Mar 17, this blog will no longer accept advertising. The reason is very simple. If I like a product, I will promote it without compensation. If I don't like a product, I will have no problem saying so.
  • [March 17, 2020] - A return to blogging! Stay tuned for new tips, resources and all things food related.
  • [February 1, 2016] - An interesting report on why you should always choose organic tea verses non-organic: Toxic Tea (pdf format)
  • Sticky Post - Warning: 4ever Recap reusable canning lids. The reports are growing daily of these lids losing their seal during storage. Some have lost their entire season's worth of canning to these seal failures! [Update: 4ever Recap appears to be out of business.]

Popular Posts

Showing posts with label homemade convenience foods. Show all posts

Thursday, March 18, 2021

Home Canned Venison Chili and Pulled Pork

homecanned chili and pulled pork

Sometimes there's this nagging little feeling that something is not quite right.  In February of 2020, I was in high gear canning, dehydrating and prepping.  February is my normal month for canning meats, stocks, soups and dry beans.  While I don't can a lot of meats or soups, it's nice to have a few jars on hand as convenience foods.    

I made a large batch (16 qt) of venison chili.  Part was for a couple of dinners, part was froze and the remainder canned (4 x 500 ml).  That's the perfect size for chili cheese fries for two!  At the same time, I had the slowcooker going with a small batch of pulled pork for sandwiches and canning.  Both meats were pressure canned in the same load rather than run the canner twice.  This is possible when canning like products in the same size jar so processing times are the same.


Wednesday, March 06, 2013

Faux Lasagna

It has been eons since I bought a boxed ground beef helper.  Why?  These types of convenience foods are expensive for what you get and the are laden with food additives.  I checked a box for the ingredients at the grocery store the other day.  Most contain maltodextrin (a corn sugar that is highly addictive creating cravings for it), monosodium glutamate (triggers headaches and allergic reactions), modified milk ingredients, natural flavour (could be anything!) and if the product has cheese, the cheese is dried.  A pasta based helper perhaps has a cup of dried pasta, the seasoning packet and you provide the meat and liquid at a cost of more than four times the cost of dried pasta bought on sale and adding your own fresh ingredients and cheese.  I have several versions of homemade ground meat helper, all fresh and easily prepared in about the same time it takes to prepare a boxed version AND they eliminate the cost of the boxed mix along with all the additives.

faux lasagna casserole
Even if you use a boxed ground beef helper you have to brown the ground beef.  I have found I can make the actual convenient dry mix for about a quarter of the price of store bought but I can also make the entire casserole from scratch in pretty much the same time at a quarter of the price as well.

The other day, I made a faux lasagna casserole using 2 lb of lean ground beef.  It had a lovely flavour, very much like lasagna without the work.  Quite frankly, I don't find lasagna a lot of work even making the sauce from scratch but I wanted a quick meal that night.

Faux Lasagna
source: Garden Gnome

2 lb lean ground beef
2 c broad egg noodles
2 c shredded mozarella cheese
½ c shredded cheddar cheese
¼ c cottage cheese
1 c shredded Parmesan cheese (divided)
1 L (4 c) roasted Italian garden sauce with mushrooms

Brown the ground beef and drain.  Cook and drain the pasta.  Pour ground beef into a large mixing bowl.  Pour the sauce over the meat. Mix well.  Stir in the pasta then all the cheese reserving ½ c of the Parmesan cheese.  Mix well.  Pour into oven proof baking dish.  Sprinkle the remaining Parmesan cheese on top.  Bake at 350°F for 15 minutes or until warmed through and bubbly.

faux lasagna
This homemade faux lasagna casserole took 5 minutes longer prep time and 3 minutes longer cooking time than the boxed version.   I didn't factor in the time it takes to bring the boxed version to a boil though so in terms of timing the homemade version was really quite close to the boxed version.  However, I ended up with a less expensive and tastier dish than the boxed version.  The homemade version not only eliminated all the food additives, it was lower in sodium as well.  Unlike the boxed version, I didn't have to take time to stir occasionally either freeing up that time to do other things.

The proof is in the taste and hands down this faux lasagna is a winner.   It is rich, creamy and cheesy sure to satisfy any lasagna craving in short order.  I usually use 7 to 9 cheeses in my homemade lasagna but this recipe only had 4 cheeses.  The mozzarella cheese could easily be reduced to 1 c then add in another cup of any desired cheese.  Over all though, this was a very nice casserole!


Saturday, February 16, 2013

Slow Cooker Chicken Cacciatore

Meals do not have to be fancy or complicated to be both frugal and delicious.  Simpler meals save on the cost of additional ingredients, they take less prep work and often less clean-up.  They are the perfect go to meals that often become family favourites!

family pack boneless, skinless chicken breasts
Our local grocery store had boneless, skinless chicken breasts on sale so I bought a family pack.  The chicken breasts were quite large so were a good deal for $7.01.  I mentally calculated a yield of four servings from the package.

I really don't like buying any meat in this type of packaging as none of it can be recycled.  The  foam trays cannot be cleaned well enough to prevent an risk of contamination from the raw meat they held.  I wash the trays well, dry then spray with rubbing alcohol to kill off contaminants.  I reuse these types for applications that will not come into anything edible.

browning the chicken breasts
Most meats cooked in the slow cooker need to be browned first.  This seals in some of the juices while adding flavour.  I used organic coconut oil to lightly brown the chicken.  Normally, I would use olive oil as the sauce was tomato based but I'm experimenting with coconut oil.  Coconut oil is very heat stable making it suitable for searing or browning meats.  It adds a light nutty sweetness.

Coconut oil is one of the healthiest oils you can use for both culinary and home made beauty products.  It contains lauric acids that aid in digestion while protecting the body from bacterial and fungal infections.  It is a solid at room temperature.  It can be used as a moisturizer on hair and skin as well.  I highly recommend using it on your hair to keep it healthy and shiny.

preparing the slow cooker
Home canned tomato sauces are our number one homemade convenience food.  I make several different, gourmet tomato based sauces each tomato harvest.  They range from plain and smooth to rich and meaty with everything in between.  One of my specialty tomato sauces started off as a roasted tomato sauce that quickly evolved to several versions of fire roasted sauces.  Fire roasting gives a rich depth to the sauces that can't be achieved by simply roasting.

I placed the browned chicken breasts in the slow cooker then poured a 1 L (quart) jar of fire roasted Italian tomato sauce with mushrooms over the chicken.  I set the slow cooker on low for 2 hrs than increased to high for an hour.  This is a newer slow cooker that does operate at higher temperatures than the old one it replaced.

slow cooker chicken cacciatore
I served the chicken breast on a bed of extra broad egg noodles then ladled with sauce, topped with fresh grated Parmesan cheese and garnished with fresh parsley from my indoor garden.  It was a simple, low cost meal that was easy to prepare.

My home canned tomato sauces cost me nothing more than the canning lid, cooking fuel (fire roasting, processing) and extra ingredients if necessary.  A 1 L jar of sauce without meat or mushrooms averages about 30¢ but I can reduce that cost using a reusable canning lid (glass insert, Tattler, 4ever recap) by 13¢.  Store bought broad egg noodles are quite inexpensive and homemade even less expensive so the only real cost for me with this type of simple slow cooker meal is the meat.  In this case using store bought chicken at the sale price brought the cost per serving to just under $1.80 which is rather frugal.


Saturday, January 19, 2013

Chile con Carne with Cheesy Garlic Bread

January is very much a laid back, catch-up month for us rounding up the end of our winter vacation in December, the holidays and entertaining, as well as re-adjusting to the cold weather and getting the house up and running smoothly.  The first week of January I started a batch of yogurt, sour cream, sour dough starter and turned my attention to grocery shopping for produce and dairy.  My husband came down with a cold so I focused on home-made comfort meals.  The down time gave me a bit of time to plan what food preservation needed to be done.  Then by the second week of January I was sick and it hung on [I sure wish we would get a hard freeze to kill off all the germs!] so it was relying on the pantry and freezers.

chili from the freezer served with cheesy garlic bread
Chili con carne is one of our favourite home made meals.  Whether made with beef or venison, my version does contain beans that are cooked fresh when making a large batch or home canned if making a small batch.  The reality is, it takes as much work to make a huge batch of chili con carne as it does a smaller one.  I personally prefer to make the largest batch possible.  I home can chili con carne and it freezes nicely.  I usually freeze in 4 to 6 serving size.  It warms up nicely on the stove top or in the slow cooker.  Even if you don't home can the chili, this is one convenience product that can be frozen for a quick meal.

January is very much a fresh start month so we are rather busy but that doesn't mean we can't eat well.  I partially thawed a smaller container of chili con carne from the freezer.  Freezing chile con carne is very easy.  Once it is finished cooking, quick cool then ladle into freezer containers or freezer bags.  It can be froze in a container then popped out into a vacuum bag and vacuum sealed if desired.   If reheating on the stove top the chili need only be thawed enough to be able to get it out of the container.  I put it in a saucepan with just a little water then heat through.  If I am doing a larger amount for entertaining, I thaw the chili then reheat using a slow cooker.

Chili con carne is often served with soda crackers, tortilla or nacho chips, or corn bread.  I like serving it with cheesy garlic bread.  This is very easy to make and there are even ready to use, pre-made garlic bread loaves available, however home-made cheesy garlic bread is ever so easy to make.  I like using a home made French baguette but other breads can be used.

Method:  Use thick sliced home-made Italian style bread to make the cheesy garlic bread.  Lightly toast the bread in the oven.  Cut a garlic clove in half and rub over the surface of the toasted bread.  An alternative method is to brush the bread with garlic butter (finely chopped garlic blended into soft butter with a bit of parsley).  Top each slice generously with shredded mozzarella cheese.  Bake at 400°F until cheese is bubbly and just lightly browning.


Friday, January 18, 2013

The Versatility of Tomato Sauce

Last September I was extremely busy home canning ten hampers of tomatoes into various tomato products.  The total yield was 206 jars ranging in size from 250 ml to 1 L for a total volume of 111.5 L.  This may seem like a large amount but the goal is to home can enough to last from one growing season to the next.  Trust me, this will not be enough to last us a full year.   Guaranteed, we will run out of some of the tomato products well before the next harvest.

The number one question I get when someone sees our pantry for the first time is 'Why?' followed by 'What do you do with all of it?'  Well, the easy answer really is to explain that this is my grocery store so unlike most home makers, I'm not spending my time in the grocery store each week.  It is a way for us to avoid the horrendous amount of food additives, excess salt, HFCS and preservatives the food industry is so good pushing at us without acknowledging the health ramifications.  Essentially, my goal stocking our pantry with good, healthy and safe foods by taking responsibility in doing so.  The bonus of home food preservation and cooking from scratch is the monetary savings.   As to what I do with all of it...

spaghetti with roasted Italian sauce with mushrooms
I have been making roasted tomato sauces for a number of years so have developed several versions like fire roasted Italian tomato sauce with mushrooms.  This is a full bodied with a rich, deep flavour.  It makes for a quick, heat and serve over spaghetti as a meatless meal as pictured.  That is fresh parsley clipped from my continuous indoor garden.

On average, my tomato sauces cost 30¢ to 50¢ per L taking into account all costs (eg. lid, additional ingredients, cooking fuel).  With a 750 ml jar of this home canned tomato sauce, spaghetti and a sprinkling of Parmesan cheese, Caesar salad and home made bread or rolls , I can feed 4 adults for under $3 and still have left-overs.  The beauty of this sauce is, while it is an excellent quick sauce for pasta, it a very versatile sauce.  I use an immersion blender for those dishes if I don't want the larger chunks like mushrooms in some of my sauces but in general all the uses listed can be done with any tomato sauce.  A variety of home canned tomato sauces will always earn their keep in our pantry to help use eat healthy, frugal, home cooked meals.

Here are some of the ways I use my many home canned tomato sauces:

  • a sauce over meatloaf, burger patties or chicken
  • a sauce to cook meatballs or chicken in; brown the meat first then finish cooking in the sauce for tender, juicy results
  • a liquid for poaching fish in
  • a liquid for cooking rice in
  • a blush sauce (mixed with béchamel sauce) for pasta or chicken 
  • an ingredient in meatloaf, burger patties, and casseroles (eg. pasta based, cabbage rolls, chicken)
  • topping for baked brie or cream cheese served with crackers
  • a topping for twice baked potatoes (sauce, pepperoni or bacon, shredded cheese)
  • an ingredient for dip (sour cream, sauce, Parmesan cheese blended in food processor then topped with shredded cheddar cheese)
  • as a dip for cheese, bread sticks, pizza crust or chicken wings
  • as a pizza sauce
  • an olive tapenade (sauce, chopped olives, roasted red peppers, capers, fresh parsley) served with crackers
  • an ingredient in soups, stews, breads or biscuits
  • as a spread in panini 
  • a base for baked beans and sloppy joes


Wednesday, January 16, 2013

Homemade Verses Store Bought Plain Waffles

There are a multitude of small kitchen appliances available, many of which can save you a substantial amount of money over their lifetime.  Some are a more frugal choice than others and as always it depends on your needs.  For example, if you are buying store bought frozen waffles to have on hand for quick hot breakfasts, then consider a waffle maker.  They start at under $20 on sale ranging into the high end of about $150.  Consider too that waffles aren't just for breakfast any more.  You can make some rather tasty desserts using waffles and savory waffles can be used in the place of biscuits for dinner. The payback period on a waffle maker is about 6 months to a year depending on how you use it.

the new Cuisinart Belgian waffle maker in action
One of our kids very generously gifted us with a Cuisinart 4-Slice Belgian Waffle Maker (WAF-100C).  This maker produces waffles with deep pockets to hold more toppings.  There are five settings for browning control as well as ready-to-bake and ready-to-eat lights with audible signals.  The plates are non-stick so only need washing then a light oiling before use.

Another of our kids who has had a waffle maker for a few years showed me how to use the waffle maker while giving me a few tips.  The grandkids and adults enjoyed fresh made waffles for breakfast that morning.

The following week I decided to do a test run myself.  I had two goals in mind.  The first goal was learning how to use the waffle maker and find the sweet spot for perfect browning.  The second goal was to do a comparison of the price of store bought frozen waffles, to those made with a store bought mix, then finally to waffles made with homemade batter.

waffles just cooked in the waffle maker
I had just enough Krusteaz pancake and waffle mix to make four waffles.  This is a mix that only requires the addition of water that the guys like for hunt camp.  I mixed up the batter then poured into the heated waffle maker.

According to the manual, it takes a bit of experimenting to determine the right amount of batter needed.  They suggest two cups of batter poured evenly over the bottom then quickly spread with a heat resistant spatula before closing the lid.  Obviously, I have to work on my technique a bit but as my first attempt, I was rather pleased.

comparing the rise on store bought mix verses homemade
The next batch of waffles was made with the basic waffle recipe that came in the Cuisinart manual.  I did a test batch by halving the recipe to make 8 waffles.  What really impressed me was the higher rise using the homemade batter (right).  Clearly, the homemade batter gave nicer results but the true test was the taste.

The waffles made with the store bought mix were good.  They were fluffy with a nice flavour.  The waffles made with the homemade mix were fluffier with a cleaner flavour (aka no chemical overtones).

Basic Waffles
modified from: Cuisinart Instruction Booklet, WAF-100, Pp. 7

3 c unbleached all-purpose flour
3 tbsp organic granulated sugar
1½ tbsp baking powder
¾ tsp baking soda

¾ tsp sea salt
2½ c milk
½ c plus 1 tbsp vegetable oil
3 large eggs, slightly beaten

Combine the ingredients in the order listed in the bowl of a stand mixer.  Blend until smooth.  Let the batter rest 5 minutes before using.  Pre-heat the waffle maker then pour about 2 c of the batter onto the centre of the lower grid.  Spread evenly with a heatproof spatula.  Close the lid and cook until the tone sounds.  Open lid and carefully remove the waffles.

cooled waffles ready for packaging
Overall, I was very impressed at the ease and cost of using a homemade waffle mix.  The results in terms of rise and flavour was superior to using a store bought mix.  Store bought frozen waffles cost about $4 for 12 or 43¢ each.  Homemade waffles using a store bought mix cost about 8¢ each and those using a scratch batter cost about 6¢ each.  Now there isn't a huge difference in cost between store bot mix and scratch batter but with scratch you aren't getting all the additives.  You are getting 8 ingredients rather than a whole list of chemicals.  Another thing you aren't getting with home-made is all that extra packaging.  Homemade waffles are about 20% larger than the store bought frozen version so that's something to consider as well.

waffles ready for the freezer
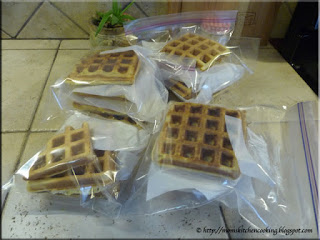
The cooled, stacked waffles were ready for packaging for the freezer.  Home-made waffles reheat in the toaster just like store bought so you still have the convenience of a quick, hot breakfast.  I packaged 4 waffles per freezer bag each separated by a piece of parchment paper and pressing the air out of the bags.  I didn't vacuum seal them as they are meant for short term storage in the freezer.

This is just a really easy way to put healthy, hot breakfasts on the table with a minimal of effort while saving a considerable amount of money.  The two batches took me under 15 minutes so I can't complain at being able to stock the freezer with waffles ready to pop into the toaster being time consuming at all.  An easy way to do this would be to make a double batch of batter, then freeze what isn't used that day.  On the other hand, if you are making waffles for a family and need a larger amount, in a half hour you can easily make 64 waffles by making a triple batch of the basic (recall I halved so double then triple).  The cooking time is very minimal so you can really make a lot of these in a very short period of time.


Monday, January 14, 2013

Frugal Kitchens 101 - Year Round Preserving

Frugal Kitchens 101
Here in the beautiful wintery wonderland of Ontario, we are hunkered down for the cold and chill the reality of winter brings.  We spent a total of six weeks spanning two trips of the last quarter of 2012 at our vacation home in Florida so really had four days to do any prep when we arrived home.  Between prep, family, friends and gatherings it was a very busy and tiring end to 2012!  The holidays are over and being mid-January, things are pretty much back to normal.  Quite often the days are cold, damp, and dreary so I don't want to be outdoors.  This is the time of year my attention turns to doing a bit of home preserving that doesn't have to be done during the busy canning season (mid-May through mid-October).  I don't mind so much running the dehydrator, canner or even the oven to do extra baking for a bit of homemade convenience for those times I don't want the heat in the house.  It's also a wonderful time to take a half hour to assemble a few cake, cookie and dry soup mixes as well as add a few casseroles and other goodies to the freezer.  I personally like to can a few soups, stews, stocks and beans during this time as well but if you don't can, you can still make all these homemade convenience products and freeze them.  It is just a great way to help stock the pantry and feezers that in most cases takes me about a half hour a week for making dry mixes or doughs for the freezer.  The canner usually runs once a week but anything I am canning is very low prep and I can work on other things while the canner is running.  A mini bulk cooking session for the freezer depends on the complexity of the dish with some casseroles taking more prep but things like waffles and pancakes less than a half hour.  Here's a few of the things I will be doing over the next few weeks with a few tips.

  • waffles/pancakes/French toast - All of these have become rather popular sellers in the freezer section of the grocery store but did you know you can save a lot of money making your own and freezing them for later use?  'Tis true.  Store bought freezer waffles cost about $4 for 12 but home-made costs between 40¢ - 70¢ for 16 to 20 waffles and takes only about 15 minutes of time if that.  Not only that, my home-made versions are healthier for you with no preservatives, HFCS or artificial anything AND they are every bit as convenient as store bought so a quick hot breakfast is only as far as the toaster.
  • beans - This is the time of year I love canning dried beans for easy and convenient ready to use beans (eg. brown beans, kidney, navy, black).  The beans are soaked overnight then home canned without cooking however, if you cook them they can also be frozen.  Now one thing I haven't tried but am planning on trying is cooking the beans then seasoning and mashing.  The mash is spread out on a drying sheet then dried and powdered to be used for instant refried beans.  It sounds interesting.
  • stocks - I save bones throughout the year to be made into stock when I have time aside of the busiest of the canning year.  Once I have enough bones accumulated, I make stock that in my case is home canned but can easily be frozen.
  • soups/stews - I make a lot of soups and stews from scratch but I also like to stock the pantry and freezers with home made versions to be used when it is too hot to cook.  During this time, the soups and stews are more meat and root vegetable based, depending on when the organic meat and poultry is available.
  • bread crumbs/croutons - I do a lot more bread making during the winter months so tend to make a lot more bread crumbs and croutons for use through-out the year.  Both use up the last bits of home made bread.  They can be stored in the pantry for short term storage or in the freezer for longer term storage.
  • casseroles - By far the two favourite casseroles that I make in bulk for the freezer are lasagna and quiche followed as a close runner up by cottage pies.  The amount I make in one bulk cooking session is very much dependent on available freezer space.
  • jams/jellies - If I have more fruit than can be processed during the busiest of the canning year, I often freeze it to make into jams when it isn't as busy.  This is also the perfect time to make jellies from wine or organic juices as well as herbed jellies from herbs grown indoors.
  • dehydrating - This is the prime time for me making beef jerky, powdered citrus peel, as well as citrus slices and coconut.
  • mixes - I make up several mixes (eg. baking, cake, pasta starts, hamburger helpers etc) usually over a period a week focusing only on mixes.  This takes a bit more planning.  Day 1, I make a list of the mixes I want to make and the number of jars, then make a shopping list for the bulk food store, pick-up my supplies then organize into ingredients per mix.  Day 2 through 4 or 5, I work assembly line style to quickly fill the jars with the desired mixes.  Each mix takes me anywhere from 5 to 15 minutes to jar ready for vacuum sealing and labelling.  Set-up is minimal requiring the recipes, measuring cups/spoons, ingredients and jars with lids.  Clean-up is minimal as well since several of the ingredients are completely used in the mixes with no left-overs.  In total, I spend about 30 minutes per mix session, usually one session per day during that week.


Tuesday, December 11, 2012

French Canadian Split Pea Soup

Home canning is a year round venture in our home.  I've even canned foods in our RV when we had it and now at our vacation home.  When we arrived home from our vacation home the end of October there were a few good deals on produce.  I had spent a good three weeks without doing a lot of cooking so I was definitely in the mood to cook.  What many don't realize is, cooking is a stress releaser for me.  When I am stressed, I cook and quite frankly it doesn't matter what time of day it is.  If I get up at 3 AM and can't sleep, much to my husband's dismay, I am cooking.  The smells of me cooking wakes him up and of course he has to do a bit of taste testing.  I'm sure you can see where that is going :)

smoked ham
Our local Walmart had hams on for a decent price, not on sale but a good price.  I bought a Country Naturals smoked ham that has no preservative!  It was only 700 g compared to the less expensive per unit 900 g smoked ham with preservatives.  I wanted the smoked ham for French Canadian split pea soup that I planned on canning.

I am seriously a bit particular about my ingredients when home canning.  If I have to buy any ingredient that will be home canned, I want organic and preservative free, so chose the Country Naturals brand over the store brand that had preservatives in the ham even though the store brand was 900 g and less per unit than the Country Naturals brand.

French Canadian split pea soup
French Canadian split pea soup is simply delightful.  I always make it from scratch.  Habitat French Canadian split pea soup was on sale 796 ml can for 97¢, regular price $1.57.  I decided to can up a batch that would be every bit as convenient as the commercially canned version but without any additives and less expensive.  Now at 97¢ a can, it is hard to see where homemade would be less expensive, but it is.

I rummaged through the freezer to find the ham bone I had kept from a charcoal grilled ham.  A ham bone really brings out the flavour in French Canadian split pea soup.  The bone from a ham that has been charcoal grilled has an unbeatable hint of smokiness to the soup.  Ideally, dried whole yellow peas are preferred if you can find them but I use split peas as that is what is available in the grocery store.  I used a carrot and onion from the Ontario produce purchase.  I ended up with 10 - 500 ml jars of the soup at a total cost of $4.99 including the cost of the natural gas to run the canner.   It was just a little over a litre more of what I could have bought the soup on sale for.

French Canadian split pea soup is a warm, creamy, filling and comforting soup perfect for a winter evening meal.  It is quite filling and very inexpensive to make from scratch.  Serve with homemade sourdough bread  and a side salad for an easy meal.  I like canning this soup for an easy homemade convenience soup but it will freeze nicely as well.

French Canadian Split Pea Soup
modified from Ball Blue Book (2001) Pp. 61

900 g (2 lb) split yellow peas
16 c water
1 ham bone from charcoal smoked ham
1/2 lg Spanish onion
1 extra large carrot
1 bayleaf
1 tsp celery salt
1 1/2 c cooked ham

Bring the water, ham bone, bayleaf and split peas to a boil.  Reduce heat and let simmer until the beans are tender.  Remove 2 c of the peas and set aside.  Stir in the chopped onion, carrot, and celery salt.  Cut the ham into small cubes and set aside.  Cook the soup until the carrots are tender.  Purée the soup with an immersion blender until smooth.  Stir in the reserved split peas and cooked ham.  Ladle into hot prepared jars.  Place lids and rings on the jars.  Tighten rings finger tight if using the metal snap lids.  Tighten rings finger tight then turn back 1/4 inch if using Tattler lids or glass inserts.  Process in pressure canner at 10 lb pressure for 75 minutes at altitudes up to 1,000 feet above sea level.  Adjust the processing if at higher altitudes using the altitude adjustment chart.  Remove from canner.  Do not adjust rings if using metal snap lids.  If using Tattler lids or glass inserts, fully tighten the rings immediately after removing jars from the canner.  Let the jars cool undisturbed for 24 hours.  Remove the rings and test the sea.  Wash rings and jars then dry well.  Rings can be put on the jars loosely for storage if desired.

Yield: 10 - 500 ml jars


Saturday, December 08, 2012

Easy Pulled Beef Dinner

Still working our way through the 40 lb of Ontario produce, I decided to make a quick, easy pulled beef dinner.  I keep packets of pre-cooked meats in the freezer as quick meal starts and homemade versions of lunch meats.  While some of the meat packets are left-overs, the majority of them are meats cooked then frozen specifically as quick meal starts and lunch meats.  When we need a quick meal, I simply pull a packet from the freezer to reheat and add sides that usually come from the pantry.

easy pulled beef dinner
Normally, when I get a good deal on produce the rule of thumb is 50% is for fresh use with the remainder being preserved for later use.  Some will preserve the full amount but this is one of those things that you do what works best for your family.  I thawed a packet of pulled beef then added fresh sides.

Pulled beef or pork is very easy to make but it basically takes a day of slow cooking.  You can cook the meat long and slow on the grill, in the oven or use a slow cooker.  I often cook two roasts (beef or pork) at a time, one for immediate eating and the other for quick meal starts.  Pulled meat is cooked long and slow usually with some type of barbeque sauce added although gravy works well too.  The meat is pulled into strands using two forks.  It is wonderful on sandwiches but can also be used as the meat for dinner.

I served the pulled beef with rustic mashed potatoes and French cut green beans.  Rustic mashed potatoes are very easy to make.  They are delicious as a side dish but also make a wonderful topping for cottage pie.  Simply wash and cut potatoes and carrots into chunks.  Add two wedges of cabbage then steam the vegetables until tender.  Pour the cooked vegetables into the bowl of a stand mixer.  Add a bit of sour cream, cream cheese, butter and milk.  Sorry, I don't measure so can't give you the actual amounts.  Mix until just creamy with a few lumps.  Stir in salt and pepper to taste.

French cut green beans is really all about the cut.  The cut is longitudinally from end to end of the bean giving long thin strands as opposed to the normal cross cut for green beans.  It is a bit more work but gives a different look and textural component.  Quite often if you buy French cut green beans commercially canned they come with bits of pimento (red chili pepper) and onion.  I can them plain without pimento or onions.

The holiday season is the time of year you really appreciate getting a nice, nutritious meal on the table without a lot of effort or time.  This meal was on the table in 15 minutes making it a very nice choice for quick meals.  This is one reason to cook ahead specifically dishes that can be used as homemade yet healthy convenience.


Friday, November 02, 2012

Home Canned Chili Con Carne

We do a lot of entertaining both at home and our vacation home.  One huge hit has always been chili dogs which basically are all beef wieners topped with chili, onions and grated cheese.  For years, I made chili with beans (chili con carne) from scratch then froze part for chili dogs.  Then a few years ago I decided to home can chili with beans as a homemade convenience product for the pantry.

home
Commercially canned chili con carne is available in the grocery store but hands down the winner in terms of flavour and price is home canned.  Home canned chili is processed in a pressure canner for 75 minutes at 10 lb pressure at altitudes under 1,000 feet above sea level.  This raises the internal contents of the jar to 116°C/240°F so the contents will still be boiling when the jars are removed from the canner.  While this temperature will destroy any botulinum spores that could produce toxin resulting in Botulism, it does produce a slight to pronounced textural change in some  foods.  Pressure canned meats can take on a slight rubbery texture some do not care for.  However, a nice selection of home canned meat products is ideal as homemade convenience products in the pantry as well as emergency supplies in the event of a power failure.


Tuesday, October 16, 2012

Home Canned Chili with Beans and Spaghetti Sauce with Meat

The kitchen has been a flurry of activity with home canning to restock the pantry after our move last year.  Now a lot of folks think home canning is all about jams, jellies, pickles, applesauce and tomatoes.  Well, it is all about those home canned products but it is so much more.  Home canning is also about putting homemade convenience products in your pantry.  This includes delicious home canned foods like chili with beans and spaghetti sauce with meat.  These are two must have homemade convenience foods in out pantry.

home canned chili and spaghetti sauce with meat just out of the pressure canner
I use my own TNT recipes for home canned chili with beans and spaghetti sauce with meat.  Both are processed in the pressure canner (large pot with label) for 60 minutes at 10 lb pressure using 500 ml jars.  I will discuss both in a bit more detail in the next couple of posts.

Pictured are the jars of chili sauce with beans (3 rows closest to wall) and spaghetti sauce with meat (3 rows closest to counter edge).  Jars just removed from the canner will still have the contents boiling and they are subject to thermal shock by sitting on a cold surface or getting a draft.  To the right out of camera range is a set of patio doors.  If they are open I close them to prevent drafts.  Overhead is a ceiling fan that I also turn off.  I set the hot jars on T-towels on the ceramic tile surface just to be on the safe side.  The jars will sit as is undisturbed until well cooled then seals tested after 24 hours, the bands are removed and washed along with the jars.  Don't they just look delicious?


Friday, September 21, 2012

Home Canned Condensed Tomato Soup

Just because I insist on doing as many home canned products as possible to avoid all the food additives in commercially canned foods, doesn't mean I don't like a few convenience products.  Two commercially canned foods I do buy are condensed tomato soup and condensed cream of mushroom soup.  I set out to create home canned versions for both.  Neither recipe are posted on this blog yet as I am still tweaking but the Garden Tomato Soup is also a good recipe to can if you are looking for a tomato soup recipe.

home canned condensed tomato soup
My home canned condensed tomato soup recipe has come about by running several small batches each season then tweaking from there.  I have tweaked for both flavour and texture.  While this soup can be used much the same was as brand name condensed tomato soup, it has a brighter flavour and it it laden with artificial additives.  It is pressure canned at 10 lb pressure for 25 minutes.

Unfortunately, 30 jars of home canned condensed tomato soup will not meet our needs until the next growing season.  I will be running another large batch of the soup with a couple more tweaks.  Once I get it just right, I will post the recipe.  Until then, I back busy in the kitchen processing tomatoes into all kinds of delicious home canned, tomato based products!


Friday, August 17, 2012

Home Canned Vegetable Beef Soup

Many perceive home canning to be making strawberry jam, canning peaches, making dill pickles and applesauce but in reality home canning is so much more than that.  With the exception of a few commercially canned foods like pickled eggs and canned pastas pretty much anything can be home canned and more.  Now, it is not recommended to home can pasta, rice and barley but I have had good success with all used in low amounts.  Home canning is an excellent way to put convenience foods on your table for a fraction of the cost of store bought.

home canned vegetable beef soup
The beauty of canning homemade soups aside of being frugal and preservative free is they are about the easiest thing to home can in a pressure canner.  You don't need an actual 'recipe' which fits into my way of thinking when it comes to soups.    There are two rules.  Only fill the jar with solids half full and always process in a pressure canner to the timing of the lowest acid ingredient.

I made a layered beef soup to home can.  Really this is just a name because the ingredients are added in layers but they don't quite stay in layers afterwards.  I had five 1 - L jars with one seal failure (right) that just happened to be testing a new homemade stock with.  Still, I put four jars in the pantry and enjoyed the other for dinner.

Home Canned Vegetable Beef Soup
recipe by: Garden Gnome

2 lb lean stew beef
3 stalks celery
3 lg carrots
1 med onion
12 small potatoes
2½ L beef stock
1 tbsp Montreal steak spice
1 tbsp Worcestershire sauce
½ tsp herbes de provence per jar

Brown the stew beef and cut into bite sized pieces.    Stir in Montreal steak spice and Worcestershire sauce.  Let simmer 2 minutes.  Remove from heat.  Place each vegetable into a separate bowl.  Cut the celery into thin slice.  Cut the washed carrots into coins  Chop the onions.  Cut the potatoes into chunks.  Cut corn from the cob.  Slice carrots.  Chop celery and onions.  Heat stock.  Layer the ingredients to fill the hot, prepared jars half full.  Add herbes de provence.  Pour hot stock over the solids leaving a ½ inch headspace.  Wipe rims.  Adjust two piece metal snap lids (or Tattler reusable lids or glass inserts).  Screw bands on jars (adjust accordingly if not using metal snap lids).  Process for 500 ml for 75 minutes [90 minutes for L] at 10 lb pressure in pressure canner at altitudes up to 1,000 feet above sea level.  At higher altitudes refer to altitude adjustment chart on Canning FYI page.  Remove from canner.  Adjust bands if using Tattler or glass inserts.  Allow to cool 24 hours.  Remove bands and test for seal.  Wash and dry bands and jars.  Label and store.


Thursday, June 21, 2012

Kitchen Quick Tips - Pancakes

kitchen quick tips

Make a double or triple batch of pancakes then freeze on a cookie sheet after cooking.  Package into freezer bags once froze.  The pancakes can easily be warmed up in the toaster or microwave oven for a quick hot breakfast during the week.


Thursday, April 19, 2012

Kitchen Quick Tips - Freezing Grated Cheese

kitchen quick tips
Grate cheese then spread it on a cookie sheet and freeze.  Transfer to a freezer bag and freeze for homemade convenience.  Grated cheese can be vacuum sealed if desired.  


Wednesday, April 04, 2012

Planned Left Overs for Homemade Convenience

Yesterday I wrote about the pot roast with fire roasted tomato basil gravy I made for dinner a couple of nights ago.  This roast was cooked with planned left overs in mind to be made into a couple of homemade convenience foods.  Since I cook mainly from scratch, homemade convenience foods really help sometimes. 

roast beef slices
Roast beef lunch meat is currently priced at $5 for two 300 g joined packages, 600 g/1.32 lb total.  That works out to $3.78/lb.  We buy our beef on the hoof which works out to $2.35/lb across all cuts of beef we get.  One of these days I am going to invest in a meat slicer but thin slicing the beef or any other meat or poultry is not a huge problem.  The Yoshiblade™ ceramic knife does a really nice job of thinly slicing meats but any sharp chef's knife will do the same thing. 

Of note, the price of $3.78/lb for the joined packages applies to ham and turkey, both of which I can get for a better price than beef.  While store bought lunch meat is convenient, it takes little time to slice your own and with homemade you aren't getting all that salt, artificial colourants or flavourings.  This left over chunk of roast beef took me less than 5 minutes to slice into thin sandwich slices. 

vacuum sealed roast beef slices
Anytime I cook a roast beef, turkey, ham or cook extra BLSL chicken breasts, I reserve a portion to make homemade lunch meat slices.  I vacuum seal the slices then freeze to use as needed.  Each packet is about 1 lb which is a comfortable amount of sandwich meat to use up within a few days.  One of our freezer baskets has been dedicated to store these convenient meat packets.  The beginning of each week I take one packet from the freezer and place in the meat keeper of the refrigerator.  It's thawed by Tuesday ready for making sandwiches which works out nicely as usually we have left over meat from Sunday's dinner for Monday's lunch.

blended roasted vegetables
I cooked the pot roast with potatoes, carrots and cabbage that took on the flavour of the fire roasted tomato basil sauce used to make the final gravy well.  We like cottage pie, aka shepherd's pie made with ground beef or pork.  Years ago I discovered that rustic cottage pie is much more flavourable and more nutritious if you add carrots and/or cabbage to the potato topping.  I pulsed the roasted, richly flavoured vegetables with left over gravy and a little milk in the food processor to make the topping for a small cottage and a vegetable side for another meal.  This really is convenience because all I have to do is thaw and use.  Quite frankly, it would take me about 15 minutes to make a potato, carrot, and cabbage topping but it wouldn't have the extra depth of roasting and it saves me 15 minutes cooking time on a busy night.

blended roasted vegetables ready for freezing
I ended up with about 4 cups of the blended roasted vegetable mixture.  Originally I was going to freeze it together but decided to divide it half so I could vacuum seal.  In order to vacuum sealing this type of dish, it has to be froze first then vacuum sealed.  You can freeze in muffin tins for individual serving sizes or in 2 c containers.  Once frozen, the dish is popped out of the container and placed into a vacuum bag then sealed.

This method is used for anything wet like soups, stews, and some vegetable side dishes.  Whole rolls, loaves of bread and muffins can be frozen then vacuum sealed as well.  This prevents crushing.  The nice thing is you need a lot less freezer containers which translates into less container clutter.

frozen roasted vegetable blend vacuum sealed

Vacuum sealing the frozen dish is highly recommended because it eliminates freezer burn and reduces the freezer space needed.   I use a Sharpie to mark the contents and date just above the seal, right on the bag.  It works well and is low cost.

I like opening bags of foods frozen this way then popping them into a bowl while still frozen to avoid any mess of getting them out of the bag.  I ended up with two 2 c bags of the roasted vegetable mix per bag.  That is enough for one topping of a rustic cottage pie and a side or two cottage pies or two sides.  Not bad for a convenience food, if you ask me :)


Monday, March 12, 2012

Frugal Kitchens 101 - Homemade Convenience (2)

Frugal Kitchens 101

Last week's Frugal Kitchens 101 discussed homemade convenience and some of the equipment needed and what to focus on.   Store bought convenience foods are more expensive and often filled with artificial colourants, flavours, fillers and other additives.  In short, most of them are over price while being unhealthy.  Homemade convenience foods, on the other hand avoid all the negatives of store bought while saving you both time and money.  Let's face, we can all appreciate saving both!  This article will expand on homemade convenience a bit further.  I have two short exercises for you to do:

  • check your pantry - Go through your cupboards, refrigerator, freezer and pantry.  Make a list of every single store bought convenience food you have on hand.  If you are the average consumer it will include store bought convenience foods like pasta mixes, canned pasta, canned beans, frozen pizza, fish sticks, condensed soups, boxed cookies and those types of foods. 
  • scout out your grocery store - The grocery store is filled will a multitude of convenience products.  If you need inspiration for making your own, just wander through the canned, snack and frozen food aisle.  Make a list of what you could make yourself at home as a homemade convenience product (eg. make a huge batch of pancakes then freeze them for a quick breakfast warmed up in the toaster during the week).
Ok, you now have two lists so let me comment on those first.  The pantry check will give you a good idea of the store bought convenience foods you use and what products to focus on when making your own homemade convenience products.  Chances are good, these are the very same products that make their way into your grocery cart every time you do a large grocery shopping.  If these foods are mixes (eg. rice or pasta mixes) about 20% of the cost is for actual food with remaining 80% going towards mark-up and packaging.  If you use one box of boxed mac & cheese a week at $1.29 for brand name the cost works out to $67.08 per year.  If you make from scratch at 20% of that cost you only pay $13.14 for a year for better quality product even if using powdered cheese bought from a bulk food store.  Now that is just one store bought convenience product.  Imagine if you do the same cost analysis for all the store bought convenience foods you buy.   If you really want to save money then you have to look at all the convenience items you use in the same light.

Let's consider commercially canned foods.  In comparison to home canned they are considerably more expensive even taking into consider the hydro, gas or propane used to process the food.  A jar of gourmet style roasted tomato sauce cost me about 20¢.  A similar store bought tomato sauce (with sugar and/or HFCS added) costs over $3.  Both are just as convenient but the homemade is healthier and a lot less expensive.  But consider what the commercially canned foods are giving you that home canned foods are not - exposure to BPA (bis-phenol A) which has been linked to breast cancer, in over 130 studies as well as hardening of the arteries, depression and diabetes.  Campbell's the dominant company making condensed soups is finally making the move to stop using BPA in the plastic coating, mandatory in all commercially canned products manufactured in North America.  France, the European Union, Canada, Denmark and Japan have taken action in banning or partially banning BPA.  The USA FDA may ban the use of BPA in food packaging in their decision on March 31 of this year.  Consider too the CFIA (Canada) and USDA (USA) both have set standards for allowable bug parts in commercially canned foods meaning you are getting more than what you bargained for aside of food in the form of additives, preservatives, carcinogens and even bug parts.

Onto the next list, the one you made at the grocery store.  First, if you are shopping mainly in the centre aisles rather than the perimeter of the store you are spending too much money.  So looking at the convenience products you can easily and rather effortlessly make at home, here is a short list to consider.  Your list should be individualized based on those two lists - what you regularly use and what you can easily make yourself.
  • tv dinners or individual dinners - Use left overs to create your own.  Freeze for later use.
  • seasoning blends - Grow and dehydrate the herbs yourself (right on your windowsill) then buy what you can't grow (eg. salt, peppercorns, bay leaves, cinnamon, etc.) to make your own seasoning blends.  Two good examples of homemade seasoning blends that take seconds to make yet are considerably less expensive than store bought and taste better are: poultry seasoning and taco seasoning.
  • frozen or refrigerated dough - Make your own from scratch then use as you would store bought.  You can even freeze bread dough so you can enjoy fresh baked bread when you don't have time for all the prep.  One trick I use is if I'm making dough, I double the recipe.  Half goes for that day's use and the other half goes for later use.
  • frozen breakfast foods - Take an hour or so to stock your freezers with ready to heat and serve breakfast foods like breakfast sandwiches, omelets, breakfast burritos, pancakes and waffles.  You can use a large batch muffin mix to use as needed or simply make a couple of trays of muffins then freeze for use later.
  • dump and pour meals - These include condensed soups and stews, canned pastas, and any other food that you basically open the can and serve.  Substitute with homemade soups and stews that freeze nicely or you can home can them for the same heat and serve convenience.  
  • the starches - Beans (eg. kidney, navy, etc.), rices, potatoes (sweet and regular) and some pastas can be cooked ahead then froze in meal sized portions or as part of other dishes.  Beans and potatoes can be home canned but rice and pasta should be added to soups when reheating.
  • the snacks - Dollar for dollar this is the second biggest portion of food costs next to meat and for some families might even exceed what is spent on meats.  Ideally, divert away from commercially prepared snacks if favour of healthier choices like fruits, nuts, vegetables and popcorn.  It takes less than 10 minutes to pop a huge batch of popcorn at home which is a healthier choice than potato chips and coated popcorn treats.  Most cookies and cakes freeze nicely.  Some pies freeze nicely as does individual fruit pies (eg. turnovers). 


Monday, March 05, 2012

Frugal Kitchens 101 - Homemade Convenience (1)

Frugal Kitchens 101
We live in a very busy world with a lot of demands coming at us from every direction.  The food industry recognized this problem back during WWII when many women went into the workforce.  They began perpetuating the myth that convenience foods like commercially canned foods and tv dinners saved the busy homemaker time because these foods eliminated the prep time necessary for home cooked.  About the same time the budding fast food industry came on to the scene further perpetuating the myth of convenience.  What neither the food or fast food industry told the consumer is their convenience foods were chuck full of artificial food additives, sugar, salt and fat.  In addition to being unhealthy or at best borderline unhealthy, these foods were expensive and yet the consumer bought in to the myth thanks to the every growing bombardment of advertising.   There is absolutely no reason why you cannot make your own homemade convenience and guaranteed it will be at a fraction of the cost of store bought.  The reason you save a considerable amount of money is because you are using the raw ingredients then assembling yourself.

Equipment Needed:

  • freezer containers - Aluminum trays (Sam's Club or dollar store) are ideal for freezing casseroles and side dishes.   Plastic freezer containers are quite inexpensive ranging from the Ziploc style containers to stronger Rubbermaid containers.  Zipper style freezer bags are cheapest when bought in bulk at Sam's Club - 8¢ per bag compared to 40¢ in the grocery stores and 30¢ per bag for vacuum seal bags.
  • mason jars/glass jars - Mason jars can be bought new or found for free through your local Freecycle or Craig's list.  Glass jars can be recycled from any food you buy in glass jars or put the word out to your family and friends that you need jars with lids.  If you need the larger 1 gallon jars, ask at restaurants.
  • plastic bags - By far, vacuum sealing foods for the freezer protects them from freezer burn better than any other sealing system.  The cheapest source for vacuum bags is The Sweet Attack.
  • specialty equipment - The following will help you create your homemade convenience:  BWB canner (free - $20), food vacuum sealer ($50 to $100), and food processor or attachment for KitchenAid stand mixer ($20 to $60).  It will help to have larger volume stock pots as well that you can likely find at yard sales or thrift stores for $2 to $5 but you only need one or two.  Ideally, you will buy a pressure canner ($70 to $250) as well BUT many of the foods that are pressure canned can also be froze.
Homemade convenience can be though of essentially duplicating what you are already buying (eg. cake mixes, cookies, canned beans, canned soups, breaded frozen fish sticks or chicken pieces, rice or pasta mixes and frozen dinners.  Take a walk through your grocery store with a set of new eyes knowing most of the foods in the canned, frozen and baking mix sections you can easily make yourself, not only saving money but  the homemade versions are healthier for you because you control the ingredients.  Here are a few of my homemade convenience products and a few tips:
  • inspiration - The biggest inspiration is knowing I'm saving money yet getting a healthier product.
  • recipes - You don't need a lot of fancy recipes.  Refer to blogs like this one or Google for 'bulk cooking' or 'Once a Month Cooking' or 'OAMC'.  There are oodles of tried and tested recipes out there and don't forget many of your family favourites can easily be frozen.
  • meal quick starts - When starting out with homemade convenience, focus on meal quick starts.  This will be family specific but some of mine are cooked meat or poultry in gravy, seasoned ground beef or pork, taco meat, chopped onions, chopped green peppers, breaded or coated anything (eg. vegetables, meat, poultry, fish, mushrooms, cheese),  side dishes, meatballs and that type of think.  While some of my meal quick starts are home canned the majority are frozen.
  • mixes - Oh my gosh the food industry really charges through the nose for mixes.  In reality you are buying into the myth and paying for the packaging.  A cake mix that costs 99¢ contains about 10¢ worth of ingredients and you still have to add oil, water or milk and an egg or two.  In less than 15 minutes time you can easily put the ingredients for 10 cake mixes together at a cost of $1 or 1/10th the price of store bought.  The same can be said for homemade shake & bake coating, many seasonings like poultry seasoning and taco seasoning, as well as mixes like stove-top stuffing and rice-a-roni.  The beauty with most mixes is they can assembled so quickly so it is quite easy to have 10 cake mixes or 10 bread mixes sitting in your pantry in about 10 minutes time.
  • cookies - The dry ingredients for cookies can be assembled as a mix or you can make refrigerator cookies.  These are similar to the store bought cookie tubes in the refrigerator sector but at a fraction of the price.
  • sauces - Many store bought sauces can easily be made at home at a fraction of the cost of store bought.  A jar of my roasted tomato sauce costs about 20¢ compared to store bought at $3.99 and while I love the convenience of having it ready to use in the jar because I home can it, most tomato sauces freeze quite nicely if you don't want to can them.
  • soups - I buy most soups to use as a sauce and by far the most purchased is cream of mushroom soup.  Aside of cream soups, homemade soups can be home canned (an easy and less expensive alternative to store bought) or they can be frozen.
  • casseroles and ready meals - Many casseroles freeze nicely in aluminum trays for freezer to oven convenience.  Most quiche freeze nicely as does homemade tv-style dinners.  The beauty of making your own tv-style dinners is they are geared to your tastes and are considerably lower in sugar and sodium than most store bought tv-dinners.  
  • rice, potatoes, beans -  All of these starches can be cooked in advanced then froze for later use.  Potatoes and beans can be home canned for dump and pour convenience.  A 2 lb bag of frozen french fries will cost you about $1.50 or 75¢ per lb but a 10 lb bag of fresh potatoes costs at it's highest price here $3.99 or 40¢ per lb.  Using a French fry cutter, that 10 lb bag of potatoes can easily be turned into ready to cook French fries for your freezer in about 15 minutes.  Freeze rice and beans in meal or recipe sized portions.
  • snacks - Store bought snacks are expensive!  One of the best ways to avoid the expense is to switch to fruits with their own protective packaging.  Prepare carrot sticks, celery sticks, pepper slices and cucumber slices in advance then keep them in the refrigerator for a quick, yet healthy snack.  Homemade popcorn is always inexpensive and easy to make fresh but you can make it ahead then seal tightly for later use if desired.  You can do the same with oven baked potato chips.  Dehydrate fruit purée for fruit leather, and vegetables like zucchini for healthy vegetable chips.  Buy fruit on sale or grow your own then dehydrate to make your own trail mixes or granola.


Thursday, September 15, 2011

Kitchen Quick Tips - Easy Bacon Bits

kitchen quick tips

Take one full pound of bacon the cut across the strips to form small about half inch pieces.  Fry until crisp, stirring to keep pieces separated.  Drain and reserve grease.  Cool then put into zipper style freezer bag.  Freeze bacon pieces and use as needed.  Freeze bacon grease to use in cooking as needed.


Sunday, August 29, 2010

Home Canned Convenience

When I tell people that I do a lot of canning many of them think of jams, peaches, and pickles.  Then if I mention we buy very little in the way of commercially canned or jarred foods there is the assumption that we don't use convenience foods.  That is the furthest from the reality of canning here.  I can everything from meats, soups, stews, fruits, vegetables, beans (eg. navy, kidney, etc) and so much more.  Canning is a year round activity with the canners running three or more times a day during the peak canning period and about once a week during the off-peak canning season.  There are many home canned products I make that I would consider convenience products.  One of those is home canned spaghetti meat sauce.

spaghetti with meat sauce
I make a lot of home made pasta sauces both for fresh using and for home canning.  Most of the tomato based sauces I make have longer cooking times that develops the flavour.  Home canned pasta sauces are convenience products in the pantry because they are ready to open and reheat without the long cooking times.  A few year ago I started canning some of my home made spaghetti meat sauce.  I usually can a half canner load (7 - 500 ml jars) with the remaining sauce used for fresh eating.

I can remember when I first considered canning this gorgeous meat sauce.  I was concerned that it would change the texture of the meat.  However the end results were quite good so now I keep a few jars in the pantry as a convenience product.  Pictured is the quick spaghetti with meat sauce meal I made recently.  I had been canning peaches that day but still wanted a home cooked meal without the work.  Spaghetti with meat sauce garnished with fresh grated parmesan cheese and Thai basil fit just that criteria.  The sauce tasted just like fresh made!

In terms of price the home canned comes in at about $1.90 per 500 ml jar including the electricity to cook and can the sauce.  While this sounds on the high side in comparison to store bought plain pasta sauce it is less expensive than store bought gourmet versions of pasta sauces.  This pasta sauce is definitely on the gourmet side of the scale when it comes to pasta sauces.  It's a nice, chunky and meaty sauce with full flavour that cans well.