My photo
Ontario, Canada
I am a wife, mother and grandma who enjoys the many aspects of homemaking. A variety of interests and hobbies combined with travel keep me active. They reflect the importance of family, friends, home and good food.
Cook ingredients that you are used to cooking by other techniques, such as fish, chicken, or hamburgers. In other words be comfortable with the ingredients you are using.
--Bobby Flay

For Your Information

Please watch this area for important information like updates, food recalls, polls, contests, coupons, and freebies.
  • [March 19, 2020] - Effective Mar 17, this blog will no longer accept advertising. The reason is very simple. If I like a product, I will promote it without compensation. If I don't like a product, I will have no problem saying so.
  • [March 17, 2020] - A return to blogging! Stay tuned for new tips, resources and all things food related.
  • [February 1, 2016] - An interesting report on why you should always choose organic tea verses non-organic: Toxic Tea (pdf format)
  • Sticky Post - Warning: 4ever Recap reusable canning lids. The reports are growing daily of these lids losing their seal during storage. Some have lost their entire season's worth of canning to these seal failures! [Update: 4ever Recap appears to be out of business.]

Popular Posts

Showing posts with label chili. Show all posts

Saturday, January 19, 2013

Chile con Carne with Cheesy Garlic Bread

January is very much a laid back, catch-up month for us rounding up the end of our winter vacation in December, the holidays and entertaining, as well as re-adjusting to the cold weather and getting the house up and running smoothly.  The first week of January I started a batch of yogurt, sour cream, sour dough starter and turned my attention to grocery shopping for produce and dairy.  My husband came down with a cold so I focused on home-made comfort meals.  The down time gave me a bit of time to plan what food preservation needed to be done.  Then by the second week of January I was sick and it hung on [I sure wish we would get a hard freeze to kill off all the germs!] so it was relying on the pantry and freezers.

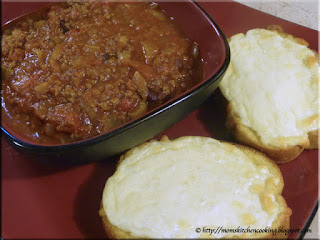
chili from the freezer served with cheesy garlic bread
Chili con carne is one of our favourite home made meals.  Whether made with beef or venison, my version does contain beans that are cooked fresh when making a large batch or home canned if making a small batch.  The reality is, it takes as much work to make a huge batch of chili con carne as it does a smaller one.  I personally prefer to make the largest batch possible.  I home can chili con carne and it freezes nicely.  I usually freeze in 4 to 6 serving size.  It warms up nicely on the stove top or in the slow cooker.  Even if you don't home can the chili, this is one convenience product that can be frozen for a quick meal.

January is very much a fresh start month so we are rather busy but that doesn't mean we can't eat well.  I partially thawed a smaller container of chili con carne from the freezer.  Freezing chile con carne is very easy.  Once it is finished cooking, quick cool then ladle into freezer containers or freezer bags.  It can be froze in a container then popped out into a vacuum bag and vacuum sealed if desired.   If reheating on the stove top the chili need only be thawed enough to be able to get it out of the container.  I put it in a saucepan with just a little water then heat through.  If I am doing a larger amount for entertaining, I thaw the chili then reheat using a slow cooker.

Chili con carne is often served with soda crackers, tortilla or nacho chips, or corn bread.  I like serving it with cheesy garlic bread.  This is very easy to make and there are even ready to use, pre-made garlic bread loaves available, however home-made cheesy garlic bread is ever so easy to make.  I like using a home made French baguette but other breads can be used.

Method:  Use thick sliced home-made Italian style bread to make the cheesy garlic bread.  Lightly toast the bread in the oven.  Cut a garlic clove in half and rub over the surface of the toasted bread.  An alternative method is to brush the bread with garlic butter (finely chopped garlic blended into soft butter with a bit of parsley).  Top each slice generously with shredded mozzarella cheese.  Bake at 400°F until cheese is bubbly and just lightly browning.


Friday, November 02, 2012

Home Canned Chili Con Carne

We do a lot of entertaining both at home and our vacation home.  One huge hit has always been chili dogs which basically are all beef wieners topped with chili, onions and grated cheese.  For years, I made chili with beans (chili con carne) from scratch then froze part for chili dogs.  Then a few years ago I decided to home can chili with beans as a homemade convenience product for the pantry.

home
Commercially canned chili con carne is available in the grocery store but hands down the winner in terms of flavour and price is home canned.  Home canned chili is processed in a pressure canner for 75 minutes at 10 lb pressure at altitudes under 1,000 feet above sea level.  This raises the internal contents of the jar to 116°C/240°F so the contents will still be boiling when the jars are removed from the canner.  While this temperature will destroy any botulinum spores that could produce toxin resulting in Botulism, it does produce a slight to pronounced textural change in some  foods.  Pressure canned meats can take on a slight rubbery texture some do not care for.  However, a nice selection of home canned meat products is ideal as homemade convenience products in the pantry as well as emergency supplies in the event of a power failure.


Tuesday, November 15, 2011

Slow-Cooker Tuscan Chili

I have enjoyed receiving Kraft Foods Canada's formerly free What's Cooking for several years.  I have kept every single copy!  It was with a bit of sadness to read that they will now be charging for a subscription.  The thing is every single recipe in What's Cooking uses one or more Kraft products so in essence the magazine is one big advertisement for Kraft products.  I pay enough for Kraft products as it is so will not be paying for a subscription just to find out how to use one of their products.  Instead I will be visiting their website for free recipes.

slow-cooker Tuscan chili
I browse though all the delicious dishes in the magazine, marking each one I want to try with a post-it.  As always the newest copy of What's Cooking (Festive 2011) had several interesting recipes.  Yesterday, I made the Slow-Cooker Tuscan Chili modifying it to use home canned diced tomatoes and home canned white kidney beans.    One problem in substituting home canned for commercially canned anything is the size difference.  The recipe called for 19 oz of diced tomatoes and the same amount of undrained white kidney beans but home canned sizes are 1L or about a quart (tomatoes) and 500 ml or about a pint for beans.  In order to make the chili according to the amounts in the recipe I ended up with part jars of tomatoes and beans left over.  The interesting aspect of this chili is there's no chili powder yet it is a rich and flavourable chili, sure to please.  I served the chili with fresh baked French bread (first bread baked in new natural gas oven) and extra virgin olive oil seasoned with basil for dipping.

Slow-Cooker Tuscan Chili
modified from:  Kraft Canada, What's Cooking (Festive 2011), Pp. 25

1 lb mild Italian sausage
1 onion, chopped
20 oz home canned diced tomatoes
20 oz home canned or fresh cooked white kidney beans
1 green bell pepper
1 yellow bell pepper
5½ oz tomato paste
½ tsp dried basil leaves
½ tsp dried oregano leaves
2 tbsp Italian shredded cheese mix per serving*

Carefully remove the casing from the sausage.  Break the sausage into pieces while browning.  Drain and spoon sausage into slow-cooker.  Chop peppers and onion.  Add vegetables, tomatoes and beans to the slow-cooker.  Stir well then stir in herbs.  Cover and cook on low for 4 hours.  Ladle into bowls.  Top with shredded cheese.  Serve with fresh baked bread and extra virgin olive oil for dipping.

*Shredded Italian cheese mix (brand name or store brand) can be found in the dairy section or you can make your own by combining shredded provolone, mozzarella, parmesan and emmental cheeses.


Tuesday, November 01, 2011

A Mini Bulk Cooking Session

My husband is gearing up for his annual trip to hunt camp.  Although he doesn't hunt himself, enjoys helping to organize and cook the food for the camp.  It has become tradition for me to make a batch of chili, a tray of lasagna and a piece of peameal bacon for the guys to enjoy at hunt camp.  I decided to do a mini bulk cooking session on Sunday since both the chili and lasagna are cooked from scratch then frozen to keep well during the long drive to where the hunt camp is.

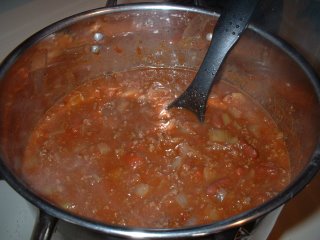
my largest stock pot with moose meat chili
Traditionally some of the previous year's catch is taken to the current year's hunt camp but they guys were unsuccessful last year.  One of our friends is a avid hunter who seldom eats any domestic meat. He brought in a very generous amount of ground  moose meat for a chili.  I like working with moose meat.  It is leaner than beef, with a deeper colour and richer flavour but lacking the gameness of venison. 

I used my largest stock pot (10" high, 11" diameter) to make a nice sized batch of moose meat chili.  As with venison, I added a little ground pork to the meat mixture.  All of my chilies take a bit of pre-planning as the dried beans need to soak overnight.  This is one time that while the quick soak method could be used, the time is needed for the long, slow simmer of the chili.  I really need to do up few cases of home canned beans!

trays of moose meat chili
Once the moose meat chili was finished, I removed it from the heat then allowed to cool on the deck before moving the pot to the refrigerator for the night.  We've had frost a few mornings so the air is quite chilly in the evening making the deck a perfect cooling spot.

The next day I ladled the moose meat chili into containers for freezing.  The two larger containers are 12¾" x 10¾" x 2½".  Each tray is enough for 10 to 12 servings of chili.  One will be used for hunt camp while the other will be used one of our larger events this winter.  The two smaller rectangular containers hold 9½ cups.  Each container is enough for 6 good sized servings.  One went into the freezer for ourselves while the other went to one of our kids who was elated to get homemade moose meat chili.  The smaller bowl was put into the refrigerator for my husband's lunch.

trays of lasagne ready for the freezer
Before I start talking about the lasagne, check out one of our new outlets.  My husband and I spent almost the entire day on Saturday replacing electrical receptacles and switches on the main level.  It was a chore and we still have part of the master bedroom and guest room to do.  The ones on the back splash are a bit fancier with larger than standard cover plates and the outlets have a safety feature to prevent foreign objects from being inserted.  The three kitchen outlets on the back splash are split receptacles so I can run more than one small appliance at a time without worrying about blowing a fuse!

My lasagne starts with homemade spaghetti with meat sauce made from scratch using fresh tomatoes (in season) or home canned tomatoes.  Once the sauce is put together with everything but the seasonings and secret ingredients, the cooking begins.  When the sauce gets to the right point I stir in the the remaining ingredients and continue with a low, slow simmer tweaking the flavour as the sauce cooks.  Nothing is measured!  After the sauce is cooled it is ready to make the lasagne.

My record number of lasagne made during one bulk cooking session is 19.  Yes, that is 19!  This was a rather tame session making two large trays and one small tray with the remaining sauce left plain for a later meal of spaghetti with meat sauce.  I used a blend of 8 cheeses in this lasagne with the remaining cheese divided into two zipper freezer bags.  One lasagne and bag of cheese will go to hunt camp.  The cheese is destined for ranch sticks there [I'll post about those later this week.]  The other large tray and sauce went into the freezer, the remaining cheese into the refrigerator and I baked the smaller lasagna for dinner.

smallest tray of lasagna freshly baked
Lasgne (plural) when made from scratch is rather labour intensive but it freezes nicely which is why anytime I make lasagna (singular), I make more than one tray.  I use my homemade meat sauce, cheese blend and regular lasagna noodles made with 100% duram semolina flour.  I don't care for the no-cook lasagna noodles at all.  The bottom layer is always meat sauce followed by cheese and the first layer of noodles.  That noodle layer is topped lightly with the cheese blend, cottage cheese and spinach, then the rest of the layers follow as sauce, cheese, noodles, sauce and ending with a cheese layer.  There are usually 2 noodle layers in the shallow trays (pictured) and 3 or 4 noodle layers in the deeper trays.  I bake at 350ºF with the top tented with tin foil removing the foil for the last 15 minutes of baking.  I increase the baking time if baking from frozen as there's no need to thaw first.


Friday, November 10, 2006

Venison Chili

My husband leaves for hunt camp early Tuesday morning. One of the traditions they have is to take a meal made with venison from last year's kill. It is supposed to bring good luck for this year's hunt. One of the guys is bring venison sausage. I'm still working on getting his recipe. I'm making venison chili for them.

Venison Chili Reducing

Venison chili or at least the way I make it looks very much like beef based chili. Don't let this picture fool you either. This is a large batch in my largest stock pot that is a 20 qt capacity. Like many things I make, there isn't an actual recipe. What is important is using good quality ingredients. For this batch I will start with 2 lb ground venison, 1 lb bacon, 5 lb cooking onions, 1 spanish onion, 2 stalks celery, about 1/2 green pepper, 3-4 cloves minced garlic, home canned or frozen tomatoes, dried or home canned kidney beans, about 1 tbsp cocoa powder, about 1 tbsp brown sugar, chili powder, onion powder, garlic powder, paprika, cumin, and filtered water. I have been fairly specific about certain ingredients for a reason. Onions are a key ingredient. I like to use cooking onions for flavour and heat. A spanish onion provides sweetness to balance any sharpness to the cooking onions. I will only use home canned or home frozen tomatoes if fresh is out of season. Home canned or frozen tomatoes impart an almost fresh taste that commercially canned tomatoes seem to lack and there is none of the tinny flavour some commercially canned tomatoes have. That is important because that tinny flavour throws off the final flavour of the chili. Cocoa powder add depth and colour to the final chili. It's not something that when you taste the chili you can say "hey, that's cocoa"! So it is one of those ingredients that works in the background adding to the final results without being obvious. Brown sugar, preferrably organic, melds the flavours. Again, this should not be an obvious flavour but one that works in the background. I put kidney bean in my chili, both beet and venison. They add protein, body, texture and visual appeal. However, I willonlyuse dried or home canned kidney beans. These lack the salt of some commercially canned kidney beans but more important they have a fresher flavour. Bacon also plays a key role in venison chili. Some like to use ground pork but to me the bacon just says so much more and it imparts that all important mouth feel. Filtered water is also important as it will not impart any off flavourings to the final chili. So that's the basic ingredients.

Method: First, if using dried kidney beans, allow to soak overnight then drain. Get your mis en place in order especially for the seasonings and vegetables. Guestimate with the seasonings. I'd say I used about 1/4 c chili powder, 1/2 tbsp paprika, 1 tsp onion salt, 1 tsp garlic salt, and 1 tbsp cumin but that can always be adjusted as you are cooking. Once started, you do not want to find out you are missing an ingredient. For the seasonings, I use a larger bowl and mix them together before adding to the chili. Once you have your mis en place in order, it is time to start cooking! Cut the bacon across the strips in about 1/2-inch increments. Pan fry the bacon until browned but not crispy. Remove the pieces from the pan reserving the grease. Allow the bacon pieces to drain on a paper towel while reheating the grease. Add the ground venison to the pan and allow to brown. Do not over cook! Remove from the pan and allow to drain. Venison is quite lean so needs the extra fat but you still don't what a lot of extra fat.

Now the fun starts. Put the chopped vegetables into a large stock pot including the garlic and if you are using dried beans add them now. Do not add any seasonings yet! Some will sautée or even lightly heat the vegetables. I prefer to lightly heat the vegetables then add the browned venison and bacon pieces. Pour in 1 -2 quarts of home canned tomatoes (quart = 32 oz) and stir well. Add a little filtered water if the mixture is too dry. Bring the meat and vegetable mixture to a boil then reduce to a low simmer, stirring occasionally. Simmer until the onions are translucent. Now it is time to add the cocoa and brown sugar and if you are using canned beans, add them now too. Note the depth of the colour and add up to a 1/2 tbsp if the colour is too bright but keep in mind the chili powder and other seasonings will add colour depth as well. Now add the other seasonings and mix well. Waft the smell using your hand to gently bring the smell towards your nose. Then do a small taste test putting a tsp of chili mixture into a bowl then tasting. Careful of the taste testing as you can go through a lot of chili that way! A good idea is to get another guinea pig aka family member to do a taste test as well. My husband loves doing this and has become quite an expert of "yep, needs more garlic" even if it's cheesecake. All kidding aside, what you want is a total melody of smell and flavours. If all goes well there will be no seasoning adjustments needed. This will give you a nice chile eveyone likes without being a mouth burner. If you want more heat, add either chili powder, paprika, cayenne pepper or hot sauce.

Oh I almost forgot, I love serving chili with homemade sourdough bread. I make an entry for the starter and bread recipe shortly.