My photo
Ontario, Canada
I am a wife, mother and grandma who enjoys the many aspects of homemaking. A variety of interests and hobbies combined with travel keep me active. They reflect the importance of family, friends, home and good food.
Cook ingredients that you are used to cooking by other techniques, such as fish, chicken, or hamburgers. In other words be comfortable with the ingredients you are using.
--Bobby Flay

For Your Information

Please watch this area for important information like updates, food recalls, polls, contests, coupons, and freebies.
  • [March 19, 2020] - Effective Mar 17, this blog will no longer accept advertising. The reason is very simple. If I like a product, I will promote it without compensation. If I don't like a product, I will have no problem saying so.
  • [March 17, 2020] - A return to blogging! Stay tuned for new tips, resources and all things food related.
  • [February 1, 2016] - An interesting report on why you should always choose organic tea verses non-organic: Toxic Tea (pdf format)
  • Sticky Post - Warning: 4ever Recap reusable canning lids. The reports are growing daily of these lids losing their seal during storage. Some have lost their entire season's worth of canning to these seal failures! [Update: 4ever Recap appears to be out of business.]

Popular Posts

Showing posts with label bulk cooking. Show all posts

Monday, January 14, 2013

Frugal Kitchens 101 - Year Round Preserving

Frugal Kitchens 101
Here in the beautiful wintery wonderland of Ontario, we are hunkered down for the cold and chill the reality of winter brings.  We spent a total of six weeks spanning two trips of the last quarter of 2012 at our vacation home in Florida so really had four days to do any prep when we arrived home.  Between prep, family, friends and gatherings it was a very busy and tiring end to 2012!  The holidays are over and being mid-January, things are pretty much back to normal.  Quite often the days are cold, damp, and dreary so I don't want to be outdoors.  This is the time of year my attention turns to doing a bit of home preserving that doesn't have to be done during the busy canning season (mid-May through mid-October).  I don't mind so much running the dehydrator, canner or even the oven to do extra baking for a bit of homemade convenience for those times I don't want the heat in the house.  It's also a wonderful time to take a half hour to assemble a few cake, cookie and dry soup mixes as well as add a few casseroles and other goodies to the freezer.  I personally like to can a few soups, stews, stocks and beans during this time as well but if you don't can, you can still make all these homemade convenience products and freeze them.  It is just a great way to help stock the pantry and feezers that in most cases takes me about a half hour a week for making dry mixes or doughs for the freezer.  The canner usually runs once a week but anything I am canning is very low prep and I can work on other things while the canner is running.  A mini bulk cooking session for the freezer depends on the complexity of the dish with some casseroles taking more prep but things like waffles and pancakes less than a half hour.  Here's a few of the things I will be doing over the next few weeks with a few tips.

  • waffles/pancakes/French toast - All of these have become rather popular sellers in the freezer section of the grocery store but did you know you can save a lot of money making your own and freezing them for later use?  'Tis true.  Store bought freezer waffles cost about $4 for 12 but home-made costs between 40¢ - 70¢ for 16 to 20 waffles and takes only about 15 minutes of time if that.  Not only that, my home-made versions are healthier for you with no preservatives, HFCS or artificial anything AND they are every bit as convenient as store bought so a quick hot breakfast is only as far as the toaster.
  • beans - This is the time of year I love canning dried beans for easy and convenient ready to use beans (eg. brown beans, kidney, navy, black).  The beans are soaked overnight then home canned without cooking however, if you cook them they can also be frozen.  Now one thing I haven't tried but am planning on trying is cooking the beans then seasoning and mashing.  The mash is spread out on a drying sheet then dried and powdered to be used for instant refried beans.  It sounds interesting.
  • stocks - I save bones throughout the year to be made into stock when I have time aside of the busiest of the canning year.  Once I have enough bones accumulated, I make stock that in my case is home canned but can easily be frozen.
  • soups/stews - I make a lot of soups and stews from scratch but I also like to stock the pantry and freezers with home made versions to be used when it is too hot to cook.  During this time, the soups and stews are more meat and root vegetable based, depending on when the organic meat and poultry is available.
  • bread crumbs/croutons - I do a lot more bread making during the winter months so tend to make a lot more bread crumbs and croutons for use through-out the year.  Both use up the last bits of home made bread.  They can be stored in the pantry for short term storage or in the freezer for longer term storage.
  • casseroles - By far the two favourite casseroles that I make in bulk for the freezer are lasagna and quiche followed as a close runner up by cottage pies.  The amount I make in one bulk cooking session is very much dependent on available freezer space.
  • jams/jellies - If I have more fruit than can be processed during the busiest of the canning year, I often freeze it to make into jams when it isn't as busy.  This is also the perfect time to make jellies from wine or organic juices as well as herbed jellies from herbs grown indoors.
  • dehydrating - This is the prime time for me making beef jerky, powdered citrus peel, as well as citrus slices and coconut.
  • mixes - I make up several mixes (eg. baking, cake, pasta starts, hamburger helpers etc) usually over a period a week focusing only on mixes.  This takes a bit more planning.  Day 1, I make a list of the mixes I want to make and the number of jars, then make a shopping list for the bulk food store, pick-up my supplies then organize into ingredients per mix.  Day 2 through 4 or 5, I work assembly line style to quickly fill the jars with the desired mixes.  Each mix takes me anywhere from 5 to 15 minutes to jar ready for vacuum sealing and labelling.  Set-up is minimal requiring the recipes, measuring cups/spoons, ingredients and jars with lids.  Clean-up is minimal as well since several of the ingredients are completely used in the mixes with no left-overs.  In total, I spend about 30 minutes per mix session, usually one session per day during that week.


Saturday, May 05, 2012

A Mini Bulk Cooking Session

Years ago I came across an idea called once a month cooking (OAMC).  The premise was that you took a weekend to prepare enough meals for the freezer to last the entire month.  Well, the concept was not new to me as I had been doing mini bulk cooking sessions for years.  An actual OAMC session can be quite over whelming. It is hectic with the extensive shopping, prep work, cooking and packaging for freezing.  My modified method fills the freezer without using an extensive cooking session.  The day following picking up our bulk meat purchase I did a mini bulk cooking session.

taco salad
We had been out of ground beef for about five weeks before I picked up our bulk beef purchase.  Oh sure, I could have ground up one of the roasts but I didn't.  The thing is we really really were missing our ground beef.

I took 4 lbs of ground beef from the freezer to do a bit of bulk cooking.  One pound went to make to plain browned ground beef.  My husband loves it just like that on bread.  The second pound went towards taco salad, one of our absolutely favourite summer meals.  The next two pounds were used to make a couple of ground beef casseroles for the weekend.

browning ground beef
The beauty of ground beef is you really can brown up several pounds then divide it down into what you want to use.  Once browned you can add whatever seasonings or sauce you want.  I browned up two pounds of the ground beef.  When the ground beef was browned, I divided it into two portion - on for the base of the hamburg casserole and the other for the base of a cottage pie.  It ended up being a pound of browned ground beef being used for each casserole.  I used about 2 cups of homemade gravy with the browned ground beef to from the base for the cottage pie.  Really, using homemade gravy is best if at all possible.

some of the ingredients for mini bulk cooking session
The other ingredients were fairly simple and while there was a bit of overlap in the ingredients something that is desirable when bulk cooking, there was enough of a difference to delineate the two casseroles.  I like using a lot of fresh ingredients as you can see and while some of the ingredients do overlap for both of the casseroles the end result is two very different casseroles.  The ingredients were those that are on hand in the pantry and freezers.

casseroles ready for the oven
I made a hamburg casserole (left) and a cottage pie (right).  I will say that I very seldom use just a plain potato topping for cottage pie.  I like using unpeeled steamed potatoes with one or more vegetables, cream cheese, sour cream or plain yogurt as the topping for cottage pie.  It adds a bit of rustic texture while adding a lot of flavour.  I always use homemade gravy to form the base of the cottage pie as well.

There was leftover elbow macaroni from the hamburger casserole so I decided to make a small mac and cheese.  I used one of the new KitchenAid ceramic baking dishes.  I seriously love these new baking dishes!  In the end I had one hamburg casserole, one rustic cottage pie, one mac and cheese with leftover cheddar cheese sauce.

homemade mac and cheese
My husband took one look at the casseroles then declared the mac and cheese for dinner.  Doesn't it look scrumptious?  The beauty of doing a mini bulk cooking session, is not only do you have the food in the freezer you have several meals for the rest of the month.

The casseroles I made all would freeze nicely and they were more than enough for easy eating for the weekend without being froze.  The nice thing is I really didn't spend a lot of time putting the casseroles together.  What is important when doing these types of canning sessions is flexibility.  In this case I had extra elbow macaroni so immediately made a tray of mac and cheese but had there been extra of another ingredient I would have used it in some way.


Sunday, November 20, 2011

Ten Dozen Peanut Butter Cookies

I don't make a lot of cookies and I don't make them often yet when I do I turn to my Betty Crocker's Cookbook (circa 1969) for easy recipes.  There is a lot of history behind that cookbook!  My Mom gave it to me as a wedding gift that has served me well over the years.  It is my most prized and cherished cookbook and while I have a smaller Betty Crocker's New Cookbook (1996) and the newest copy of the the big red Betty Crocker Cookbook (2011), I still turn to my cherished 1969 edition. 

peanut butter cookies in the oven
My husband's favourite cookie is peanut butter.  I make them a couple of times a year using my tried and trusted recipe for peanut butter cookies from Betty Crocker's Cookbook (circa 1969).  I have used this recipe since being a newlywed.  It has brought many a smile over the years. 

If you have been following this blog you will know we recently moved and I made the ultimate decision to switch to natural gas as a cooking fuel.  This was a hard decision as I seriously loved my Jenn-Air slide in range.  I was determined to switch to natural gas with this move due to the ever rising costs of hydro in Ontario, Canada as well as being able to accommodate the larger stock pots and pressure canners I use on a regular basis.

I made a large batch of peanut butter cookies a couple of days ago, ten dozen to be precise.  I have read a lot of complaints about natural gas ovens with respect to them having hot spots so was a bit nervous baking cookies for the first time.  Pictured is a tray of the peanut butter cookies in the oven.  Granted I have gone from three oven racks to two but other than that, the cookies baked nicely without a problem.

ten dozen peanut butter cookies
So what does ten doezen peanut butter cookies look like?  Voila!  The white tray was prepared for a larger event we were hosting last Saturday.  I apologize for the quality of the picture as the cookies were not over baked!  I'm getting used to the lighting in the new kitchen that is resulting in a few less than ideal pictures. 

Peanut butter cookies freeze nicely so I set the tray aside for the weekend, filled a container with cookies for my husband to take to the office then packaged the rest for freezing.  It was a very productive evening!  Oh my gosh did the house ever smell good and my husband was in seventh heaven seeing that many peanut butter cookies.  Next up, shortbread cookies!


Tuesday, November 01, 2011

A Mini Bulk Cooking Session

My husband is gearing up for his annual trip to hunt camp.  Although he doesn't hunt himself, enjoys helping to organize and cook the food for the camp.  It has become tradition for me to make a batch of chili, a tray of lasagna and a piece of peameal bacon for the guys to enjoy at hunt camp.  I decided to do a mini bulk cooking session on Sunday since both the chili and lasagna are cooked from scratch then frozen to keep well during the long drive to where the hunt camp is.

my largest stock pot with moose meat chili
Traditionally some of the previous year's catch is taken to the current year's hunt camp but they guys were unsuccessful last year.  One of our friends is a avid hunter who seldom eats any domestic meat. He brought in a very generous amount of ground  moose meat for a chili.  I like working with moose meat.  It is leaner than beef, with a deeper colour and richer flavour but lacking the gameness of venison. 

I used my largest stock pot (10" high, 11" diameter) to make a nice sized batch of moose meat chili.  As with venison, I added a little ground pork to the meat mixture.  All of my chilies take a bit of pre-planning as the dried beans need to soak overnight.  This is one time that while the quick soak method could be used, the time is needed for the long, slow simmer of the chili.  I really need to do up few cases of home canned beans!

trays of moose meat chili
Once the moose meat chili was finished, I removed it from the heat then allowed to cool on the deck before moving the pot to the refrigerator for the night.  We've had frost a few mornings so the air is quite chilly in the evening making the deck a perfect cooling spot.

The next day I ladled the moose meat chili into containers for freezing.  The two larger containers are 12¾" x 10¾" x 2½".  Each tray is enough for 10 to 12 servings of chili.  One will be used for hunt camp while the other will be used one of our larger events this winter.  The two smaller rectangular containers hold 9½ cups.  Each container is enough for 6 good sized servings.  One went into the freezer for ourselves while the other went to one of our kids who was elated to get homemade moose meat chili.  The smaller bowl was put into the refrigerator for my husband's lunch.

trays of lasagne ready for the freezer
Before I start talking about the lasagne, check out one of our new outlets.  My husband and I spent almost the entire day on Saturday replacing electrical receptacles and switches on the main level.  It was a chore and we still have part of the master bedroom and guest room to do.  The ones on the back splash are a bit fancier with larger than standard cover plates and the outlets have a safety feature to prevent foreign objects from being inserted.  The three kitchen outlets on the back splash are split receptacles so I can run more than one small appliance at a time without worrying about blowing a fuse!

My lasagne starts with homemade spaghetti with meat sauce made from scratch using fresh tomatoes (in season) or home canned tomatoes.  Once the sauce is put together with everything but the seasonings and secret ingredients, the cooking begins.  When the sauce gets to the right point I stir in the the remaining ingredients and continue with a low, slow simmer tweaking the flavour as the sauce cooks.  Nothing is measured!  After the sauce is cooled it is ready to make the lasagne.

My record number of lasagne made during one bulk cooking session is 19.  Yes, that is 19!  This was a rather tame session making two large trays and one small tray with the remaining sauce left plain for a later meal of spaghetti with meat sauce.  I used a blend of 8 cheeses in this lasagne with the remaining cheese divided into two zipper freezer bags.  One lasagne and bag of cheese will go to hunt camp.  The cheese is destined for ranch sticks there [I'll post about those later this week.]  The other large tray and sauce went into the freezer, the remaining cheese into the refrigerator and I baked the smaller lasagna for dinner.

smallest tray of lasagna freshly baked
Lasgne (plural) when made from scratch is rather labour intensive but it freezes nicely which is why anytime I make lasagna (singular), I make more than one tray.  I use my homemade meat sauce, cheese blend and regular lasagna noodles made with 100% duram semolina flour.  I don't care for the no-cook lasagna noodles at all.  The bottom layer is always meat sauce followed by cheese and the first layer of noodles.  That noodle layer is topped lightly with the cheese blend, cottage cheese and spinach, then the rest of the layers follow as sauce, cheese, noodles, sauce and ending with a cheese layer.  There are usually 2 noodle layers in the shallow trays (pictured) and 3 or 4 noodle layers in the deeper trays.  I bake at 350ºF with the top tented with tin foil removing the foil for the last 15 minutes of baking.  I increase the baking time if baking from frozen as there's no need to thaw first.


Tuesday, May 08, 2007

Chicken Stock Revisited

Anyone following this blog will know I've been focusing on chicken for the last almost two weeks. The sale ends on Wednesday so my husband picked up another twelve chicken breasts (4.286 kg, $18.64) yesterday and I told him to pick up more today. So it was a surprise when I saw someone was googling to find out why their chicken stock was not clear and stumbled upon my blog. I thought that would be a great post since I have been canning a lot of stock lately.

Quick Cool

I posted earlier on how I make stock. For those who do not wish to go back a couple of posts, I use chicken bones, skin, onion with skin on, celery, carrot and a bayleaf.

I wanted a clear chicken stock for part of this batch. By far the majority of he chicken stock I make is not clear as seen in the following picture. That doesn't bother me but there are sometimes you want a nice clear stock. The first trick to a clear stock is a quick cool. The way to do this is remove the stockpot from the burner and immediately immerse it in a sink filled with iced water.

The second trick to a clear stock is to remove all the chicken fat. Once well chilled, peel off the the chicken fat without disturbing the stock. When the fat has been removed, carefully pour the stock through a fine mesh strainer double lined with cheese cloth. Try not to disturb any solids during this process. Return the solids and water to make regular chicken stock.

Clarified and Regular Chicken Stock

This photo shows the difference between clarified and non-clarified chicken stock. I canned up seven pints of regular and six pints of clear chicken stock. As you can see the regular stock is cloudy likely due to a slower chill but the biggest factor to the cloudy appearance is I mush everything. Then I bring the much to a boil and pour the strained liquid into the stock. The clarified chicken stock has this step eliminated and a quick chill so the result is a much clearer appearance. As far as taste, both stocks are fairly similar but the regular may be just a bit stronger. The clear stock will be slightly lower in fat if that is a concern. Processing time for pints for both is 25 minutes at 10 lb pressure.


Saturday, May 05, 2007

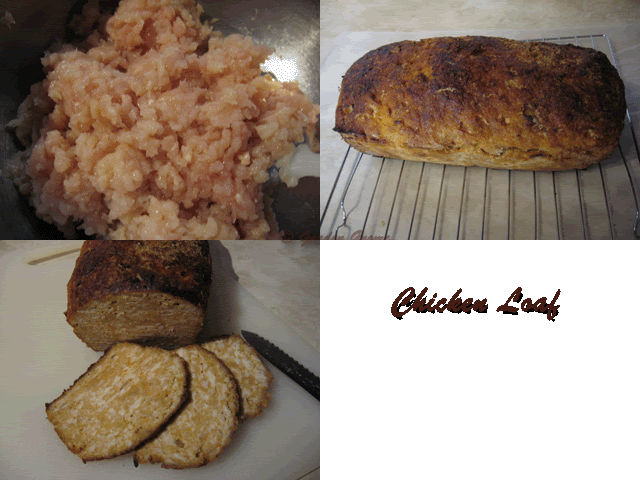
Chicken Loaf

Continuing the chicken theme since chicken breasts are on sale until May 9, part of the second batch of chicken breasts were turned into chicken loaf. There is one recipe in the archives. I took this chicken loaf in a slightly different direction.

Chicken loaf is an easy to make budget stretcher. When cooled and sliced thin, it is perfect for a homemade lunchmeat.

Chicken Loaf

4 large chicken breasts
2 eggs
1 carrot, shredded
1 med onion, chopped fine
1 stalk celery, shredded
3 tbsp Dianna Gourmet Rib & Chicken Sauce
1 tsp honey mustard
dash sea salt
dash fresh ground pepper
3 cups dried bread crumbs

Remove the skin and bone from the chicken breasts. Cut into strips. Grind using the Kitchen Aid® attachment or manual food grinder on fine grind. Whisk eggs and stir into meat. Mix in the vegetables, sauce and mustard, salt and pepper into the meat. Pour in the bread crumbs and mix well. Place mixture into silicone loaf pan. Bake at 350ºF until firm and golden brown on top. Allow to rest for 10 minutes if slicing hot. Cool entirely to slice for lunchmeat.

Chicken Loaf Sandwich

This picture is meant to wet your whistle and get your mouth watering. Chicken loaf is good served on a bed of leaf lettuce and swiss cheese. Top with sliced tomatoes, onions and honey mustard for a deletable sandwich! While this sandwich was made using store bought white bread, it lends itself nicely to homemade 12 grain or sourdough breads.


Saturday, April 28, 2007

Bulk Cooking - $12 Worth of Chicken

This blog turned one year old today. I can't believe it has been that long! I'm very stressed today so am cooking up a storm. I can't promise you any recipes or pictures tonight but they will be on the blog tomorrow and the next day or two. I might have to break them down into a couple of entries. The theme will be chicken.

Chicken breasts with skin and bone in on are sale so I couldn't resist. It will be a few days of processing chicken but not back to back. Today's and overlapping tomorrow for the canning session was $12 for the chicken breasts. That was for eight good sized chicken breasts so I decided to break them up into three dishes (5 meals), wraps (3 meals), one snack (Rachel Ray's Chicken Poppers) and homecanned chicken stock. I'd say that isn't bad for the price. I'll more than likely do another two or three sessions.


Thursday, June 29, 2006

Wraps

Wraps are the perfect lunch sandwich. I keep strips of grilled chicken and roasted turkey breast in the freezer to make our favourite wraps. Fresh picked garden greens and herbs are one of our favourite toppings. I have been experimenting with flavoured tortillas so we've had some interesting combinations.

Grilled Chicken Wrap
I used a sundried tomato and basil tortilla to make this wrap.
Grilled Chicken Wrap Toppings

It was topped with a little mayonnaise, chinese mustard leaves, chives, basil, tomatoes, a little Catellina dressing and cheddar cheese. I am anxiously waiting for our first ripe tomatoes from the garden. While this tomato looked ok it had almost no flavour. The chinese mustard gave the wrap a nice zing that went well with the other flavours. The basil brought out the hint of basil in the tortilla.

Grilled Chicken Wrap

Once all the toppings were on, the tortilla was folded to form the wrap. I find the mayonnaise helps with the folding process. I fold up the two ends along the narrow part of the toppings towards the centre. Then I take one open side and fold it over the topping pulling the toppings in tightly. Finally, I finish rolling the wrap. I like cutting the wraps in the middle on a bit of a diagonal for a nice presentation.

Roasted Turkey Wrap
This wrap was made using a pesto garlic tortilla.
Roasted Turkey Wrap

The toppings were mayonnaise, romain lettuce, onions, tomatoes and cheddar cheese. I made a platter of these for a get together we were hosting. They were a huge success!