My photo
Ontario, Canada
I am a wife, mother and grandma who enjoys the many aspects of homemaking. A variety of interests and hobbies combined with travel keep me active. They reflect the importance of family, friends, home and good food.
Cook ingredients that you are used to cooking by other techniques, such as fish, chicken, or hamburgers. In other words be comfortable with the ingredients you are using.
--Bobby Flay

For Your Information

Please watch this area for important information like updates, food recalls, polls, contests, coupons, and freebies.
  • [March 19, 2020] - Effective Mar 17, this blog will no longer accept advertising. The reason is very simple. If I like a product, I will promote it without compensation. If I don't like a product, I will have no problem saying so.
  • [March 17, 2020] - A return to blogging! Stay tuned for new tips, resources and all things food related.
  • [February 1, 2016] - An interesting report on why you should always choose organic tea verses non-organic: Toxic Tea (pdf format)
  • Sticky Post - Warning: 4ever Recap reusable canning lids. The reports are growing daily of these lids losing their seal during storage. Some have lost their entire season's worth of canning to these seal failures! [Update: 4ever Recap appears to be out of business.]

Popular Posts

Showing posts with label cooking methods. Show all posts

Wednesday, February 26, 2014

Cooking Quinoa

One of the interesting aspects of my fitness journey is experimenting with various foods.  Quinoa (pronounded 'keen wah'), popular with those eating the Paleo diet,  is one of those foods that I've enjoyed in salads but until recently did not cook it at home.  Quinoa is an ancient food that has been cultivated for years in the South American Andes.  It was known as the Mother Grain and revered as sacred by the Incas. 

uncooked quinoa
Quinoa is not a grain but rather the seed of the Goosefoot plant.  Native inhabitants used quinoa like a grain in breads and soups.  The seeds are small flattened, opaque discs with a slightly darker band around the circumference with a tiny embryo tip extending from the seed that would develop into a root tip if the seeds were sprouted.  I don't know how well the seeds sprout but that is on my agenda of quinoa experiments.  Quinoa is also available ground into a flour that can be used for baking and more importantly for the Paleo folks, quinoa flour is used to make quinoa pasta as a substitute for wheat based pasta.

Quinoa is more expensive than other grains but it is usually organic or I should say I have only found organic quinoa.  A 400 g (14 oz) bag of organic quinoa costs about $6.  It is an excellent substitute for rice with similar cooking method and timing.  Quinoa is however, considerably higher in protein than white rice.  It is just slightly higher in calories by 17 cal per cup but is also significantly higher in potassium, lower in carbohydrates and higher in iron making quinoa a good nutritional value over white rice.

cooked quinoa
Quinoa is cooked very much like white rice but because it is a seed rather than a grain, it is important to rinse the quinoa well before cooking.  Once cooked, it can be used plain as a side dish as pictured or cooled for use as an ingredient in other dishes.  The opaque disks take on a translucence while the darker band turns white when the quinoa is cooked.  It has a pleasant, nutty flavour that is sure to please.

Method:  Measure 1 cup of quinoa into a fine mesh strainer.  Rinse well.  Place the rinsed quinoa into a medium sized saucepan.  Pour 2 c of water over the quinoa.  Stire.  Bring to a boil.  Reduce the heat.  Cover and simmer for 15 minutes.  Drain using the fine mesh strainer.  Return the cooked quinoa to the saucepan.  Cover and let sit 15 minutes.  Fluff and serve or cool as desired.


Friday, April 05, 2013

No Knead Crusty Bread

I bake a lot of bread, averaging now about three loaves a week but when the kids were still at home I averaged more.  Over the years, I have developed some of my own bread recipes and we do have our family favourites.  The one bread that has always eluded me is crusty bread.  A good crusty bread has a crispy, crunchy crust with chewy interior.  It is one of the very few breads that I resorted to buying because I couldn't make it.  Crusty bread is not so much about the recipe, it is about the baking method which involves steam.  I was showing my new Lagostina cookware set to a couple of our kids and our daughter said, you know you can bake bread in the cast iron Dutch oven.  Well, my interest was peaked especially since steam would be created if the lid were in place so I reasoned this may be a way for me to get that elusive crusty bread.

An online search quickly brought up several references to Jim Lahey's  no knead crusty bread recipe and method of baking in a cast iron Dutch oven that originally appeared in The New York Time's Minimalist column.   His method is based on fermentation much the same as a sour dough bread to develop the flavour.  He used little yeast (on 1/4 tsp) and a lot of water to make a sticky, wet dough that was then allowed to ferment 12 to 18 hours before being shaped, proofed and baked in a Dutch oven with the lid on.  Several folk have modified his basic recipe, adding a bit more yeast or decreasing the amount of water and the various additions like sharp cheddar cheese take the basic artisan recipe to the artistic level.  The flour can be entirely unbleached or it can be a combination of whole wheat or rye and unbleached flours.  There is even a gluten free version using brown rice flour, potato starch and tapioca starch!  Jim has a video on YouTube (Speedy No-Kneed Bread Revisited)  to modify the fermentation period to only 4 hours but I don't mind the longer fermentation period for flavour development.  So the possibilities for this bread once you learn the basics is endless.  I will warn you now, there are a lot of pictures for this post because I wanted to show you each step I did.

scruffy dough ready for proofing
No Knead Crusty Bread
(modified Jim Lahey recipe)

3 c unbleached flour
1¾ tsp sea salt
½ tsp instant yeast
1½ c luke warm water

Mix ingredients together to form a shaggy dough.  Cover bowl with plastic wrap.  Ferment 12 to 18 hours.  Shape into round on floured parchment paper.  Let proof 30 minutes while Dutch oven pre-heats at 450°F.  Place loaf on the parchment paper into Dutch oven.  Cover and bake at 450°F for 30 minutes.  Remove lid and continue baking for 15 minutes.  Remove from oven.  Place on rack to cool.

The dough takes less than 5 minutes to make.  There is no kneading at all.  Simply mix and set aside for fermentation.  The dough will be quite sticky and it certainly does look shaggy in comparison to other bread doughs that are smooth and elastic looking.  I covered the bowl with plastic wrap and set it on the counter to ferment overnight.
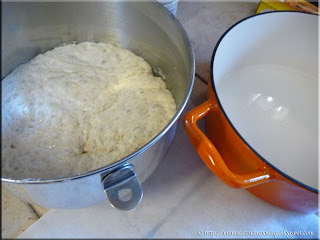
dough sponge ready for second proofing
I started my dough at 8:30 PM figuring it would be ready for baking at 3:30 PM the following day.  The following morning at about 9 AM the dough was nice and bubbly, ready for baking.  This is exactly what the dough should look like before moving to the next step.  I decided to go ahead and make the bread then even though my fermentation period was only 12 hours.  Once the dough is at the bubbly stage, if left too long it can fall because all of the starch and sugar in the flour has been consumed by the yeast.  This commonly happens when making sour dough sponge if left too long so it is important to move to the next stage once the sponge is ready.   If the sponge falls, the fix is to add a bit more flour to feed the yeast.  Once the sponge returns to bubbly, then use. 

I placed about a cup of water in my Dutch oven, put the lid on then put it into the oven at 450°F for 30 minutes.  Some folks are not adding water to their Dutch ovens for this pre-heating but others are as their brand cannot be heated empty.  I decided to err on the side of caution.  After the pre-heat period, the water was completely evapourated so next time I will add more water then empty just before putting the dough in.

shaped dough on parchment paper covered with plastic wrap
While the Dutch oven was pre-heating, I floured a piece of parchment paper then shaped the dough into a ball on the parchment paper and covered with plastic wrap to proof for 30 minutes.  Some folks do not use parchment paper but others find getting the loaf into the hot Dutch oven is a lot easier if using parchment paper.  The paper goes right into the Dutch oven along with the loaf of bread so the loaf itself is not disturbed while being transferred.  With such a sticky dough, the less handling the better for a nicely shaped loaf.  I found the parchment paper method extremely easy and fool-proof.

Some bread doughs can tolerate a heavy hand when shaping but I used a lighter touch to shape this loaf.  I did not notice any remarkable increase in size of the dough during the 30 minute proof although the dough itself did not look quite as shaggy.   Once the dough had proofed for 30 minutes it was time to put the loaf into the heated Dutch oven.

prepared dough in heated Dutch oven
I removed the Dutch oven from the oven and the plastic wrap from the dough.  Then I carefully brought up each corner of the parchment paper to form a sling.  Holding the four corners together, I carefully transferred the dough into the Dutch oven.  I trimmed the corners of the parchment paper so they would not stick out of the Dutch oven or over the dough when baking.  I put the lid on the Dutch oven and put it back into the heated oven.  I let the bread bake at 450°F covered for 30 minutes then removed the lid and baked the bread for an additional 12 minutes rather than the 15 minutes others were using.  The initial bake is what gives the interior of the bread that nice chewy texture.  The final bake turns the crust a golden brown with that wonderful crunchy, crisp texture.  Oh my gosh, did it ever smell heavenly baking!

baked bread in Dutch oven just out of the oven
I had the light on in the oven for the final 15 minutes so I could remove the loaf before it darkened too much.  Ovens vary in temperature so it is always best to monitor the progress carefully during the last few minutes of baking.   I found that the loaf looked quite lovely after a final 12 minutes of baking. 

I carefully lifted the loaf of bread and parchment paper from the hot Dutch oven.  The Dutch oven itself, was still clean as if nothing had ever baked in it!  On the other hand, properly baked yeast breads usually do leave the baking pan quite clean.  Still, the loaf of bread looked good just out of the oven.

With anticipation mounting, I set the loaf of bread on a cooling rack, anxious to cut it for the final taste results.  The loaf of bread was gorgeous with a lovely rise, beautiful golden brown crust and tantalizing aroma.  The piece de resistance was the crust cracking as it cooled.  This is the ultimate sign of a good crusty loaf.  I was so excited that I even took a video to capture that cracking sound.

The loaf had a lovely rustic quality.  I really wanted to cut into that loaf of bread while it was still hot!  However, the bread was destined for dinner last night so I had to resist.   It was only 10 AM and had I cut into the loaf, it would have been gone by dinner time!

crusty bread wrapped in t-towel
Once you have a nice crusty bread, the secret is keeping it crusty.  If you have ever bought crusty bread from a bakery, you will have noticed it is never packaged in plastic.  Plastic traps the moisture causing the crust to soften and lose it's wonderful crunch.  Instead, crusty breads are placed in paper bags usually with the end open to prevent any moisture from becoming trapped.  The easy home solution is to wrap the bread in a t-towel, in this case one of the bar towels I use in place of t-towels.  This prevents moisture from becoming trapped while preventing the bread from drying out too quickly.  The bread sat on the counter, safely wrapped in the t-towel until dinner time. 

Loaves of crusty bread destined for gift given can be place into a t-towel lined basket then covered with a t-towel.  An alternative method is to place the loaf of bread in the middle of a t-towel then bring up the corners and secure with a ribbon.  As such, the t-towel becomes part of the gift so I like keeping a few new t-towels on hand for this purpose.

crusty bread cut
I used a serrated bread knife to cut the loaf of crusty bread.  The pores formed from gaseous bubbles produced by the yeast were nicely formed, large, open and irregular as opposed to the finer small pores found in store bought white breads.  This structure is a result of a high water content combined with the no-knead method.  The final test before giving this bread two thumbs up was of course the taste test.  It certainly excelled there!  There is less of a yeast more of a wheat flavour.  The crust was delightfully crunchy yet the inside tender and chewy.  Finally, I had made a wonderful homemade loaf of crusty bread!

This no-knead crusty bread is very easy to make and is very versatile.  The dough is simply mixed, covered and set aside until bubbly.  If you want fresh bread the following day, just mix the dough the night before which takes less than 5 minutes.  The following day, it will take 2 minutes to shape the dough, 30 minutes heating of Dutch oven and proofing of the dough,  30 minutes initial bake time and 12 to 15 minutes final bake time for a total of 84 to 87 minutes (1 hr 45 min to 1 hr 17 min).  This really is not bad considering there is practically no prep and the resulting bread is beyond delicious!  While there are a lot of variations from Jim Lahey's original ingredients as far as quantity, the basic recipe consists only of flour, salt, yeast and water combined with a long fermentation period.  The fermentation period allows the dough to develop both rise and flavour so while some are trying to reduce the fermentation period, it will not be something I tinker with.  The reason being, I have made enough sourdough breads to appreciate the extra flavour longer fermentation periods impart to the bread.  Some have added butter or oil and/or sugar taking the bread a step away from the original.  Others have added other ingredients like nuts, herbs, cheese, seasonings, cranberries or raisins.  Some of these combinations get rather creative!   Even the baking method has been altered from using a Dutch oven to using a slow cooker, countertop roaster and make shift covered pots.  Still, a Dutch oven is likely the easiest way to get the crispy crust.  I also saw where some used the no-knead recipe and simply baked as a regular loaf of bread without covering.  This of course would not give the crispy crust and for those of us who use a Kitchen Aid stand mixer for kneading bread doughs, it would not save much in the way of time.  It would save time for those who are kneading by hand.

The bottom line is, this bread recipe and method is a real keeper!  The basic recipe is delicious without any further additions but it can also serve as the basis for a wide range of creative breads.   I will be posting more on some of my creations made using the basic recipe.  In the meantime, if you want a few ideas or to see how others have modified the original recipe, search online with the key words "no knead crusty bread" or "no knead bread".



Monday, July 19, 2010

Frugal Kitchens 101 - Pomona's Pectin

Frugal Kitchens 101

We seldom use jams as spreads but rather as fillings, meat/poultry/fish glazes, an ingredient, topper and condiments.  Most of the jams I make are created by me.  I use Pomona's pectin which is a low methoxy pectin that I use to make gourmet syle low sugar jams.  I actually like making jams and jellies using local honey or maple syrup.  The flavour is amazing!  I can't do this using regular pectin that requires sugar for the gel.  Pomona's pectin (no affiliation or compensation) gives me clean, consistent results allowing me the flexibility when making jams and jellies.  At the same time it cost me money on the pectin alone and when making low sugar jams on the cost of sugar too.  From a canning perspective this is one of my most frugal additions to my canning repetoir.  Here's why:

  • storage  - Unlike other pectins, Pomona's pectin is shelf stable with no expiry date making it the ideal emergency preparedness product. It will consistently gel without fail.  Regular pectins (eg. Certo, SureJel) have an expiry date usually about a year from purchase after which time the gelling properties diminish or even fail.
  • flexibility - Pomona's pectin allows you to easily make test batches of jam using as little as a cup of fruit.  This is particularly useful when trying new combinations, testing for gelling and flavour.  In addition to this Pomona's pectin does not rely on sugar for gelling but rather calcium water.  Monocalcium phosphate is included with Pomona's pectin to make the solution as needed.  What this means is any sweetener can be used including honey, maple syrup and artificial sweeteners.  It should be noted that sugar in jams using regular pectins also plays the role as a bulk filler adding texture.  You can certainly use the same amount of sugar if desired while still having the flexibility of using Pomona's pectin and white sugar is the cheapest of the sweeteners.  However, Pomona's pectin allows you to experiment with other sweeteners. 
  • cost - Pomona's pectin costs $48 per pound bought directly from them and that includes shipping.  One pound gives a yield of 128 tsp at a cost of 37.5¢ per tsp.  A normal sized batch of strawberry jam using regular pectin gives a yield of 4 - 500 ml (pint) jars with the pectin portion costing approximately $2.49 to $2.79 (powdered, liquid).  To make the same sized batch using Pomona's pectin you would need 4 tsp at a cost of $1.50 so for each 4 - 500 ml batch of jam you save at least $1.  That doesn't seem like a lot of money but factor in the cost over 10 batches of jam or more.  
  • not corn based -  Regular pectin actually has trace amounts of corn in it something I learned from a member on one of the groups I frequent who is dealing with a severe corn allergy.  The problem with corn is it is found in some form in a wide range of foods including regular pectin.  Pomona's pectin is citrus based with no trace amounts of corn making it a safe product for those with corn allergies or insensitivities. 


Thursday, July 02, 2009

Kitchen Quick Tips - Steam Your Vegetables

kitchen quick tips
Steaming your vegetables uses less water and less energy to cook than boiling. Steaming gives a nice texture and flavour to vegetables while retaining more of the nutrients.


Saturday, May 23, 2009

Buttermilk Fried Chicken with Ranch Potatoes

Whenever we get together with the kids good food is always a guarantee! That's just what foodies do! The kids made a finger licking good fried chicken for dinner our last trip there. You just can't go wrong with fried chicken! I think everyone has their own way to fry chicken whether it be on the stovetop or in a deep fryer. Quite often fried chicken is coated as well so the possibilities are endless!

The choice to coat or not largely depends on the cut of chicken you are frying. I have deep fried chicken wings without a coating with excellent results. At the same time a thin, seasoned flour coating also gives excellent results. There are reasons for choosing stovetop frying over deep frying. While you can get flaky, crusty results by stovetop frying I think you get better results deep frying. The oil of choice should be light flavoured so as to let the flavour of the chicken shine through. Peanut oil gives gorgeous results but if you are concerned over peanut allergies use canola, soybean, sunflower or corn oil. If you are re-using the cooking oil filter it for storage. Make sure to heat your oil to the proper temperature for deep frying chicken of 185ºC to 190ºC (365ºF to 375ºF). Most modern deep fryers will have a setting for the proper temperature for frying chicken but it doesn't hurt to use a manual thermometer to make sure.

fried chickenButtermilk Fried Chicken

The coating on the buttermilk fried chicken is golden brown and crispy with just the right amount of flavour. You will need to adjust the flavouring as desired. The accompanying potatoes were rich and creamy. They had a lovely flavour that was a bit different yet went well with the fried chicken. It was an excellent, tasty meal!

Neither of the following recipes have actual carved in stone measurements. The measurements are only a guideline. In general figure 1 medium to large potato and 2 to 3 pieces of chicken per adult. Tweak as desired.

Buttermilk Fried Chicken

2 c flour
2 c buttermilk
Montreal Chicken seasoning*
chicken seasoning*

Place the flour and seasoning in a bowl, mix well. Pour the buttermilk into another bowl. Pat the chicken dry. Dip the chicken into the buttermilk then into the flour mixtures. Deep fry at 185ºC to 190ºC (365ºF to 375ºF) until chicken is crispy and golden brown. Drain then serve.

*Substitute either with your favourite chicken herb/spice blend.

Ranch Potatoes

1 medium to large potato per person
chili powder
diced butter (about 1 tbsp total)
ranch dressing (about 3/4 c)
shredded cheddar cheese (about 1 cup)

Peel and cut the potatoes into bite sized pieces. Place in a greased baking pan. Sprinkle a little chili powder over the potatoes. Add 4 - 6 pieces of diced butter on top. Bake at 180ºC (350ºF) for one hour. Remove from oven. Pour the ranch dressing over the potatoes. Top with shredded cheese. Bake at the same temperature for 10 minutes or until cheese is bubbly. If desired you can turn the oven off and simply let the cheese melt with the residual heat in the oven.


Friday, April 04, 2008

Butter Steamed Salmon

Steaming is one of my favourite methods for preparing cooked vegetables. It gives a nicer texture and maintains the flavour better than boiling. Normally I steam using a steaming basket in a covered pot and because I like the method so much, I have three different sized metal steamer baskets capable of steaming small to large batches. Steaming baskets come in a variety of sizes with some being collapsible for easy storage while allowing the basket to fit more than one size pot. Most electric rice makers come with a steamer basket and electric steamers are also available. The basics of steaming is simple.

Method: Place the food you want to steam in the steamer basket. Pour about 1-inch of water or stock in the pot. Put the filled steamer basket on the pot and cover with the pot lid. Bring the liquid to a boil on high heat. Reduce heat to medium-low that will maintain the steam without the pot boiling dry. Steam the food to the desired tenderness. Remove from heat. The food is now ready to season if desired and serve.

However, food can also be steamed in a covered baking dish in the oven. This is one method I use for cooking salmon. Hmm, the last couple of entries have been about fish and come to think about it with the exception of yesterday when we were on the road for our second grandbaby's birth (read about it here) we have had fish daily for the past week. If you have been following this blog you will know I'm not a huge fan of heavily coated or seasoned fish.

Butter Steamed Salmon

Salmon has a strong flavour than perch or other white fish. It can handle stronger seasonings and the flavour of butter naturally enhances salmon. Steaming keeps the salmon moist and tender. Pictured is butter steamed salmon, steamed spinach and steamed Yukon gold potatoes. Any fish marries nicely with potatoes so when serving fish consider potatoes as the primary vegetable compliment. Pair with another vegetable, coleslaw (creamy coleslaw recipe here) or garden salad for a complete meal. Lemon is the perfect garnish that can be used to accent the fish flavour.

Method: What I do for steaming salmon is to place a couple of pats of butter (about 1 tbsp) in the baking dish along with the salmon. Sprinkle with a little lemon pepper. Cover the baking dish. Bake at 350º just until the salmon is cooked through.

What this does is steam the salmon using the butter and its own juices. It is important to make sure the lid fits tightly to keep the steam in and do not over cook. The end result is a mildly seasoned, moist, tender and flakey piece of salmon. So do try this method for cooking salmon. I'm sure you will be pleased!


Tuesday, February 19, 2008

Pot Roast Using HamiltonBeach® Roaster

We bought our previous home solely on the basis of location. Unfortunately storage was almost non-existent so I decided to eliminate as many single use appliances as possible. We also bought this house because of location however, there is more than ample storage here. Still I stuck to the decision to not buy any single use appliances. A countertop roaster was tempting after a couple of overnight boat trips as a few of our fellow boaters swore by their Nesco® roasters. While I could see the usefulness of such an appliance, I kept putting it off buying one because of the size as storage on a boat is always limited and because it reminded me too much of a slow cooker, something I'm not really fond of using despite owning two.

A couple of days ago I asked my husband to stop at the hardware for a couple of items needed for doing the preliminary prep work on the kitchen for the remodel. He came home with four appliances! The hardware store was having an appliance clearance and he just had to take advantage. Three of the appliances were stashed for gift giving but I decided to keep the fouth, a HamiltonBeach® countertop roaster, for myself. The HamiltonBeach® countertop roaster had an original price tag of $59.99 on sale for $15.99. Similar savings were on the perculator ($66.99 for $20), hand held blender with chopper ($29.99 for $10) and personal coffee maker ($19.99 for $10).

The Roaster

The HamiltonBeach® countertop roaster is smaller than the Nesco® roaster (18 qt) at 6.5 qt. The outside is a crisp white with black lettering. The white metal lid (not shown) has two small vent holes. The black metal roasting pan is large enough for a 5 lb roast or large chicken and is removable for easy cleaning. It does not have a non-stick surface. The temperature range is 200ºF to 450ºF controlled with an easy grip knob. There is an indicator light as well. I was disappointed that instructions and a recipe book were not included with this appliance. The box was still factory sealed so obviously these were simply not included. I was also disappointed that the temperature markings are in fahrenheit only.

Cost of operation is always something that should be considered for any appliance. Remember every kW counts so we should always be striving to use less electricity. This roaster is 750 W compared to my oven element that is 2400 W. In terms of cost the roaster will cost $0.09 per hour where the oven costs $0.28 per hour. Unlike the calculated costs for my slow cookers that end up being more expensive to operate than using the large burner (2000 W) and a pressure cooker, the roaster appears to be on the money saving end.

I placed a frozen blade roast in the roasting pan, seasoned it with Montreal Steak spice, sliced onions and added about ½ c of water, put the lid on the roaster then set the temperature to 250ºF much the same as I would do if roasting in the oven. After two and a half hours the roast was progressing quite nicely so I added the potatoes, carrots and corn but unlike doing a pot roast in the oven, I did not increase the temperature to 350ºF. It seemed to me that the roast was cooking too fast so I was immediately concerned that it would not be tender. The vegetables took about 40 minutes to cook. Instead of removing the vegetables and roast as I would with oven cooking, I poured the cornstarch slurry directly into the juices and allowed it to thicken about 5 minutes. This eliminated using the large burner (2000 W) on the stove but the real reason for doing so was to do everything in the same dish.

Pot Roast

I have to admit I was very surprised at the results. Normally a roast done this way would take me 4 to 4½ hours (10.8 kWh or $1.29) but it only took 3 hr 15 minutes using the countertop roaster (2.44 kWh or $0.29). So on the green scale for energy use, the countertop roaster used about ⅕ the kWh of the oven.

The next test was the appearance. In comparison to oven cooked the vegetables and roast were more than comparable. There was a bit less caramelization likely because I did not increase the final cooking time. The vegetable colours were bright and enticing with a firm texture without being overcooked and mushy that often happens in a slow cooker . Making the gravy directly in the pan was a simple convenience for me and I often do the same when using a slow cooker. The end result was stew-like vegetables with the meat separate. The final test was of course the taste.

Plated

Unlike cooking this type of dish in the oven or slow cooker, the vegetables and meat were still steaming when being plated even though we let the meat rest for 5 minutes. One notable difference is the house was not filled with the smell of dinner but more of a hint. Despite my reservations, the roast was extremely tender, almost melt-in-your mouth tender. The vegetables were very impressive, cooked perfectly! The gravy was tasty giving a nice addition to the vegetables even though there was not extra for the meat.

So I am quite impressed as I ended up with quite a nice meal while saving a lot of kilowatts, both of which are very important to me. Given this was the first time using this appliance, I was pleased. The results were definitely better than a slow cooking and far superior to a microwave oven. However, next time I will cook the roast at a lower temperature (200ºF) to get the end result medium rare. I will also add a bit more liquid for extra gravy. Mushrooms would have been a great addition to the vegetables as well.

All in all, I'm pleased with the energy savings and cooking results of this countertop appliance. The size is just right as well. Depending on what you are cooking, a meal for four is easily obtainable and I think it will be perfect for baked beans or casseroles. It is also small enough that it doesn't take up a huge amount of room for storage. We often have fresh baked bread with dinner so that means juggling the oven space sometimes so this is an easy solution as well. It will also be ideal for my bulk cooking sessions.