My photo
Ontario, Canada
I am a wife, mother and grandma who enjoys the many aspects of homemaking. A variety of interests and hobbies combined with travel keep me active. They reflect the importance of family, friends, home and good food.
Cook ingredients that you are used to cooking by other techniques, such as fish, chicken, or hamburgers. In other words be comfortable with the ingredients you are using.
--Bobby Flay

For Your Information

Please watch this area for important information like updates, food recalls, polls, contests, coupons, and freebies.
  • [March 19, 2020] - Effective Mar 17, this blog will no longer accept advertising. The reason is very simple. If I like a product, I will promote it without compensation. If I don't like a product, I will have no problem saying so.
  • [March 17, 2020] - A return to blogging! Stay tuned for new tips, resources and all things food related.
  • [February 1, 2016] - An interesting report on why you should always choose organic tea verses non-organic: Toxic Tea (pdf format)
  • Sticky Post - Warning: 4ever Recap reusable canning lids. The reports are growing daily of these lids losing their seal during storage. Some have lost their entire season's worth of canning to these seal failures! [Update: 4ever Recap appears to be out of business.]

Popular Posts

Showing posts with label entrées. Show all posts

Tuesday, February 24, 2015

Herbed Garlic Rice Stuffed Portobello Mushrooms

We have had a rather busy and exciting February thus far!  We have been focusing on eating meals prepared from our pantry and freezer overstock for home prepared meals.  Despite eating out on average of three times a week, we are still making a bit of headway in paring down the overstock.  We also dramatically reduced buying any groceries other than fresh produce for the month.  I bought some gourmet teas and macadamia nuts too, but other than that only produce.  It helps that it has been extremely cold so I really don't feel like going out to shop and even considered cancelling a couple of social events because it has been so cold!

rice stuffed portobello mushrooms
We aim for 5 to 7 servings of fresh fruits and vegetables daily in addition to any frozen or home canned fruits and vegetables.  I was looking for something a bit different during my last trip to the grocery store and settled on portobello mushrooms.  Portobello mushrooms are simply grown brown crimini mushrooms with a diameter of 4 to 6 inches.  Their deep flavour with firm texture lends themselves nicely as a meat substitute.  We often enjoy portobello mushrooms grilled or sliced and sautéed, as well as stuffed.  The caps are large enough to hold a nice portion of the desired stuffing to create a filling, delicious entrées.  Portobello mushrooms are fat-free, low in calories, and a rich source of selenium, copper and niacin.

I cooked long grain rice then stirred in about a quarter cup of Kraft Herb & Garlic Shredded Cheese and finely chopped broccoli.  I cleaned the mushroom caps and placed top-side down on a Silpat lined baking sheet.  I brushed about a tablespoon of home canned pizza sauce in each mushroom cap.  Then, I spooned the rice filling into each cap mounding nicely.  I sprinkled lightly with fresh grated Parmesan cheese and baked at 350°F until the mushroom caps were cooked (about 40 minutes).  A fresh garden salad with citrus vinaigrette completed the meal.  


Sunday, September 14, 2014

Crab Cakes for Two

Crab is such a lovely seafood - sweet, tender, low calorie, high protein and delicious with hot drawn butter!  I absolutely love crab, specifically king crab legs.  I am rather picky about crab preferring fresh or frozen to canned.  Canned crab is fine for crabmeat dip but that is about the extent of our use for it.  I will often bring home a few crab legs from a restaurant meal when possible but for most purposes, we buy froze king crab legs from Elite Gourmet Food Service that delivers to the door in southern Ontario.

favourite crab cakes
I thoroughly enjoy sitting down to a plate of king crab legs, leisurely savouring each succulent morsel.  My husband, on the other hand does not enjoy cracking crab legs!  In order to use crab meat as an ingredient, the legs must be cracked open releasing the tender, sweet meat.  This is not a difficult task but it is a bit time consuming.

I bring water to a boil in a roasting pan then add the frozen crab legs.  Most of the leg pieces have the larger knuckle where it was attached to the body of the crab.  I crack the cooked crab legs according to their segments, pulling connective tissue to help release the meat.  I also use a thin tipped fork to help release the meat and kitchen shears to open segment portions that refuse to crack open.  Once all the crab legs have been cleaned, I break the larger chunks up depending on how they will be used.

Crab cakes are a delightfully tasty way to use fresh or frozen crab meat.  Like many homemade favourites, there are as many ways to make them as there are cooks.  The big debate appears to be which is best, baked or pan fried.  Baking reduces or eliminates the butter for cooking but at the same time removes the flavour the butter imparts to the crab cakes.  We prefer pan fried crab cakes.  They are easy to make, a tender and tasty seafood main or make them smaller for an appetizer.  Our recipe gives a yield of four crab cakes just perfect for two.  We like Breton crackers for this purpose but you can substitute with your favourite cracker. 

Crab Cakes for Two
recipe by: Garden Gnome

½ c Breton Bites, original whole wheat, crushed
1 egg
4 tsp fresh squeezed lemon juice
3 tbsp Miracle Whip (or Miracle Whip Clone)
1 tsp garlic pepper
1 tbsp finely chopped green onion
1 tbsp finely chopped parsley (optional)
8 oz (226 g) crab meat pieces
1 tbsp butter

Whisk egg, lemon juice, Miracle Whip and garlic pepper together.  Stir in crab meat and green onions.  Gently mix being careful not to break up crab meat.  Mix in crackers.  Divide into four equal portions (mixture will be stickly).  Heat butter on medium heat.  Place each crab mixture portion in heated butter and flatten.  Fry until golden brown, about 5 minutes each side.  Remove from fry pan.  Drain and serve.

Makes 4 patties
Serves 2

Nutritional Value per serving:
298 calories, 14 g total fat (7g saturated fat), 177 mg cholesterol, 726 mg sodium, 468 mg potassium, 19 g total carbohydrates (2 g fibre, 4 g sugar), 25 g protein


Saturday, February 01, 2014

Italian Venison Fusilli

My husband spent a week in November at hunt camp in the Muskoka Region of Ontario.  A fun time was had by all!  They got two doe that were cleaned, cut and wrapped before they left.  Everyone brought home a bit of venison, a much welcomed addition in our freezer.  Venison is a rich, flavourful red meat that can be used in place of beef for most dishes.  It is a healthier option, well for those counting calories.  Venison is lower in calories (102 cal/3 oz), lower in sodium (42 mg/3 oz), lower in fat (2.8 g/3 oz) and lower in cholesterol (72 mg/3 oz) than beef (3 oz: 162 cal, 56 mg sodium, 5.8 g fat, 76 mg cholesterol).  It is, however, lower in protein at 19.2 g per 3 oz verses 25.8 g per 2 oz of beef.  Venison should be served hot because what fat there is has a slightly unpleasant mouth feel when cold.  For that reason, venison is often cooked with pork fat.
  

Italian venison sauce cooking
I used home canned Italian Garden Sauce with Mushrooms to make a delicious venison sauce for pasta.  This is a must have staple sauce in our pantry, one I created a couple of years ago then tweaked in small batches until it met my specifications. 

I lightly seared the venison pieces then poured in a 750 ml jar of Italian garden sauce with mushrooms.  I brought the mixture to a boil then reduced to a simmer.  I let the mixture simmer until the venison pieces were cooked through and tender.  While the venison sauce was simmering I cooked tri-colour fusilli to al dente then drained.

Italian Venison Fusilli
I topped the tri-colour fusilli with a generous scoop of the venison sauce along with fresh grape tomatoes, green peppers and chopped onions for Italian Venison Fusilli.  This entrée was low calorie and low fat, yet tasty and filling. 

A serving size of tri-colour fusilli is 2 oz dry which gives a yield of 255 g/9 oz cooked [210 cal. 7 g protein, 41 g carbohydrates, 25 mg sodium, 2 g fiber, 1 g fat, 0 mg cholesterol].  Plain wheat fusilli does not have any fiber so the tri-colour is a healthier choice as is whole wheat fusilli.  If counting calories, it is best to weight out the cooked pasta for the proper serving size.  I often add fresh vegetables over pasta sauces.  They add a nice texture, complimenting the flavour of a wide variety of sauces while adding extra nutrition. 


Friday, February 03, 2012

15 Garlic Clove Prime Rib Roast

We have been working on the kitchen for almost two weeks meaning I haven't been doing a lot of cooking.  Last Tuesday I was to the point of doing the finer detail touch-up and while there is still more to do, I was able to get the kitchen back somewhat in order enough to back into cooking mode to prep for Superbowl weekend.  I still need to add the finishing touches then will share with you the new look next week.  I must we are both pleased the way the kitchen has been transformed!

15 garlic clove prime rib roast
We did a bit of cooking in a makeshift kitchen area using a slow cooker but I didn't want to actually cook in the kitchen to avoid steam and grease from affecting the paint.  Besides all of the stove and microwave were covered to protect them.  The first cooked meal out of the new kitchen came together on a bit of a whim.  We both love garlic and I had a small prime rib roast so decided to cook the roast in the clay baker with potatoes, onions and lots of garlic.  Roasted garlic is simply delightful!  I served the roast topped with a rich gravy from the drippings and steamed broccoli.  It was a wonderful meal to welcome in the new colour to our kitchen!

15 Garlic Clove Prime Rib Roast
source:  Garden Gnome

3 lb prime rib roast
10 - 12 mini red potatoes
15 whole cloves of garlic
1 c tomato stock
½  medium onion
sprinkle of sea salt/fresh ground pepper
1 tsp browning
2 tbsp cornstarch
2 - 3 tbsp water

Pre-soak the lid of the clay baker in water for 30 minutes.  Peel garlic cloves.  Place roast in clay baker.  Add potatoes, onions and garlic cloves.  Sprinkle with salt and pepper.  Cover with lid.  Bake at 300ºF for 1½ hours or until potatoes are tender and the meat is nicely browned.  Remove the roast and allow it to rest 10 minutes before serving.  Remove vegetables.  Make a cornstarch slurry using the cornstarch and water.  Pour the drippings into sauce pan.  Stir in the browning.  Bring to a low boil over medium heat.  Stir in the slurry then continue cooking until thickened.  Remove from heat.  Plate the roast and vegetables then top with the gravy.  Serve with a vegetable side (eg. steamed broccoli).

spirited peaches with French vanilla ice cream
Since we were celebrating being back to cooking in the kitchen I opened a jar of spirited peaches for dessert.  Spirited peaches are made using peach schnapps although other suitable liqueurs can be substituted.  I don't make a lot of home canned products using alcohol but those I do make tend to be reserved for special occasions.

I topped French vanilla ice cream with slices of the spirited peaches.  Then drizzled a little of the syrup from the peaches over the ice cream.  It was a lovely dessert with the peach slices accenting the vanilla flavour in the ice cream.  This would be a great combination for an adult frozen cocktail. 

It's been a long and tiring job painting the kitchen right back-to-back painting the main bathroom.  The paint has been very testy as reds usually are but it was testy right from the point of picking out the colour.  I finally opted to have the paint custom matched to my dinnerware.  Then the wood cover for the exhaust fan literally fell apart so that will be another job for our friend who is doing all the custom woodworking in our house.  We still haven't found a range hood, sink, faucet or disposal but simply have little time to go shopping.  I have a huge, and I do mean huge project (top secret) aside of my winter project to paint all the rooms in our new home so it is going to be a very busy time!  This is one time we really need the home cooking to comfort and nourish us, body and soul.


Tuesday, January 03, 2012

New Year's Day Surf and Turf

My husband and I have long held the tradition of a grilled steak with lobster dinner affectionately known as surf and turf in the restaurants as our New Year's Day meal.  The surf (sea) portion is the lobster while the turf (land) portion is the steak.  We live in beautiful southwestern Ontario where the weather can be blizzard conditions on New Year's Day but that does not stop us from firing up the outdoor grill!  The whole day is focused of surf and turf foods so it is a day long feast fit for a king leaving us so stuffed that eating the next day is almost impossible.

crap meat dip appetizer
I made crabmeat dip as an appetizer.  This has has been a long time family favourite appetizer that I've been making it since the early 80's.  If I recall correctly I got the recipe from my husband's aunt who is actually the same age as he is.  She is every bit the sweetheart he is but that's another story.  This appetizer does make an appearance at many family functions throughout the year.  The dish is ever so easy to make a few hours ahead of time and as party dishes go is rather on the inexpensive side.  Once the topping is on the cream chees there is a tendency towards weepage.  The trick to preventing weeping is to press the crabmeat firmly to remove any liquid before making the topping.  Doesn't it look gorgeous on my new cheese server?

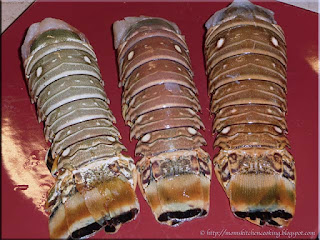
Cuban rock lobster tails
We bought a box of Cuban rock lobster tails from Elite Gourmet Food Service.  I have dealt with this company for several years now and while the prices are on the higher end, the quality supreme.  A box of 8 - 7 oz lobster tails cost $139 or $17.38 each.  Considering a T-bone steak was being served with each lobster tail the entrée cost per person was about $28 including potato and salad.  Before you splutter at the cost, this was actually a frugal meal.  If we wanted surf and turf, we would have to drive at least an hour each way, with the price of travel adding to the cost of the meal.  A nice surf and turf dinner in our area costs about $30 plus appetizer, drinks and gratuity.  At home the appetizers and drinks cost next to nothing but the cook always appreciates a gratuity (hugs or kisses only LOL)! A a meal goes, it is on the expensive side but it is once a year and this is the reason frugal meals are served the rest of the year.

our New Year's day surf and turf dinner
It was rainy and cold threatening freezing rain yesterday when my husband bravely went out to start up the grill.  We have a charcoal and propane combination grill so I expected he would use propane.  Nope!  He fired up the charcoal side then once the coals were going put the potatoes on.  Shortly before putting the steaks on he added an apple wood smoking puck.  The steaks were grilled to medium rare.

I have cooked a lot of live lobster but not frozen lobster tails.  I boiled the lobster tails in salt water 1 minute per ounce.  The tails curled during cooking but they still tasted heavenly!  The next time I boil them I will use the skewer trick to keep the lobster tail straight for presentation.  Doesn't our surf and turf dinner look devine?  What a way to welcome 2012!

To boil frozen lobster tails:  Thaw the lobster tails in the refrigerator 8 to 10 hours or cover them with cold water in the sink to thaw faster.  Bring salted water (I used about a quart per tail and good splash of sea salt) to a boil.  Place the lobster tails in the boiling water and cook 1 minute per ounce of tail.  Drain and serve with hot melted butter.

Note: to prevent the lobster tail from curling, run a skewer from one end to another.  Split the soft shell and place skewered tails in the boiling water.  Cook as above.  Remove skewer for serving.


Tuesday, January 25, 2011

Tacos (Beef)

We have never been much of a fast food restaurant family.  I grew up in a very small town that had no take-out food other than frozen pizza from the grocery store.  I can still remember the very first time I ever had a Big Mac and to this day I will very rarely splurge on one.  Taco Bell was established in 1962 and franchised in 1964 but it took a while to spread into Canada.  We discovered Taco Bell in the early 1980's.  It was an immediate hit as to the idea but not so much for eating there.  Tacos were novel, different from burgers and simply fun to eat.  We loved the idea of the hard and soft shells so from there created our own tacos, taco salad and a wide range of wraps.

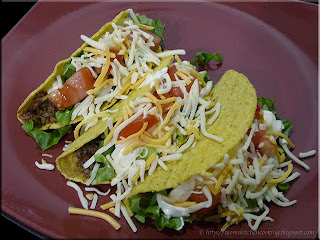
beef tacos
What many don't realize about Taco Bell tacos is they can't be easily duplicated at home simply because the meat they use is precooked and dehydrated then sent to the restaurant.  The meat is rehydrated and warmed for serving at the restaurants.  As a result of all of this processing the meat has a texture that you can't duplicate at home.  Boiling the ground beef comes close to the Taco Bell meat but it still isn't the right texture.

We make tacos with extra lean, hormone free ground beef that is browned, drained then seasoned while simmering.  Unlike taco salad I keep the toppings a bit more simple.  Offerings include leaf lettuce, tomato, onion, sour cream and shredded cheese.  I use store bought taco shells but hopefully will be switching that to homemade taco shells now that I have a tortilla press.  They aren't identical to Taco Bell tacos.  I think they are better and they do get rave reviews from our family.

Taco Bell was the inspiration for a few of our family favourites and while we seldom go to Taco Bell, we've taken those food ideas and made them our own.  I try to keep that in mind each and every time we visit a restaurant.  Each meal becomes the potential inspiration for home cooking and that's what it is all about!


Saturday, December 11, 2010

Beef and Cabbage with Dumplings

A good portion of the home-style meals I cook have no recipe.  Rather the meal is based on something that caught my attention while in the pantry or freezers.  The number one kitchen utensil I rely on especially for starting soups, stews and chowders is a pressure cooker.  The reason for this is a pressure cooker is the fastest way to make a rich stock while giving tender results for the meat.  All that is needed is to remove the bones and initial stock flavouring vegetables for a lovely base perfect for any soup, stew or chowder.  A couple of days ago it was cold with very light snow flurries so I thought a soup would be a good idea for dinner.  It evolved from a soup to an one pot entrée.  That is another great benefit to using a pressure cooker in that the meal from start to finish can be easily cooked in the same pot.

beef and cabbage with dumplings
I actually started this meal out with the intentions of making a beef based soup.  That is one of the beauties of not following a set recipe.  I put 2 frozen beef soup bones, a carrot, stalk of celery, a small onion and bay leaf into a pressure cooker then opped with water to the ⅔  mark.  It is important that a pressure cooker not be filled above the ⅔ mark to prevent over pressurizing the cooker.  Once the pressure cooker came to pressure, I reduced the heat to maintain pressure and cooked at pressure for 40 minutes.

Once the meat and stock were cooked I removed the bones and vegetables.  I seasoned with Worcestershire sauce, sea salt and fresh ground pepper with just a touch of browning.  Then I stirred in about a quarter wedge of cabbage cut into strips and about 2 cups of a frozen carrot and green/wax bean mixture.  I could have stopped there for a nice hearty soup with adding perhaps rice or pasta but I decided to dumplings add instead.  Dumplings thicken any liquid but they are ever so good!  The end result was a very, very tasty dinner!


Saturday, August 28, 2010

She Said - Stuffed Chicken Breast

Yesterday I posted about the baked potatoes my husband made for his third selection for the Second Annual He Said/She Said Contest.  My gosh they were delicious!  While he was making the potatoes I made the stuffed chicken breast (Pp. 86) from Jean Paré's Company's Coming Heart-Friendly Cooking for my third entry.  Lately I have been doing a fair amount of experimenting with various stuffings.  I thought the stuffing in this recipe sounded interesting.

My apologies, in hindsight I should have taken pictures of each dish separately rather than the complete entrée.  Unfortunately I didn't so had to use the same picture as yesterday's post.

I used the stuffing to make 2 stuffed chicken breasts, substituted unbleached flour for the all-purpose flour and used olive oil in a health mister in place of cooking spray.   The chicken breasts did not brown up as nicely as I would have liked but they were cooked through.  This will be something I work on the next time I make them.  

The stuffed chicken breasts were quite tasty and they did pair nicely with the baked potato dinner (stuffed potatoes).  It is definitely another keeper recipe!  The stuffing makes about 1¼ c but I used it all between the 2 large chicken breasts.  I would do it the same way the next time I make them as the stuffing had a lovely flavour.  I think the stuffing would also be suitable for making a stuffed chicken loaf.  All the way around it was a great tasting meal that we will make again.

Stuffed Chicken Breast
source: Jean Paré Company's Coming Heart-Friendly Cooking, 2003, Pp. 11

1 medium leek, thinly sliced
2 garlic cloves, minced
½ c finely chopped red pepper
1 tsp olive oil
6 oz jar marinated artichokes
1 tbsp balsamic vinegar
1 tbsp brown sugar, packed
1 - 3 tbsp fresh sweet basil, chopped
8 boneless, skinless chicken breast halves
½ all-purpose flour
1½ c fine dry whole wheat bread crumbs
2 large eggs
2 tbsp mil

Thinly slice the white and tender parts of the leak.  Drain and chop the artichokes.  Sauté lee, garlic and red pepper in olive oil on medium-high until leek is soft.  Reduce heat to medium.  Add artichoke, vinegar, and brown sugar.  Heat and stir until sugar is dissolved.  Remove from heat and stir in basil.  Cut a deep horizontal slit into 1 side of each chicken breast to form a pocket.  Fill each pocket with stuffing.  Secure the openings with wooden picks.  Put the flour and bread crumbs into separate bowls.  Beat eggs an milk with fork in a third bowl.  Dredge the chicken in flour to coat, dip into the egg mixture then into the bread crumbs.  Spray the chicken with cooking spray.  Bake at 350ºF (175ºC) until chicken is golden and no longer pink inside, about 25 minutes.  Remove from oven.  Allow to cool slightly.  Remove wooden pick.  Cut chicken in half diagonally to serve.

Serves 8


Sunday, June 27, 2010

Chicken with Mango Chutney

Yesterday I wrote about an easy chicken and gravy with rice dinner using boneless, skinless chicken breasts and Thai sweet rice.  This sticky rice is often paired with mango slices then surrounded by coconut milk as a desert.  I decided to take a savory spin on the sweet rice and mango combination by using mango chutney to create an entrée.

chicken with mango chutney
Mango chutney has a deep, warm, spicy flavour with slightly sweet high notes.  It has a chunky texture similar to thick salsa.  It really is delightful!  Mango chutney pairs wonderfully with chicken adding a lot of flavour. 

Pictured is the easy to make chicken with mango chutney.  I cooked the Thai sweet rice in chicken stock while the chicken was cooking.  I seared the chicken on both sides then covered the pan and allowed the chicken to continue cooking on reduced heat until the juices were no longer pink.  This kept the chicken nice and moist.  To serve I placed the chicken on a bed of sweet rice and topped with mango chutney.  It was an easy, low fat yet wonderfully flavoured meal.


Saturday, June 26, 2010

Easy Chicken & Gravy with Rice

Chicken is a versatile frugal meat choice.   Chicken can bought deboned and skinned or can easily be deboned and skinned at home for more savings.  If you debone and skin at home you have the meat plus the bones for making stock.  Boneless, skinless chicken breasts are very versatile so they are one of my freezer staples.  They are great pan fried or grilled.  Quite often I will cook up several then slice for use in chicken wraps and salads.  Once sliced I package them into meal size portions and vacuum seal them, then freeze for quick meal starts. 

easy chicken & gravy with rice
One of my favourite ways of cooking boneless, skinless chicken breasts is pan frying.  I sear the meat on both sides on high heat for a nice golden brown then reduce the heat and season as desired.  Pictured is the chicken dinner I made a couple of nights ago.  I started the chicken in the same fashion then after reducing the heat I seasoned lightly with garlic pepper then poured in about a half cup of water stirring to loosen the bits of chicken from searing.  I let the chicken cook until the juices were no longer pink then removed from the pan to make the gravy.  I added about a cup of chicken stock to the remaining drippings brought to a low boil and stirred in a corn starch slurry to thicken. 

While the chicken was cooking, the Thai sweet rice (Sanpatong) was cooking in the rice cooker.  Thai sweet rice is a sticky rice  In Thai the northern and northeastern regions of Thailand, this rice is eaten in place of long grain rice.  There it is traditional eaten with your hands by making the rice into a little ball and dipping it into other dishes.  Thai sweet rice should be soaked for 10 minutes before cooking.   When cooked the rice will be translucent.  I used chicken stock for the cooking liquid.  Rather than forming into balls, served the rice topped with a chicken breast with the gravy poured over it.


Friday, April 30, 2010

Egg Noodles With Beef, Asparagus and Mushrooms

Our beef on the hoof purchase is ready for cutting which means it will be ready to picked up in a week or two.  The past couple of months we have been focusing on reducing our freezer stock in preparation for the new meat.  At the same time because of the potential move combined with the new growing season starting I have been working on reducing our pantry stock so we are doing a lot of eating from the pantry and freezer which is not a bad thing. 

egg noodles with beef, asparagus and mushrooms
Looking through the freezers I discovered the last package of stew beef, not quite enough to make my normal sized batch of stew.  I put that out for thawing then checked the fridge to see what would go with the beef.  I found a part bottle of Diana Sauce™from our last barbeque so a plan was already in motion in my mind.  I paired a sauce made with stew beef, Diana Sauce™home canned mushrooms, and fresh asparagus with broad egg noodles.  The end result was an easy, comfort, frugal meal right from the pantry.

Egg Noodles With Beef, Asparagus and Mushrooms
1 lb  stew beef
1 tbsp olive oil
¼ c water (red wine or beef stock)
about 1½ c Diana Sauce™
500 ml (2 c) jar home canned mushrooms
8 spears fresh asparagus
about 4 c of cooked egg noodles

Heat olive oil in fry pan.  Brown stew beef in the olive oil then deglaze the pan with water.  Pour the Diana Sauce™ over the meat and bring to a simmer.  Cover and let simmer about 30 minutes.  Stir in the drained mushrooms.  Cover and simmer 10 minutes on low heat.  While sauce is simmering cook and drain the egg noodles.  Toss in the asparagus pieces into the sauce.  Cover and  simmer 5 minutes on low heat then ladle over hot egg noodle.

Note: Do not over cook the asparagus.  It should retain a bright green colour and be al dente


Friday, January 15, 2010

Cheese, Meat & Vegetable Twist

I don't buy or subscribe to very many foodie type magazines. A few years ago I signed up to receive What's Cooking, a free quarterly magazine put out by Kraft Foods. The magazine is wonderful presented with easy recipes using Kraft products. There are a lot of cooking and menu planning tips as well. I will admit to enjoying opening up a foodie magazine and immediately seeing something I want to try making.

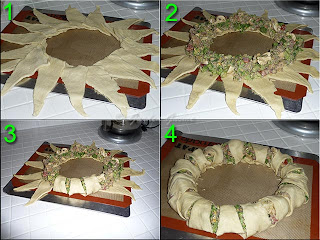
steps for making easy baked cheese, meat and vegetable twistThe Steps

This recipe was originally called Easy Baked Cheese & Vegetable Twist. The presentation was quite appealing yet looked easy enough to duplicate. I took one look at the recipe then started tweaking changing the filling to include meat. I also wanted something with a bit more flavour which the original recipe didn't have. Here's my version.

Cheese, Meat & Vegetable Twist
modified from: Kraft Foods, What's Cooking. Festive 2009. Pp. 37.

2 cans refrigerated crescent dinner rolls
2 eggs
125 g (4 oz) Philadelphia Herb & Garlic cream cheese spread
2 c broccoli, rough chopped
8 mushrooms, quartered
½ roma tomato, seeded and chopped
1 green onion, sliced
1½ c ground beef, browned

Brown ground beef and drain. Prepare vegetables. Open the crescent rolls, separate and arrange on a baking sheet overlapping to form a circle (1). Mix the rest of the ingredients together then spoon around the centre of the circle (2). I found it worked best to use a large spoon then shape the ring as I went using the other hand. Pull up each triangle point towards the centre and tuck under (3). Continue in this fashion until all points are tucked under (4). Bake at 190ºC/375ºF until golden brown about 35 minutes.

Easy Baked Cheese, Meat & Vegetable TwistFresh from Oven

I was a bit surprised to see the ring did not keep its nice round shape but that's ok. Honestly I do have a crooked eye but do still know the difference between a circle and oblong. With a bit of practice I should be able to perfect this. The original recipe showed the finishd twist on a serving wood. This definitely would be a two person endeavour to get the baked ring onto any serving dish without breaking it.

What strikes me about this recipe is you really could use any filling you wanted to as long as the filling isn't runny when hot. It could be a savoury, meat filling as I used, a vegetarian filling or even a sweet, dessert filling. So it is the method and idea that is most important then tailor the filling to what you want.

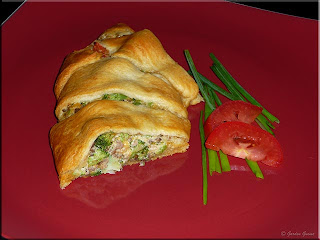
Easy Baked Cheese, Meat & Vegetable Twist platedPlated

Once the twist is cut for plating it really doesn't have the circular shape although there is a slight arc to the pieces. For presentation and serving it would be very nice to present the twist whole as that is when it is most impressive visually. I plated the cut twist very simply with a small garnish. An average serving would be 3 sections depending on the filling. It was quite tasty and very filling. I'm glad I substituted the Philidelphia Herb & Garlic cream cheese spread in place of plain cream cheese as that added a nice flavour element. The real trick is going to be substituting the refrigerator dough. I think puff pastry would be a good substitute so will try that the next time.


Friday, December 18, 2009

Chicken Vegetable Stir Fry

The holiday season begins shortly after the cold weather hits. When the cold weather fits hits our bodies are not acclimatized to the temperature change so we seek warm, comfort foods like thick, rich soups and chowders as well as heavier dishes such as lasagne and roasts with all the fixings. Homemade breads become a norm for most meals and salads get a wee bit plainer. We rely on more of our home canned stores and less on fresh fruits and vegetables. I'm not saying we don't eat fresh fruits and vegetables just we eat less both in quantity and variety. Now overall this wouldn't be a problem for us except this is also the time of year we tend to do a bit more cocooning indoors so our activity levels are down. Knowing that most of the holiday eating we do away from home is going to be packed with extra calories, I try cooking a bit lighter at home for the month of December. A stir fry is an ideal way to cook a bit lighter without it feeling like you are cooking lighter.

Rooster Brand instant noodlesInstant Noodles

When it comes to quick cooking noodles many think of the Ramen noodles that come in the little pouches with a high sodium content seasoning packet. Unfortunately Ramen noodles are also high in fat because they are fried as part of the pre-cooking then packaged to complete the cooking process at home. Now Ramen noodles do have their use but if you can eliminate the nutritional problems of this quick cooking noodle (3 minutes), why not?

I found Rooster Brand Instant Noodles that have all the convenience of Ramen noodles without being high in sodium or fat and they only take 1 minute to cook! Unlike Ramen noodles that has a list of ingredients a mile long the Rooster Instant Noodles ingredients are wheat flour, water, duck eggs, colour. So let's compare the nutritional value of each. Ramen noodles contain: 380 cal per 85 g pk, 22% fat (36% saturated fat), 5 mg cholesterol, 77% sodium, 18% carbs (16% fiber), 4% calcium and 23% iron. Rooster Brand Instant Noodles contain: 300 cal per 1¼c (85 g), 0% fat (0% saturated fat), 0 mg cholesterol, 14% sodium, 21% carbohydrates (8% fiber), 2% calcium and 10% iron. In terms of both fat and sodium the Rooster Brand Instant Noodles is a better choice nutritionally even though they are slightly higer in carbohydrates as well as lower in fiber, calcium and iron. As far as cost goes Ramen noodles (85 g) packages are often on sale 4/$1 or 25¢ per 85 g. The Rooster Brand Instant Noodles contains the equivalent of 4 packages of Ramen noodles at a cost of $1.19 or 30¢ per 85 g which really is not uch of a price difference to get a healthier product.

chicken vegetable stir fryChicken Vegetable Stir Fry

Instant noodles are ideal for adding to soups and into stir frys. The noodles can be cooked directly is soups just before serving. Once cooked which only takes 1 minute, the instant noodles can also be stirred directly into the stir fry coating them with the sauce. As instants go the Rooster Brand Instant Noodles are worth of a spot in your pantry.

Stir frys are always quick, easy and frugal meals. They really allow you to reduce the amount of meat per serving without noticing that there is less meat. They are ideal for those meals when time is at a premium or during the hot summer months because cooking takes only a few minutes. By far the most time spent is the food prep that consists mainly of cutting up a variety of vegetables. It is important to have all your vegetables ready before beginning to cook. If you are using meat or poultry it goes into the pan first as it takes the longest to cook then vegetables are added in the order of longest cook time to shortest. The resulting liquid can be thickened with a cornstarch slurry then if desired stir in cooked instant noodles. Give a toss and voila you have a lovely dinner with little effort.

Pictured is the stir fry I made a couple of nights ago. I served it on a bed of instant noodles that were cooked in turkey stock. The lightly seasoned chicken (lemon pepper) was cooked first then deboned, cut into strips and reserving the liquid. The chicken vegetable mixture consisted red onions, carrots, broccoli, celery, bamboo shoots, water chestnuts and red pepper. The mixture seasoned with a little soy sauce and Hoison sauce. The rich reserve liquid was poured back into the mixture then thickened with a corn starch slurry. The meal was quick, easy, very filling and quite tasty! The best part is the meal was low sodium, low fat, low carb yet quite nutritious :)


Friday, October 30, 2009

Sautéed Brussels Sprouts

Good home cooking need not be time consuming or complicated. In fact some of the best meals are the simple meals. Typically these meals have fewer ingredients, nothing fancy just normal ingredients you would find in your pantry, vegetable bin, refrigerator or freezer. I love finding a simple side that just works nicely especially when it is just a bit on the rustic side! When it is a side that can be easily made with ingredients I have on hand that's even better.

Brussels sprouts with shake & bake style chickenSautéed Brussels Sprouts

There is no doubt that food is a bonding factor in our family. We often call or email other family members with a new recipe we tried. One of our kids called with a way to cook Brussels sprouts that was quite tasty yet very simple involving two ingredients, Brussels sprouts and bacon. Brussels sprouts are one thing I have had problems growing but they are one of my favourite vegetables. I usually steam fresh Brussels sprouts. They don't can well and I don't care for them frozen so fresh it is.

I liked the idea of sautéing with just bacon but had a half of an onion in the fridge so chopped that to add with the Brussels sprouts and bacon. Home made shake & bake chicken legs with backs attached and oven baked potatoes completed the entrée. It was a simple meal, easy to put together with very little prep work just the perfect meal for busy homemakers.

Sautéed Brussels Sprouts

30 Brussels sprouts
½ medium onion chopped
6 slices thick bacon

Wash and trim the Brussels sprouts. Chop the onion. Cut across the bacon slices to form 1-inch pieces. Place in a fry pan on medium high. Sauté until Brussels sprouts caramelize and bacon is golden brown. Remove from pan using a slotted spoon to help drain any grease before serving.


Tuesday, February 24, 2009

A Foodie Weekend

From February 13 to the 19th there was something on the go every day and evening so my husband and I did not get a chance to eat together. During the week I made dinner as normal packaging up my husband's meal for the following day's lunch. We like going out for dinner Friday evenings so I found a community event with all you can eat pickerel that sounded good. Saturday night we were hosting our monthly larger event with the kids home so I kept dinner simple with homemade individual sized pizzas. I had several goodies planned for the event despite the bad weather that was threatening. In little time the weekend shaped up to be a foodie weekend!

Pickerel Dinner

If you have followed this blogs you will have already read how much we enjoy small community food events. Quite often these are hosted by community service clubs or charity groups as fund raisers. We like to support these efforts whenever possible. Not only does this give back to our community it gives us a nice social night out with good food and entertainment at a very low cost.

Friday night there was an all you can eat pickerel dinner for $12 per person. We went with another couple then stopped at their house for drinks and socializing afterwards. The meal included all you can eat fish, vegetables, French fries, pickles and coleslaw. Pictured is my plate and just take a look at that piece of pickerel! Each beautiful, meaty fillet was a good 12 inches long. I finished one with the fixings while my husband had three fillets. Oh and where they ever good! The nice meaty fillets were cooked to perfection. We will definitely be at their next all-you-can-eat event.

Individual Pizzas

Saturday afternoon I made pizza dough for dinner. Normally we make one or two large pizzas but this time we made 6 individual pizzas topped as desired. My husband even formed a small, grandbaby sized pizza for the little one. Toppings included sautéed mushrooms, pancetta, onions, green peppers, ham and fresh tomatoes. The pancetta was a nice addition.

Italian pancetta is salt cured pork belly that has been spiced then dried for about three months. It is not smoked. It is either rolled as ours was or straight with the fat on one side. Pancetta is usually very thinly sliced. It is more expensive (here $2.69/100 g) to purchase than regular bacon or you can make your own pancetta.

Cured Meats

Three other kinds of homemade cured meat were served during our get together. The kids brought home some Italian sausage (top) made by grandbaby's babystitter. This tasty, spicy sausage that was sliced quite thin. I think this sausage was cured then oven cooked similar to my easy homemade sausage as there was no casing present. The sausage had a nice, firm texture. I really must get the recipe for this sausage!

Two of our friends make homemade venison sausage that is just wonderful. Unfortunately they aren't parting with their recipes so I'm going to have to experiment. One of these friends brought venison sticks (bottom). These spicy, homemade meat sticks are simply delightful! Everyone loves them. They have the texture of the pepperettes (not pictured) that I also served. Perhaps he will share the recipe for the venison sticks.

Making your own sausage and meat sticks is really quite easy. You don't need a lot of equipment either. One reason for making your own is to season according to how your family likes it. Another reason is to take advantage of good meat sales and/or use meats from a successful hunt. In many cases homemade sausages and meat sticks are cheaper than store bought.

Nilla Dips

It always amazes me that sometimes the simplest treats like chocolate pretzels are the most popular at get togethers. Of course this makes entertaining a bit easier. I'm also pleasantly surprised that despite being asked not to bring anything a lot of our guests bring some type of treat. Over the holidays a box of Vanilla wafers made their way into the house. I decided to use them up Saturday night. What I came up with was ever so easy yet went over well.

I melted regular chocolate chips but next time I think I'll use chocolate wafers. Then I spread peanut butter on the bottom of a vanilla wafer and sandwiched another vanilla wafer on top. Once assembled I dipped the little sandwiches into the melted chocolate and set on wax paper to cool.

Normally I have a large batch of chili on the go for this particular monthly get together. The guys love it! Saturday night I decided to do something a bit different and make ultimate hot dogs. My gosh did these ever go over well! So it went for another foodie weekend.


Friday, February 20, 2009

Chicken Portobello

I can remember the first time I saw portobello mushrooms in a grocery store. At that time they were considerably more expensive than the common mushrooms. I bought one to use in my first attempt at making beef burgundy. The dish itself was a disaster beyond being edible but I learned the valuable lesson to never cook with a wine I wouldn't drink. Sometimes cooking lessons are hard learned! Over the years our preference has remained the common white mushroom. We do use a lot of them not only fresh but home preserved (some ways here). Not only are mushrooms low in calories they are high in vitamin B, potassium and phosphorus.

Chicken Portobello

A few years ago I began experimenting more and more using portobello mushrooms. I find these meaty, flavourful mushrooms are even more versatile than the common mushroom so watch this blog for more ways we enjoy this wonderful mushroom. Unlike the common mushroom I have not canned portobello mushrooms but I have dried then both as pieces and powdered.

When we were at Sam's Club on Saturday I bought 4 lovely portobello mushooms. Normally I do not like to buy mushrooms in plastic wrapped trays because moisture tends to make mushrooms tough and rubbery but also because this type of packaging is not environmentally friendly. I made an exception since these were such lovely looking mushrooms. As you know two of the mushrooms were made into very tasty portobello pizzas. Last night I used the remaining two mushrooms to make chicken portobello using a mushroom chicken sauce I often serve over rice or egg noodles. The result was a wonderfully rich and creamy yet very filling entrée.

Chicken Portobello

2 lg portobello mushrooms
2 boneless, skinless chicken breast
1 can condensed mushroom soup*
½ can skim milk
500 ml jar home canned green beans
125 ml (½ c) chicken stock
1 tsp Montreal Steak seasoning
1 tbsp butter
sour cream (optional)

Heat a little oil in a fry pan. Sear chicken breasts on both sides. Remove chicken breasts from pan and deglaze pan with chicken stock. Cut chicken breasts into cubes then put back into the pan. Sprinkle with seasoning. Stir in mushroom soup and milk. Bring to a simmer. Cover and let cook about 20 minutes, stirring occasionally. Remove cover and let sauce reduce to half. Stir in the green beans to heat through.

While chicken is simmering, heat oven to 350ºF. Place mushrooms gill side up on Silpat® lined baking sheet. Melt butter. Brush onto the mushroom using a pastry brush. Bake until cooked through about 15 minutes. Remove from oven and place in centre of plate. Top with the chicken mixture. Garnish with a teaspoon of sour cream if desired.

* Although we do not use condensed mushroom soup as a soup I keep a good supply on hand for making creamy mushroom sauces. Homemade mushroom soup is often used for the same purpose either fresh or frozen.


Tuesday, February 17, 2009

Portobello Pizza

The past five days have been a whirlwind of activity with little time for cooking. Saturday we managed to siphon enough time to get to Sam's Club. While the purpose was not for stocking up on food I managed to pick up a few food items, mainly large containers of seasonings. I also picked up a package of beautiful looking portobello mushrooms.

Portobello mushrooms are the mature form of brown crimini mushrooms. These mushrooms are often used in vegetarian cooking. They are very impressive simply by size often reaching diameters of 6 inches. They have a bit deeper more pronounced flavour than the juvenile crimini mushrooms which is to be expected. Portebello mushrooms are ideal for used as a bread replacement because they have a lovely texture when cooked. Believe me you won't even miss the bread when you substitute porobello mushrooms!

There were four lovely portobello mushrooms in the package. Now generally portobellos are viewed as expensive but these worked out to $1.05 each I will tell you I really do not like buying any kind of mushroom in a plastic wrapped tray. Mushrooms are like sponges so absorb moisture. This type of packaging can cause the mushrooms to be soggy and soil quickly plus it is not very environmentally friendly. Mushrooms packaged this way should be repackaged into a paper bag for storage in the crisper.

I decided that an easy meal of portobello pizza was in order. Toppings included home canned pizza sauce, green peppers, tomatoes, onions, bacon and Asiago cheese. Essentially the portobello mushroom is used in place of pizza dough.

Method:
Place the mushroom on a baking sheet with gills facing up. Top with pizza sauce and desired toppings. Bake at 350ºF until cheese is bubbly.

You will need to use a knife and fork for eating portobello pizzas when eating a whole one. Portobello mushrooms have an intense enough flavour that they can easily accent stronger flavoured cheeses. One of the real beauties of homemade pizza based dishes is they are versatile. Use the toppings you want and leave omit the rest.

My husband wanted only sauce, cheese and bacon on his portobello pizza. I chose an Asiago cheese for this purpose as it has a bit more flavour that pairs nicely with the depth of flavour of the portobello mushroom. Bacon is another topping that pairs nicely with the flavour of portobello. Mine was topped with onion, green pepper, tomato slices, bacon, sauce and cheese. Both were quite lovely but very filling!

Portobello pizzas are very filling so don't let the smaller size fool you. Baked they are still a good 5 inches in diameter but are very meaty. Even though you are not getting a lot of carbs, the portobello mushroom itself is quite meaty and filling. One large portobello is more than sufficient per person for this meal. If anything it is more filling than the bread crust version. This dish would make a great appetizer as well although you may want to cut them into quarters.