My photo
Ontario, Canada
I am a wife, mother and grandma who enjoys the many aspects of homemaking. A variety of interests and hobbies combined with travel keep me active. They reflect the importance of family, friends, home and good food.
Cook ingredients that you are used to cooking by other techniques, such as fish, chicken, or hamburgers. In other words be comfortable with the ingredients you are using.
--Bobby Flay

For Your Information

Please watch this area for important information like updates, food recalls, polls, contests, coupons, and freebies.
  • [March 19, 2020] - Effective Mar 17, this blog will no longer accept advertising. The reason is very simple. If I like a product, I will promote it without compensation. If I don't like a product, I will have no problem saying so.
  • [March 17, 2020] - A return to blogging! Stay tuned for new tips, resources and all things food related.
  • [February 1, 2016] - An interesting report on why you should always choose organic tea verses non-organic: Toxic Tea (pdf format)
  • Sticky Post - Warning: 4ever Recap reusable canning lids. The reports are growing daily of these lids losing their seal during storage. Some have lost their entire season's worth of canning to these seal failures! [Update: 4ever Recap appears to be out of business.]

Popular Posts

Showing posts with label grains. Show all posts

Tuesday, February 24, 2015

Herbed Garlic Rice Stuffed Portobello Mushrooms

We have had a rather busy and exciting February thus far!  We have been focusing on eating meals prepared from our pantry and freezer overstock for home prepared meals.  Despite eating out on average of three times a week, we are still making a bit of headway in paring down the overstock.  We also dramatically reduced buying any groceries other than fresh produce for the month.  I bought some gourmet teas and macadamia nuts too, but other than that only produce.  It helps that it has been extremely cold so I really don't feel like going out to shop and even considered cancelling a couple of social events because it has been so cold!

rice stuffed portobello mushrooms
We aim for 5 to 7 servings of fresh fruits and vegetables daily in addition to any frozen or home canned fruits and vegetables.  I was looking for something a bit different during my last trip to the grocery store and settled on portobello mushrooms.  Portobello mushrooms are simply grown brown crimini mushrooms with a diameter of 4 to 6 inches.  Their deep flavour with firm texture lends themselves nicely as a meat substitute.  We often enjoy portobello mushrooms grilled or sliced and sautéed, as well as stuffed.  The caps are large enough to hold a nice portion of the desired stuffing to create a filling, delicious entrées.  Portobello mushrooms are fat-free, low in calories, and a rich source of selenium, copper and niacin.

I cooked long grain rice then stirred in about a quarter cup of Kraft Herb & Garlic Shredded Cheese and finely chopped broccoli.  I cleaned the mushroom caps and placed top-side down on a Silpat lined baking sheet.  I brushed about a tablespoon of home canned pizza sauce in each mushroom cap.  Then, I spooned the rice filling into each cap mounding nicely.  I sprinkled lightly with fresh grated Parmesan cheese and baked at 350°F until the mushroom caps were cooked (about 40 minutes).  A fresh garden salad with citrus vinaigrette completed the meal.  


Sunday, November 27, 2011

Venison Rib Eye with Creamy Mushroom Pilaf

I use a select few commercially prepared condensed soups to make sauces and dips but I always  substitute my home canned stocks and broths when a recipe calls for the commercially canned versions.  The reason being is home canned or simply home made stocks and broths are less expensive but have better flavour.  Stocks and broths add a wonderful flavour to rices so unless I need plain white rice for a particular dish, I always cook rices in stocks (eg. beef, chicken, vegetable, tomato).

creamy mushroom pilaf
The guys had a successful hunt camp which translates into me having a bit of venison in the freezer.  Venison is wild game that can have a gamey edge to it if not cooked properly.  This is mainly due to the meat being very low fat and the mouth feel of what fat there is.  For this reason, venison is usually cooked with pork or bacon fat.

We pan fried the venison rib eye steaks in a little bacon grease in one of our new ceramic coated non-stick EcoPans.  The pan was amazing to use to the point my restaurant grade Teflon coated have officially been retired.  I served the venison steaks with home canned green beans and a creamy mushroom pilaf.  The recipe called for using part of the Parmesan cheese and parsley as a garnish.  I omitted both as venison is a very rich meat so I wanted the pilaf to complement rather than compete with that richness.

Creamy Mushroom Pilaf
modified from: Campbell's, Simply Delicious Recipes (1992), Pp. 130

3 tbsp butter
1 small onion, chopped
1 c fresh sliced mushrooms
1 c uncooked long grain white rice
1¼ c homemade stock
¾ c water
¼ c dry white wine
¼ tsp pepper
¼ c sour cream
½ c fresh grated Parmesan cheese
1 tbsp chopped fresh parsley (optional)

Place the onion, mushrooms, rice and butter into a 2-quart saucepan.  Cook until rice is lightly browned on medium heat, stirring often.  Stir in broth, water, win and pepper.  Heat to boiling.  Reduce the heat to a low simmer.  Cover and cook 20 minutes.  Remove from heat.  Stir in the sour cream and half of the cheese.  Cover and let stand 5 minutes.  Stir.  Garnish with remaining cheese and parsley if desired.


Sunday, October 30, 2011

Rice - My Cooking Nemesis

Everyone who cooks regardless of their experience or training will face a cooking nemesis.  The difference between a home cook and a professionally trained one is the professionally trained cook/chef is forced to cook the same dish over and over until they have it mastered to perfection.  The home cook has easy options to practicing a dish though so it is easy to never have to face your cooking nemesis.  My cooking nemesis is rice.

rice cooked in rice cooker
Rice is a staple in most pantries because it is a good value for your food dollar.  It can be enjoyed plain or seasoned as a side and there are a lot of easy recipes that using rice as an ingredient.  However, I cannot cook rice the way I would like to.  As a newlwed I used instant rice or Rice-a-Roni but then we bought our first microwave oven, I started experimenting with long grain rice.  It cooked the rice reasonably well but my gosh the spill over resulted in a huge mess every time.  I finally bought a rice maker.  I'm now on my second rice maker.  I make rice a couple of times a week and the consistent problem has been scorching.  It is the same problem I had trying to cook rice on an electric stove.

I developed several methods to deal with the scorching problem.  I've added butter, cooked in stock and unplugged the rice maker as soon as the rice was cooked.  Each time I carefully spoon out the unscorched rice then tossing the scorched rice but to me that was acceptable.  Finally as soon as the rice cooker clicked off, I removed the cooked rice and set it on a trivet then covered with a lid to keep warm until being served but there was still a bit of scorching.  A few days ago, it dawned on me that the problem with the rice scorching was the residual heat in the burner of the rice cooker or electric stovetop.  The natural gas stove removes this problem so I was on a mission to finally learn how to cook rice on the stovetop.

rice cooked on natural gas stovetop
I consulted my much used and beloved Betty Crocker's Cookbook (circa 1969).  There is a chart to refer to for the amount of rice you want to cook.  I used ⅓ c long grain white rice, ⅔ c water and ¼ tsp salt.  The instructions said to mix together in a sauce pan, bring to a boil then reduce to simmer, cover with a tight fitting lid and cook for 14 minutes.   Once the rice is cooked, turn off the heat, fluff the rice, cover and let steam 5 to 10 minutes.

I am rather pleased and encouraged with my first test batch of cooking rice on the stovetop.  I experienced two minor problems but the rice was still nice and fluffy.  It has a nicer texture than rice cooked in the rice cooker.  First, there was a bit of spill over shortly after I put the lid on.  I'm still getting used to the settings on the gas stove so I had the burner turned too high.  Now I know to turn the burner down even further.  Second, there was a bit of sticking on the bottom of the pan.  It wasn't scorched, just sticking.  There wasn't as much wastage as there is using the rice cooker but still a bit of practice should solve that problem.  I used a stainless steel saucepan so worst case scenario I could buy a non-stick saucepan for cooking rice.  I prefer not to do this though so will be practicing cooking rice several times over the next few days.  This really is going to be an exercise in patience but I'm determined to master cooking rice on the stovetop!


Saturday, April 09, 2011

Chicken with Mushroom Fried Rice

There are four Chinese restaurants within about 40 minutes of us, each with their own unique style.  That is something I appreciate because even though it is Chinese it isn't all the same.  We usually get Chinese take-out at our favourite restaurant two or three times a year and eat in at the other two once a year.  The furthest from us has a rather interesting menu with a couple of sides unique to them.  This restaurant is not one we would go out of our way to go to but when in the area take-out is in order.  Most of their dishes have almonds and I've noticed that almonds play a large role in a lot of their dishes.  My husband stopped for take-out there a couple of days ago. 

chicken with mushroom fried rice
Chinese take-out is expensive coming in at about $50 per order for a dinner for three plus extras.  However, it usually gives us two meals each plus a bit of leftovers for another meal.  With respect to other take-out, Chines take-out despite the initial cost tends to be the more fugal choice sine all of it reheats nicely.

There was a bit of mushroom fried rice left over so we sautéed boneless, skinless chicken breast strips to a golden brown.  Then we tossed in the mushroom fried rice to create a new creation with lots of flavour.   This was an easy, peasy meal at it's finest taking about 15 minutes to put together.


Mushroom fried rice is extremely easy to make and there really are no measurements.  Start with mushroom slices then sautée them in butter until nicely browned.  Stir in the desired amount of cooked rice along with about a cup of cubed cooked carrots and sweet peas.  Add just enough chicken stock to give a nice, creamy texture.  I think cooking the rice in chicken stock boosts the flavour as well for this dish. 


Thursday, March 24, 2011

Kitchen Quick Tips - Preventing Sticky Rice

kitchen quick tips

For light fluffy rice, rinse the raw grains to remove surface starch then cook.  When your rice is cooked, remove from heat.  Remove the lid and cover with a clean T-towel then replace the lid.  Allow the rice to sit off the heat for 10 minutes.  The T-towel will soak up steam preventing sticky rice.


Saturday, September 25, 2010

Grilled Garlic Pepper Pork Chops with Red Beans and Rice

Two more of our friends arrived a couple of days ago.  My husband want to play with out fancy new grill again and after a long travel day for them I decided a homemade meal was in order.  We bought a large pork loin (about 10 lb) for $19 on our first grocery shopping trip so I cut it into thirds.  One third is in the fridge curing for peameal bacon later in the week.  I'm sure everyone will appreciate a taste of home!  One third went into the refrigerator for me to decide what to do with and the other third was turned into boneless garlic pepper pork chops.


seasoned pork loin
It was rather interesting as I didn't have an actual menu plan for the dinner.  I just started pairing things together knowing I wanted to use up part of the pork loin.  I rolled a pork loin piece in garlic pepper to create a nice coating then set in the refrigerator until ready to be cut for grilling.  I cut the seasoned pork loin into 1 - inch chops for grilling as pictured.  The chops were nicely flavoured, tender and juicy.


Grilled Garlic Pepper Pork Chops


about 3 lb pork loin
about ½ c garlic pepper

Place the pork loin onto a cutting board.  Sprinkle one half of the garlic pepper over the pork loin and press in a bit.  Turn the pork loin over and repeat.  Flip the pork loin a couple of times to be sure all sides are well covered with the seasoning.  Place the pork loin into a zipper style bag or large container.  Refrigerate until ready to grill.  Remove from refrigerator.  Slice into 1 - inch thick chops.  Grill on direct heat on medium until marked with nicely defined grill marks.  Turn and repeat.

garlic pepper pork chops with red beans and rice
I mentioned earlier this week that we stopped at a Popeye's for chicken.  One of the sides we ordered was red beans and rice.  Well now, we love just about any bean out there and we love rice so it made a lot of sense to try this Louisiana specialty dish that is served both in restaurants and at home.  I love finding a dish like this that are rather easy to duplicate at home!

Traditionally red beans and rice is a side dish served on Monday to help use up pork from Sunday's dinner.  I cheated on this recipe using a can of cooked small red beans but sure shooting I am taking a lot of dried small red beans home to can up.  I honestly was flying by the seat of my pants while creating this side as well, tasting as I added ingredients to get the taste I wanted.  The beauty of this simple recipe is it very easy to tweak as far as seasonings and extras.  Popeye's version was a bit spicier but didn't have the extra vegetables.  I think the extra vegetables compliment this dish nicely.  I really like how it came out!

Red Beans and Rice

beans:
1 - 15 oz can small red beans (500 ml/16 oz home canned)
¼ small green pepper
1 small stock celery
 ¼ small onion
1 bay leaf
½ tsp garlic pepper
½ tsp thyme
¼ tsp cayenne pepper

Chop the pepper, celery fine.  Divide in half reserving the remainder for garnishing.  Pour the beans into a small saucepan.  Stir in the vegetables.  Add bay leaf and seasonings.  Bring to a low boil, cover and remove from heat.  Let sit until cooled then refrigerate to let the flavours meld.  Before serving bring back to a low boil.  Pour into serving bowl for spooning over rice.  Garnish with remaining uncooked vegetables if desired.

rice:
The only tried and true method I use for cooking rice is a rice maker.  The only thing I insist on is to always use another liquid with flavour if at all possible

serving:
Place the rice in a serving bowl, the beans in another serving bowl and the remaining uncooked vegetables in a third serving bowl.  Assemble directly on the plate as desired.


Monday, July 05, 2010

Frugal Kitchens 101 - Rice

Frugal Kitchens 101

Rice has been a staple in many countries and is the most commonly consumed grain in the world, second only in North America to wheat.  In general rices tend to be a very inexpensive starch, certainly less expensive than potatoes.  In comparison to wheat an 8 kg bag of long grain rice cost me $6.99 but has the potential to make almost 4 times that amount with little more than water making rice an extremely frugal starch choice.  Currently rices in my pantry include: Basmati, brown Basmati, Arborio, white long grain, Jasmine, Calrose and Thai sweet rice.   This week's Frugal Kitchens 101 focuses on rice and why it is a frugal choice as a side or ingredient.

  • price - Rice regardless of the variety is quite inexpensive, even less expensive than potatoes.  In general plain long grain white rice is the cheapest but even more expensive short grain varieties and converted rices.  White rice has been stripped of most of it's nutrients so a more frugal choice is brown rice that has a higher nutrition value yet the price is fairly close to that of white rice.  My experience has been that rice regardless of the variety seldom goes on sale but the nice thing is the price of larger bags of rice tends to stay fairly consistent.  An initial outlay of about $30 will give you enough rice to feed a family of 4 for well over a year!
  • storage - Most rices keep well in cool, dry locations for years.  The exception to this is brown rices that have more rice oil in them so they can become rancid but that problem can be solved by storing the rice in the freezer or refrigerator.  Buy rice in bulk in large sized packages then store in a cool, dark location in metal or heavy plastic bins to protect from water and/or rodent damage.
  • versatility - Rice can be used as a meat/soup extender, appetizer, side dish, salad, basic ingredient, or base for a dessert.  Leftover rice reheats nicely and it can be frozen for later use if desired.  Leftover rice can also be tossed into soups and stews. 
  • easy cooking - Rice can be cooked on the stove with nothing more than a saucepan with lid or in the microwave over or a rice maker.  I personally prefer a rice maker for convenience.  Uncooked rice can also be added to casseroles, soups, meatballs and similar dishes where it will cook along with the other ingredients.


Sunday, June 27, 2010

Chicken with Mango Chutney

Yesterday I wrote about an easy chicken and gravy with rice dinner using boneless, skinless chicken breasts and Thai sweet rice.  This sticky rice is often paired with mango slices then surrounded by coconut milk as a desert.  I decided to take a savory spin on the sweet rice and mango combination by using mango chutney to create an entrée.

chicken with mango chutney
Mango chutney has a deep, warm, spicy flavour with slightly sweet high notes.  It has a chunky texture similar to thick salsa.  It really is delightful!  Mango chutney pairs wonderfully with chicken adding a lot of flavour. 

Pictured is the easy to make chicken with mango chutney.  I cooked the Thai sweet rice in chicken stock while the chicken was cooking.  I seared the chicken on both sides then covered the pan and allowed the chicken to continue cooking on reduced heat until the juices were no longer pink.  This kept the chicken nice and moist.  To serve I placed the chicken on a bed of sweet rice and topped with mango chutney.  It was an easy, low fat yet wonderfully flavoured meal.


Saturday, June 26, 2010

Easy Chicken & Gravy with Rice

Chicken is a versatile frugal meat choice.   Chicken can bought deboned and skinned or can easily be deboned and skinned at home for more savings.  If you debone and skin at home you have the meat plus the bones for making stock.  Boneless, skinless chicken breasts are very versatile so they are one of my freezer staples.  They are great pan fried or grilled.  Quite often I will cook up several then slice for use in chicken wraps and salads.  Once sliced I package them into meal size portions and vacuum seal them, then freeze for quick meal starts. 

easy chicken & gravy with rice
One of my favourite ways of cooking boneless, skinless chicken breasts is pan frying.  I sear the meat on both sides on high heat for a nice golden brown then reduce the heat and season as desired.  Pictured is the chicken dinner I made a couple of nights ago.  I started the chicken in the same fashion then after reducing the heat I seasoned lightly with garlic pepper then poured in about a half cup of water stirring to loosen the bits of chicken from searing.  I let the chicken cook until the juices were no longer pink then removed from the pan to make the gravy.  I added about a cup of chicken stock to the remaining drippings brought to a low boil and stirred in a corn starch slurry to thicken. 

While the chicken was cooking, the Thai sweet rice (Sanpatong) was cooking in the rice cooker.  Thai sweet rice is a sticky rice  In Thai the northern and northeastern regions of Thailand, this rice is eaten in place of long grain rice.  There it is traditional eaten with your hands by making the rice into a little ball and dipping it into other dishes.  Thai sweet rice should be soaked for 10 minutes before cooking.   When cooked the rice will be translucent.  I used chicken stock for the cooking liquid.  Rather than forming into balls, served the rice topped with a chicken breast with the gravy poured over it.


Tuesday, December 29, 2009

Vegetable Beef and Barley Soup

During the winter months homemade soup is my version of fast food. I can make a lovely, nutritious soup from start to finish completely from the soup bones up in about 50 minutes using one of my pressure cookers and in under 20 minutes if I start with homemade and home canned stock or soup base. Served with homemade bread or biscuits any homemade soup turns into a warm comfort meal on a cold winter's night!

vegetable beef and barley soupVegetable Beef & Barley Soup

As I've previously mentioned many of the meals I make are inspired by an ingredient that caught my eye on one of the many trips I make into the pantry each day. A couple of days I beef soup bones just beckoned to be made into a hearty soup. When I make soup I tend to go with ingredients that inspire me at that time and barley was it for this soup. The vast majority of the non-cream based soups I make are both low fat and low sodium.

I will warn you now that I didn't measure anything for this soup. I started with 2 lg beef soup bones, a stalk of celery, a carrot, small onion and enough water to fill the 4 qt pressure canner ⅔ full. I brought the pressure canner to pressure then reduced the temp just low enough to maintain pressure and let cook 20 minutes. While the stock was cooking, I brought barley and a jar of stewed tomatoes from the pantry then prepared the fresh vegetables (red onion, carrots, mushrooms, tomato) about a handful each. When the stock was finished, I lowered the pressure then removed the bones and cooked vegetables. Beef soup bones have very little fat, usually a nice amount of meat and connective tissue. After pressure cooking the meat will basically fall the bone so I just cut it into bite sized pieces and added it back into the stock. I then added the fresh vegetables, about a cup of barley, a bit of tomato liquid from the stewed tomatoes, a couple of generous spoons of stewed tomatoes, dash of Montréal Steak Seasoning and a couple of splashes of Worcestershire sauce. Then I put the lid back on the pot, brought the pressure cooker to pressure and let cook for 15 minutes. Once the time was up I depressurized the pressure cooker then ladled the soup into bowls and garnished with green onion.


Friday, June 19, 2009

Homemade Granola

I am always looking for ways to make our favourite foods from scratch. The reason for doing often has little to do with saving money but rather getting a healthier, preservative free version of a commercial product. The cost savings is just an added bonus. It's funny that I had just made a batch of homemade granola when one of my kids called to tell me how they had made homemade granola that apparently is oldest grandbaby's new favourite morning cereal. We don't use granola as a cereal very often. We use it instead as a topping.

homemade granolaHomemade Granola

Homemade granola is ever so easy to make and it's cheaper than store bought granola. What makes homemade granola even better than store bought is the ability to change the ingredients. Add whatever extra dried fruits you desire making it your own special blend. You can even add in ½ tsp of seasonings like cinnamon or ginger. Add ½ tsp vanilla or almond extract to the liquid mixture for a nice blend. Shop for the ingredients at a bulk food store for additional savings. Add your homedried fruits like blueberries or strawberries for even greater savings. Make several small batches with different ingredients for variety. Just make the base portion of the granola then tweak as you desire. My recipe for granola also included wheat germ to boost the fiber content making this granola a slightly healthier granola than other homemade granolas. The yield was 3½ c at a cost of $1.17 or 4.2¢ per ounce.

Homemade Granola

2 c old-fashioned oats*
½ c wheat germ
2 tbsp dark brown sugar
¼ tsp sea salt
⅓ c sweetened flaked coconut
⅓ c sliced almonds
⅓ c dark raisins
¼ c pure maple syrup
3 tbsp light vegetable oil
1 tbsp water

Mix first six ingredients together. Place the maple syrup, vegetable oil and water in small sauce pan. Heat just to a simmer. Pour over the oats mixture. Pour the mixture onto Silpat® lined baking pan. Bake at 135ºC (275ºF) for 30 minutes. Stir in the raisins. Bake 15 minutes or until golden brown. Remove from oven. Let cool. Pour into air tight container. Store up to 2 weeks.

* Do not use quick cooking or instant oatmeal.


Thursday, June 18, 2009

Kitchen Quick Tips - Flours/Grain Storage

kitchen quick tips
To keep flour and other grains from getting buggy freeze them overnight then transfer to an air tight container for long term storage.


Tuesday, March 24, 2009

Depression Cooking with Clara - Poorman's Feast

Many are experiencing tough times due to the economic downturn. As a result there is considerably more interest in reducing the ever rising cost of food. This is one reason I include the economic benefits of cooking from scratch and preserving home grown or locally purchased foods at home. Avoiding fast food and convenience foods is one sure fire way to save money. Unfortunately many are being forced into this philosophy.

I discovered the Depression Cooking with Clara videos on YouTube. My first thought was her videos fit nicely with the them of this blog (previously here and here). The following video is Clara's version of a Poorman's Feast. It's interesting to note that you can make quite a nice meal with a few simple ingredients. One thing she does not mention is lentils may contain small stones so be sure to check them before putting them in the pot. Clara adds lemon juice to the olive oil because the citric acid acts as an anti-bacterial agent that might have been important during the Great Depression when the meat might have been a bit off.

Clara speaks of using both olive oil and lemons during the Great Depression. I recall my late Mom talking about the depression years in Ontario, Canada. Oranges were very rarely available so it was a real treat to get an orange in your stocking for Christmas. Unless you lived in an area where you could get lemons, they would have been just as scare as oranges. Olive oil is another commodity that would have been practically unheard of. Instead rendered fat would have been used.


Wednesday, January 28, 2009

Sweet & Sour Chicken Wings

You just can't beat the old, tried and true family recipes handed down through the generations. When we were first married my cooking skills were limited, something I worked hard to remedy since my husband loves to eat. My Mom was a great cook with all her recipes stored safely in her head! I watched, learned and took notes. My MIL shared several recipes of their family favourites as well. More often than not these were not actual recipes but more verbal add this, this and this. They weren't written down so I would be frantically writing as she told me how to make the dish and what ingredients to use. I'd watch her make the meal to see her methods. Sweet & Sour chicken wings was one of those recipes. Over the years this has remained one of our family favourites as well.

Sweet & Sour Chicken Wings

I don't think I've seen Sweet & Sour chicken wings done this way anywhere else. The wings are not coated and they are not crispy as most wings are in restaurants. The meat is extremely tender and juicy. The sauce is thinner than a Chinese sweet & sour sauce. There is no pineapple chunks or juice yet the sauce is nicely flavoured.

This recipe was one of the first ones I got from my MIL. There were no actual measurements. It didn't take me long to figure our the portions through a bit of trial and error. We like the sauce as is without thickening beyond the reducing stage but you can thicken with a corn starch slurry if desired. I often use frozen chicken wings for this dish.

Sweet & Sour Chicken Wings

5 lb chicken wings
5 c water
3 c ketchup
¾ c white vinegar
¾ c packed brown sugar
2 tbsp soy sauce
1 tsp prepared yellow mustard
1 finely chopped onion

Place the chicken wings in a roasting pan. Pour the water over them. Cover and bake at 275ºF for about 1½ hours if the wings were frozen, 1 hour if the wings are fresh. Pour most of the liquid off the wings reserving it for making stock later. [Cool reserve liquid, freeze until ready to make stock.] Mix the remaining ingredients together. Pour over the wings. Stir the wings to coat. Cover and return to the oven at 300ºF for 1 hour. Raise temperature to 350ºF. Remove lid. Allow the wings to continue cooking until the sauce is reduced to desired consistency.

Plated

As you can tell from my husband's plate, he loves sweet & sour chicken wings cooked this way! I always served the wings with rice. I use a large slotted spoon to carefully remove the wings. They are rather delicate because the meat is so tender it falls from the bone easily.

This time I served the sweet & sour wings with Arborio rice cooked in chicken stock and butter using a rice cooker. The sweet & sour sauce flavours the chicken wings through to the bone and gosh are they ever good! It clings to the wings as well. We like ladling some of the sauce over the rice. Served with a garden salad the wings make a lovely, low prep meal.


Thursday, September 07, 2006

Home Canned Kidney Beans, Dilly Beans and Potatoes

I was on a preserving marathon yesterday! The end result was worth it except I didn't get any tomatoes processed. The garden is laden with tomatoes so I'll be making an extra large batch as in about 20 quarts of my homemade spaghetti sauce with meat. I managed to freeze roasted acorn squash and two servings of left-over steak with sauteed mushrooms. On the canning front, I processed potatoes, kidney beans, green beans, and yellow beans.

Today, I picked up 15 lbs of mushrooms from the mushroom farm. Then I stopped at a bulk frozen foods place where I got a 10 lb box of hamburg patties. There are fourty 4 oz patties so that will need to be divided into meal size portions. My final stop was at the beekeeper's were I got a half gallon of fresh honey and some tulip bulbs. So check back in the next few days to see what I do with these goodies.

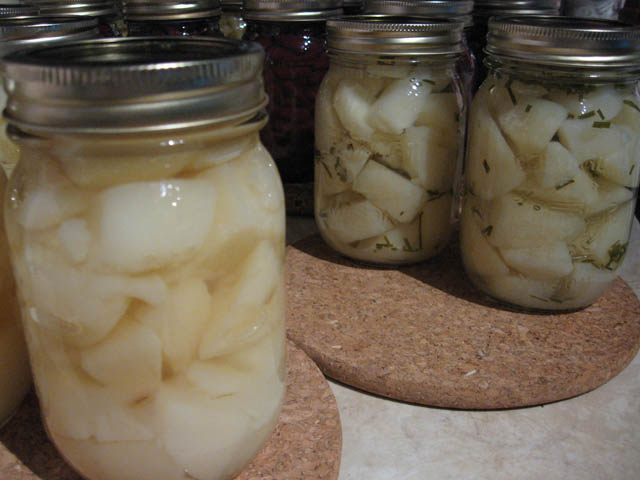
Home Canned Potatoes - Plain and with Chives

My local farmer's market has 50 lb bags of potatoes on sale for $7.99. These are wonderfully large potatoes so I re-stocked my potato bin and started planning what to do with the rest. Some will be frozen as side dishes. Both golden potato bake and fancy potatoes freeze well as will scalloped and twice baked. Some will be used in home canned soups. I have a potato soup recipe that I really want to can but I've always wanted to try canning just potatoes. So yesterday, I canned three pints of plain potatoes and four pints of potatoes with chives. They look good in the jars!

Canning potatoes is relatively simple. Wash then peel the potatoes. Wash again. Cut into cubes. Boil 10 minutes then pressure can 20 minutes at 10 lbs. pressure.

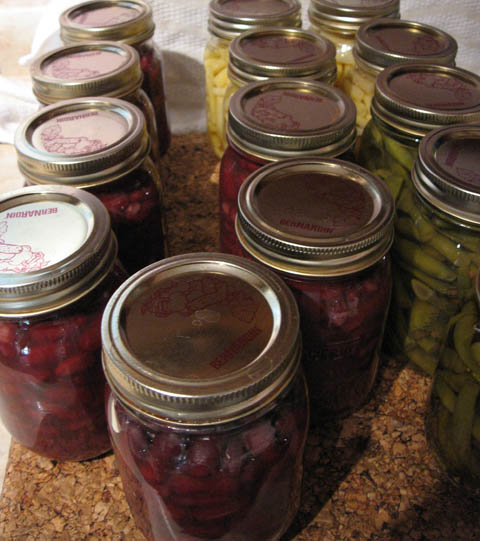
Dark Red Kidney Beans
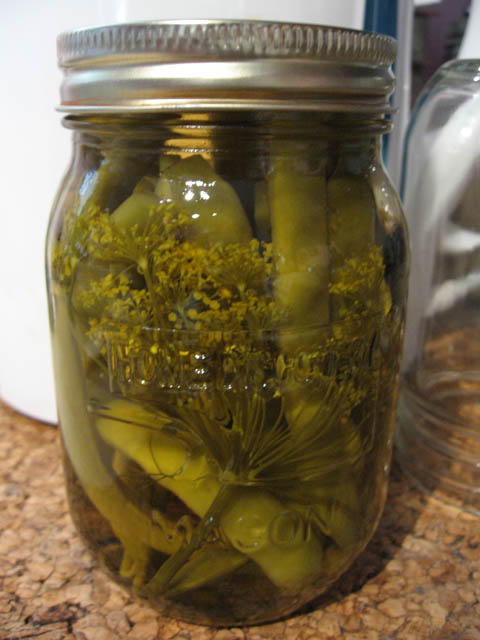
We are not a bean family with the exception of kidney and baked beans. I like canning my own beans for a few reasons. One of the biggest reasons is taste followed by convenience. At 24 cents a jar for kidney beans, it does save money as well. That price is if I use bagged beans from the grocery store. I can cut costs further by buying the beans in bulk when I have a chance. The cheapest kidney beans tend to get here is 69 cents a can. Another thing I like about home canned kidney beans is I can omit the salt entirely and I can add a few spices to make seasoned beans for chili.

I think one of the things I enjoy about canning is I unlike tin cans, I can see what is in the jar. I label all my jars on the lid with a Sharpie marker as I don't like sticker type labels. This serves two purposes as it not only dates the jar but is a reminder the lid has been used so toss it. Now I might be a bit biased but I think dark red kidney beans look absolutely stunning in the jar. Also in the picture are the green and yellow beans.


Dilly Beans

Dilly beans are a nice pickle to have on hand and they look delightful in the jar. You can eat them as is or use in alcoholic drinks like a Bloody Mary. I generally make a few jars so was pleased that my dill heads were finally ready for picking. The beans are Romano from my garden.

I like this recipe because you can do as many jars as you want. Unlike the Ball Blue Book recipe there is no cayenne pepper included and cider vinegar is used instead of white vinegar. I think the cider vinegar adds a nice depth to the pickles. When using cider vinegar be sure to use Pure Apple Cider Vinegar that is 5% acetic acid by volume.

Dilly Beans

Do these one jar or more at a time. Increase brine proportion as needed.
(amounts are per pint)

2 cups green beans or wax beans
boiling water

1 head of dill
1/2 garlic clove
1 cup cider vinegar
1 cup water
1 1/2 tsp coarse pickling salt

Place beans in large pot of boiling water. Return to a boil. Boil 2 minutes. Drain. Rinse in cold water.


Put 1 head of dill and 1 garlic clove into each hot sterilized pint jar. Pack with beans to within 1 inch (2.5 cm) of top.


In large saucepan, combine vinegar, water and salt. Stir and bring to a boil. Pour over beans to within 1/4 inch (6 mm) of top. Seal. [Process in boiling water bath 10 minutes for pints.]* Makes as many jars as you wish.

Source: Jean Pare, Company's Coming Preserves, 1994. Pp. 80

* The processing time was not given in the original recipe. These should be processed in a boiling water bath for 10 minutes according to the Ball Blue Book.