My photo
Ontario, Canada
I am a wife, mother and grandma who enjoys the many aspects of homemaking. A variety of interests and hobbies combined with travel keep me active. They reflect the importance of family, friends, home and good food.
Cook ingredients that you are used to cooking by other techniques, such as fish, chicken, or hamburgers. In other words be comfortable with the ingredients you are using.
--Bobby Flay

For Your Information

Please watch this area for important information like updates, food recalls, polls, contests, coupons, and freebies.
  • [March 19, 2020] - Effective Mar 17, this blog will no longer accept advertising. The reason is very simple. If I like a product, I will promote it without compensation. If I don't like a product, I will have no problem saying so.
  • [March 17, 2020] - A return to blogging! Stay tuned for new tips, resources and all things food related.
  • [February 1, 2016] - An interesting report on why you should always choose organic tea verses non-organic: Toxic Tea (pdf format)
  • Sticky Post - Warning: 4ever Recap reusable canning lids. The reports are growing daily of these lids losing their seal during storage. Some have lost their entire season's worth of canning to these seal failures! [Update: 4ever Recap appears to be out of business.]

Popular Posts

Showing posts with label pressure cooking. Show all posts

Friday, April 22, 2011

Hearty Beef and Tomato Soup

Old Man Winter just refuses to release his grip on what has been a rather long, drawn out winter.  We've had snow on and off since the first week of November and just had snow April 18 so we have been dealing with snow for about twenty-two weeks.  If anything this long winter will go down in our culinary history as the Winter of Soups.  I think I made a pot of soup for each of those weeks, sometimes twice including the four weeks we were away on our winter vacation.  This year I was a bit more adventuresome in soup making, adding ingredients or using combinations I haven't tried before.  The beauty of soup is as long as you have the basic stock you have the makings of soup!

hearty beef and tomato soup
I wrote earlier about a fundraiser one of our grandkid's school had with bean packets from the Bean Ladies.  One of the packets I bought was a simple bean mixture to be used for soup.  The next time I was at the grocery store I checked to see what kind of mixes they have.  Now I know there are a number of dried soup mixes available but I didn't want anything with seasonings, just the actual dry mix.  The intent was if I liked that combination I could make up a few jars ready to use when desired.  I bought a soup mix by Bella Tavola that consisted of green split peas, yellow split peas, long grain rice, pearl barley, alphabet pasta and red split lentils in about equal portions.  The 450 g package (about 2 cups) was 99¢.  

I made a hearty beef and tomato soup using half of the package of mix, two soup bones, carrot, parsnip, onion and seasonings.  The total cost from scratch came out to about $3.65 with the most expensive ingredient being the soup bones.  Cooking time costs for electricity would add about 70¢ for a grand total of $4.35.  The yield was 8 - 10 servings of soup so the cost per serving was 44¢ to 54¢ bring the meal when served with homemade bread well under the $1 mark.  These numbers would make any frugalista jump for joy.  Talk about a budget stretching meal!

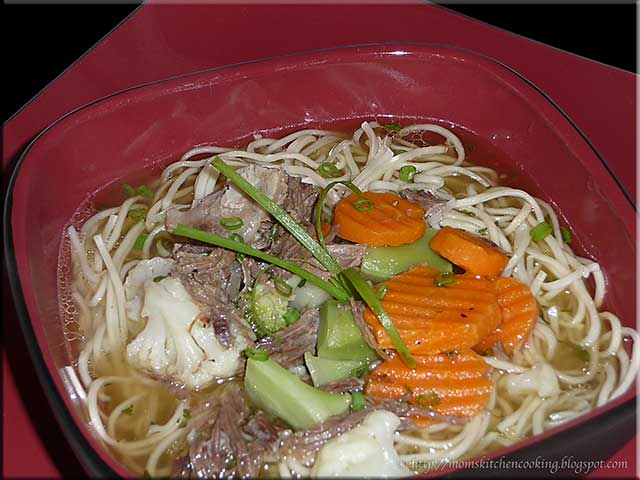
I apologize for the quality of the picture.  This soup has a little olive oil in it that makes it very difficult to take a good picture.  Olive oil not only helps to caramelize the soup bones adding colour and flavour but makes the lycopene in the tomatoes more accessible so this is a healthier soup.  The soup was an absolute winner hands down!  I made it from scratch using soup bones but you could start with pre-made stock to shorten the prep time.  There is a lot of room to tweek as desired as well.  I think it would be excellent substituting wild rice for the long grain rice for added flavour.  The only complaint I had with this particular mixture is the pasta cooked considerably faster than the other ingredients so I wasn't pleased with the softer pasta texture.  When using a homemade mix I will omit the pasta then add it to the soup in about the last 10 minutes of cooking.

Hearty Bean and Tomato Soup

2 tbsp olive oil
2 lg soup bones
1 onion, unpeeled and quartered
1 carrot, unpeeled
1 parsnip, unpeeled
5 peppercorns
1 lg bayleaf
water

Heat oil in bottom of pressure cooker with lid off.  Brown the soup bones.  Add remaining ingredients.  Fill with water to the ⅔ mark.  Place lid and regulator on the pressure cooker.  Bring to pressure and cook 40 minutes.  Remove from heat.  Allow to depressurize.  Strain the stock returning stock to pot.  Cut any meat from the bones adding to stock.

Add:

1 L (4 c) chopped tomatoes
500 ml (2 c) beef stock
1 c Bella Tavola soup mix
1 tbsp Worcestershire sauce
1 tsp onion powder
salt to taste

Bring to a boil.  Reduce heat to a low simmer and continue cooking until barley and lentils are tender.  Serve with dinner rolls, crackers or homemade bread. 

Bon Appétit!

Garden Gnome
©2006-2011


Friday, April 08, 2011

Beef and Barley Soup

Old Man Winter is not letting go of his chilly grasp just yet.  In fact we encountered rather ugly roads with heavy slush and freezing rains coming home from the kids this past weekend.  As a result I'm still in soup making mode.  Soups are just so easy to make and they are one dish where you can let your creativity run wild.  Basically anything goes with soups as long as you have a stock or broth and one or more vegetables then one or more of optional ingredients like meat or poultry, grains, lentils, dried beans or noodles.

beef and barley soup
Barley is a rather underused grain in our home and yet is it very easy to cook.  It goes quite nicely in a soup especially anything beef based.  I made a delicious beef and barley soup a couple of nights ago.  Unlike a lot of my beef soups I added tomato paste to the stock for a zesty flavour. 

While I keep a lot of home canned stocks on hand and use a lot of stocks in cooking I often make soups right from scratch.  That is I make the stock first usually using a pressure cooker than I finish off the soup on the stovetop or in the slow cooker.  This allows me the greatest level of creativity to take the soup in which ever direction desired.

Beef and Barley Soup

2 beef soup bones
1 medium onion
1 carrot
1 parsnip
1 stalk celery

Wash but do not peel vegetables.  Cut carrots, parsnip and celery into 3-inch pieces.  Cut unpeeled onion into quarters.  Place vegetables and soup bones in 6 L pressure cooker.  Fill with water to the  ⅔ mark on the pressure cooker.  Secure the lid.  Place on high heat to bring to pressure.  Reduce heat to just the point where the pressure cooker maintains pressure.  Cook for 40 minutes.  Remove from heat and allow to de-pressurize.

Add 1 lb stew beef and about 2 c of water.  Bring pressure cooker to pressure then cook 30 minutes.  Remove from heat and let de-pressurize.  Remove meat pieces and any meat from the bones.  Cut meat pieces into bite size and place in slow cooker.  Strain the stock mixture pouring stained stock into slow cooker.

Add:

1 bay leaf
6 oz tomato paste
⅔ c barley (soaked using quick method)
1 tbsp Worcestershire sauce

Cook in slow cooker on high 2 hours.  Sauté a half pound of sliced mushrooms in butter.  Drain and stir into soup.  Add 2 cups frozen peas.  Continue cooking on high 10 minutes.  Remove bay leaf and serve.


Saturday, December 11, 2010

Beef and Cabbage with Dumplings

A good portion of the home-style meals I cook have no recipe.  Rather the meal is based on something that caught my attention while in the pantry or freezers.  The number one kitchen utensil I rely on especially for starting soups, stews and chowders is a pressure cooker.  The reason for this is a pressure cooker is the fastest way to make a rich stock while giving tender results for the meat.  All that is needed is to remove the bones and initial stock flavouring vegetables for a lovely base perfect for any soup, stew or chowder.  A couple of days ago it was cold with very light snow flurries so I thought a soup would be a good idea for dinner.  It evolved from a soup to an one pot entrée.  That is another great benefit to using a pressure cooker in that the meal from start to finish can be easily cooked in the same pot.

beef and cabbage with dumplings
I actually started this meal out with the intentions of making a beef based soup.  That is one of the beauties of not following a set recipe.  I put 2 frozen beef soup bones, a carrot, stalk of celery, a small onion and bay leaf into a pressure cooker then opped with water to the ⅔  mark.  It is important that a pressure cooker not be filled above the ⅔ mark to prevent over pressurizing the cooker.  Once the pressure cooker came to pressure, I reduced the heat to maintain pressure and cooked at pressure for 40 minutes.

Once the meat and stock were cooked I removed the bones and vegetables.  I seasoned with Worcestershire sauce, sea salt and fresh ground pepper with just a touch of browning.  Then I stirred in about a quarter wedge of cabbage cut into strips and about 2 cups of a frozen carrot and green/wax bean mixture.  I could have stopped there for a nice hearty soup with adding perhaps rice or pasta but I decided to dumplings add instead.  Dumplings thicken any liquid but they are ever so good!  The end result was a very, very tasty dinner!


Saturday, November 06, 2010

Beef Noodle Bowl

Pasta is just one of those foods that is so versatile there is some version in most cultures.  It is inexpensive, can be easily be made from scratch with only 2 or three staples or can be purchased commercially made quite inexpensively.  Wheat based pastas are very popular but there are rice and gluten free pastas available as well.  Pasta is just one of those foods most people enjoy and there are so many ways to enjoy pasta!

3
Chow mein noodles can be found in the Asian section of most grocery stores.  Chow mein noodles are one of the key ingredients for many Chinese dishes.  They are boiled for 3 minutes then used as is for soup noodles or stir-fried for chow mein.  Not only are chow mein noodles quick cooking the ones I bought are egg free with 0% sodium and cholesterol.  In comparison to other pastas they are lower in calories at 280 cal per 1½ pieces (85 g) verses 320 cal per cup (85 g) of gemelli.  The noodles are pressed into 8 squares.  A serving size is 1½ squares per noodle bowl so a package that cost $1.29 will give 4 servings but there may be more servings when used for other dishes. 

beef noodle bowls
On one of our many visits to the Greater Toronto Area (GTA) we discovered noodle bowls at a Chinese restaurant in Chinatown.  A rice bowl is somewhat like a soup but the focus is on the noodles so there is little in the way of other ingredients.  The broth which can be beef, chicken or pork is usually clear.  The noodles are cooked separate from the broth then placed in a bowl using tongs.  The noodles should fill the bowl by at least half.  A generous spoonful of a vegetable with or without meat mixture is placed on top of the noodles then hot broth is added just enough to show slightly around the noodles.

This is an extremely inexpensive dish to make.  I used 2 beef soup bones to make the broth in the pressure cooker.  

Broth

2 lg soup bones
1 lg carrot
1 sm onion
1 stalk celery
1 clove garlic
1 bay leaf
1 tbsp olive oil
12 c water
1 tbsp worcestershire sauce
salt and pepper to taste


Heat oil in pressure cooker bottom.  Brown soup bones.  Add all ingredients except worcestershire sauce, salt and pepper.  Place lid on pressure cooker.  Bring to pressure.  Reduce heat to just maintain pressure and cook for 30 minutes.  Remove from heat and allow pressure to come to zero.  Remove bones and cut meat from them, shredding and defatting as necessary.  Strain the broth.   Return broth to pot.  Stir in worcestershire sauce, salt and pepper.


Beef Noodle Bowl


1½ squares chow mein noodles per person
2 c broccoli, cauliflower, carrot mix
meat from broth
broth
parsley flakes
green onion


Cook the chow mein noodles.  Heat the vegetable mix and meat in the broth.  Stir in two good pinches of parsley flakes.  Spoon drained noodles into bowl.  The bowl should be about half full of noodles.  Top with a couple of spoons of the vegetable and meat mixture.  Ladle hot broth over the vegetable, meat and noodles until just visible through the noodles.  Sprinkle with a few slices of green onion.  Garnish with green onion spike.


Monday, August 02, 2010

Frugal Kitchens 101 - The Pressure Cooker

Frugal Kitchens 101

Prior to the microwave oven frugal cooks wanting to save time and money used a pressure cooker.  A pressure cooker does exactly what it sounds, it cooks food under pressure.  Normal cooking to a boil will cook at 212ºF but under pressure the temperature is 240ºF.  In addition to the higher temperature the pressure tenderizes tougher cuts of meat.  The pressure allows flavours to permeate quickly through the food as well.  Unlike a microwave oven, browning is quite possible using a pressure cooker.  Browning the meat prior to pressure cooking adds to the richness in flavour.  Cooking under pressure greatly reduces the cooking time and it does not heat up the kitchen the way an oven would.  Long cooking foods like stock that if done in a stock pot normally take a few hours but using a pressure cooker a rich, full flavoured stock can be made in about 40 minutes!  In my opinion a pressure cooker is a must have in any frugal kitchen.

Of special note, a pressure cooker cannot be used as a pressure canner but a pressure canner can be used as both a cooker and a canner.  The two main reasons why a pressure cooker cannot be used as a canner is size and pressure.  A pressure canner must be able to hold 4 - 1 quart jars something most pressure cookers are not big enough to do.  Pressure cookers are designed to operate at 15 lb pressure only but pressure canners are designed to operate at 5, 10, and 15 lb pressure.  Pressure cookers also take less time to come to pressure then pressure canners and the cool quicker than the larger pressure canners.  Processing times have been developed according to how the larger pressure canners perform not the pressure cookers so don't be tempted to use a pressure cooker for canning.

Pressure cookers are available in a variety of sizes.  In general it is better to buy one larger than you think you will use because it can only be filled ⅔ full.  I have 3 pressure canners (Mirro, All American) and 2 pressure cookers (Jasi, Fagor).  The Jasi is a 6 qt aluminum pressure cooker.  I paid somewhere in the $40 price range.  It is a first generation pressure cooker with a rocker regulator that gives an audible signal as to the pressure.  Getting used to a rocker regulator takes a few attempts.  Ideally the goal is a gentle rock not too slow and not a steady rock but somewhere in between.  The downside to the Jasi is it is aluminum so I don't use it for any acidic foods that could cause aluminum to leach into the food.  The Fagor is a 4 qt stainless steel second generation pressure cooker.  The regulator is in the handle so this pressure cooker is a lot quieter than rocker style models.  I use the Fagor a lot with my only complaint being I wish it were bigger.  I am planning on replacing the Jasi with a larger stainless steel Fagor.

When shopping for a pressure cooker:

  • Watch the sales.  Pressure cookers tend to go on sale just before Christmas and again in the spring.
  • Buy used.  If you want a great bargin pressure cookers can often be found at estate and yard sales.  Be aware though that some may need a new gasket.  
  • Stainless steel will cost more but after using both stainless steel and aluminum my recommendation is to go with stainless steel.
  • First generation (rocker style) or second generation (handle regulator) pressure cookers are equal in performance with both being calibrated to operate at 15 lb pressure.  As far as use goes it depends on what you get used to.  I've used rocker, petcock, dial and handle between my pressure canners and cookers.  When it comes to pressure canners I like the dial but with pressure cooker I really like the handle regulator.  This really is a matter of choice though.


Wednesday, November 11, 2009

Braised Outside Round Roast

Early this week I posted about cherry picking the sales and there have been some great local sales recently. The sales included fresh pork shoulder picnic roasts and outside round (bottom round) roasts for $1 per pound. In addition to the meat values various sizes of beets, carrots and onions were on sale for $1. I decided to take advantage of the sales picking up one of each roast for the freezer and one each for immediate use. This is a nice way to do a bit of stocking up without spending a lot of money at one time. The great sales continue this week with fresh pork shoulder picnic roasts, pork loin and sirloin halves on for $1 a pound so you know what I'm stocking up on this week.

preparing the outside round roastPreparing & Cooking

The weather turned cooler yesterday so a comforting winter meal was in order. I decided to cook one of the outside round roasts. Outside round roast is a Canadian term for the cut called bottom round outside of Canada. The outside round roast is the outer part of the round where muscles are well exercised. It consists of tough muscles and some connective tissue making it the least flavourful of all the beef cuts.

Braising is a great way to tenderize this cut of meat. Braising is simply a moist type of cooking is which the meat being tenderized is covered with liquid. The cooking time is usually long and slow. I decided to use braising combined with a pressure cooker which also helps to tenderize tougher cuts of meat without the longer cook times of braising. I heated a little olive oil on medium high then seared all sides of the meat (1). Searing locks in the juices while adding colour and flavour. I used a stainless steel fry pan with copper encapsulated bottom for the searing as that gives better results than non-stick pans. Once the meat was seared I deglazed the pan with a little beef stock to pour over the roast waiting on a layer of carrots and onions in the pressure cooker. Deglazing gets all those tasty bits and pieces that really boost the flavour. Carrots and onions add both moisture and flavour. I would have added celery but found myself in the rare position of being out of celery. I seasoned the roast with Montreal Steak Seasoning and Worcestershire sauce poured in 500 ml of beef stock then I put the lid on the pressure cooker, locked it and brought it to pressure (2) then cooked for 20 minutes. The roast looked gorgeous (3) with a nice amount of juices to lightly thicken for gravy. The roast was cooked to medium rare (4) with the smaller end medium.

outside round roast dinnerDinner

I really wanted a nice, tender, juicy yet flavourful roast using a cut of meat that is not really known for that. At each step of the way adding both flavour and moisture became the primary goal. The results were well worth it! In hindsight a bayleaf and the celery would have added a bit more flavour. I also think a parsnip would have added a nice flavour so will keep that in mind for the next time. I served the roast with Himalayan Basmati rice, tender beets with butter then garnished the plates with carrots removed from the roast juices. I removed the carrots from the roast juices but did not strain the juices for the thinly thickened gravy. It was a frugal, comfort meal perfect for a cool autumn dinner.


Saturday, October 24, 2009

What's in the Pressure Cooker?

After a few meals of turkey we are always ready for something a bit different. Now we have been on this use it up trend since we returned home from our trip. Part of the reason is reducing what's in the freezers in prep for new meats but another part is the weather has turned cold so hibernation is a good thing.

pressure cookerMystery

These are days I love my pressure cookers mainly because I do feel lazy. Pressure cooking is so easy and so much quicker than slow cooking but with a lot better results than using a slow cooker. A pressure cooker can save as much as 70% in energy usage and it doesn't heat the kitchen. It was the precursor to the microwave oven and remains more energy efficient than the slow cooker. Unlike the microwave oven or slow cooker, any meat can be browned in the same vessel saving time and foods do not need to be thawed although thawing does speed up the cook time. In terms of a cooking utensil a pressure cooker is one of the most frugal items in your kitchen.

Pictured is my Fagor 4 qt pressure cooker. So what is cooking? I pulled 3 nice sized country cut pork ribs from the freeze then let them thaw to where I could pull them apart. They were placed in the pressure cooker and the rest is history :)

pressure cooked pork loinCooked

I started with 3 large country cut pork ribs just browned then added carrots, onions and a bit of stock to do the initial pressure cooking that took 20 minutes. Then I de-pressurized and added Diana Sauce® then brought it back up to pressure and cooked under pressure for 5 minutes. The result was a wonderfully tender meat perfect for a cold night's meal.

Pictured are the country cut pork ribs I made in the pressure canner. Doesn't this just look yummy? The carrots and onions were for flavour only and they really did do their job. Once the sauce caramelized a little the ribs were ready for serving with steamed potatoes, niblet corn and homemade bisquits.


Saturday, January 03, 2009

Hearty Vegetable Beef Soup (Pressure Cooker)

Another new year has begun. I hope everyone enjoyed their New Year celebrations and thank-you for all the well wishes for the new year. May 2009 bring you peace, joy, love and lots of yummy food!

Over the holiday season we did a fair amount of entertaining that resulted in a variety of left overs some that found their way into the soup pot. The weather has been quite cold with snow and blustery winds combined with being exhausted from the holiday season means the soup pot is working overtime. Soup is just so comforting! I especially appreciate that there is very little work to making soup as well.

Last Tuesday afternoon and evening we babysat oldest grandbaby while her parents went to a hockey game. At age two a favourite food is soup so I made a large pot of hearty vegetable beef soup. The basis for this soup is meaty soup bones. Soup bones are always very inexpensive even at the butcher shop where they cost about $1.50 each. These are nice meaty soup bones with enough meat on them for a larger pot of soup.

A common misconception is that making soup is a long, drawn out process when it isn't. Next to a stockpot the most often used kitchen appliance for making soup is a slow cooker. If you have been following this blog you will know that my slow cookers are the least used kitchen appliances I own. I prefer using a pressure cooker for making flavourful broth soups quickly.

Broth

2 meaty soup bones
2 ribs celery cut into chunks
2 carrots or 4 cocktail carrots
1 bay leaf
1 tsp Montreal Steak Seasoning
water to fill pressure cooker to ⅔ mark
Note: I would normally add a quartered, unpeeled onion except I was completely out of fresh cooking onions!

Vegetables
Note: I used home canned vegetables. To substitute store bought use 398 ml (15 oz) cans.
1 500 ml jar carrots
1 500 ml jar green beans
1 500 ml jar niblet corn
4 medium potatoes, cubed and cooked
2 green onions, thinly sliced
1 rib celery, sliced

Place the ingredients for the broth into the pressure cooker. Cover with water to the ⅔ line and no further. Place the lid on the pressure cooker. Bring to a boil on high. When the lid begins to vent (steam comes out) place the weight on the pressure valve. Let come to pressure then reduce heat and to keep a gentle rock. Let cook 20 to 30 minutes. Turn off the heat and let the pressure cooker depressurize before removing the weight. Total time for making the both and cooking the meat will be about 45 minutes.

Finished Soup Bones

While the pressure cooker is depressurizing steam the potato cubes. Steaming gives a firmer texture to the potatoes, preferable for soups. Cooking them separately will keep the broth at a lovely clarity. When the pressure cooker has depressurized, remove the weight and lid. Use a large slotted spoon to carefully remove the soup bones. The meat will very tender and easily fall off the bone. It may already have fallen from the bone. Cut the meat into bite sized pieces removing any gizzle and fat (arrow) as you cut. Set the meat aside. Use a slotted spoon to remove the vegetable chunks. The broth will be rich and flavourful yet clear. At this point the broth can be quick chilled and defatted (for canning) or used as is. There isn't a lot of fat on soup bones so it is fine to omit defatting.

Return the meat to the broth. Add the green onion and celery to the broth. Bring the soup to a low boil. Drain the vegetables reserving the liquid for later use. Pour into the soup. Add the potatoes. Cook about 5 minutes to heat throughly. Serve with homemade bread or crackers.

Hearty Vegetable Beef Soup

The total time to make this hearty vegetable beef soup including prep and cooking was just slight of one hour. The majority of that time was cook time with very little prep that freed up time for me to entertain oldest grandbaby while the soup was cooking. The yield was about 6 L of gorgeous vegetable beef soup, more than enough for dinner and lunch the following day. Notice the clarity of the broth despite the soup being chuck full of vegetables? Don't let the clarity fool you either because the broth itself was very rich and flavourful. This was a lovely and easy to make soup perfect for a cold, blustery day! Oldest grandbaby really enjoyed it and I enjoyed being able to spend time with her instead of in the kitchen, not that being in the kitchen is a bad thing just this time of year I'm tired. Ah well, winter vacation time will be here shortly giving me time to rejuvenate.


Tuesday, November 20, 2007

Pressure Canning & Pressure Cooking - Pork

After a very busy weekend, yesterday was a catch-up day for preserving. Once I decided on how I was going to use the food, things progressed somewhat smoothly with the exception of a glitch for dinner. I started with two sweet potatoes, four acorn squash, one rutabaga, one pumpkin, two lb lean ground beef, about a 4 lb ham, 4 chicken thighs with backs attached and about 10 lb of apples. The goal was to get as much processed and use some for dinner.

Unfortunately all did not go according to plan but a good portion got done but the rest will get done shortly so all is well. I managed to process the squash and half the rutabaga for freezing in individual serving sizes. The rest of the rutabaga went for dinner. The ground beef was used for a canning test batch of meatloaf while the ham was canned along with the resulting stock.


Pressure Canners & Cookers

I've talked quit a bit about pressure canning yet have mentioned little about pressure cooking. There is some confusion over pressure canners and pressure cookers. To qualify as a pressure canner according to the USDA there must be a holding capacity (different than total volume) of 4 - 1 quart jars with the ability to adjust the pressure to 5, 10 or 15 lb pressure. So, a pressure canner can be used as a pressure cooker but not all pressure cookers can be used as pressure canners.

I have two pressure cookers (1, 3) that can be used for pressure cooking only. One is a Jasi 6 qt (1) and the other a Fagor 4 qt (3). The Jasi is a first generation, rocker control model whereas the Fagor is a second generation, regulator in the handle model. I find both easy to use but the Fagor is quieter. My two pressure canners (2, 4) are huge beasts. One is an older All American 21 quart (2) and the other a Mirro 22 qt (4). When it comes to pressure canners the quarts stated is total volume not the number of actual jars you can process. At full capacity for either the total number of quart jars that can be processed is 7. With stacking they can process 36 - 250 ml (half pints), 26 - 500 ml (pints) standard or 20 - 500 ml (pints) wide mouth jars. During the busiest canning season, the canners run at full capacity but the rest of the year at half capacity or less.

All pressure canners and cookers with the exception of the All American require gaskets. Weighted gauges (4) do not need to be checked if using for canning but dial gauges (2) do. Gaskets need to be replaced as well for either so be sure to check the availability of replacement parts. With proper care, pressure cookers and canners will give you years of dependable service. Both will save you time and money so are a worthwhile investment.

Canned Meatloaf, Ham & Stock

I belong to a few preserving groups as well as running my own group. There has been some discussion on canning meatloaf so I decided to try it using the 2 lb of ground beef. I canned 3 - 500 ml jars of meatloaf (5) using my normal recipe along with 2 - 500 ml jars of ham (6) and 5 - 500 ml jars of ham stock (7).

Method (meatloaf): The meatloaf was mixed then packed raw into hot, sterilized 500 ml wide mouth jars leaving 1 - inch head space. Wipe the rim. Adjust the two piece caps. Process 75 minutes at 10 lb pressure.

The canned ham once again came out nice looking in the jars but I was not pleased with the look of the meatloaf. This is one reason why test batches are beneficial when preserving foods. When in doubt and before committing a large amount of food to any preserving project, always do a test batch! Test batches allow you to troubleshoot as well as taste the finished product before committing. As far as the meatloaf goes, I haven't opened a jar yet. It definitely will be considered as a convenience food on my pantry shelves. There is little that can be done about the looks in the jar so as long as it tastes good it will be on the pantry shelves. Aesthetics is likely one reason commercial food processors tend to favour tin cans since the consumer is much more likely to buy the product if it doesn't look unappealing.

Pork Chops with Vegetables

A pressure cooker saves both time and money. It is one piece of kitchen equipment that I highly recommend. Unlike other quick cook methods, you can have a nice meal on the table from start to finish within 30 minutes. Unlike slow cookers or microwave ovens, you can brown the meat giving it not only flavour but visual appeal. One of the best online resources for pressure cooker recipes is Miss Vickie's Pressure Cooker Recipes, a site dedicated only to pressure cooking.

I had decided on pressure canning the chicken for dinner but fate stepped in the way. The chicken that was purchased Saturday was off! So I did a quick adjustment using 1 - inch thick pork chops and continued with the meal plan. I paired the meat with rutabaga, onion, potatoes, carrots and corn. When pressure cooking a liquid is needed. For this meal I used 1 c water and 1 c apple juice. I thickened the liquid with a corn starch slurry for serving. This meal from start to finish took 5 minutes for the pressure cooker to come to pressure, 15 minutes cooking and less than 10 minutes prep time so qualifies for an under 30 minute meal. If you want to save the time at the dinner hour, prep the vegetables earlier in the day. Either way you do it, you will quickly appreciate the value of a pressure cooker.

Method:

Brown the pork chops in a little olive oil in the pressure cooker bottom, lid off. Prepare the vegetables. Choose vegetables with similar cooking times. Chop the vegetables and pour over the meat. Pour in at least 1 1/2 c of desired liquid. Shut the lid and bring to pressure. Reduce heat to where pressure can be maintained. Cook at pressure 15 minutes. Depressurize using quick method. Serve.

So if you don't have a pressure cooker or are debating whether you need one, get yourself down to the nearest store and pick one up. If you have one sitting on the shelf collecting dust, get it out. These are the ultimate time savers! I think they are better than slow cookers or microwave ovens too.