My photo
Ontario, Canada
I am a wife, mother and grandma who enjoys the many aspects of homemaking. A variety of interests and hobbies combined with travel keep me active. They reflect the importance of family, friends, home and good food.
Cook ingredients that you are used to cooking by other techniques, such as fish, chicken, or hamburgers. In other words be comfortable with the ingredients you are using.
--Bobby Flay

For Your Information

Please watch this area for important information like updates, food recalls, polls, contests, coupons, and freebies.
  • [March 19, 2020] - Effective Mar 17, this blog will no longer accept advertising. The reason is very simple. If I like a product, I will promote it without compensation. If I don't like a product, I will have no problem saying so.
  • [March 17, 2020] - A return to blogging! Stay tuned for new tips, resources and all things food related.
  • [February 1, 2016] - An interesting report on why you should always choose organic tea verses non-organic: Toxic Tea (pdf format)
  • Sticky Post - Warning: 4ever Recap reusable canning lids. The reports are growing daily of these lids losing their seal during storage. Some have lost their entire season's worth of canning to these seal failures! [Update: 4ever Recap appears to be out of business.]

Popular Posts

Showing posts with label food sealer. Show all posts

Wednesday, September 23, 2009

Tomato Wafers and Tomato Stock

We think of tomatoes as a vegetable even though botanically they are a fruit. They are one of the most versatile foods there is. Those who love tomatoes know that the anemic tomatoes sold in the grocery stores during the winter months do not compare with the full bodied flavour of vine ripe tomatoes! I am very fortunate in that I am able to grow tomatoes as well as having a free source for all the canning tomatoes I can use. Still I try to make sure nothing goes to waste.

A few days ago I posted about canning pizza sauce along with drying the tomato waste consisting of seeds and skin for tomato powder. Tomato powder is a wonderful product to have in your pantry. It ads nutrition, colour and flavour to soups, stews and meatloaf. This post is about two more tomato products that are must haves in your pantry.
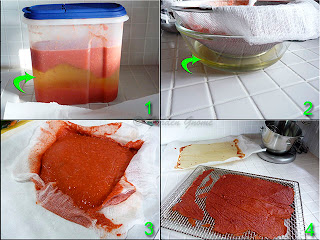
drying tomato wafersWhen tomatoes are plentiful in the garden there is no choice but to either preserve what you can't eat or they will go to waste. I ran two varieties of tomatoes through the food mill then poured the resulting purée into a plastic container to be stored in the refrigerator until processing. The tomato purée separated into 3 layers (1). Note the yellowish layer as that is what I wanted for the tomato stock. If you use 1 variety you will end up with 2 layers. Removing this layer removes a lot of water from the tomato purée shortening the drying time which is a frugal energy reduction method. If you don't have cheesecloth then the top layer can be carefully removed for drying reserving the yellow layer for canning.

My preferred method is to use a cheesecloth lined strainer. As you can see in (2) the results is a much clearer juice. This raw tomato juice makes a lovely, refreshing summer drink! It does take awhile for the purée (3) to drain the juice. Once the purée stops dripping it is spread onto a parchment line baking sheet and dehydrated at 145ºF until it can easily pull from the paper. The semi-dried purée is then transferred to a drying rack and place back in the oven to continue drying until brittle. The fully dried purée is then broken into wafters about 2-inch pieces and vacuum sealed. The wafers have a deep, intense tomato flavour. They are used much the same way as tomato paste.

vacuum sealing dried foodsI highly recommend sealing any dried foods in glass jars to protect them from moisture, rodents and insects. The canister method can be used for sealing small jars or other jars with 1-piece lids that have a button indicator in the middle. Place the filled jar in the canister. Put the lid on the canister then attach to FoodSaver®. Vacuum on canister setting. When the appliance stops, release the vacuum on the canister at which time you will notice the lid on the jar become concave indicating it is vacuum sealed. Mason jars and any jar that will fit a mason jar lid either widemouth or standard can be sealed with the lid sealer attachment available in both sizes.
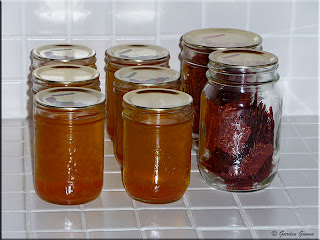
tomato stock and tomato wafersTomato Wafers & Stock

I love experimenting to see how many different and unique tomato products I can get in my pantry. These two extremely useful products certainly fit the bill! Both add nutrition, flavour and colour but in very different ways. The tomato wafers are used much the same way you would use tomato paste mainly in soups, stews and chili. I find it best to add a piece or two then mix well then taste adding more if necessary. The wafers can be rehydrated with a little boiling water to form a paste for use in meatloaves if desired. The tomato stock can also be poured into soups and stews to enhance the flavour. One of my favourite ways to use is as the liquid when cooking rice. It makes a nice liquid to cook pasta or meats in. It can also be thickened with a cornstarch or tapioca flour slurry to use as a glaze. So this is a very versatile tomato product to have in the pantry.
Enjoy!


Wednesday, June 24, 2009

A Bit of Kitchen Chit Chat

Goodness we have been waiting for the warm weather that has taken forever to arrive this year. Does it ever feel lovely despite the high humidity. It's days like this that I am very appreciative of having the kitchen in the lower level of a semi earth bermed home. Cool breezes off the water keeps the kitchen comfortable most summer days. Even though this is the second smallest kitchen we've had since owning houses, it is by far the most energy efficient.

Decker's Landing Mel BurgerMel Burger

Summer weather means boating! Monday we took a spur of the moment boat ride. It was beautiful out especially desirable when boating. After enjoying fun in the sun on the water we stopped at Decker's Landing for dinner. They have a new burger called the Mel Burger. This burger is ½ lb of ground round with bacon, American cheese, iceberg lettuce, sliced onion and Cajun ranch served with fries. That day they had a buy one get one free special. We ordered a side of onion rings as well. The total with beverages came in at just under $24 for two people. The service as always was friendly and fast. The atmosphere was delightful!

strawberries jamStrawberries

Ontario strawberries are ripe for the picking! My husband brought me home a flat. I was astonished that they had gone up to $18 up $3 from last year. Obviously this farmer is taking advantage of other U-picks closing in the area meaning he has a bit of a monopoly. Even the grocery store prices are cheaper! I'm hoping to have our new strawberry bed producing enough next year that I won't have to buy them again.

I made 4 jars of low sugar strawberry jam for the pantry with half the berries using Pomona's pectin as well as reducing the sugar from 4 cups to 3 cups. Using this method I can get the sugar down to 2 cups or substitute the sugar with honey or Splenda® so the next batch will be made using local honey. I also ended up with almost a full jar (forefront) of jam for immediate use. The only downside I find to using Pomona's pectin in unlike regular pectin where it thickens before pouring into the jars so stirring prevents floating fruit, the Pomona's continues to thicken as the jam cools. So there is a bit of floating fruit that won't win a county fair award but simply stirring after opening this gourmet style low sugar jam is sure to please!

bulk chicken purchaseBulk Chicken

A few weeks ago I wrote about Maple Lodge Farms in Brampton, ON. One of our kids brought us home a box of chicken wings and a box of legs with backs attached. Pictured is how the chicken is packaged in a large plastic bag inside a box. I vacuum sealed the chicken legs for longer storage. Vacuum sealing prevents freezer burn during longer freezer storage. I ended up with 10 - 2 piece vacuum sealed packages.


Sunday, December 30, 2007

Catching Up from Chrismas

One of the best parts about Christmas aside of family is the wonderful abundance of food. It is everywhere! There's all kinds of foods that only seem to come out at holidays. I've done minimal cooking yet am surrounded by an excess of food so needed to preserve. At the same time I wanted a couple of lighter dishes because a lot of the holiday meals this time of year are rich and heavy.

Kibby

One of our Christmas traditions is kibby. Traditionally this is made with lamb but our family makes it with thrice ground extra lean ground steak. The meat is always fresh ground the day of making it. This is very important because the majority of it is eaten raw usually served in pita bread with a little olive oil and cumin. Making kibby is more of a knack so I don't have an actual recipe. It is passed down from mother to daughter or daughter-in-law in our family. I used 5 lb of meat to make the kibby this year. The following evening I baked it as kibby will not keep longer than a day. Because it is so lean I pour a bit of olive oil over the meat before baking. After baking I let the meat cool then slice thin and freeze.

Vacuum Sealed

Our traditional meat for Christmas dinner is turkey with all the fixings. This year's turkey was 22 pounds served with stuffing, gravy, fancy mashed potatoes, home canned green beans and home frozen corn nibblets. I didn't make an official dessert because there were so many cookies and sweets already out on trays. Despite nine for that meal there were a lot of left-overs. I left enough out for snacking and dinner the following day then packaged up the rest for the freezer. I ended up with a good sized turkey breast (1), turkey in gravy (2) and turkey slices (3) so that isn't too bad. I also vacuum sealed the kibby slices (4). Vacuum sealing is really the way to go but if you've been reading this blog you already know that.

Turkey Stock

Turkey stock is a given anytime I roast a turkey. Again I don't have an actual recipe.

[Method] What I do is put the carcass in a large stock pot then cover with water. I add a couple of carrots and celery stocks cut into large chunks along with a large unpeeled onion cut in half. Then I bring it to a boil and reduce to simmer for about 3 hours. The resulting is then either canned or froze.

This turkey stock batch resulted in 9 L of stock. Doing the math that works out to 15 cents per litre so to all those who ask if cooking from scratch or canning is worth it, my cost says definitely. Homemade also can be salt and preservative free so you end up with a better quality product. Now, many foods look wonderful in the jar but most stocks aren't. There will be a bit of a fat layer and more of one if you don't defat. However by carefully pouring the stock you can eliminate any of this fat.

Garlic Pasta with Shrimp

I've been doing rather simple meals to break up the monotony of turkey. I've posted how I make garlic pasta with shrimp before. This time I took advantage of extra shrimp on hand for the holidays. So the shrimp was larger but the effect was the same. Garnished with Parmigiano Reggiano and parsley flakes and served with a tossed salad it was a delightful change from some of the heavier holiday meals.

What I did differently this time was to purposely cook and season enough angle hair pasta for left-overs for the following night's meal. Purposely creating left-overs sounds different but I do this quite a bit because the planned left-overs give me a basis another meal. To me this simply makes good sense.

Spaghetti Pie

Spaghetti pie is oh so simple to make! All you need is left-over spaghetti or in my case angel hair pasta and something to fill it with. Basically you end up making the pasta into a crust. Cut into wedges for a lovely presentation. I used garlic buttered pasta for this pie but you could plain pasta. A bit of butter will help.

The end result is a wonderful dish that is served in wedges. I used home canned barbeque pork topping home canned green beans. Then I topped with home canned mushrooms and three cheeses. This really is a simple meal that just doesn't taste simple.

Method: Beat two eggs and blend into the pasta. Form the pasta into a nest coming up the sides of a round baking dish. Fill as desired (see above). Bake then cut into wedges and enjoy.


Thursday, September 06, 2007

Canning Tip and Preserving Onions

The heavy canning season is in full swing here. I've already processed three hampers of tomatoes and have one sitting ready for processing today. However, there are also things like onions, peaches, grapes and apples to preserve so it will be quite busy here for the next couple of months.

I can foods year round so my pressure canner is in use at least weekly except during the heaviest canning season (May to October) when it can be in use as often as three times a day. A good rule to follow is always test your pressure canner before the heaviest canning season and any time you have even the slightest concern over the canner's performance.

Method: To test the pressure canner, follow your manufacturer's recommendation for the amount of water in the canner. Check the gasket, vent and pressure release. Prepare at least three 500 ml (pint) jars by sterilizing then fill with boiling water leaving 1/2 inch headspace. Adjust the two piece caps. Place them in the canner. Place the lid on, bring to a boil then vent as per your manufacturer's recommendation. Place the regulator on the vent and bring to pressure. Process for 15 minutes at 10 lb pressure. Turn off the heat and allow the canner to depressurize. Remove the jars and allow to cool undisturbed. Check for a good seal then label and store.

Note: Since you are testing your canner's performance, do not leave it unattended. You need to observe if the seal (gasket) is failing or if the canner is doing any number of things that is not normal. Any abnormalities should be corrected before using again.

Vacuum Sealed Onions

My rule of thumb for anything I'm preserving is use more than one method. The reason for this is if for some reason the electricity or even freezers failed to the point of spoiling the food, I would have at least two (canned, dried) longer term storage back-ups. I think this is the frugal approach to home preserving. I also follow the rule of using home preserving to make things convenient for my style of cooking. Making my own ready to use convenience foods means that I can still put a nice meal on the table with little effort on the days I don't feel like a lot of prep work.

My husband picked up a 50 lb bag of Spanish onions. A good portion of these will be used during the canning season with another bag stored in the pantry to be used fresh. I keep several pints of chopped onions in the freezer. Not only are these convenient but they are very easy to prepare. A large Spanish onion will yield a bit more than a pint bag for vacuum sealing. I coarsely chop the onions, place it in the vacuum sealer bag, vacuum seal with the FoodSaver then freeze.

Carmelized Onions

Onions will keep for quite sometime when properly stored but I came across a method for canning carmelized onions that I just had to try. We have carmelized onions quite often so the idea of canning them was interesting. I only made six 250 ml jars and will likely use them to blend into mashed potatoes. It was more of a can I do this and novelty recipe.

The end result was a gorgeous and versatile product for the pantry shelf.  I was quite pleased with the results!  The carmelized onions looked rather pretty in the jars as well.

Pickled Onions

Pickled onions have always been one of my favourite pickles so I make a batch each year. It is important to use the small white pearl onions. Sometimes they are labeled as pickling onions. Pickling onions is a two step process involving an overnight soak in salt water so do plan extra time for this.

Pickled Onions
adapted from: Jean Paré, Company's Coming, Preserves, Pickled Onions. Pp. 75

4 c small white pearl onions
boiling water to cover

4 c boiling water
1/2 c coarse pickling or sea salt

1 c granulated sugar
1 c white vinegar
3/4 c water
1 tbsp mixed pickling spice

Wash onions then cover with boiling water in a large bowl. Cover and let stand 4 minutes. Drain, rinse in cold water and peel. Place into large bowl. Pour salt and boiling water over the onions. Cover and let stand on the counter overnight. Drain. Rinse with cold water and drain again.

Prepare the brine by combining the last three ingredients in a saucepan. Place the pickling spice in a tea ball or make a small bag using a double layer of cheesecloth. Put into the mixture and bring to a boil. Boil 5 minutes. Discard the spice. Add the onions and return to a boil. Fill hot, sterilized jars with onion leaving 1 inch headspace. Ladle the brine over the onions leaving 1/4 inch headspace. Wipe the rims. Adjust the two piece lids. Process for 10 minutes in a boiling water bath canner.

Yield: 4 - 250 ml (half pint) jars


Tuesday, May 01, 2007

Lemon Peppered Chicken & More on Chicken

As promised, here are some of the things I made with the chicken breasts from the previous entry. One goal when buying meat or poultry on sale is preserving it for later use. I like to have just enough that I can process both cooked and raw in the same day. As you read through the methods for the following chicken preparations, you will notice I specify a few things: light olive oil, pre-heated stainless steel fry pan and vacuum sealing. As many of you who follow my blogs know, I strongly recommend using a vacuum sealer. For the new readers, I have the FoodSaver® V2480. The reason I recommend using a vacuum sealer can be found in the archives here along with a short video clip and usage. Keep checking back as I will be doing more chicken dishes to take advantage of this sale. My husband picked up another 3.56 kg of chicken breasts today at a total cost was $15.64 so I'll be posting as I make the dishes. Tomorrow's post, time permitting will be chicken & dumplings ala Garden Gnome style.

Lemon Peppered Chicken

Lemon Peppered chicken is very easy to make. When prepared the way I make it, the result is a flavourful and moist chicken. The finished chicken can be cooled, flash froze then vacuum sealed.

I start with a pre-heated stainless steel fry pan and light olive oil on high heat using bone-in, skin-on chicken breasts. The chicken is placed in the hot fry pan, skin side down and seared. The chicken is turned, seasoned with MSG-free Lemon Pepper Blend (Tone's) and seared on the bone side. Then I remove the chicken, drain and place on a two piece broiling pan with enough water in the bottom tray to prevent smoking. The chicken is baked at 350º F until the juices are clear when pressed or a slight give when pressed with the thumb.


Chicken for Strips, Vacuum Sealed Chicken, Chicken Stock

Chicken for Strips

I like to keep vacuum sealed chicken strips in the freezer. These can then be thawed and used either cold or warmed for wraps or salads. They are especially appreciated during the hot summer days when I don't want to heat up the kitchen by cooking. I preheat about 2 tbsp of light olive oil in a stainless steel fry pan. The boneless, skinless chicken breasts are placed in the pan when it is hot. I reduce the heat to medium high and let the chicken breasts cook until they can be moved on the pan without sticking. Then I turn the chicken breasts onto the uncooked side and repeat. Sometimes I add a seasoning like Old Bay at this point. When the chicken is finished cooking, I remove from the pan, cool, cut into strips, flash froze*, then vacuum seal.

Vacuum Sealed Chicken: Another nice thing to have on hand in your freezer is boneless, skinless chicken pieces. They are a homemade convenience item sure to please and unlike some chicken piece products, they are all chicken! I like to keep a few packages on hand. They can be made into chicken poppers (recipe to be posted later this week), chicken nuggets or added as an ingredient for other dishes. I flash freeze* them raw but they could easily be pre-cooked similar to the chicken strips.

*flash freezing: This method is used for freezing foods you want to keep separate or moist pre-cooked foods that are to be vacuum sealed. Spread the food onto a freezing tray. Allow to freeze then vacuum seal.


Chicken Stock

Now having to remove the skin and bones from such lovely chicken breasts is very easy. The first thought that came to mind is stock using the skin and bones. My chicken stock is fairly easy to make. I put the bones and bits in a large stockpot, cover with water by about 3 inches and bring to a boil, then reduce the heat. I add 2 stalks celery cut into 3 inch pieces, 2 carrots washed but not peeled cut into large chunks, one medium onion washed but skin still on (adds a natural yellow colour to the stock), and one bay leaf or a couple sprigs of thyme. I bring the mixture back to a boil then reduce the heat to simmer and let simmer for an hour or so adding filtered water as needed. The mixture is cooled and de-fatted. Then I strain the mixture placing the bone and vegetable pieces in another pot and returning the stock to the original pot. The bone mixture is again covered with water, brought to a hard boil, simmered about 10 minutes then strained into the original pot. Before bringing the original pot of stock to a boil for canning, I strain it twice through a fine mesh strainer lined with cheesecloth. The stock is then brought to a boil and ladled into hot jars. It is processed at 10 lb pressure 20 minutes for pints in a pressure canner. I like the pint size jars for stock because I tend to use the entire jar at once instead of having left overs.


Sunday, April 29, 2007

Chicken Prep for Bulk Cooking Session


Following up to yesterday's post, I have everything made (except canning the stock) with pictures and recipes. The problem is there are a lot of pictures so I thought instead of making one huge entry, I would break it down into a few entries. I started with 2.92 kg of chicken breasts with skins and bones. For those not into metric 1 kg is about 2.5 pounds. This gave me eight lovely chicken breasts with skin and bones. The problem is for the majority of what I wanted to make, the skin and bones would have to be removed. Note, I said removed not tossed unless of course you toss them into the stock pot, which is what I did.

There is a trick for removing both skin and bones from chicken or any other meat. Start with a sharp knife. Removing skin is fairly easy. Just pull with your fingers on a loose spot, slip your knife in and cut the connecting tissue holding the skin. It will come off very easily. In the middle picture you will see me holding the knife at an angle. This is how I remove the bones from chicken breasts and fish. A fillet knife helps but once you get a hang of it a regular paring knife will work. Cut a slit between the flesh and bone. Now, hold the flesh in one hand with slight tension while making sharp cuts along the bone. You will be left with the fillet ready to prepare as desired. Once you have done this and seen how easy it is to do, you will no longer pay the higher prices for boneless/skinless chicken breasts.

Tomorrow's entry will be: Lemon Pepper Chicken and preparing chicken for the freezer. Watch for Chicken and Dumplings on Tuesday. The recipe and picture for chicken stock is in the archive.


Friday, April 13, 2007

Sirloin Tip Meatloaf

Back by popular demand is my old template. I would like to spiff up the background and header so over the next few days you will see a few changes. So if you notice any weird things going on, it's just me playing with the template. Sorry for the inconvenience.

Ok, who the heck would make meatloaf using sirloin tip? Well, sometimes when you don't have much choice that's what you do. My husband picked up fresh, twice ground sirloin tip for kibby late the Thursday afternoon before Good Friday. He bought extra because the weekend was already slated for a lot of visitors and since one batch was going to a family gathering, he thought I would make one for those coming to the house. Along with all the Easter gatherings, our first grandbaby was baptized Easter Sunday. I would have ground the meat myself but with everything else going on (house sale), I was runny on empty.

We eat kibby raw so whatever is not consumed that day is baked then sliced for sandwiches. However, I found myself with about 2 lb of twice ground raw sirloin that need to be used and not a whole lot of energy to be creative. The problem is once frozen it can't be used for kibby and there was no way I was going to let this meat go to waste.

Sirloin Tip Meatloaf

We get the sirloin tip will as much fat as possible cut off because we eat it raw. Normally I mix in shredded vegetables for my regular meatloaf but I wanted this meatloaf to give firm slices when cooled. We seldom buy lunchmeat because I routinely slice meat and freeze it for making sandwiches later.

The following list of ingredients is just a guideline but close in amounts I used.

Sirloin Tip Meatloaf

2 lb twice ground sirloin tip
2 eggs
2 1/2 c dry bread crumbs
1 tbsp tomato powder
1 tbsp carrot powder
1 tbsp zucchini powder
1 tbsp mushroom powder
1/2 c Heinz 57
1 tbsp ketchup
1 tsp mustand
2 good splashes of Lea & Perrins Worchestershire sauce

Pre-heat oven to 350ºF. Mix the ingredients together then place in a loaf pan. Bake for approximately 40 minutes until centre is cooked through.


Sliced

This meatloaf gives firm slices when cooled. Of course we had some of it for dinner that night served with a tossed salad, baked potato and sauteed mushrooms. After dinner, I allowed the meatloaf to cool enough to put in the refrigerator. This is a bit of an aside. Up until recently I always had a fridge with metal racks. The new fridge has glass shelving so I'm a bit concerned over thermal shock at putting something too warm on them. So I set the pan on a folded tea towel just in case.

Once the remaining meatloaf was fully cooled, I sliced it thinly. It isn't as thin as what you would get at a deli but then the thickness is just right for a hearty sandwich. It has a wonderful flavour that will go just perfect with beefsteak tomatoes! I'm getting hungry just thinking of a slice of this meatloaf, a slice of beefsteak tomatoes, fresh garden greens, a couple rings of onions, a bit of mayo and mustard all sandwiched between fresh 12 grain bread.

Vacuum Sealed

Garden goodies are awhile away so beefsteak tomatoes are just a dream. From the looks of it, I will more than likely be planting in containers and move them but there is a chance of early possession which means the garden will continue as normal. I mentioned that I routinely make sandwich slices from whatever meat I cook.

I don't have a meat slicer but that may change in the new house if all goes well. What I do is cool the meat thoroughly. I find it best to let the meat cool overnight in the fridge. Then I cut into slices about 1/8 to 1/4 inch thick depending on the meat. I like to vacuum seal the slices for freezing. With drier meats like most meatloaves, turkey, and chicken there is no need to flash freeze before vacuum sealing. For moister meats like ham, I place then in the vacuum sealer bag then into the freezer. Once semi-frozen, I vacuum seal them.