My photo
Ontario, Canada
I am a wife, mother and grandma who enjoys the many aspects of homemaking. A variety of interests and hobbies combined with travel keep me active. They reflect the importance of family, friends, home and good food.
Cook ingredients that you are used to cooking by other techniques, such as fish, chicken, or hamburgers. In other words be comfortable with the ingredients you are using.
--Bobby Flay

For Your Information

Please watch this area for important information like updates, food recalls, polls, contests, coupons, and freebies.
  • [March 19, 2020] - Effective Mar 17, this blog will no longer accept advertising. The reason is very simple. If I like a product, I will promote it without compensation. If I don't like a product, I will have no problem saying so.
  • [March 17, 2020] - A return to blogging! Stay tuned for new tips, resources and all things food related.
  • [February 1, 2016] - An interesting report on why you should always choose organic tea verses non-organic: Toxic Tea (pdf format)
  • Sticky Post - Warning: 4ever Recap reusable canning lids. The reports are growing daily of these lids losing their seal during storage. Some have lost their entire season's worth of canning to these seal failures! [Update: 4ever Recap appears to be out of business.]

Popular Posts

Sunday, October 31, 2010

Funnel Cake

One of the best parts about going to county fairs and tourist areas is being able to sample a lovely array of somewhat naughty foods.  They are naughty simply because they would never fit into the health food category but at the same time make you feel good by indulging.  Who can resist piping hot soft pretzels, elephant ears, funnel cake or even just the heavenly smell of cotton candy not to mention the glistening red candy apples and delectable caramel corn?

funnel cake
Funnel cake is often available at county fairs.  This light, donut confection gets it's unique appearance by the way the batter is put in the deep frier.  Rather than adding the batter in a clump as you would a dough the batter is poured into a squeeze bottle then squirted into the hot oil while moving the bottle in different directions to create a lacy design.  Alternately the batter can be poured through a funnel into the hot oil.  Like a snowflake, no two funnel cakes are the same.  Funnel cakes are usually made when you order them so they a nice and hot, perfect for snacking!

Funnel Cake

3 c unbleached flour
2 c milk
½ tsp vanilla
2 eggs
1 tsp baking powder
¼ tsp salt
¼c sugar
topping of choice: sugar/cinnamon, icing sugar, chocolate sprinkles, and etc.

Heat oil to 190ºC/375ºF.  Beat the eggs and milk together.  Stir in vanilla.  Mix the flour, baking poser, salt and sugar together in a separate bowl.  Mix into the egg mixture beating well so there are no lumps.  Pour the batter into a squeeze bottle.  Squeeze batter while moving the bottle in different directions to form a somewhat lacy pattern.  Fry until golden brown, turn and fry other side.  Drain on paper towel lined cooling rack.  Sprinkle with topping of choice if desired.


Friday, October 29, 2010

Bacon on the Grill

Bacon seriously should be a food group of its own.  We love bacon!  Bacon can be cooked in a skillet but there are other ways to cook bacon that makes it a bit healthier.  When cooking larger amounts of bacon I like to cook on a rack over top of sided cookie sheet in the oven or grill.  The grease drains off while the bacon strips stay rather flat.  Some line the cookie sheet with tin foil for easy cleanup but I don't.  The reason is once the bacon grease cools I scoop it up for use in cooking later.

bacon on the grill
We had a fair amount of company during our recent stay at our vacation home.  One of our guests generously offered to cook the bacon, on the grill no less.  Now this was rather interesting because the bacon was cooked directly on the grill grates without using any baking sheet at all.  I found this to be a rather interesting cooking method.

Bacon produces a lot of grease which means flare-ups on the grill.  However, cooking on the grill keeps the heat and grease splatters out of the house.  So of course I was interested in this cooking method.  Pictured is the cooking bacon on the grill grates. 

grilled bacon
All of the grease from the cooking bacon dripped down onto the grill and was burned off.  This did result in more flare-ups.  Our friend cooked the bacon to crisp as pictured.  I like my bacon crisp but my husband does not.  Still this was a lovely way to cook the bacon and definitely one I will be experimenting with in future. 

Surprisingly despite more flare-ups than would be expected with higher fat content meat, the grill cleanup was minimal.  There was grease in the drip pan which is to be expected.  The downside to using the grill is the bacon grease can't be saved for later use but it keeps the heat out of the kitchen which is quite desirable at our vacation home.  All in all though this really resulted in a lovely bacon.


Thursday, October 28, 2010

Kitchen Quick Tips - Preventing Food Stains on Plastic Storage Containers

kitchen quick tips

Spray a light coating of oil on the inside of plasticware before pouring tomato based foods into the container to prevent staining.  


Wednesday, October 27, 2010

Last of the 2010 Brandywine Tomatoes

We eat tomatoes on almost a daily basis in one form or another.  Not only do I grow a lot of tomatoes I also have access to free tomatoes.  The end of the tomato growing season is always bittersweet.  I pick as many tomatoes daily once the threat of frost is near.  As the ADFF approaches I strip the garden of any green tomatoes as well.  These are left to ripen indoors.  With any luck we have garden tomatoes to eat into December. 

brandywine tomatoes
There were only a couple semi-green Brandywine tomatoes left.  We were on vacation the last couple of weeks of September and first week of October so I told family and friends to help themselves to any ripe tomatoes.  These are a lovely producing, slicing heirloom tomato perfect for tomato sandwiches.  They have a pinkish tone to them when ripe.  The flavour is quite delicious so I certainly was happy to see them. 

Just look at those gorgeous tomato slices!  Aren't they wonderful looking?  I think they are quite lovely but then I'm a bit partial.  My mouth was watering in anticipation just cutting the slices.

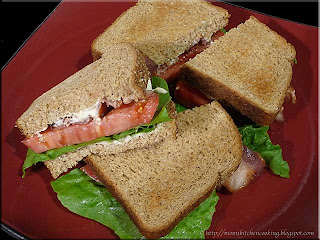
bacon lettuce tomato sandwiches
One of the things we missed the most when we lived in Edmonton was decent BLTs.  BLTs are one of our favourite sandwiches!  The only tomatoes available were anemic, hard balls that resembled tomatoes with all the flavour of cardboard.  I also noticed the tomatoes where our vacation home is in the sunny south are about a tasty as those in Edmonton!  Once we run out of home grown tomatoes we can get hot house tomatoes in the grocery stores here in Ontario but they lack the flavour of a good homegrown tomato.  Sadly we will not eat another great BLT (pictured) like we had mid-October this year until the next growing season starts producing.  We can however dream of this wonderful sandwich over the cold winter months.


Tuesday, October 26, 2010

Frank's RedHot Original Cayenne Pepper Sauce Copycat Recipe

As a result of milder fall temperatures the pepper plants were still producing nicely through the mid portion of last week.  The plants were still loaded with a lot of green cayenne peppers mid-week (Oct. 20).  The extended weather forecast showed a low of 0ºC on Wednesday and -3ºC the following day.  The daily low temperatures would be hovering around the freezing mark for the rest of the week. With the chance of frost nearing I decided it would be prudent to pick all the green cayenne peppers so as to not lose them.  Once they turn red I will go ahead and preserve them as well.

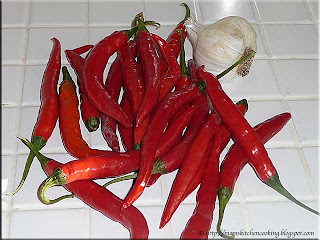
cayenne peppers
Cayenne peppers are so pretty on the plant when they turn their showy red colour!   Cayenne peppers range between 30,000 and 50,000 Scoville units or about a tenth as hot as habanero peppers.  They are rather easy to preserve by stringing to dry.  Once dried cayenne peppers can be powdered in a blender if desired. 

Another popular way of preserving cayenne peppers is making a cayenne pepper sauce.  I picked all of the red cayenne peppers to make a test batch of a hot sauce copycat recipe I am creating.  Aren't they gorgeous? 

Frank's RedHot Sauce Clone
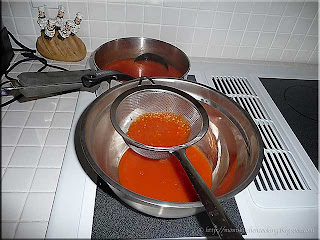
Frank's RedHot Original Cayenne Pepper Sauce is a key ingredient in the traditional hot sauce for chicken wings.  Ingredients listed on the bottle are aged cayenne red peppers, vinegar, water, salt and garlic powder.   I made the first batch (pictured) using cloves of garlic instead of garlic powder.  It tasted fairly close to Frank's Hot sauce freshly made.

Hot sauce mellows over time once the flavours have had a chance to blend well.  I will make the second batch using garlic powder as a comparison.  Hot sauce does not need to be canned as it will keep for quite some time in the refrigerator.  I can mine to save space in the refrigerator.  The small 125 ml (4oz) jars are perfect for this as when mixed with the same amount of butter there is just the right amount of traditional hot wing sauce for a family sized meal.

Frank's RedHot Original Copy Cat Recipe

18 red cayenne peppers
2 c white vinegar
3 cloves garlic
½ tsp sea salt

Wash and cut the stem end from the cayenne peppers.  Place in a stainless steel saucepan.  Add vinegar, salt and garlic.  Bring just to a boil.  Reduce the heat to a low simmer.  Simmer until peppers are soft.  Pour mixture into a blender.  Blend well.  Pass through fine mesh metal strainer.

If canning: Pour into prepared jars.  Wipe rim.  Adjust lids.  Processing in boiling water bath canner 10 minutes.  Remove from canner.  Allow to cool then test for seal, label and store.

If refrigerating:  Allow the strained sauce to cool.  Pour into clean bottle and cap.  Refrigerate.


Monday, October 25, 2010

Frugal Kitchens 101 - Shopping the Ethnic Shops

Frugal Kitchens 101

Canada is a wonderful mosaic of ethnicities.  From a foodie perspective this presents an amazing opportunity not only in terms of food fests and food event but also in the abundance of ethnic shops.  A bit of research may be needed to get address of these shops but it is well worth the effort.  Most major Canadian cities will have established pockets of ethnic culinary delights like China Town or Little Italy but there are many more.  Snuggled comfortably in these pockets of ethnicity is one of the most amazing culinary opportunities possible.  Even more surprising to the variety of foods available is the prices!  Foods the supermarkets don't carry can often be found here and if the supermarkets do carry them they are more expensive than the ethnic shops.  Shopping the ethic shops not only gives a wider variety of foods but less expensive.  This week's Frugal Kitchens 101 topic is shopping the ethic shops.

  • location - In general the ethnic shops will be located in small pockets within a city where a larger number of that particular ethnic immigrants have settled.  For example many large Canadian cities have a China town.  Don't discount smaller communities though but rather get to know your neighbours.  One small community we lived in had a number of Portugese families that had various Portugese foods, grapes and tomatoes delivered right to their door and while the service was geared towards serving these families they would not turn down business from others.  Some small communities in particular are mainly one ethnicity meaning a bit of a gold mine for wonderful foodie finds.  A good example of this is some of the small (less than 400 people) French communities scattered throughout Ontario.  In areas where there are Amish and Mennonite settlements it will be possible to find a lot of excellent bulk food buys, canning supplies, meats, cheeses and that type of thing.
  • what to expect - Most ethnic shops are mom & pop operations with family members working right along with them.  These shops tend to be small, unpretentious and large signage is not the norm.  In larger centres they might not be as quaint but still along the same lines.  In some areas there may be small and I do mean small supermarket style shops that will have more foods of that particular ethnicity.  A good example of this was the Bravo that we stopped at on vacation that had a lot of Mexican foods.  Some ethnic shops will sell in bulk in quatities as large as 50 lb of rice or beans.
  • variety - Expect to find a strong presence of foods that particular ethnicity likes to cook with.  That includes snacks, seasonings, dry ingredients, canned or bottled foods.  If you are in a Chinese shop expect those types of foods like noodles, rice, dried fish, sauces, and those types of things but if you are in a Mexican shop expect a heavier emphasis on beans, hot peppers, and hot sauces.  Some ethnic stores also carry fresh produce.
  • prices - My experience has been that in general the cost of food will be between 10 and 20% cheaper at ethnic stores when compared to supermarkets.  There are a few reasons for this.  First being a mom & pop operation with nil to minimal wages to pay out keeps the overhead lower as does the smaller sizes of the shops.  Here I can buy an 8 kg (20 lb) bag of long grain rice in our local grocery store for $7.99 yet at Bravo a 25 lb bag of long grain rice was $5.99.  Dried beans, rices and many spices tend to be cheaper in the ethnic shops.  The price difference is due to supply and demand.  In that particular ethnic community rice is in high demand to the shop owner can afford to sell at a lower price making profits off of quantity sold.  A lower price keeps their customers coming back so they generate repeat business.


Sunday, October 24, 2010

Octopus on a Bed of Seaweed

I hope the title peaked your interest!  Since October is National Pasta Month I thought is would be a bit fun to come a very kid friendly pasta dish.  I wanted something that would be easy to make yet a bit of fun for the little ones.  The criteria was quite clear that the dish be fun and kid friendly but I also wanted it to be Mom friendly.  I also wanted everything to be entirely edible so no toothpicks holding things together or any non-edible props.  Our grandchildren are all under the age of 5 so this was important to me. 

children's octopus pasta dinner
Pictured is the octopus on a bed of seaweed I came up with for a kid friendly meal.  I was looking for some type of blue liquid to set this meal up on and I suppose I could have used blue jello but I don't think the sweetness of jello would go well with the other ingredients so I used a blue plate.  The seaweed is organic spinach spaghetti.  I cut the all beef wiener to give 8 legs then cooked the wiener in boiling water that curled the legs slightly.  Mr. Octopus's hat is a hollowed out small plum tomato half.  His eyes and face is spreadable cream cheese.  Swimming around feeding off the seaweed are gold fish crackers.  I though he came out rather cute.  What do you think?

In hind sight there are a few little extras I could have added like a couple of cooked macaroni shells.  Some type of a treasure chest would be rather neat too and I thought about adding a cheese flag on a thin carrot stick flag pole.  The possibilities are really endless.  As the dish stands though I think any little one would enjoy eating it!


Saturday, October 23, 2010

Habanero Fire Sauce

We were blessed with an abundance of fairly nice weather upon returning home from vacation in early October.  Last year by this time we had already had a heavy frost.  The warm weather meant the gardens continued to produce so I had an abundance of hot peppers to use up.  It was surprising just how much the 16 hot pepper plants were producing.  I quickly needed to find ways to take advantage of the excess hapanero, jalapeno, Hungarian wax and cayenne peppers.

simmering habanero peppers
Habanero peppers are the hottest chili peppers you can buy in the grocery stores.  They come in at 300,000 Scoville units, the measurement of heat in hot peppers.  It is important to realize that a little habanero goes a long way in terms of heat!  These peppers are quite easy to grow in the home garden.  I decided to make a habanero fire sauce with the excess habanero peppers.

First I washed the peppers then put on latex gloves to cut the stem end off.  Latex gloves or similar are a must when handling habanero peppers!  I placed the peppers in a stainless steel sauce pan and covered them with 5% acetic acid vinegar.  I brought the mixture to a low boil then reduced the heat to simmer.  Putting the lid on helped contain the capsaicin from permeating the air too much as that causes a fair amount of coughing.

straining the habanero fire sauce
Once the peppers had turned to mush I removed them from the heat and blended the mixture with a stick blender.  Then I carefully ladled the mixture through a fire wire mesh strainer to remove the seeds.  During this step it was important to keep my face away from the steamy mixture and that also triggered coughing.  However, the straining itself was fairly easy and problem free.

Hot pepper sauce will keep for ages in the refrigerator but I wanted to jar up some for gift giving.  The sauce tested to pH 2.4 so I knew it was acidic for using a boiling water bath (BWB) canner.  I did a small taste test and oh my gosh is this sauce ever hot!  It has good flavour but it is hot.

canned and bottled habanero fire sauce
I filled 8 - 125 ml (4 oz) jars with the sauce then processed in a BWB for 10 minutes.  I used Tattler reusable canning lids (white) on four jars for ourselves and metal two piece snap lids for gift giving.  I poured the remainder into a squeeze bottle for the refrigerator.  This really is a lot of very hot yet tasty sauce.  To put it into perspective it is the equivalent of over 26 (57 ml) bottles of Tobasco sauce.

I was concerned the sauce would separate during processing or upon cooling but it didn't.  The following day the sauce looked just as good as when I made it.  I labeled the sauce as habanero fire sauce with a warning that it


Friday, October 22, 2010

How to Make a Restaurant Style Deep Fried Mexican Crispy Taco Salad Bowl

I've talked about taco salad presentation before where the salad is served in deep fried tortilla bowls.  I love this presentation!  It really is a bit unique as the prepared tortilla bowls aren't readily available in the stores so you really have to make them yourselves or enjoy them prepared for you at a restaurant.  Your family and/or dinner guests will be impressed to be served taco salad in these bowls at home!

Here is a short video clip that demonstrates the method I used for making the taco salad bowls.  The video is illustrative only but easy to follow the method without a commentary.  


Making taco salad bowls is not difficult but will increase your meal prep time by about 2 minutes per bowl plus the oil heating time.  I made thtee taco salad bowls to serve taco salad for dinner.  I set the deep fryer to 190ºC (375°F), frying one bowl at a time.  I modified the method to use a silicone ladle to form the bowl shape as I was using the smaller 6 - inch tortilla shells.  I drained the bowls upside down on wire racks.  Once cooled the bowls were ready for filling.  The bowls could be prepared the day before or earlier in the day then placed in an airtight container if making enough for 6 or 8 servings.  I would think they will keep their crispy texture for a day or two.

I was quite pleased with my first attempt making taco salad bowls.  While you can fill these bowls with any arrangement of the normal taco salad toppings, quite often the base layer is refried beans that helps to protect the bottom of the bowl from getting soggy too fast.  I used my standard taco salad toppings - seasoned ground beef, lettuce, homemade salsa, homemade taco hot sauce, chopped vegetables (tomatoes, green peppers, onion, black olives, lettuce), sour cream and cheddar cheese.  Tortilla shells come in three different sizes here - small (6"), medium (8") and large (10").  The larger the tortilla shell the more pronounced the bowl shape and the more the bowl will hold.  I found the small tortillas just perfect in comparison to many restaurant taco salads that are simply too much for one person to eat.  The limiting factor as to how big of a tortilla shell that can be fried for a taco salad bowl at home is the size of the deep fryer.   I can go as large as the medium sized tortilla shell.


Thursday, October 21, 2010

Kitchen Quick Tips - Cleanup As Your Go

kitchen quick tips

Kitchen cleanup is so much easier if you clean as you go!  Keep a wet dishcloth, spray bottle of rubbing alcohol or white vinegar for disinfecting handy for countertop spills and splatters.  Load your dishwasher as you use various utensils and wash kitchenware not going into the dishwasher as you use them.


Wednesday, October 20, 2010

Spinach Pasta with Blush Sauce

In keeping with October being National Pasta Month I've been doing a bit of experimenting with pastas.  Pasta comes in such a wide range of shapes and sizes so there is always a perfect pasta for any meal.  While most pasta is wheat based, rice based pasta is available as well as low-carb pasta.  Pasta is also available in whole wheat, spinach or tomato as well as organic.   It's quick and easy to make yet always pleasing.  The most popular way to serve pasta is with some type of saucee.  Sauces can range from tomato based to cream based to butter or oil based and everything in between. 

spinach pasta with blush sauce
I found an organic spinach spaghetti at the bulk food store during one of my travels.  Spinach ads both nutrients and colour to the pasta.  I specifically needed a green pasta for a cute kid's dish I wanted to try without having to resort using food dye.   I used some of the pasta for dinner a couple of nights ago.  It definitely is green when cooked but surprisingly there isn't much of a spinach taste.  I did notice it took a little longer to cook than regular spaghetti.

I served the pasta with a  blush sauce made using a home canned plain Italian pasta sauce.  A dash of fresh ground pepper and fresh grated Parmesan cheese.  According to my husband it looked a bit odd but the flavour was really quite good.  Bread and a side salad rounded out the meal.


Tuesday, October 19, 2010

Chicharron de Harina (Wheat Pellets)

One of my foodie finds at Bravo during our vacation was Chicharron de Harina (wheat pellets).  I specifically focused on Mexican foods here.  I had bags of really interesting wagon wheel shaped snacks that looked a lot like a fancy cheesee at the flea market on the previous trip.  I asked what they were and the lady explained they were a fried dough like tortillas.  It wasn't practical for me to bring home a bag as we had flown that trip.  This trip I looked for the wagon wheel shape in the hopes of being able to cook the snack at home since I didn't think they would travel well.

uncooked chicharron de harina
Chicharron de Harina are wheat pellets similar to pasta.  The pellets have a unique wagon wheel shape but can also be found as strips.  The pellets have a shiney, hard candy appearance.  Each wagon wheel pellet is about 1¼ - inch diameter.  Some are made using pork fat but the ingredients in the ones I bought are: wheat flour, iodized salt, corn starch, sodium bicarbonate, vegetable oil, colorant yellow #5, #6 cert and red #40.  I would imagine using pork fat would give a rather nice flaver similar to pork rinds.  Those not made with pork or fried in lard are a favourite vegetarian Mexican snack.

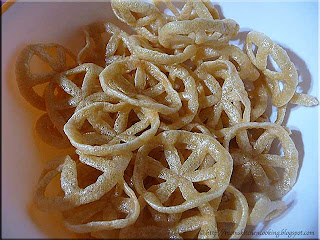
deep fried chicharron de harina
The chicharron de harina were quite easy to prepare.  I heated vegetable oil to 190ºC (375ºF) in the deep fryer.  When the oil was heated I dropped 5 - 6 of the hard wheat pellets into the hot oil.  They initially sink then within a couple of seconds puff up to about double size and rise to the top of the oil.  I gave quick stir to ensure they were cooked through then drained on a paper towel.  The total cooking time for each batch was about 20 seconds.  We enjoyed the chicharron de harina plain but you can sprinkle with salt, chili powder or sugar and cinnamon if desired.  An alternative serving suggestion is to sprinkle with lime juice or a dash or two of hot sauce.

Our grandchildren thought they were quite tasty so I sent some of the uncooked chicharron de harina home with them.  The pellets do go a long way!  I fried about 25 pellets when the grandchildren were here then later that night I fried up about half of the bag for entertaining and I still have almost a full 500 ml jar of the pellets left.  As snacks go this is a very frugal choice at only $1.69 with enough pellets to make several batches of the tasty snack.  I popped the leftover fried chicharron de harina into a storage container just to see how well this snack keeps.  The following day they were still crispy so this is a snack that could be made ahead for entertain, school lunches or picnics.


Monday, October 18, 2010

Frugal Kitchens 101 - Good Kitchen Practices to Reduce Food Borne Illness

Frugal Kitchens 101

Most people will say they have the flu when in fact they have a mild case of food poisoning.  The flu is a much more serious illness that can take weeks to recover from whereas the short duration of mild food poisoning only lasts a day or two.  Food borne illnesses resulting from food poisoning are caused by bacteria (eg. Clostridium botulinum, Escherichia coli, Salmonella, Listeria monocytogenes, Vibrio cholerae) or molds or parasites (eg. and can range from mild to severe even causing death.  Foods can be naturally contaminated with bacteria that can cause food born illnesses (eg. C. botulinum) or they can become by improper food handling and storage (eg. E. coli).  Practicing safe food handling in the kitchen can greatly reduce the chances of contracting a food borne illness.  This week's Frugal Kitchens 101 focuses on some of the things you can do in the kitchen to reduce the risk for contracting a food borne illness.

  • the danger zone - The food danger zone is 4.4°C (40°F) to 60° (140°F).  This is the range where foods easily become contaminated and can quickly spoil.  It is very important to keep cold foods cold (below 4.4°C) and hot foods hot (above 60°C).  Hot foods meant for storage should be quickly cooled then stored.  The foods at risk tend to be those served buffet style especially those served at home functions, picnics and church gatherings where chaffing dishes (hot) and ice (cold) may not be used.  When hosting this type of event if at all possible use chaffing dishes, crockpots, tabletop roasters and ice to keep foods at their proper temperatures.  Never store foods that may have unintentionally been in the danger zone.  Avoid having others help with the clean-up of the actual food where something like leftover potato salad that has been left out too long might end up in your refrigerator through the good intentions of others. 
  • hand washing - Your hands should be washed in hot, soapy water before beginning any food prep and then several times during the food prep as you touch surfaces that may be contaminated (eg. refrigerator handle, raw foods, etc.). 
  • food prep -  Use separate cutting boards for meats, seafood, poultry, and fruits or vegetables to prevent cross contamination.  Spray down your cutting boards with alcohol before washing then again after washing to kill any remaining bacteria.  Never place cooked foods onto a surface that had raw food on during the food prep stage.  Knife handles in particular can be problematic if they are not all one piece as food residues especially blood from meats and poultry can get between the handle and blade at the bolster.  If you have this design of knife and we all have at least one of them spray this area until soaked with rubbing alcohol before and after washing.
  • pre-cut - Many grocery stores offer a variety of pre-cut fruits and vegetables as a convenience product.  The more a food has been handled the greater the chance for contamination and you have no idea who or how it was handled.  The second problem with pre-cut is the surface area is greatly increased allowing bacteria more space to multiply.  This is one reason I don't like buying pre-ground meats of any kind.
  • fruits & vegetables - All raw fruits and vegetables as well as fresh herbs should be washed prior to consumption regardless whether the package says they were pre-washed or they were just picked from the garden or they are organic.  E.coli in particular has been a contaminant in pre-washed salad greens and spinach.
  • clean-up as you go - I cannot stress this enough!  If you watch any of the cooking shows you will notice that cleaning the prep area during the prep is as important as the food prep itself.  This is a safety measure to prevent cross contamination as well as accidental injury.
  • taste testing - One of my pet peeves is someone tasting from the stirring spoon then returning the same spoon to the pot.  The human mouth is the dirtiest part of the body with high bacterial levels.  It also has high enzyme levels needed for the initial stage of breaking down foods.  Returning a spoon that has been tasted from introduces both bacteria and enzymes that can cause food spoilage as well as food borne illness.  If taste testing remove a small portion to a dipping bowl then sample from that bowl using a separate spoon from the stirring spoon.
  • if in doubt throw it out - This should be your kitchen mantra!  Never taste food that you suspect may have spoiled as some as in C. botulinum toxin is odourless, colourless and tasteless but only a very small amount can cause serious illness or death.  Do not scrape mold off of jam then consume the jam.  While scraping mold off of hard cheeses is supposed to be fine I don't recommend it.
  • food preservation (eg. canning, freezing, drying, curing) - Use the current, up to date guidelines for safe home food preservation.  Do not take shortcuts or use out dated, unsafe preserving methods.  Always use the proper canning processing method - low acid foods are pressure canned processed while high acid foods can be boiling water bath processed.
  • kitchen towels, sponges, dishcloths - I view all of these items as single use.  What I mean by this is a I will use a t-towel or multiple t-towels during food prep for a meal.  During the food prep these are tossed into a small basket I keep in the kitchen but away from the food prep area as they become soiled.  They are removed from the kitchen at the end of that meal's clean-up and allowed to dry until laundry day where they are washed in hot water.  On any given day this means I can easily go through 5 t-towels but on busy canning days I may go through as many as 20.  Dish cloths are treated the same way and I really don't like kitchen sponges so seldom use them.  A sponge can be sanitized by placing in the microwave on high for 2 minutes to kill off bacteria.  This should be done 2 to 3 times per week.


Sunday, October 17, 2010

Cheesy Creamed Turkey Casserole

Last Monday we celebrated our Thanksgiving with a lovely turkey dinner and all the fixings.  There are three guaranteed uses for leftover turkey in our home.  It's a given that creamed turkey casserole and open faced hot turkey sandwiches will be served later that week.  It is also guaranteed that I will be canning turkey stock during the week.  Along with those must makes with leftover turkey I usually put turkey pieces with leftover gravy in the freezer for a later meal as well as slice turkey breast for sandwiches. 

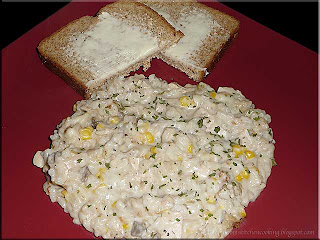
dressed-up creamed turkey
The creamed turkey casserole is a family tradition passed on from my mother-in-law.  The beauty of this dish aside from using up leftovers is its simplicity.  It only takes a few minutes to mix the ingredients together then pop in the oven. 

I tweaked the recipe slightly to use Asiago cheese.  This time I tweaked the recipe to include ¼ cup provolone cheese, ¼ cup mozzarella cheese and garnished with parsley flakes.  The result was a rich, creamy dish similar to a risotto but without the work.  This really is a very easy dish that fits into the comfort meal category.  Serve with bread and a side salad for a complete meal. 


Saturday, October 16, 2010

Pan Fried Cod with Deep Fried Potatoes

As mentioned in the past few posts we were on vacation so managed to bring back several interesting foodie finds.  One of our foodie finds was Weisenberger's Fish Batter Mix from the  Old Town Amish Store in Berea, Kentucky.  This mix is from Weisenberger Mill, the historic water powered flour mill on the South Elkhorn Creek in southern Scott County, Kentucky.  It is the oldest commercial mill in Kentucky.  We plan on making a side trip to visit this mill during our next vacation.  I think it will be a rather interesting stop!

pan fried cod with deep fried potatoes

Homemade fish batter is quite easy to make using flour, corn meal or corn flour and seasonings of choice.  Everyone has their own favourite combinations and so it is with companies that make fish batter.  It is interesting to try different commercial fish batters as well as the slight variations in application.

The Weisenberger fish batter can be used wet or dry.  We dipped the fish in an egg wash then coated with the dry fish batter mix and pan fried until golden brown.  Deep fried potatoes and home canned wax beans completed the meal.  It was a lovely meal.  The fish was tender and flakey while the lightly seasoned coating was crispy.  This would be a fish batter I would use again. 

We discovered deep fried potatoes at a local eatery quite some time ago.  This is a fancier presentation usually served with prime rib or roast beef.  The inside is creamy while the outside has a golden crust.  Deep fried potatoes can be garnished with parsley if desired.  They are very easy to make at home. 

Deep Fried Potatoes

Wash and peel desired number of small potatoes.  Steam the potatoes until al dente.  Do not boil the potatoes as the texture will not be correct.  Heat vegetable oil in deep fryer to 190ºC (375ºF).  Transfer the potatoes from the steamer basket to the deep fryer basket.  Fry until golden brown.  Remove from deep fryer.  Serve hot.


Friday, October 15, 2010

Olive Garden in Lima, Ohio

This is the last post on our recent foodie finds while on vacation although I will be sharing so of the great things I make with the foods we brought home from the trip.  Going to our vacation home ends up being a mixture of eating out and cooking in.  This offers us the wonderful opportunity to explore some great regional foods, diners, restaurants, farmer's markets and grocery stores as well as get culinary inspiration.

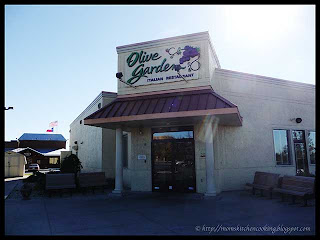
Olive Garden facade in Lima, Ohio
Our final foodie stop on the way home was Olive Garden located at 1936 Roschman Ave in Lima, Ohio.  Olive Garden is a chain restaurant specializing in Italian style cuisine.  A chain restaurant when on the road traveling from point A to point B without sightseeing can be rather desirable as you already know the quality of food.  For that reason we often stop at truck stops when traveling.  This trip we decided to stop for a nice relaxing meal at Olive Garden.  It proved to be a lovely way to end the trip.  We still had several miles to travel but will filled tummies after a bit of down time from being on the road it made the last leg of the journey a lot more pleasant.

smoked mozzarella fonduta
I really enjoy restaurants!  I love taking in the sights, the sounds, the aromas and the food presentation.  It is a great way to do a bit of pampering while peaking your interst in food.  Of course good company doesn't hurt!  We ordered the smoked mozzrella fonduta as an appetizer.  This appetizer consisted of oven-baked smoked mozzrella, provolone, parmesan and romano cheese garnished with parsley and chopped tomato served with Tuscan bread.  The baked cheeses where rich and creamy with a delightful flavour and just gooey enough for topping the bread medellions.  This wonderful mouth sensation would be extremely easy to duplicate at home so I will definitely be trying it. 

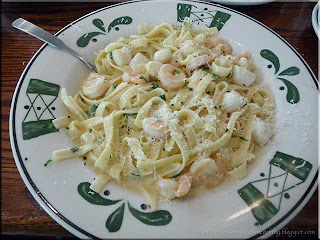
Seafood Alfredo
October is National Pasta Month so where better to indulge in pasta than an Italian style eatery?  Olive Garden offers several pasta dishes so were plenty to choose from.  My husband ordered the seafood alfredo.  This is dish came with fettuccine noodles topped with alfredo sauce, shrimp and scallops garnished with  parsley and fresh grated parmesan cheese.  Warm, soft breadsticks and a salad were included.  The alfedo sauce makes the dish rich and creamy, Seafood fettuccini is a very easy dish to duplicate at home and one we have made many a time.  My version is a bit saucier but very close to the Olive Garden's seafood alfredo.


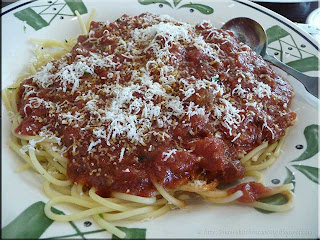
spaghetti with meat sauce
Salad was included with both meals.  Instead of bringing out two side salads the waiter brought out a large, bottomless salad for us to share.  This is a nice presentation as each one at the table can help themselves to as much salad as they desire.  The bowl can be refilled if desired.  It is also a practical, time saving presentation for the restaurant staff.

I ordered the spaghetti with meat sauce.  Now I have to confess this is the ultimate meal choice for me when eating out.  Yes I make spaghetti with meat sauce at home from scratch and I even can up some of my sauce for convenience but this has always been my favourite meal to order out.  You can tell a lot about a restaurant on the basis of their spaghetti with meat sauce!  To me a big plate of spaghetti covered with meat sauce is comfort eating at it's best!


Thursday, October 14, 2010

Kitchen Quick Tips - Leftover Ketchup

kitchen quick tips

When the bottle of ketchup is empty, pour ¼ c of hot water into the bottle.  Shake vigorously to mix the leftover ketchup with the water.  Pour into small freezer container and freeze for later use in soups, stews or gravies.


Wednesday, October 13, 2010

Bravo Supermarket Purchases

Any frugal foodie will tell you if you want to save on preparing ethnic foods is you need to shop at an ethnic grocery store.  In larger urban areas where there may be several established pockets of various ethnicities (eg. China town, Little Italy, etc.) then the best place to by ethnic ingredients is in the small mom & pop shops in those small niche areas.  If you live in a rural area then some of these ingredients might possibly be found in some country markets or grocery stores.  In general though if you want a few more exotic, ethnic ingredients the main choice is ethnic stores.

Bravo supermarket purchases
We stopped at a small Bravo supermarket in Florida.  It was in an area that has a higher Latino population and I got the distinct impression it was not in what would be considered affluent but still rather safe area.  The store was stocked with all kinds of great Latino foods and ingredient.  Oh my gosh I bought a bit to bring back home.  My purchases included: pork skins, dried black beans, dried Central America red beans (aka small red beans), chicharron de harina (wheat pellets), whole annato seed, ground annato seed, menduo mix, espresso coffee, masa flour, ancho chili pose, turbinado natural sugar and sugar cane (cones to the upper left).  The prices were really quite good in this little grocery store.  I only spent $31.91.  I noticed their prices for rice were almost half of what we pay for long grain rice.  I have a lot on hand otherwise would have bought some.  One of the most interesting things I bough was the chicharron de harina (middle bag to right).  These wagon wheel shaped pellets almost look like a hard pressed rubber except they are not flexible.  However when they are deep fried they puff up like cheesies for a light fluffy snack.  I can't wait to try these!


Tuesday, October 12, 2010

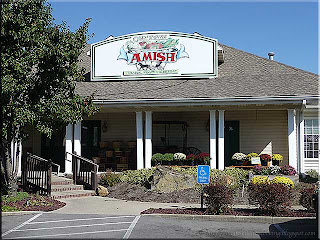
Old Town Amish Store in Berea, Kentucky

There are quite a few interesting foodie finds as well as other attractions along the I-75 corridor.  Most have one or more large billboards along the highway announcing what exit to find them on.  While some of them are touristy others are not.  Such is the case with the Old Town Amish Store.  While it is quite apparent that this is an Amish store there isn't much touristy about the store at all.  It really is a convenient stop to bring home bulk food supplies, home baked goods and dairy though.  You just know we had to make a pit stop here!

The Old Town Amish Store in Berea, Kentucky
The Old Town Amish Store is located at 201 Prince Royal Dr. in Berea, Kentucky just off Exit 76 on I-75.  The shop opened in July of 2009 so is still fairly new.   It is quite easy to find off the exit and there is ample parking.  The store is beckoning from the outside where a large display of apples tantalized us with their beautiful colours and wonderful aroma.  Upon entering the door the amazing aroma of fresh baked breads while rows and rows of neatly stocked shelves delight the senses.  The interior is light, bright and airy has a cosy atmosphere.  To the left of the main food area is a room filled with hand crafted Amish rocking chairs, porch swings and other furniture.  To the back of the main food area is a small dining area.

well stocked shelves
The Old Town Amish Store sells a wide range of foods including bulk foods like beans, pasta, herbs and so much more.  Unlike the Bulk Barn bulk food stores I shop at, all the the bulk food has been packaged for sale in the store eliminate the problems of bulk food in bins with scoops.  While the price per pound is the same for a certain bulk product (eg. beans) there will be in weight so one bag may be a few cents cheaper than another.  The products are neatly arranged on commercial shelving.  Foods are packaged in the standard thin plastic bulk bags, small plastic tubs, paper sacks and glass jars.  A wide range of homemade jams, jellies and preserves are available.  Roll butter (not pictured), honeys, bacons, farm fresh eggs, cheeses, fresh baked breads and pies are also available as well as some commercial products like Ball canning mixes.  I did not see any Pomona's pectin or Clear Jel® but I likely didn't look hard enough and didn't think to ask.

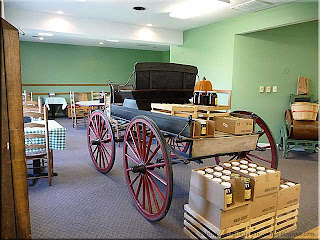
Amish carriage in Old Town Amish Store
A lovely Old Order Amish buggy serves as a visual divider between the main bulk food area and the dining area.  Despite its decorative element it also serves as a practical shelving for cases of honey.  The dining area is neat, tidy and cosy, a unique blend of quaint and modern.  The chairs would be just lovely to sit a spell enjoying a slice of homemade pie! 

The entire store is just simply a delight to spend a bit of time in.  They are very friendly!  I found the prices to be quite reasonable, in line with what I pay at the Bulk Barn.  There was less of the bulk candy but they more than made up for it in staples.

my purchases from the Old Town Amish Store
If you get a chance to visith the Old Town Amish Store you definitely will not regret it.  This store is on our list of must stops on the next trip and you can bet I will have a long list of goodies to buy!  We didn't buy much this trip.  Our purchases included a 500 ml jar of pure sourwood honey, two pouches of fish batter, dill weed (like Israeli) and dill seed.  The total came to $13.24.  The sourwood honey looked interesting.  There is a piece of the honeycomb in the jar.  According to one source sourwood honey is seldom sold outside of the area it is produced because of supply and demand.  This honey is considered one of the rarest and finest of honeys that is only havested a few days in the fall.  It has a deep, woodsy flavour so this will be an interesting honey to do a bit of experimenting with.


Monday, October 11, 2010

Frugal Kitchens 101 - Happy Thanksgiving!

Frugal Kitchens 101

Happy Thanksgiving!

Today is our Thankskiving Day Feast.  The Canadian Thanksgiving has been celebrated on the second Monday of October since 1957.  Thanksgiving is the ultimate in celebrating Frugal Kitchens because it is very much a celebration of the harvest. Today's feast menu for six: turkey with stuffing and gravy, mashed roasted garlic potatoes, niblet corn, green beans, homemade bread, homecanned cranberry sauce, and apple pie.

For the most part almost everything on the Thanksgiving table comes from the garden or local farmers.  All the wonderful local produce that makes the Thanksgiving meal like squash, green beans, apples, onions, potatoes and so much more are in season and quite inexpensive.  Turkeys tend to be a bit on the expensive side ($1.95/lb or higher) in Canada thanks to the pricing boards but enterprising Canadians raise their own turkeys or catch a wild one or shop in the US where turkeys can be had for as low as 29¢ per lb.

The real star of the meal is always the turkey and for me a turkey is about as frugal as you can get.  I can get a 22 lb turkey for about $10.50 or less depending on the sales.  That size will give a lovely Thanksgiving dinner for 8 with left overs for a few meals, the carcass to make soup and 14 - 500 ml jars of turkey stock.  Essentially the savings on stock alone more than pays for the turkey (store bought cost for same amount about $20.86) meaning I'm ahead by $10 and all of the meals were free.  In perspective even buying turkey at $1.95/lb that would cost $42.90 is still an excellent value considering half the price can be recouped simply by making stock.  For those who do not can, stock can easily be frozen.  Turkey is one of those meats that just goes a long way all the way around making it one of the most frugal meats you can buy. 


Sunday, October 10, 2010

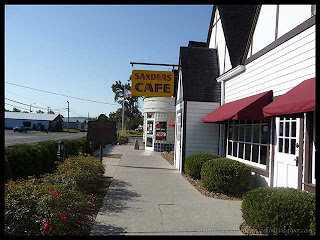
Sanders Cafe and Museum in North Corbin, Kentucky

I do a lot of genealogy and family history so have always been interested in how our ancestors ate and stored foods.  It is especially interesting to see what kind of equipment our ancestors used along with their methods of food storage.  Being foodies we are both interested in the history of foods and that includes restaurant foods.  We stopped at Sanders Cafe and Museum in North Corbin, Kentucky on our way home from our vacation home.  Sanders Court and Cafe is the birthplace of Kentucky Fried Chicken.

Sanders Cafe and Museum in North Corbin, Kentucky
The Colonel Harland Sanders Cafe and Museum is located in Corbin, Kentucky off of I-75, Exit 29 then go 1 mile south on 25E, turn right on 25W one half mile.  The directions sound a little confusing but it is only because 25 bends around.  The quaint white building is rather easy to find. It is how the restaurant appeared in the 1940's.   There is a historical plaque outside of the museum that is well worth reading.  This is very much a working museum with dining tables set up amongst the various displays.  Rooms like the kitchen and motel display are blocked off from roaming through with a low glass barrier.  To the furthest side behind the rounded entrance (back middle of picture) is the restaurant where you can order eat-in or take-out.  We didn't order anything but certainly enjoyed looking through the displays!

the origninal Sanders Cafe kitchen
The original Sanders Cafe kitchen like many commercial kitchens is not large but it was well organized.  Harland Sanders started Sanders Court and Cafe in 1930 where he originally fried chicken in an iron skillet.  Despite being in the trying times of the Great Depression he was quite successful.  He certainly did not use a lot of fancy equipment but he did put out exellent food.  The kitchen obviously was utilitarian with function first.  He realized that frying the chicken in an iron skillet took 30 minutes so in 1939 Colonel Sanders altered his cooking method to us a pressure fryer that would reduce the cooking time allowing him to serve more patrons quicker.  And thuse was born Kentucky fried chicken.

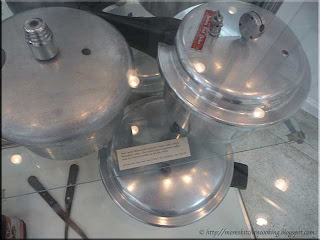
original pressure cookers used by Colonel Sanders for Kentucky fried chicken
I work with pressure canners and cookers a lot so can really appreciate the logistics of what went into using pressure cookers as a pressure fryer.  Pictured on the top are the two 4 qt Mirro-Matics with single Wisconsin valves.  Both have weights as regulators and one has a custom made metal label for Kentucky Fried Chicken.    The lower pressure cooker is a double Wisconsin valve pressure that was in used from the 1960's until the advent of self-contained pressure fryers.

I mentioned the logistics of using a pressure cooker as a pressure fryer.  Pressure cookers are designed to operate at 15 lb pressure which is one reason they should not be used for pressure canning.  The second problem is a pressure cooker can only be filled 2/3 full so that really restricts the amount that can be cooked in a pressure cooker so at best these pressure cookers could only put out small amounts of chicken at peak time but it would be faster than pan frying.  It just boggles my mind that he was able to achieve this without blowing up a pressure cooker!

These are exactly the same types of pressure cookers I have in use and certainly the same type available to the general public during that era.  In fact very little has changed with the design of modern pressure cookers.  Modern pressure cookers should not be used as a pressure fryer though.  There are specific pressure fryers meant for home use but unless you are frying a lot of chicken they are really a bit on the expensive side at $230 or more for the unit. 


Saturday, October 09, 2010

Magnolia Plantation in Tifton, Georgia

There are always so many great foodie finds to discover when on a road trip.  Quite often there are billboards along the highways announcing various food stops of interest or as my husband calls them tourist traps.  It is often better to get off the main highway to find some of the more unique shops but that isn't always possible.   It is surprising just how many great foodie places can be found just off the highway exits!

Magnolia Plantation
Magnolia Plantation is located at 35 Omega Elderado Rd, Tifton, Georgia just off of I-75 on exit 55.  They specialize in pecans, peanuts, Vidalia® onions and other southern treats like salt water taffy, pralines, poppy cock and so much more.  There is also a gas station.  The building's facade is that of an old two story plantation style house complete with large pillars and porches.  As tourist traps go this one really is less touristy and more foodie!  Practically everything in the store was either food or pertaining to food (eg. cookbooks).  That in itself made for a lovely spot to just wander through the store to see all the goodies and believe me there was a lot to see.

pecans
Pecans were the main feature but peanuts were close as well.  There was a large display of home canned style goodies mainly jams, jellies, and condiments.  Most of the displays were counterstyle and bins although there were a few racks and shelves.  There was a cute open top pop cooler hold glass bottles of CocaCola® on ice.  An abundance of warm wood tones gave the bright, airy store a touch of warmth.  I really enjoyed shopping here.

I will warn you this foodie stop is not cheap though.  A 3 lb bag of pecans in the shell was $11.19 and 12 oz bags of shelled pecans were $6.97.  Jams and jellies were priced around the $6 per pint with condiments in the $4 range which is fairly normal pricing for home canned style products.

purchases from Magnolia Plantation
My foodie purchases at Magnolia's Plantation  included fresh roasted peanuts in the shell , shelled pecans, powdered peanut butter, Vidalia® onion relish, Ma's Cookin' by Sis and Jake (1986), and Gerorgia Hometown Cookbook by Sheila Simmons and Kent Whitaker (2008).  The grand total came to $51.11 so a bit more on the higher end for foodie purchases.  In fairness though we basically bought what we wanting not really paying attention to the price.  The pecans are a treat for a couple of our kids because we know the grandkids love nuts.  I already have a couple of ideas for ways to use the powdered peanut butter.  If we like the Vidalia® onion relish then you can be sure I will be coming up with a clone recipe to home can as well.  All in all I enjoyed our stop here and it is a foodie place we will stop at again.


Friday, October 08, 2010

Canning At Our Vacation Home - Plout Jam

Part of traveling for me anyways is discovering new foods and regional dishes.  There are very few times that I don't bring home some type of foodie item to try.  Being Canadian living mainly in Canada but traveling outside of Canada presents a few problems bringing certain foods back into Canada.  There are restrictions as to how much dairy or poultry can be brought back at one time but the fruit and vegetable restrictions are the ones that cause the most concern.  Some fruits and vegetables are not allowed while others may be temporarily disallowed.  The last thing I want to do is get to the border with a box of lovely fruit to find out I can't bring it into Canada.  So I have come up with a solution.  I take my BWB canner with me along with any necessary supplies (eg. Pomona's pectin, pickle crisp, etc) and can the food wherever we are.  Since filled jars of home canned foods come with us I have empty jars for refilling for the return trip.  Once canned bringing the fruit back into Canada is a non-issue.  This is working well so I'm considering taking my extra pressure canner with us the next trip.

pluotsOn our recent trip I discovered pluots.  I simply had to try them.  As produce goes they are a bit more expensive though.  Pluots are an apricot and plum hybrid.  The fruit itself looks like a rather large red plum but without the purplish overtones.  The pit is very much like an apricot.  The flavour is a mingling of the two fruits but more of a distinct flavour.  I cut one open as pictured and immediately thought this would make for a lovely looking jam or jelly.  The flesh is a wonderful, gorgeous almost rosy pink!  The texture is firm yet juicy and the flavour really is quite unique.

Canning outside your normal environment brings a few challenges.  I've canned on camp stoves, in an RV, on the road and now at our vacation home.  Logistically you simply do not have everything you may need when canning away from home.  If you don't have a key ingredient (eg. Pomona's pectin) chances are very good you can't just rush out and buy it either.  This can create both frustration as well as a learning experience in adapting.

pluot jam
I brought exactly 8 tsp of Pomona's pectin with me.  That is enough pectin for 4 batches of jam or jelly.  I brought the monophosphate calcium in the original package since customs on both sides aren't really fond of unlabeled white powders.  What I didn't bring was my kitchen journal with how to make the calcium water but thanks to this blog I was able to carry on.  This is something to keep in mind though when canning on the road.  Make sure you bring your tried and true or essential recipes with you.

The pluot jam just looks absolutely scrumptious in the jars!  It was quick to make taking me only about 20 minutes.  I did learn that the water at our vacation home is considerably harder than at home.  Normally I add a bit of vinegar to the processing water but didn't for this batch and oh my gosh the jars came out almost white!  That will be a mistake I won't be repeating.

Pluot Jam

4 c chopped pluots
2 c organic sugar
2 tsp Pomona's pectin 
2 tsp calcium water
juice of one lime

Wash the pluots.  Rough chop then squeeze slightly while adding to measuring cup to measure out 4 cups.    Pour prepared pluots into large saucepan.  Mix in lime juice and calcium water.  In a separate bowl, mix the sugar and pectin well.  Bring the fruit mixture to a boil.  Stir in the sugar/pectin mixture.  Return to a low boil cooking and stirring until sugar is dissolved.  Ladle into hot jars.  Secure the two piece lids.  Process in BWB canner for 10 minutes or adjusted timing according to altitude adjustment chart for your altitude (please see canning information tab).

Yield: 4 - 250 ml jars


Thursday, October 07, 2010

Kitchen Quick Tips - Homemade Popsicle Idea

kitchen quick tips

Pour milk into an emptied jar of jam that has not been scraped out.  Put the lid on and shake to flavour the milk.  Freeze in popsicle molds for a frozen treat.


Wednesday, October 06, 2010

A Pit Stop At Checkers

If you have been following this blog you will know my husband and I are not huge fast food fans by any stretch of the imagination.  From time to time we hear about a fast food restaurant that we are familiar with.  Depending on the recommendation we may make it a point to try out the food when we are on a road trip.  So it was with Checkers.

Checkers
Checkers is a drive-in restaurant only.  There are no on site seating arrangements.  This keeps their overhead low and that definitely is reflected in their food prices.  The Checkers restaurants are rather sleek with a lot of chrome combined with a red, black and white theme.

We stopped at the Checkers on US 98 North.  The chrome sparkled with the bright sunlight creating a nice contrast to the deep blue sky.  The drive-in itself is quite small.  We drove in on the right hand side, placed our order then picked it up on the left hand side.  There was a slight wait for our order.  I don't know if this is the norm or not but we really didn't mind.  Our total meal cost came to $11.21 for two people.

Checker's onion rings
We ordered a small onion rings with our meal rather than fries.  The onion ring portion was more than enough for two people.  The coating was crunchy but on the spicy side something we were not quite expecting.  They would have been nice with a bit of ranch dipping sauce but that wasn't offered.

Without a dipping sauce the spicy coating on the onion rings was a bit over powering.  I'm glad we didn't order a larger portion or a portion each as they would have gone to waste.  The onion rings were simply over seasoned to the point they were just too much by themselves.

Checker's road house burger
My husband ordered the road house special - 2 road house burgers for $4.  The road house burger comes sandwiched between two slices of Texas style bread. The beef patties were topped with onion rings, American sliced cheese and barbeque sauce.  These were good sized burgers with the bun making them a bit on the unique side both in appearance and taste.

My husband really enjoyed these burgers.  He had one for dinner and saved the other for lunch the following day.  It reheated well which is a nice bonus for a left over fast food burger.  He said the burgers were quite good.

Checker's buford burger
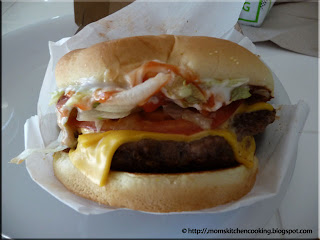
I ordered the buford burger at $3.49 which in hind sight with my appetite I should not order anything called a buford!  The burger came with 2 beef patties, American sliced cheese, tomatoes, lettuce, onions and pickles.  Condiments included ketchup, mustard, relish and mayonnaise.  It was huge, way more than I could eat.  The burger was nice and juicy though.  What was interesting is the burger came packaged in the standard cardboard burger box but it was inside a paper cone for easy holding while eating.  I thought this was a rather interesting concept, one a bit more developed than the standard wrap-around-the-serviette method.  At any rate the buford burger is quite tasty, well worth ordering!


Tuesday, October 05, 2010

Fresh Baked Bread with Dipping Oil

Bread is a fundamental part of most dinner meals.  The best breads are homemade, piping hot from the oven ready to drizzle with butter and savour every morsel!  Few can resist the tantalizing aroma of fresh baked bread.  Restaurants know this which is one reason warm breads are served before the entrée almost as an appetizer then the bread basket is usually filled during the meal.

fresh dinner breads
Dinner breads are traditionally served on a cutting board with a serrated knife to cut as desired.  Dinner rolls are traditionally served in a lined wicker bread basket.  The basket itself allows steam to escape the hot bread from below so the crust does not become soggy.  At the same time the lining which is usually a cloth serviette keeps the bread or rolls warm.

Pictured is the beautiful dinner roll basket we enjoyed at Middle Grounds (more on this restaurant in future posts).  The rolls were a variety of mulit-grains and not shaped in the traditional roll style.  The shape was achieved by rolling out the dough then cutting into rectangles that when baked softened the edges.  They were hearty yet delightful dinner rolls to say the least!

dipping oil
The wonderful dinner rolls were not served with butter but rather a seasoned extra virgin olive oil in which to dip the bread.  This is quite customary where the bread is torn from the loaf then dipped into the oil to be enjoyed and it is a healthier yet just as tasty choice as using butter.

Dipping oil is not difficult to make and in fact you don't even need to add any herbs or seasonings.  The key ingredient is good quality extra virgin olive oil.  Look for cold first pressed olive oil for the best flavour.  If using as is all you need to do is pour the olive oil into a shallow saucer for dipping the bread into.  Pictured is the dipping oil served with the fresh dinner bread.  It was seasoned with fresh basil and garlic.  Oh my, it was simply amazing!  I could have eaten nothing else and still been quite satisfied.


Monday, October 04, 2010

Frugal Kitchens 101 - Kitchen Disinfectants

Frugal Kitchens 101

There have been reports out for years regarding bacterial issues with sponges and cutting boards as well as other kitchen surfaces.  As a result manufactures fed into and continue to feed into the fear by developing anti-bacterial kitchen cleaners.  Anti-bacterial agents are now found in dish detergents, kitchen wet wipes, kitchen de-odourizing sprays, kitchen hand soaps and kitchen surface cleaners.  Anti-bacterial agents are also found in some kitchen plastics such as some NSF® (National Sanitation Foundation certified) knife handles and in some plastic cutting boards.  The bottom line is when it comes to controlling bacteria in the kitchen the vast majority of the anti-bacterial products are not necessary.  In fact they have been implicated in the emergence of super bugs (anti-bacterial resistant bacteria) as well as the increased incidence of allergies and asthma.  In addition to these concerns anti-bacterial products are considerably more expensive than the eco-friendly alternatives.  This week's Frugal Kitchens 101 focuses on how to disinfect your kitchen without the use of specialized anti-bacterial products.

The following eco-friendly cleaning solutions will help control bacteria and bacterial contamination in the kitchen:

  • soap - Soap as opposed to detergents is either animal (beef fat) or vegetable based.  Soap is eco-friendly because it does not contain phosphates, bleaching or anti-bacterial agents and is biodegradable.  By it's very nature simple soap and water can be quite effective at controlling bacteria on surfaces and hands.   Soap can be homemade or store bought usually in a bar or flake form (eg. Sunlight, Ivory, Fel Naptha) but can also be found in liquid form.
  • white vinegar -   White vinegar has anti-bacterial properties while being an effective de-odourizer.  It is inexpensive and can be used on most kitchen surfaces.  It can be warmed in a mug in the microwave oven to clean and de-odourize it.  White vinegar can be added to the rinse water when washing t-towels to kill any bacteria that may be present.  A 1:1 (water:vinegar) solution in a spray bottle can be used to wipe down countertops, appliance surfaces, sinks and taps to not only shine but sanitize.  A cup of vinegar can be used in the dishwasher to remove any water deposit build-up while sanitizing and freshening the inside of the dishwasher.  Straight white vinegar can be used to kill off any mold or mildew on kitchen window sills or in the refrigerator as well as sanitize cutting boards.  A bowl of straight white vinegar can be used in place of anti-bacterial kitchen sprays to effectively eliminate kitchen cooking odours.  Add vinegar to the water used to wash fruits and vegetables to eliminate surface bacteria and residues.
  • rubbing alcohol - Straight rubbing alcohol (denatured ethanol or isopropyl) is one of the most effect sanitizers you can use in the kitchen.  It will effectively kill bacteria from most kitchen surfaces without harming them.  Pour rubbing alcohol into a spray bottle for easy application.  Spray onto cutting boards after use and again after washing to kill any remaining bacteria.