My photo
Ontario, Canada
I am a wife, mother and grandma who enjoys the many aspects of homemaking. A variety of interests and hobbies combined with travel keep me active. They reflect the importance of family, friends, home and good food.
Cook ingredients that you are used to cooking by other techniques, such as fish, chicken, or hamburgers. In other words be comfortable with the ingredients you are using.
--Bobby Flay

For Your Information

Please watch this area for important information like updates, food recalls, polls, contests, coupons, and freebies.
  • [March 19, 2020] - Effective Mar 17, this blog will no longer accept advertising. The reason is very simple. If I like a product, I will promote it without compensation. If I don't like a product, I will have no problem saying so.
  • [March 17, 2020] - A return to blogging! Stay tuned for new tips, resources and all things food related.
  • [February 1, 2016] - An interesting report on why you should always choose organic tea verses non-organic: Toxic Tea (pdf format)
  • Sticky Post - Warning: 4ever Recap reusable canning lids. The reports are growing daily of these lids losing their seal during storage. Some have lost their entire season's worth of canning to these seal failures! [Update: 4ever Recap appears to be out of business.]

Popular Posts

Wednesday, June 30, 2010

Porcupine Balls

Casseroles flexible dishes requiring less preparation needed making them the ideal dish for the busy home cook.    Most casserole recipes do not have to be followed exactly.  Slight changes in the amount of the main ingredients will have little effect on the finished casserole.  An appealing aspect of casseroles is they only take a few minutes to put together.  While they are baking your time is freed up to do other things.    Adding to the convenience of casseroles is most of them can be frozen for later use.  I often make two casseroles at a time, popping one into the oven for that night's dinner and the other into the freezer for another night. They are a good way to use up those little bits of leftovers and casserole leftovers reheat well too.

porcupine balls prep
When it comes to casseroles ground beef reigns supreme.  Ground beef is an economical meat choice that lends its well to the use of extenders.  Ground beef can also be shaped into meatballs, patties and loaves adding to the versatility of this inexpensive meat.  For best results, grind lean beef at home or have it ground for you as part of your beef on the hoof or bulk beef purchase.  It is possible to substitute ground pork, turkey, chicken or venison for ground beef in most casserole recipes.

Porcupine balls are tasty meatballs that get their name from the cooked rice sticking out from the surface.  Grated carrot or zucchini can be added to the meat mixture if desired.  They can be baked, cooked in a crockpot or covered frypan.  Once cooked they do freeze well for later use. 

Porcupine Balls

1 lb lean ground beef
½ c uncooked long grain rice
1 small onion, finely chopped
1 egg, lightly beaten
¼ tsp garlic powder
¼ tsp sea salt
¼ tsp pepper
¾ tsp Italian seasoning
2 c (500 ml) jar home canned tomato soup*

Finely chop the onion.  Mix all ingredients except the soup together.  Form the meat mixture into walnut sized meatballs either by hand or using a meatball former.  Place meatballs in a single layer in a baking pan.  Pour the tomato soup over the meatballs.  Cover and bake at 180ºC (350ºF) for 45 minutes.  Remove cover.  Bake an additional 15 minutes.
Yield: 24 meatballs

* If using commercially canned 10 oz soup add ¾ c of water to the soup before pouring over the meatballs.

porcupine balls
The meal pictured consisted of the porcupine balls, baked potatoes and home canned wax beans.  I put two large potatoes in the oven to bake along with the porcupine balls.  This meal would definitely fit into the comfort meal category because it just has that wonderful taste of homemade.  The meatballs are a sure kid pleaser!

My husband said the meatballs tasted a lot like the filling in cabbage rolls and they did.  I found the meatballs a little on the bland side so will be increasing the seasonings the next time I make them.  I will also use home canned roasted tomato soup for a flavour boost.


Tuesday, June 29, 2010

How to Cut a Mango (video)

On Sunday I wrote about the chicken and mango chutney dinner I made.  One of our local grocery stores has cases of mangos on sale for $3.99.  Each case contains 14 mangos.  My husband brought home one case for me.  This case will be used for fresh eating and to make mango chutney and mango jam.  At this price I will be getting a second case before the end of the sale.

Mangos have a large pit that can present a bit of a problem if you don't know how to cut a mango.  Improperly trying to cut a mango ends up in a mushy mess but properly cutting you end up with slices, dices or chunk rather quickly.  Rather than trying to explain how to cut a mango, I found this good video that demonstrates how to cut a mango by Chef Allen Susser.  Notice that Chef Allen holds the unpeeled mango pieces in the palm of his hand to do the slicing and dicing technique.    If you want chunks rather than dices space the cuts further apart when doing the dice cut.


Monday, June 28, 2010

Frugal Kitchens 101 - Using Herbs in the Kitchen

Frugal Kitchens 101

A recent comment regarding drying oregano prompted this week's Frugal Kitchens 101 post.  Herbs can be used fresh, dried, frozen or teas.  They are a wonderful way to add a lot of flavour to foods without adding salt.  Although some dishes may still require a little salt when using herbs, the amount of salt added can be greatly reduced.  Herbs can be used to add high and low notes to a dish.  For example when cooking lemon chicken adding lemon balm tea with add a bit of higher lemon note.  Adding lemon balm to chicken stock gives a lemon note to the rice cooked in the stock.  Both oils and vinegars can be infused with herbs to add flavour to the base notes of vinaigrettes, sauces, and dressings.  Herbs can be the main ingredient in a dish (eg. basil pesto) or they can serve as the garnish on plate (eg. parsley).  Aside of the flavour and visual appeal of herbs, many fresh herbs are beneficial in terms of health.  Parsley helps to freshen your breath while mints help setting the tummy after a heavy meal.  On that note of the versatility of culinary herbs in the kitchen how does one go about cooking more with herbs?

  • Chances are very good if you are like most home cooks you will have a few bottles of dry herbs floating around.  They likely are stored in a open rack by the stove, lined up on the back of the stove or in a cabinet over/by the stove.  There is a very good chance these herbs are well over a year old.  Throw these herbs out!  Why?  Both heat and light destroy the essential oils in herbs so you aren't getting flavour, you are getting filler.  If you are serious about learning to cook with herbs, empty those bottles, clean them then refill with quality herbs.  Do not replace with the little bottles of herbs in the grocery stores that you have no way of knowing how old they are and have been exposed to light.  Buy dried herbs from a bulk food store where you can buy the amount you need or dry home grown herbs.  Buy herb plants from a nursery or start from seed.  Some fresh herbs can be bought in the produce section of the grocery store.
  • The basic herbs I recommend starting with are parsley, sage, rosemary, thyme, oregano, basil, and marjoram.  These herbs can be used by themselves or in combination to form herb blends (eg. Italian seasoning, poultry seasoning).  All of these herbs grow nicely on sunny window sills.   If growing herbs indoors I also recommend adding chives and members of the mint family (eg. spearmint, peppermint, lemon balm) to your collection.  These herbs are extremely easy to grow.  Until you get used to growing indoor herbs stick with the basic varieties as many like basil are available in several varieties but the basic culinary variety used is sweet basil.
  • I prefer using fresh to dried herbs and for some dishes like pesto fresh basil is needed.  Essential oils in dried herbs are more concentrated so to substitute dried herbs for fresh, less is needed.  The conversion for substituting is 1 tbsp fresh herb = 1 tsp dried herb.
  • Start small.  Learning to cook with herbs is quite easy but my recommendation is to keep it simple and easy.  Start with something simple like a homemade vegetable dip using either fresh or dried herb(s).  Use half the herb(s) the recipe calls for.  Taste.  If the dip has a strong enough flavour for you then leave as is and note the change beside the recipe ingredient list.  If the dip is not flavourful enough add a little more until you get the flavour you want.  Remember it is always easy to add more herbs but you can't take out excess so always add less.
  • Herbs should not overpower the dish.  Certain herbs pair with certain meats or fish better than others.  For example, rosemary pairs nicely with salmon and beef but is a bit overpowering for whitefish.  Use a lighter herb such as lemon thyme with whitefish.  Parsley goes with just about everything to the point is over used as a garnish.  Cooking method can affect the flavour of the herb as well.  In particular sage tends to get stronger and bitter when added to anything to be canned.  Cooking times can affect flavour as well so tender herbs (eg. parsley, basil) should be added during the last few minutes of cooking to retain best flavour and colour.  Do a bit of reading on the herbs you want to use.
  • Have fun!  Cooking is all about having fun in the kitchen.  Using herbs is just one more way to extend the repetoir of meals you can make.  Simply adding a sprinkling of fresh chives to a baked potato or chopped parsley on roasted potatoes can make them feel special even though all you really did was add herbs. 


Sunday, June 27, 2010

Chicken with Mango Chutney

Yesterday I wrote about an easy chicken and gravy with rice dinner using boneless, skinless chicken breasts and Thai sweet rice.  This sticky rice is often paired with mango slices then surrounded by coconut milk as a desert.  I decided to take a savory spin on the sweet rice and mango combination by using mango chutney to create an entrée.

chicken with mango chutney
Mango chutney has a deep, warm, spicy flavour with slightly sweet high notes.  It has a chunky texture similar to thick salsa.  It really is delightful!  Mango chutney pairs wonderfully with chicken adding a lot of flavour. 

Pictured is the easy to make chicken with mango chutney.  I cooked the Thai sweet rice in chicken stock while the chicken was cooking.  I seared the chicken on both sides then covered the pan and allowed the chicken to continue cooking on reduced heat until the juices were no longer pink.  This kept the chicken nice and moist.  To serve I placed the chicken on a bed of sweet rice and topped with mango chutney.  It was an easy, low fat yet wonderfully flavoured meal.


Saturday, June 26, 2010

Easy Chicken & Gravy with Rice

Chicken is a versatile frugal meat choice.   Chicken can bought deboned and skinned or can easily be deboned and skinned at home for more savings.  If you debone and skin at home you have the meat plus the bones for making stock.  Boneless, skinless chicken breasts are very versatile so they are one of my freezer staples.  They are great pan fried or grilled.  Quite often I will cook up several then slice for use in chicken wraps and salads.  Once sliced I package them into meal size portions and vacuum seal them, then freeze for quick meal starts. 

easy chicken & gravy with rice
One of my favourite ways of cooking boneless, skinless chicken breasts is pan frying.  I sear the meat on both sides on high heat for a nice golden brown then reduce the heat and season as desired.  Pictured is the chicken dinner I made a couple of nights ago.  I started the chicken in the same fashion then after reducing the heat I seasoned lightly with garlic pepper then poured in about a half cup of water stirring to loosen the bits of chicken from searing.  I let the chicken cook until the juices were no longer pink then removed from the pan to make the gravy.  I added about a cup of chicken stock to the remaining drippings brought to a low boil and stirred in a corn starch slurry to thicken. 

While the chicken was cooking, the Thai sweet rice (Sanpatong) was cooking in the rice cooker.  Thai sweet rice is a sticky rice  In Thai the northern and northeastern regions of Thailand, this rice is eaten in place of long grain rice.  There it is traditional eaten with your hands by making the rice into a little ball and dipping it into other dishes.  Thai sweet rice should be soaked for 10 minutes before cooking.   When cooked the rice will be translucent.  I used chicken stock for the cooking liquid.  Rather than forming into balls, served the rice topped with a chicken breast with the gravy poured over it.


Friday, June 25, 2010

Kiddie Vegetable Tray

Last Saturday oldest grandbaby and Mom were visiting.  I had a heads up that oldest grandbaby wasn't feeling much like food lately so I decided to make a dip & finger food based meal.  On the menu: chicken strips with honey, homemade potato wedges with ketchup, and a vegetable tray with ranch dressing.  The honey, ketchup and ranch dressing were in individual dipping bowls.  Kids just seem to love dipping foods so I thought this would be a good menu choice.

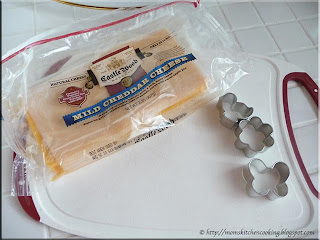
cheese and cookie cutters
I seldom buy American processed cheese unless it is for a special project.  Instead we use pre-cut cheddar cheese slices or simply cut cheese slices ourselves.  The week before we hosted a large event where we served grilled hamburgers, hot dogs and sausages resulting in a few left-overs including cheddar cheese slices.  I decided to use mini cookie cutters to cut out cheese shapes for the vegetable tray. 

Originally I planned to use three shapes but as things progressed I ended up using only the duck shape.  Cutting the cheese shapes was quite easy.  I cut one slice of cheese at a time getting 6 shapes out of each slice of cheese.  The cheese stuck in the cookie cutter but popped right out with a gentle poke.

kiddie veggie tray
I arranged the cheese ducks arround the rim of a serving platter.  I added cut pieces of pepperettes, sliced cucumber, baby carrots and green pepper slices.  I served individual dipping bowls of ranch dressing to go with the vegetables.  I thought the overall presentation came out nicely.  The little one aka oldest grandbaby really enjoyed the vegetable tray and dipping the vegetables.  This is the type of tray that could easily be adapted to meet the likes of the child.  I can get away with using a lot of vegetables because our grandkids love vegetables.

Oh a bigger scale this is an easy way to add a theme to any vegetable tray for entertaining.  It would be a great way to add that special touch for holiday entertaining.  This will be a presentation that I expand on!


Thursday, June 24, 2010

Kitchen Quick Tips - Cheesecloth

kitchen quick tips

Cheesecloth is used to strain out larger food particles especially when making jellies.  If you don't have cheesecloth, use a clean piece of old pillowcase or old dish towel instead.  Be sure to wet the cloth before using it as a strainer.


Wednesday, June 23, 2010

Tuscan Tomato Salad

If you have been following this blog you will know that we eat salad almost daily and sometimes more often.  Salads do not have to be lettuce based although that is the image that comes to mind when talking of salads.  A wide range of vegetables can form the basis for a delectable salad perfect for any occasion.

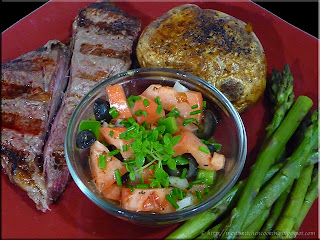
tuscan tomato salad
My husband's ultimate favourite meal is grilled steak and potatoes.  That's it!  He would gladly eat this meal 7 days a week without complaining.  I make sure to add in vegetables and some type of side salad to balance out the meal.   I made a Tuscan Tomato Salad as a the side salad to compliment our Father's Day dinner.   The meal consisted of grilled sirloin steak, foil wrapped grilled seasoned potatoes, steamed asparagus and the Tuscan Tomato Salad.

When I think Tuscan I think of Tuscany and the rich Italian flavours.  I used a basic vinaigrette consisting of 1 part vinegar, 3 parts oil and binder then built from there using flavours from Italy.  Those flavours include olives, tomatoes, onions, basil, oregano, marjoram, rosemary, and sage as well as extra virgin olive oil and red wine vinegar.  The resulting salad was as tasty as it was colourful!  It will be ever so much better tasting with home grown tomatoes as soon as the garden starts producing.

Tuscan Tomato Salad

1 large tomato, diced
½ small onion, chopped
3 tbsp, diced green onion
8  pitted black olives, sliced
Tuscan vinaigrette (recipe follows)
2 sprigs boxwood basil**

Prepare the vegetables.  Stir tomatoes, onion, green pepper and olives together.  Divide into 2 - 4oz bowls.    Drizzle the prepared Tuscan Vinaigrette over the vegetables.  Place a sprig of boxwood basil into the centre of each bowl.

Tuscan Vinaigrette

1 tbsp Italian Red Wine Vinegar*
3 tbsp extra virgin olive oil
¼ tsp honey
½ tsp Dijon mustard
½ tsp Italian seasoning
½ tsp chopped chives

Whisk the ingredients together.  Pour over salad as desired.

* I used Alessi Italian red wine vinegar from Tuscany.
** Boxwood basil is a strongly flavoured basil with tiny leaves.


Tuesday, June 22, 2010

Egg Salad Wraps

Sometimes a new spin on an old family favourite is just what's needed to add a bit of spark to the dish.  When it comes to sandwiches it is quite easy to turn them into wraps.  Wraps use flour tortilla shells to form the pocket style wrap.  Flour tortilla shells now come in a variety of flavours ranging from plain to pesto to sun dried tomatoes which really adds to the kinds of wraps you can make.

egg salad wraps
One of my husband's favourite sandwich fillings is egg salad so I did a little twist on this sandwich. Pictured are the egg salad wraps I made for my husband's Father's Day lunch.  He loves egg salad!  That is a sprig of fresh parsley from the garden as well.  

I use the method for making perfect hard boiled eggs as the base for the egg salad.  Once the eggs are cooked, cooled and peeled I mash them then add finely chopped onions, fresh ground pepper and fresh ground sea salt followed by stirring in Miracle Whip® dressing to get a nice spooning consistency.  The egg salad is then ready for using in sandwiches or wraps.


Monday, June 21, 2010

Frugal Kitchens 101 - Tomatoes Reign Supreme!

Frugal Kitchens 101

Tomatoes are botanically a fruit that is used as a vegetable.  They range in colours from pinky red to orangy red to yellows, oranges and even deep purples, greens and whites.  From a gardening perspective tomatoes fall into two categories, heirloom and hybrid.  From a cooking perspective tomatoes fall into three categories: cherry/grape, paste, and slicing.  Tomatoes in my garden being second in quantity and variety only to herbs.  In the kitchen tomatoes reign supreme!  By far they are the most consumed food in our house with some type of tomato product and/or fresh tomatoes being consumed daily.  They earn the number one position in foods that I preserve coming in well over the 10 hamper mark if I take into consideration the tomatoes I grow as well.  Home canned tomato product constitute close to 60% of all the home canned products I make each year or in terms of jars about 600 jars are tomato products. 

Tomatoes are easy to grow and in most cases very low priced when in season.  The going price for a hamper of tomatoes here is $8.  Although I do not buy my tomatoes at an $80 value I could not buy the same amount of commercially prepare tomato products that I make for that price.  Tomatoes are one of the most frugal foods there is because of the versatility.  Just look at some of the few ways tomatoes can be used!

  • jams/jellies - Tomatoes can be used to make jams and jellies.  I've made several and they are wonderful! 
  • condiments - Tomato based condiments include: salsas, chili sauce, chutneys, chopped for tacos etc, sliced for sandwiches etc, ketchups, various bbq sauces, and other sauces like taco hot sauce and seafood cocktail sauce.  Tomato based salsa has come to the forefront with commercial tomato salsas available.  However, home canned tomato salsa will beat commercial salsas both in terms of flavour and texture.  At the same time fresh made tomato salsas make for a quick and easy to make condiment.
  • sauces - Tomato sauces range from fresh made to canned to frozen either plain or with other ingredients with or without meats so that gives a wide range of possible tomato sauces.  Homemade tomato sauces come in at less than a quarter the cost of most commercially made tomato based sauces.
  • soups - Tomato based soups range from plain to just about anything you can imagine adding to them.  As always soups are a frugal meal choice especially when homemade.  Tomato based soups can be made fresh, frozen or canned as well.
  • stocks - Tomato stock is absolutely wonderful especially when roasting beef.  The resulting gravy is amazing! 
  • appetizers - Tomato slices make wonderful appetizers when drizzled with a little olive oil then topped with mozzarella cheese and grilled.  
  • salads - Tomatoes are an ideal base for salads.  Dice then add a few diced vegetables (broccoli, red onions) and fresh herbs, drizzle with vinaigrette.  Pour over cooled pasta for a summer light salad.
  • flavour enhancer - Tomatoes are perfect flavour enhances for soups, stews and breads.  Dry tomato to make tomato powder or condense into paste for instant flavour boosters.  Toss fresh tomatoes into breads for a delectable treat.  
  • garnish - Tomatoes just have that bright, cheery look that makes fresh sliced perfect garnishes.
  • juice - Tomatoes can be made into juice by themselves or add other vegetables for a garden fresh juice.


Sunday, June 20, 2010

Drying Oregano

I love using herbs when cooking so I learned years ago that the best way to get fresh herbs was to grow them myself.  Just like fresh fruits and vegetables picked moments before preparing, fresh herbs cut just before going into whatever is cooking really makes a difference.  The flavour is fresh and vibrant even more intense that fresh cut herbs in the grocery store that may have be cut two or three days before you buy them.  I grow a wide range of herbs both indoors and outdoors.  There were 40 different herbs growing in my last garden.  This garden's herb bed has not reached that stage yet but it is getting close and if we stay here will exceed that. 

fresh cut oregano
Last year I planted two common oregano plants that obviously have not read the square foot gardening manual as this year they are taking up about 2 sq. feet each!  I check my garden beds and containers at least twice daily but quite often am out cutting product for meals so I immediately noticed the fungus gnats on the oregano.  They are a common pest of oregano that does minimal damage.  At the same time I noticed signs of other damage so decided to trim the oregano good before moving to any stronger treatment.  I ended up with a turkey platter piled as high as a turkey of oregano clippings to be cleaned and dried with the exception of a few pieces that were popped into water for rooting.  These will be later planted for growing indoors.

Small insects can hide in herbs so it is important to wash them well under running water that will wash the insects off.  Once washed I give each stem a good flick of the wrist to knock off any insects that might have missed the wash.  Then I place the stems on thick bath towel and blot dry before placing the stems on wire drying racks to be dried in my oven that has a specific, adjustable temperature drying cycle.  

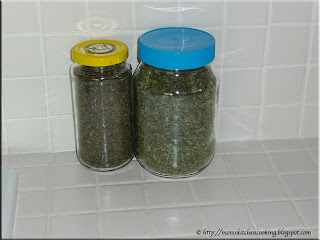
dried oregano
I ended up with 750 ml of dried oregano as pictured.  Please note the difference in colour between the smaller jar and the larger jar.  The reason for this is the temperature at which the oregano was dried.  The larger jar was dried at 110ºF whereas the smaller jar was dried at 140ºF.  While both have excellent oregano flavour the larger jar has nicer colouration and a fresher oregano flavour.  The smaller jar has a deeper but a bit more intense borderline bitter flavour.  The oregano dried at the higher temperature is ok for cooking however oregano dried at a lower temperature is considerably better both in terms of colour and flavour.

Herbs should always be dried at the lowest possible setting.  Unfortunately, lower cost dehydrators will dry in the 140ºF range with no possibility of adjustment.  If you have one of these dehydrators you would get better results by hanging the herbs to dry in a warm, dry, dark place.  Ovens with special adjustable dehydrating cycles and temperature controlled dehydrators should be set to 110ºF for drying herbs.  Tender herbs like basil should only be air dried or frozen as heat drying removes some of the essential oils. 

Growing your own herbs gives you the opportunity to use both fresh and preserve for winter use.  I already have enough oregano dried  for winter storage just with the first cutting.  We have almost 4 months left in the growing season here so there will be a lot more oregano to come.  What a lot of home growers don't realize about herbs is the more you cut them the more they reward you with new growth.  So cut those herbs!  Use what you can fresh with each cutting then dry or freeze the rest.


Saturday, June 19, 2010

A Strawberry Kind of Day

Ontario strawberries are now in season.  The season will last for about 10 days depending on the weather.  This year's berries a gorgeous!  Many of them are almost the size of a golf ball.  The beautifully coloured red berries certainly don't disappoint with their nice and juicy, deep strawberry flavour.  We will be eating a lot of strawberries this year!

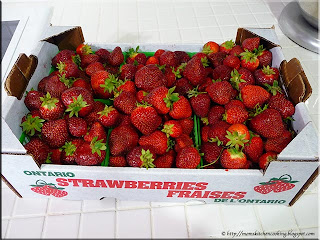
flat of strawberries
My husband picked up a flat of strawberries for me.  A flat of strawberries now contains 6 quarts of strawberries.  The going rate for a flat of already picked berries is $18.  If picking at the U-pick, a flat will cost $15 which doesn't sound like a lot of savings but for those putting up a lot of strawberry products the U-pick is preferred.  Picking strawberries is easy and goes quickly so picking enough for two or three flats can be done is about an hour or less if you have a pair of helping hands.

I sort the berries as I wash and hull them into three sizes: small, medium and large.  The small berries are best for jam making, medium berries are for freezing and the large ones are for fresh eating.  I use this same sort as I clean method for other produce like mushrooms.  
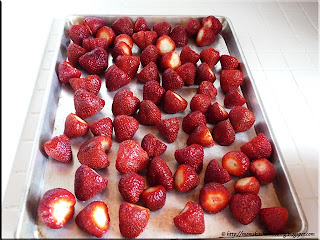
prepping berries for freezing
Freezing strawberries is quite easy!  I simply wash and hull the berries.  After being patted dry I arrange the berries in a single layer on a baking pan.  I place the filled baking pan into the freezer.  Once the berries are frozen I remove them from the baking sheet an place them into a zipper style freezer bag with as much air as possible removed.

Normally I prefer to vacuum seal foods for the freezer.  However, quite often I want only a couple of berries to pop into fruit smoothies.  Zipper style freezer bags make it easy to remove only a couple of berries without having to re-vacuum seal.  The yield for the frozen berry portion was a one gallon bag of strawberries.

strawberry jam
I made a batch of low sugar strawberry jam making two modifications to the recipe.  I increased the sugar to 3 cups from the 2 cups.  Since I am using Pomona's pectin, a low methoxy pectin that uses calcium water for achieving the gel rather than sugar, modifying the amount of sugar does not affect the gel.  Sugar adds sweetness, bulk and texture in jams.  The extra cup of sugar was just enough to give a yield of 4 - 500 ml (pint) jars with a couple of tablespoons left-over.  The second modification I made was adding a teaspoon of pure vanilla.  Vanilla pairs nicely with strawberries heightening the flavour and giving it just that little extra special nuance.

vanilla strawberries
I used the largest berries to make a simple glazed strawberry dessert.  The glaze is very easy to make by pouring vanilla sugar over the berries then covering and setting in the refrigerator for an hour or so.  The berries can then be used as is or topped with fresh whipping cream or vanilla flavoured yogurt.  They can also used as a topping for vanilla ice cream or gelato.  The glazed berries can also be chopped then stirred into vanilla flavoured yogurt then poured into popsicle molds for a healthy, kid friendly summer treat.  Notice again I'm pairing vanilla with strawberry then layering the vanilla flavour.  These two flavours really go nice together! 


Friday, June 18, 2010

Using Up a Few Left-Overs

Left-overs tend to be the bane for many home cooks simply because eating the same meal twice in a couple of days is perceived to be boring.  The other problem is sometimes the amount of the left-over is not enough to make an actual meal out of.  Honestly what can you make with one left-over burger pattie or a couple of small baked potatoes?  How do you use up the condiment tray from entertaining?  It is all those small bits and pieces of left-overs that can be combined to make an easy meal with just a bit of creativity or thinking outside the box.

left over steak and burger
We entertained on the weekend with the menu consisting of burgers, sausages, hotdogs and all the fixings.  The following night we had grilled steak so Monday night we were looking at bits and pieces of left-overs.  The resulting meal turned out quite nice even though everything used was left-overs.

We used up one burger pattie, 1 piece of steak about half  the size of a burger pattie, 2 small baked potatoes, caramelized onions reheated in a fry pan with a little butter.  The onions were left-over onion slices for the burgers so we just carmalized them then stirred in the potatoes and meat pieces.  We used  dill pickle slices and tomato slices as sides for this simple meal that was quite tasty and filling.  


Thursday, June 17, 2010

Kitchen Quick Tips - Failed Jams and Jellies

kitchen quick tips

Occasionally when making jams or jellies you will get a set failure where the jam or jelly fails to set up to the proper gel state.  Don't despair!  Sealed jars can be safely stored then used as glazes for meats or syrups for ice cream and pancakes.  They can also be used in cooking.


Wednesday, June 16, 2010

Camp Style Honey Glazed Carrots

We did a fair amount of camping when the kids were growing up.  Two things criteria for camping foods seemed to be consistent in that we wanted simpler foods that could be prepared on the campfire, on the campstove, the propane grill or in the RV and we wanted something just a bit different.  The end result is we ended up with several meals and dishes that can be cooked using one of the four methods that met both of the criteria.  At the same time many of these simpler camp style foods have become family favourites including our family favorite taco salad that started out as a camping recipe. 

camp style honey glazed carrots
Vegetables can present a problem when camping simply because a lot of times you don't want to take the time to set up the camp stove or heat up the RV just to boil up vegetables.  I quickly found foil packets worked nicely as the vegetables could be cooked on the propane grill or on the firepit that quite often was on during the dinner.    I devised several rather simple vegetable based foil packets that gave us nice vegetable sides without a lot of time or effort.  I continue to use these especially during the hot summer months when I cook as much as possible on the outside grill.  One such dish is Camp Style Honey Glazed Carrots pictured.

Camp Style Honey Glazed Carrots

2 c prepared carrots or baby carrots
2 tbsp butter
2 tbsp honey
1 tsp fresh chopped chives
pinch of salt

Place the ingredients on a sheet of tin foil.  Fold long ends together to form a tight seal then repeat with each resulting end.  Wrap a second time.  Place the foil packet on the grill or firepit in indirect heat.  Let cook about 20 minutes.  Carefully remove from heat.  Poke holes in the tin foil to allow steam to escape [careful as steam can burn].  Open the packet and serve.


Tuesday, June 15, 2010

Caramelized Onions

Caramelized onions are a true delight and are a staple in our house.  They are used as a condiment usually with burgers or as a side dish with liver and onions.  Caramelized (carmelized) onions are easy but somewhat time consuming to make.  The reason for this is the onions need to be cooked long and slow to allow the sugar content to caramelize giving them that wonderful flavour and colour.  I discovered that caramelized onions reheat nicely and can be made in advance then frozen, canned or dried for later use. 

caramelized onions
By far the vast majority of caramelized onions that we eat are cooked fresh along with the meal.  This past weekend I did just that to have fresh caramelized onions as a condiment for the burgers.  Surprisingly there were left-overs so I popped them into a bowl and covered with tin foil.  The following evening we grilled steaks for dinner so I inverted the bowl so the onions were in the tin foil and reheated them on the grill in the foil.    It was a very easy reheat method for using up the left-over caramelized onions.  Some recommend adding a bit of sugar to help the onions caramelize quicker but I don't do this.  Here is my basic way for making caramelized onions.

Caramelized Onions

1 - 2 large Spanish onions
2 - 4 tbsp butter*

Peel the onions.  Cut in half then into slices.  Melt the butter on medium then add the onions.  Cook until translucent stirring occasionally.  At this point you may have to add a bit more butter.  Continue cook on low heat until golden brown and nicely caramelized.

*If intending to can the caramelized onions follow the instructions in the above link.


Monday, June 14, 2010

Frugal Kitchens 101 - Produce Variety Does Matter

Frugal Kitchens 101

Home gardening is an excellent way to save money on your grocery bill.  As both a home cook and home gardener one of my pet peeves is recipes that do not tell you what variety of a particular produce or herb to use.  Variety does matter when it comes to taste and texture of any fruit or vegetable.  Some varieties are simply not interchangeable!  For example a tomato is a tomato, right?  Wrong!  Tomato varieties include grape, cherry, paste, and slicing.   Slicing tomatoes do not make good tomato sauce and paste tomatoes don't make good tomato sandwiches.  In addition to that tomatoes come in a vast array of colours when ripe ranging from green to pinkish red to orangish red to yellows and oranges and even deep purple.  Each has their own flavour, texture and aesthetically are better for some culinary uses than others.  The same thing applies to virtually every plant in your garden.  There are upwards of 20 or more different basils so a recipe that calls for fresh basil is rather vague but in most cases refers to the standard sweet basil.  Certain varieties of green beans can better than others.  The problem for many new home gardeners is they don't understand that variety does matter and has a huge effect on the end result of anything you are cooking.  They end up being disappointed because they don't get the end result they wanted

I tend to grow vegetable varieties in my garden that are expensive to buy in the grocery store.  For me that means a secret commercial variety of paste tomatoes, cherry tomatoes, heirloom tomatoes, yellow tomatoes.  At the moment I have 27 plants that will more than double as I start taking clipping.  Each plant has a specific purpose.  If you want to maximize your food dollars with a garden then do pay attention to the varieties of vegetables that you plant, not only for their use but as to how well they do in your particular area.  If you want to preserve some of your harvest which most home gardeners do then choose varieties of vegetables that freeze or can well.  Either way whether using home grown produce for fresh eating or preserving it can save you a considerable amount of money.

Gardening is a very inexpensive, healthy activity but you can make it even cheaper.  The more you save on the garden the cheaper your harvest is.  A few garden saving tips to help you save even more money:

  • Plants go on sale towards the end of the perceived planting season so shop those sales as often it is not to late to plant them for a harvest.
  • Think outside of the box.  If you need more growing space add hanging planters and containers.
  • Collect seeds from this year's harvest.  Any heirloom plant will breed true so always plant a few heirlooms and collect those seeds.
  • Plants grown from seed are cheaper so start your own.
  • Get plant clippings and seeds from other gardeners often for free or the cost of a stamp.
  • Always plant more than you think you will need to compensate for plant loss, inclimate weather and pest damage.
  • Collect and use rainwater for your watering needs.  Rainwater doesn't contain chlorine or fluoride so is considered the organic choice for watering and it is free.
  • Dollar stores are a good source for some vegetables seed although there may be a slightly lower germination rate.  The packets usually go 2 for $1 so they are still a good deal.
  • If you have a lot of one type of vegetable trade a fellow gardener for what they have extra of.  It works out to be a win:win.
  • Certain fruits, vegetables and herbs can be grown year round indoors using a variety of methods.  This is known as "continuous harvest" as is another way to help you get fresh produce on your table without breaking the bank.
  • Use intensive gardening methods such as square foot gardening, container gardening, small space gardening and vertical gardening.  All of these methods maximize yield while taking up the minimal amount of ground space.

If you would like to know more about the varieties of vegetables and herbs I grow please check out my gardening blog.


Sunday, June 13, 2010

Rhubarb Tart

Rhubarb is the first fruit (technically a vegetable) here.  This is such a common home garden plant in our area that it is quite difficult to find it in the stores.  Even if the home owner doesn't have a vegetable garden chances are still very good they have a rhubarb patch!  Rhubarb can be eaten fresh dipped in a little sugar, stewed then canned or made into delicious fresh pie or the pie filling can be canned for later use as well.  Not only that but rhubarb is a great extender fruit when making jams using more expensive berries like strawberries.  In fact strawberry/rhubarb is a very popular combination!

rhubarb tart
Friends of ours brought a lovely cutting of fresh rhubarb.  I have been trying to get a rhubarb patch growing since we moved here.  It was nicely taking off then someone emptied their cigarette tray near it resulting in it's demise.  Nicotine is quite toxic to some plants.  So I'm back to square one restarting the rhubarb and relying on the generous gifts of others.

I used homemade puff pastry to make a quick, easy to make rhubarb tart for dessert.  The filling was a simple rhubarb pie filling.  The end result was a nice rhubarb tart perfect for a spring dessert.  This dessert would pair nice with vanilla ice cream.

Rhubarb Tart Filling
3 c fresh rhubarb
1 c organic sugar
¼ c Clear Gel*
1 tbsp butter

Wash and trim rhubarb.   Cut into half inch pieces.  Pour sugar and Clear Gel over the rhubarb and mix well.  Pour the rhubarb mixture onto the puff pastry dough in the centre.  Dab with butter.  Pull the edges up of the dough up and over the filling.  Bake at 220ºC (425ºF) until pastry is golden brown and filling is bubbly.

*This is the Clear Gel used in cooking and canning not the instant Clear Gel.  It gives nicer results than flour or regular corn starch.


Saturday, June 12, 2010

My Husband's Grilled Ribs

During the summer months we eat a fair number of ribs.  We each have our different styles of cooking ribs so ribs tend to be different each time we serve them. After our vacation my husband headed right to the grill where he managed to grill a lovely meal of T-bone steaks.  He had to fix our grill before we could use it again as the burner was beyond being able to use.  Replacing a burner in a grill is not expensive or difficult but it is a dirty job! 

ribs on the grill
The kids emailed to say they would be down on the weekend so I took one of the large packages of ribs from the freezer.  It turns out they weren't going to be here for dinner but the ribs did not go to waste as friends came for dinner.  My husband baked the ribs covered at 150ºC (300ºF) for 3 hours then finished them on the grill, mopping them with Diana Sauce® in the last 15 minutes of grilling.  It is important when using a mop (wet sauce) to not put it on the ribs too early or at too hot of temperatures as the sugar in the sauce will burn.  The mop should be brushed on 15 to 20 minutes before the meat is to be served.  Let it slightly caramelize on the first side then flip, mop again and let the sauce slightly caramelize.

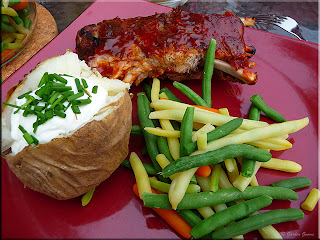
grilled rib dinner
I served the ribs with grill baked potatoes topped with sour cream and garden fresh chives, bean and carrot mixture and freezer pickles (not pictured).  It was a simple summer meal served outside on the dock enjoying the good company of friends with the sights and sounds of the water.  The ribs were nice and tender, melt in your mouth and packed full of flavour.  The real trick with cooking ribs is long and slow!  Most recipes call for pre-cooking ribs in the oven or on the grill in a covered roasting for a period of time usually 3 hours or more at a low temperature then following up by finishing on the grill at a higher temperature using a rub and/or mop.  Ribs using a dry rub sometimes are not pre-cooked but I don't find those as tender.  Done properly with a long-slow pre-cooking then finished on the grill gives lovely, mouthwatering, fall-off-the bone, melt-in-your-mouth ribs.


Friday, June 11, 2010

The Brass Monkey, St. Petersburg Beach, Florida

This is the last post highlighting some of the foods we enjoyed on our recent vacation to our new vacation home.  Despite being a vacation we were able to enjoy both eating out and testing out our vacation home kitchen.  I hope you enjoyed reading about some of the great food we enjoyed while on vacation.  I will be duplicating some of these foods at home so please check back for those great home cooked recipes.

St.Petersburg Beach, Florida
Most of the posts on this blog are food related so unlike my personal blog you don't get to see a lot of the beautiful scenery we enjoy while scouting out restaurants during our many travels.  I thought I would share a picture of the gorgeous area we visited where we discovered this restaurant.  It was a hot, humid day so we decided to head to the Gulf coast of Florida with no particular plans or pre-determined destination other than the beach.  We ended up in St. Petersburg Beach, a barrier island community located just off the Pinellas County mainland which is often called simply St. Pete Beach to lessen confusion with St. Petersburg located on the mainland to the east.

The Brass Monkey is located at 709 Gulf Way, St. Petersburg Beach, Florida.  The restaurant is named after the indented brass plates used to stack cannonballs on the deck of sailing ships.  Brass was used for the plates to prevent the cannonballs from rusting to the plate as they would if iron were used.  Of interest if the brass plate got too cold it would contract faster than the iron spilling the cannonballs over the deck hence it was literally "cold enough to freeze the balls off a brass monkey".  The Brass Monkey is on the second floor of the building.  It has a lovely dining area and outdoor patio.  We chose the outdoor patio.

We ordered the pizza skins (top right) as an appetizer along with drinks.  I ordered the Caesar salad (bottom left) and my husband ordered grouper sandwich (bottom right).  I was impressed with the pizza skins ($8.00) that were were potato skins loaded with pizza sauce, mozzarella cheese and sausage.  They were quite good!  This would be one easy appetizer to duplicate at home.  I wasn't impressed with the Caesar salad ($6.00) that lacked both lemon wedges and crumbled bacon.  My husband did enjoy his grouper sandwich ($13.00) but it really was nothing special and could easily be duplicated at home.  Our total bill with drinks came to $44.30 plus tip.  The food itself was nothing spectacular but the view and atmosphere was.  Sitting on the upper floor patio overlooking the beach was quite lovely so we would stop there again. 


Thursday, June 10, 2010

Kitchen Quick Tips - Honey

kitchen quick tips

Honey will virtually keep forever!  If it becomes crystallized or cloudy warm in the microwave oven or place container in a pan of boiling water for a few minutes.  It will become clear and free flowing again for easy use.


Wednesday, June 09, 2010

Pan Fried Wild Caught Flounder Fillets

The first trip to our vacation home was a fair amount of work.  Most vacations we eat out two to three meals daily plus snacks.  Although we don't eat a lot of snacks I tend to bring a few pieces of fruit and beverages up to the room.  We bought the vacation home in an area we are quite familiar with and one in which we have rented houses with cooking facilities several times.  The beauty of a vacation home even a rental is you can greatly reduce the cost of meals especially breakfasts and dinners.  My goal to to get the vacation home to the point that we eat out as part of our entertainment much the same way we do at home with all other meals eaten at the vacation home.

pan fried flounder
I picked up wild caught flounder fillets.  This is a white, flaky, mild flavoured fish.  It is almost sweet with nutlike undertones.  Flounder can be steamed, poached, broiled, baked and panfried.  This really was a very simple meal!  There was minimal prep and I used up a bit of left-overs.  I paired the fish with left-over homemade potato salad, baby carrots, cucumber salad and cottage cheese. 

Cucumber Salad - Peel and slice one cucumber.  Thinly slice one quarter of a red onion.  Place in bowl then pour enough white vinegar (5% acetic acid) over the vegetables.  Let sit at least 1 hour covered in the refrigerator before serving.


Tuesday, June 08, 2010

Stuffed Flank Steak

As a foodie I love eating out that's a given but I can only go for a few days before I'm itching to do a bit of cooking.  Some vacations do not allow me to do this so one priority when we were deciding to buy a vacation home was to have a nicely supplied kitchen where I could cook if I wanted to.  At the same time both of us really like enjoying that morning coffee but there are times that I really don't feel like getting dressed to go out for a hot breakfast.  So we were really looking for a vacation home where we could make simple breakfasts and lunches with a few dinners because let's face it food is one of the most expensive components of any vacation.

flank steak ingredients
We discovered a Publix and an Aldi's for grocery shopping.  The Publix is more like our Sobey's here offering the extras that Aldi's doesn't offer.  Aldi's is similar to our No Frills.  I quickly realized even with our RV that cooking when on vacation takes on a whole new meaning.  We are looking for something different.  It's where unlike at home where I will make something entirely from scratch I do buy from the deli, freezer section, I will use ingredients like baby carrots and I will buy smaller container sizes to use up before we leave but other than that I don't deviate much from cooking from scratch. 

I spotted stuffed flank steaks in the deli section.  I've seen these in the flyers here where they are called a roulade and had been intending to try making one.  The concept is not difficult and one I've worked with several time.  Essentially the steak is trimmed, flattened slightly the topped with filling of choice and rolled the cut into medallions for cooking.  The fact the roulades were already made was rather appealing given we were on vacation but I had nothing to bake them in.  No worries as they each came with their own little baking pans and detailed instructions from the friendly deli person.  He said to just add whatever vegetables we wanted then bake along with the steak.  I was sold.  The entire dinner eaten at home would come in at under $15 and we could just relax around the house enjoying our new purchase.

flank steak prepared
We bought one flank steak stuffed with mozzarella cheese (right) and one stuffed with provolone cheese (left).  I put in baked potatoes about 10 minutes before the steak.  I added in baby bello mushrooms, red onion and baby carrots  to each baking dish stuffing in as much as possible.  Then I put the pans in the oven at 350ºF (180ºC) and baked until the vegetables were tender.

I have to tell you I was really leary on this just because I thought the vegetables would be overcooked and the meat undercooked.  Undercooked beef I can handle as we like most beef cuts rare  but overcooked vegetables are just plain nasty!  I was really concerned over how the carrots and mushrooms would come out.

stuffed flank steaks
First off the dishes we bought for the vacation house are white which plays with the camera lens.  We may add our favourite burgundy or blue yet but for now white keeps thinks light and bright.  The entire meal took about 50 minutes to cook.  We were both impressed with the results!  Pictured is the plated cooked meal.  The meal tasted every bit as good as it looks.  The stuffed flank steak had a lovely flavour that accented the vegetables cooked in the juices.  Of course I topped my baked potato with sour cream while my husband used butter and salt.  What a great, low cost dinner to enjoy while on vacation!


Monday, June 07, 2010

Frugal Kitchens 101 - Vacation Home Eating

Frugal Kitchens 101

The past couple of weeks we have enjoyed eating at our vacation home.  By default that means the cooking pattern was changed but that doesn't mean we couldn't be frugal.  When it comes to being frugal anytime you can have any homemade meal even if it as simple as a bowl of cereal for breakfast it will be cheaper than eating out.  In general especially with our vacation home we try to avoid eating breakfast, lunch and snacks out reserving our food dollars for dinners.  At the same time many dinner meals can easily be made at home  but in this case this is an excuse to use a few pre-made things like stuffed ready to cooked meats, baby carrots and salad greens.  True these foods are going to be just a bit more expensive than full prepare from scratch but they will be cheaper that full convenience or eating out.  At the same time delis offer a nice selection of salads and ready-to-eat meats like rotisserie chicken.  So vacation time becomes the time to use semi-cooked from scratch meals keeping foods on the simpler side while cooking as much from scratch as possible and using what you can fresh-prepared.

Fresh-prepared is really what you want to look for.  This will include things like salad greens, salads, stuffed meats, seafood, artisan breads, pastries, some dairy products and that type of thing.  In most vacation homes you will not want to bake your own bread or make your own yogurt and you may not have all your normal equipment for your normal style of cooking so make it a bit easier on yourself by buying good quality semi-prepared foods along with easy to prepare scratch foods.  If you cook anywhere 80 - 95% from scratch at home on a regular basis taking a few short-cuts when on vacation will not be a problem for you.  Cooking semi-from-scratch while on vacation will save you a lot of money while giving you the great nutritious food you are used to with some of work taken away.  That way you can enjoy great food at a fraction of the cost while away from home.


Sunday, June 06, 2010

A Little Cuban Culinary Experience

When we travel and I don't care where it is I want to experience the local cuisine which is directly opposite from my husband who prefers to stay with the tried and true.  Honestly he went to Cuba and seriously never at Cuban food?  In fairness he did bring back a Cuban coconut made by one of the Cuban women and he brought me back Cuban vanilla but he never ate an actual Cuban dish!  There is a  good sized Latino where our vacation home is so finding a Latino restaurant is not difficult.  We had to do laundry since we were waiting on our washer and dryer and right beside the laudromat there was a Latino restaurant.  There is no point in sitting in a laudromat if you can multitask enjoying a nice meal as well!

coffee
Tropico Latino Restaurant is located at 5100 US HWY 98 in Lakeland, Florida.  It is small but packs a lot of atmosphere and they are ever so friendly!  The prices are definitely something to talk about as they are well under a lot of the local restaurants. Our meal cost $13.36 plus $2 tip.

We started our meal off with Cafe Cubano (left) for my husband and Cafe Con Leche (right) for myself.  The Cafe Cubano was rich and robust while the Cafe Con Leche was smooth, creamy and sweet.  Heaven I would go back there just for the coffee!  It was a true delight :)

Cuban sandwich
A couple of months ago I blogged about my new panini press (panini grill, sandwich press).  A panini press is a fancier version of a sandwich maker that allows you a greater variety as to what type of sandwich you can make.  I've been on the look-out for more sandwiches that I can make in th panini press.  Both of the sandwiches we ordered were made using a sandwich press.

My husband ordered the Cubano (Cuban sandwich).  The sandwich consisted of ham, roasted pork, tomatoes, lettuce, mustard and Swiss cheese on Cuban bread.  The sandwich was then grilled using a sandwich press.  The Cubano was originally created in cafes serving Cuban workers in Cuba or Cuban communities in Florida.  It remains a very popular sandwich in Miami, Florida.  The Cubano tradition has pickles on it buy my husband ordered his without.  He declared the Cubano quite tasty!

chimuchurri aka Dominican burger
I ordered the Chimichurri (Dominican burger).  The sandwich had a burger pattie, cheese, lettuce, tomato, onions with a tangy tomato, mayonnaise and mustard blend sauce.  It had been grilled using a sandwich press.  This sandwich was a little messy to eat but quite tasty.

Both sandwiches would be very easy to make at home.  Neither have fancy ingredients which makes them easy sandwiches to put together.  The Cubano in particular would be a great way to use left-over roast pork.  If you don't have a sandwich press you can get the same results by placing the sandwich in a hot fry pan then place a heavy weight (eg. heavy skillet) on it.  When the first side is golden brown flip the sandwich replacing the weight until the bread is flattened by about half. 


Saturday, June 05, 2010

Club House Grub (pub grub)

I would be remiss in my discussions on our vacation foods if I did not mention the classic pub grub we enjoyed of a meal.  Now if you recall we are eating out and cooking at the vacation home but because this was setting up the vacation home from almost nothing eating out took precedence.  When it comes to pub grub there is very little of it you can't make at home if you have a deep fryer and a fry pan or griddle.  Pub grub is meant to be easy, quick yet keep you there for a little while for a few drinks and good enough to keep you coming back.  Honestly the pubs do not make much of a profit if at all from their food.  Profits rather come from the drinks.  Pub grub is unpretentious and makes no claim about being healthy for you.  In fact is is not particularly health with the high emphasis on frying but if push comes to shove it is healthier than the average fast food dinner.

onion rings
The club house onion rings were excellent and the price wasn't bad at $3.50.  That's about the going price for most pubs.  Onions rings hold a bit of a mystic about them for creating a  home but really all you need is a Spanish onion, batter and a deep fryer.  In less than 10 minutes you will have enough onion rings to feed an entire family!  Surprisingly the batter can be as simple as a pancake batter or a bit more complex as a beer batter but either way this is one side that really is quite easy to duplicate at home.  The main goal is you want a lovely, golden brown, crispy coating with tender, translucent onion inside.


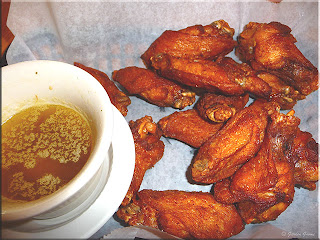
chicken wings
We ordered chicken wings with a garlic butter sauce.  Chicken wings are another great pub food to duplicate at home.  They take very little prep, can be fried coated or uncoated and served with your choice of sauce.  Quite often the best chicken wings are not coated.  They are fried simply as is then served either tossed in sauce or with served with sauce in dipping bowls.

Now this is very easy to duplicate at home.  The individual dipping bowls are quite inexpensive.  In fact you can find really cute ones at the dollar stores so just fill with the sauce of choice.  This makes it nice because each family member can have a different sauce without costing you a fortune.

To make the garlic butter:  Peel and finely chop about 4 cloves of garlic.  Heat fry pan and add 4 oz butter until just bubbling and stir in the garlic.  Heat through then remove from heat.

pub grub burger
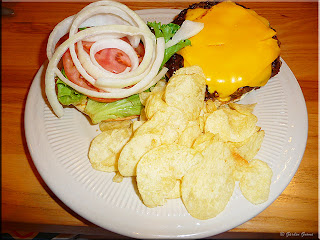
When it comes to burgers pub grub has it and that is because they use the fundamental philosophy in cooking call KISS (keep it simple silly).  Very few put grub burgers are complicated.  The general topping are lettuce, onion, tomato and American processed cheese along with whatever condiments they offer usually restricted to mayonnaise, ketchup and mustard.  If you are lucky the burger is served with a side of potato chips and even luckier French fries.

The pub grub burger has to be about the easiest to duplicate at home.  You will need hamburger buns, pre-formed frozen burger patties, iceberg lettuce, onion, tomato, American processed sliced cheese, ketchup, mustard and mayonnaise.  Pickle and relish is optional.  If you want to duplicate the taste do not grill!  Instead use a griddle to cook the burger patties.  Add the process cheese just after flipping the burger on the griddle and just let it melt.  Place on the bun, add the toppings with a few potato chips and you have an authentic pub grub burger made at home.


Friday, June 04, 2010

The Pasta Bar at the Club House

The community club house where our vacation home is open only to members of the community and their guests.  It serves a wide range of cuisine in a warm, friendly atmosphere.  The food is excellent with prices well below that of many of the local restaurants.  The bar offers happy hour which differs depending on the day and season.  Thursdays are all you can eat pasta bar night for $9.99.

pasta bar
The pasta bar is set up as an impromptu cooking station so you can watch your food being cooked.  Essentially what you do is choose your main ingredients from a variety of offerings then your sauce followed by choice of a couple of cooked pastas.  The night we went there was shrimp, clams, garlic, tomatoes, mushrooms, onions, green peppers, meatballs cheese ravioli, tri-coloured tortellini, linguine and penne.  Rounding out the selection were buns, garlic bread and tossed salad with choice of toppings and dressing.

The chef sautées the toppings of choice in a little oil warming the garlic first if adding followed by the other toppings as desired.  He then ladles sauce of choice and warms it through.  Finally he adds pasta of choice and plates.  It is interesting to watch him work as he only uses a flipping motion to keep the toppings from sticking in the pan.  He said that most nights he will put out a little over 100 plates of pasta made to order while you wait so I thought that was rather impressive.

linguine with blush sauce
My husband had linguine with garlic, shrimp, and mushrooms in a blush sauce topped with meatballs and mushrooms.  He had a small side salad and garlic bread to round out the meal.

There were others in line that did not know what a blush sauce was but in fairness it is a rather newer sauce to our repertoire of sauces.  This turned out to be a great way to meet another couple from the community who decided to try a blush sauce as well.  They really enjoyed so stopped by our table to thank us for letting them know about blush sauce.  One of our kids introduced us to blush sauce a few years ago.  It has become a family favourite usually made with roasted tomato sauce

clams in béchamel sauce
Seafood is not something I pair a lot with cheese or pasta.  We enjoy tuna salad, seafood fettucini and garlic shrimp but that's about the extent of of the seafood paired with pasta.  I spotted the luscious looking clams so decided that's what I had to have.  The whole vacation I was on a serious seafood binge trying to get away from the heavier beef and pork of a long winter at home.

My toppings were garlic, clams, mushrooms, tomato, onion, green peppers and cheese ravioli with a béchemel sauce.  I paired the meal with a small side salad and garlic bread.  The clams were a nice addition so this is definitely going to be a dish I duplicate at home!  One of the things I like best about eating out is discovering new combinations for meals that I can easily duplicate at home.  I will be posting more about the homemade versions of both of our meals.


Thursday, June 03, 2010

Kitchen Quick Tips - Storing Popcorn

kitchen quick tips

Store popcorn in the freezer where it will last longer and pop more kernels.


Wednesday, June 02, 2010

Dinner at the Club House

We were extremely lucky in discovering this location for our vacation home.  The amenities are absolutely wonderful!  There is excellent food right at the club house without even leaving the park.  This worked out quite nicely for use on a working vacation trip.  We ended up eating breakfast and lunch most days at the house working between meals to get the house into shape then we headed down to the club house where we enjoyed very reasonably priced, home style cooked meals.

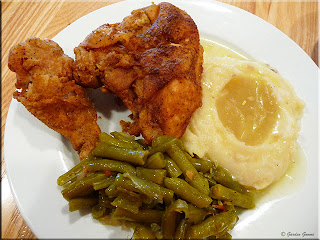
fried chicken
You just can't go wrong with fried chicken!  I ordered the fried chicken dinner that came with a garden salad, mashed potatoes green beans and dinner rolls ($9.99).  The chicken was some of the best fried chicken I've tasted!  It was nice and crispy on the outside, moist and tender on the inside and just a lovely flavour.  The potatoes were real mashed potatoes not instant and the green beans were cooked southern style.  I've heard a lot about southern style green beans but had not had them.  Southern style green beans are cooked a lot longer usually in a little bacon fat.  They have a lot of flavour.

turkey manhattan
My husband ordered the Turkey Manhattan.  The meal included turkey breast on bread slices served with mashed potatoes and gravy ($8.25).  It looked like there was a thin layer of dressing between the turkey breast and the bread as well.  The meal got two thumbs up from my husband.  He said it was just like homemade!  Now this would be an extremely easy meal to duplicate at home and a perfect way to use up left-over Thanksgiving turkey.  As such I've put the meal idea into my easy uses for left-overs folder. 
cherry al a mode pie
Sometimes just a little sweetness is needed to end a meal.  We are not huge dessert eaters by any stretch of the imagination.  We very seldom have dessert at home unless there is a special get-together or if I'm doing a bit of experimenting in the kitchen.  When we are eating out my husband will occasionally order a bowl of vanilla ice cream.     Instead of plain ice cream he finished this meal of with a slice of cherry pie topped with French vanilla ice cream.  Doesn't it just look like a scrumptious way to end a meal?