My photo
Ontario, Canada
I am a wife, mother and grandma who enjoys the many aspects of homemaking. A variety of interests and hobbies combined with travel keep me active. They reflect the importance of family, friends, home and good food.
Cook ingredients that you are used to cooking by other techniques, such as fish, chicken, or hamburgers. In other words be comfortable with the ingredients you are using.
--Bobby Flay

For Your Information

Please watch this area for important information like updates, food recalls, polls, contests, coupons, and freebies.
  • [March 19, 2020] - Effective Mar 17, this blog will no longer accept advertising. The reason is very simple. If I like a product, I will promote it without compensation. If I don't like a product, I will have no problem saying so.
  • [March 17, 2020] - A return to blogging! Stay tuned for new tips, resources and all things food related.
  • [February 1, 2016] - An interesting report on why you should always choose organic tea verses non-organic: Toxic Tea (pdf format)
  • Sticky Post - Warning: 4ever Recap reusable canning lids. The reports are growing daily of these lids losing their seal during storage. Some have lost their entire season's worth of canning to these seal failures! [Update: 4ever Recap appears to be out of business.]

Popular Posts

Friday, July 31, 2009

Black Cherry Jams

If you recall one of the goodies I picked up on my foodie road trip was black cherries. My husband absolutely adores cherry jam! Cherry jam made with sour cherries is good, with sweet cherries is better but made with black cherries it is delectable!

sink full of black cherriesSink Full of Cherries

Cherries grow on trees so if you are going to a U-Pick wear sturdy shoes and comfortable clothing as you may be going up and down a ladder. Cherry U-Picks will provide the ladders and baskets. You will be picking 3 to 4 feet off the ground so it's not a high distance bu still you will be picking from a ladder so do dress accordingly.

Black cherries when ripe are a deep purplish black. Even the flesh is dark compared to other berries. They have a very rich, deep, sweet flavour. The nice thing about cleaning black cherries is there isn't a lot of work to them as far as bugs go. They need to be washed and the stems removed which is a rather simple process. Once the cherries are washed and de-stemmed they need to be pitted.
cherry pitterCherry Pitter

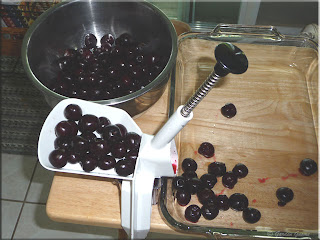
Pitting cherries can be the pits :) Seriously there are several manual cherry pitter models out there that rely on a significant amount of thumb action and they do one cherry at a time. The down side to these cherry pitters is the strain it causes to your hand. Somehow in the move I lost my beloved cherry pitter so found myself looking for a new one. I actually found a real beauty during my foodie road trip!

One of my last stops was at Home Hardware. I knew I had 11 qts of black cherries to pit, no cherry pitter in sight and the two stores I thought would have one (Dollarama, Canadian Tire) did not. By the time I hit Home Hardware I was getting despirit! Lo and behold they had a KitchenValue cherry pitter! Now this is one of the neatest manual cherry pitters I've ever seen. The cherry go into a shoot then with a quick pumping action using the palm of hand so it doesn't cause a lot of hand strain. Hand stain is a common problem with the repetitive chopping motion for preparing many foods for canning so when you find a product that eliminated this it is always a blessing!

Cherry Jams

I used the entire 11 qt basket of tomatoes to make cherry jams. My husband loves cherry jam and it is the only jam he requested I make that isn't low sugar. Sugar adds not only sweetness but bulk to jams so any time you reduce the sugar you reduce a bit in terms of texture and bulk. I made black cherry jam using regular pectin (1), black cherry jam using Pomona's pectin (2, 4) and low sugar black cherry jam (3). Recipes follow.

Black Cherry Jam
source: Ball Fruit Pectin insert

4 c finely chopped black cherries
¼ c lemon juice
5 c sugar
1 box Ball fruit pectin (dry)

Prepare cherries. Measure the cherries into a large sauce pot. Stir in the pectin and add up to ½ tsp butter to reduce foaming. Bring mixture to a full boil that cannot be stirred down. Add the sugar stirring to dissolve. Remove from heat. Ladle into prepared jars ¼ - inch headspace. Wipe rims. Adjust 2 piece lids. Process 10 minutes in BWB at altitudes below 1,000 ft above sea level. At higher altitudes refer to the processing times on the altitude adjustment chart (here).

Black Cherry Jam (Pomona's)

4 c chopped cherries
5 c sugar
4 tbsp lemon juice
4 t calcium water
2 t Pomona's Universal Pectin

Combine cherries, lemon juice and calcium water in large saucepan. Mix sugar and pectin in separate bowl. Bring the cherry mixture to a boil then stir in the sugar mixture and return to a boil. Remove from heat. Ladle into prepared jars ¼ - inch headspace. Wipe rims. Adjust 2 piece lids. Process 10 minutes in BWB at altitudes below 1,000 ft above sea level. At higher altitudes refer to the processing times on the altitude adjustment chart (here).

Low Sugar Black Cherry Jam

5 c chopped cherries
5 tbsp lemon juice
2½ c granulated sugar
5 tsp calcium water
1½ tsp Pomona's Universal pectin

Combine cherries, lemon juice and calcium water in large saucepan. Mix sugar and pectin in separate bowl. Bring the cherry mixture to a boil then stir in the sugar mixture and return to a boil. Remove from heat. Ladle into prepared jars ¼ - inch headspace. Wipe rims. Adjust 2 piece lids. Process 10 minutes in BWB at altitudes below 1,000 ft above sea level. At higher altitudes refer to the processing times on the altitude adjustment chart (here).


Thursday, July 30, 2009

Kitchen Quick Tips - Left-over Beans

kitchen quick tips
Mash left-over beans (navy, kidney, pinto etc) to make refried beans or add them to meatloaf as a protein extender. Mashed left-over beans can be seasoned then froze to be used as needed later.


Wednesday, July 29, 2009

A Blueberry Day!

Saturday was a blueberry day! I started a bit early working on the blueberries I picked up on the foodie road trip. The kids were arriving shortly with the grandbabies so I knew there would be little time to spend on canning. It's always such a pleasure when the grandbabies come as the are all turning out to be real foodies not that we could expect anything different. For those who do not know we have 3 grandbabies, the oldest is 30 months, the second is 16 months and the youngest is almost 4 months. The oldest and youngest are sibs and the second is an only. All are just as cute as a they can be, simply adorable! Ok, so onto blueberries. Oh I should mention the two oldest grandbabies love blueberries!

blueberry fieldBlueberry Field

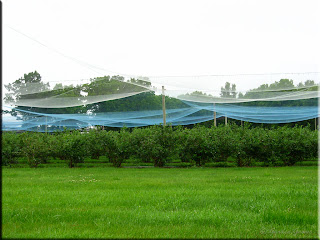
I mentioned in one post about U-picks. Pictured is a U-pick blueberry farm. Blueberries grow on bushes about 4' - 5' tall. As U-picks go this is rather nicely laid out with nicely grassed paths. Don't let that fool you. Sturdy shoes preferably with socks are a must. As you move through the paths picking your berries you will encounter dust and insects. You may even spot the occasional snake or toad. When you arrive at a U-pick you park then register to get your baskets. This does vary from U-pick to U-pick as some will simply weigh your pail then calculate the weight of what you picked and charge based on kilograms rather than L. You will notice from the picture there is no actual shading which means you will need sunblock and hat. I always advise carrying a refillable water bottle with you when you pick to prevent dehydration. The netting above the blueberries is to keep the birds from enjoying a free meal.

fresh picked blueberriesFresh Picked Blueberries

When blueberries are ripe they are a deep bluish purple with a dusty blue haze. They are firm to the touch with a sweet, almost tangy taste. Blueberries will keep well for several days after picking. For best canning results process the berries as soon as possible after picking for optimal nutrition.

Cleaning blueberries is quite easy. When you pick blueberries the stem may stay attached to the berry. Remove this while cleaning. Do not use any unripe blueberries that are more of a red colour. Any over ripe or squished berries should not be used either.

A bit of a warning should come with blueberries. The juice stains! I advise wearing an old t-shirt that you don't care about when processing blueberries and keep plenty of wet dishcloths on hand to clean-up any spatters as you go.

blueberry pie filling, blueberry syrup, blueberry juiceBlueberry Products

Pictured are 3 of the blueberry products I made. They are blueberry syrup (3), blueberry juice (2) and blueberry pie filling (1). You will note the jars are arranged from last to first batch meaning the blueberry syrup was the last batch out of the canner. There is a reason for this. The last batch is always closest to the canner to save on the distance I have to move jars. The jars are always arranged in rows according to what they are. I know what they are but using this method ensures that they are kept straight prior to labelling. As you can see in the jars these 3 products look quite similar!


The blueberry pie filling (1) is one you really will want to keep a few jars on hand. It's easy to make and tastes delightflur! As always please read the notes at the end of the recipes.

Blueberry Pie Filling
source: Bernardin Ltd. Bernardin Guide to Home Preserving, 2006. Toronto, Ontario. Pp.43.

7 c blueberries
1⅔ c granulated sugar
⅔ c Clear Jel® starch
2 c water
2 tbsp lemon juice
1 tsp grated lemon peel (optional)

Wash and stem blueberries. Bring a large saucepan of water to a rolling boil then add blueberries. Blanch 1 minute. Drain the blueberries [reserving the liquid*] and keep warm. Combine sugar and Clear Jel® in a large sauce pan. Whisk in the water and bring to a boil. Cook and stir until the mixture thickens. Stir in lemon juice and peel. Cook 1 minute. Fold in the blueberries mixing well. Ladle into prepared jars leaving 1 - inch headspace. Wipe rims. Adjust 2 piece lids. Process 30 minutes in BWB at altitudes below 1,000 ft above sea level. At higher altitudes refer to the processing times on the altitude adjustment chart.

*My Notes: reserve the liquid to make blueberry syrup

I canned one jar of the reserve blueberry juice to use for baking. Then I used the remainder to make another batch of blueberry syrup modified from the recipe in the Ball Blue Book. If you recall the last batch of blueberry syrup I made was from Jean Paré's Preserves. As always when canning you may want to try two or three recipes to see which one you prefer.

Blueberry Syrup
source: modified from Alltrista Corp., Ball Blue Book, 2001. Pp. 76

5 c blueberry reserved juice (from pie filling)
2½ c sugar
1 tbsp lemon juice

Combine juice and sugar in large saucepan. Bring to a boil then boil 1 minute. Stir in lemon juice. Ladle into prepared jars ¼ - inch headspace. Wipe rims. Adjust 2 piece lids. Process 10 minutes in BWB at altitudes below 1,000 ft above sea level. At higher altitudes refer to the processing times on the altitude adjustment chart.


Tuesday, July 28, 2009

Home Canned Green and Wax Beans

As promised over the next few posts intermingled with other posts I will share what I did with the goodies from my foodie road trip. If you have been following this blog some things you will have already seen so just click on the link to get to the recipe and method. Other things will be new with recipes and methods in that post.

canning jar lidsCanning Jar Lids

I go through a lot of canning jar lids, well over 1,000 in a normal year. Canning jar lids cannot be re-used for canning however used lids can be used for vacuum sealing dried foods and other storage. As any home canner will tell you finding lids at a descent price is a must for any high volume canning. Pictured is my stash of canning jar lids bought from Dollarama at $1 per box for the standard lids (red) and all but the top 4 wide mouth (green) were a $1 but then the price went up to $2 for the wide mouth so the last 4 were $2 each. There is 34 dozen (408 lids) of standards and 13 doz (156 lids) of wide mouth. I use a lot more standard lids than wide mouth lids.

How does this compare to regular store prices? The standard lids work out to 8¢ a piece as does the wide mouth lids bought for $1. Those bought for $2 are 16¢ a piece. The current price for standard lids is $1.64 on sale (reg. $2.19) at Home Hardware so that works out to 14¢ to 18¢ per lid. The wide mouths are $2.57 (reg. $3.49) This price is comparable with other stores in the area. The dollar store price is considerably lower! At 1,000 standard lids my cost is $80 with lids bought from the dollar store compared to $140 - $180. That reminds me I do need to stop there again to replenish what I used this past weekend.

home canned green and wax beansHome Canned Beans

My general rule of thumb for processing any fruit or vegetable is to pick just after the dew is dried and have it canned before lunch. Quite often I have all the equipment set up so the time from picking to canning is basically the prep time. However, a foodie road trip is different because you have travel time involved. By the time you get home you're tired so canning or freezing produce doesn't sound all that enticing. In this situation it is necessary to decide what needs immediate attention and what can keep for a day or two.

Friday night I canned up the green (pictured in previous post) and the yellow wax beans. My experience has been that beans need to be canned as soon as possible after picking or they start to go limp. Normally I would not buy beans for canning but beans are a no go in my garden this year due to late planting. The couple of bean plants might possibly produce but I'm not holding my breath! The variety of beans is important when canning. The best varieties are Blue Lake or Kentucky Wonder.

I used the entire amount of beans purchased for canning. The total cost of the beans bought at two different orchards was $7.50 with a yield of 9 jars. The total cost per 500 ml jar including electricity and lids was 71¢ or .00142¢ per ml. Now this is coming quite close to grocery store prices so it is important to realize home canned gives a higher quality product. Think of a foodie road trip as a bulk food purchase. For example our bulk beef purchase works out to $2.35 across all cuts of meat so 1 lb of ground beef costs $2.35 but 1 lb sirloin tip also costs $2.35 so it ends up being a considerable savings. When purchasing produce on a road tip there will be one or two things that you will not realize a savings on however on other home canned products there will be a greater savings so if you take the total amount spent on produce plus your gas used minus the cost of produce used fresh then divide by the total number of jars canned for an average cost per jar. Remember that this applies only to the produce not any additional ingredients you used. Overall, the cost per jar should come out well under grocery store prices but remember canning is not always about cost savings. It is about getting a high quality or unique product that you can't find in the stores.


Monday, July 27, 2009

Frugal Kitchens 101 - Home Canning Essentials

Frugal Kitchens 101There are a lot of myths surrounding home canning with the two main ones being it is expensive and it isn't safe. Both of these myths are completely false! Home canning requires a minimal investment in equipment but that equipment will pay for itself the first year of canning if used properly. In fact home canning is one of the most frugal activities you can do! Home canning is completely safe if you follow the current recommended canning guidelines. That means no cutting corners on the method or processing times. All home canned foods must be processed using one of two methods depending on the acidity (pH) of the food. Low acid foods (meats, soups, vegetables, etc) must be processed in a pressure canner to ensure botulin spores are destroyed. High acid foods (fruits, jams, jellies, pickles, etc) are processed using a boiling water bath (BWB) canner.

A common question this time of year: How long do I process green beans using a BWB canner. The answer is you don't! Green beans must be processed using a pressure canner.

With this in mind there is canning essentials. These are not expensive:

  1. current issue of Ball Blue Book (BBB), use the tested, approved recipes on the National Center for Home Food Preservation (NCHFP), current issue of Bernardin's Guide to Home Preserving or their website, Small-Batch Preserving by Ellie Topp and Margaret Howard or the recipes that came in your pressure canner manual. Both the BBB and Bernardin's will cost somewhere around $8 while the Small-Batch Preserving will cost about $20. In addition to that Bernardin has a series of small specialty booklets focusing on one topic such as tomatoes or jams and jellies. At $4 each CDN they are well worth buying!
  2. a boiling water bath canner or a large stockpot with a cake rack on the bottom and lid is necessary for processing high acid foods. If you already have a large, deep stockpot there is no need to buy a special canner. It must be deep enough to cover the jars by 1 to 2 inches. You can easily find inexpensive cake racks at the dollar stores. If you can't find one to fit, fasten a few canning jar rings together to keep the jars off the bottom of the pot.
  3. lid lifter, jar lifter, cork hot pads, timer
  4. a pressure canner for canning low acid foods. This is not a must have if you plan to only can high acid foods but it will greatly increase the variety of foods you can put up. You will want a pressure canner not pressure cooker. A pressure canner must be able to hold 4 quart jars and be able to adjusted to 5, 10 or 15 lb pressure. If you are pressed for space a pressure canner can be used as a BWB canner by leaving the lid loose with regulator off on the All American canners or by removing the gasket and leaving the regulator off on models using gaskets.
  5. mason jars - The cheapest source for these is free through freecycle followed by the resale stores and yard sales. Put the word out that you need mason jars as well. Canadian Tire's cheapest price is $6.99 for 12 - 500 ml (pint) jars with lids and rings. Smaller and larger jars generally cost more. Recycled mayo jars may be used for BWB canner only but expect more breakage. Do not use recycled mayo jars for pressure canning!
  6. lids and rings come with the new jars. Lids cannot be re-used for canning purposes but the rings can. However, lids can be re-used for dry storage, vacuum sealing and for freezer storage so keep them.
An estimated cost to start canning without a pressure canner is well under $50. You can even find kits that come with everything you need for BWB for about $25. Pick up a case or two of new jars and you are ready to go for about $39. Use a recipe from one of the websites mentioned or this blog and you will be on your way to canning all kinds of jams, jellies, pickles, fruits and wide range of condiments.

A pressure canner will set you back anywhere from about $70 to $400 depending on the make and size. With a pressure canner I advise to go a bit bigger than you think you will use because it is more cost effective to run one large load than two small loads. The 22 qt model range is the most popular size which will allow you to can 7 L (quarts) or 20 - 500 ml (pints) quite easily. Pressure canners come in two designs, one using gaskets and the exclusive metal-to-metal seal of the All American. I've used both and prefer the All American simply because there are no gaskets to replace. Despite the initial outlay costs of a pressure canner it is well worth it in any frugal kitchen!


Sunday, July 26, 2009

A Busy Preserving Weekend


It has been a busy preserving weekend thanks to the foodie road trip. Friday night I canned up the wax and yellow beans. The kids were here yesterday with all three grandbabies then we went boating when they left so I didn't get as much canning done as I should have. I managed to get blueberry pie filling and blueberry juice canned. So far today I've canned blueberry syrup, chocolate raspberry sauce, low sugar cherry jam, regular cherry jam with one batch using regular pectin and the other using Pomona's pectin. The plum sauce is simmering so will be next in the canner. The freezer pickles will be ready to put into containers around 11 pm. Tomorrow I will be canning mushrooms and pickled beets. I will also be drying mushrooms if the humidity level stays low enough. Starting Tuesday I will begin posting pictures and recipes of this weekend's canning.


Friday, July 24, 2009

Come on a Food Road Trip With Me in Southwestern Ontario

Friday I decided to do a larger produce run to one of my favourite produce hot spots following the Talbot Trail along the shores of Lake Erie. This scenic historical route was completed in 1820 overseen by Colonel Thomas Talbot. It stretches almost 500 km (300 miles) between Amherstberg, Ontario and the Niagra region. You would be hard press not to find good produce in this area rich in orchards, commercial green houses, smaller agriculture and even wineries.

My first stop was a resale shop where I picked up 20 canning jars for 75¢. She said they get one or two boxes of canning jars a week so I told her I would take all she could get so she is setting them aside for me. My husband iss going to stop next week to see what she has. Onto the day long shopping trip. I carried along my digital camera, lots of water and a homemade lunch. It was a hot, humid day so I decided against doing any actual picking although I knew there would be ample opportunity. All the produce purchased was locally grown.

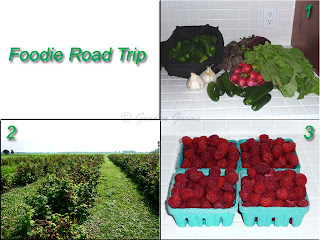
food tripI dropped off my husband then set off stopping at a nursery where they had flats of greenhouse plants on for $10. I bought a flat of impatiens (not shown) then stopped just a couple of block away to pick up pickling cucumbers, beets, radishes and mini zucchini (1). I headed west to a small greenhouse operation but they were closed. By then it was obvious the day was going to heat up a bit more than expected so I decided to take my purchases home so I could change. On the way home I stopped at my favourite raspberry U-pick (2). This U-pick is practically within walking distance of our house so I stop there quite often. I bought 4 pints of ready picked knowing that I would not be able to fit picking into my day's plans. This bit of backtracking cost me a bit in both time and kilometers but in the end it was a good decision.

Bulk BarnOn the way to my destination I stopped at Bulk Barn (4) where I picked up white chocolate chips, white Belgian chocolate, loose leaf tea, xanthum gum, sunflower seeds, organic pastas, 2 small bags of candy (5). Then I headed out into the bliss of a beautiful drive in the country.

Orchard stores are unpretentious and wonderful to shop in. My first orchard stop on the Talbot Trail was Greenview Orchards in Cedar Springs, Ontario (6). This is a lovely orchard that offers the produce they grow ready picked in a great little store at very reasonable prices. They also offer U-pick for some of their produce. I bought 11 qt sweet cherries, 4 qt blueberries, 4 qt new red potatoes, 2 qt green beans and 3 qt yellow plums (7).

Lake Erie, Talbot TrailWith my purchases safely tucked in the car I headed south of the Talbot Trail towards Lake Erie (8) to enjoy a bit of photo opportunities. Lake Erie like all the Great Lakes is just pure eye candy! I drove along into Erie Beach enjoying the peaceful drive then backtracked to Talbot Trail where I stopped at Delhaven Orchards (9) where I picked up 4 qt yellow string beans, 3 beefsteak tomatoes (10).

I just love the scenic drive along the Talbot Trail! On both sides of the highway there are rows and rows of fruit trees (11) with the lake peaking through to the south and an endless expanse of farmland to the north. The highway is well maintained with wide shoulders that makes it quite easy to pull over to enjoy the view and take pictures.

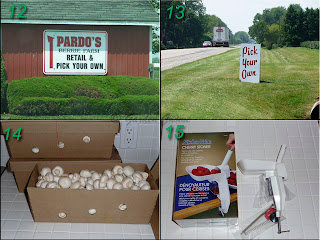
u-pick, mushrooms, cherry pitterLess than about a kilometer I stopped at Pardo's (12) another orchard with U-pick. They were extremely busy with people coming to pick raspberries. I didn't buy anything but took a few pictures. Along the Talbot Trail there are orchards after orchards and farms after farms with many of them offering U-pick (13). The pick your own opportunities are practically endless in this area!

The next stop was at the mushroom farm where I bought 15 lb white mushrooms (14). There are at least 3 large commercial mushroom farms in this area all with excellent prices if you buy directly from them. On the way home I stopped to pick up 2 bags potting soil and the most amazing cherry pitter I've ever seen (15)!

I hope you enjoyed coming on a food road trip with me. I'm tired but content so canning began tonight. The bean have already been canned. So stay tuned the next few days as I do a few things you've already ready about on this blog but also a few new things.


Thursday, July 23, 2009

Kitchen Quick Tips - Egg Cartons

kitchen quick tips
Keep your egg cartons for starting seeds for you garden. Individual cardboard egg carton cups with seedling can be planted directly into the garden. Avoid styrofoam or plastic egg cartons but if you find yourself with some, they can be re-used several times for seed starting as well. Just pop the seedling out and plant.


Tuesday, July 21, 2009

He Said (1) - Texas-Style Barbecued Chicken Legs

I mentioned to my husband that we were in a bit of a grilling rut. Now that really isn't much of a problem in one sense because we are preparing tried and true grilling methods. Considering we basically like our steaks cook unseasoned so the meat itself shines and ribs are always slow barbequed, well as you can see we are in a bit of a rut. So my husband and I have come up with a bit of a way to spark up our grilling. From now until the end of August we are going to be doing a he said/she said recipe discovery. This essentially will be 6 weeks where he makes a recipe and she responds with a recipe so essentially what we should end up with 12 new recipes and out of those 12 hopefully we will find one or two that become a family favourite. I will mark each post with a he said/she said followed by a number so in the end there should be 6 of each. The first week of September I will post a poll looking for votes on what you thought was the best recipe. So plan to make each recipe and vote at the end our our little he said/she said contest for the best recipe. May the best (ahem) cook win!

Etter Homes and Gardens New Grilling BookInspiration

To make the contest fair we decided all the recipes had to come from the same cookbook. Since it's summer and the main grilling season we settled on the Better Homes and Garden New Grilling Book, 2005 by Meredith Corporation. Now the rule is the recipe has to be followed as is without modification of ingredients other than the amount of added. For example if a recipe calls for ingredients A, B and C then all three ingredients must be used but can be reduced or increased if desired.

As you can see I already have a few recipes tagged with post-it notes to try. My husband on the other hand dog eared his recipe! Now that might be fine for some people but dog earing one of my books is sacriligious so he heard about it. Anyway, those are the rules and I doubt he will dog ear another one of my books. Other than that it should be a good bit of fun.

indirect grillingOn the Grill

My husband chose the Texas-style Barbecued Chicken Legs on page 270 of the cookbook. What was very interesting about the way the chicken was cooked was a different method of creating indirect heat on the grill. We have used two methods of grilling chicken. The first applies mainly to boneless, skinless chicken breasts. The meat is grilled on indirect heat over the burner that is not turned on. The second method for skin on chicken involves par-boiling the chicken, draining then finishing on the grill. Both methods work quite nicely but are still subject to minor flare-ups. This method called for placing a tray of water over both burners set to medium heat with the chicken on the grate above. This method virtually eliminated any flare-ups! Pictured is the chicken legs as they were cooking and with the sauce.

Texas-Style Barbecued Chicken Legs
source: Meredith Corporation, Better Homes and Garden New Grilling Book, 2005. Pp. 270

½ cup finely chopped onion
2 cloves minced garlic
1 tsp chili powder
¼ tsp ground sage
1 tbsp butter
½ cup ketchup
2 tbsp water
2 tbsp vinegar
1 tbsp sugar
1 tbsp lemon juice
½ tsp salt
½ tsp hot pepper sauce
¼ tsp cracked black pepper
6 whole chicken legs

Prepare onion and garlic. Place onion, garlic, chili powder, sage and butter in saucepan. Cook until onion is tender. Stir in remaining ingredients except for chicken. Brig to a boil then reduce heat to a simmer. Simmer uncovered for 5 minutes then remove from heat. Heat the grill to medium. Place the chicken legs bone sides up on grill over the filled drip pan. Grill for 50 to 60 minutes until the chicken is no longer pink, turning once halfway through the grilling. Brush with the sauce during the last 10 minutes of grilling. Heat remaining sauce until bubbly to spoon over the chicken.

Texas-Style Barbecued Chicken Legs

Pictured is the Texas-style Barbecued Chicken Legs my husband made. I paired them with Arborio rice cooked in homemade chicken stock with a little butter and tomato slices on a bed of Chinese mustard and Grand Rapids lettuce fresh cut from the garden. I garnished the tomato slices with Vadalia onion wedges.

I really have to say this is one of the best barbequed chicken I've tasted! The method of grilling virtually eliminated any charring yet the chicken was moist, tender and flavourful. Adding to the perfectly grilled chicken was the wonderfully flavoured sauce. Now this sauce is really quite tasty and it is one that I will be modifying for canning. The sauce was amazing with a deep, rich flavour! My husband made two changes reducing the chili powder and hot sauce by half. The sauce was very easy to make using ingredients most cooks would have on hand.


Monday, July 20, 2009

Frugal Kitchens 101 - Old Cookbooks

Frugal Kitchens 101
Many home cooks turn to cookbooks for inspiration while other use them for specific recipes. One problem that is often experienced is the use of ingredients you might not readily have on hand and depending on your location cannot easily get. In addition to this some ingredients listed are brand specific. In a time when many are feeling the pinch and are trying to stretch their food budgets a simpler source for recipes is called for. Now don't get me wrong because using exotic and brand specific ingredients is fine but if you can get a great meal without the added expense, why not? The reality is unless it is an ingredient that is only made by one specific company a cheaper brand will get the same or very close to the same results. In these trying economic times, turn to the older cookbooks!

Two of my favourite and dependable older cookbooks are dated 1974 and 1964 respectively. The first is my Betty Crocker cookbook and the second is Kate Aitken's Canadian Cookbook. Both contain recipes that really don't call for fancy ingredients or brand specific ingredients and home preserved foods (dried, frozen, canned) can easily be used in the recipes. Both give you excellent basic cooking advice with recipes anyone could duplicate with the ingredients they have either on hand or easily available. These types of cookbooks are a must have! If you want go back a bit further looking for wartime and Depression era recipes. These will tend to be even more frugal as far as ingredients go but they still put good food on your table without breaking the budget.

Older cookbooks can often be found rather inexpensively at yard sales and resale stores usually for well under $1. I always check these resources because you never know what you will find even in newer cookbooks.


Saturday, July 18, 2009

Salad Greens and Steak Rub

My husband arrived home late Wednesday from an event he had organized. As a side benefit the left over food was split amongst the guys who wanted it. This meant an influx of foods like processed lunch meats, pre-sliced cheeses, store bought bread and a few snack type items. While the cheeses and unopened snacks will keep for a couple of weeks the opened packages and lunch meats won't. So we are in sandwich mode!

salad greensSalad Greens

My raised garden beds have been progressing nicely despite a late start. Pictured are my four square feet of salad greens. Aren't they gorgeous? In the top left corner is Chinese mustard. Next to that is Grand Rapids leaf lettuce. The two squares at the bottom is mesclun mix. Look at how much produce is coming out of 4 square feet! With reseeding after each cutting we will have more than ample salad greens to last us until first frost. This is a huge savings considering we eat salad almost daily! More importantly the greens are fresher than anything you can buy in the grocery stores. The taste is unbeatable! I snip the greens as I need them within minutes of serving. I rinse well with a light spray so as to not bruise the greens. Then I pat dry between two t-towels before using.

sandwichesSandwiches

During the summer months we love power sandwiches. These are sandwiches made with home grown produce on homemade whole grain breads using home cooked meats with cheese but the real focus is on the vegetables. Garden fresh vegetables include cucumber, tomatoes, onions and salad greens. Fresh from the pantry is alfalfa sprouts.

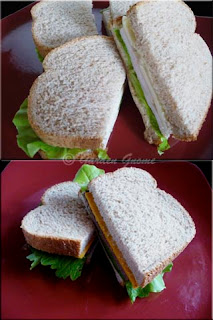
Well, thanks to the influx of food I had almost a loaf of whole wheat bread to use up along with the cheeses and lunch meats. So I made a modified version of power sandwiches. I paired turkey breast lunch meat with Swiss cheese and Grand Rapids lettuce for my husband sandwiches pictured in the top picture. I would have added tomatoes if I had them but mine are setting fruit and I'm not buying store bought if at all possible. Why? Home grown tomatoes taste so much better so I'll wait with much anticipation!

I made a roast beef and cheddar cheese sandwich on whole wheat with Grand Rapids lettuce and Chinese mustard. The Chinese mustard adds a nice mild, peppery flavour. It's important when growing Chinese mustard to not let the plant leaves get too large or they will be bitter and to let one plant go to seed to collect for the following growing season.

steal rubPrep & Cooking

Thursday night we had New York Strip steaks for dinner. Normally steaks are grilled and served without sauce or seasonings to let the flavour of the organic, hormone free beef shine though. This time I decided to get a bit creative with mine by using a rub. A rub is a mixture of dry ingredients consisting usually of salt, sugar, spices and/or herbs. What a rub does is adds a lot of flavour similar to a marinade. You can use a pre-made mixture or make your own.

I used Dean Jacobs's Savory Mesquite rub for this steak that was part of a gift package I received. Ingredients in the rub blend are "salt, spices, onion, garlic, mesquite flavor, caramel color, natural flavorings and silicon dioxide". This is precisely what I don't like about some commercial blends as the spices and natural flavourings are not specified which could be a problem for anyone with food sensitivities or food allergies. I am going to start experimenting with homemade rubs so watch for more on that in future posts.

Using a rub is rather easy. The prepared rub is simply sprinkled onto the meat then rubbed in. The meat is then refrigerated to let the seasonings penetrate throughout the meat. Once the meat has been seasoned it is time to grill. As you can see there is a definite difference between plain meat and meat with a rub on the grill. Both steaks were cooked to medium rare.

Method: To use a rub, place the meat on a cutting board. Sprinkle the rub over the meat then with a gentle rotating motion rub it into the meat covering all sides. Place in a zipper style bag and refrigerate for 3 to 4 hours.

savory mesquite steakSavory Mesquite Steak

Both the seasoned and unseasoned New York strip steaks were grilled to medium rare. Sides included home canned green beans, frozen cauliflower and pickled beets. The steaks were garnished with caramelized onions.

In a comparison taste test my husband preferred the unseasoned steak. His two complaints were the salty taste and the mesquite flavour. I liked the flavour but not the salty taste. One reason both of us immediately noticed the salt is because we use so little of it and when we do it is sea salt (Mediterranean, French Grey, Alaca Hawaiian) or Himalayan pink salt depending on the food. Unlike regular iodized salt that adds that salty taste the aforementioned salts add flavour as well.

This experiment gave me an idea of where to start with homemade rubs. I know the salt I use will likely be a sea salt and only in the amount to add flavour without being overpowering. Experimenting with homemade rubs should be a lot of fun!


Thursday, July 16, 2009

Kitchen Quick Tips - Leaky Kitchen Tap

kitchen quick tips
A leaky kitchen tap at 1 drop per second wastes more than 25 L of water per day or 9,000 L a year. At our prices (9,000 L = 9 m3, 9 m3 x 0.76 = $6.84) that works out to $6.84 per year. Fixing the tap usually costs nothing more than a washer at about 5¢ so fix the tap and use your water savings to buy extra food for your pantry (eg. savings would put 5 packages of dry pasta in your pantry assuming $1.29 per package).


Wednesday, July 15, 2009

Blueberry Syrup

Ontario blueberries are now in season! They will be available from now until late summer but I plan on getting the blueberry products I'm putting up within the next week. The reason for this is other produce is simple time management. As the growing season progresses, the days get hotter, boating beckons and my gardens are producing it is a little more difficult to get out to the U-picks. I ever love to get my hands on some wild blueberries! They would make a beautiful syrup!

preparing blueberry syrupPreparations

Blueberries should be picked in season when they are blue with a powdery hue (1). They can be frozen as is without washing for later use or rinsed well for immediate use. While washing remove an reddish coloured berries that will not ripen after picking or wrinkled berries that are a bit over ripe. Combine the ingredients for the syrup then bring to a boil (2). Reduce the heat to simmer then cover and simmer for 10 minutes. The blueberry mixture is now ready for straining to separate the remaining berry pulp from the syrup.

I use a fine mesh strainer inside a colander set in a metal bowl (3) for straining the blueberry mixture. Then I lined the fine mesh strainer with two layers of cheesecloth (4). I moistened the cheesecloth before straining the blueberry mixture. If you don't moisten the cheesecloth it will act as a hungry wick absorbing the syrup.

pulp and reheatingBlueberry Pulp

The easiest way to transfer the mixture into the strainer is simply pouring. Do not be tempted to do this unless you want to clean your kitchen! The splatters will go everywhere. I used a ladle to transfer the mixture into the strainer (5). Once the syrup was separated I was left with a good amount of pulp very much the consistency of jam. I originally planned on drying this but decided to can it as well. I brought both the syrup and pulp to a boil (6) then proceeded with the canning. Don't throw out the soiled cheesecloth as it is made from cotton so can be put in your compost bin.

canned blueberry syrup and pulpOut of the Canner

Blueberry products always look dark and regal when canned. The picture really does not do justice as to how pretty they look due to learning how to use my new camera. I ended up with 3 - 250 ml (half pint) jars of blueberry syrup, 1 - 250 ml jar of the blueberry pulp jam and a 125 ml baby food jar of the jam. The baby food jar is only for short term refrigerator storage as it was not processed. Baby food jars cannot safely be used in canning because the sealant on the lid has already been used so will fail. I like using them for storing that little bit of extra left over from canning that won't fill a regular mason jar.

Blueberry Syrup
modified from Jean Pare, Company's Coming Preserves (1994), Pp. 137

6 c blueberries
1 c granulated sugar
1 c water
1/2 c corn syrup
2 tbsp lemon juice, fresh or bottled

Rinse and drain blueberries. Measure ingredients into a large saucepan. Heat on medium high until mixture boils while continuously stirring. Cover then simmer for 10 minutes. Strain the mixture though a moistened cheesecloth lined strainer. Bring the syrup to a boil. Divide the syrup equally into 2 - 3 hot 250 ml (half pint) jars. Add boiling water if necessary to leave 1/4 inch headspace. Wipe rims. Adjust two piece caps. Process in BWB 10 min at altitudes 1,000 ft or less above sea level. If above 1,000 ft refer to altitude chart. Remove from canner at end of processing. Let sit undisturbed 24 hours. Check for seal then store properly.

Yield: 2 to 3 - 250 ml jars

My Notes: 6 c of blueberries is roughly 2 lb or 2 quarts. I used organic cane sugar and bottled lemon juice (standardized) adjusted to 2 tbsp as per BBB. The corn syrup gives a silkier texture to the syrup while adding a bit of flavour. I processed the jam at the same time in keeping with current USDA recommendations for soft spreads.


Tuesday, July 14, 2009

Weekend Pig Roast

Pig roasts are always fun events! Two years ago we held a pig roast that was a huge success.  We were planning on holding another pig roast this year but so far have been unable to find a roaster for rent. At one time the local abattoirs and a few local farmers had the roasters that they would rent out but no longer. A relative and I were chit chatting about not being able to find a roaster. They were hosting their annual fireworks event on the 11th. It always falls in July as close as possible to Canada Day. The number in attendance reaches around 150. This wonderful day long event is held on their picturesque, farmland property in southern Ontario. Local foods and entertainment are always a feature which is something I really appreciate. After dark everyone settles in for a gorgeous fireworks show that would out do many communities! Some of the fireworks are originals made specifically for the occasion. It is just a lovely event with a good time had by all!

She also wanted a pig roast for this event to compliment the hot dogs and hamburgs being grilled but was having no luck finding a roaster. She had found a place in Ahmerstberg, Ontario that seasons and roasts the pig. Then then gut it, remove the bones and stuff the meat back into the skin. Well sounded a bit intriguing to me so I couldn't wait to see what the pig looked like done this way. More importantly I couldn't wait to taste the meat!

pig roastRoasted Pig

The roasted pig was nicely presented on a bed of lettuce and garnished with the traditional apple in the mouth and orange slices. The meat had been de-boned then stuffed back into the skin to give the appearance of a whole pig. The meat was then easily sliced as desired with an electric knife.

As interesting as this solution is, buying a roasted pig this way presents a couple of problems. It removes the day long work of tending the roasting pig and it eliminates having to pick-up and return the roaster. However, buying the pig already roasted was considerably more expensive coming it at $5 per pound plus the cost of gas to pick it up. In comparison we paid $100 for the 117 lb pig for our pig roast, $80 for the roaster and about $150 in additional foods for a total of $330 serving about 70. The pig pictured was similar in size at a cost about $585 already roasted. Additional foods would have driven the cost per plate considerably higher. They would have had to drive a good 90 minutes each way. Taking a good 3 hours out of the prep time on the day of this type of event just to pick up the pig would have been rather inconvenient. It definitely would not work for us as we would have to drive even further. The second problem is transportation itself. The pig would have to be kept in the safety temperature zone during transportation and until serving. With this in mind, a roasted pig purchased this way can still be a good solution in a pinch.

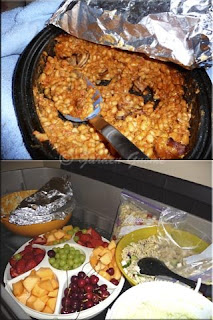
baked beansBaked Beans & Sides

The sides consisted of several homemade dishes including baked beans, potato salad, coleslaw, fresh fruits and various desserts. Grilled hamburgers and hot dogs were available for those not wanting pork. One way to keep costs down a bit is to have people bring a side, salad or buns. Even if you ask people to bring nothing more than whatever they are drinking they will invariably bring something else. If someone asks what can they bring be specific. The real problem with this method is even if you delegate you will end up with too much of one dish and not enough of another because that is human nature. So you really do need to with the flow and be prepared with back-up dishes just in case.

The sides and additional food was presented linear spread in a covered outdoor location. This controlled any outdoor food problems such as dust and insects. The host kept things simple by serving in the baking pans and plastic bowls. What I found interesting was behind some of the sides like the coleslaw was a plastic zipper style bag filled with more for easy refilling as required. While this does work, I wouldn't recommend it simply because the food in the bags may spend time outside the proper safety temperatures that could cause later tummy upsets or worse.

roasted pig dinnerRoasted Pig Dinner

Pictured is my plate of food consisting of pork with barbeque sauce, potato salad, coleslaw and baked beans. The meat was nicely roasted, moist and tender. The sides did not disappoint either. That golden brown to the upper right of the meat is roasted pork skin. Roasted pork skin is a true delight! It is chewy yet crispy with a thin layer of fat on the inside. It is packed full of flavour! I don't to enjoy roasted pork skin very often even though I love it. The closest I get is the occasional cracklings which is pan fried pig skin from our bulk pig purchase and that I don't get that very often either. It likely isn't the healthiest thing to eat but oh my gosh it is just so good! I tucked a small container of it into our cooler to enjoy the next day.


Monday, July 13, 2009

Frugal Kitchens 101 - U Picks

Frugal Kitchens 101
Like many I grow a vegetable garden but simply cannot produce as much as we need to get us through from one growing season to the next for some fruits and vegetables. Unless you live on a good sized parcel of land the chances of growing all the produce you want to use both fresh and for preserving is likely not possible. Certain vegetables such as corn take up a fair amount of room in the garden for the yield. Potatoes are nice in the garden to enjoy the small, new potatoes but to grow the amount needed for a year supply would be difficult for many home gardeners. Fruit trees and bushes, asparagus and rhubarb can take a few years to become well established so in the meantime buying this produce is the only real option. The best place to buy this type of produce it at the source.

U-picks are simply farmers who may also have ready picked produce for you to buy and orchards that have both. Always check them out before planning a trip especially if you want organic, pesticide-free produce. Ask about their growing methods. In general U-picks are mainly fruit focused but some may offer vegetables for picking as well. Their ready picked produce is quite often cheaper than in the grocery stores but more expensive than if you pick your own. Picking your own is an excellent way to connect to your food. You become quality control while you pick so you are assured of getting the fruit or vegetable just at its peak. You can also determine just the right size of fruit or vegetable. For example, large strawberries are ideal for desserts and snacking but small berries are better for making jam so you can sort as you pick into two containers saving you time later. Picking your own is wonderful exercise as well as a great way to spend quality family time and meet others in your surrounding community. When you go to a U-pick, be prepared.

  1. dress appropriately - You will be picking your produce directly in the field or plot that it is planted. That means in most cases little shade and depending on the day hot sun. You will encounter rough paths between the rows, mosquitoes and/or other insects, possibly a snake or two and/or other critters, weeds like stinging nettle and possibly thorns. You will need: sunblock, a wide brimmed hat, sturdy closed toe shoes with socks, light coloured breathable clothing, a light long sleeve shirt to protect your arms. A mid-calf length skirt or long lightweight pants are better than shorts too.
  2. water - Lack of shade and hot sun will make you dehydrate rather quickly so bring water in a re-usable water bottle.
  3. restroom facilities - These are basically non-existent so govern yourself accordingly.
  4. timing - The best time to go to a U-pick is early morning just after the dew has burned off and before the heat of the day. Avoid going after a rain or heavy dew as this can spread any plant disease from one to another plant as well as make it uncomfortable picking due to mosquitoes.
  5. containers - Bring your own containers! Many U-picks are just small Mom & Pop garden patches so they more than likely will not supply much in the way of containers. They may give you quart fruit baskets to use for picking only for calculating cost. These are then emptied into your own pail or other container. I always take a few extra shopping bags with me to leave. This helps them out and recycles my bags.
  6. wet wash cloth - Pack a wet wash cloth in a re-usable container. When you are finished picking your hands will be dirty.
  7. cooler - Hot berries spoil quickly. I recommend putting them in a cooler for transporting home.
In most cases you will have to drive to a U-pick. A U-pick is not the place to drive to for one quart of berries if that's all you need! However, I like to keep a few picking supplies in the trunk of the car just in case on one of my travels I pass by a U-pick and decide to stop. Now this brings up an issue of availability. We live in an area where we can find a lot of these types of orchards and farms within a 100 mile radius from our home. This is a huge cost savings for me for the produce I don't grow but even then I still always take into consideration the cost of acquisition. I also consider that the best time to preserve any produce is as quickly as possible after picking. In short, that means an early morning start with multiple stops gathering food with a goal of being home by noon followed by a long afternoon and evening of processing the produce. This is a very cost effective way of putting good quality food on your table while saving money so be sure to check this source out!


Saturday, July 11, 2009

Honey Strawberry Kiwi Jam

It's jamming time! This week I had kiwis, strawberries, raspberries, blueberries and watermelon so decided to do a bit of small batch preserving. Unlike many home canners I prefer not to make a lot of one particular jam so most batches are under 1 L (4 cups) and tend to be on the gourmet side. I like making low sugar jams or jams using local maple syrup and honey. Most of my jams and jellies are my own creation using Pomona's Universal Pectin rather than regular pectin because this pectin does not depend on sugar for the gel. This means the sugar can be greatly reduced or substituted. Unlike regular pectin Pomona's is shelf stable with no expiry date and even though there is a higher cost outlay when bought in bulk, per batch it works out cheaper than regular pectin.

kiwiKiwifruit

Kiwifruit are not local fruit but rather imported from New Zealand. They have a brown fuzzy thin skin with a green flesh. The seeds form around a central pith giving them a characteristic look when sliced. Kiwifruit is rich in Vitamin C and the protein dissolving enzyme actinidin. This enzyme can cause allergic reactions in some and makes the fruit unsuitable for use in milk or dairy products that are not going to be consumed immediately. Kiwifruit is also a natural blood thinner.

Kiwifruit is often served simply peels and sliced. The flavour is somewhat a mixture between strawberries and lemons yet rather unique. It pairs nicely with strawberries especially for jams. When kiwifruit are plentiful our local grocery stores put them on for a rather good price. I paid 97¢ for three kiwifruit on Thursday. This makes the kiwifruit a great fruit extender for strawberry jam reducing the overall cost of the jam if purchasing strawberries and allows the home gardener with smaller strawberry yields to still make lovely homemade jam.

honey strawberry kiwi jamHoney Strawberry Kiwi Jam

Yesterday I made a batch of honey strawberry kiwi jam. I use local unpasteurized honey which imparts a wonderful flavour to the jam. It is important to use local honey as it is less likely to cause an allergic reaction. It is also important to mark any home canned foods containing honey as honey should not be consumed by children under the age of 1.

This jam is a real keeper! The next time I will cut the amount of honey by half which will cut some of the sweetness while still giving a lovely honey flavour. I used 3 cups of prepared fruit with a yield of 4 - 250 ml (1 cup) jars of gourmet jam.

Honey Strawberry Kiwi Jam

3 cups mixed fruit (1 qt strawberries, 3 kiwifruit)
1 cup honey
3 tsp calcium water
1½ tsp Pomona's pectin

Wash and mash strawberries. Wash, peel and mash kiwifruit. Stir together then measure for 3 cups and pour into large saucepan. Stir in the calcium water. Measure room temperature honey into measuring cup. Stir pectin into the honey and set aside. Bring the fruit to a boil. Add the pectin-honey mixture. Stir vigorously 1 - 2 minutes while cooking to dissolve pectin. Return to a boil and remove from heat. Fill prepared jars leaving ¼ - inch headspace. Wipe rims and adjust two piece lids. Process in boiling water bath 10 minutes at 1,000 ft above sea level. At altitudes above 1,000 ft use altitude adjustment chart (here).


Friday, July 10, 2009

Kreativ Blogger Award


It is always a surprise and please to receive a blog award! I am very honoured to be presented with the Kreativ Blogger award. The award is very much appreciated! Thank-you so much Charlotte of Canning Jars Etc. for nominating me for this award.

Charlotte lives in Iowa, USA. Her blog focuses on canning information and recipes presented in a lovely, down home style. Her love of canning shines throughout her blog. Please take a moment to stop by and say hi. I'm sure you will enjoy her blog as much as I do. I will mention that she already took a couple of things I would have used on point 4 (follows). Hmm, I think we may just be kindred spirits!

Seven things about myself that people might find interesting:

  1. My family is my priority.
  2. I've been a nature lover since day one so being eco-friendly is extremely important to me.
  3. I am a chronic multi-tasker. Sitting idle is not an option for me.
  4. Even though I cook most days, I cook more when I'm stressed! This seems to suit my family quite nicely :)
  5. I'm a techo geek who loves to experiment with anything to do with technology.
  6. I do a lot of genealogy research in my spare time and can now trace my family back into the early 1500's. I'm a stickler for detail in my research so primary documentation is critical.
  7. Academically my area of expertise is medical genetics. I hold four degrees and firmly believe in life long learning .
I nominate the following bloggers to receive the Kreative Blogger Award:
  1. Maggie author of A Taste of Both Worlds
  2. Daily Cute
  3. Leanne author of Tired Mama
  4. Emm (Mandy) author of Emm in London
  5. Cyn author of Creative Canning
  6. Wanda author of 1 Blogs and 2 Sides
  7. Cooked From the Heart
To accept this award do the following

1. Thank the person who nominated you for this award.
2. Copy the logo and place it on your blog.
3. Link to the person who nominated you for this award.
4. Name 7 things about yourself that people might find interesting.
5. Nominate 7 Kreativ Bloggers.
6. Post links to the 7 blogs you nominate.
7. Leave a comment on each of the blogs letting them know they have been nominated.


Thursday, July 09, 2009

Kitchen Quick Tips - Garbage Disposals

kitchen quick tips
Garbage disposals waste both water and electricity. They put a strain on the sewage treatment systems as well. Compost you kitchen waste in a compost bin or use verminculture for a low cost, eco-friendly way to use those kitchen scraps.


Wednesday, July 08, 2009

Vegetable Stuffed Meatloaf

One pot meals are generally casseroles, slowcooker dishes, soups, stews and pot roasts. The nice thing about one pot meals is this method frees up time for the busy cook. While the food is cooking other things can be done without worrying about cooking additional side dishes. One pot meals are an efficient use of energy as well something we all need to consider.

I took out a pound of extra lean ground beef from the freezer to thaw on Sunday evening for Monday's dinner. I wanted to try an enchilada casserole recipe I had found. My husband took a look at the recipe giving it two thumbs down so I decided to make meatloaf instead. Not just regular meatloaf, a nice kicked up version!

how to make vegetable stuffed meatloafMethod

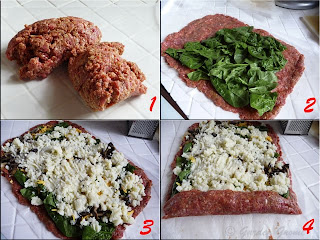
This really is a fun way to make a familiar meal taste like a new one simply because it is just a bit different! The ingredients aren't written in stone making this a frugal, budget stretching meal. I made my meatloaf mixture then poured it onto a sheet of wax paper (1). Then I formed the mixture into a rectangle and starting with spinach (2) topped it with the fillings (3) much the same way you would top a pizza. After rolling the meatloaf I baked it (full instructions follow).

Ingredients

meatloaf:
1 lb extra lean ground beef
1 tbsp prepared mustard
½ c ketchup
1 tbsp Worcestershire sauce
2 eggs
Montreal steak seasoning to taste
2 c dried bread crumbs

filling:
½ pk fresh spinach
4 med. potatoes, microwaved
10 - 12 button mushrooms
1 c grated Colby cheese

Wash and poke holes in the potatoes. Place on a piece of paper towel and microwave until just soft. Remove from microwave, cut in half and scoop out the flesh. Set aside. Clean, slice and sautĂ© mushrooms in a little butter. Remove from burner and set aside. Grate the cheese. Wash and pat dry the spinach. Make the meatloaf mixture mixing well (see ingredients below) then poured the mixture onto a sheet of wax paper. Form the meatloaf mixture into a flattened rectangle about ½ - inch thick. Cover with spinach first (2) followed by the other filling ingredients (3). Starting at one narrow end and using the wax paper under the meat, carefully lift up and over to start the roll (4). Continue rolling to the other end using the wax paper to help lift. Once the meatloaf is fully rolled carefully place it in a heavy metal loaf pan. Bake at 180ºC (350ºF) until cooked through. Remove from oven. Let rest 5 minutes before slicing.

vegetable stuffed meatloafVegetable Stuffed Meatloaf

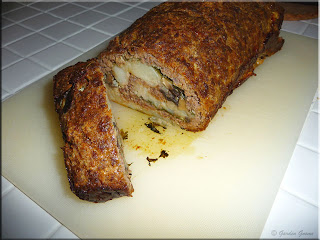
When the meatloaf was baked I carefully removed it from the oven then let rest on a cutting board for 5 to 10 minutes. Resting allows the juices to set up so the meatloaf slices cleanly without crumbling. Pictured is the vegetable stuffed meatloaf just after cutting. Doesn't it just look gorgeous?

I was quite impressed with the results! The vegetable stuffed meatloaf was extremely easy to prepare. It was very tasty and filling. If you look at the list of ingredients my most expensive ingredient was the extra lean ground beef at $2.35 per pound (price per pound across all bulk meat purchase cuts). Over all the entire meal cost just under $5 including the electricity (32¢) to cook it. The meatloaf would easily serve 4 to 6 ( 83¢ to $1.25 per serving) people making this meatloaf a lovely, budget stretching and frugal meal! Serve a tossed garden salad as a side.

vegetable stuffed meatloaf dinnerDinner

I plated the vegetable stuffed meatloaf rather simply without any further sides. The spinach really lost its lovely green colour during the baking so adding a bit of green would make the meatloaf sparkle. For proper presentation a spring of parsley would have been nice but I also think the meatloaf would look good on a bed of leaf lettuce. As soon as my leaf lettuce is ready for cutting I will make another meatloaf just to see how it plates up. A ladle of beef gravy would also be a nice addition although the meatloaf is moist enough not to need gravy. This meal received two thumbs up from my husband!


Tuesday, July 07, 2009

Fun With Orzo

Pastas come in all shapes and sizes. Did you know there is a reason for this? The shape actually determines how the pasta will hold the sauce. Ridged pastas hold thinner sauces best but shape goes well beyond that. The shape of the pasta determines the dish. Quick lasagna is lovely but lasagna made using actual lasagna noodles is always better!

orzoOrzo

Orzo was originally made from barley where the name came from. It is sometimes call Italian rice because of its shape. Orzo is a rice shaped pasta made from hard wheat semolia. While it is not rice orzo is a good substitute for rice. You can get the rich, creaminess texture of a risotto in a lot less time yet orzo stands up nicely in a salad or soup. So this really is one pasta shape you want on your pantry shelves because of its versatility.

Pictured is uncooked orzo to give you an idea of the shape and size. As with most dried pastas orzo is relatively inexpensive. Do keep in mind when cooked orzo is larger than rice so while it is a good substitute is still different. It does cook considerably faster than rice!


orzo with baked chicken and mango chutneyOrzo with Baked Chicken

Last Thursday my husband was away so I decided on a bit simpler meal for myself. Orzo just fit in with that plan nicely. Cooking for one does not need to be time consuming or boring! I put two chicken legs with backs attached in the oven to bake. When finished I paired the chicken with an easy orzo side dish reminiscent of risotto by simply draining the cooking orzo then stirring in butter, dried parsley along with a little salt and pepper. I added one of the chicken legs with backs attached to the side then topped with mango chutney.

Despite cooking for one this really was a nice meal. The orzo was rich and creamy with the mango chutney adding interest without overpowering. In hindsight I think stirring in a bit of plain yogurt with the orzo would have given just that extra. Oh and that mango chutney is a real keeper! Talk about a lovely flavour!

Cooking for one is always a challenge and even more so when you have been used to cooking for a larger family. In this case I actually cooked enough for two planning on left-overs. What is very tempting when eating alone is to ignore presentation. This really is a time when presentation becomes a bit more important because you are sending yourself the message that you are worth the extra effort. Thank goodness I don't have to eat alone a lot but hey it happens. I fell into the trap of eating meals alone in front of the computer or television, essentially multi-tasking and not really enjoying my food. Now I actually plan ahead for dinners I know I will be eating alone. Normally I do cook extra because my husband will take the left overs for lunch. Then I set the table properly unless I decide to eat in the sunporch or on the dock and set that properly as well. I also garnish exactly as I would if someone else was dining with me. Garnishing is one of those things that honestly those cooking for one is just too easy to omit yet it really gives that great eye appeal. So if you are cooking for one, do a bit of pampering. Set the table, turn off the television, use garnishes and enjoy your food!

Summer SaladSummer Salad

It's kind of funny that one of our kids almost goes in the same cooking trends I do. Last week I was really into orzo and I really wanted to make taco salad but didn't get the chance. We visited the kids on Sunday and it was like they had read my mind.

They served grilled hot dogs for lunch along with a really nice orzo salad. I'm not a huge hot dog fan but I will tell you that salad was awesome! It was made with boiled, drained orzo with chopped tomatoes, onions, red and yellow peppers, cucumbers and sweet peas. Tying it together was a simple homemade vinaigrette at only 2 tbsp for a large bowlful. The results were just delightful! This summer salad is definitely something I will be doing a bit of tweaking. I'm thinking a nice vinaigrette made with Herbs de Province would be nice but with the herb garden going fresh herbs will definitely be on the agenda!