My photo
Ontario, Canada
I am a wife, mother and grandma who enjoys the many aspects of homemaking. A variety of interests and hobbies combined with travel keep me active. They reflect the importance of family, friends, home and good food.
Cook ingredients that you are used to cooking by other techniques, such as fish, chicken, or hamburgers. In other words be comfortable with the ingredients you are using.
--Bobby Flay

For Your Information

Please watch this area for important information like updates, food recalls, polls, contests, coupons, and freebies.
  • [March 19, 2020] - Effective Mar 17, this blog will no longer accept advertising. The reason is very simple. If I like a product, I will promote it without compensation. If I don't like a product, I will have no problem saying so.
  • [March 17, 2020] - A return to blogging! Stay tuned for new tips, resources and all things food related.
  • [February 1, 2016] - An interesting report on why you should always choose organic tea verses non-organic: Toxic Tea (pdf format)
  • Sticky Post - Warning: 4ever Recap reusable canning lids. The reports are growing daily of these lids losing their seal during storage. Some have lost their entire season's worth of canning to these seal failures! [Update: 4ever Recap appears to be out of business.]

Popular Posts

Monday, October 31, 2011

Frugal Kitchens 101 - Preventing Injuries in the Kitchen

Frugal Kitchens 101

I had a topic I wanted to blog about today then a kitchen injury happened while I was making spaghetti sauce for lasagna and moose meat chili. I don't use a lot of commercially canned foods but this year I have had to resort to using some simply because I did not get as much canning done with our recent move.  The lid snapped back slicing through my thumb very close to the underside of the nail, spanning across the entire thumb.  It likely needed stitches but the cut was slow close to nail, I doubt they would have stitched it up so I used basic emergency first aid to secure the wound.  I decided to write about preventing injuries in the kitchen instead.  The reason being is I was careless which is the cause for most kitchen injuries.  In other words most kitchen injuries are preventable.  This week's Frugal Kitchens 101 focuses on kitchen injuries, preventing them and a few tips for dealing with the common kitchen injuries.

  • emergency first aid training - It is my belief that if you cook you do need to have emergency first aid training.  An amazing number of hazardous chemicals can be found in the kitchen so I even suggest being WHIMS certified.  I have CPR, emergency first aid and WHIMS certification.  For most home cooks emergency first aid is recommended and you should have a good understanding what the chemical warning signs mean.  
  • cuts - Most cuts in the kitchen are caused by can openers (eg. my recent cut) or by trying to cut with a dull knife.  Second to those causes is glass breakage.  The common recommendation is to keep fingers away from lids cut with a can opener but sometimes they snap back causing a cut anyway.  Prevent this by using the type of can opener that doesn't leave a sharp edge (eg. I'm going shopping).  Keep knives sharpened and properly stored.  Never put your hand into a glass or jar and avoid thermal shock breakage of glass (eg. pouring hot liquid into a cold glass).  If a glass or jar falls onto the floor causing breakage, stop what you are doing and vacuum up the broken glass.  In the event of a cut, stop what you are doing and turn off any stovetop burners.  Assess whether the cut needs medical attention or not.  If it does not need stitches, clean the cut then pat dry and bandage well applying pressure.  Pressure will stop the bleeding while promoting the skin to fuse back together.  Use a pair of surgical gloves (latex or latex free available in pharmacies) to prevent blood from contaminating food and to prevent contamination to the wound.  Keep the cut clean, dry and bandaged until healed to prevent any  complication like infection.  If the cut needs stitches, wrap tightly while applying pressure and keep the injured area elevated to slow blood flow to that area.  Wrap the injured area in a clean towel or sheet to keep the area clean until it can be assessed medically.  If the cut is severe, apply a tourniquet above the injury.   In this event, it is best to call a friend or neighbour to ensure you can get to the hospital safely rather than drive yourself.
  • burns - There are several sources for burns in the kitchen.  Burns are classified as first degree, second degree and third degree based on severity.  Avoiding a burn is a lot less painful than dealing with a burn but the fact is burns do happen.  Keep pot handles turned towards the inside of the stove when cooking.  Avoid loose fitting clothes and keep hair longer than shoulder length tied back.  Burners should be off when not in use and should not be used unsupervised.  Do not put grease on any burn!  Use ice water instead.  Minor burns can be treated with the juice from aloe vera.  Some burns may require medical treatment.  In this case, do not put anything on the burn other than a clean, sterile bandage/wrap to protect the injured area while seeking medical help.
  • slip and falls - The kitchen is second only to the bathroom with respect to household slip and fall accidents.  It is best to avoid shiny floor surfaces (eg. shiny ceramic tile, marble) but if you are like me having a shiny floor surface then minimize the possibility of slip and falls.  Wipe up any spills as they happen.  If your kitchen opens to the outdoors, use a throw mat to ensure feet are dry.  Don't cook in bare feet.  Borrowing from laboratory standard practices and a kitchen is very much like a laboratory, feet should be covered anytime you are cooking.  Use indoor shoes or slippers with non-slip bottoms.
  • fires - The kitchen is the prime location for many household fires.  Equip your kitchen with a smoke detector and fire extinguisher but if in doubt get out.  If you have natural gas in the house for anything (eg. furnace, water heater, kitchen range) and you smell gas do not use anything electrical (eg. light switch) as there is the risk of explosion.  Vacate the premises then when you are in a safe location call your local gas provider to report the leak.  Never leave a stove unattended when the burners are on.  Should a pot catch fire, place a tight fitting lid on the pot that will extinguish the flames.  Never put grease fires out with water as that will cause them to spread.  Use baking soda, salt or a fire extinguisher on grease fires.  Keep all flammables (eg. T-towels, curtains, loose clothing) away from the stove burners and do not have any flammable/combustible/explosive cleaners anywhere near a source of heat in the kitchen.
  • kids/pets -   In general kids and pets should be kept out of the path of cooking.  I do not believe in keeping kids entirely out of the kitchen though as that is an ideal time to teach them a few cooking skills.  Our kids were always in the kitchen even when I was canning but I created a safe zone for them away from the path of cooking.  They were able to observe and I was able to keep an eye on them knowing they were safe.  As they got a bit older they were able to help in the kitchen without a problem because they had learned good kitchen safety through observation.  Pets have always been a no no in my  kitchens.  We had a cat for almost fifteen years who moved with us to a house well into older age and yet that cat knew the kitchen was off limits.  It's quite easy for a pet to cause a slip and fall or even knock over a hot pot causing injury to itself or anyone nearby. 


Sunday, October 30, 2011

Rice - My Cooking Nemesis

Everyone who cooks regardless of their experience or training will face a cooking nemesis.  The difference between a home cook and a professionally trained one is the professionally trained cook/chef is forced to cook the same dish over and over until they have it mastered to perfection.  The home cook has easy options to practicing a dish though so it is easy to never have to face your cooking nemesis.  My cooking nemesis is rice.

rice cooked in rice cooker
Rice is a staple in most pantries because it is a good value for your food dollar.  It can be enjoyed plain or seasoned as a side and there are a lot of easy recipes that using rice as an ingredient.  However, I cannot cook rice the way I would like to.  As a newlwed I used instant rice or Rice-a-Roni but then we bought our first microwave oven, I started experimenting with long grain rice.  It cooked the rice reasonably well but my gosh the spill over resulted in a huge mess every time.  I finally bought a rice maker.  I'm now on my second rice maker.  I make rice a couple of times a week and the consistent problem has been scorching.  It is the same problem I had trying to cook rice on an electric stove.

I developed several methods to deal with the scorching problem.  I've added butter, cooked in stock and unplugged the rice maker as soon as the rice was cooked.  Each time I carefully spoon out the unscorched rice then tossing the scorched rice but to me that was acceptable.  Finally as soon as the rice cooker clicked off, I removed the cooked rice and set it on a trivet then covered with a lid to keep warm until being served but there was still a bit of scorching.  A few days ago, it dawned on me that the problem with the rice scorching was the residual heat in the burner of the rice cooker or electric stovetop.  The natural gas stove removes this problem so I was on a mission to finally learn how to cook rice on the stovetop.

rice cooked on natural gas stovetop
I consulted my much used and beloved Betty Crocker's Cookbook (circa 1969).  There is a chart to refer to for the amount of rice you want to cook.  I used ⅓ c long grain white rice, ⅔ c water and ¼ tsp salt.  The instructions said to mix together in a sauce pan, bring to a boil then reduce to simmer, cover with a tight fitting lid and cook for 14 minutes.   Once the rice is cooked, turn off the heat, fluff the rice, cover and let steam 5 to 10 minutes.

I am rather pleased and encouraged with my first test batch of cooking rice on the stovetop.  I experienced two minor problems but the rice was still nice and fluffy.  It has a nicer texture than rice cooked in the rice cooker.  First, there was a bit of spill over shortly after I put the lid on.  I'm still getting used to the settings on the gas stove so I had the burner turned too high.  Now I know to turn the burner down even further.  Second, there was a bit of sticking on the bottom of the pan.  It wasn't scorched, just sticking.  There wasn't as much wastage as there is using the rice cooker but still a bit of practice should solve that problem.  I used a stainless steel saucepan so worst case scenario I could buy a non-stick saucepan for cooking rice.  I prefer not to do this though so will be practicing cooking rice several times over the next few days.  This really is going to be an exercise in patience but I'm determined to master cooking rice on the stovetop!


Saturday, October 29, 2011

Come Take a Walk Through My Pantry

I grew up in a small two-story house with an unfinished, unheated, dirt floor walk-out basement leading to the river's edge.  My Mom kept home canned foods on a large homemade shelf unit at the bottom of the stairs.  Apples, potatoes, and squash were kept in old fashioned wood bushel baskets sitting on wood planks.  My job was to retrieve any food needed from that horrible dungeon.  Many a time a mouse would scurry over my hands!  We even encountered muskrats and snapping turtles but thankfully the snakes stayed in the rock crevices that formed retaining walls for the yard.  That in itself is another story!  I swore when I got married my panty was always going to be large, organize, rodent free and finished.  Unfortunately our last two pantries met all the requirements except being rodent free so I quickly learned to seal the house, be on the look-out as soon as the fields were harvested and to protect our food storage by using glass and metal containers.

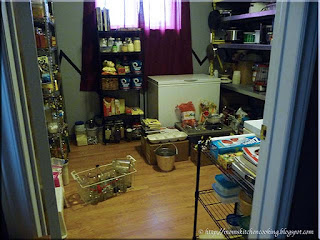
looking into the pantry from the hallway
Welcome to my new pantry!  It is on the lower level of a bi-level house on the northeast corner.  The room is a former bedroom so is completely finished complete with a decorative paint stripe.  The window faces north so it gets good but not direct sunlight.  The window well is 12" deep to the edge of the window leaving ample room to install shelving for part of my continuous harvest indoor garden.

Pictured is the pantry looking from the hallway towards the north wall of the pantry.  Please keep in mind that I am still in the process of organizing the pantry so it is not quite as neat as I would like it to be and there will likely be a few changes yet as the need arises.  Also please keep in mind we just moved so prior to that I was focusing on reducing our pantry supplies and I did not do the volume of canning I normally do.

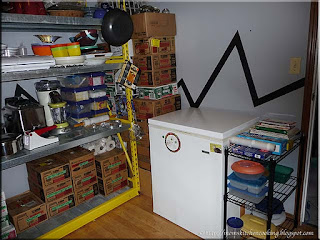
small freezer on the south wall of the pantry to the right of the door
On the south wall of the pantry to the right of the door, there is a small wire industrial shelf unit, small chest freezer and two large stacks of empty canning jars.  I would love to say that was it for empty canning jars but there are a few more boxes in the garage.

There are cases of filled jars on the bottom shelf of the commercial shelf unit.  I label each box with the contents, date and number of jars since some cases have a mixture of contents.  The easiest system I came up with for labeling the cases was green painter's tape and a Sharpie.  It is easy, inexpensive and doesn't damage the cases so they can easily be relabeled when refilled.

commercial shelving on east wall of the pantry
The commercial metal shelf unit came from a grocery store.  We have three of them where they were originally in the garages of our last three houses.  This garage is a bit smaller and already has built-in shelving on one side so my husband brought one of the shelf units in for my pantry.  This is extra heavy duty shelving so I don't need to worry about what I put on it.  It is home to most of my kitchen small appliances, all necessary kitchen overflow, canning equipment, entertaining supplies and a bit of food in the plastic bins on the right (blue lids).

I want the bottom shelf for filled cases of home canned foods.  I can stack the 1L cases three high, the 500 ml cases four high and the 250 ml cases five or six high depending on the shape of the jar.  So that shelf will hold a lot of home canned food waiting to be moved to the food shelves.  Just past the stack of white and green boxes, I have an old freezer basket used for snacks like potato chips.  Next to that is my candle making supplies; the carton beside the wall is a 75 lb box of beeswax sheets.  I'll move these supplies when I need the space for cases of filled food. 

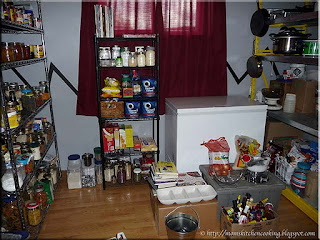
larger freezer, window and shelving on the north wall of the pantry
The north wall has the larger chest freezer and a lighter duty industrial metal shelving unit.  The shelving unit from top to bottom contains: cookbooks, canning supplies/specialty flours, coffees/teas/caramels/marshmallows, boxed crackers/cornmeal, and a variety of dried beans.  A few containers of dried foods sit on the floor next to the shelf unit awaiting a home.

In front of the freezer there is a box and grey bin that do not belong in the pantry but we don't have another spot for them yet.  On top of both are items awaiting a home as is the box of hot sauce in front of the grey box.

The bucket in front of the box was a source of much frustration.  The movers, without our knowledge, dismantled all of our metal shelving.  Both the light and heavy duty industrial shelving units we have require special plastic locking clips to secure the shelves.  The bucket went missing meaning we could not put the shelf units together.  We bought a new heavy duty unit just to get the pantry organized then the bucket was found a couple of days later so we could get some of the light duty units put together as well.

industrial wire shelving on the south wall of the pantry
The heavy duty industrial wire shelving is on the west wall of the pantry.  As you can see it is quite full!  The food is organized according to type of food similar to what you would find in a grocery store.  From top to bottom: boxes of packaged dried pastas/tortilla chips/cheese sauce/canned chili, large container seasonings/commercial sauces/commercial condiments/commercial canned, home canned foods/commercial canned, ois/vinegars/homemade mixes/grains/legumes, and flours/pastas/rices.  Larger 5 gal pails of flour and pasta sit on the floor beside the unit.  My ever trusty Rubbermaid step stool sits in front of the full sized closet that will be used for food and beverage storage as the need arises.  It is currently housing several boxes that we need to organize as well as beverages.  There are wire wall units on top of the step stool that will be used on the walls for smaller items.  I use removable 3M hangers and C-hooks on the walls as needed as well as S-hooks on the shelf units to extend the storage.


Friday, October 28, 2011

My New Cookbook Shelf

Like many home cooks I do have a larger cookbook collection.  Sadly in all the kitchens I've had there has never been an actual spot to display cookbooks.  Most of my cookbooks are stored in the pantry.  I had an industrial metal shelving unit at our house before our last house where I was able to display a few of my cookbooks but not many as the house was very spatially challenged.  At our last house I displayed a few select cookbooks on my rolling metal kitchen cart, changing them out as desired. 

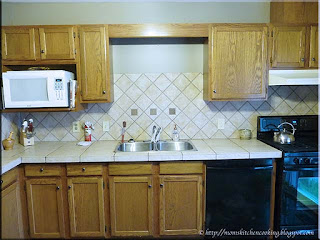
before adding the cookbook shelf
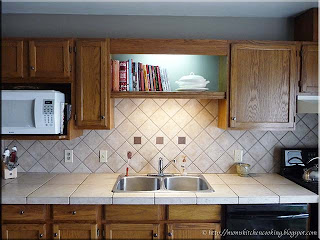
My new kitchen presented the perfect location for a cookbook shelf!  The area over the sinks is partially tiled leaving what I think is a rather awkward un-tiled section resulting in a rather unfinished look.  Ideally this section should have been tiled and with the boxes of tiles left in the garage we know there was enough tile to do so.  I pondered removing the half tiles to finish the tiling job properly but then came up with a more practical solution - a built in shelf.

One of our friends is a cabinetmaker.  He does absolutely amazing work in solid wood with custom lathing and routering.  He made my husband gorgeous, triangle shaped drink tables on wheels for the games room.  He is not cheap but he is well worth every penny paid!  So we called him in to do the shelf for the kitchen, make a custom medicine cabinet and mirror frame for the upper bathroom and install my husband's new dry bar on the lower level.  He's coming back to frame in the lower bathroom mirror.  I imagine with our plans for this house he will be here quite a bit!

new cookbook shelf with both lights on
Our friend has an excellent eye for detail.  He does some of the nicest custom wood router work I've ever seen.  He took one of the cabinet drawers from the bathroom (same as the kitchen cabinets) to match the stain and finish.

The new cookbook shelf finishes off the awkward division between tile and painted wall nicely.  There are two under cabinet lights completing the installation.  Both can be on using the main switch when each light is left in the on position.  The lights are then both on or both off.  Each light has it's own switch to be controlled individually by leaving the main light switch on so one or the other or both can be on.   The upper book light is cool tones accenting the taupe wall.  The lower light is warm tones bringing out the warm beige tones in the tile.

new cookbook shelf with lower light on
Here is a picture of the shelf with just the lower light on so you can see the difference.  I have already placed some of my favourite cookbooks on the shelf.  The second from the left (faded orange) is my most used cookbook - a circa 1969 Betty Crocker Cookbook.  Beside it to the right (dark red spine) is my brand new Betty Crocker Big Red Cookbook courtesy of Mom Central.  It arrived a couple of days ago, much to my surprise and delight.  I was elated so will tell you more about this lovely gift shortly!  I am very much looking forward to discovering all of the wonderful and easy recipes in the newest addition. 

To the right is my hand crafted soup tureen made back in the 1980's when both my husband and I were very much into ceramics.  We made a full setting for 8 with a lot of specialty extras all in the same finish called 'eggnog'.  The pieces were always in a refinished 1950's blond china cabinet that we later sold to a friend so the set has been in storage for about fifteen years.  I'll tell you more about them when I write about the my gorgeous china cabinet with bowed glass.  The eggnog handmade pieces are slowly making their way out of storage, getting back into use where they should be.


Thursday, October 27, 2011

Kitchen Quick Tips - Melting Cheese

kitchen quick tips

Aging affects how cheese melts.  Fresh cheeses resist melting so for best melting properties use hard cheeses like Cheddar or Parmesan.


Wednesday, October 26, 2011

Easy Pressure Cooker Chicken Noodle Soup

I mentioned previously that I have been relying on tried and true dishes to get to know my new natural gas stove.  I'm also keeping the meals a bit simpler until we get settled into our new home.  So far, I have not attempted canning on the gas stove simply because I'm too tired and the opportunity hasn't presented itself.  The weather has turned cold and rainy so soup season has started!  Tonight I made use of one of my pressure cookers to make a quick and easy chicken noodle soup. 

chicken noodle soup cooked in pressure cooker
Pressure cooking is my preferred method for making soups.  From freezer to stock it only takes 45 minutes for tender meat and rich stock.   I add vegetables if desired then bring the pressure cooker back to pressure to cook them or if using noodles, dumplings, rice or barley I just de-bone then add to the hot meat stock mixture and cook without pressure.

Tonight's soup started with two frozen chicken legs with backs attached.  I added a stalk of celery, a quartered unpeeled cooking onion, and two bay leaves then filled the 6 qt pressure cooker to the 2/3 mark.  I brought the pressure cooker to pressure then cooked for 45 minutes. After de-pressurizing, I removed the lid the de-boned the chicken placing skin and bones in a small sauce pan, covering just barely with water and brought to a rapid, hard boil.  While that was in process I strained the remaining stock adding it to the meat in the pressure cooker bottom.  Once the bones boiled hard I strained the resulting stock into the meat mixture then added one chopped onion and brought the mixture to a boil then stirred in extra broad egg noodles.  When the noodles were cooked, I stirred in salt, fresh cracked pepper and Worchestershire sauce to taste.  That's it.  The whole soup took about 75 minutes from start to finish. 

I was quite pleased with how the pressure cooker performed on the natural gas stove.  It came to pressure quicker and de-pressurized quicker which is a very encouraging sign for running the larger pressure canners.  I am planning on putting the pressure canner through its paces this weekend since the pantry is quite close to being organized.  I likely have another half day's worth of work in there then it will be tweaking as need be.  I'll be posting pictures hopefully on Friday!


Monday, October 24, 2011

Frugal Kitchens 101 - Pantry Organization

Frugal Kitchens 101

My pantry at the house we just sold was about 8' x 10' with rather low, (about 5')  open beamed ceilings.  It was home to two freezers as well as copious amounts of food.  The pantry in our new home was formerly a bedroom on the lower level.  It is about 10' x 11' with a full 9' ceiling.  There is a window that is really not desirable in a pantry but that is easily dealt with.  The pantry has a full sized bedroom closet for additional storage and will be home to two freezers, two industrial shelve units (one came from a grocery store) and a couple of smaller knock off metal industrial shelving units.  It will house an eighteen to twenty-four month supply of food as well as small kitchen appliances and equipment.  This week's Frugal Kitchens 101 focuses on how I am organizing my new pantry [pictures later this week].

A well stocked pantry is one of the best safety nets in today's poor economy but it rather useless if it is not well organized.  The reasons being are, first you have to be able to find what you are looking for to eliminate duplicate purchases and, second you have to have a good rotation of food to prevent your carefully accumulated food stock from spoiling before it can be used.  Here are a few ways I organize my pantry:

  • metal industrial shelving - This type of heavy duty wire shelving (eg. Alera available through Sam's Club or Home Depot) can hold 600 lb per shelf which means I can load the entire shelf unit with pretty much anything I want.  I also have a heavy duty, metal shelving unit that came from a grocery store that can hold a lot more weight per shelf.  The smaller, knock-off Alera units hold less but are great for dry goods.  I use S-hooks to hang pots, pans, utensils and food items as needed to extend the storage capacity of the shelving.
  • like with like - Some home organizers recommend organizing a pantry with foods you cook together (eg. everything to make a pasta meal) but I don't like that method.  Instead, I organize according to similarity, much the same way a grocery store is organized.  For example, all rices together...all flours together...all baking needs together.  It makes a bit more sense to me.  
  • labels - Labels become extremely important with a larger food pantry.  At any given time I have several boxes of home canned foods waiting to be moved onto shelves as they become available.  I label the front of each box with the contents, year made and number of jars using green painter's tape and a Sharpie then stack two to three cases high on the bottom shelf of my heavy duty industrial shelving.  I label each jar of home canned food with the contents, month and year it was canned.  I do the same for anything I freeze or dry or any container holding food. 
  • systematic - I am very systematic about pantry storage, keeping a running list of what I need as items are used, buying when on sale then stocking enough to get to the next sale.  Home canned foods are stocked in the quantity to get from one growing season to the next.  The list is created by noting when I'm down to the last two or three items of that particular food so as to not run out entirely. This is a good way of determining how many jars of a certain food I need to can as well.
  • rotation - It is very important that the food stored in the pantry is constantly rotated.  I put newly acquired food whether purchased or home canned/dried to the back so older food gets used first. 
  • the floor - My pantry room floor is laminate wood and while the danger of flooding is low, anything stored on floors is in plastic pails or bins.  Floor space is ideal for stacking empty canning jars and bulk dried food purchases.  Everything is stored around the perimeter of the room leaving the centre of the room with ample space for unloading newly acquired foods as well as easy access to the stored foods.
  • the walls - I use a variety of organizing baskets and hooks on the walls to utilize what would be otherwise wasted storage space.  The 3M removable hooks work well as do the screw in C-hooks.  
  • the ceiling - Unlike my former pantry with a beam ceiling, my new pantry has a finished ceiling.  I plan on hanging a dowel for drying herbs from the garden.
  • the window - Windows are not recommended in any pantry as light can cause certain foods to deteriorate faster.  If a window is present it is recommended that it be blacked out but I have a bit more interesting plan.  The window is above one of the freezers.  My husband is going to build a wood frame with shelves around the window where I can grow potted herbs and start seeds.  On the room side he is putting a room darkening shade so the window side that gets good light will be producing food while the pantry side is protected from the light.  The shade allows for easy access to water my mini indoor garden. 


Sunday, October 23, 2011

Easy Italian Linguini

I spent much of Sunday just trying to organize my pantry and that was after helping my husband replace a few electrical outlets and switches.  The good news is we bought another industrial metal shelf unit yesterday so he was able to finish the partially assembled one in the pantry.  Hopefully the missing lock clips are found soon but in the meantime, I was able to get a fair amount of food organized.

easy Italian linguini
I mentioned yesterday that due to the pantry chaos we were having rather simple meals embellished with a few fresh gourmet touches.  I'm sorry but I am beyond exhausted so fancy cooking isn't going to happen but at the same time plain meals aren't going to work.   I made an easy Italian linguini using a home canned roasted Italian tomato sauce and boneless, skinless chicken breasts from the freezer topping fresh store bought linguini and garnished with basil from my new indoor herb garden.  The chicken breasts were simply seared then pan fried and seasoned with garlic pepper.  I cut them across the grain, layering them on top of the linguini with sauce.

Homemade egg noodles are very easy to make but when time is lacking, many grocery stores are now carrying fresh pasta.  It is nicer than dried pasta but not as nice as fresh home made.  The basil is not just a garnish either.  Cut into pieces while cutting the chicken makes the fresh basil part of the meal and oh my gosh is it very good that way!  There's no such thing as too much basil so I am quite pleased to get my indoor herb garden underway. 


Friday, October 21, 2011

Rib Roast

We have been in our new house officially as owners for five weeks but for the two weeks prior to that we were essentially living between two houses and three days after the closing date we left for our vacation home for a much deserved rest.    We've been home from the vacation home two weeks now so we are working on getting settled.  I'd love to report that I'm cooking up a storm but the reality is there is still a good amount of my pantry stock in boxes.  The movers in their ultimate wisdom dismantled one of my large Alea industrial steel racks and a knock off smaller gauge one (Canadian Tire).  We have yet to find the locking clips to hold the shelves so I could gladly give them a piece of my mind not that it would help any.  My husband wants another of the industrial racks anyway so he came up with a plan.  My partially assembled rack and already loaded will be finished tonight with the new purchase then the new rack will be partially assembled.  Hopefully somewhere in the process we find the locking clips. 

rib roast
At the moment, getting into the freezers is a bit problematic.  I have to move boxes as well as clear the tops of the freezers.  I made a path to both then grabbed a plastic grocery bin and filled it with whatever I could reach.  That bin went into my new [to me, it was part of the house purchase]  kitchen side-by-side.  We are eating from whatever was in that bin as well as what I can reach from my home canned and dried food supply.  Needless to say, meals have been rather simple.  I've been picking up the odd extras just to make the meal not so plain.

There was a rib roast in the bin so I used it to make a pot roast dinner by adding cut white potatoes, whole baby red potatoes and cremini mushrooms.  We really like how the baby red potatoes roast up!  I made gravy to accompany the dinner.  It was a simple, easy meal that freed up time to continue with the organizing.  Just wait until you see pictures of my new pantry! 

I am so excited!  Not only is the pantry spacious there is no more ducking to miss hitting your head on beams.  I have lots of space for everything needed for a well stocked pantry.  A friend of ours is custom making a lighted shelf for my kitchen to house a small selection of my cookbooks so that will be really nice.  He's coming out early next week to install it.  Now if you see the work he does, it will be gorgeous.  He made my husband these amazing solid wood, triangle shaped drink tables on wheels for the games room.  He also custom making us a medicine cabinet for the main bathroom and framing in the mirror for a more custom look.  He's going to be rather busy around our house :)


Thursday, October 20, 2011

Kitchen Quick Tips - Zesting Citrus Fruit

kitchen quick tips

When zesting lemons, limes or oranges be very careful to avoid the bitter white pith just under the zest.


Tuesday, October 18, 2011

Cooking With Natural Gas

The price of hydro in our corner of beautiful Ontario, Canada is skyrocketing despite the fact that Ontario generates a good amount of hydro via hydro, coal and nuclear power plants.  Much of that hydro apparently is sent to the United States.  We are now on TOU pricing meaning that most cooking is done during peak hours or in terms of economics at the highest kWH price.  I really loved my Jenn-Air electric range but decided to go with natural gas when we moved.  Natural gas has always been less expensive in Ontario.  It is about a third of the price of hydro if not a bit less so in terms of economics it made good sense to switch cooking over to natural gas given the amount of cooking and canning that we do.  

gas burner off and don't have flammables near an open flame
Natural gas as a cooking fuel has a lot of benefits over electricity.  The burner is either on or off without any of this warm-up period for the burner.  It is even faster than instant-on electric burners.  There is no residual heat in the burner when it is turned off eliminating any scorching that can occur if you don't take the pot off the burner immediately.  Natural gas actually shortens the cook time and burner can be adjusted to perfectly fit any pot or pan possible.  That being said, using natural gas as a cooking fuel involves an open flame so extra precautions are necessary.

Rule Number One:  If you smell gass, do not attempt to light the burner or turn on anything electrical including a light switch as that could cause the natural gas to ignite.  Call your gas provider immediately and vacate the premises until the issue has been resolved!

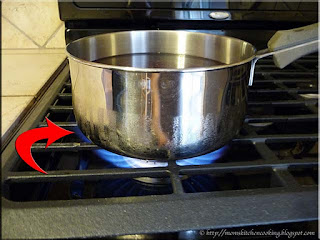
Never have flammables like t-towels (red X)  near the stove.  Yes they can catch fire when using electric burners but there is a greater risk when using natural gas.  Long hair should be tied back and loose fitting clothing should be avoided.  Curtains should not be used in a kitchen where they could accidently come into contact with an open flame such as a gas burner.  Always light the burner after the pot or pan has been placed on the burner (red arrow)!

incorrect height of flame on gas burner
Once the pot is on the burner you can safely light the burner.  Newer gas ranges have an electronic ignition so turn to ignite then once the burner is lit, turn the knob to cook and adjust the flame height.  In the event the hydro service is disrupted you can light the burner manually by turning to ignite and lighting with a match.  Once lit, turn to the cook setting and adjust the flame.

The flame should be blue or mainly blue and it should not come up the sides of the pot or pan (red arrow).  From basic chemistry a blue flame burns hotter than yellow or orange.  A yellow/orange flame means there is dust, dirt or air in the gas line.  Adjust the flame so it is sitting below the pot or pan, not coming up the sides.  If the flame comes up the sides of a pot or pan you waste as much as 80% of heating capacity (aka not frugal) and you run the risk of damaging your cookware (also not frugal).

correct height of flame on gas burner
The properly adjusted flame will be inside the diameter of whatever pot or pan you are using and it should be mainly blue (red arrow).  There may be condensation on the outside of the pot but that is normal, no cause for concern.

I did quick soak of kidney bean for chili a couple of days ago (pictured) then fully cooked them.  Hands down the natural gas burner was superior to cooking beans on an electric burner.  I opted for a gas range with enclosed burners and continuous burner grates as opposed to individual burner grates.  This makes clean-up a snap as boiling water can be poured over any spills to easily wipe up.  What I really like is the controllability of the burner.  The flame can be adjusted for just about any sized pot and when I want it off, it is off immediately.  All in all cooking with natural gas is a lot nicer!


Monday, October 17, 2011

Frugal Kitchens 101 - Let's Talk Fish

Frugal Kitchens 101

I've mentioned several times that we enjoy eating locally caught fresh water fish (eg. bass, perch, pickerel, whitefish).  In addition to what I catch and the generosity of some of our friends who also like to fish, I end up buying a considerable amount of fish.  Fish is generally more expensive than other meats but it is a frugal choice in terms of healthier eating and vastly reduced cooking time.  Fish is one food I prefer fresh (aka still swimming) or frozen.  Fish is versatile lending itself nicely as the meat component in meals, sandwiches, salads, soups and chowders.  This week's Frugal Kitchens 101 focuses on fish.

  • fresh fish - You can catch fresh fish yourself or it can be purchased directly from fishermen, fish mongers (eg. retail from commercial fisheries), fish farms or in the fresh seafood section of your grocery store.  It is best to clean your fish catch as soon as possible then prepare what cannot be used that day for freezing (see methods below).  Fish bought fresh from other sources may have the head and scales still on so you need to descale the fish and remove the head.  The head should be used to make fish stock.  The flesh behind the operculum especially on bass is quite tender and sweet.  It is considered a delicacy.  When buying fresh fish with the head on the eyes should be clear not cloudy and it should not have a strong 'fishy' smell.  Cleaned fish is usually sold as descaled and beheaded or as fillets.  The flesh should be translucent, free of blemishes and there should be no strong 'fishy' smell.  Transport fresh fish on ice or in insulated grocery bags.  Fish that is still living can be transported in a bucket with water from the source where the fish was caught.
  • frozen fish - Frozen fish is available from fisheries and the grocery stores.  It is usually vacuum sealed as fillets or steaks.  Frozen fish is also available already coated but I do not recommend buying fish this way.  It is more expensive per unit price and many fish products like breaded fish sticks are made with chopped fish as well as having additives and preservatives.  Frozen fish should be kept frozen until ready to cook.  When buying frozen fish look for the Marine Stewardship Council's (MSC) certification indicating the fishery has met the environmental standard for a well-managed and sustainable fisher. Avoid salmon that is farm raised as dye may have been added to give the reddish flesh colour.  Instead choose 'wild' salmon.
  • canned fish - Both tuna and salmon are available canned.  I am not a big fan of either but they do have their place in a well stocked pantry.  Choose tuna that has the 'dolphin friendly' symbol indicating the fishery uses methods that don't entrap dolphins.  Tuna that has been packed in water is healthier than that packed in oil.  Always shop the sales when buying canned fish.  Smaller fish such as sardines and anchovies are also available canned.  These are usually packed in oil.
  • cooking fish - Fish can be cooked using most cooking methods although one method may be better for one type of fish than another.  Fish should be cooked until the flesh is opaque and flakes nicely.  Avoid over cooking!  Keep coatings and seasonings on the lighter side.  Citrus pairs nicely with fish to brighten the flavour.  For a crispier coating use a dry flour mixture with cornmeal but use a batter mixture for a smoother English style coating.
  • freezing fresh fish - Fresh fish is delicate so it does need to be well protected when freezing.   There are three ways to package fresh fish for freezing. 
    • freeze in water - Clean the fresh fish.  Place in freezer containers.  Pour cold water over the fish leaving ½- inch headspace.  Freeze.  Thaw before using.  This works great for perch and pickerel.
    • ice dipping - Place cleaned fish fillets in a single layer on a baking sheet then freeze.  Quickly dip in cold water then refreeze.  Repeat this process a few times to form an ice barrier on the fish fillet.  Place fillets in freezer container and freeze.
    • vacuum sealing - Place cleaned fish fillets in vacuum bag.  Vacuum seal.  For best results, use one meal's worth or one fillet per vacuum bag.
  • canning fish - Fresh caught fish can be home canned and while I have not canned fish many of my fellow home canners have.  I certainly would home can fish given the opportunity.  In general stick to tuna or salmon but in reality any fish could be canned.  
  • smoking fish - Fresh caught fish can easily be hot or cold smoked for a lovely flavour.  This is a preservation method for keeping excess fresh fish while adding flavour.  Smokers can range from simple DIY set-ups to outdoor grill add-ons (inc. foil smoke packets) to rather fancy smokers.  The average home cook will likely use an outdoor grill add-on or small specialized smoker (~$100).


Sunday, October 16, 2011

Baked Basa Fish

We enjoy a fish dinner at least once a week, usually on Fridays but we often have fish a couple of times a week.  Fresh caught local fish here is bluegill, bass, perch, pickerel and whitefish.  Since I like to fish and we have friends who are very generous with their catch, we eat a lot of local fresh-water fish here but more salt-water fish at our vacation home.  One of the local grocery stores has a few rather good sales on various fish fillets.  I took advantage of the sales to stock up on wild salmon as well as try a couple of fish we haven't had before.  One of those fish was basa.


baked basa fish
Basa fish (Pangasius bocourti) is a type of catfish native to southeastern Asia (Mekong River Delta in Vietnam and Chao Phraya basin in Thailand).  The package I bought was farm raised rather than wild.  The fillets were good sized enough for one serving each.

I baked the basa fish seasoned with lemon pepper.  Sides included roasted mini red potatoes and steamed asparagus.  The basa fish had a light, clean flavour.  My husband really liked it however I found the texture to be a bit mushier than I like in fish.

The package cost me $5 for two fillets, enough for a meal for two.  In comparison to chicken, pork and ground beef the basa fish at $2.50 per serving is a bit higher priced but it is a healthier meat choice.  Fish is lower in calories and fat especially in comparison to red meat.  Fish also has a short cook time making it a frugal meat choice.  In this respect, even though fish costs a bit more per serving, it is still an excellent value for your food dollar.


Thursday, October 13, 2011

Kitchen Quick Tips - A Squirt of Lemon

kitchen quick tips

Lemon is a wonderful flavour enhancer.  Add a squirt to your soup to brighten the flavour.  Undress your salads by sprinkling with fresh squeezed lemon juice.  There's no calories, just oodles of flavour!


Wednesday, October 12, 2011

Easy Cranberry Sauce with Pizzaz

I prefer fresh cranberries over commercially canned or frozen although I do home can a few jars for use when fresh cranberries are unavailable or too expensive.  I freeze a bag or two as well.  There is no prep work for freezing.  Just toss the bag in the freezer then wash and clean when you want to use them.  Fresh cranberries tend to be the least expensive here the week before Thanksgiving or Christmas. 

easy cranberry sauce
Cranberry sauce is ever so easy to make from fresh cranberries.  Every package has the recipe.  The standard recipe is one 12 oz bag of cranberries, 1 c of water and 1 c of sugar.  I decided to give a bit more pizzaz to my cranberry sauce for this get-together.  Here's the recipe I developed.  Recall this was for a get-together of twenty-five so you can easily reduce by half and the sauce does freeze nicely.

Easy Cranberry Sauce with Pizzaz
recipe by: Garden Gnome

24 oz fresh cranberries
2 c orange juice with pulp
1½ c granulated organic sugar
2 tbsp orange zest

Wash cranberries.  Mix the orange juice and sugar together in sauce pan.  Bring to a boil over medium heat then boil for five minutes.  Stir in cranberries.  Continue cooking until cranberries pop open.  Remove from heat.  Stir in one tbsp of the orange zest.  Pour into serving bowl.  Sprinkle remaining orange zest over the cranberry sauce.


Tuesday, October 11, 2011

Our Thanksgiving Turkey 2011

We hosted Thanksgiving at our new home this year.  There were a total of twenty-five from our family including ourselves.  Larger scale entertaining takes a bit more planning and prep.  This is one time where I do use menu planning.  We were at our vacation home but thanks to email my husband's sister took care of a lot of the menu details.  We provided the turkey and ham as well as our home.  It only seemed fitting especially since both his parents have passed.  My husband is the eldest of his siblings  and since we do a lot of entertaining we have all the extra needed for larger gatherings. 

turkey just out of the natural gas oven
I am getting used to cooking with natural gas and so far loving it immensely!  The new stove was hooked up just a couple of days before we left for our vacation home so I didn't have much time to experiment.  We've only been home not quite five full days so in total have had less than a week to use the stove.  I made a banana loaf, roasted a chicken, and used the stovetop a bit.

We roasted a 23.7 lb turkey for part of our Thanksgiving feast.  There honestly isn't much difference between roasting a chicken or turkey other than timing.  I always roast both stuffed and covered at a lower temperature until the last fifteen minutes or so when I remove the lid for browning.

A turkey this size would have to be in the oven by 10 AM to be ready for dinner at 6 PM, or a total of eight hours when I was using an electric oven.  I put the turkey in at 11:30 AM and discovered it was cooked perfectly by 4:24 PM, for a total of only 5 hours without the need to remove the lid for browning!  The turkey pop-up timer has sprung with confirmation by a meat thermometer at an internal temperature of 175ºF.  Not only are we saving on the price of cooking fuel, the cooking time is reduced.  Now I have to ponder why as the temperature was the same I always use - 275ºF.  Technically, the cook time should be the same regardless of the cooking fuel.

roasted turkey ready for carving
Pictured is the beautiful beast, and doesn't it look delicious?  We roasted the turkey the day before our Thanksgiving feast.  It is a lot easier to de-bone then reheat for larger gathering.  The stuffing is scooped into an oven-proof baking dish for re-heating.  I made the gravy then as well which worked out nicely for defatting.  I kept the carcass for making turkey stock later.  The ham (not pictured) was warmed through the next day.

Tip:  When warming deboned turkey, pour a small amount of water over it then cover well with tinfoil.  This will prevent the turkey from drying out.

My husband and I thoroughly enjoy entertaining our family and friends.  We have a long standing tradition of sending left-overs from larger events home with our guests.  Yes, we could use up the left-overs ourselves but some of our family and friends travel a fair distance to attend meaning they don't get home until after midnight or later yet have to be up for work the next day.  Some of them have little ones as well.  This is our gift to them to help make the next day just a bit easier for them. 


Monday, October 10, 2011

Frugal Kitchens 101 - Entertaining for Large Groups

Frugal Kitchens 101

Happy Thanksgiving!

Today we celebrate our Canadian Thanksgiving.  There will be between twenty-five and thirty of us, hosted in our new home.  Yes we recently moved and because we were on our fall vacation for two an a half weeks the house is not perfect but we felt it is more personal than renting a hall as was suggested.  We are used to hosting larger groups with one monthly event of fifteen to thirty as well as larger family gatherings. Here's a few tips for entertaining for large groups on the frugal side.
  • KISS (keep it simple silly) - The KISS hypothesis really works when entertaining for large groups.  Less is more in the sense of dishes offered.  I have place settings for 30 but sometimes going to paper plates is a good idea depending on the venue. 
  • don't refuse help - Trust me I am the queen of my kitchen but for larger events a bit of help is always appreciated.  If someone offers to help, graciously accept even if you need to slightly modify the help offered,
  • use disposable - I don't like disposable anything and have service for thirty but even at that there are sometimes disposable is better than anything else.  
  • enlist help - I have no problem hosting for thirty but I am not above asking for help.  It is not impolite to say, I need help for this event.
  • everyone brings something - Ok, this is not my idea and in fact when hosting an event there are very few times I would want a guest to bring anything because that is not our style.  But sometimes like our Thanksgiving feast each couple was responsible for bringing one dish.  It works and it does take a bit of the burden off of the host. 


Sunday, October 09, 2011

Salmon Dip

Yesterday I posted about a lovely seafood dip we had as an appetizer at ChaCha Coconuts in St. Petersburg, Florida.  Two things stood out in their dip.  The first was a creamy texture and the second was  presentation.  The very next day I made my own version using left-over grilled salmon.  It was not identical as I only used salmon but the results were quite similar.

salmon dip
Left-over fish can present a problem usually because there isn't enough to do anything with and reheating can cause the fish to toughen.  I  like using what little fish we have in sanwiches, dips or salads.  Salmon is one fish I like to cook a bit extra for use in another dish simply because fresh cooked tastes so much nicer than canned salmon.  This time I used the salmon for a cloned recipe of ChaCha Coconut's seafood dip.

Salmon Dip
recipe by:  Garden Gnome

3 oz. grilled salmon
¼ c chive & onion cream cheese
¾ c sour cream
¼ c Miracle Whip salad dressing
¼ tsp prepared horseradish
¼ tsp prepared mustard
1 tbsp chopped parsley
2 tbsp finely chopped onion
1 c ribboned Romaine lettuce

Pull salmon into pieces.  Place salmon, cream cheeses, sour cream, salad dressing, horseradish and mustard in blender.  Pulse blend until well mixed.  Transfer the mixture to a small mixing bowl.  Stir in the parsley and onion.  Cover and refrigerate 1 hour.  Wash the lettuce.  Remove large centre vein.  Roll from one side of the vein to the other.  Start at the top cutting thin strips across the roll.  Place the ribboned lettuce on a serving platter.  Spread the dip mixture over the lettuce (it becomes part of the dip).  Place crackers of your choice on the serving platter for spreading the dip on.


Saturday, October 08, 2011

ChaCha Coconuts in St.Petersburg, Florida

During our recent stay at our vacation home we rented a boat for the day to spend a bit of time exploring the waters around St. Petersburg, Florida.  By the time we reached the St. Petersburg pier on Tampa Bay storms were threatening and we were ready for lunch so docked the boat wandering up the pier for a good place to eat.  There are five levels to the pier.  Everyone we talked to recommended ChaCha Coconuts on the fifth floor.  We nicely got settled with drinks ordered when the first storm blew through.  It was apparent we were going to be there awhile. It was a very pleasant way to wait out the storms.  We even managed to get a few great pictures of the dolphins and pelicans. The prices are very reasonable, the food is good with an ample selection and the view on the wrap around open deck is spectacular!

seafood dip
We ordered the seafood dip (pictured) and Bahamian conch fritters (not pictured) as appetizers.  I was particularly impressed with the seafood dip although the presentation was slightly lacking with having to unwrap the crackers but given the humidity combined with being an outdoor patio, wrapped kept the crackers fresher.  Still, I can't complain at the generous portion.

The seafood dip was light and refreshing served on a bed of shredded lettuce with lime wedges and red onion pieces served on the side.  One taste and I knew this dish was one I simply had to clone!  And I did just that the very next day so watch for tomorrow's post.

Yucatan fish taco
My husband ordered the Yucatan fish tacos ($10.95) consisting of two soft flour tortillas filled with grilled Merluza dusted with Cajun spices, caramelized onions, peppers, Jack & cheddar cheeses served with their homemade fresh roasted corn & black bean salsa.  The generously tacos were served with sour cream and salsa as well as black beans and yellow rice.  Lime wedges garnished each taco.

Surprisingly the idea of fish tacos never appealed to me so I've never made them.  However, my husband declared them quite tasty so I will make them in the future.  The fish used in these tacos was merluza (hake), a popular fish in Spain.  Halibut is a good substitution for merluza which tends to be a bit more expensive in North America.

San Juan nauchos
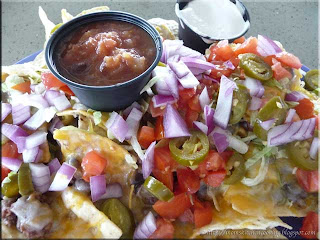
I ordered the San Juan nachos consisting of tortilla chips with black bean chili, Jack and cheddar cheese, shredded lettuce, onions, tomatoes and jalapeno peppers.  They were served with sour cream and black bean-corn salsa on the side ($8.95).  The black bean chili was an interesting change from ground beef.  I really liked that they used actual shredded cheese rather than a processed cheese sauce.  The nachos were baked similar to the way I make mine.  The portion size was quite large suitable for sharing.  The nachos were good!

I have noticed that many restaurants here serve one or more dishes with black beans as an ingredient.   Black beans with their deep flavour are one of my favourite beans.  I cook mine from scratch as well a can them when I'm doing a bean canning session.  They are a great substitution for beef, lending themselves nicely for vegetarian chili or burger patties.


Friday, October 07, 2011

Palace Italian Restaurant in Lakeland, Florida

My husband and I have always enjoyed eating out.  By eating out I do not mean fast food restaurants but rather any restaurant from pubs, diners, drive-in, casual dining, and occasionally finer dining.  Our focus is usually on restaurants with home style cooking.   Not only is eating out a form of entertainment it is also a wonderful source of culinary inspiration.  Discovering that little pearl of a diner off-the-beaten-track -- priceless!

Palace Italian Restaurant is located at 6120 North Highway 98 in Lakeland, Florida.  There are five more locations in the Lakeland area.  The restaurant has been family owned since 1997.  This restaurant is well worth the visit.  The atmosphere is warm and welcoming with friendly staff.  The food is divinely delicious because they use only the freshest ingredients to create authentic Italian dishes.  To quote them "Mangiare bene per vivere bene! (Eat well to live well!)".  This is one restaurant were you will be eating quite well!

Prices at the Palace Italian Restaurant are more than reasonable with dinner pasta entrée $15.95 or less and a reduced price for the lunch sized portions.  They have a good selection of gourmet pizzas, of appetizers, and salads.  We spent $36.73 for two meals with drinks.

All of their classic pasta dishes are served with freshly made traditional focaccia served with a shallow bowl of dipping sauce made with sun dried tomatoes and olive oil, just light seasoned.  The sun dried tomatoes gave the dipping sauce a lovely, rich flavour.   I often serve bread this way at home so will work on a clone recipe for this one.

spaghetti puttanesca
My husband ordered the veal parmigiana (not pictured)  while I ordered the spaghetti puttanesca.  Spaghetti puttanesca literally means whore's style spaghetti, made with ingredients typical of Southern Italian cuisine.1  The sauce consisted of black olives, capers and garlic sauteed in marinara sauce so would be very easy to duplicate at home starting with the basics of a marinara sauce.  The sauce tops spaghetti cooked to al dente.  Although the dish is noted to be spicy by some sources, I found the spaghetti puttanesca to be quite delicious, definitely not too spicy.  The whole black olives combined with the capers gave an nice, chunkier texture that was quite pleasing.  The funny thing is I've put black or green olives on my pizzas for ages but never thought to use olives in a pasta sauce.  I can't wait to start experimenting to create a recipe for this yummy pasta dish!


Thursday, October 06, 2011

Kitchen Quick Tips - Avoid the Green

kitchen quick tips

Blueberries are high in a group of pigments called anthocyanins (blue pigments).  Avoid using baking soda when cooking with blueberries as the base (baking soda) will cause the blueberries to turn green.


Tuesday, October 04, 2011

Cabot Greek Yogurt

We eat a lot of yogurt, mainly homemade.  The yogurt maker is always in operation at home.  I haven't set up a yogurt maker at our vacation home.   The main reason has been we have had too many things to do getting the vacation home up and running to worry about making yogurt.  So, for the length of time we are there I buy plain yogurt.

Cabot Greek style yogurt
I discovered Cabot Greek style yogurt made with 10% milk fat.  This yogurt is made in Vermon and 100% of the profits got to their farmers (similar to Fair Trade products) t.  Oh good gosh is it ever good!  The highest milk fat I use at home to make yogurt is 2% but occasionally buy 3% milk fat Greek style yogurt as a starter.  I always buy the smallest size container possible at home.

I often substitute plain yogurt for sour cream because yogurt encourages the growth of beneficial intestinal floral growth that keeps harmful bacteria in check.    The numbers for the 10% milk fat yogurt actually were quite good in comparison to sour cream.  Sour cream is 492 calories per cup with 10 mg cholesterol, total fat of 48.3 g, 7.3 g protein and total carbs of 9.9 g.  The 10% milk fat yogurt is 290 calories per cup. total fat of 36%, 75 mg cholesterol, 18 g protein and total carbs of 12 g.  Since dietary cholesterol really plays a very small role in coronary disease (high cholesterol is mainly genetic), yogurt even at 10% milk fat is a healthier choice than sour cream.

yogurt not sour cream
I honestly found the 10% yogurt too rich to eat by itself.  It was extremely rich and creamy lacking much of the natural tang of plain yogurt.  It was a wonderful substitution for sour cream on top of grill baked potatoes though!  It would be really good for cooking as well.

I will certainly be using the 10% milk fat yogurt at our vacation home rather than sour cream.    Hey we can all cut back a bit on calories yet that doesn't mean we have to cut back on flavour.  I really liked this yogurt as a topping!  It would be a lovely substitute for whipped cream too.  The flavour was quite delightful but for me only in small amounts.


Monday, October 03, 2011

Frugal Kitchens 101 - Cloned Recipes

Frugal Kitchens 101

I think everyone at one time or another has enjoyed a restaurant meal or dish that they would like to recreate at home.  A couple of reasons for cloning a recipe is it is less expensive and sometimes more convenient than eating out.  Another good reason for cloning a recipe is some dishes are regional so even if eating out you might not be able to find that particular dish.  Cloning a recipe is not as easy at it sounds even if the restaurant is generous enough to give you the recipe.  Restaurants don't tend to give out their recipes simply because if you can make the dish at home chances are very good you won't be back meaning they don't make money.  It is very difficult to make money in a restaurant as it is without giving diners a reason to not return.  The second problem with cloning a recipe is lack of a comparison.  The taste is all in your memory unless you are fortunate enough to be able to get another sample of the dish which is not always possible.  The work around for this in some restaurants is to bring home the left-overs but you do need a sensitive palate to detect some of the nuances and notes in the dish.  The third problem is ingredients.  These tend to vary from region to region.  Something as simple as a tomato variety that particular chef/restaurant uses may not be available where you live.  We live in Ontario but our vacation home is in Florida and I can't tell you the frustration at wanting to make a dish but can't find that particular ingredient I always use.  Finally is even if you have the recipe and the proper ingredients, there are always little things like shaken not stirred, methods used,  lack of commercial equipment and even the cooking fuel used.  At best a cloned recipe is just that.  It comes close to but is not the same.  With this in mind, here are a few tips for cloning recipes:

  • ask - Some restaurants will give out a recipe or two but don't expect the recipe for their signature dish.  Realize that they may not include their 'secret' ingredient in the recipe even if they do give it to you.  
  • the doggie bag - Bringing home what you can't eat is an option at some restaurants.  This is a wonderful aid in cloning a recipe because it helps your taste buds remember what your brain forgot especially the subtle notes in a dish.  
  • take pictures - Always take a picture of the dish before enjoying it.  This will jog the memory with respect to some ingredients and presentation.
  • get a second opinion - There are days your taste buds may be slightly off.  My husband is great with offering a second opinion.
  • keep trying - The beauty of cloning a recipe is most results are edible so keep trying.  In the process you may end up with an intermediate to the recipe you were trying to clone that you really like.
  • keep notes - Use a kitchen journal to record what you did to clone the recipe as well as each change you make along the way.


Saturday, October 01, 2011

Spinach Artichoke Parmesan Chicken Bundles

A few years ago I signed up for a free subscription to What's Cooking magazine by Kraft Canada.  I really like this magazine.  While it does promote Kraft products I find it rather easy to substitute ingredients.  The nice thing is the recipes are fairly simple without a long list of ingredients.  I have kept every copy I have received.  I recently found out they will be charging for the magazine only because I went to their site to change my email and address.  Their email service and online recipe resource remains free.

spinach artichoke parmesan chicken bundles
The recent copy of What's Cooking had a recipe for artichoke-parmesan chicken bundles that became the base for the dish created.  I added baby spinach and used marinated artichoke hearts.  I actually used the shake & bake specified but next time will use my homemade shake & bake chicken coating that has a lot more flavour than the commercial version and it's considerably less expensive.  The downside to moving is looking for an ingredient in an unorganized pantry so in this case the commercial version was easier than climbing over boxes.

The spinach artichoke parmesan chicken bundles were very filling and quite tasty.  We really enjoyed them.  The chicken bundles are really quite easy to make  lending themselves nicely to a variety of fillings.

Method:  Prepare your filling of choice.  Pound boneless, skinless chicken breast thin using a food mallet.  Spread your filling in the middle then roll starting at a short side of the meat similar.  Secure with a toothpick.  Coat as desired.  Bake at 375 degrees F for 30 minutes until golden brown and cooked through.  Serve with sides of choice