My photo
Ontario, Canada
I am a wife, mother and grandma who enjoys the many aspects of homemaking. A variety of interests and hobbies combined with travel keep me active. They reflect the importance of family, friends, home and good food.
Cook ingredients that you are used to cooking by other techniques, such as fish, chicken, or hamburgers. In other words be comfortable with the ingredients you are using.
--Bobby Flay

For Your Information

Please watch this area for important information like updates, food recalls, polls, contests, coupons, and freebies.
  • [March 19, 2020] - Effective Mar 17, this blog will no longer accept advertising. The reason is very simple. If I like a product, I will promote it without compensation. If I don't like a product, I will have no problem saying so.
  • [March 17, 2020] - A return to blogging! Stay tuned for new tips, resources and all things food related.
  • [February 1, 2016] - An interesting report on why you should always choose organic tea verses non-organic: Toxic Tea (pdf format)
  • Sticky Post - Warning: 4ever Recap reusable canning lids. The reports are growing daily of these lids losing their seal during storage. Some have lost their entire season's worth of canning to these seal failures! [Update: 4ever Recap appears to be out of business.]

Popular Posts

Tuesday, August 27, 2013

Shipwreck Lee's Bar & Bistro in Tobermory, Ontario

We arrived in Tobermory, Ontario just after 11:30 AM to sunny skies despite the cold, wet and windy weather of South Baymouth when we set sail.  It had been an uneventful passing over Lake Huron although it was too chilly and rainy to sit outside on the upper deck of the Chi-Cheemaun.  The waves were high due to the stormy weather although no where near as bad as they could have been.  As boaters, the rougher waters didn't bother us.   We were quite pleased to see the sunny skies knowing we wouldn't be setting up camp in the rain. 

Shipwreck Lee's Bar & Bistro in Tobermory
Shipwreck Lee's Bar & Bistro is located at 4 Bay Street in Tobermory, kitty corner from the only grocery store in town not even a block from Little Tub harbour.  To the left just out of camera range is the facade of the restaurant with a small indoor dining area but the happening dining area is outdoors.  The very friendly waitstaff are dressed as pirates acting the part right down to the lingo making this a fun, kid friendly eatery.  The licensed bar features beer (aka their house wine) from Flying Monkey Craft Brewery of Barrie, Ontario.  It's the perfect little eatery for lunch, dinner or after hours.  Oh, and dogs on leases are allowed on the grassy sitting area above the gravel sitting area making this the perfect pit stop for those traveling with man's best friend.

seating at Shipwreck Lee's
Outdoor sitting is a must in Tobermory!   There are amazing sights to enjoy while people watching in this quaint little port village.  Shipwreck Lee's Bar & Bistro caters nicely to enjoying the great outdoors.   The simple wood picnic tables are painted blue and white echoing a nautical theme.  Blue and white striped dining tents provided shade from the warming rays of the sun.  The gravel sitting area is somewhat sheltered with a small grassed area rising about 3 feet above to the right just out of camera range.  A wonderful hand painted mural completed the pirate theme.

Tobermory is in bear territory so all the refuse containers are bear and racoon proof.  Visitors are encouraged to use these containers scattered throughout the village to help discourage wildlife from becoming a problem.  Shipwreck Lee's Bar & Bistro is set up with this in mind.

Georgian whitefish at Shipwreck Lee's
The Bruce Peninsula is well known for its Georgian Bay whitefish, a mildly flavoured local fish.  Shripwreck Lee's Bar & Bistro also refers to Georgian Bay whitefish as their house wine.  And rightly so!  We each ordered the two piece lunch special Georgian Bay whitefish & chips ($13.95).  The delectable whitefish was batter coated served on top of a generous portion of fries, garnished with a party umbrella for a festive touch.  It was served with a small side of coleslaw.  The presentation added to the atmosphere of fun dining with the emphasis on good, unpretentious food.  I really have to give this small, unique eatery two thumbs up.  It has fast and friendly service, good food and great atmosphere!

Georgian whitefish
I just had to show a close-up shot of the Georgian Bay whitefish.  The texture is similar to that of cod but smaller flakes.  There is just a hint of wild to the flavour, hard to describe but incredibly delicious!  It was coated in batter then deep fried similar to English style fish (usually cod).  While I don't eat the batter, I do like fish cooked this way as it keeps the fish moist and tender.  Doesn't that fish look delicious?

Tobermory is on Georgian Bay.  The only main road south to Owen Sound is Highway 6, a small but very scenic two lane highway.  Scattered along this route are several roadside stands as well as a few farm markets selling local whitefish.  We normally stock our cooler with whitefish and other goodies to take home.


Tuesday, August 20, 2013

Carol's & Earl's Restaurant & Farmer's Market Ltd., South Baymouth, Ontario

We stayed in Gaylord, Michigan the first night of our great road/camping adventure.  The next morning we headed north on I-75 finally crossing back into Canada at Sault Ste. Marie, Ontario just before lunch time.  After a few detours around Sault Ste. Marie we proceeded along the Trans Canada as far as Espanola, Ontario where we turned south for our evening destination of South Baymouth.  We had booked a room there and had reservations for the Chi-Cheechmaun ferry that would take us to Tobermory, Ontario the following morning. 

It was a cold, dreary day with on and off rain yet we happily made our way through the amazingly beautiful Canadian landscape.  It was our anniversary and having spent many a mile traveling together over the past 36 years, it was a rather fitting way to celebrate this milestone!  We arrived at South Baymouth shortly before 7 PM and decided to stop for dinner before going to the motel.  South Baymouth is in Tehkummah Township, population 406 (2011).  It is the northern terminal for the Chi-Cheechmaun ferry, the southern being Tobermory.  This is very much a tourist pass through point as thousands make the trek from Espanola through Manitoulin Island with a destination of Tobermory saving considerable time and kilometer in comparison to driving the northern route.  The town has access to the Canadian mainland during the winter months via Highway 6 as the ferry does not run during the winter months.  Essentially the town shuts down for the winter months.  We have driven through Espanola several times staying on the Trans Canada during the winter months and let me tell you, folks up there have no choice but to keep very well stocked pantries and necessary supplies on hand to get them through the long winter months!

Carol's & Earl's Restaurant & Farmer's Market in South Baymouth, Ontario
Carol's and Earl's Restaurant & Farmer's Market Ltd., is located at 21306 Hwy. 6, South Baymouth, Manitoulin Island, Ontario.  It's on the left hand side of the road heading into South Baymouth.  The building is rather non-descript but don't let that fool you.  Through those door you will be greeted with some of the most delicious homemade pies I've ever seen.  They are made from scratch daily.  To the left of the doors is a small dining area then archways lead to the larger dining area under the roof peak (centre).  The restaurant seats 100 at full capacity.  I can't comment on the 'farmer's market' portion of their name as there were no signs of produce when we were there although I suspect that is what the two picnic tables were set up for.  As is customary with many farm stands in this area, local white fish and wild blueberries are often sold.  I sure would have loved to been able to buy some of either for the camping portion of our trip! 

homemade chicken noodle soup
We planned stopping at Carol's &  Earl's who specialize in home cooked meals for their yellow perch.  Yellow perch is a local fish, mildly flavoured and just down right delicious.  It is usually lightly coated and pan fried.  We both ordered the yellow perch dinners that came with a choice of soup or salad.  My husband ordered the homemade chicken noodle to accompany his meal.  Carol's & Earl's make all of their soups from scratch.  The chicken noodle soup was about as close to the way I make it as you could get starting right from homemade stock.  The soup was chuck full of broad egg noodles and chunks of chicken.  Served piping hot, it was a pleasant way to warm up after a chilly, damp day that was only getting colder.

yellow perch dinner
The yellow perch came with a choice of mashed or fried potatoes and a side of coleslaw.  I ordered mashed; my husband ordered the fries.  We ordered a side of gravy.  The mashed potatoes were real mashed while both the gravy and coleslaw were homemade.  The mouthwatering pan fried yellow perch was delightful! 

Carol's & Earl's is a must stop at eatery when visiting South Baymouth.  Their food is delicious!  Their service is friendly, very much home style and they love to talk to their patrons.  We bought a cherry pie on the way out the door sure that it would be a lovely dessert at the campground.  We were not wrong!  Even if you don't stop for a meal, be sure to stop for a pie.  Originally the pies were made by Earl's Mom but now they are made by Earl.  Honestly, they are amazing!   If you visit this restaurant, they do not accept debit or credit cards.  I recommend carrying sufficient cash for fuel and meals when traveling through northern Ontario as many places are cash only.


Monday, August 19, 2013

The Clarkston Union Bar & Kitchen in Clarkston, Michigan

Yesterday I wrote briefly about our recent road/camping trip that took us from southwestern Ontario through the thumb of Michigan, across Lake Huron to Tobermory, Ontario, and finally back home.  The entire adventure was six days in its entirety.  Four of those days were spent rustic camping with our kids and grandkids.  Talks about a wonderful adventure!  Over the next few days I will share some of the foodie highlights we enjoyed during our adventure.

The Clarkston Union Kitchen and Bar in Clarkston, MichiganWe are avid fans of several Food Network shows including Diners, Drive-Ins and Drives, affectionately known as Triple D with host Guy Fieri.  We watch one episode that featured The Clarkston Union Bar & Kitchen located at 54 S. Main Street in the Village of Clarkston, Michigan.  This classic greasy spoon housed in a converted 1840's wooden church holds the bragging rights as having the most macked mac & cheese.  Kid Rock frequents the restaurant as well so there's always a chance of seeing him there. 

A small gift shop, the Union General, home of the Cupcakery is located just behind the restaurant outdoor patio.  It features coffee, ice cream, sweets, bath and toys.  Be warned, this shop is heavily scented, not suitable for those with respiratory problems or asthma.

Clarkston was listed on the National Register of Historic Places as a Historic District on the merit of its architectural and historical significance in 1980.  The village is home to important examples of Queen Anne style homes, well worth visiting for it's historical significance.  We planned a stop in Clarkston the first day of our travels to check out this featured eatery and do a bit of sight seeing as it was on our planned route, less than a mile off of I-75 N.

interior of The Clarkston Union Kitchen and Bar
The interior decor of The Clarkston Union Bar & Kitchen is warm and inviting, very much church-like.  The owners have certainly maintained and built on the church-like feel.  The high ceiling, hanging lights, stain glass windows, wood floor, authentic church pews and open kitchen all lend themselves nicely to the atmosphere. Even the pale creamy yellow walls is reminiscent of many church interiors.

We had a short wait for seating but this restaurant is reputed to have rather long wait times.  There is a sitting area to enjoy while waiting in what was once the front entrance to the church.  There is seating at the very well stocked bar (middle right) in addition to the dining room seating.  Seating is close but open.  We were seated in the middle just on the other side of the two folks in yellow shirts.  The restaurant is loud (ok borderline very loud) with a very social atmosphere though, definitely not the place for a quiet dinner conversation.

Buckler non-alcoholic beer
We each ordered ice tea with our meals.  The nice thing about ordering ice tea in the US is it is just that, tea.  It is not sweetened.  If you want sweetened ice tea then you have to order sweet tea, but sweet tea is not always available.

The Clarkston Union Bar & Kitchen had a very impressive beer list, many unique artisan, small batch brew and specialty beers (eg. gluten free).  Their listing of available beers is on blackboards at the very front of the restaurant near the waiting area for seating. 

Despite their long list of beers, I decided to try a non-alcoholic beer, Buckler, imported from Holland, brewed by Heineken.  Non-alcoholic (de-alcoholized) beers and wines have less than 0.5% alcohol by volume.  They are gaining favour with those who what to enjoy beer and wine without the negative effects of alcohol.  I've been sampling several to find those to stock for entertaining.  In general, the European non-alcoholic beers and wines are far superior in flavour to those brewed in North America.  I found the Buckler non-alcoholic beer is light and refreshing.  It has only 75 calories as well.

meatloaf
We decided to order one entrèe and a full order of mac & cheese to share.  With a long ride ahead of us, we didn't want heavy tummies but we did want to get a good sampling of the food at The Clarkston Union Bar & Kitchen.  We ordered the meatloaf special ($9.75) made with house ground seasoned angus beef, topped with marsula gravy, mashed potatoes and vegetables.

The meatloaf was fine but not spectacular.  It was heavily seasoned with white pepper and there definitely was a hint of nutmeg, the cook's obvious seasoning of choice.  The seasonings clashed somewhat with the marsula gravy that had a nice flavour and smooth texture.  The mashed potatoes looked delicious but again were heavily seasoned with white pepper and nutmeg to a fault!  The baby carrots were almost an afterthought, simply boiled and plated with no seasoning or garnish.  They were over cooked as well so were lacking in flavour.  

the most macked mac and cheese
We ordered the mac & cheese made with Canadian cheddar and mild pinconning cheeses layered with penne rigate and a crunchy crust ($13.95).  The generous full size portion of mac & cheese arrived at our table delightfully hot and bubbly.   Technically there is no mac (eg. maccaroni) in this mac & cheese but it sure did have eye appeal!  This mac & cheese was rich and cheesy but not creamy.  Once again the white pepper and nutmeg pairing appeared.  It wasn't as strong as in the mashed potatoes but it was strong enough to be noticeable.  Unfortunately, this mac & cheese did not live up to its reputation.  It was ok, lacking the velvety creamy texture of a good mac & cheese, and simply over seasoned.

The Clarkston Union Bar & Kitchen is a busy place with an interesting atmosphere set in a historical, quaint village.  The food itself is really nothing spectacular and I suspect many visit there for the same reason we did, we saw it on Diners, Drive-ins and Dives.  The prices are average to high for what you get and service can be slow.  That being said, we might go back again if in the area but we would not make a special trip to eat there.  That says a lot because we have no problem driving a couple of hours or more to enjoy a restaurant that impressed us.  If you decide to visit The Clarkston Union Bar & Kitchen, don't expect the 'wow factor' for the mac & cheese. 


Sunday, August 18, 2013

Pie Irons and Shrimp on the Campfire

On August 5, 2013 my husband and I left our cozy little domicile on a wonderful road trip with a final destination just south of Tobermory, Ontario before returning home.  We crossed into Michigan mid-morning then made our way to Williamsburg, Michigan.  After a brief stop there, we arrived in Gaylord, Michigan where we spent the night.  The following morning we continued on our journey enjoying several stops highlighted by delicious food to the backdrop of amazingly gorgeous landscape scenery.  We settled in South Baymouth, Michigan for the night where we would catch the Chi-Cheechmaun ferry in the morning to take us across Lake Huron to Tobermory, Ontario.   We arrived in Tobermory just after 11 AM, stopped for lunch then headed to Cypress Lake campground in the Bruce Peninsula National Park.

We began camping when our youngest was just barely out of diapers.  Our first camping trip was to Cypress Lake, a rather rustic campground on Georgian Bay, in tents.  We bought a tent trailer the next spring then a large travel trailer the following year.  We camped every chance we got, always preferring rustic, natural  campgrounds to privately owned, commercialized ones.  We sold our trailer in 2005 so haven't done much camping, mainly hit or miss.  We certainly are well versed in camping during adverse weather conditions yet the weather forecast was cause for concern - rain, cold temperatures and more rain.   This trip was four days out in tents, going back to our camping roots!  This would be a special trip, the first one enjoyed camping with our grandkids.

Cypress Lake campground is very much in bear (black and grizzly), cougar, wolf, and coyote territory.  It is home to racoons, hares, skunks and Ontario's only poisonous snake, the Massasauga rattle snake.  The park has a 'bare' campsite program meaning no garbage or food on the campsite to attract wildlife.  All food and food-related items are to be stored in a hard-sided vehicle when not in use.  Tossing dishwasher into the brush is discouraged as it may contain food bits that can attract wildlife as well.  Paper food wrappings are burnt but there are recycling facilities for newspapers, cans, bottles and plastics.  There is no hydro except at the registration office, no showers, no hot water in the comfort stations (some have composting toilets), and cell phone service is sporadic at best.  It has some of the best hiking trails and amazing scenery ever seen!

We kept our food in plastic covered totes and coolers stored in the vehicles for this trip.  After dinner as part of the clean-up the camp stove, food and coolers were put into each of our vehicles.  Any food we wanted for around the campfire were brought out of the vehicle as needed.  Any food scraps were simply tossed into the fire. 

shrimp and pie irons on campfire
Regardless of what camping shelter we used, cooking over an open fire was always a must.  There were very, very few times that we didn't cook over an open fire.  We usually build a campfire shortly after rising.  Unless leaving the campsite, the fire is maintained at a low burn ready to cook pie irons, hotdogs or marshmallows over, ever ready to be stoked up for a bit of extra heat.  If we are leaving the campsite, the fire is doused which is proper camping etiquette.

Pictured is the campfire with pie irons (lower left) and shrimp cooking.  Pie irons are a camper's must have.  The name refers to either the tool (aka sandwich maker) itself or the food sandwiched between two slices of bread.  The filling for pie irons can be quite creative.  These were filled with home canned pizza sauce, homemade pesto, sliced rosemary ham and mozzarella cheese.  The pie iron aka sandwich maker can also be used to cook meat and so much more over an open fire.  If it fits in the pie iron, it's fair game!  Shrimp cooks nicely in a pie iron but for larger quantities, an open flat pan with handle works nicely.  Doesn't that shrimp look delicious?

Stay tuned for more tales of our recent road/camping trip....


Saturday, August 17, 2013

The Great Smoker Experiment (Part 2)

When I am testing a new method I like to use a tried and true food we like for the comparison.  So it was with my great smoker experiment.  Beef jerky is a family favourite that I have been making since my kids were knee high to a grasshopper.  Homemade beef jerky is a healthier version to mass produced beef jerky.  It is very easy to make requiring minimal equipment and a few simple ingredients.  I normally make beef jerky using a dehydrator and the dehydrator setting on the oven when I had the Jenn-Aire range.

prepared beef slices for jerky
Although beef jerky can be made using ground beef, I don't.  There is a higher risk of contamination using ground beef because of the increased surface area.  Beef jerky is not cooked but rather dried to 160°F/71°C which is a high enough temperature to kill off bacteria and remove moisture to preserve the meat.  I use a lean cut of beef sliced into thin strips either by the butcher shop or myself to make traditional beef jerky. 

A marinade is optional but is usually used to add extra flavour to the beef jerky.   There are numerous marinade recipes ranging from very simple to complex or a commercially made barbeque sauce can be used.  I marinated the hand cut beef strips in Sweet Baby Ray's barbeque sauce overnight.

meat slices in the dehydrator
The main purpose for this cooking experiment was to see what if any differences there were in the finished product by changing the drying method.  For a valid comparison, it was important to use beef strips that had been treated identically up to the actual dehydration process.  That would mean any differences in flavour or texture would be due to the drying method used.   I would be using my Nesco American Harvest dehydrator and the True North smoker for this cooking experiment.

The next morning I divided the beef slices into two portions.  I placed the first portion of the strips on the prepared dehydrator trays and set the temperature to 160°F/71°C.  In all honesty, I love my dehydrator and have even expanded it BUT if I were doing larger scale dehydrating, I would consider buying a dehydrator with rectangle or square racks as they are a bit more versatile.  At any rate the Nesco dehydrator works well for my needs.

meat slices in the smoker
I loaded the second portion of the beef strips directly onto the smoker racks.  The need for a drip tray quickly became apparent but that is the case with drying beef jerky regardless of the drying method.  I loaded up the wood chip pan with mesquite wood chips then set on the burner and plugged the unit in.  Once the smoking began, I removed the door to take a picture then replaced it.  The door was removed again to refill the wood chip pan a couple of times, then finally for the removal of the finished beef jerky.  Of note, when the smoker door is opened you will be greeted with a large puff of smoke meaning your clothes, hair and anything in the general vicinity of the smoker will smell like smoke!

a comparison of smoked to dehydrated beef jerky
This was a rather interesting cooking experiment.  Clearly there are pros and cons to using both methods.  A smoker can only be used outdoors whereas a dehydrator can be used both indoors and outdoors.  Both need to be sheltered from the elements when in use outdoors.

The results:   The drying time was considerably shorter for the beef jerky dried in the dehydrator, with the jerky drying in a little over half the time of that in the smoker.  In terms of colour and texture, the beef jerky dried in the dehydrator was almost identical to that dried in the smoker.  The beef jerky dried in the dehydrator may have been just a little darker.  So, either way the colour and texture is pretty much the same.  The big difference was the flavour!  The beef jerky dried in the dehydrator had a lovely flavour with just a hint of smokiness from the Sweet Baby Ray's.  By hint, it really was barely noticeable, yet a flavour element none the less.  The beef jerky dried in the smoker was heavy on the smoky flavour, over powering the Sweet Baby Ray's that became more of a flavour note.  Two weeks later, test strips of retained their colour, texture and flavours nicely.

The bottom line:  I was quite impressed with the smoker results.  I will definitely be experimenting with more smoked meats and am one step closer to buying a smoker.  The dehydrator gave consistent results in a shorter period of time with less fussing.  There was more fussing to the beef jerky dried in the smoker but I was new to the process and there was no temperature control or wood chip indicator on the basic smoker I borrowed so those were factors.  The smoke gives great flavour that can't be duplicated by the dehydrator.  If using a smoker, I think the marinade can be kept simple.  It is an easy way to get great flavour without any of the calories of barbeque sauce too. 


Thursday, August 15, 2013

Kitchen Quick Tips - Coring Strawberries for Stuffing

kitchen quick tips Easily core a strawberry for stuffing with a large metal icing decorator tip.  It will remove the core leaving enough hole for filling with whip cream or desired filling.


Tuesday, August 13, 2013

The Great Smoker Experiment (Part 1)

I have been wanting a smoker for eons!  Like many homemade foods, smoking is an economical way of enjoying smoked meats, fish and poultry while controlling what ingredients are added.  Smoking is not limited to meats either!  It means you can avoid all the artificial flavourings, colourants and preservatives of commercially prepared smoked foods.  You can experiment with different woods for adding natural smoke flavour to your smoked foods.  A good friend of ours recently lent me his smoker to experiment with.

true north smoker exterior
Smokers range from homemade to rather fancy commercially made versions.  The cost can range from free to hundreds of dollars.  His smoker is an entry level, commercially made electric smoker with a retail value of about $120.  It is Canadian made.  There is no thermostat or temperature control.

An electric smoker takes a bit of work out of smoking in that you don't have to constantly monitor the smoker.  It will continue smoking as long as the tray of wood chips is filled.  Once the wood chips stop smoking, you can refill then repeat as often as desired. 

true north smoker interior
A wood smoker is a  rather simple set up consisting of an inner smoking chamber, a heat source hot enough to cause the wood chips to smoke, a pan for the wood chips and one or more racks.   The interior  chamber of the smoker allows the smoke to permeate the food.

There are plans online to make a small homemade smoker using two clay pots as well as turning an old refrigerator into a smoker.  The easiest way to try is smoking before investing in a smoker is using a smoking box on the outdoor grill.  This smoker had three removable wire racks, a removable drip tray, and the wood chip pan.  The wood chip pan sits directly over the burner when in use.

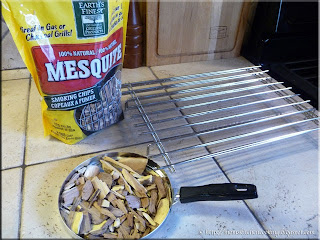
wood chips and racks
True North has their own series of wood chips called smokin' wood bits that are considerably finer cut, more like saw dust.  They recommend against using larger pieces of wood chips because the wood may not produce the smoke properly.  There was a bag with the smoker but because I was borrowing it, I decided to use my own wood chips.  They were larger than the True North brand but I reasoned using less of them in a refill would give suitable results.

I used Earth's Finest 100% natural mesquite smoking chips for this experiment.  These chips can be used either wet or dry as can most smoking chips.  The Truth North wood bits are used dry.

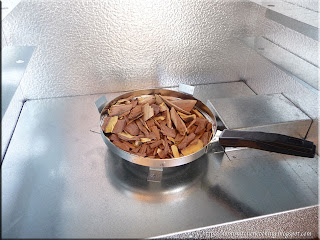
wood chips in smoking pan
The filled wood chip pan sits directly over the burner on the bottom of the smoker.  The instructions said to place the smoker on a non-flammable surface.  We placed the smoker on four large paving bricks to raise it off the surface of the wood deck.  This also allowed for a bit of air circulation under the smoker.
This particular model of smoker has a detachable power supply and the cord is short enough to need an extension cord.  The burner can easily be removed to adjust or replace.  This is a nice feature in the event the burner needs replacing.

The drip pan sits over the filled wood chip pan.  It is designed to catch any drippings from the food being smoked.  I covered it with aluminum foil for easy clean-up.  A food tray fits over the drip pan and there are shelves for two more trays.   Once I had the drip pan ready it was time to season the smoker.

I plugged in the smoker then put the door in place.   Within a couple of minutes puffs of smoke were escaping from the smoker which is not air tight but the majority of the smoke does stay in the smoker.  However, enough smoke escapes that you would not want the smoker sitting where the smoke can easily go into your house.  Following the instructions, once the smoker stopped releasing smoke, I filled the pan again then once again for a total of three fills.

At this point the smoker was seasoned and ready to use.  I filled the wood chip pan again then put the food on to smoke.  Check tomorrow's post for the results of the great smoker experiment...


Friday, August 09, 2013

Barbeque Rib Roast

Beef, venison and pork roasts lend themselves nicely to cooking on the outdoor grill.  They can be cooked directly on the grill racks, wrapped in foil, in a covered or uncovered pan or on a spit.  Roasts can be cooked without season, with a rub or sauce, or a combination of rub and sauce.  Regardless of the way they are cooked on the grill, roast turn out moist, tender and flavourful!

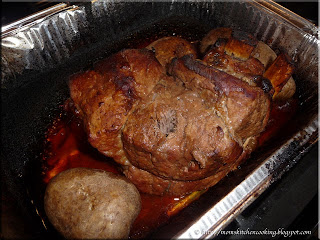
barbeque rib roast just off the grill
We cooked a rib roast in a covered pan with sauce on the grill.  While a regular roasting pan could have been used, I used an aluminum foil pan.  I poured a health dose of Sweet Baby Ray's barbeque sauce over the roast then added half an onion cut into slices.  Then I covered the pan with aluminum foil and placed on medium indirect heat.  Mid-way through cooking, I added two large potatoes.  Potatoes cooked this way absorb flavours from the roast and sauce.

Adding saucer at the start of cooking gives the roast a lovely flavour throughout however, there is a risk of the sauce burning.  When cooking this way, you want the sauce to cook to the point of burning for the rich caramelization flavour but you don't want it to burn enough to cover the entire bottom of the pan or give the roast a burnt flavour.  This is why I used a disposable baking pan.

barbeque rib roast plated
Despite first appearances with the burnt sauce edging on the pan, the rib roast comes out a sure fire winner!  The meat is richly flavour, melt in your mouth, fork tender.  It falls off the bone!  There is not as much sauce left as you would expect.  The thick sauce is perfect for topping the meat if desired.  Doesn't the meat look delicious?

This has to be one of our favourite ways to cook roasts during the hot summer months.  The results are consistently delicious!  Any barbeque sauce can be used so don't be afraid to experiment.  We like the deep rich, smokey flavour of Sweet Baby Ray's or bourbon whiskey grilling sauce


Thursday, August 08, 2013

Kitchen Quick Tips - Quickly Seed Cucumbers

kitchen quick tipsTo quickly seed cucumbers with little waste, cut the cucumber in half then run a melon baller down the length of both halves to scoop out the seeds.


Wednesday, August 07, 2013

Ciabatta Sandwiches

Years ago, I relished running about a block from our house to our local bakery.  I could see the roof of the bakery from my bedroom window!  It was one of my favourite local haunts.  I could always tell when they were baking fresh bread as the aroma filled the air.  At that time, a loaf of fresh baked bread cost 50¢.  The local bakery had the best doughnuts I've ever tasted.  They also made a limited variety of buns, mainly dinner rolls and crusty rolls.

ciabatta buns
The beloved bakery of my childhood is no more, having ceased the bakery portion of operations several years ago.  I still love fresh baked breads, most of them homemade.  Our local No Frills brings in fresh made breads (preservative free) from a bakery the next town over.  Their breads are very good, made much the same as I do at home with fresh ingredients and no preservatives, artificial colours or flavourings and no HFCS.

Ciabatta bread (slipper bread) is an Italian yeast bread traditionally formed into elongated, broad, flat loaves.  This bakery makes ciabatta bread but shaped into triangular buns, perfect for sandwiches.

meat and cheese for ciabatta buns
The kids were down for a visit so I used ciabatta buns for make-your-own sandwiches for lunch.  Make-your-own sandwiches always go over well.  I borrowed the idea from various luncheons we have attended.  Instead of actually making the sandwiches then serving, the components are set out on serving trays along with condiments for each person to assemble their sandwich as they choose.  This presentation was quite popular with out kids and continues to be popular with our grandkids as well as guests.

I filled one serving tray with ciabatta buns (above).  Another tray held rolled cooked turkey breast slices, Swiss and cheddar cheeses.  Any lunch meat or cheese slices would have worked.  The meat and cheese tray can be made as simple or as elabourate as desired but I usually keep it simple.

toppings for ciabatta buns
The topping tray can vary as well.  I usually add lettuce, tomatoes and onions. Red or green leaf lettuce adds just the perfect crunch and flavour.  Romain lettuce works nicely too as do other salad greens.  I normally don't  use iceberg lettuce as it doesn't have much flavour.  I also like using red onions as they add a bit of colour along with flavour.  There are so many varieties of slicing tomatoes that add not only colour but also flavour.   I prefer the heirloom slicing tomato varieties but there are a few good hybrids as well.

Not pictured are the additional condiments like mayonnaise, mustard, and horseradish.  Fresh alfalfa sprouts, mustard greens and pickles are also a nice addition but really anything goes.  A separate pickle or vegetable tray works nicely to complete the meal. 
 
The ciabatta buns make rather large sandwiches, larger than a good sized burger.  It is a rather filling sandwich but lower in fat and calories.  The assembled ciabatta bun sandwiches were delightfully delicious served with fresh baby cucumber pieces and Best Bread & Butter Pickles

Little Miss A, our second grandkid really enjoyed creating her own ciabatta sandwich.  Even cut in half, it was still triangular shape like the adults.  Part of the fun for kids is letting them make their own choices as to what they want to put on their sandwiches.  The make-your-own sandwich presentation is very kid friendly!  Simply put healthy choices on the serving platters then let them make their own creations.  It's a fun way to get your kids to eat healthy with very little effort.


Monday, August 05, 2013

Frugal Kitchens 101 - Butter

Frugal Kitchens 101

We are a family of butter users.  We don't buy or use margarine for various reasons.  Many folk use the useless fact floating around cyberspace that margarine is one molecule away from plastic.  Well it is but many other chemicals in the form of food we ingest are also one molecule away from a harmful chemical.  The issue with margarine is much broader than one molecule!   Margarine is full of preservatives, artificial colours, artificial flavours and now GMO oils.  It is not what I would call a frugal choice for our food dollars.  Butter, on the other hand is a natural by product of whole milk, packed full of natural flavour sans artificial anything.  If you are lucky enough to have your owing dairy cows, you can easily make your own fresh butter.  If not, you can make fresh butter from heavy whipping cream.  The easiest way to do this is with a blender but during our heavy camping days, our kids were often entertained by making butter in a mason jar.  I would pour in the cold whipping cream then cap tightly and pass it to one of the kids who would shake the jar until their arms were tired then pass it on to the next kid and so on until the cream separated into butter and whey.  Butter made this way can be used as a spread, topping for vegetables, baking and cooking.  I use the whey for baking and cooking.

Butter is available salted or unsalted, usually packaged in foil wrap or waxed paper inside a box.  Here in beautiful Ontario, Canada it is available in 454 g/1 lb or 227g/ half pound blocks.  At our vacation home in Florida, butter is also packaged into quarter pounds, 2 to 4 to a box, which is convenient for measuring.  I prefer the foil wrapped 1 lb sizes because there is less packaging (eco-friendly) and it is generally less expensive.  Commercially prepared butter is from the milk of a large mixture of cows so tends to taste the same but fresh butter from milking cows can taste slightly different depending on what they are eating.  We notice a slight taste difference between our Ontario butter and that bought in Florida which is likely due to what the cows were eating, northern verses southern.  Here are a few butter tips:

  • Butter freezes nicely so stock up when it is on sale.
  • Butter will keep on the counter without refrigeration for easy spreading unless it is too hot or humid.  
  • Use a butter bell in hot, humid conditions to keep butter fresh.
  • Use butter as a flavour enhancer rather than a spread.
  • Use unsalted butter for baking because using salted butter may result in an over salted result.
  • Butter burns easily.  To get the flavour of butter, add a little butter to olive oil when cooking.


Saturday, August 03, 2013

Foil Packet Beets

During a recent trip to my hometown, I discovered a couple from up north had taken over a greenhouse operation that had been in business years ago.  The business had been sold to the bother of one of my girl friends but he moved on leaving the business in limbo for several years before this nice young couple bought it.  They really are super, full of wholesome back-to-the-land ideals which is a win:win for everyone who stops by to enjoy their offerings of organic produce.  Many of the varieties they grow are heirloom as well!  Their prices are more than reasonable, under the price of the grocery stores as well. 
  

fresh organic beets
I bought a small bunch of mixed heirloom beets.  The dark red beets are Detroit Dark Red, an old time heirloom beet dating back to 1892.  The candy stripe beets are a pre-1840's heirloom variety called Italian Chioggia, commonly referred to as bullseye or candy stripe beets.  The Detroit Dark Red beet remains a favourite for home gardeners but both heirloom varieties are easily grown in the home garden.

Candy stripe beets are gorgeous raw but the red bleeds into the white when they are cooked.  They retain their colour better if roasted or steamed rather than boiled.  I used a foil packet to cook the beets on the grill.  

organic beets grilled in foil packet
Foil packets are one of the simplest way to cook vegetables on the grill.  I use them quite often because foil packets give consistently good results.  Foods steam nicely in the foil packet retaining both their vibrant colour and flavour.  I brush a little olive or coconut oil on the foil sheet, put the desired vegetables on top then dab with a little butter and seasoning of choice then tightly close the foil packet.  This particular method is great for on the grill but also lends itself nicely for cooking camp sides. 

The Detroit Dark Red beet colour bled into the candy stripe beets as I knew they would.  Don't let the paler colour of the candy stripe beets fool you though as these are really tasty beets!  


Friday, August 02, 2013

The Annual Pig Roast

Every year, my husband's aunt hosts a large annual gathering the weekend following the Canada Day weekend.  No invites go out, rather everyone know when and where it is.  Family is encouraged to bring friends and spread the word.  The event starts mid-afternoon at their beautiful park-like setting in rural southern Ontario.  A picture of one of their man made ponds is the background image for my gardening blog, Garden Gnome Wanderings.  It has been wonderful watching as their vision for this gorgeous acreage become a stunning reality! 

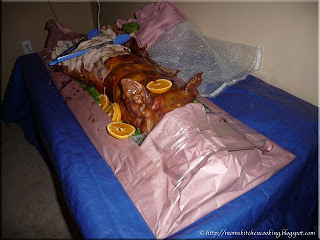
pig roast
We are beyond blessed with amazing family and friends.  Our extended family are very much foodies so there is always an abundance of delicious foods at family gatherings.  This gathering is no exception.  The grills are fired up for hot dogs and burgers while the piece de resistance is the roast pig is ready for serving along with a large variety of salads, vegetable trays, potatoes and of course, baked beans.  Then the dessert trays laden with delectable treats made their rounds. 

This year's pig did not disappoint.  As always, it was moist, tender and flavourful.  Normally the full face is showing as well but for some reason it was covered.  I forgot to ask why.  At any rate, the pig was the sure crowd pleaser.  I brought home a bit of the skin for pork rinds, a delicious treat I indulge in once a year.

After dinner which really continues into the wee hours of the morning with food out and ready for anyone wanting more, folks wander about the ponds, hike up the hill or just sit and chit chat waiting for the fireworks display that out does most community fireworks.  It is one of the most spectacular displays we've ever seen!  A couple of campfires are lit to ward of mosquitoes then left to die into glowing embers during the fireworks.  We usually head home after the fireworks but others stay through the night and the gathering continues throughout much of the following day.  It really is an incredible event!


Thursday, August 01, 2013

Kitchen Quick Tips - Remove Onion Odour From Hands

kitchen quick tips Quickly remove the odour from chopping onions after chopping onions by sprinkling your hands with salt then rubbing them together for a few seconds.