My photo
Ontario, Canada
I am a wife, mother and grandma who enjoys the many aspects of homemaking. A variety of interests and hobbies combined with travel keep me active. They reflect the importance of family, friends, home and good food.
Cook ingredients that you are used to cooking by other techniques, such as fish, chicken, or hamburgers. In other words be comfortable with the ingredients you are using.
--Bobby Flay

For Your Information

Please watch this area for important information like updates, food recalls, polls, contests, coupons, and freebies.
  • [March 19, 2020] - Effective Mar 17, this blog will no longer accept advertising. The reason is very simple. If I like a product, I will promote it without compensation. If I don't like a product, I will have no problem saying so.
  • [March 17, 2020] - A return to blogging! Stay tuned for new tips, resources and all things food related.
  • [February 1, 2016] - An interesting report on why you should always choose organic tea verses non-organic: Toxic Tea (pdf format)
  • Sticky Post - Warning: 4ever Recap reusable canning lids. The reports are growing daily of these lids losing their seal during storage. Some have lost their entire season's worth of canning to these seal failures! [Update: 4ever Recap appears to be out of business.]

Popular Posts

Sunday, July 28, 2013

Creamy Orzo Salad

I love to peruse the grocery store aisles looking for new products mainly for flavour combination ideas but from time to time I will buy a product that sounds interesting in the hopes of being able to clone it in the event we like it.  Two new flavours of Kraft dressing recently became available in our little corner of beautiful Ontario, Canada.  I seldom buy salad dressings as we prefer homemade but these flavours sounded interesting so I bought one of each.  The flavours were sweet onion and roasted red pepper with parmesan, both with no artificial flavours, cholesterol free, zero trans fat and low in saturated fat.

creamy orzo salad
One of the salads served at our relative's annual pig roast was an orzo and watermelon salad.  It was a unique and unexpected combination.  Orzo is a delightful pasta to use as a salad base because it is naturally creamy.  I used orzo to make an easy, creamy orzo salad using the new Kraft sweet onion salad dressing.  The result was a light, creamy salad that was a sure winner!

Creamy Orzo Salad
recipe by:  Garden Gnome

2 cup cooked orzo
1 tomato, chopped
½ c broccoli, finely chopped
2 green onions, finely sliced
¾ c Kraft Sweet Onion dressing

Cook orzo to al dente.  Drain.  Measure out two cups of the cooked orzo and allow to cool.  Wash vegetables.  Chop the tomato.  Fine chop the broccoli.  Fine slice the green onions.  Mix vegetable into the cooled orzo.  Pour the salad dressing over the pasta mixture and mix well.  Serve.

Note:  Will keep well for 2 - 3 days in the refrigerator.

I really liked the flavour of the Kraft sweet onion salad dressing.  This should be a fairly easy salad dressing to clone which will give all the flavour without any preservatives.  Like many commercially made salad dressings, this salad dressing gets its texture from xanthan gum, something I will also use in the clone recipe.  Another ingredient of note is citric acid, often added to commercially made salad dressings to give a bit of tang.  Citric acid is something I always have on hand for home canning acidification of certain products.  The benefit of using citric acid over lemon juice in a salad dressing is not increasing the liquid volume as citric acid is a crystallized powder rather than a liquid.  I'll post the clone recipe I came up with shortly.


Friday, July 26, 2013

Steamed Garden Peas

This is an odd year for me in that for the first time in several years I really don't have much in the way of a garden.  We've been here almost two years.  The spring of 2012 we put in a large raised bed and two smaller beds but the combination of the cold, wet spring combined with being in the sunny south for the month of May, followed by flooding in June, very few vegetables got planted this year.  I have a few containers of greens and herbs as well as tomatoes in one of the raised beds, asparagus and strawberries in the others.  It doesn't help that we are doing a complete revamp of our backyard meaning new decks and new sunroom which will see about 95% of our backyard covered in deck and pool.  The whole edible garden area will be revamped as well so at least two beds will be dismantled and rebuilt in the next couple of weeks.  At any rate, I am buying organic produce this year from local growers in lieu of home grown. 

steamed garden peas
I love garden fresh peas!  They are an early crop that prefers cooler temperatures.  Garden fresh sweet peas were in season when we visited the Niagara area a couple of weeks ago.  These delightfully sweet morsels of goodness are best enjoyed raw or steamed. 

Garden peas steam nicely.  Don't over steam them, just steam until they are al dente.  Quickly remove from the steamer basket.  Stir in a little butter and sprinkle with sesame seeds.  The smaller pods are tender enough to eat.  The larger pods are a bit tougher but they can be enjoyed much the same way you would artichoke by pulling the pod through your teeth. 

Do be sure to enjoy garden peas in season.  They really are delightful!  One variety I like growing is Little Marvel which has large pods with about eight nice sized peas.  In our corner of beautiful Ontario, Canada I plant the first crop in the spring while it is still cool then plant a second crop in the fall as the weather starts to cool again.  I don't worry about preserving them either, just simply enjoy them in season!


Thursday, July 25, 2013

Kitchen Quick Tips - Strawberries

kitchen quick tips Choose plump, fragrant strawberries that are firm, bright and fresh-looking,  free of mold or bruised spots.  Refrigerated unwashed berries as soon as you get home.  Do not wash or hull berries until you are ready to use them.


Monday, July 22, 2013

Shrimp on the Barbie

Congratulations to Prince William, Duke of Cambridge and Catherine Elizabeth Kate, nee  Middleton, Dutchess of Cambridge on the birth of their first child, a son!

Shrimp on the barbie is a phrase made famous by Paul Hogan (Crocodile Dundee, 1986) in a series of television advertisements by the Australian Tourism Commission that ran from 1984 through 1990.  That phrase has always stuck in my mind so I get a little chuckle every time we grill shrimp.  Shrimp is ever so easy to cook on the grill because it has it's own built in timer, changing from grey to pink orange-pink when cooked.

shrimp on the barbie
Shrimp is generally viewed as being expensive, and in many cases it is unless you live near a local source.  Here in our corner of beautiful Ontario, Canada I buy frozen raw shrimp mainly from Elite Gourmet Food Service but if I am out, I buy Zipperback Black Tiger Shrimp shrimp at No Frills in 454 g (1 lb) for $8.  This shrimp has a firm texture with mild flavour perfect for grilling.  It is deveined ready to thaw and cook.  Three bags of this shrimp will comfortably serve four adults.

Quite often shrimp are cooked on skewers on the grill but we like using a grilling basket instead.  The grilling basket takes a lot of the fuss out of grilling shrimp.  Pictured is the thawed jumbo Black Tiger Shrimp shortly after putting onto the grill in the grilling basket.  These were the 16/20 count shrimp, the perfect size for grilling.  I didn't use a marinade although one could be used with this method.  I lightly sprayed the grilling basket with cooking oil then placed the prepared shrimp in the basket.  As you can see the raw shrimp is grey in colour.  As it cooks, the shrimp changes colour and the flesh turns opaque.

grilled shrimp ready for serving
Shrimp cooks rather fast on the grill.  It is important to not over cook the shrimp as this will cause the texture of the shrimp to become rubbery.  Using a grilling basket allows you to quickly turn the shrimp with a flipping motion.  The cooked shrimp turns a beautiful orange-pink with golden overtones.  This mouthwatering shrimp is delicious as is or served with home canned seafood cocktail sauce.

The shrimp was part of dinner celebrations for our youngest's birthday.  It was a milestone birthday, a reminder of time marching on!   We enjoyed the delicious meal on the deck, letting the cooler summer breeze brush our shoulders while enjoying simply being together.  It was a wonderful way to celebrate such a special day!


Friday, July 19, 2013

Great News From NCHFP Regarding Reusable Canning Lids

Social media really is the place to keep up on a lot of food related information.  I am on both Twitter and Facebook one a personal and blogging basis.  A couple of days ago, I spotted an interesting post regarding reusable canning lids.  Now, in technicality, the only recommended closure for home canning is the metal two piece snap lids consisting of a metal disc with attached plastisol and a metal band.  Notice that I say recommended not approved?  The USDA does not approve anything including recipes, it only makes recommendations, something the canning police fail to recognize.

At any rate, reusable canning lids have been used for almost a hundred years.  I have used both glass lids and glass inserts as well as Tattler and 4ever Recap reusable canning lids.  Glass lids and inserts have been in use since at least the forties and while neither are no longer made as well as the gaskets for the standard mouth glass inserts, the gaskets for the glass lids and Gem jars are still in production.  Tattler lids are a plastic disc with a rubber gasket that has been in production since 1976 and 4ever Recap lids has only been in production a few years.  If the folks who are adamant about following the USDA guidelines to the point of it being a fault aka the canning police had their way, no one would be using the reusable lids.  Seriously, some of these folks are so insistent on the USDA guidelines that no substitutions are allowed in any USDA recommended recipe meaning sea salt should not be substituted for regular salt which is utter nonsense but that is another story.  What they fail to realize is the USDA makes their recommendations based on testing and that testing is paid for by manufacturers.  Recipes submitted to the USDA to be tested for home canning safety are tested at a cost to the submitter.  So, the large scale manufactures like Ball and Kerr in the US paid to have their closures, the metal two piece snap lids tested to the point the USDA would recommend them.  Note, recommend not approve.  Bernardin, a Canadian owned company and leading expert in home canning in Canada were purchased by Altrista Corporation (now Jarden Corp) in 1993.  They remain the leading Canadian home canning experts and are still well known for their jars, closures and publications.  Their jars and closures also are recommended by the USDA.

To date, the reusable canning lids have not been tested by the USDA even though many experienced home canners including myself feel the reusable canning lids are safer than the metal snap lids as the possibility of false seals is eliminated.  Not only are they safer, they are the eco-friendly choice for home canners.  The the United States, university extension services do testing for the National Center for Home Food Preservation (NCHFP) on behalf of the USDA.  The University of Minnesota Extension service made the following announcement in their June 2013 newsletter:

Reusable canning lids have been around for 40 years and today, there is renewed interest in these lids. When using the lids, carefully follow the manufacturer’s (Tattler®) instructions. This lid should not impact the safety of the product as long as the food was processed properly. Currently, there is no research that looks at seal failures, rates, number of reuses or performance throughout reuses. The National Center for Home Food Preservation recently received a grant to study the performance of these lids with results available in 2014 or 2015.
This is amazing news!  Home canning is not exactly a high priority with respect to funding for testing.  On a per capita basis, home canning is a activity that is mainly low level and quite seasonal focusing mostly on jams, jellies, and pickles.  Those with higher level canning volumes tend to be rural folk, survivalists, and religious groups but there are a growing number of folk wanting to take control of their food supply.  These folks like myself want to put good, healthy foods on their table that are preservative free, additive free, and not laden with all those things the food industry puts into our foods that in turn are causing health problems.  Home canning is seeing a revival and has since the y2K scare as more realize it is a frugal and eco-friendly way to enjoy good food year round.

Like many home canners, I will be keeping a close eye for the results of the NCHFP's results testing the Tattler lids.  While the testing is specific to Tattler lids, the result will apply to the Gem glass inserts with rubber gaskets as well as the 4ever Recap lids.  The only differences are the discs for Gem are glass and the gaskets for the 4ever Recap are silicone.  Hopefully this will lead to the testing of the 4ever Recap closures.  I doubt testing will be done on the glass inserts because the inserts themselves are no longer in production and most Gem jar usage is in the Canadian prairie provinces.  At any rate, I am excited to hear about the testing and hope the results will finally put the minds of the canning police at ease!


Wednesday, July 17, 2013

Creamy Tomato Salad

We are officially in the midst of a heat wave and my gosh it's a dilly with extreme heat alerts and severe thunderstorm watches being issued daily.  Ah,  the dog days of summer when you don't really feel much like cooking in the heat let alone eating a hot, heavy meal.  Thank goodness there is a never ending variety of salads to refresh and nourish without heating up the kitchen!

creamy tomato salad
There are really no hard, fast rules as to what makes a salad.  In  their simplest form, a salad is simply salad greens and some kind of dressing but even then the dressing can be replaced with a few spritz of fresh citrus juice.  With that in mind, I love making salads with what's on hand.  In the summer months, that means garden fresh produce.  I often add fresh herbs to my salad creations because I grow herbs year round.  Herbs add a lot of flavour without adding calories while being good for you.

Tomatoes are often included in many salads so I decided to make tomatoes the star of a simple creamy tomato salad as a side dish for our grilled entrĂ©e.  It was a light, refreshing salad full of flavour, just perfect for a hot summer's meal.

Creamy Tomato Salad
recipe by: Garden Gnome

20 grape tomatoes
¼ c red onion, chopped
¼ c cooked bacon pieces
¼ c English cucumber pieces
2 tbsp Miracle Whip
2 tsp white vinegar
1 tsp raw honey
¼ tsp celery seed
1 tbsp chopped chives

Cut two slices of bacon across short end to form small pieces.  Fry until crisp.  Drain and set aside.  Wash tomatoes.  Pat tomatoes dry and slice in half.  Rough chop red onion.  Cut about a 2 - inch piece of English cucumber into quarters length wise.  Slice across the quarters.  Stir prepared tomatoes, onion, cucumber and bacon together in mixing bowl.  Combine Miracle Whip, vinegar, honey and celery seed in small bowl.  Whisk to mix.  Pour the dressing over the vegetable mix and stir well.  Pour salad into serving bowl.  Sprinkle with chopped chives to garnish.  Refrigerate before serving if desired.


Tuesday, July 16, 2013

Meat Glue - Oh My!

How would you feel if you paid a premium price for a prime cut of beef only to find out it had been manufactured to appear like a prime cut from scrap meat?  Well, if it were me I would be very angry!  I have moved beyond feeling betrayed by the food industry.  For the most part, a very large portion of the food industry lies, cheats, misleads and manipulates consumers into believing the food they produce is safe and good for us.  What they omit is the fact that food additives are not only tricking us into believing we are buying a healthy product, they are actually making us sick.  So what if the food we eat causes allergies, asthma, ADD/ADHD, leaky gut, IBS, diabetes and the list goes on increasing daily, as long as the shareholders of the huge companies behind the food industry line their greedy little pockets?

Well, now the food industry has added an enzyme called transglutaminase that binds protein together.  The manufacturer can add this enzyme to scrap meat to form what appears to whole pieces of meat that are then cut into steaks.  These factory formed eye filets sell for a premium price and you wouldn't even know they were not the real McCoy!  Even experts can't tell the difference between a real eye filet when cooked and a factory formed one.  And, it is not just beef!  Pork, lamb and chicken pieces are all stuck back together using meat glue.  Transglutaminase aka meat glue is banned in the European Union but not in North America.


The use of transgluatminase is misleading consumers causing them to spend top dollar for scrap meat.  That is bad enough.  Of more concern is the microbial issues with transgluaminase.  This meat is sold as a whole piece of meat when in fact it is not, it only appears to be whole.  That means an increased surface area much the same as with ground meats which gives a larger surface for microbes (eg. E. coli) to grow as well as providing more nooks and crannies for the microbes to hide and grow.  Each piece of the meat scrap has microbes that when stuck together makes the resulting glued meat have a higher initial microbe content, hundreds of times higher than a regular whole piece of meat.  The use of meat glue is more widespread than you would think especially in restaurants. 

The only way you can lessen the chance of paying premium dollars for glued meat is to know your meat source.  If at all possible buy directly from the farmer and have the meat processed yourself at an abattoir like we do for beef and pork.  Alternately, buy meat from a reputable butcher shop where there is considerably less or no risk of buying glued meat.  Avoid buying cryovac steaks and even larger pieces of meat unless you are sure of the source.  Avoid buying shaped meats like bacon wrapped steaks or poultry toronados, fish sticks and chicken nuggets.  While it may be a bit more difficult avoiding glued meat in restaurants, a restaurant that prides itself in its quality of food and reputation is not going to be serving glued meat.  If in doubt ask and definitely check out reviews for any new restaurant prior to visiting them.


Monday, July 15, 2013

Best Bread and Butter Pickles Revisted

Every year I develop and/or try new home canning recipes.  Of those, some are duds, others are keepers and then there are the one or two outstanding recipes.  In many ways this is to be expected.  The duds are simply not to our expectations based on flavour and/or texture BUT that doesn't mean the recipe can't be tweaked to become a rather good recipe at some point.  This is especially true of some of the basic recipes in Bernardin Complete Guide to Home Canning, Ball Blue Book or recipes for jams and jellies using traditional pectins.  I often tweak these recipes for the trial run just based on experience and know what can be safely tweaked, substituted, added or omitted.  The end result is a creation tailored to the tastes of our family. 

best bread and butter pickles
Last year, I made a lot of pickles.  One of the recipes I used was Best Bread and Butter Pickles modified from Small-Batch Preserving (2001) by Ellie Topp and Margaret Howard.  I did a bit of slight tweaking ingredients as well as added calcium chloride to the jars in this recipe even though I had not made it before.  These pickles were a huge hit!  They are delightfully delicious, better than any store bought bread and butter pickle!  They aren't too sweet and have a nice tang without a bite.  They are quite pretty presented in a pickle dish for serving.

If you are looking for a nice flavoured, sure to please bread and butter pickle, do try these pickles.  You won't be disappointed.  The recipe is quite easy but the results are above average!


Sunday, July 14, 2013

Canadian Made Improved Gem Jars for Home Canning

I have been talking about the very generous gift of old canning jars received from one of our friends.  Yesterday, I talked about why old canning jars using glass lids and inserts are still quite safe to use and what closures to not use.  Today, I want to share with you a bit more on the Canadian Gem jars that were in the boxes.

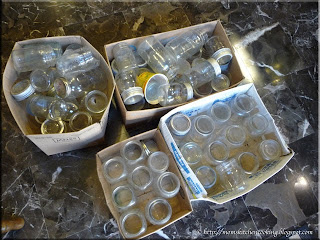
old canning jars cleaned up and ready to use
I was very impressed!  There were 12 newer style (about 30 years old) Imperial size Canadian jars (upper right corner), 27 Canadian made Improved Gem jars with glass inserts (middle), 25 mainly Canadian made Crown jars (right) with glass lids, 6 extra glass lids, 10 Gem bands and 12 zinc bands.  All of the jars were in excellent condition with no chips.  All of the lids and glass inserts were in excellent condition with no chips.  Finding older jars (circa 1950's) with glass inserts, glass lids and rings in this kind of condition is almost unheard of.  They certainly were well loved and cared for by someone!  I am very honoured to be able to give them a home and like their previous owner will gladly love and care for them.

Canadian Gem jar and closure options
The Canadian made Gem jars have quite a history.  They were the most popular jars on the Canadian prairies for over 100 years.  The Improved Gem jars made by Bernardin (Toronto, Ontario) have a mouth opening of 78 mm, in between standard mouth (70 mm) and wide mouth (86 mm).  When Bernardin was bought by Altrista Corporation in 1993, the Canadian manufacturing of Bernardin jars and lids moved to the US.   The Canadian manufacturing plant ceased operations in 2001 spelling the end of Gem lids rendering the many thousands of Gem jars useless unless of course they had the glass inserts.  However, by 2001 most of the home canners some who were canning over 3,000 jars of food per year were using the metal snap lids for Gem jars, manufactured only at the Canadian Bernardin plant.  Paulette Lysyshyn, a home canner from Saskatchewan took up a petition to get the Gem lids back into production in 2002 but she wasn't the only one pressuring Bernardin to resume producing the lids.  About 27,000 members of the western Hutterite communities with an estimated 250,000 useless Gem jars joined the protest as did Rosann Wowchuk, the cabinet minister of agriculture along with a multitude of other home canners depending on the Gem metal snap lids.   As a result, in January of 2003 the Gem metal snap lids went back into production and have been available ever since. Originally the decision was to make one long run of the Gem metal snap lids but that quickly changed to continue production as long a folks kept buying the lids.  While the issue with Bernardin was being settled, Gordon Tirebuck, a former manager of Bernardin who had signed a contract not to go into direct competition with them, went into production with Gem lids under his own company, Canadian Home Canning Inc.  With Tirebuck in production and Bernardin back in production, there were two choices of lids for the beloved Gem jars. 

There are two options for closures for Gem jars.  There are the original glass inserts with metal bands and rubber gaskets as pictured.  The rubber gaskets, made by Viceroy (Weston, Ontario) are still in production and available on a limited basis depending on location.  I paid $1.99 for a box of 12 at Home Hardware.  I did notice that while these gaskets were originally made in Canada the newer boxes say 'made in Sri Lanka' and they are now about triple the price I used to pay for them .  The rubber gaskets fit on the glass insert.  A deeper metal band is necessary to use the glass inserts.  Note that these are not zinc bands (see previous post).  They assembled glass insert and rubber gasket is placed on the filled jar then the band is tightened and turned back a quarter inch for processing.  Immediately after removing from the canner the band is fully tightened and left for the cooling period.  The band is then removed.  If the jar did not seal, it will be immediately apparent as the lid will pop right off with no pressure.  While the glass inserts are not recommended by the USDA they are a viable, eco-friendly alternative to the metal snap lids AND there is no worry over BPA leaching into your food.  The second option is the metal snap lids.  A box of bands and lids cost about $8.50 for 12; lids without the bands can be bought in a box of a dozen as well.  Both are available at Home Hardware. 

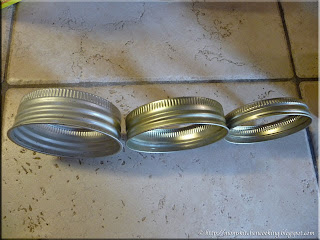
Gem jar band comparison
Of note are the bands for the Gem jars.  The silver coloured widest band (left) is for use on the jars when using a glass insert and rubber gasket.  The centre gold band is for use on the jars when using a metal snap lid.  The smaller, narrowest band (right) is a standard mouth (70 mm) band to show the difference in band depth between Gem jars and the standard or wide mouth bands both of which are not as deep as the Gem band.

Gem jars are mainly used in Canada specifically the prairie provinces and the jars themselves are no longer in production, only the metal snap lids for the jars.  Canning jars tend to get around because home canned foods are gifted so it is quite possible to find Gem jars throughout North America.  Generally what has happened is these jars get discarded because there were no available lids.  To date there are no Tattler or 4ever recap lids available for the Gem jars although I did see where Tattler may consider it.  While Bernardin does make plastic storage lids in both standard and wide mouth sizes, they do not make them for Gem.  There is also no Gem size attachment for food savers to vacuum seal the jars however, Gem jars can be vacuum sealed using the canister method.

I am beyond excited at acquiring this number of Gem jars!  They effectively replace two dozen of my regular jars AND complete with the glass inserts are one step further from depending on the metal snap lids.   Not only that, I also have the option of using the Gem metal snap lids even though they are a little over double the price of wide mouth that are more expensive than stand lids.  Still, having the option is nice!  Now it's time to get all these jars filled with this years harvest...


Saturday, July 13, 2013

Old Canning Jars and Closures

I posted yesterday about my wonderful gift of old canning jars.  These jars are all quite usable for home canning and I intend to use them as such.  I really want to tell you more about the Gem jars, a uniquely Canadian home canning jar but thought I should discuss a few thought on jars and closures first.  Before the canning police feel the need to inform me that the old glass jars with zinc lids and rubber seals are not approved by the USDA, I will explain further.  First off, the USDA does not approve any home canning product.  Instead the USDA makes recommendations based on their testing and it should be noted for a product to be tested by the USDA it costs the manufacturer.  So smaller companies like Tattler that make reusable canning lids have not been tested by the USDA simply because of the cost factor.

old canning jars no longer used for home canning
The 2001 Ball Blue Book says that porcelain lined zinc caps and glass lids with wire bails requiring rubber gaskets should not be used for home canning as there is no way to determine if the closure has a safe seal.  Pictured are a few of the jars from my collection that are not in regular use canning that the USDA recommend not using.  As you can see from the lid, the porcelain liner is attached to the lid.  The lid screws on the jar but there is no gasket that would complete a seal.  Honestly, it would be quite difficult to use these jars for canning because the lids are very hard to find and the newer band or even the older deep metal or zinc bands won't fit on them.  The other two have the bail and wire closure with gaskets.  I'm on the fence about the bail and wire closure as it is fairly close to the Weck canning jars widely used but I think with Weck the wire clips are removed for storage.

In my opinion these jars should be used for display purposes only.  First, the jars themselves are old glass so there are flaws such as bubbles and in the case of the smaller back jar with metal cap on it, the seam is rough at the top causing unevenness around the rim.   Both types of closures would make it difficult to tell if there is a seal or not because there is no way for the lid to pop off indicating a seal failure.  Second, the age of these jars make them antiques.   In good condition, complete with caps  are worth a bit of money.

metal bands compared to zinc bands
Newer versions of the Ball Blue Book has simplified the USDA recommendation to include all zinc lids with rubber gaskets even though the USDA was referring to the porcelain lined zinc lids as well as the bail and wire closures.  This recommendation does not apply to the older glass lids, older glass inserts or newer plastic discs all which use rubber or silicone gaskets.  Essentially these are a two piece version of the metal snap lids. The USDA recommends against using zinc bands that are used for glass inserts with rubber gaskets.

Pictured are older metal bands (left), older deep standard mouth band for glass inserts and newer bands for metal snap lids or reusable lids (centre back) and zinc band (right).  The older metal bands are smooth with the same type of finish as the newer metal bands.  These can safely be used for home canning with glass lids or glass inserts.  There are deeper to accommodate the extra width of the glass lid or insert and the gasket. The older zinc bands develop a whitish film much like hard water buildup so they take on a dull greyish appearance as well as a roughness to the touch.  Although the USDA says it is difficult to easily tell if  a jar is sealed, which is true of the porcelain lined zinc lids or the bail and wire closures,  this does not apply to the glass lids, glass inserts or newer plastic discs.

The USDA recommends the metal snap lids because the manufacturers paid to have them tested.  They are relatively easy to use with minimal seal failures and at one time were fairly inexpensive.  It is important to note that when the USDA wrote their guidelines, the emphasis was on food safety which still holds true but the concern over availability of the metal snap lids or the fact they were single use was a non-issue.  The USDA also was not concerned over the leaching of BPA into food from the plastic lining on the metal snap lids which we now know is a health concern.  None of the reusable lids (glass or plastic) have been tested by the USDA so no recommendation has been made.  Thousands of home canners are using all three types of lids and the plastic discs are growing increasingly popular.  The only difference between these closures and the metal snap lids is the closure becomes a three piece system comprised of lid, gasket and band rather than two (metal lid with sealant, band).  If anything, the glass lids, glass inserts and plastic discs (eg. Tattler, 4ever recap) are safer than the metal snap lids because there is no danger of a false seal that can happen if the centre of the metal lid is pressed before the jar is fully cooled.  This will make it appear that the jar is sealed when in fact during storage is will quickly become apparent that it is not sealed.  However, the problem arises if the band is left on preventing the lid from popping off the unsealed jar.  In contrast, if a jar does not seal using a glass lid, glass insert or plastic disc it is immediately apparent upon removal of the band.  The lid will pop right off!  bottom line is the USDA recommends the metal two piece snap lids, recommends against porcelain lined zinc lids and makes no recommendation with respect to the glass lids, glass inserts or plastic discs all using rubber gaskets.

zinc bands up close
If a zinc lid is in good condition, it is suitable for dry storage but be careful as the sharp edges present a cutting hazard.  I am only guessing at the reasoning for the USDA's recommendation against zinc lids but to me, the roughness they develop with use could cause seal failures during the canning process.  Older zinc lids (left) don't bend up over the lid as much as the slightly newer ones (right) and they can be quite sharp on the edges.  It is possible to find some zinc lids that have no bend at all.  To the middle right there is an unused zinc lid showing how these lids look before developing the characteristic deposits and roughness.
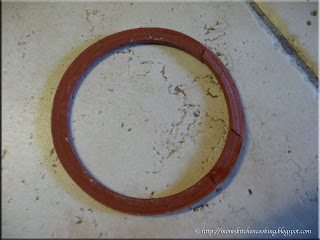
damaged rubber gasket
The Ball Blue Book does mention to not use rubber gaskets which if following to the letter would mean you would not use the newer plastic discs (eg.  Tattler, 4ever recap).  Regardless, there are two primary issues with rubber gaskets, availability and degrading with age.  Rubber gaskets are hard to find with the exception of those manufactured by Viceroy in Weston, Ontario.  These gaskets fit the older jars with glass lids AND the Canadian Gem jars (78 mm).  These rubber gaskets will not fit the Tattler, 4ever recap or standard (70 mm) mouth glass  inserts.  These gaskets can be found at Home Hardware in Canada but it is very much on a location basis.

Rubber has the distinct problem of drying out and becoming brittle with age as pictured.  This renders the gasket useless for home canning.  The glass inserts that fit the standard mouth (70 mm) jars are vintage as are the rubber gaskets.  Any rubber gaskets available are old vintage stock so may already be brittle depending on how they were stored.   To date, I have found no source for new gaskets to fit these glass inserts.  What this means from a canning perspective is the standard mouth glass inserts will only be useful until the gaskets wear out at which time it is unlikely a replacement will be found although there were sellers on eBay selling the gasket material so you could cut your own. 

Now that I've discussed what jar closures should not be used for canning and why I consider the glass lids, glass inserts and plastic discs every bit as safe for home canning as the metal snap lids, I'll make a couple of points about self-sufficiency and being eco-friendly.  Glass lids, glass inserts and plastic discs allow the home canner to be less reliant on finding a supply of the single use metal snap lids.  At one time these lids were available even in the variety stores but no more.  In our small community there are five stores which sounds like a lot but they only carry limited amounts and other than the dollar store the price for a doze is almost $3.  The dollar store currently sells them for $1.50 and I have cleaned out their stock on several occasions!  That means someone is out of luck until new stock arrive.  Outside of the busy canning season, any canning lid supply in town practically dries up.  In some areas, canning lids are available by mail order only.  Re-usable lids make a lot of sense both in terms of cost and waste reduction while allowing the home canner to take advantage of canning opportunities without worrying about rushing out to buy metal lids.  Re-usable is the eco-friendly approach as well.  Each time I use a reusable lid I save a lid from going to the curb.  Sure, it is the recycle bin but it is still waste that costs to recycle.  At my level of canning, I am saving over a thousand lids per year from ending up in the recycle bin!  Actually, I also saving that many aluminum cans from ending up in the recycle bin as well but that is another story.  Tomorrow I will tell you all about the Gem jars!


Friday, July 12, 2013

A Generous Gift of Old Canning Jars

Home canning has been a big part of my life.  My Mom canned as did most of the ladies I knew growing up.  I have been home canning myself for over 35 years.  All of our family and friends know that I'm an avid home canner so boxes of canning jars tend to show up on my door step.  We arrived home from a weekend in the Niagara area to find one of our friends had dropped off four boxes of canning jars!

boxes of old canning jars
To anyone else, these four boxes would look like old canning jars unusable for canning but perhaps usable for dry storage.  Others with an eye for antiques would quickly spot the more valuable jars.  I took one look at the boxes and immediately knew this was a special find!

As I went through the box, my excitement grew.  The jars were mainly Crown and Gem, a few Corona and Jewel , all Canadian made.  There were a couple of Ball jars (American made).   There were zinc and metal bands, glass lids and glass inserts.  The Gem jars made these boxes of jars a particularly amazing find!  I will explain more about these jars in tomorrow's post.

old canning label and lid bag
It is always a treasure hunt going through any box of old things.  So it was with these boxes of jars.  Some of the jars still had hand written labels with the contents and dates.  I carefully soaked these off and added to my collection.  There was a Bernardin bag that originally held one dozen preserving jar rings.  Bernardin is the leading home canning expert in Canada.  At one time they manufactured the jars and lids but those operations were moved to the US in the 1993 when they were purchased by Altrista Corporation, now Jarden Corporation. Bernardin is still in operation in Canada and are well known for their home canning and preserving publications.

A vast number of my canning jars in regular use were made in Canada although that has been slowly changing as I acquire newer Bernardin jars manufactured in the USA.  At one time there were several smaller glass factories scattered throughout Canada, some of which manufactured mason jars for home canning.  The Gem jars in this lot of jars are unique to Canada, made in Canada and still widely used in Canada.  Stay tuned...


Thursday, July 11, 2013

Kitchen Quick Tips - Keep Foods Fresh Longer

kitchen quick tipsBoth air and moisture can cause foods to spoil quickly.  Avoid this by vacuum seal foods stored in the refrigerator.


Wednesday, July 10, 2013

Grilled Round Steak

We just picked up our beef on the hoof purchase for 2013 but I still had a few packages left from last year's beef purchase.  A couple of those packages were round steaks.  Some cuts of beef are better for grilling than others, however even those cuts that give less than ideal results can be grilled if you modify how you do the grilling.  So it is with round steak.  A round steak is from the round primal cut of beef.  It is comprised of  the eye (of) round, bottom round, and top round still connected.  The bone may or may not be included.  A round roast is lean but moderately tough due to the lack of fat and marbling.  This makes round steak dry out when cooked with dry-heat cooking methods like roasting or grilling.  Slow moist-heat methods including braising, to tenderize the meat and maintain moisture are commonly used to cook round steak.  Round steak can also be sliced thin, then dried or smoked at low temperature to make jerky.

sugar maple wood smoking chips
During our camping days we often brought cherry wood with us to use for cooking on the campfire.  Cherry wood gives a beautiful deep ruby red embers and tantalizing sweet smoke.  Smoking chips are available in a variety of woods including hickory, sugar maple, cherry and mesquite.   Although wood smoking chips can be used with any meat, fish or poultry, some wood flavours are more suitable than others for certain meats, fish or poultry.  Wood smoking chips can even be used to add extra flavour to grilled vegetables, breads and pizza!

Wood smoking chips can be found in the grilling aisle of most box stores, specifically Canadian Tire and Home Hardware here in our corner of beautiful Ontario, Canada.  They are not expensive at about $7 for 220 cubic inch bag and the bags often go on sale near the end of the summer when there is less demand for them.   I look for all natural 100% organic, pesticide free wood smoking chips.   You can also use wood chips from woodlots and orchards providing it is pesticide free.  Quite often the wood will be free or very low cost from either source.

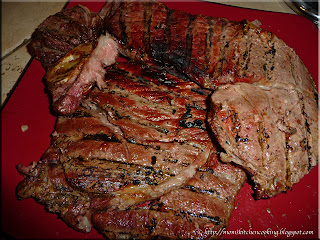
grilled round steak
Round steaks are quite large.  The bone in round steak I grilled (pictured) was about three quarters of an inch thick.  I decided to experiment by grilling the steak low and slow over charcoal enhanced with wood smoking chips to medium rare.  I reasoned this would give flavourful results without drying the meat.  I soaked a good handful of sugar maple wood smoking chips in water for about 30 minutes.  According to the bag, sugar maple is perfect for pork and poultry but I thought it would work well for the beef as well.  Once the coals were hot, I put about a third of the prepared wood chips on the coals then put the steak on the grill when the chips began smoking.  I let the steak grill slowly, adding a few more pieces of charcoal and wood chips as required to keep a low, slow heat. 

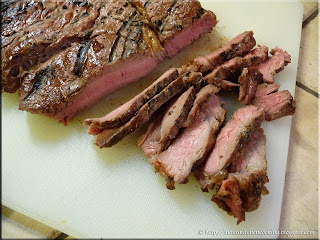
slicing round steak for freezing
Once the steak was cooked to medium rare, I removed it from the grill and let it rest for 5 minutes.  Resting ensures the meat stays moist, tender and juicy.  I was very pleased with the end result!  It was a nice flaourful steak that wasn't dried out.  The smoky element was delightful and what a difference it made in the flavour of the steak.  The key to this was the low, slow grilling.  After resting, I cut the steak into thin slices then divided into meal sized portions and vacuum sealed for freezing.  These cooked steak strips will be used for salads and wraps. 

I am quite impressed that the steak did not become dry and tough during the cooking process.  Overall, I would rate this experiment a 9 out of 10.  One portion of the steak was cooked a bit more than I would have liked but other than that, I have no complaints.  The real beauty of using the smoking chips is the flavour they add to the foods.  While the results are good using the wood chips on the outdoor grill, I want to do more smoking that requires a smoker.  I'm borrowing a smoker from one of our friends this week to see if I really want to buy one.  I have one round steak left that I will be smoking for beef jerky so will report back on the results.  I am very much encouraged by the results so far.


Tuesday, July 09, 2013

Easy Grilled Potatoes

For many, hot summer days means outdoor grilling which means an easier, laid back cooking style.  While grilled hotdogs, burgers and sausage are quite popular so to are meats, poultry and fish that need easy sides to make the meal.  My husband is really a meat and potatoes kind of guy so we often cook potatoes on the grill.

grilled potatoes
Grilled potatoes are an excellent side that pairs nicely with grilled meats and fish. Potatoes can be baked on the grill whole as is or wrapped in foil.  Each give a slightly different result.  We have cooked grilled sliced or cubed potatoes for years in foil packets on the grill.  One of my husband's friends uses a metal loaf pan which makes a lot of sense when trying to reduce waste.  This method allows for a slight higher degree of caramelization which means extra flavour.   Unlike using a foil packet, the pan method makes it easy to check whether the potatoes are cooked as desired without having to guess or go by feel.

Potatoes grilled this way are quite delightful!  They are ever so easy to make.  These potatoes sure winner as a side dish.  

Ingredients:  potatoes, sweet onion, sea salt, pepper
 

Method:  Wash the potatoes.  Thick slice them.  Slice onion.  Pour a little olive oil in the bottom of a metal non-stick loaf pan.  Layer in potatoes and onion slices.  Drizzle with a little olive oil.  Add a couple of dabs of butter.  Season with sea salt and pepper or garlic pepper or seasoning of choice.  Cover the pan with aluminum foil.  Place on the grill on indirect heat.  The potatoes take about 40 minutes to cook with nice caramelization.  Stir midway through the cooking process for best results.


Monday, July 08, 2013

Frugal Kitchens 101 - Summetime Entertaining

Frugal Kitchens 101
Note:  The long running weekly feature post, Frugal Kitchens 101, appearing each Monday will now appear on the first Monday of each month.  This will be the last of the weekly Frugal Kitchens 101.  The next post of this type will be on August 5, 2013.

We are well into summertime entertaining which means outdoor entertaining.  There is just something delightfully enjoyable about eating outdoors!  Hosting outdoor gatherings can be fun and smooth going with a bit of prep without breaking the bank.  It doesn't take a lot of effort to host a successful outdoor gathering.  Here are a few tips:

  • planning - It goes without saying that you really need to have an idea of how many people will be attending.  Whether a small or large gathering, it is easier to plan with an estimate of how many will be attending.  With that in hand, it is easy to menu plan.  Always include in your plan the possibility of having to move the gathering indoors in the event of a sudden rainfall as well as shelter from the hot summer sun.
  • timing - Unless it is a pool party, I like planning for guests to arrive around 4 o'clock.  This is out of the main heat of the day and early enough for a bit of socializing prior to dinner.
  • KISS - Keep it simple, silly.  A simple menu plan combined with simple outdoor decorating is quite easy and inexpensive to set up.  Outdoor tables can be set up with small bouquets of wildflowers or floating candles.  Vases need be no more complicated than mason jars or even a few mismatched tea cups.  Table cloths are optional but if using them, I prefer vinyl which are inexpensive (under $5) and easy to clean.  If using table cloths, you may want to use table cloth clips to hold them in place (dollar store find).  Citronella candles can add ambiance while keeping mosquitoes at bay. 
  • disposable vs reusable - I am not a huge fan of disposable dinnerware, drinkware or cutlery although I will use them for larger gatherings.  Disposable anything adds to the cost of the gathering as well as to the waste produced.  If at all possible, I use plastic or metal reusable dinnerware for larger gatherings which is eco-friendly without the worry over breakage.  For smaller gatherings, I use regular dinnerware if there is no chance it will get near the pool otherwise I use plastic dinnerware.  There's quite a wide range of plastic and metal dinnerware available at reasonable prices, often on sale at greatly reduced prices in the fall.  I use regular cutlery whenever possible.
  • food safety - The rule of thumb is to keep cold foods cold and hot foods hot.  Keep foods out of the danger zone and discard any food that has been out for two hours.  Food coolers and chaffing dishes help a lot in maintaining proper food temperature when outdoors.
  • the extras - I keep sunblock and bug repellant on hand for guests who forgot to bring some.  While it is tempting to buy less expensive off brands, I only buy what I would use myself which is high SPF broad spectrum UVA/UVA sunblock and bug repellant with high DEET content.


Friday, July 05, 2013

Sodastream Jet Titan Starter Kit

We are not nor have ever been huge consumers of soda drinks.  By far the majority of soda purchased by us is for use when entertaining.  My husband enjoys Pepsi as an occasional mix for rye & coke but even there the choice tends to be half & half aka Arnold Palmer (half lemonade, half ice tea).   Once in a blue moon he will have a Mountain Dew.  I don't drink flavoured sodas.  My carbonated beverages of choice are club soda, Perrier and occasionally all natural ginger beer or sparkling grape juice.

I have moderate to severe year round allergies.  One of the most annoying symptoms is the insides of my ears and into the back of my throat intensely itching.  I don't take an antihistamine or leukotriene blocker unless absolutely necessary.  Both club soda and Perrier with the carbonation is one way I get relief but there is a catch to both.  Any soda in cans contains trace amounts of mold which isn't a problem for some but for folks like me who react to mold it is a problem.  Club soda is made with sodium bicarbonate which adds 20 mg to 85 mg of sodium per 355 ml serving, definitely not for those on sodium restricted diets.  Perrier is a carbonated natural spring mineral water.  All mineral waters can cause urinary tract problems.  Most sodas in general contain benzoic acid that can cause kidney stones.  Flavoured sodas are high in HFCS and/or sugar, artificial flavours and colourants, and calories.  In short, sodas are not a healthy drink of choice.  I wanted an alternative carbonated drink without a high sodium content and the option to flavour as desired so had considered a home soda machine for quite some time.

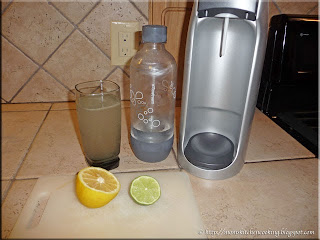
sodastream homemade soda maker
Canadian Tire is the best place to find kitchen appliances and other kitchen equipment on sale at rock bottom prices.  A couple of weeks ago they had three models of the Sodastream home drink makers on sale. These carbonating machines are tooted as being eco-friendly and they are in the sense the CO2 canister is exchangeable for refill and using the machines will greatly reduce soda cans and bottles BUT these machines are manufactured in Israel.  Shipping of these machines leaves a large carbon footprint that negates any environmental savings at the personal level.  Still, if one of these machines completely eliminated soda cans and bottles in the household it was being used in, over the lifetime of the machine, then I can see an environmental benefit. 

I bought the Sodastream Jet Titan starter kit ($109.99) that came with the machine, 1 L bottle (BPA free) and 60 L CO2 canister.  It also came with instructions and license for the canister.  Additional bottles are available in a 3 pack for $17.99 and should be changed out every 2 years.  The CO2 canister is $34.99 if you purchase a second one so you don't run out.  Empty canisters can be exchanged for $18.99 saving the core charge fee of $16.  The beauty of these machines is they are completely manual so are ideal to cart along camping or when traveling.  The CO2 canister are not allowed on airplanes either in carry-on or checked bags.  The machines and canisters are sold world-wide. 

sodastream flavoured syrup
Each CO2 canister will carbonate 60 L of water.  No other liquid should be used.  If paying for a full canister plus core charge ($34.99) the cost works out to 58¢ per L but using the exchange program, the cost is reduced to 31¢ per L.  To use, simply fill the bottle to the fill line with cold water then screw the bottle onto the machine.  Press the top button and quickly release three times.  You can add an extra press if you want the water a bit heavier carbonated.   Optional flavouring can be added after the water is carbonated.

Club soda comes in at 84¢ per L and Perrier is about three times that cost so if making simple fizzy water you will realize a savings.  Sodastream has a line of flavouring syrups in popular flavours at $6.99 for a 500 ml bottle.  Each bottle makes 12 L so this adds a cost per L of 58¢ so the total cost per L will range from 89¢ to $1.16 depending on whether you pay the core price for the canister or not.  A sampler pack of 12 Sodastream flavours is available for $11.99.  Syrups used for flavouring coffee (eg. Torani, Jordan's Slender Syrups) can be used as well as homemade flavourings.
 
lemon lime soda
Commercially flavoured syrups add cost but more importantly they add artificial sweeteners, colour and flavour, and calories.  Homemade sugar based syrups will also add calories but they can be made without artificial flavour or colour.  Vanilla syrup, a fruit syrup like peach syrup or an herb (eg. mint, lemon balm. lavender)  flavoured syrup can be used as flavouring. 

I used fresh squeezed lemon and lime juices to make lemon lime unsweetened soda.  This is a refreshing, sugar free, zero calorie drink I often make using club soda or Perrier that is similar in flavour to Sprite.  I like it without any sweetener but if you wanted it sweet without calories, adding a bit of stevia would work nicely.

The Sodastream is a frugal option for us.  I'm getting a healthier product that meets my needs without a high sodium content or ingredients that have the potential to cause more health problems.  I am saving a bit of money in the process and less waste will be going into the recycle bins.  So for us it is a win:win.   These machines are getting favourable reviews.  It is a great way to enjoy soda without all the additives and calories. 


Thursday, July 04, 2013

Kitchen Quick Tips - Refrigerating Highly Perishable Foods

kitchen quick tipsDo not store highly perishable foods (eg. milk, eggs, sour cream) in the fridge doors as the temperature fluctuation will lead to quicker spoilage.


Wednesday, July 03, 2013

Using Honey as a Sweetener in Homemade Jam

The busiest time of my home canning has started.  Ontario strawberries are in season just perfect for a few batches of homemade strawberry jam.  Of all the foods I can, strawberry jam is seldom a bargain in terms of cost.  Strawberries are expensive at as high as $5 per quart although you can get them a bit cheaper at the U-pick.  Even then, the price has risen significantly.  It takes on average 2 quarts plus the pectin and sugar to make the jam.  Certo (liquid or crystal pectin) adds about $1.50 to the price of a batch of homemade jam.  The average batch of jam takes 7 cups of sugar which further increases a batch of jam at a cost of about $1.40.  The yield for a batch of strawberry jam using traditional pectin is 7½ cups.  At the cost of homemade strawberry jam, it is hard to justify making it other than the fact you are getting a superior product to store bought. 

honey strawberry jamPectin is the ingredient that makes the jam gel.  It is dependent on the sugar content which is why recipes using traditional pectin should not be altered.  The cost of traditional pectin (eg. Certo) really adds to the price of homemade jams.  Liquid pectin averages $2.89 for 2 pouches but I've seen it as high as $3.49.  The biggest problem for me with traditional pectin is their short shelf life which means I can't buy a lot of it on sale for the following year as the pectin won't keep that long.

Sugar as mentioned is necessary for the pectin to form the gel (eg. jam set).  Sugar is also a bulking agent that adds texture to the jam.  This is noticeable when making a low-sugar jam that gives a lower yeild.   It is a cheap ingredient that doesn't add flavour only sweetness.  Until a few years ago, those making homemade jams and jellies had two choices.

The first was long cook, no pectin added and the second was shorter cook, pectin added.  Both relied on adding a lot of granulated white sugar.  Low sugar pectin became available but while the amount of sugar was reduced it was not eliminated and sugar substitutes could not be used.  Then I discovered Pomona's universal pectin.  This is a low methoxy pectin that uses calcium water, a solution of monocalcium phosphate for the gel which is not dependent on sugar.  That means sugar substitutes can easily be used in jam making.  Pomona's universal pectin works out to 35¢ per teaspoon.  Only a ½ tsp to ¾ tsp of Pomona's is needed per cup of prepared fruit so it is less per batch than traditional pectin.  It has no expiry date and you can easily develop your own recipes.  Pomona's universal pectin can also be used to make sugarfree jello and gummy candies.

I made a batch of honey strawberry jam (pictured).  This jam has no sugar added, only honey and my gosh is it ever delicious!  Honey adds a wonderful flavour to any dish!  Not only that, honey is good for you.  It is easier to digest and has a wide range of health benefits.  I never use the pasteurized, homogenized honey found in the grocery stores.  This honey is a blend of several honeys with the end result being a bland, tasteless honey stripped of its natural nutrients and health benefits.  Rather, I use raw, unpasteurized honey usually local or from an area we are visiting.  Honey varies in colour (very pale amber to very dark amber) and flavour (light to strong)  depending on the nectar source.  While it is the same sweetness as sugar, honey has flavour! 

I like pairing the honey variety with the fruit to enhance and accent the flavour of the fruit.  I used a medium amber (golden) honey in the strawberry jam which accented the flavour of the strawberries nicely without being overpowering.  Honey differs from granulated sugar in that it is a liquid as well as a humicant (attracts moisture).  It does not add the bulk to jam that sugar does but I used less honey than what I would have sugar if using a traditional pectin.  Jam foams as it cooks and normally that foam is skimmed off.  Jams made with honey have a finer foam that is a bit more tedious to skim off but there is a lot less of it than there is if using sugar.  The butter trick works to reduce the foam when using honey the same way it does if using sugar.  Everything comes back to the flavour and for that honey certainly does not disappoint in creating a gourmet, delectable jam!


Tuesday, July 02, 2013

Parmesan Ranch Chicken Wings

One of the ideas I had for a recipe to enter in the Hidden Valley RanchTM Ranchify Recipe Challenge was ranch dressing paired with chicken wings.  Ranch dressing is often served as a dip for carrot sticks served with buffalo wings.  I wanted to take that flavour one step further, right on the wings!  We usually visit Hooter's for wings each trip to our vacation home,  My husband loves their garlic Parmesan wings.  These wings are rich, gooey, messy and delightfully yummy.  I decided to go with that type wing using ranch dressing.

parmesan ranch chicken wingsHidden Valley RanchTM dressing is available in three yummy flavours - original, cheesy and spicy.  I tried all three combinations for the contest creation stage recipes.  Hands down the Hidden Valley RanchTM Ranchify spicy dressing was a sure fire taste winner when paired with chicken wings!  Although I did not submit this recipe as my entry, it is tantalizingly delicious and ever so easy to make.  They are rich, gooey and messy but oh so good!  I'm sure your family will enjoy them for your next wing night!


Parmesan Ranch Chicken Wings
recipe by:  Garden Gnome

Note:  I used 16 large wings, tips removed and cut at the joint to form 32 pieces.   The parmesan ranch sauce is enough to comfortably coat 8 to 10 large chicken wings.

chicken coating
1 c organic unbleached flour
½ c homemade breadcrumbs
1 tbsp garlic pepper

Mix well in large container.

Parmesan ranch sauce


½ c Hidden Valley RanchTM cheesy ranch dressing
1/3 c fresh grated Parmesan cheese

Reserve 2 tbsp of the grated cheese.  Mix the remaining cheese with the dressing in a bowl large enough to accommodate the chicken wings.

Prepare the desired number of wings.  Place in the flour mixture.  Shake to coat.  Let sit 5 minutes.  Leave the wings in the flour mixture until ready to deep fry.  Heat the deep fryer to 356°F.  Fry the chicken wings in small batches of 8 to 10 wings at a time until golden brown, about 7 minutes.  Remove from deep fryer and drain.  Place the wings into the sauce then use a flipping motion to coat the wings.  Remove wings to serving plate with tongs.  Sprinkle remaining Parmesan cheese on top of the wings.


Monday, July 01, 2013

Happy Canada Day!

Happy Canada Day

146 Years Young
Strong, Proud and Free
Oh Canada!

Normally, a Frugal Kitchens 101 post would appear today because it is Monday.  But this isn't any Monday, it's Canada Day!  I wanted to write something special in celebration of Canada's 146th birthday.

Happy Canada Day to all our friends, family and readers wherever you may be!

Canada is a land of plenty in many ways and especially so when it comes to Canadian grown and produced food.  Our food safety is second to none!  Each province and territory is known for a particular food or foods not only in terms of growing and producing but also one or more dishes (eg. muskrat dinner, poutineQuebec style green ketchup, pork tourtière).  Not only are some of the finest beers, rye whiskeys, liquors, and wines produced in Canada we even have our own national drink, the CaesarButter tarts and peameal bacon are truly Canadian culinary creations.  Canada is home to many top notch, world class culinary chefs as well.

We are celebrating Canada Day by hosting an outdoor gathering for a small group of friends.  The food choice focus is on Canadian foods!  Most of the food (eg. hormone-free and grass fed beef, strawberries, watermelon, cucumbers, tomatoes, homemade bread, cheeses, potatoes, corn) being served was grown or made with food grown within a short distance of our home.  Drinks will also focus on Canadian brewed beers, Ontario wine and Canadian rye whiskey as well as other Canadian produced liquors.  After dinner we will sit around chatting about our next trip to the great Canadian wilderness that we will return home from with a cooler full of Canadian whitefish, wild blueberries and honey.  We will definitely be talking about Dillon's Small Batch Distillers, a new distillery in the Niagara area featuring rye whiskey, gin and vodka.  I'm sure our wonderful 5 course meal enjoyed last weekend at Vineland Estates in Niagara will also be a topic of  discussion.  As the evening fades into darkness, we will still be enjoying the celebrations, tummies filled with a wonderful assortment of great Canadian foods!  I'll be crocheting a toque while chatting about food, listening to the guys chatter about hockey. 

Here's to Canada - 146 years young - the true north strong and free!  Eh!