My photo
Ontario, Canada
I am a wife, mother and grandma who enjoys the many aspects of homemaking. A variety of interests and hobbies combined with travel keep me active. They reflect the importance of family, friends, home and good food.
Cook ingredients that you are used to cooking by other techniques, such as fish, chicken, or hamburgers. In other words be comfortable with the ingredients you are using.
--Bobby Flay

For Your Information

Please watch this area for important information like updates, food recalls, polls, contests, coupons, and freebies.
  • [March 19, 2020] - Effective Mar 17, this blog will no longer accept advertising. The reason is very simple. If I like a product, I will promote it without compensation. If I don't like a product, I will have no problem saying so.
  • [March 17, 2020] - A return to blogging! Stay tuned for new tips, resources and all things food related.
  • [February 1, 2016] - An interesting report on why you should always choose organic tea verses non-organic: Toxic Tea (pdf format)
  • Sticky Post - Warning: 4ever Recap reusable canning lids. The reports are growing daily of these lids losing their seal during storage. Some have lost their entire season's worth of canning to these seal failures! [Update: 4ever Recap appears to be out of business.]

Popular Posts

Saturday, June 30, 2012

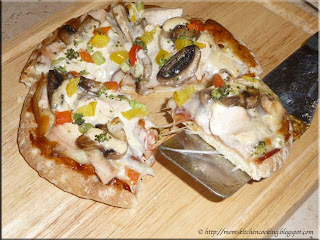
Mini Ranch Pizza Appetizers

[This is my first of two entries being submitted to the Hidden Valley Ranch™ Recipe Challenge.  I hope you enjoy the flavours!  My second entry will be posted tomorrow.]

As soon as my box of Hidden Valley Ranch™ samples (full sized bottles) arrived for the Hidden Valley Ranch™ Recipe Challenge, I had an idea for a recipe.  Well, actually I had three so I started experimenting in the kitchen.  In the end, I had four nice recipes that were delicious keepers according to my taste testers and two that were good but needed more tweaking.  So here is one of the keeper recipes that I decided to use for my first entry in the recipe challenge.

mini ranch pizza entry 1 for Hidden Valley Ranch Recipe Challenge
Yesterday, I told you how I made the  charcoal grilled jerk seasoned chicken that I would be using for my first entry in the challenge.  I use a lot of Greek style pocketless pitas when entertaining.  Cut into four or eight wedges they are perfect for appetizers.  At the same time, these pitas are perfectly sized for a child's meal and they would be a tasty, easy treat for a child's birthday party.  My goal when creating this recipe was a bit rustic, flavourful, easy to make mini pizza that would appeal to both adults and kids.

If you are making them for kids, place various vegetable toppings and let them assemble their own pizza.  Guaranteed they will choose more vegetables than expected!  Of course a little taste testing of the ingredients while making their pizza always helps.  We did this with our kids when they were young.  Even though they were and are still veggie lovers, it always amazed me how letting them choose made a such a difference. 

Ranch® really is the new flavour of the day.  It's not just for dressing and dips anymore!  I used the new Hidden Valley® The Original Ranch® Cheese Creamy Dressing & Dip as a blending base flavour for this recipe.  The flavour works nicely with the other flavours, giving a creamy element to the pizza.  We liked the flavour so much, the Ranch® Cheese has earned a place in our pantry. 

Mini Ranch Pizza Appetizers
recipe by: Garden Gnome

3 Greek style pocketless pitas
1 cup (250 ml) prepared charcoal grilled jerk seasoned chicken
4 slices Provolone cheese*
2 tbsp (30 ml)sweet peppers, red and yellow
3 tbsp (45 ml) Sweet Baby Ray's® Barbecue Sauce
3 tbsp (45 ml) Hidden Valley® The Original Ranch® Cheese
2 tbsp (30 ml) brocoli, chopped
2 tbsp (30 ml) green onions, sliced
⅓ c (75 ml) seared mushroom slices
1 tbsp (15 ml) butter
3 tbsp (45 ml) chopped tomatoes (optional)

Slice the mushrooms and pan sear in a little butter.  Drain and set aside.  Chop broccoli and sweet peppers.  Slice the green onions thinly.  Brush the tops of the pitas with Sweet Baby Ray's® Barbecue Sauce.  Tear the cheese slices into thirds and distribute even over top of each pita.  Divide chicken into thirds and place on pitas.  Squeeze in a circular motion about 1 tbsp of Ranch® Cheese dressing over each pita.  Top with mushrooms and then the prepared vegetables.  Bake at 350ºF/175ºC in oven or outdoor grill on Silpat lined baking sheet until cheese is melted and just turning golden on the edges.  Remove from oven.  Cut into 4 or 8 wedges as desired using a pizza cutter.

*I could only find sliced Provolone cheese here so used it as that is the flavour and texture I wanted.  Grated Provolone cheese can be substituted.


Friday, June 29, 2012

Charcoal Grilled Jerk Seasoned Chicken

I am currently tweaking the final two Ranch recipes I will be submitting for the Hidden Valley Ranch™Recipe Challenge.  When I received my box of five delectable Hidden Valley Ranch™chicken immediately popped into my mind and I already had a idea in mind.  The recipe would used chicken but not any chicken.  My creation would use charcoal grilled jerk seasoned  chicken to give a unique flavour that would go nicely with the Ranch.  Before I post that recipe to be submitted for judging, I wanted to share with you exactly how I make the chicken.

starting the charcoal briquettes
When I took these pictures for the first run of the recipe we were using charcoal briquettes.  We ignite them using an electric starter rather than use lighter fluid.  Briquettes are wonderful and used properly you can get some amazing results.  They add a smokey note that you can't get using propane or natural gas grills.  We have since switched to using old fashioned lump charcoal in favour of briquettes.  Briquettes burn hotter than lump charcoal and they are cheaper but they produce a lot of ash.  Lump charcoal is all natural.  It lights quickly, burns hotter with little ash production but it burns faster and is more expensive.  Still, we are finding we are getting better results using lump charcoal in terms of flavour and performance.  Whether you use charcoal briquettes or lump charcoal, the method for grilling the chicken is the same.

whole chicken
The Hidden Valley Ranch™ Recipe Challenge specified using fresh ingredients with a strong emphasis on fresh vegetables and kid friendly.  I picked up two fresh whole chickens to start creating.  The reason being, I knew I would have to recreate my recipe a few times to get it the way I wanted.

Pictured is one of the fresh chickens.  I removed the fatty portions around the cavity opening as they would cause flare-ups on the grill.  They went into the freezer bag of chicken parts for stock making.    Once the chicken was clean-up, I cut in in half, butterfly style.

cut and jerk seasoned chicken
For this purpose, it didn't matter whether I cut along the rib cage (butterfly) or breastI cut from end to end along the breast line.  The cut really didn't matter as all the meat would be cut from the bones. Leaving the chicken somewhat whole gives a juicier result than cutting it into individual pieces.  Leaving as many bones in the chicken gives nice stock bones.

I used Cool® Runnings Jerk Seasoning to lightly season both sides of the chicken.  I reasoned the seasoning would compliment the smokiness of the charcoal without over powering it.


chicken just on the grill
I put the chicken on the grill when the briquettes were covered with white ash.  The heat can be adjusted by lowering or raising the coal bed or the chicken can be moved to the upper shelf to cook slower.

When cooking on charcoal, it is important to avoid flare-ups much the same as any other types of grilling.  Flare-ups cause heavy charred or burned parts on the food.  The standard trick of using water or beer to douse the flames doesn't work with charcoal as that causes ash to rise and stick to your food.  Keep a close eye on the food and move it to another part of the grill when flare-ups occur.  Be sure to adjust the coal tray level to reduce flare-ups and add fresh coal if necessary especially if you are doing a slow cook.

chicken almost cooked
The chicken is cooked when the juices run clear and the meat is no longer pink.  Note the smoke surrounding the almost cooked chicken?  This adds an amazing flavour that permeates the meat without overpowering.  It is mouthwatering!  This is my current favourite way of cooking chicken on the grill.

Once the chicken is cooked, remove it from the grill and allow to rest 10 minutes before deboning.  The meat will fall from the bone rather nicely.  Cut larger pieces into strips or you can cube if desired.  Make sure you leave bits of the skin on as it really does add flavour.  Most of the fat has dripped off anyway.  Cool the chicken pieces.  Reserve bones for stock.  When the chicken pieces are cooled they are ready to be used in sandwiches, salads or you can freeze for a taste of summer during the winter months.


Thursday, June 28, 2012

Kitchen Quick Tips - Bacon Grease

kitchen quick tips
Save bacon grease to use for frying eggs or cabbage or brussel sprouts, flavouring corn bread or soups.  It can also be used to add a bit of extra flavour when frying chicken.


Wednesday, June 27, 2012

Ranch Potato Salad

A few days ago I announced that I was one lucky Canadian blogger chosen to participate in the Hidden Valley Ranch™ Recipe Challenge.  That means I have been having a bit of fun experimenting with Ranch!  I have three specific recipes I am still tweaking for the final submission prior to July 1.  Of these recipes, I will be submitting two but will not share them here until after the judging.  Hopefully, one will be a winner!

ranch potato salad
Our kids and grandkids were home last weekend for a family pool party and BBQ.  I made a ranch potato salad to accompany the charcoal grilled jerked chicken breasts and corn on the cob.  I love packing as much nutrition as possible into salads and that means extra vegetables.  My potato salad is no different.  What was different about this potato salad was the addition of homemade bacon bits and Hidden Valley Ranch™.

Everyone enjoyed the upscale flavour of the ranch potato salad.  It was very easy to make and I liked that I managed to get a few extra vegetables into a dish.  Now I will admit our kids and grandkids love their vegetables so I really don't need to use any tricks to get them to eat more.  This is a keeper recipe that I'm sure you will enjoy.  It is not one I am submitting for the contest but it still is quite good!

Ranch Potato Salad
source:  Garden Gnome

10 medium waxy potatoes
1 lg stalk celery
½ English cucumber
4 - 5 radishes
1 small onion
1 green onion
¾ c Miracle Whip or mayonnaise
⅓ c Hidden Valley The Original Ranch®
 ½ c homemade bacon bits

Wash and peel the potatoes.  Cut into bite sized pieces.  Steam until tender.  Remove from heat and allow to cool.  Cut about 4 slices of bacon to form pieces.  Fry until crispy.  Remove from heat and drain.   Place in mixing bowl.  Cut the celery stalk down the centre then thinly slice and pour into bowl with bacon.  Cut the English cucumber into quarters then cut into bite sized pieces.  Add to bacon bowl.  Cut the radishes into quarters and slice, add to bacon, vegetable bowl.  Slice the green onion thinly and add to bowl.  Chop the onion finely and add to bowl.  Mix vegetables and bacon together.  Stir into cooled potatoes.  Mix the Hidden Valley The Original Ranch® and Miracle Whip or mayonnaise together.  Pour over the vegetables.  Use a wide, slotted spoon to mix.  Add a little extra of either if the mixture is too dry.  Spoon into serving bowl.  Refrigerate 1 hour before serving to allow the flavours to blend.


Monday, June 25, 2012

Frugal Kitchens 101 - Stocking the Pantry for Illnesses

Frugal Kitchens 101

The kids and grandkids visited us on Saturday for a pool party and BBQ.   Two of our grandkids and their parents stayed overnight.  I woke in the early morning hours of Sunday with a horrid sore throat.  By the time brunch was over, my voice was fading quickly.  After the kids left, we had friends over for more swimming and a BBQ but by dinner there was no way I could eat anything solid.  Today, I have no voice period, notta, nothing, not even a squeak and my throat is still quite painful.  While an injury can interrupt cooking via restricted mobility, illness is often worse especially if you are the only cook or primary cook in the household.  The very smell of some foods cooking or even the smell of coffee quite often do not sit well when you are ill and physically you simply may not feeling like doing any cooking at all.  The problem is and as tempting as it may be to no eat, your body needs nutrients to help fight off the illness and heal so it is very important to continue eating even if you don't feel like it.  It is also very important to drink plenty of water to rid your body of toxins while it heals.  The well stocked pantry takes this into account.  Here are a few things I keep on hand to help us get through illness.

  • jello -  Jello has a long shelf life and is very easy to prepare even when you are ill.  While it doesn't provide a lot of nutrients, it is an easy source of sugar to prevent your blood sugar from dropping too low and it is generally well tolerated for most illnesses.
  • green tea -  Green tea itself does not have much in the way of nutrients but it is high in anti-oxidants and helps your liver eliminate toxins during your illness.  It is soothing for sore throats yet the smell isn't enough to turn your tummy.
  • chamomile tea -  Chamomile tea has natural calming properties to help you relax and sleep better.  The body needs extra sleep to help heal during illness.
  • honey - Honey has natural anti-bacterial properties.  Not only does it sooth sore throats it helps control harmful bacteria in your gastrointestinal tract while promoting healing.
  • instant potatoes - Instant potatoes are an easy way to get a few nutrients and fiber into you without much effort.  Add a light sprinkling of salt especially if you have a a bit of a fever.  This will add needed sodium you have lost through sweating.  Do not add dairy (eg. butter, milk) if the illness is intestinal.  If there is any signs of nausea eliminate all dairy until you are feeling better.
  • Lipton chicken noodle soup - This really is a childhood thing because my Mom always made Lipton noodle soup when I was sick.  This boxed soup mix has a long shelf life and is easy to prepare without the longer cook time and smell of homemade chicken soup.  It is fairly nutritious with easily tolerated noodles that provide starch and a small amount of fat from the broth.  Be warned, this soup mix is high in sodium so should not be consumed when ill if there are any signs of dehydration.
  • home canned broths - Broth is made using the meat and bones.  Home canned broths are very nutritious containing vitamins, a small amount of fat and protein.  It's easy to warm, soothes sore throats and is fairly well tolerated if suffering from an intestinal upset.
  • saltine crackers - Saltine crackers are very effective for calming nausea.  They provide sodium and starch.
  • apple cider vinegar (ACV) - ACV has anti-bacterial properties as well as beneficial properties for the gastrointestinal tract.  It helps calm nausea and aids with digestion.  One tsp of ACV in warm water helps to sooth sore throats.  If you don't like the taste of ACV there are ACV tablets available in the dietary supplement section of the drug store.
  • cranberry juice - We don't drink much in the way of fruit juice but when ill we drink cranberry juice.  This provides Vitamin C while supporting your urinary tract to help rid your body of toxins.


Thursday, June 21, 2012

Kitchen Quick Tips - Pancakes

kitchen quick tips

Make a double or triple batch of pancakes then freeze on a cookie sheet after cooking.  Package into freezer bags once froze.  The pancakes can easily be warmed up in the toaster or microwave oven for a quick hot breakfast during the week.


Tuesday, June 19, 2012

Using Reusable Canning Lids for Home Canning Strawberry Jam

I have talked so much on this blog about canning.  The reason being home canning is a huge part of our lives.  Home canning allows us to keep our food costs low, gives us unique products you could not buy in stores and the products are healthier, not laden with extra preservatives, or artificial colours and flavours.  It is our way of taking responsibility for our own safe food supply as well as preserving the bounty of the harvest.  It is also a way for us to share our blessings with family and friends.

Everyone who home cans is familiar with the single use metal snap lids.  These are the only lids currently approved by the USDA but only because those companies paid big bucks for the endorsement.  A metal snap lid is sealed if the center of the lid is indented so it gives a nice visual along with a ping to let you know the lid is sealed.  There are three problems with the metal snap lids.  First, they can result in false seals because the natural tendency is to touch the lid to see if it is sealed which may push it down creating a false seal.  The second problem is these lids really are disposable meaning they are not eco-friendly.  In some areas, they can be put into the recycle bin but in other communities they end up in the landfill.  The third problem is the metal lids are coated with a plastic containing bis-phenolA (BPA) so they present a potential health risk.  High acid foods (eg. jams, jellies, pickles, fruits) processed in a boiling water bath canner (BWB) are not likely to come into contact with the coating so BPA leaching into the food is low risk.  Those low acid foods (eg. vegetables, meats, soups, dried beans, and some tomato products) will come into contact with the coating during processing resulting in trace amounts of BPA in the food, although it is much lower in concentration than any commercially canned foods.

strawberry jam sealed with Tattler and glass inserts just out of canner
I have been experimenting with re-usable canning lids to circumvent the BPA issue while becoming more eco-friendly.  While I still use the metal snap lids for any product given away, I am using Tattler re-usable plastic BPA free lids and glass inserts.  When you put a metal lid on the jar, you tighten finger tight then process.  When you put a Tattler on, originally the instructions were to tighten finger tight then turn back a quarter inch but now it is to tighten finger tight.  When you put a glass insert on, you tighten fully then turn back a quarter inch.  Immediately out of the canner, the rings of both must be tightened fully.

Here is strawberry jam fresh from the canner.  Note the difference in the bands?  Now that can be a problem with the glass inserts.  Boiling water rests between the lid and the band so you can burn yourself trying to tighten the band.  Make sure you use a thick towel.

strawberry jam sealed with Tattler and glass inserts ready for labeling
Pictured is the jam jars cleaned with rings removed ready for storage.  I really like my Tattler lids, seriously I do.  However, I love my glass inserts!  I have 14 jars with glass inserts in storage without one seal failure and the jars just look gorgeous!  In comparison, it depends on what I am canning but I have a seal failure rate of about .1% with Tattlers and about the same with metal lids, maybe a bit more if I hit a bad box of lids.  False seals are not an issue with the Tattlers or glass inserts.  They are either sealed or they aren't.  If the lid is not sealed it lifts off with no resistance as soon as you remove the band.

Be warned, unlike the Tattler and metal lids, the glass lids will break.  They are difficult to find especially the rubber gasket that is no longer in production.  They are considerably more expensive as they are vintage lids.  On average I have paid $1.50 per lid with gasket in comparison to Tattler lids at 82¢ and Bernardin metal snap lids 14.5¢ each.  Both Tattler and Bernardin lids are still in production but that might not be the case in the future.  For that reason, I continue to increase my stock of all three types of lids. 

This batch of strawberry jam was made using Redpath QUICKSET™ for jam.  This is not a product I have used before and normally would not buy.  The 1 kg package contains sugar, citric acid and pectin mixed together.    The current price is $2.99 but a local grocery store recently had it on sale for $1 as part of their dollar sale. At the regular price, it is more expensive than Pomona's pectin and Certo crystals but less expensive than Certo liquid per batch of jam.  It may work out slightly cheaper per batch considering the sugar is included in the price whereas sugar is in addition to the cost of the other pectin.  Current sugar prices range from 10¢ to 17¢ per cup depending on where you buy it.  Using the Redpath QUICKSET™ is no easier to use than using Certo or Pomona's.  It removes measuring the sugar but increases the boil time by 3 minutes.  The set is comparable to other pectin. 

Method:
Wash and hull the strawberries.  Crush the fruit and measure out 3½ c of crushed fruit into large saucepan.  Add 2 tbsp lemon juice and the entire bag of Redpath QUICKSET™.  Mix well.  Bring to a full rolling boil [Add ½ tsp butter to prevent excess foaming. (optional)] and boil for 4 minutes stirring constantly.  Remove from heat.  Continue to stir for 5 minutes to prevent floating fruit.  Ladle into hot jars.  Wipe the rim and place lids on the jar.  Tighten band according to the type of lid being used.  Seal -> This means to process in a BWB canner for 10 minutes.  Remove from canner.  Let sit undisturbed for 24 hours.  Check seal.  Label and store.


Monday, June 18, 2012

Frugal Kitchens 101 - Jams and Jellies

Frugal Kitchens 101
Ontario strawberries and cherries are in season signifying the start of the jam and jelly making here. Unless you grow your own berries, there are little savings in home canned jams but the finished product is far superior to what you can buy in the grocery store. There are no preservatives or artificial flavours or colors and certainly no HFCS in homemade jams or jellies.  There are three main costs for jams and jellies: berries, sugar, and pectin. If canning the jam, the cost of lids need to be factored in as well. There are ways to save on the costs of making homemade jams and jellies. Here are a few of the things I do to keep the costs in check:

  • berries or fruit - Berries or fruit for jam making are available at farmer's markets, roadside stands, U-picks and the grocery store.  By far the cheapest is if you grow some or all of the berries or fruit you will be using for making jam.  If buying berries, know the current prices.  For example, I recently bought strawberries as my strawberry bed has just been planted.  A local roadside stand had theirs priced at $4 per quart or $20 per flat (6 quarts, $3.33 each) while a local grocery store had strawberries on sale 2/$5 or $2.50 per quart.  However, the quality of the berries were better at the roadside stand making them a better deal as there is no point making jam with poor quality berries.  The local U-pick is coming in at $2.25 per quart but factoring in the cost of gas and time, the frugal choice between the two is the in town roadside stand or the grocery store.  A trick to stretching more expensive fruit is to make a mixed berry or fruit jam.  I made strawberry kiwi because kiwis were on sale and I made a mixed berry jam because blueberries were on sale. 
  • sugar - Sugar ranges in price from about 10¢ to 17¢ per cup depending on where you buy it.  Traditional jam recipes tend to be very sugar heavy, usually between 4 to 8 cups of sugar depending on the recipe.  On the low side sugar will cost to 40¢ to 80¢ and on the high end 68¢ to $1.36.  This cost can be reduced by making healthier, sugar reduced or low sugar jams.  There is a lower yield for the healthier versions as sugar adds bulk but the final product is well worth it, more of a gourmet jam.  The second way to save is to buy sugar in bulk for the lowest price per lb.  The third way is to watch the sales.  Sugar seldom goes on sale but some grocery stores will put sugar on sale for holiday preparations (mid-November) so take advantage of those sales if you can.
  • pectin -  Surprisingly, store bought pectin can be one of the biggest costs of jam making.  Pectin is available in crystals, liquid, quickset or low methoxy granular.  Each has its advantages and disadvantages.  Be aware that all by the low methoxy pectins have a use by date.  Liquid and crystal pectin cannot be interchanged. 
    • homemade pectin - If you have access to free green apples or crabapples you can make your own pectin.  You will need 10 lb of either to make about 2 cups of pectin.  It can be home canned if desired.  Be warned this is a long cook process requiring overnight straining to use the juice only.  Each batch of jam will use ½ to ¾ c to 4 c of fruit so a batch of pectin will give a yield in jam of 3 to 4 batches.  Do consider the cost of energy to cook down the pectin.  We now have time of use electricity pricing which is one reason I switched to natural gas for cooking when we moved.  A large electric burner (2100 W) costs just over 25¢/hour so a long time cook can actually make homemade pectin more expensive than store bought.  Cooking it on natural gas will cost about 8.3¢/hour. 
    • crystal - The common brands are Sure-Jel and Certo but I did see a store brand recently.  Certo crystals are currently selling for $1.99/box.  One box is required for each batch of high sugar jam.  The store brand was $1.19.
    • liquid - The most common brand is Certo.  It comes in a box of two pouches for the current price of $3.49.  Depending on the jam being made, one or two pouches are needed.  Liquid pectin really is the most expensive form of pectin and it has a lower shelf life than either crystal or low methoxy pectins.
    • quicksets - Redpath has a pre-mixed bag of quickset that includes the sugar and pectin.  The beauty of this is pretty much a dump and use with only measuring the fruit.  It currently costs $2.99 but was recently on sale for $1 a bag.  A one kilogram bag makes 5 - 7 cups of jam, consistent with crystal and liquid pectins.  Since you don't have to add sugar, the cost using a quickset is lower than crystal pectin on the high range end of sugar and considerably lower than liquid pectin even at the regular price.
    • low methoxy - Low methoxy does not require sugar for the set meaning you can use sugar substitutes, make low sugar jams and create your own recipes.  Of all the pectins, it is the most versatile.  There is a higher initial outlay at $49.70 per lb which works out to about 35¢ per tsp.  Each batch will use ½ to ¾ tsp per cup of prepared fruit.  The average batch of jam will cost 70¢ to $1.05 as well as the savings on using less sugar.  It does not have an expiry date either so is a great product to have in your pantry.
  • lids - There are two type of lids. re-usable and single use.  Single use metal snap lids are the only lids officially endorsed by the USDA.  The reason being, those companies paid the big bucks to get the endorsement.  Re-usable lids are available in glass (vintage) or plastic and while they work just as good as the metal, in fact even better, they aren't USDA approved because the companies have not paid for the testing.  I use all three.
    • metal snap lids - These range in price from $1.50 per box of 12 in the local dollar store to $2.79 in the grocery stores.  A couple of years ago, the boxes were $1 in the dollar store, then last year $1.25 and now $1.50 but they are the cheapest price around even with the HST.  The dollar store lids are brand name Bernardin lids coming in at a total cost 14.5¢ (12.5¢ lid, 2¢ HST).  This is a considerable increase for those doing larger scale home canning.  The same lids will cost you 23.25¢ plus 3¢ HST in the grocery stores.
    • Tattler and 4ever Recap lids -  Tattler and 4ever Recap lids are a plastic disc version of the metal snap lids but they have a separate gasket and they are reusable.  Unlike the metal snap lids, they are BPA free.  My last purchase of Tattlers cost me $29.63 including tax for 36 at a cost of 82¢ each which means I need to re-use them 6 times to break even compared to dollar store prices or 3 times grocery store prices at which point each additional use costs me nothing and are in fact saving me money with each use.  Some of my Tattler lids have already paid for themselves!  The plastic lids are guaranteed to last a lifetime but the rubber gaskets may need replacing after using about 20 times.  The 4ever Recap lids are slightly less expensive.
    • glass inserts - By far these are my favourite lids!  Like the Tattlers they consist of a disc that fits on the jar with a rubber gasket.  They look good on the jars and they perform like a dream.  They come in at about $1.50 per lid and they require special rings.  The gaskets are thicker and smaller than Tattler and while they can be used multiple times, they can be hard to find.


Saturday, June 16, 2012

My First Recipe Contest

As you know we recently returned from our spring vacation spent at our vacation home in Florida with a side trip to Aruba.  I have so many wonderful foodie things to share with you from that vacation alone.  However, on the home front things are in full gear in the kitchen.  I've been busy taking advantage of a pork loin sale at $1/lb, as well as canning mainly in season fruits and jams.  A couple of days ago, I received an email asking me to participate in the Hidden Valley Ranch™ Recipe Challenge.  I accepted and am pleased to say this is my first official recipe contest!  My acceptance letter read that "you've been selected as one of Canada's top online influencers"!  I am beyond flattered!  What an amazing honour to bestow on this humble blog!  Can you tell from all the exclamation points how extremely excited I am?

I am up against 15 of Canada's top food bloggers!  The recipe will be judged by Chef Ned Bell*.  Three runner ups will receive a $100 gift certificate for Williams Sonoma.  The grand prize is a Kitchen Aid stand mixer and we all know how much I love mine!  Plus Chef Bell will do a live demonstration of the recipe at this year's Calgary Stampede and the winner gets full bragging rights!  I was sent five full sized bottles of Hidden Valley Ranch™ and $100 gift card to help buy the food needed to create a recipe for the contest.  Recipe submission deadline is July 1, 2012.

That means between now and the end of the month I will be working on a recipe hopefully good enough to be in the top four of the contest so I will be posting some of my recipes using Hidden Valley Ranch.  At the same time I will be sprinkling in posts about foods enjoyed during our recent vacation as well as canning since for many, it is the start of canning season.   Watch for exciting things from the kitchen over the next couple of weeks plus my ultimate culinary experience at being invited into the kitchen at Matthew's Beachside Restaurant in Aruba.  Now that was an absolutely amazing experience!

*From my acceptance letter:


Arguably one of Canada’s foremost culinary talents, Ned’s new and imaginative dishes are inspired by fresh and local ingredients. He started his career in Vancouver where we worked as a sous chef at Robert Feenie’s Lumiere. He has since enjoyed successful stints as executive chef at Niagara-on-the-Lake’s Peninsula Ridge Estates Winery, Toronto’s Accolade and Senses Restaurant, Murrieta Grill and Hotel Rosewood Georgia in Vancouver. He is host of The Food Network’s “Cook Like a Chef” as well as Co-Host of CTV’s “Its Just Food”. Ned Bell is currently the executive chef of the Four Seasons in Vancouver and will join the Hidden Valley Ranch team at this year’s Calgary Stampede to ring in the Stampede’s Centennial Anniversary.


Thursday, June 14, 2012

Kitchen Quick Tips - Perfect Scrambled Eggs

kitchen quick tips
Whip at teaspoon of mayonnaise into eggs (1 tsp per 2 eggs)  before scrambling them.  They won't dry out or overcook!


Tuesday, June 12, 2012

Aruba, Bahama, Come On Pretty Mama...

We arrived in gorgeous Aruba just after 4 PM on May 12.  After picking up our rental vehicle (a Hummer) we headed to the Costa Linda Beach Resort where we would be staying for seven nights.  Six of those nights were on the fifth floor overlooking the resort and Eagle Beach while the last night was on the first floor overlooking the pool area.  After checking in we went for drinks at one of their bars near the beach.

galley kitchen in the time share at Costa Linda in Aruba
When we do rentals for any vacation, we usually get a unit with a kitchen.  This saves on the cost of breakfast, lunches and snacks.  Sometimes we enjoy a dinner or two in the rental unit as well.  Our time share unit at the Costa Linda had a small but functional galley style kitchen.  It was adequately equipped for simple cooking.  It included a gas range, microwave oven, refrigerator, dishwasher, blender, toaster, can opener and coffee maker as well as serving ware.  There was a three seat breakfast bar on the L of the counter then a full sized dinning room table with seating for six off the kitchen.

a simple pork loin dinner
We went grocery shopping at Ling & Sons Super Center in Oranjestad, Aruba, just a short drive from the Costa Linda the day following our arrival.  It looked very expensive because prices were posed in the Aruban Florin (AFL).  One USD is about 1.75 AFL.  Factoring in the exchange rate the cost of food was not much more expensive than we pay in Florida at our vacation home.  There were four of us so bought according and although it looked like a lot of food, we had little left over at the end of the week.

One of our meals was a simple pan fried pork loin chop with corn on the cob and boiled Dutch potatoes.  At first I thought Dutch potatoes were an actual dish as they are called that on many restaurant menus but it turns out they are a variety of potato in the grocery store.  In the restaurants, they were very similar to what we would call home fries - fried chunks of peeled potato with onion.  What I did note even at the restaurants the potatoes were always peeled.  It reminded me of my late father-in-law who immigrated from the Netherlands to Canada when he was 19.  He refused to eat potatoes with skins on them as that was considered pigs' food!  I don't recall him ever eating the skins on potatoes, not even baked potatoes.

the view from our balcony at the Costa Linda in Aruba
Our simple dinner was enjoyed on the balcony of our time share.  Just look at the beautiful view!  In the foreground is the resort.  To the upper left of the yellow building there is a little resort bar with stools but you can take your drinks anywhere on the resort.  To the right of the yellow building is a new bar that had it's grand opening a couple of days before we left.  There are various barbecue areas set up where you can cook your own food if desired.  To the bottom left corner out of camera range is one of the resort restaurants. The natural body of water is the Caribbean Sea.

We ate out a fair amount during our stay in Aruba.  I will be sharing some of those dishes with you as one very special foodie highlight.  Stay tuned for more of our Aruba foodie adventures!


Monday, June 11, 2012

Frugal Kitchens 101 - Prepping the Kitchen for a Vacation

Frugal Kitchens 101
  Summer is just around the corner and soon the kids will be out of school.  This is the time of year when many families turn their thoughts to summer vacation.  Years ago when our kids were young, we did a lot of camping.  We had a larger travel trailer (28') with microwave, oven, stove top, furnace, running water as well as outdoor cooking equipment (Coleman stove, fire pit tripod, propane grill, pie irons).  We very seldom hooked to hydro or water because we had batteries and large water holding tanks.  We could get about 11 days off of our batteries using power conservatively.  Back then the only planning I did was move foods from the house to the trailer.  I always made a dish for set-up day but really the cooking didn't change all that much from our home to our home away from home.  Fast forward to life as empty nesters and owning property in Florida.  We spend anywhere from three to five weeks at a time there.  There is only so much food I can feasibly bring with us when we go to our vacation home which means a good two to three weeks before we leave for our vacation home I need to do a bit of prep work.  At the same time I can't store a lot of food at our vacation home because we rent it out when we aren't there.  Here are some of the things that work for me:

  • stop buying all but the essentials - Unless it is something we absolutely need and some fresh fruits and vegetables are a need, we do not buy anything for the two week period before we leave.  We eat from the pantry and freezers letting our fresh food supplies diminish.   When I buy produce I buy only what we need for that time period.  For example, instead of a bag of onions, I will buy two.
  • freeze whatever fresh produce possible -  If I have an excess of things like onions, green peppers and any vegetable that will freeze nicely, I prepare it then vacuum seal and freeze.  Sometimes I will dehydrate or can them if I have enough.  We cannot take fresh fruit when traveling to our vacation home because we have to cross the border.  There are produce restrictions as to what can enter Canada and the US. 
  • dairy -  Dairy is a hard one to deal with.  We have meals based on eggs and dairy, bake and yet there is always a bit left over.  The only two options that really work for us is to stop buying and to give whatever we can't use but won't keep to family.   Eggs can be scrambled then froze but I haven't done it so can't tell you how well it works.  Some cheeses freeze nicely so I grate or pop as in to the freezer and unopened cheeses are generally fine until we return.  Unless they are close to the use by date, I leave them as is in the cheese keeper.   I stop making yogurt, buttermilk and sour cream about a week before our departure.  I'm usually able to use those types of things up fairly quickly so just plan meals that don't require them as an ingredient once they are gone.
  • meats -  I freeze any meat in the meat keeper including bacon unless it was previously frozen.  Unlike many, I seldom keep a lot of meat in the meat keeper to begin with as we tend to thaw what meat, poultry or fish as we need it.  Fresh meat, poultry or fish is usually used the same day of purchase.
  • refrigerator - I clean out the refrigerator, then clean it the day before leaving.  By then there is little left other than condiments and cheese.
  • dishes - We traditionally eat out the night before leaving but that is because our flights tend to be around the 6 AM mark meaning we are on the road about 2 AM aka don't want to deal with dirty dishes or cleaning the kitchen at that hour of the morning on a travel day and we want the dishwasher empty before leaving.  We do take homemade coffee in our travel mugs for the ride to the airport.  They are rinsed out, left empty and ready for on flight and we take refillable water bottles to fill at the airport once we clear security. 
  • bring what we reasonably can - When driving we are restricted as to what foods we can bring by available space and weather.  It really is a pain to have to unpack the trunk to bring in cases of home canned foods overnight to protect them from freezing during the trip. When we fly, we are restricted to basically what we can carry as there is no need for us to check bags.  Liquids must be 3 oz or less for carry-ons.  We do have the option of shipping some foods to our vacation home but that would mean a separate trip to the US within a day or two of our departure.  So I only bring what I reasonably can when flying which means no home canned foods.  Dried foods are great because they are lightweight and take up little room but be warned if going through security, certain dried foods should be in their original containers especially if they are a white power or crushed anything that would resemble wacky tabacky (just saying!) .  But this means I can still bring seasonings and some of my homemade mixes.  Even at the border, customs likes to have all containers sealed, preferably original but they will make a exceptions for some homemade blends and mixes.  Frozen foods are basically out even if driving.  Raw meat allowances depends on current restrictions but in general, raw meat doesn't travel well but cured meat is fine when we drive.  My work-a-round for cured meat was to take a package of Morton's Tender Quick to our vacation home then just buy the fresh meat and cure it there.  I did the same thing with Pomona's pectin so I can make jams and jellies there if the opportunity presents itself.
  • appliances - We unplug the coffee maker but not the microwave oven.  Our other small kitchen appliances are stored in the pantry and only plugged in when in use so I don't have to worry about unplugging anything else.
  • general cleaning - I run the self-cleaning cycle on the oven a day or two before leaving.  Other than that, I clean the kitchen as I normally would.
  • garbage/recyclables - Garbage is collected every week and recyclables every two weeks.  We generate a lot less garbage and recyclables than many families.  Still I like all the garbage and recyclables put into the garage before we leave.  One of our kids puts out the garbage for us but leaves the recyclables until we return.  


Sunday, June 10, 2012

Revisiting Giorgio's Bakery & Bistro in Hollywood, Florida

During our first vacation house hunting trip to Florida, we stayed in Hallandale.  One of my husband's aunts highly recommended Giorgio's Bakery & Bistro.  This little bakery and bistro offers waterside dining as well as a wonderful bakery with take-out available.  We so enjoyed our visit there we simply had to take our friends there for this visit.  It was a beautiful, lazy night just the perfect location to spend a bit of time before heading to the motel for the night with visions of Aruba the following day.

Giorgio's Bakery & Bistro angel hair pasta
We settled into the bench booths at Giorgio's to watch the boats through the waning sun.  I admit it.  My number one favourite dish when eating out is pasta!  I have had some duds, I have had some stellar dishes and I have tweaked my own sauces to get just the right results.  So, I ordered the angel hair pasta ($8.95) with fresh tomatoes, black olives and basil in a light tomato sauce.  It came with fresh baked bread.

The pasta serving was generous, well over the recommended serving size.  It was light and tasty!  This would be a very easy dish to duplicate at home.   Angel hair pasta is perfect for quick meals as it takes very little cooking time.  The sauce was quite thin, on the watery side with little seasoning allowing the tomato flavour to shine,

Giorgio's philly cheese steak
My husband ordered the Philly cheese steak ($7.95).  The thin sliced beef steak with onion, peppers and provolone cheese was served on a fresh baked baguette.  A side of potato chips rounded out the meal.  What really made this sandwich was the baguette.  You just can't beat fresh baked bread!

Philly cheese steak sandwiches are very easy to make at home.   I keep packets of thin sliced roast beef from left over roast beef in the freezer for use as lunch meat.  These work nicely for Philly cheese steak sandwiches.   If you don't want to make your own baguettes, buy them in the fresh baked section of the grocery store or in a bakery.

The food at Giorgio's is not fancy, it is very much home style cooking.  Sitting outside listening to the sights and sounds of the water inches away from your feet is well worth it.  The view is wonderful!   Picking up a few extras from the bakery after dining is highly recommended!  It's hard to resist with the tantalizing aroma :)


Friday, June 08, 2012

Rib City at Immokalee, Florida

We arrived at our vacation home on May 8 with our friends.  Our plans were to fly out from Fort Lauderdale to Aruba on May 12 so we decided to make a bit of a scenic trip leaving the day before to show our friends the coast.  This type of sight seeing of course involved stopping to eat.  We stopped for lunch in Immokalee, Florida were we found a Rib City located at 621 North 15th Street.  It looked inviting, and we are always in the mood for ribs!

Rib City three cheese fries
We ordered the three cheese fries ($7.95) as an appetizer.  They were made with waffle cut fries, something just a bit different than French fries.  The toppings were Monterrey Jack, Pepper Jack and cheddar cheeses with real bacon bits.  The fries were served with spicy ranch sauce for dipping.  Oh my, were they good!

Now, this is a very easy and inexpensive, home style dish that could be made at home.  McCain's waffle cut fries can be found in the freezer section of the grocery store or a less expensive alternative is to cut them yourself from fresh potatoes using your food processor.  Simply fry the waffle fries until golden brown then top with the three cheeses and homemade bacon pieces then place in a hot oven just until the cheeses are melted.

Rib City ribs
I ordered the back rib plate lunch special ($8.99) that included a half rack of tender ribs, choice of two sides and toast.  I chose coleslaw and baked beans as my sides.  This was a delicious meal, very much home style cooking.

You just can't go wrong with BBQ ribs in the summer!  The trick it to cook them long and slow.  You can use a rub for the slow cook then a mop (wet sauce) when finishing them up.  I make my baked beans from scratch to use that day or home can as well as creamy coleslaw.  This home style BBQ is one of our favourite summertime meals.  Sometimes we add in grilled local corn and/or some type of dessert like homemade ice cream. 


Thursday, June 07, 2012

Kitchen Quick Tips - Preserving Thyme

kitchen quick tips
Air dry thyme by hanging upside down in bunches.  Once dry squeeze the stems to remove the leaves from the stem.  Leave as is or grind to a fine powder.  Store in an air tight container.


Wednesday, June 06, 2012

Captain J's Ocean Front Restaurant in Cocoa Beach, Florida

We arrived at our vacation home in the later evening hours of May 8 with another couple who would be staying with us until we returned from Aruba.  It had been an uneventful flight.  We were tired and decided to cook at home the following day.  On the Thursday we headed down for a road trip to Cocoa Beach, Florida to connect up with our friend's (the other couple) son who works on the cruise ships.  After our scenic drive, we met up with their son at Captain J's Ocean Front Restaurant.

Captain J's grouper
Captain J's Ocean Front Restaurant is located at 211 E Cocoa Beach Cswy in Cocoa Beach, Florida.  The cozy, casual dining restaurant is on the beach so you can dine while enjoying all the sights and sounds of the beach.  We ate at the tiki bar, just off the upper deck over looking the Cocoa Beach.  The view was gorgeous and the atmosphere was relaxed and casual.  The service and food was average for this type of restaurant.  Despite a few less than stellar online ratings, we enjoyed our food.

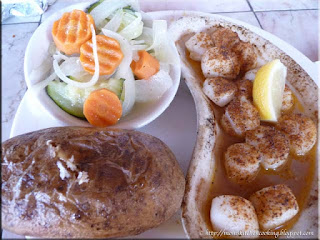
We ordered the coconut shrimp (not pictured).  I ordered the grouper.  This was a delicious, light meal perfect for a hot day.  The meal would not score a ten on presentation but it was definitely better than some of the reviews indicated.  What I didn't like and this is a very common practice at many pub-style restaurants is the baked potato came wrapped in tin foil.  Not only does this get the diner's hands dirty while leaving the potato skin almost soggy, it is a safety issue if the potato has not been kept in the proper temperature zone prior to serving.  Potatoes in foil present a very good opportunity for food born illness including botulism.

Captain J's scallops
My husband ordered the baked scallops.  They were served with a baked potato and mixed vegetable of the day.  The scallops were quite tasty!

On a scale of one to ten for pub grub food, I would rate this restaurant a six but will admit the view definitely helped tip the scale.  The food itself was very much average for Florida beach side bars.  What was nice, is most of their dishes could easily be duplicated at home.  In fact, I would almost call their food home style cooking because there was nothing pretentious about it.  The food was simply good.

When it comes to restaurants, you don't always need spectacular food, you need good food.  Captain J's did not disappoint.  This really is a nice beach front restaurant to visit.  The view is well worth it!


Tuesday, June 05, 2012

Back From Our Spring Vacation

For the past two years we have spent our time between our permanent home in Ontario, Canada and our vacation home in Florida, USA.  We left for our vacation home on May 8 with another couple, then flew from there to beautiful Aruba on May 12 where we stayed at the gorgeous Costa Linda Resort.  We returned to our vacation home on May 19 and our friends departed the next day leaving us to enjoy the sunny Florida weather until May 29.   I have spent the last few days getting my home kitchen back to full gear.   That means I have a lot of foodie fun to share with you!

If you have been following this blog, you will know that we also cook while at our vacation home.  The timeshare in Aruba also had cooking facilities.  At the same time, we very much enjoy exploring the local culinary opportunities when we travel.  One of the highlights of this trip was the manager of a very, very lovely restaurant in Aruba with dining on the beach took me on a tour of their kitchen!!! [more on that shortly]  Another in Florida where we have dined several times and knows I blog about them came out to great us at the table. 

Over the next couple of weeks I will share our culinary and travel adventures with you,  Mind you I'm into full gardening mode, took on a huge community project and starting the heavier canning season.  I'm hoping to still be able to get local asparagus and strawberries are just around the corner.  A lot of exciting culinary chit chat and recipes are just around the corner!


Monday, June 04, 2012

Frugal Kitchens 101 - Buying Small Kitchen Appliances Tips

Frugal Kitchens 101 The modern kitchen is a mecca for small kitchen appliances.  Some of them are not essential but rather nice to have and yet others are essential.  While most households have a fairly large selection of small electric appliances, it is possible to get many of them in manual (non-electric) versions.  In some cases it may be preferable to use a manual version especially if your area is prone to frequent power outages or living off the grid.  Manual small appliances may also be preferred if using them for camping or you want to reduce your electricity consumption.   As the cost of electricity continues to rise, the manual small appliances will increase in popularity.  However, small electric appliances can be essential for those with motility problems like arthritis. 

Here's a few tips to consider when buying small kitchen appliances:

  • where to purchase - Most small electric kitchen appliances are bought at box stores like Canadian Tire, Home Hardware and Wal-mart.  Those sold in specialty kitchen stores tend to have a higher price tag.  Those sold at liquidation stores (eg. Liquidation World, Giant Tiger, Big Lots) tend to have lower prices than the box stores and they may be considerably less if there is no box or manual or if it was a display model.  [We actually bought a brand new Kenmore display model microwave oven, 1,100 W for $49.99 at a liquidation store!  It has every button imaginable.]  Manual kitchen appliances can be found at dollar stores (eg. can opener) but my recommendation is to spend a bit extra for a higher quality one that will last.  One of the best sources for manual kitchen appliances is anywhere there is a Amish or Mennonite community.  Home Hardware (head office is St. Jacobs, Ontario) is a very good source for some manual small appliances as are camping supply stores (eg. Camper's World) and outdoor supplies stores (eg. Gander Mountain).  Lehman's is an excellent online source for manual kitchen appliances.  Yard sales and resale stores are a good source for some small kitchen appliances.  Check the resale stores in January and February as that's were unwanted gifted small kitchen appliances end up.
  • when to buy - Ideally and unless it is an emergency, never pay full price for a small kitchen appliance.  The large box stores often have a clearance bin or table so check there.  Certain small kitchen appliances are viewed by the stores as being seasonal.  December is always a good month to pick up small kitchen appliances on sale as is the couple of weeks before Mother's Day.  However, if you are looking for a good deal on outdoor grills (one of my kitchen must have appliances) the couple of weeks before Father's Day and end of summer sales are the times to buy.  Watch for grand opening or one day only sales as they tend to be better deals than the normal cyclic sales. 
  • need verses want -  In general, most small kitchen appliances are for convenience to lessen the work load and make it quicker.  Unless you have motility problems, most small kitchen appliances are a want not a need.  If you do a lot of home canning or entertaining, some small kitchen appliances are a need not a want and in this case it is advisable to have both electric and manual versions.  Now, there is nothing wrong in buying a small kitchen appliance you simply want but these are the appliances that tend to end up in yard sales and resale store.  If the small kitchen appliance is not an emergency (eg. can opener) refrain from buying it until you can find it on sale.  
  • avoid gimmicks - Gimmicky small kitchen appliances are a dime a dozen.  Now, if you have kids you may want the cotton candy maker or if you do a lot of entertaining you might want that chocolate fountain but the reality is these types of appliances get tossed into storage, seldom ever seeing the light of day.  They essential end up being a waste of money and valuable storage space.


Friday, June 01, 2012

Caesar Salad at the Airport

Although I am sure some of my readers realized I was way for the past three weeks, some do not.  We left southwestern Ontario (Canada) on May 8 for our vacation home.  Then we flew out of Fort Lauderdale on May 12 to spend a wonderful side trip to Aruba.  We returned to our vacation home on May 19 where we stayed until May 29.  It was a wonderful, food filled vacation of which I will share some of our foodie finds and favourite restaurants in the next couple of weeks.!

airport Caesar salad
We always fly out of Detroit Metro Airport usually on Spirit but occasionally on Delta.  Now Spirit is a low budget air service that provides a seat and washroom.  You can't even get a glass for water without paying for it!  Once clearing security you can buy food and non-alcoholic drinks that can be brought on board if desired.

Airport food is expensive compared to other restaurants but you are paying for the convenience of getting food before boarding.  We have arrived several times where the airport restaurants a closed so which is really a pain if your flight is delayed.  Spirit does sell non-alcoholic and alcoholic drinks as well as limited number of snacks but they only accept credit cards or debit card, no cash.

We get there early enough to get through security so we have a bit of down time in one of the restaurants.  Once cleared security, we head to one of the bars where we can order fairly decent, all be it pricey food.  We stopped at the Redwing Bar for lunch.  I seriously do not like much in my tummy when flying.  Quite frankly, my choice would be no food at all before flying by my husband insists I eat a little.  Don't worry about me going without food for part of the day as I do make up for it once we are safely at our destination.

I ordered the chicken Caesar salad and ate just enough to appease my husband .  This is just a lovely salad that can easily be made at home.  Chicken strips are one of my favourite quick meal starts.  Look for chicken on sale then skin and debone.  Pan fry or barbecue the chicken and cut into strips.  Package in meal sized servings then freeze until you want to use it.  Use the chicken strips for Caesar salad or wraps.