My photo
Ontario, Canada
I am a wife, mother and grandma who enjoys the many aspects of homemaking. A variety of interests and hobbies combined with travel keep me active. They reflect the importance of family, friends, home and good food.
Cook ingredients that you are used to cooking by other techniques, such as fish, chicken, or hamburgers. In other words be comfortable with the ingredients you are using.
--Bobby Flay

For Your Information

Please watch this area for important information like updates, food recalls, polls, contests, coupons, and freebies.
  • [March 19, 2020] - Effective Mar 17, this blog will no longer accept advertising. The reason is very simple. If I like a product, I will promote it without compensation. If I don't like a product, I will have no problem saying so.
  • [March 17, 2020] - A return to blogging! Stay tuned for new tips, resources and all things food related.
  • [February 1, 2016] - An interesting report on why you should always choose organic tea verses non-organic: Toxic Tea (pdf format)
  • Sticky Post - Warning: 4ever Recap reusable canning lids. The reports are growing daily of these lids losing their seal during storage. Some have lost their entire season's worth of canning to these seal failures! [Update: 4ever Recap appears to be out of business.]

Popular Posts

Monday, December 31, 2012

Frugal Kitchens 101 - Natural Verses Organic

Frugal Kitchens 101
On this last day of 2012, the last Frugal Kitchens 101 post for 2012, I thought it would be interesting to discuss a topic that become a growing concern over the past year.  Food manufacturers have been using two product labels to help increase the sales of their products.  The first term is natural and the second is organic.  All organic foods are natural foods but many natural foods are not organic.  This creates confusion for the consumer especially when they find that their natural food product contains one or more GMO and/or synthetic food additives even though they thought they were buying a safer, healthier product.  Over the past year, a couple of the larger manufacturers (Kashi and now General Mills) have been on the hot seat over GMO and the implication of GMO ingredients in their food products.  In fact, General Mills is currently in the midst of an anti-GMO backlash after contributing $1.1 million dollars to the anti-Proposition 37 campaign in California, a bill that if passed would force the food industry in California to declare any GMO ingredients in their food products.  Despite this, the food industries use buzz phrases like 'natural source of fibre', 'farm fresh goodness', 'naturally good for you' and so on when in fact the word natural on any product is nothing more than a touchy, feel good buzz word to get the consumer to buy the product.  I grow organically, buy organic meats/poultry/eggs and use both edible and inedible organic products.  If I have a choice between organic and non-organic, organic wins every time.  So what is the difference between natural and organic AND why is organic the frugal choice?

Natural

  • The word natural or any implication that the food product is natural is merely a sales tactic.  It implies the food is good for you in some way playing off the consumer's belief that natural is better.  The reality is there are a lot of natural substances that are toxic to the human body and even have the potential to be fatal (eg. Bella Dona, poison ivy).
  • No certification or testing is required in order for the food manufacturer to use the word natural. 
  • Although the word natural implies healthier, better for you it in no way guarantees the absence of GMO ingredients nor does it guarantee less sodium, sugar, fat or preservatives.
  • The word natural especially when used to describe food additives is about as confusing as it gets.  Dried beaver castor glands (anal sacs) are used as a natural food flavouring for vanilla, raspberry and strawberry flavoured foods and beverages.  True, the castor glands are natural but let's face it if the food industry actually put that on their food products rather than 'natural flavour', how fast do you think that product would sell?
  • Any product labelled as natural is usually so heavily processed to begin with.  Heavily processed foods are a poor food value choice because they are high in calories, high in food additives especially sodium/sugar and high priced when compared to whole foods.
  • In general any food product labelled natural is close to the same price as similar products not labelled as natural.  There are exceptions (eg. PC natural vinegar $2.99/4L vs PC plain vinegar $1.49/4L) but for the most part most foods labelled as natural won't increase your food budget.
Organic
  • In order to use the word organic on a food product, the food manufacturer must be government certified BUT more importantly the food producer (farmer, grower) must be government certified as using organic growing methods.  This includes testing to ensure petroleum products are not used on or near the fields, no synthetic pesticides or herbicides AND the soil, growing area cannot have any of the above in or around it for a period of a number of years that includes regular testing before the farmer is ever granted organic certification.  The regulations are very stringent.  For example, to be certified an organic grower you cannot use manure from a source where the animal was exposed to growth hormones or anti-biotics.  In addition to all the rules, regulations and testing, the entire certification process is expensive.
  • The word organic is viewed by many consumers as meaning a more expensive product.  This may or may not be the case depending on what food it is.  For example, I can buy locally grown, organic produce in season from the farm and roadside stands considerably less expensive than buying non-organic produce in the grocery store.  In short, the organic grower can have lower yield and higher costs which may or may not be reflected in the price of the produce.
  • Consider what you are buying when buying a certified organic food or food product.  It was grown on a smaller farm using organic growing methods so you aren't getting pesticide residue, synthetic chemicals leaching into the food, and in most cases the food has been harvested manually (aka providing jobs).  It hasn't been injected with artificial dyes to make the fruit look ripe as some commercially grown citrus fruits are.  It has not been sprayed with ethylene to make it convenient for the farmer to harvest the field all at once even though some of the produce is not ripe as is common practice for commercially grown tomatoes.  The produce has not gone through a lye (very caustic) bath to remove skins before processing as some commercially processed vegetables do.  Organic eggs have not been washed in any chemical solution other than plain water if even that.  Aside of using organic growing methods, organic growers tend to use sustainable and eco-friendly methods.  
  • Certified organic meats, poultry and dairy means you aren't ingesting anti-biotics (linked to increased anti-biotic resistance), growth hormones (now linked to girls maturing at much younger ages) and you aren't getting that extra dose of corn in the meat (corn allergies are on the rise).  You are getting a protein product that was grown using above standard animal husbandry skills where the animal lived a good life prior to slaughter.  Animals raised organically are not cooped up in small spaces where they have less than a few inches to move.  Confined like this, it is very common for hens to pick another hen to death.  The thirst for low fat, white meat has caused chicken producers to use hormones to grow chickens with larger breast to the point that even though they can only move a few inches in the crowded barns, they are so top heavy they can't even walk if they wanted to.  I've been in commercial pig and chicken operations.   Let me tell you, it is not a pretty sight!  Our beef, pork, poultry and eggs at home here in Ontario are bought directly from friends who produce organically or one of two local organic farms.  We buy certified organic meats and poultry when we are at our vacation home in Florida.  When it comes to meats and eggs, there is a big difference in flavour between organic and non-organic, with organic being far superior AND our organically raised meats and poultry are less expensive than commercially produced in the grocery store.  
  • Certified organic is your guarantee that the food is not GMO.  In fact, many certified organically grown fruits and vegetables are from heirloom varieties rather than hybrids.  Heirloom varieties helps to maintain plant diversity.  Don't get me wrong as many hybrids are good as well but some hybrid varieties (eg. roma tomatoes, delicious apples) have been tweaked to the point of have no flavour.
  • Certified organic produce, meats, poultry and eggs are generally grown with a 100 mile radius of your home meaning they are fresher.  They haven't had to travel the average 1,500 miles to get from grower to your table.  
  • Organic really is eco-friendly.  Foods grown and produced organically have a considerably lower carbon footprint than foods grown and produced by any commercial method.  
  • Organic foods have considerably less potential to cause you future health problems.  In the end, even though a organic foods and food products may cost a bit more it can save you a bundle in long term health care costs.  In fact, organic foods are healthier for you and because they tend to be grown closer to home, their nutritional value is higher.  


Sunday, December 30, 2012

Tampa Bay Brewing Company in Ybor City, Florida

We spent three weeks at our vacation home in December.  Unlike our October stay, the December visit was much more laid back and relaxing.  We had no family or friends staying with us and we weren't on the road near as much as we usually are.  We went to Cleveland Heights twice with friends for dinner and the evening entertainment (Ken Brady, and friends).  We also made a side trip to Sanibel Island to hunt for seashells then stopped to visit family in Naples, Florida.  One of our friends and their son drove their other son's car down to Tampa.  He works on the cruise lines and needed his car down there.  We met up with our friend and son for dinner at Tampa Bay Brewing Company, a restaurant and microbrewery friends had introduced us to during our October visit.

Tampa Bay Brewing Company in Ybor City, Florida
Tampa Bay Brewing Company is located in Ybor City, founded by Vicente Martinez-Ybor as a cigar-manufacturing centre.  Ybor City is one of two Floridian National Historic Landmark Districts; it is also known as Tampa's Latin Quarter.   This area is well worth visiting for the eclectic shops, museums, patio bars and nightly music!  The air is filled with tantalizing exotic aromas too tempting not to indulge.  Ybor is famous for its cafĂ© con leche, a perfect drink for people watching.   you can watch hand-rolled cigars being made.  It is one of Florida's top ranting nightspots.

John G. Doble, III founded the Tampa Bay Brewing Company in 1996.  The microbrewery was originally located in a two-story brick building (former horse stable) on 15th Street in Ybor City.  The business was moved to its current location on the plaza level of Centro Ybor in 2006. The business continues to be family owned and operated.
,
a sampling of Tampa Bay Brewing Company beers
All the beers brewed at the Tampa Bay Brewing Company are handcrafted by brewmaster, David Doble and his assistant brewers on the premises using a 10-barrel brewing system.  The brewhouse consists of a combination of: mash/boil kettle, lauter tun, hot liquor tank, cold liquor tank, three 10bbl fermenters and a 20 bbl fermenter.  Unlike some of the microbreweries we have visited, we did not see the tanks or brewing process because we sat on outdoor patio to enjoy a bit of people watching and the absolutely delightful atmosphere in the district.  However, it does appear from their website that the tanks and brewing can be viewed from the indoor restaurant area.

Our friend ordered a sampler of beers.  They were generous sized samplers!  Now, if you are going to a microbrewery, you must taste some of their beer.  The best way to do this is via samplers.  I hope I'm getting this right, from left to right: old elephant foot IPA, red eye amber ale (American), one night stand pale (American ale) and wild warthog Hefeweizen (German).  I had a true blond ale that had a slight hop nose with a smooth, crisp and slightly citrus note.  My husband seldom drinks beer so he ordered an alternative adult beverage but he did have a sip of mine.

tomato caprese pizza
I was on a huge Caesar salad trend the entire trip.  Quite frankly Caesar salads seldom vary other than creamy verses oily dressing and presentation.  So, even though I took a picture, there really wasn't anything interesting show.  Don't get me wrong as it was a good salad just basically the same I've shown in previous posts.

Our friend's son ordered the personal sized  Tomato Caprese pizza made with whole milk mozzarella cheese, sliced roma tomatoes and fresh basil chiffonade.  The crust is hand tossed featuring their own dough made with their own ale.  Doesn't it look absolutely delicious?

This would be very easy to duplicate at home.  I always use beer when making pizza dough.  It really does make a huge difference.  My requirements are a microbrew beer, usually Sleemans out of Guelph, Ontario and good, fresh ingredients.  I would recommend making this pizza when tomatoes and basil are in, but with a bit of care you can keep both growing indoors over the winter.  Roma tomatoes have been so over bred they really are tasteless especially if not bought in the peak of season.  Fresh basil is a must have for the chiffonade.  Tampa Bay Brewing Company used fresh, sweet basil but really any basil (and there are so many) will work.

A chiffonade can be made with any green leafy vegetable and it works nicely for broad leaf herbs like basil as well.  Simply wash and pat dry the leaves then stack.  Carefully roll the stack then cut across the stack to form thin strips.  Sprinkle the chiffonade over the pizza or dish of choice for that wonderful punch of flavour.  It really is nice, flavourful presentation!


Thursday, December 27, 2012

Kitchen Quick Tips - Storing Cheese

kitchen quick tipsWrap cheese in parchment or wax paper  to wick surface moisture from the cheese then loosely wrap in aluminium foil to prevent the cheese from drying out.  Cheese wrapped this way will keep for a week (eg. goat cheese) to over a month (eg. Brie, cheddar) depending on the cheese.


Monday, December 24, 2012

Frugal Kitchens 101 - Menu Planning for Holidays

Frugal Kitchens 101Tomorrow is Christmas and while we will not have our big Christmas dinner until the 26th, the menu has been set and preparations are in full gear.  I am not a huge menu planner on a regular basis because I am very much a cooking from the pantry style cook.  When it comes to special occasions and holidays, I do menu planning.  In this case, menu planning helps to keep me organized so I can make sure I have everything on hand for the dishes I will be preparing, do pre-prep as needed and make things streamlined so the meals go smoothly.

We know we will have two of our kids with grandkid overnight on the 25th staying through the 26th but not overnight.  Then two of our kids with two grandkids will be arriving around noon on the 26th and staying until noon on the 28th.  That means I have to plan for three hot breakfasts, four snacks, one lunch, two dinners plus the main meal along with all the snacks and appetizers during the day.  Menu planning in this case works quite nicely for me.

Here's a few menu planning tips:

  • keep it simple - This is the number one rule in menu planning, KISS.  For example, bacon and eggs with toast and hashbrowns is simple enough for breakfast but a breakfast casserole is simpler.
  • number of meals -  Simply figure out how many breakfasts, lunches, snacks and dinners you need for that time period then decide upon a main dish for each meal and work from there.
  • TNT - Stay with tried and true (tested) dishes.  This isn't the time to fuss with a dish you've never made before.
  • attention to detail - What really makes holiday meals is the extras like homemade condiments and garnishes.  Chives, parsley, rosemary and citrus are easy garnishes so be sure to add them to your shopping list if necessary.  Don't forget to add beverage specific garnishes (eg. pickle spears, olives, pineapple)
  • beverages - Make sure you have plenty of mix and non-alcoholic beverages.  
  • snacks - Keep the snack trays to easy to prepare finger foods like fruits, vegetables and nuts.
  • appetizers - As a guideline, plan on 3 to 4 appetizers per person unless the gathering is appetizers only then double that.  
  • shopping list - Create your shopping list from your menu plan.  Buy only what is needed for that holiday menu plan plus $5 - $10 extra to restock the pantry.   


Sunday, December 23, 2012

The Importance of Marbling in Steak

In recent years, dietary fat has gained a very bad reputation.  Health conscious folks limit their fat intake to the point it can actually be damaging to their health.  I honestly do not believe in ultra low-fat diets.  A certain amount of fat is necessary for the proper brain development in infants and children.  It is needed for the formation of the myelin sheath, the outer white insulating sheet surrounding nerve fibres. Think of myelin as the plastic coating on electrical wires.  If there is reduced myelin, signals cannot travel normally from the brain through the nerve cells.  My graduate thesis involved de-myelination in the proband that lead to a Wernkie's-Korsakoff presentation in an 18 month old child.  Mild loss of myelin can result in reduced brain function, nerve  problems and confusion.  The worst part is, once the myelin is destroyed, no amount of fat is going to replace it.  So it is very, very important to not restrict dietary fat to the point of causing a deficiency.  The second factor in restricting dietary fat comes from the fact that fat makes fat.  In reality, fat comes from starch that was converted from sugars (carbohydrates).  If the body cannot use the sugars ingested, it converts them to starch which is then converted to fat, likely part of our evolutionary make-up to provide nourishment from within when food was sparse.

New York Strip steak marbling
We have made a tradition of the first meal at our vacation home being grilled steak.  We always choose steaks that are well marbled.  Marbled is just a fancy word for nice fat distribution.  It is apparent by the white throughout the steak as well as a layer of fat around the steak.

Fat add flavour, flavour, flavour!  At the same time it makes the meat tender and juicy.  While some trim the excess fat from steaks, we do not trim if grilling.  Excess fat can cause flare-ups on the grill but flare-ups can be easily controlled.  The outer fat drips down into the grill adding to the smoke flavour.  Fat is easily cut off before eating the steak.  The inner fat (marbling) reduces when grilling while keeping the meat moist and juicy.

grilled New York strip steak
A good steak is all about flavour.   It should be tender and juicy, never over cooked but rather just to perfection according to desired doneness.  Be aware that doneness does change over time.  I used to always like my steaks well done but now prefer medium rare.  If you are cooking steaks for others, always ask how they would like their steaks cooked.  We often add caramelized onions or sautĂ©ed mushrooms. Both enhance the flavour of grilled steak without overpowering it the way barbeque sauces, steak sauces and seasonings can.  Both of us agree, when you want steak it is that flavour that should shine.  Marbling brings out the flavour of beef.  So, don't shun a bit of fat on any beef cut especially if grilling or broiling.  Choose nicely marbled steaks then trim after grilling for the best flavour.


Saturday, December 22, 2012

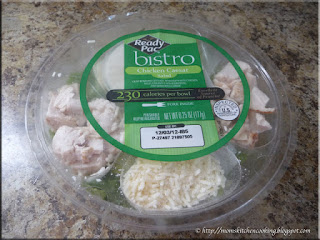
Walmart Ready Pac Bistro Chicken Caesar Salad Bowl

Readers of this blog know that I take a rather dim view on convenience products like store bought, pre-cut fruits and vegetables as well as salad kits.  In general, they are over priced and laden with preservatives.  In the case of salad kits, you have no control over the fat content of the salad dressing.  When we are at our home in Ontario, buying a salad kit would not even be a consideration.  When we are travelling, I prefer to enjoy salads when on the road or flying.  Salads are light on the tummy, nutritious and provide much needed hydration when flying.  A lot of folks don't realize that the air in air planes is very drying especially to the mucosa tissues which makes them more susceptible to viral infections.

Ready Pac bistro chicken caesar salad from Walmart
We left for our winter vacation at our vacation home in Florida on November 29.  As per our norm we stopped for dinner while waiting for the flight, so I had my regular salad.  Our flight was delayed so we didn't arrive into Tampa until after midnight.  By the time we got our rental vehicle and drove to our vacation home, it was about 1:30 AM.  We stopped at Walmart to get a few groceries.  Since we had left food in the fridge, freezer and cupboards as there was only five weeks between our fall and winter vacation, we really only had to pick up perishables.

While in the produce aisle, my husband put a Ready Pac Bistro Chicken Caesar salad bowl into the cart to replace the Caesar salad ingredients I had in the cart.  His premise was, we had plans for the following few days and didn't need a large bottle of Caesar salad dressing so this was a nice solution to my salad fixation and for only $2.98.  Then he hit me with the whammy "this will give you a comparison of ready salads to blog about."  Trust me at 2 AM, running on empty with no sleep in over 24 hours, his reasoning sounded rather good.

the salad bowl packaging
Salads on the go are a norm when travelling but sometimes it is hard to tell which is the better deal.  Most fast food restaurants offer some type of salad in the average price range of $4.  So, I decided to compare this salad bowl to the McDonald's Caesar Salad with grilled chicken, croutons and dressing.

Now, take-out salads really are not the best solution as they are more expensive per serving than making a salad from scratch.  Then there is the packaging.  Most take-out leaf salads come in two piece plastic containers.  The clear plastic top protects the salad while the bottom serves as the bowl for the salad.  The dressing usually comes in a plastic condiment packet.  Toppings are usually already on the salad.

This salad had the bowl was covered with a sealed plastic lid as was the dressing.  There was a separate insert for the dressing, chicken and cheese.  It definitely had more packaging than a fast food take-out salad.  However, just as with fast food salads, the trays and lids can be reused or recycled so it isn't as bad as it seem and if anything, since this salad had the dressing in a covered cup, there was less throw-away waste than there would be with a fast food salad.  Next up was a taste, price and nutritional comparison.

McDonald's Caesar salad with grilled chicken, croutons and dressing is 9.8 ounce (278 g) while the Walmart salad bowl was 177 grams so I converted everything to the 278 g weight for comparison.  Again, this is a time to do the math to be sure you are making the right comparison.  The general conversion was:  Y/177 g = X/278 g  which works out to be (Y x 278 g)/177 g.  For example, price was $2.98/177 g = X/278 g.  Solving the equation, the price of the Walmart salad bowl worked out to be $4.68 for a comparable amount.

nutritional value of the bistro salad bowl
The McDonald's salad was $4.19.  The comparable amount of Walmart salad bowl worked out to be $4.68, so 49¢ more.  In terms of flavour, the McDonald's salad comes with a full piece of grilled chicken which tastes fresher than the chicken in the salad bowl which seemed to have more of the texture of thick cut chicken lunchmeat.  However, the salad bowl included a parmesan style cheese that really added to the flavour of the salad.  The dressing included with the salad bowl had a nicer flavour with just the right amount of tang.  The lettuce was crisp.  Now something to be aware of,  all greens based salads sold this way are treated with a sulfate spray (copper sulfate).  This presents a health problem for those of us with sensitivities to sulfates that trigger asthma attacks and if you have melasma as I do, excess copper in the body makes the condition worse.  So be aware of that.

Let's talk nutrition.  Pictured is the nutritional label on the salad bowl.  After doing the conversions to get to 278 g (same as McDonald's) I came up with 361 calories, 25 g total fat (4.5 g of that is saturated, 0 g unsaturated), 78.5 mg cholesterol, 12.5 mg carbs (4.7 g sugars, 1.6 g fiber), 1,539 mg sodium, and 25.1 g protein.  I compared this to the nutritional value for the McDonald's Caesar salad with grilled chicken, croutons and dressing.  The McDonald's version (278 g) came in at 490 calories, 31 g total fat (7 g saturated, 0 g unsaturated), 140 mg cholesterol, 17 g carbohydrates (sugar 4 g, fiber 3 g), 1110 mg sodium and 27 g protein.  The Walmart salad bowl was higher in Vitamins A and C content than the McDonald's version but the McDonald's version was higher in calcium and iron.

Going by the numbers, the Walmart salad bowl is lower in calories, fat and cholesterol and higher in Vitamins A and C.  The McDonald's version is lower in sodium, higher in protein and higher in calcium and iron.  The bottom line is, neither of these salads are good for anyone on a sodium restricted diet.  In my opinion, both salads are too large for one person and there really is no reason to have to use the full amount the salad dressing included with the salad.  Reducing the amount of the dressing in either will reduce the fat and sodium content.

The reality is, neither of these salads are as healthy as a homemade version.  That's a given but think about it.  If you go to a restaurant and order a Caesar salad, you have no idea of the nutritional value especially with respect to sodium and fat content.  Unless you order a dinner size Caesar salad, most served in restaurants will average about 125 g but they usually have bacon.  At the same time, both of the salads are healthier choices when the dressing is reduced than a lot of fast food or take-out choices.

My bottom line is, I liked the Walmart salad bowl.  It tasted fresher.  I used less than half of the chicken, about half of the dressing and about a quarter of the cheese.  It was more than sufficient for flavour while reducing both the sodium and fat content.  If I had to pick up a take-out quick salad when out, my choice would be the Walmart salad bowl.


Friday, December 21, 2012

Traceability Codes on Eggs

We spent most of the month of October at our vacation home in Florida then returned home for most of November before returning to our vacation home November 29 to stay until December 20.    One thing I do notice when shopping in the grocery stores where our vacation home is, is the food labelling.  It's not like I don't see food labelling at home in Ontario, it is I see a lot less of it because of our heavy reliance on whole foods home grown, bought directly from the source (eg. farmers, farm markets, orchards, etc.) or bought in bulk from the bulk food stores.

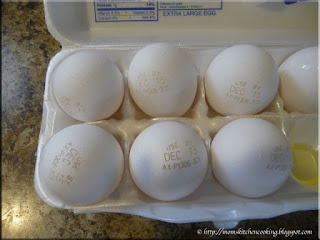
dating on eggs
We buy most of our groceries a Publix when at our vacation home.  However, we also occasionally shop at Sweetbay and Walmart for groceries.  Our flight was late on November 29 so we didn't arrive into Tampa until after midnight so didn't arrive into our vacation home community until about 1:30 AM.  We stopped at Walmart which is open 24 hours to pick up a few groceries to last us for a couple of days.  Part of that purchase was a dozen of extra large eggs.

When I opened the eggs a couple of days later, I found one was broke.  Normally, I check store bought eggs for breakage but at 2 AM the old brain was a bit fuzzy.  Each egg had a 'use by date stamp' with a code below it.  I've seen this type of thing on eggs before.   The use by date is the last date you should use your egg for freshness.  The other code is the traceability code.

Traceability codes are on most commercially prepared products, cheeses, some meat products, dairy, some bakery goods, canned and jarred foods, and dairy.  The traceability code is usually found under the best by or use by date.  It is normally a series of alpha numerical characters separated into groups as the one on the eggs.  The groups may be separated by spaces or dashes.  Essentially, the code can gives information from the grower to the processing plant.  This is the code that is used when a food product is recalled which is one reason foods should be stored in their original packaging.  If you have a mobile device, it is easy to check the traceability code while you are shopping before buying.

Here's a short video that explains how eggs are graded and how they can be traced back to the producer.


We bought the extra large eggs at Walmart on November 30 for $2.08.  I pay $2 per dozen from the organic farm and $3.49 at the grocery store for free range eggs at home (Ontario).  I put the code AX-P1306-306 into The Egg Tracker at My Fresh Egg.   This dozen eggs were processed on November 1, 2012 from Cal-Maine Farms located in Bushnell, Florida.  They were Grade A, extra large sold under the brand name Sunny Meadows.  I got all that information just from the code that was on the egg using The Egg Tracker!

What I found concerning was the eggs were already a month old when we bought them.  I wasn't pleased about that.  The use by date was December 15 which means the eggs had a freshness span of 45 days.  When I buy eggs from the organic farmer at home, the eggs were collected the same day so not even a full 24 hours old!  In other words, the eggs we normally use are fresh not days old.  To date, I have not found a source for fresh (hours old), free range eggs at our vacation home.  I have an app on the iPad called Eat Local to find farmer's markets near our vacation home so that has been a huge help as far as finding fresh, local produce.  Now we just need to do a bit of networking to find fresh sources for meats, cheeses and eggs.


Thursday, December 20, 2012

Kitchen Quick Tips - How to Quickly Soften Cream Cheese

kitchen quick tipsQuickly warm cream cheese to room temperature by placing the foil-wrapped package* [in a small zipper style storage bag] and place in a bowl of warm water for about 10 minutes, or until softened.

*Note, cream cheese is that is wrapped in foil wrapping with seams that could let water in, use the zipper bag.


Monday, December 17, 2012

Frugal Kitchens 101 - Things You Shouldn't Buy at the Grocery Store

I usually don't add pictures or videos to the Frugal Kitchens 101 posts but I found this short video by Steve Noviello of Consumer Reports on things you shouldn't buy at the grocery store. I intended to show the video as well but it appears to no longer be working.  However, if you get a chance there are a lot of good kitchen and food related videos on the Consumer Reports website.

According to Consumer Reports laundry soup, light bulbs, pre-made baked goods, non-perishables unless they are at rock bottom sale prices, cheese at the deli counter and magazines.  All of these items can be found for less from other sources.  Of the items listed the only one I disagree with is cheese at the deli counter.  Their advice was to buy cheese in the dairy section.  True, you may pay more at the deli but you get a larger selection and you can buy only what you need.  I seldom buy pre-sliced or shredded cheese to begin with as block cheese is less expensive per unit price, has less chance of contamination and unlike shredded cheese does not contain cellulose to keep it from sticking.  I prefer to buy cheeses directly from local cheese factories.  A magazine subscription is always less expensive than the  price per copy but consider many magazines are now offered in an electronic version which is even less expensive than the paper copy.  Not only are you saving money, you are being eco-friendly while reducing household clutter.  Electronic versions are even available for mobile devices so no more stopping at the airport tuck shop to buy magazines for the flight.  There are considerably more items that many buy at the grocery store but can be found for a lot less money elsewhere.  Pretty much anything found in the sundry aisle of a grocery store can be bought elsewhere for less.  Surprisingly, your local dollar store can be a mecca for finding some of these items at rock bottom prices.  However, online sources, bulk food stores, dollar stores and warehouse stores also offer rather good savings.  Here's a list of some of the things I have found that are less expensive when bought somewhere else than a grocery store.  I'm sure there are several more items that can be added to the list.

  • in season local produce
  • shampoo/conditioner
  • dishwasher rinse aid
  • canning jar lids
  • dish soap
  • bar soap and many toiletries
  • disposable electrostatic cloths
  • vitamins and dietary supplements
  • K-cups for the Keurig 
  • paper plates and napkins
  • plastic cutlery
  • food wrap (eg. aluminum foil, plastic wrap, wax paper)
  • spices and seasonings
  • household cleaners
  • cleaning aids
  • baking basics (eg. sugar, salt, flours)


Sunday, December 16, 2012

Easy Way to Cook Acorn Squash

As newly-weds  my husband would not eat sweet peas, squash or eggplant but he loved rutabaga.  I, on the other hand would eat any vegetable, except eggplant and I have to tell you rutabaga was something I almost had to choke down.  Other than that, any vegetable was fair game for both of us and to this day, while our tastes have changed a bit, vegetables play a large role in our diet.  Honestly, the only vegetable neither of us eats is eggplant.  That may be because I don't cook it right.  I don't know.  At any rate, any vegetable other than eggplant is fair game in our home.

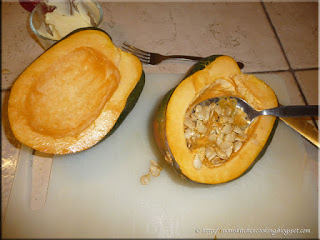
seeding the acorn squash
Squash comes in two varieties, summer and winter.  Summer squash (eg. zucchini) has a thin, edible skin whereas winter squash has a thick, inedible skin that needs to be removed.  The seeds of both varieties are edible as well with summer squash seeds being small and tender compared to the larger, tougher skinned seeds of winter squash.

By far my favourite winter squash is acorn squash which gets it's name from its shape that resembles an acorn.  It is rich in Vitamins A (beta carotene) and C as well as a good source of potassium.  It has a bit lighter flavour than some of larger, darker fleshed winter squashes.  In season, large acorn squash will be as cheap as 5/$1 or 20¢ each but even off season, they are still quite inexpensive.  The beauty of acorn squash is it can be baked, grilled, steamed or microwaved without removing the hard outer skin.

Simply cut in half and scoop out the seeds with connective tissue.  The squash is now ready to prepare for baking or grilling.  Don't discard the seeds!  Place the seeds in a colander and rinse well to remove the connecting tissue.  Place the seeds on a mesh tray to dry.  The dried seeds can be saved for next year's garden or they can be roasted in the oven for a delightful, nutritious snack.

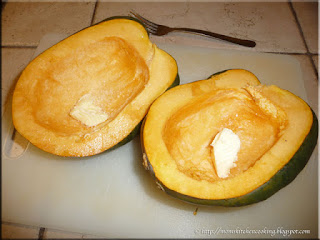
add a little butter and salt to the acorn squash cavity
Some folks like to add brown sugar to their squash and the worst concoction I've ever seen with squash was adding marshmallows!  I see no need to mask the flavour of squash.  Instead, I add a little butter and sea salt to the cavity of each half of the squash.  This is just enough flavour without overpowering the wonderful flavour of the squash.

That is just how quick and easy it is to prepare acorn squash for baking, microwaving or grilling.  The same prep without the butter and salt is used when steaming except the squash is turned cut side down in the steaming basket.

wrap the acorn squash in foil to bake
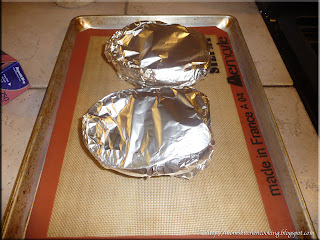
If baking or grilling, I cover the prepared acorn squash with tinfoil.  This retains the steam produced by the cooking squash, keeping it tender and flavourful.  If cooking the prepared squash in the microwave oven, I recommend using wax paper to wrap the squash in.

Acorn squash baked or grilled takes about the same amount of time as baked potatoes, usually about 45 minutes.  If cooking on the grill, the prepared squash should be put on the top rack of the outdoor grill.  I place the prepared squash on a Silpat lined baking sheet when cooking in the oven to prevent any leakage onto the floor of the oven.

spoon out the acorn squash
The squash is cooked when it gives when slightly pinched between fingers and thumb.  I remove the squash from the oven (grill or microwave) and let sit a couple of minutes.  I then carefully remove the covering.  It is important to open from the side furthest from you to prevent steam burning you.  The soft flesh is easily scooped from the harder skin which has softened somewhat during cooking.  I simply scoop the flesh out into a serving bowl, mash lightly with a fork to mix the butter and salt, then serve.  The empty skin is destined for the compost bin.  It really is that easy to prepare and cook acorn squash without ever having to peel it!  It is a no muss, no fuss method to enjoy acorn squash.


Saturday, December 15, 2012

Venison Cottage Pie

We spend most of the month of October at our vacation home in Florida.  The day after returning No Frills had a great sale on potatoes, beets, carrots and onions at $1.88 for a 10 lb bag each so of course I had to take advantage of that.  The week after returning home, my husband left for hunt camp with the guys.  He doesn't hunt himself so along with another good friend they are chief cook and bottle washer.  The guys have a lot of good old fashion fun and always share the rewards of any catch.  This year they took down a five point buck, so there was each of them brought home a little over 20 lb of venison each.

vegetables ready to steam for rustic potato topping
I've talked about making rustic potatoes in the previous posts.  Rustic potatoes have a lot of flavour and nutrition and because the skins are left on the potatoes, extra fibre.  Now, the carrots add sweetness, colour and texture but cabbage is a must.  A lot of folks turn their nose up at cabbage or only relate cabbage to coleslaw, but cooked cabbage takes on a mellow sweetness.

I like to steam the vegetables when making rustic potatoes.  In fact, I prefer steamed vegetables to those boiled.  Steamed vegetables lack the sogginess that comes with boiling vegetables.  They are higher in nutrition as well plus steaming vegetables are an eco-friendly way to cook vegetables because they use less water and energy.  Oh and if all those benefits weren't enough, they are very, very inexpensive and beyond easy to make, something every frugal cook loves to hear.

preparing the rustic potato topping
Once the vegetable mixture is tender, I pour it into the bowl of the KitchenAid stand mixer.  Then I add cream cheese, sour cream, milk or stock, a little butter, seasonings (garlic powder, onion powder, white pepper).  I don't add salt so while the dish is higher if fat, it is low sodium.  Low fat sour cream and cream cheese can be used if desired because it really is the flavour that counts in these potatoes, not the fat.  I always use 2% milk if using milk or de-fatted chicken stock depending on how the potatoes will be used.  Then I lightly whip the mixture leaving slightly lumpy but not starchy, adjusting the liquid if needed to get the consistency I want.

Rustic potatoes are ideal as a side dish and topping cottage pies or other casseroles.  They can be used as a pierogi or hot pocket filling as well.  I have also used rustic potatoes as a filling for rolled meatloaf.  A rolled meatloaf has a spiral effect.  The rustic potatoes look lovely when used this way while getting more nutrition into the finished dish.  These potatoes freeze nicely so make up a large batch then make a few dishes for the freezer for a bit of homemade convenience.

prepared venison cottage pie ready for oven
I made a venison cottage pie using the rustic potatoes.  A cottage pie is basically the same thing as a Shepard's pie except it is made with with ground meat other than lamb.  Lamb is traditionally used when making a Shepard's pie. Semantics (vs nomenclature) aside, the resulting dish consists of ground meat with some type of gravy topped with a layer of corn or mixed vegetables and a final layer of mashed potatoes then baked until warmed through and bubbly.   I added a thin layer of shredded extra old cheddar because I had a piece I wanted to use up.  Any shredded cheese can be used but is optional.

I used a covered glass casserole dish for the venison cottage pie.   At this point, I could have froze as is then popped out the frozen casserole and vacuum sealed it or instead of using a glass casserole dish, an aluminium baking tray is what I normally use for casseroles destined for the freezer.  If freezing in aluminium trays, I cover the top of the casserole with wax paper then seal tightly with aluminium foil.  Venison cottage pie can also be frozen in individual serving sizes using large muffin tins to freeze then pop out and vacuum seal.

venison cottage pie ready for serving
The venison cottage pie using up some of my Ontario produce purchase was destined for dinner that night.  Venison is an interesting meat to work with.  It is very low fat and what fat it does have has a poor mouth feel if the meat gets luke warm.  The solution to this problem is to add ground pork to ground venison in about a 1:2 ratio (ground pork:ground venison).  The abattoir that processed the venison actually did this when he ground it but most abattoirs don't.  The ground venison can also be browned in bacon fat.  Once the venison is browned, I drain it and use the drippings to make a gravy seasoned with a bit of Worcestershire sauce.  The pan can be de-glazed with red wine if desired then thickened to make a gravy using a roux but can be made gluten free by simply reducing somewhat and stirring into the meat.  If the corn is substituted with a gluten free vegetable, the venison cottage pie can easily be converted to gluten free if desired.

The venison cottage pie just out of the oven looked delicious and smelled divine   The rustic potato topping is a perfect  match for the rich flavour of the venison.  This was a good sized casserole that gave a yield of six to eight generous servings.  The cooked venison cottage pie reheats nicely.

venison cottage pie serving
Shepard's or cottage pie is usually shown plated as a square as the common restaurant presentation much the same way lasagne is plated.  However, when I serve it, the result is anything but a square.  Neither is my lasagne.  The reason being, both are served piping hot so it does not hold a firm shape.  The cream cheese in the rustic potato topping and gravy added to the meat means the cottage pie will not hold a firm shape.  At the same time, the addition of the gravy and cream cheese gives nice moist results eliminating the need for topping with separate gravy.  Homemade bread and a garden salad rounded out the meal.


Friday, December 14, 2012

Cleaning Out the Freezer - Chicken Stock

Stock making is a year round activity because we use a lot of stock.  I prefer stocks over water for cooking many savoury dishes because they add flavour.  The vast majority of the stocks I make are home canned for convenience.  Stocks can be home canned any time of the year but I prefer to can them during the winter months when there is less fresh produce to process.  I also prefer to make stock when there will be enough run the pressure canner at half to full capacity.  I freeze bones to be used for larger batch stock-making during the busier canning season.

chicken stock simmering
This batch started with five large zipper freezer bags of chicken bones.  All stocks are richer and more flavourful when made with roasted bones.  In this case, the bones were from chicken that had been charcoal grilled during the summer months.  This adds an subtle extra flavour element to the stock.

I started the stock with cold water, onion, carrot, celery, bay leaves, and peppercorns.  Stock-making is always a two day process.  The stock is made the first day, strained of the bones and vegetables then cooled overnight for de-fatting.  The large stock pot would over tax the refrigerator for cooling so I often cool the covered pot in the garage in the winter months.  It cools quickly there while being protected from critters.  In milder weather, I quickly cool the pot of stock in a sink with ice cubes surrounding the pot.

solids strained from chicken stock
The easiest way to do the first straining for any stock is using a colander.  This removes the larger solids.  I often take the stained solids, add fresh water to them and bring to a boil, then simmer for 15 minutes and strain again.  This adds flavoured liquid to top up the stock without watering it down by using plain water.

Once the large solids are removed, the stock is cooled to allow the fat to congeal on the surface.  The fat is removed then the stock is heated and strained through a cheesecloth double lined colander to remove the finer particles.  At this point, a couple of egg white can be added to help clarify the stock further if desired.  If the stock is to be canned, it can be reduced slightly if desired but it isn't necessary.  The stock can also be frozen as is or it can be reduced to 25% to freeze as a concentrate.  An alternate is to reduce to a thick syrup consistency then dehydrate for homemade bouillon [I'll show the entire method for this in a future post.]
 
home canned chicken stock
As mentioned, I can the majority of the stocks I make.  If I have extra from a batch of stock, I freeze or concentrate it.  I also make homemade bouillon from time to time.  By far, home canned stock is the most convenient for most applications because you don't have to thaw it.  It's ready to use as is.  Homemade bouillon is ideal for those recipes that call for bouillon.  You get the rich flavour of bouillon without the high sodium content.  When I make stock at our vacation home, it is mainly for fresh use with any left-overs frozen to be used while we are there, not long time storage because we rent out our vacation home for periods of time when we aren't using it.

The yield for this batch of rich chicken stock 4 - 1 L, 3 - 750 ml and 8 - 500 ml jars .  The L and 750 ml jars were processed at 10 lb pressure for 25 minutes; the 500 ml jars were processed at the same pressure for 20 minutes.  The L and 750 ml constituted a full canner load while the 500 ml jars were a half canner load.  I used Tattler reusable lids on the 500 ml jars.  The more I use the Tattler lids, the more impressed I am with them.  Their performance has been problem free after the initial learning curve.  Each time I re-use a Tattler lid instead of using a single use metal snap lid, I'm saving 12¢ which doesn't sound like much but over the course of on average 1,200 jars per year, my savings if using all Tattler lids would work out to a savings of $144.


Thursday, December 13, 2012

Kitchen Quick Tips - Grating Semi-soft Cheeses

kitchen quick tips
Prevent semi-soft cheeses from sticking to the box grater or shredder blade of the food processor by spraying lightly with a vegetable oil spray.


Wednesday, December 12, 2012

Tex Mex Beef Stew

I was very fortunate to get a good deal on carrots, onions, beets and potatoes for $1.88 per 10 lb bag, the day after arriving home from our fall vacation in October.  I had done a lot of canning, over 200 jars of home canned tomato products in addition to other home canned products.  After being away for three weeks, we were quite tired.  Still, I took advantage of the sale.  As a result, I had 40 lb of Ontario produce to use.  The nice thing about the produce sale was  carrots, onions, beets and potatoes keep well in our pantry so there wasn't an urgency for processing them.

tex mex beef stew
I decided to do a bit of a freezer clean-out to use the packages of chicken bones I had saved since the summer to can stock.  During the process, I found a couple of packets of pre-cooked beef, just perfect for soup or stew.  I used one of the packages to make a full bodied stew with Tex-Mex flavours.  The stew was quite tasty!

Tex Mex Beef Stew
source:  Garden Gnome

2 L (8 c) home canned whole tomatoes
250 ml (1 c) beef stock
1 lg carrot
2 ribs celery
2 sm onions
2 lg potatoes
500 ml (2 c) left-over cooked beef pieces
500 ml (2 c) cooked kidney beans
5 ml (1 tsp) garlic powder
5 ml (1 tsp) onion powder
30 ml (2 tbsp) homemade taco seasoning
250 ml (1 c) frozen corn
1.25 ml (1/4 tsp) paprika
1.25 ml (1/4 tsp) cayenne pepper
5 ml (1 tsp) cumin
garnish with plain yogurt or sour cream

Cut the carrot, celery and potatoes into bite size pieces.  Finely chop the onion.  Place the whole tomatoes in a large saucepan.  Bring to a boil on high heat.  Reduce to a simmer.  Continue cooking while mashing the tomatoes to break down, leaving a few larger pieces.  Stir in the stock and vegetables.  Continue cooking until potatoes and carrots are tender.  Stir in beef, seasonings and kidney beans.  Mix well then cook for 10 minutes to allow the flavours to blend.  Serve hot.


Tuesday, December 11, 2012

French Canadian Split Pea Soup

Home canning is a year round venture in our home.  I've even canned foods in our RV when we had it and now at our vacation home.  When we arrived home from our vacation home the end of October there were a few good deals on produce.  I had spent a good three weeks without doing a lot of cooking so I was definitely in the mood to cook.  What many don't realize is, cooking is a stress releaser for me.  When I am stressed, I cook and quite frankly it doesn't matter what time of day it is.  If I get up at 3 AM and can't sleep, much to my husband's dismay, I am cooking.  The smells of me cooking wakes him up and of course he has to do a bit of taste testing.  I'm sure you can see where that is going :)

smoked ham
Our local Walmart had hams on for a decent price, not on sale but a good price.  I bought a Country Naturals smoked ham that has no preservative!  It was only 700 g compared to the less expensive per unit 900 g smoked ham with preservatives.  I wanted the smoked ham for French Canadian split pea soup that I planned on canning.

I am seriously a bit particular about my ingredients when home canning.  If I have to buy any ingredient that will be home canned, I want organic and preservative free, so chose the Country Naturals brand over the store brand that had preservatives in the ham even though the store brand was 900 g and less per unit than the Country Naturals brand.

French Canadian split pea soup
French Canadian split pea soup is simply delightful.  I always make it from scratch.  Habitat French Canadian split pea soup was on sale 796 ml can for 97¢, regular price $1.57.  I decided to can up a batch that would be every bit as convenient as the commercially canned version but without any additives and less expensive.  Now at 97¢ a can, it is hard to see where homemade would be less expensive, but it is.

I rummaged through the freezer to find the ham bone I had kept from a charcoal grilled ham.  A ham bone really brings out the flavour in French Canadian split pea soup.  The bone from a ham that has been charcoal grilled has an unbeatable hint of smokiness to the soup.  Ideally, dried whole yellow peas are preferred if you can find them but I use split peas as that is what is available in the grocery store.  I used a carrot and onion from the Ontario produce purchase.  I ended up with 10 - 500 ml jars of the soup at a total cost of $4.99 including the cost of the natural gas to run the canner.   It was just a little over a litre more of what I could have bought the soup on sale for.

French Canadian split pea soup is a warm, creamy, filling and comforting soup perfect for a winter evening meal.  It is quite filling and very inexpensive to make from scratch.  Serve with homemade sourdough bread  and a side salad for an easy meal.  I like canning this soup for an easy homemade convenience soup but it will freeze nicely as well.

French Canadian Split Pea Soup
modified from Ball Blue Book (2001) Pp. 61

900 g (2 lb) split yellow peas
16 c water
1 ham bone from charcoal smoked ham
1/2 lg Spanish onion
1 extra large carrot
1 bayleaf
1 tsp celery salt
1 1/2 c cooked ham

Bring the water, ham bone, bayleaf and split peas to a boil.  Reduce heat and let simmer until the beans are tender.  Remove 2 c of the peas and set aside.  Stir in the chopped onion, carrot, and celery salt.  Cut the ham into small cubes and set aside.  Cook the soup until the carrots are tender.  PurĂ©e the soup with an immersion blender until smooth.  Stir in the reserved split peas and cooked ham.  Ladle into hot prepared jars.  Place lids and rings on the jars.  Tighten rings finger tight if using the metal snap lids.  Tighten rings finger tight then turn back 1/4 inch if using Tattler lids or glass inserts.  Process in pressure canner at 10 lb pressure for 75 minutes at altitudes up to 1,000 feet above sea level.  Adjust the processing if at higher altitudes using the altitude adjustment chart.  Remove from canner.  Do not adjust rings if using metal snap lids.  If using Tattler lids or glass inserts, fully tighten the rings immediately after removing jars from the canner.  Let the jars cool undisturbed for 24 hours.  Remove the rings and test the sea.  Wash rings and jars then dry well.  Rings can be put on the jars loosely for storage if desired.

Yield: 10 - 500 ml jars


Monday, December 10, 2012

Frugal Kitchens 101 - Eco-friendly Tips for Gifting Kitchenware

Frugal Kitchens 101

Last week's Frugal Kitchens 101 discussed a few ways to save on buying small kitchen appliances and equipment, specifically the best time to buy these items.  During the pre-Christmas season, the end of January and the two weeks before Mother's Day, great bargains can be found on all things kitchen related.  This is the best time to buy kitchen items for your home as well as gift giving.  Gift giving usually involves some type of wrapping because let's face it part of the gift includes the surprise of opening it.  Traditionally, the wrapping is some type of themed wrapping paper with a bow and card or tag.  Unfortunately, wrapping paper is not only expensive, it is not eco-friendly.  Wrapping paper can't be curbside recycled and while there are some novel ways to reuse wrapping paper, you are essentially paying for something that you know will end up in the landfill.  The same is true of gift cards.  A frugal kitchen seeks to reduce waste wherever possible including gift giving.  There are many ways to 'wrap' small kitchen appliances and kitchenware without resorting to wrapping paper and cards although a homemade gift tag is still a nice touch.  Here's a few tips for wrapping those kitchen items for gift giving without breaking the bank while being eco-friendly:

  • baskets - Baskets are an ideal way to give small kitchen items like mugs, tea balls, milk frother and those types of things.  Add in a jar or two of homemade jam or coffee mix, or tea bags to compliment the gift.  Tuck in a recipe to go with their coffee, tea or hot chocolate.  The basket can be reused by the receiver for a multitude of purposes.  The best places to find baskets in order of price are: resale shops, dollar stores, department stores (eg. Walmart, IKEA).  Keep in mind, you can spray paint baskets or dye wicker baskets for a personalized touch.  Larger baskets with or without cloth liners are perfect for holding some small kitchen appliances.  Picnic baskets are an ideal way to gift someone with a set of dishes, glasses and cutlery.  
  • metal/plastic containers - Metal containers are usually used for food items like fruit cake or cookies when gift giving.  The dollar stores usually have the best price on these containers.  However, there are metal storage containers with lids meant for the office that could be used to wrap kitchen utensils or gadgets, t-towels, and smaller items.  Plastic totes come in all sizes and colours, just perfect for wrapping all types of gifts in pluse the plastic tote is very useful in the pantry.  Think outside of the box.  One year we bought a stainless steel kitchen waste can then stuffed it with all kinds of kitchen essentials (eg. dish soap, t- towels, dishcloths, garbage bags, etc.) for one of our kids that was just setting up their kitchen.  A new recycle bin can be used much the same way as a basket.  
  • textiles - Textiles (eg. t-towels, tablecloths, cloth napkins) can be used to wrap a kitchen item for gift giving much the same way you would use wrapping paper.  Reusable cloth shopping bags are ideal for wrapping small kitchen appliances.  Smaller cloth bags are available for potpourie, soaps, and wine but you could use them to gift a wide range of kitchen related items.  They are available at dollar and department stores but if you are handy with a sewing machine, make your own.  Be sure to buy the material on sale.  If you crochet, there are several nice, free patterns available online for shopping and gift bags making your gift and wrapping personalized.  If you happen to know the receiver also needs a sheet set, use it to wrap small kitchen appliances or you can use sheets bought on sale to make gift bags.  


Sunday, December 09, 2012

A Generous Gift with a Canning Lesson

As a home canner who processes well over 1,400 jars of food each year, I am always very appreciative of any free jars that come my way.  Sometimes the jars come filled with food that I have to discard then clean the jars and other times the jars come empty with only cleaning needed. At any rate when my husband recently brought me home three cases (36 jars) of 500 ml jars, I was elated.  After doing a bit of power canning, I am getting low on jars which is fine because that means the jars I have are filled but you know a home canner doesn't just can during the peak season of May to October.  Oh no, a home canner tends to can year round filling jars as quickly as they are emptied.

three dozen free mason jars
My husband brought me home 3 cartons of filled jars.  A friend was cleaning out a home and came across the jars so gave them to my husband.  I, of course was elated.  They were filled so I had to empty each of the jars which was not as easy of a task as you would think.  Still, free jars are free jars.  In this case, the jars were in their original cartons but unlabelled so I had no idea of the actual processing date, not that I was intending to use the contents.  Always put the month and year of anything you freeze or home can on the package! If going by the boxes, I would guess the jars were canned about 2 years ago.  The cartons were fairly new going by the UPC and store coding so the product was more than likely canned in 2010 or 2011.

damaged lids
The jars were filled with crushed tomatoes that actually looked nice.  It always bothers me to toss out someone's hard work.  In this case, the person had left the rings on the lids without washing and drying both jars and rings.  That meant the rings were almost welded to the jars. Most of the jars showed signs of seal failure (eg. centre button up, bulging lids) as shown in the picture and clearly the product was spoiled going by the smell.  I don't know whether the seal failures were due to improper canning methods or improper storage but it was quite apparent that the seals had failed.  The food waste disposal unit was in overtime but it handled things nicely.

Now, this is a clear example of what to look for in home canned foods.  If the lid is bulging, buckled or otherwise not sealed then do not consume the product.  Do not taste the product!  Metal lids will bulge or when pressed in the centre will give indicating the seal has been compromised.  Any product should be appropriately discarded.  If you are using Tattler lids or glass inserts, the lids will not bulge but rather the lid and rubber gasket will pop right off.  If that happens, do not consume the product.  Chances are the food is only contaminated with bacteria BUT food born illnesses are easily avoided and there is no point taking chances.  The rule of thumb with any food is if in doubt throw it out.


Saturday, December 08, 2012

Easy Pulled Beef Dinner

Still working our way through the 40 lb of Ontario produce, I decided to make a quick, easy pulled beef dinner.  I keep packets of pre-cooked meats in the freezer as quick meal starts and homemade versions of lunch meats.  While some of the meat packets are left-overs, the majority of them are meats cooked then frozen specifically as quick meal starts and lunch meats.  When we need a quick meal, I simply pull a packet from the freezer to reheat and add sides that usually come from the pantry.

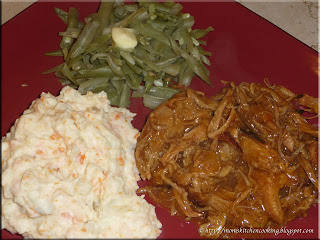
easy pulled beef dinner
Normally, when I get a good deal on produce the rule of thumb is 50% is for fresh use with the remainder being preserved for later use.  Some will preserve the full amount but this is one of those things that you do what works best for your family.  I thawed a packet of pulled beef then added fresh sides.

Pulled beef or pork is very easy to make but it basically takes a day of slow cooking.  You can cook the meat long and slow on the grill, in the oven or use a slow cooker.  I often cook two roasts (beef or pork) at a time, one for immediate eating and the other for quick meal starts.  Pulled meat is cooked long and slow usually with some type of barbeque sauce added although gravy works well too.  The meat is pulled into strands using two forks.  It is wonderful on sandwiches but can also be used as the meat for dinner.

I served the pulled beef with rustic mashed potatoes and French cut green beans.  Rustic mashed potatoes are very easy to make.  They are delicious as a side dish but also make a wonderful topping for cottage pie.  Simply wash and cut potatoes and carrots into chunks.  Add two wedges of cabbage then steam the vegetables until tender.  Pour the cooked vegetables into the bowl of a stand mixer.  Add a bit of sour cream, cream cheese, butter and milk.  Sorry, I don't measure so can't give you the actual amounts.  Mix until just creamy with a few lumps.  Stir in salt and pepper to taste.

French cut green beans is really all about the cut.  The cut is longitudinally from end to end of the bean giving long thin strands as opposed to the normal cross cut for green beans.  It is a bit more work but gives a different look and textural component.  Quite often if you buy French cut green beans commercially canned they come with bits of pimento (red chili pepper) and onion.  I can them plain without pimento or onions.

The holiday season is the time of year you really appreciate getting a nice, nutritious meal on the table without a lot of effort or time.  This meal was on the table in 15 minutes making it a very nice choice for quick meals.  This is one reason to cook ahead specifically dishes that can be used as homemade yet healthy convenience.


Friday, December 07, 2012

Habanero Gold Jelly

We spent most of the month of October at our vacation home in Florida.  That meant I could not fully enjoy the remainder of my garden's harvest.  It had been rather cool at home while we were away with a couple of mild frosts while we were away.  So, I was quite surprised to find ripe habanero, jalapeño and super chili peppers along with a few tomatoes when I checked the garden the day after we arrived home.

freshly picked habanero, jalapeno and super chili peppers with a few tomatoes
There wasn't much but I was still pleased that there was any to begin with.  The super chili peppers (small red) are actually hotter than the  jalapeño (large green) and habanero (orange).  In general the smaller the pepper the hotter it is.

I dried the super chili peppers whole.  A whole dried super chili pepper is ideal for adding a bit of heat to soups and stews.  Just pop it in as is then remove when the dish is finished the same way you would with a bayleaf.  The whole super chili peppers can also be crushed to use as hot pepper flakes.  I actually ended up with another harvest a bit smaller than this one as well as a nice harvest of green tomatoes before the frost hit hard.

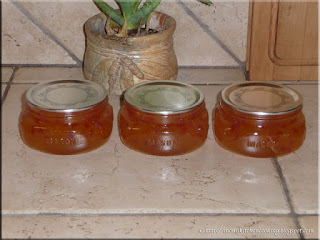
habanero gold jelly
Hot pepper jellies are one of my favourite home canned products.  They can be used as a condiment, as a topping over cream cheese on bagels or appetizers, or as a glaze for grilled meats.  They are the perfect 'go to' when entertaining.  I make several different home canned hot pepper jellies.

Habanero peppers are one of my favourite hot peppers.  The local grocery store seldom carries them so I grow my own.  The plants are compact making them perfect for growing using the square foot garden method.  Yet they are prolific, problem free producers.  I dry, pickle and freeze them.   One of the best ways of preserving habanero peppers is making hot pepper jelly.  It is a firey golden, translucent jelly with colourful bits suspended throughout.  The jars look like they are filled with golden jewels.  This really is a must have home canned product!

I really like using the squatty Bernardin/Ball Elite line of 250 ml jars for  hot pepper jellies because they double as a serving bowl for entertaining.  The jelly looks equally as nice in the taller 250 ml jelly jars and for gift giving, the 125 ml mini jars work nicely.  I really wouldn't can hot pepper jelly in jars larger than 250 ml.

Habanero Gold Jelly
modified from: Bernardin Complete Guide of Home Preserving (2006)

1/3 c finely sliced dried apricots
3/4 c white vinegar
1/4 c finely chopped red onion
1/4 c red bell pepper
1/4 c seeded habanero peppers
3 c organic granulated sugar
1 pouch liquid pectin
1/4 tsp butter (optional)

Slice the dried apricots then combine with vinegar in a large stainless steel saucepan.  Cover and let stand at least 4 hours.  Finely chop the red onion, red bell pepper and habanero pepper.  Stir the prepared vegetables into the apricot mixture.  Bring to a full rolling boil over high heat, stirring constantly.  Stir in pectin and butter.  Boil hard, stirring constantly for 1 minute.  Remove from heat.   Skim off any foam.  Stir for 5 minutes to distribute the vegetables throughout the jelly.  Ladle into hot prepared jars.  Place lids and rings on the jars.  Tighten rings finger tight if using the metal snap lids.  Tighten rings finger tight then turn back 1/4 inch if using Tattler lids or glass inserts.  Process in boiling water batch canner for 10 minutes.  Remove from canner.  Do not adjust rings if using metal snap lids.  If using Tattler lids or glass inserts, fully tighten the rings immediately after removing jars from the canner.  Let the jars cool undisturbed for 24 hours.  Remove the rings and test the sea.  Wash rings and jars then dry well.  Rings can be put on the jars loosely for storage if desired.

Yield: 3 - 250 ml jars


Thursday, December 06, 2012

Kitchen Quick Tips - Thawing Shrimp

kitchen quick tips The holiday entertaining season is upon us.  To quickly  thaw frozen shrimp, place the bag or wrapped tray in cold water in the sink.  The shrimp will be ready to use in about 10 minutes.


Wednesday, December 05, 2012

Roasted Beets

I recently posted about a few great deals I got on Ontario produce only a day after returning home from our fall vacation.  No Frills had 10 lb bags of beets, onions, potatoes and carrots on sale for $1.88 each.  When I come across a deal like this, there is no way I am not going to take advantage of it.  I do a lot of home food preservation so it would take me very little time to home can or freeze 40 lb of produce but I have a bit of a system.  I tend to preserve 25% to 50% of this type of deal and use the rest fresh for very inexpensive, frugal meals.  This is a very frugal method for keeping your pantry and freezers well stocked while using fresh produce.

roasted beets
This meal seriously was about as cheap as you can get with the most expensive item being chicken breast baked in homemade shake and bake coating mix.  I baked a couple of potatoes, roasted a couple of beets and steamed carrots all from my frugal Ontario produce purchases.  That isn't sour cream on the potato either, it is homemade yogurt which is lower in fat and calories than sour cream.  It is butter on the steamed carrots.

Roasted beets have a deep rich flavour.  It rather surprising that you don't often see beets served at restaurants given their delicious flavour element combined with very low price.  In fact, even on the food channel, I seldom see them cooking beets.  Anyway, roasting beets is simple.  Scrub the beets well and trim only the top leaving about 2 - inches.  This prevents the beet from bleeding.  Place the whole beets in a baking dish and bake uncovered at 350°F until the beets are tender, about 45 minutes.  Remove from baking dish and let sit 5 minutes.  Trim both ends and slip the skins.  The roasted beets can be halved or sliced for serving.

This was a very simple, frugal meal yet rich in antioxidants, beta carotene and fairly high in tryptophan.  It was low fat as well even though I did add butter to my steamed carrots.  It was very low sodium.  The most important thing though, it was a delicious meal that took almost no effort.  It was low prep, toss in the oven except the carrots that went into the steamer basket.  Not bad if I don't say so myself !


Tuesday, December 04, 2012

Pickled Beets

Beets are one of my favourite vegetables.  Not only are they quite inexpensive, they are a powerhouse when it comes to nutrition.  They detox the liver, purify the blood and prevent some cancers plus they contain tryptophan that works much the same way as chocolate without all the calories.  Beets are also a good indicator of stomach acid.  If your urine is pink instead of clear after eating beets, it is an indication of low stomach acid so increase your beet and greens consumption.  A ten pound bag of large red beets last long in our home!  Beets are ideal for pickling, canning, roasting, grilling, boiling, and of course making Borscht.  Beets can also be frozen.  I am particularly fond of Harvard beets that are sweet and tangy with their thicken sauce.  So, I knew that 10 lb bag was not going to last very long.

pickled beets
One of my first projects using the beets was a batch of pickled beets.  Pickled beets look like sparkling dark rubies in the jar.  They are just so absolutely gorgeous!  Pickled beets are rather versatile too as well as being a tasty pickle.  The pickling liquid can be drained off then used as a brine to pickle hard boiled eggs giving them a lovely pinkish tinge.  All homemade pickled eggs are not shelf stable so must be refrigerated but they will keep for about six months so it is a good way to use up extra eggs.

I don't make a lot of pickled beets as I'm the only one in our immediate family who likes them.  I normally can them in the 250 ml jelly jars but after the canning tomato products found myself with only 3 - 250 ml jelly.  I could have used the squatty elite jars but decided to can the beets in 500 ml jars instead.  At any rate, the jars looked lovely and oh so tempting!