My photo
Ontario, Canada
I am a wife, mother and grandma who enjoys the many aspects of homemaking. A variety of interests and hobbies combined with travel keep me active. They reflect the importance of family, friends, home and good food.
Cook ingredients that you are used to cooking by other techniques, such as fish, chicken, or hamburgers. In other words be comfortable with the ingredients you are using.
--Bobby Flay

For Your Information

Please watch this area for important information like updates, food recalls, polls, contests, coupons, and freebies.
  • [March 19, 2020] - Effective Mar 17, this blog will no longer accept advertising. The reason is very simple. If I like a product, I will promote it without compensation. If I don't like a product, I will have no problem saying so.
  • [March 17, 2020] - A return to blogging! Stay tuned for new tips, resources and all things food related.
  • [February 1, 2016] - An interesting report on why you should always choose organic tea verses non-organic: Toxic Tea (pdf format)
  • Sticky Post - Warning: 4ever Recap reusable canning lids. The reports are growing daily of these lids losing their seal during storage. Some have lost their entire season's worth of canning to these seal failures! [Update: 4ever Recap appears to be out of business.]

Popular Posts

Showing posts with label kitchen renovations. Show all posts

Friday, March 28, 2014

Kitchen Updating Continues

If you have followed this blog for any length of time, you are likely wondering what the heck has been up.  Posting has been considerably less than it usually is.  There is a reason for that...kitchen renovations!  We bought this house in August of 2011, moving in just before heading down to our vacation home in Florida for the fall.  Upon our return, just after the holidays I started on the kitchen.  January of 2012 saw a fresh coat of paint that lead to a massive snowball effect.  Our friend who does custom woodworking made a couple of suggestions and the kitchen has been in an uproar since.  The snowball effect did not stop at the kitchen though as he had done custom work for the upper bathroom, custom wall unit for the games room and other finish work.  He will be doing the crown molding and trim on the main level as well.

Our kitchen is small so we are adding custom features to increase the functionality while giving it the custom look.  The marble tile floor and ceramic tile counter and backsplash were installed by the previous owner.  Aside of those two features and the layout, the kitchen bears little resemblance to what it was when we bought the house.

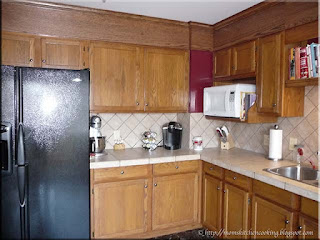
cabinets as they were on January 4, 2014 before work started
We arrived home from our vacation home just in time to celebrate Christmas with our kids.  We had a few days to settle in then on January 3 our friend was out to take my cabinet doors for refinishing.  When he installed the custom bulkhead, the stains did not match.  We liked the darker cooler tone so opted to have the cabinets refinished to get rid of the yellow tones.  Once again the kitchen was being pulled apart.

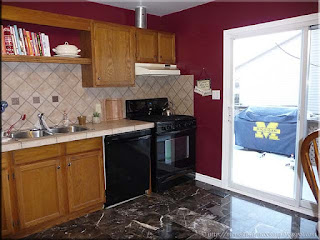
Pictured is the kitchen as it was the morning he came out to take the upper cabinet doors for refinishing.  Aside of the cabinets, we still have the microwave oven, sink and faucet to replace.  The under cabinet lighting on the custom built shelf was added in 2012.  We have decided to update that to LED lighting along with LED lights in the ceiling as well as adding a solar tube.

top cabinet doors removed
Little did I know when he took the doors on January 3 that the work would be dragged out until March!  Honestly, by that time my frustration was definitely showing.  I have refinished the cabinets in three of the homes we have owned so know the work that goes into it.  Yet, those kitchen cabinets were completely refinished in under two weeks.  I was quite surprised that he was taking so long.  In hindsight, I should have done them myself but my husband felt this was the easier route to go.  And so the kitchen sat, and sat!

We hosted our monthly games night in January and February with the kitchen looking like this.  I had to keep the patio panels closed in the morning to prevent the strong sunlight damaging the contents of the spice cabinet.  We tried to minimize any cooking that would create a lot of steam or grease being released into the air.  The worst part though was as things dragged on, my mood sunk deeper and deeper. 

staining the cabinet trim
Finally, in March he came out to take the base cabinet doors for refinishing.  He sanded down the cabinet trim the same day.  Talk about a mess!  Even with taping a plastic sheet over the kitchen entrance and opening the patio door, there was still a fine layer of dust on many surfaces.   The stain went on the cabinet trim the same day.  A couple of days later, our friend installed the custom built drawers in the short end of the base cabinets.  We lost a bit of space but gained in usable space.  The drawers are on soft close runners.  My husband took one look at the drawers and said we needed to do the same with the other smaller cabinet.

That night, I heard a dripping noise in the utility room.  The refrigerator was leaking!  My husband shut off the water supply then did some troubleshooting.  It was the dual valve intake so we ordered the part and he fixed it the following Monday.  This was the second water leak we had dealt with that week!  In the meantime, that Saturday night we hosted our monthly games night with fifteen in attendance and a kitchen with minimal functionality.

refinished door fronts on the cabinets
I told our friend that I would put the urethane on the cabinet trim.  I wanted three coats for good protection which would be faster if I did it than wait for him to come out three times.  Finally, he was able to get the refinished cabinet doors installed.  The kitchen was starting to come back together, once again.  He measured up the cabinet next to the sink for drawers before he left.  I set about putting things back into the cabinets knowing full well that I would have to pull everything out of the one cabinet for the new drawers.  He wasn't planning on coming out for a couple of weeks to install the drawers so it was better to have the items in the cabinet rather than in boxes on the floor.

preparing cabinet for drawers
Last week, our friend came out to install the new kick plate and drawers in the smaller base cabinet.  Surprisingly, this installation was quite disruptive.  We emptied the cabinet and cleared the counter the night before.  He had to build a spacer the width of the divider in the cabinet.  This holds the runners on one side of the drawers.  He also had to reinforce the inside of the cabinet sides to hold the runners on the other side of the drawers.  This actually took longer than I expected.  Once the divider and sides were installed, it was time for him to install the drawers.  He went for lunch while I mused about how I would organize the new drawers.

custom built drawers installed in cabinet
Finally the new drawers were installed and the cleanup finished.  We had discussed turning the original drawer to the left above the new drawers into a knife drawer with a custom built knife rack.  Unfortunately, there was only room for eight or nine of my chefs knives which wouldn't really free up that much space on the counter or other drawer so we decided against it.   We aren't sure what we are doing next although I did buy LED strip lighting to test out.  At least the cabinets are one step closer to being finished.  The planned lighting should only take a day for installation but it will once again disrupt the kitchen.  Still, the disruptions should be getting shorter.  I'm at least back to having a functional kitchen for the time being.

We really love our new kitchen drawers!  We knew we would lose the space behind the dividers but the drawers really add a lot of extra storage by making what was once unusable space usable.  We have a total of ten drawers.  The four drawers in the base cabinet on the short arm of the counter are home to pots, pans and miscellaneous kitchen equipment.  They hold everything that was in the original base cabinet as well as a few items from the upper cabinet, freeing up a bit of space there.  The six smaller drawers are home to various food items all neatly organized.  The upper right drawer has coffee supplies which is rather nice and I'm using the middle left drawer as a snack drawer.  Gone are the days of being able to open the cabinet and toss something in quickly.  Instead, everything is neat and tidy. 

While our cabinet drawers were custom made to fit our cabinets, there are stock drawers available.  If you are looking for ways to make your small kitchen more functional, definitely consider putting drawers in your cabinets.  Honestly, it is one of those little additions that makes a huge difference!


Sunday, February 17, 2013

My Kitchen Dreams if I Ever Won $50,000

As a food blogger I get a lot of perks because of my blog.  These include free products, gift cards, recipe books, higher value coupons and of course, monetary compensation through allowing affiliate advertising on my blog.  I don't write paid posts so any opinion I express on this blog are my own.  I have been affiliated with Mom Central Canada for a little over three years now.  They treat me very good!  I was offered a chance to be one of 40 Canadian bloggers to participate in the Royale Golden Kittens Blog Tour.  I like Royale products.  The potential to win $50,000 in the Royale Golden Kitten Contest.  Each golden ticket you find gives you an opportunity to win the grand prize along with instant prizes.  Golden tickets are available on specially marked packages and through the Royal Kittens Facebook Page.

I received a gift box of Royale products that included a package each 3 ply Royal Ultra Signature Bathroom tissues, 3 ply facial tissue, travel pack facial tissue, 3 dinner napkins and 1 ply serviette napkins.  Let me tell you our postal  worker who delivered the parcel got quite a chuckle that we had toilet tissue delivered!

The big question is, "If I win the $50,000 what would I do?".  I'm a very frugal person so the temptation would be to share with our kids, invest some and pay down our mortgage.  However, I dared to dream what I would do with all that money!

kitchen bulkhead over sinks and stove
We bought this house with a closing date of September 15, 2011 although we arranged to take possession on September 1.  The house was built in the 1990's.  It is a large, spacious home (five bedrooms) with a lot of nice upgrades, and ample room.  We are currently working on doing more upgrades.

The kitchen is small but has marble floor, ceramic tile counter top and back splash.  It was originally painted taupe so we brightened it up with a deep red, closed in the bulkhead, added custom trim, new dishwasher and natural gas range, and the custom shelf over the sink.  I blogged earlier about a few kitchen upgrades in our new home purchased in 2011.  We still need to replace the microwave, fume hood, faucet and sink.  But I have big dreams!

The patio doors lead to a nice sized deck with two dining areas and the outdoor dual fuel grill.  It over looks the pool and smaller detached deck.  Last summer was our first summer there and we quickly discovered the kitchen deck gets too hot, so my husband erected a very nice, but temporary covered gazebo.   What we want to do is expand that deck over by 3 feet, create a new entrance to the downside entrance, move the garage door to the side of the garage, then tie into the pool decking so basically 80% of our back yard would be under deck (aka maintenance free).  It would involve replacing the fence and building a pool change room.  We want to put the kitchen deck entirely enclosed for year round use, basically an expansion of the kitchen.

We are very blessed in that we are avid DIYers who more than capable of doing fencing, decking, roofing and siding thanks to over eleven years renovating a turn of the century home.  We have friends who knows how to tie the addition into the house as it would involve cutting into the roof and side of the house.  The biggest expense for all these plans come from materials but while I am dreaming I would like my husband to work in an outdoor cooking area complete with counter.  I would also be elated if he could work in a wood fired oven!  With all these great plans, I really hope I do win that $50,000 :)

What would you do if you won $50,000?  Be sure to enter the Royal Golden Kitten Contest for your chance to win!


Wednesday, March 14, 2012

Custom Kitchen Bulkhead and Trim

Yesterday was a whirlwind of activity here rendering my kitchen inoperable for a little over eleven hours without the clean-up today.  I will apologize in advance for the glare on the pictures.  This kitchen is absolutely horrid for taking pictures in due to the natural lighting and reflections from the marble tile floor.  Our friend who is doing a lot of custom woodworking in our home arrived with his crew of one at 9 AM.  Now this is my husband's busy time of the year meaning he works 16 to 18 hours a day.  He came up with a plan to skirt some of his DIY projects and that was to get our friend and his crew to do them.  At the end of the day, the kitchen bulkhead and trim were finished, the front door was fixed, the replacement garage door opener was installed and I had a nice, new central vacuum cleaner to play with.  Had we waited, none of this would have been done until after tax season (April 30) but in reality likely not until after our spring vacation.  Anyway, this work was finished in one day and while I didn't get any cooking done, I am pleased with the results.

kitchen prepped for renovations
Marble tile flooring is a bit  more on the delicate side than I thought it would be.  I can't even use my standard vinegar solution for washing it as the pH needs to be neutral so the steam mop works nicely.  The guys protected the floor with a heavy quilted throw.  This was to be the kitchen scene for the next almost eleven hours.  It doesn't show the two ladders being used or the guys standing with work boots on my counter or even remotely describe the sound of the power nailer powered by the air compressor (bottom centre).

All of the cutting was done in his mobile workshop which is quite impressive!  At least most of that mess stayed outside.  It was a very long day though!

kitchen bulkhead over sinks and stove
We moved here last September.  The original kitchen was taupe tones.  Our friend made a custom shelf for my cookbooks giving a home to some of my most used cookbooks.  I recently painted the kitchen the same colour as my dinner plates, a colour that matched nicely into the colour scheme I chose for the house. 

The kitchen cabinets had an open bulkhead, the space between the cabinets and ceilings.  One of our houses had the same open bulkhead as does our vacation home.  When our friend suggested enclosing it, I was all in favour.  An open bulkhead is a work-maker, dust collector, and borderline clutter collector.  Anyone with an open bulkhead knows it is a greasy dust collector as well.  Our friend recommended building in the bulkhead.  True we would lose a bit of storage space and we could have designed it to have extra storage but we chose not to.

Pictured is the finished bulkhead along the long wall of the kitchen.  There is a slight tone difference in the woods, something our friend is really not happy about but quite frankly I think the new tone suits the kitchen better.  In reality, the tone difference shows more in the pictures than it does in the kitchen.  At this point we have a few options.  We decided to take the kitchen cabinets from their yellow tones to the taupe tones of the new trim.  While this does mean more work to be done, the end results will be nicer.  Seriously, we dealt with this very same problem at our last house.  The fix is not as complex as it sounds.  So, the kitchen isn't completely finished but that's ok.

kitchen bulkhead on refrigerator wall side of kitchen
The refrigerator wall of the kitchen had a bank of cabinets separated by jut out wall we cannot change.  At first, the plan was to leave that wall with no trim but then I thought it would look better with the same trim.  What do you think? This is one good reason why the homeowner should be there when any custom work is being done especially in the kitchen.

All in all, I am quite pleased with building in the bulkhead.  While it removes a bit of storage, it removes a dust collector that is much appreciated given my allergies.  Ideally, kitchen cabinets should go to the ceiling eliminating this problem entirely but if they don't this is a viable option.  In vacation homes that you rent out when not using this is a great spot to build in secured storage for items you don't want your renters to use. 

ceiling trim in the kitchen
We extended the oak trim around the entire kitchen.  This added continuity and character to the kitchen.  The deep cove molding added a touch of elegance without being pretentious as well.

This was a very long day of workers in the house.  In the end, everything was done that needed to be done that day.  True, it has led to more work but that is the nature of any home renovation.  The next step is the cabinets, bringing them to the tone of the new bulkhead.  And with that the kitchen should be finished but is it?  My husband wants to add a sunroom off of the kitchen making that portion of the deck usable three seasons or year round.

This is precisely what happens when two people who love to cook are faced with a brand new kitchen.  Nothing happens in one fell swoop and the plans keep getting changed but in the end we get what works for us.  I will post a picture of the finished cabinets and keep you updated on the sunroom.


Wednesday, February 15, 2012

A Sneak Peek at My New Kitchen Colours

If you recall we moved into this during the first two weeks of September of 2011, taking official legal position as homeowners on September 15.  We really liked the colours but upon closer inspection it was quite obvious every room in the house needed freshening with a new coat of paint.  Part of the reason for this was the previous owners did soddy workmanship with respect to painting and the other being the colours just didn't flow as they should.

kitchen just after moving in
When we first moved in the kitchen was a taupe that looked nice but didn't mesh with the taupe in the living/dining area.  There was a awkward space that should have been tiled above the sink but we added a custom made cookbook shelf.  One of our friends is a fine finish carpenter who does amazing work.  He made us custom drink tables for the games room (will post more on this) and is doing a lot of custom work in our home.

The walls were a taupe that while it looked nice just didn't make the kitchen pop the way it should.  There was an open bulkhead that I considered putting items on for storage but having gone that route in our fourth house wasn't to anxious to repeat the cluttered look.  What I really wanted was something to accent the beautiful marble tile floor in the kitchen.

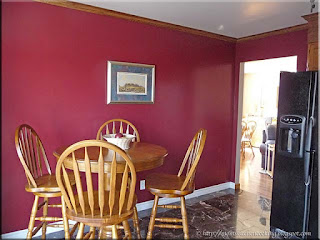
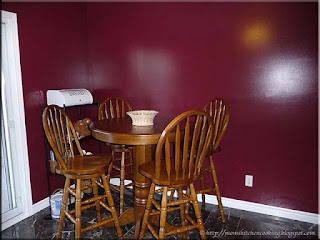
kitchen nook area sporting a new splash of colour
I went onto the Behr website and chose all my colours based on co-ordinating colours to match the colour I had chose for the master bedroom.  Home Hardware can colour match most manufacturer's colours.   I had a cranberry red chose for the office but my husband said it would look really good in the kitchen.  So off to Home Hardware where they didn't have the code to mix that paint.  I came back home to get the code for the next red but when driving back it hit me the red was too purplish so I headed back home and grabbed a dinner plate.  The kitchen is now custom matched to our main dinnerware.

This was absolutely the most difficult paint I have ever worked with and that is just after painting the main bathroom using the same brand of paint.  The difference was the bathroom paint (Hazelnut Cream) was a white base while the custom red was a clear base.  At any rate after three coats of paint the kitchen eating nook looks rather spiffy.  I just can't help but smile every time I go into the kitchen!

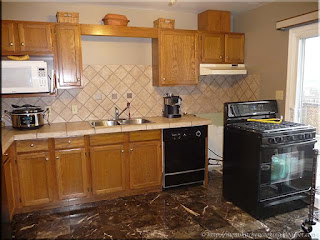
kitchen stove area freshly painted
The covering for the exhaust fan literally disintegrated when I accidently bumped it while paint.  Our friend came to my rescue!  He suggested building in the bulkhead that will eliminate a major dust trap in the kitchen.  He is also making custom crown trim.  The look of the kitchen is going to change dramatically with this addition.  I will post pictures once it is finished.

We still have to change out the sink and exhaust fans as well as trim up the new dishwasher but other than that I am very pleased with how things are progressing.  While waiting for him to do the finish work, I moved onto the guest room that is now sporting a beautiful new look (Seal) .  That is three rooms painted in the last two and a half weeks along with custom carpentry finished in the main bathroom.  The crowning touch though is the beautiful, rich and vibrant red in my kitchen!  Oh, and I did find yarn that matches the kitchen almost identical for a new afghan in the livingroom to tie the colours in.  What do you think?


Monday, September 01, 2008

My Updated Kitchen


My Updated Kitchen
August 29, 2008

Ladies and gentlemen, I am pleased to present my new and updated kitchen! As of last Friday the kitchen was fully functional after a very long renovation essentially started the last week of June 2007 when we moved. We removed old built-in appliances and installed ours thinking the renovation would be finished in time for our anniversary party. Wrong! Life as well as really not being sure what we wanted in the kitchen lead to a lot of delays. The only thing I was certain of is I wanted the sink moved and I wanted ceramic tile countertops. It was important to us to keep the cottage look and we had to work within the space we had. There were no options for expanding and complicating the problem was the beautiful tongue and groove wood ceiling with large beams in the family room continued into the kitchen. Replacing cabinets would have damaged the ceiling so again we had to work with what we had although replacing the door fronts was an option.

When the built-in oven was removed we decided to turn it into storage. My husband added shelving and we planned on having doors made to match to cover except virtually everyone who visited loved the open storage concept! I kind of have a love/hate relationship with open storage because you have to constantly do clutter and dust control but things are right within easy sight and reach. The new storage area sat with new shelves but unfinished edges.

There are still a few little finishing touches to do but the kitchen is fully functional. The weather is cooling, tomatoes are starting so I will be putting the kitchen will be seeing a lot of action over the next few weeks!

Now here's a question for you: If money and space were no option what is the number one thing you would include in a kitchen renovation?


Wednesday, August 06, 2008

Kitchen Renovations Continued - Braised Ribs

I have to tell you that I am tiring of the ongoing kitchen renovations. They basically started the moment we moved in with removing built-in appliances and roughly fitting ours in. At that time we had planned on having the kitchen completely renovated within a month. Then came injuries for both of us, his 5 stitches across the knuckle and my 8 stitches in the arch of my foot. Then came family events, electrical issues, plumbing issues, flooding issues, Christmas, winter vacation, sewer issues (yep we had a blue port-a-potty for 5 days!), spring vacation, one of our kid's weddings and finally we are getting the kitchen done! In short, life got in the way and when you are a DIYer that can really slow things down.

Surf & Turf

Before I get into a bit more about the kitchen I want to share my husband's birthday meal. We don't do things like birthday gifts, cards or go out. The reason for this is we try to make each other feel special every day of the year. Besides instead of small gifts throughout the year we save that money for our quarterly vacations. What we do for each other if make a special birthday meal.

This year my husband wanted steak and scallops for his birthday dinner. The steak was grilled to rare served with broiled bacon wrapped scallops, steamed red potatoes, sautéed mushrooms with red onions and side salad consisting of mesclun mix, tomatoes and cucumbers with fresh lemon juice in place of dressing. We dined in the upper screened in sunporch enjoying the sights and sounds of the water.

Tiling Started

This is how my kitchen looked Monday (August 4) night after both of us spending a very long and sometimes frustrating day of working on the kitchen. The night before my husband burned out the circular saw for cutting the sink and base which resulted in an unexpected trip and purchase setting us back. The water was beckoning us to forget the kitchen and get away on the boat. It would have been ever so easy! We resisted and kept plugging away.

The tiling is going amazing smoothly considering up to this point the only thing I had tiled was the base for a wood stove in one of our former homes. My husband has no tiling experience aside from observation. He had to learn quickly how to use a tile saw and the clippers but picked it up nicely. We started with the window frame and were going to leave the top piece because he thought it needed bracing but after checking online we found we could go ahead and do it. Miracle of miracles it stayed up! We moved down to the walls where the first obstacle was cutting an opening for an outlet. By now hubby has learned a few tricks so the end result is quite nice looking.

Tonight (Aug. 5) we are working on the bridging for the back of the stove and small counter. I doubt we will get to the breakfast island but if we do that would be great. The time frame looks to be by Wednesday night we will have all the tiling finished. The tiles need to sit 24-36 hours before grouting of which I want to do all the grouting at once so we won't be grouting before Friday morning. The grout has a 3 day cure period where you have to mist it for proper curing. Then we can put the grout seal on - 2 coats at 3 hours dry time so by next Tuesday the kitchen will be fully operational!

BTW, the new sink and downdraft system can be seen where the stove opening is. The stove is in the right foreground, fully protected with the cartridges removed. Oh and the grout is white so that will really change the look again.

Braised Ribs

I am determined to put good food on the table despite the renovations. From previous experience (4 houses) renovations create laissez-faire attitude towards meals. Let's face it kitchen renovations are the worst as far as disruption! Either the meals are kept so simple they are boring no cooking required meals or more often that not end up being fast food or take-out. Both really are expensive and cut into the unexpected expenses of remodelling. So I'm relying on a well stocked pantry and freezers because grocery shopping is the last thing I want to do right now as well as those resources I have at hand.

My stove is out of commission until at least next Tuesday but I'm not concerned. I have a gas grill with side burner, slow cooker, rice maker, deep fryer, toaster, microwave oven and countertop roaster so being without a stove shouldn't be a huge problem. I also have a campstove somewhere in the unorganized garage from our move here. We also have room for a fire pit so that could be in place within a day and I do love cooking over an open fire. The dishwasher and fridge are operational but will be disconnected for brief periods of time and I have a large sink in the laundry room. Anyway, I'm digressing.

Monday night's dinner was braised ribs done in the countertop roaster. When they were partially finished I poured on a little Diana's Gourmet Western Steakhouse sauce. Then I added quartered red potatoes. I steamed the broccoli on the grill side burner. It was a nice hearty meal that didn't take much in the way of preparation.