My photo
Ontario, Canada
I am a wife, mother and grandma who enjoys the many aspects of homemaking. A variety of interests and hobbies combined with travel keep me active. They reflect the importance of family, friends, home and good food.
Cook ingredients that you are used to cooking by other techniques, such as fish, chicken, or hamburgers. In other words be comfortable with the ingredients you are using.
--Bobby Flay

For Your Information

Please watch this area for important information like updates, food recalls, polls, contests, coupons, and freebies.
  • [March 19, 2020] - Effective Mar 17, this blog will no longer accept advertising. The reason is very simple. If I like a product, I will promote it without compensation. If I don't like a product, I will have no problem saying so.
  • [March 17, 2020] - A return to blogging! Stay tuned for new tips, resources and all things food related.
  • [February 1, 2016] - An interesting report on why you should always choose organic tea verses non-organic: Toxic Tea (pdf format)
  • Sticky Post - Warning: 4ever Recap reusable canning lids. The reports are growing daily of these lids losing their seal during storage. Some have lost their entire season's worth of canning to these seal failures! [Update: 4ever Recap appears to be out of business.]

Popular Posts

Showing posts with label countertop roaster. Show all posts

Wednesday, January 11, 2012

Hearty Blade Pot Roast with Brussels Sprouts

Pot roasts are the perfect wintertime, no muss, no fuss meal.  They are warm and comforting yet about as easy to make with very little prep work.  The nice thing about pot roast is you can use just about any cut of beef as well as any combination of vegetables desired.  A blade roast is typically used for a pot roast because it is a cheaper cut of meat with a lot of connective tissue that doesn't lend itself well to cooking using dry heat methods.  Not that it can't be done and in fact we like using a small blade roast on the grill.  We are in the process of eating from the freezer to use up the remaining meat before ordering our beef on the hoof shortly.  It's a good thing it is wintertime as I have a few roasts to use up!

heart blade pot roast with brussels sprouts
One way to tenderize tougher cuts of meat is to use an acidic ingredient.  Tomatoes are acidic enough to help tenderize beef.  One of my favourite tomato products for this purpose is tomato stock.  It tenderizes while adding a lovely, subtle flavour.  I decided to add a bit more of a pronounced tomato flavour to this pot roast using whole tomatoes instead.  Then I brought in the warm, comforting flavour of potatoes combined with the sweetness of whole Brussels sprouts. The tomato flavour not only accents the beef but highlights the Brussels sprouts.  The meal was a huge success! 

Hearty Blade Pot Roast with Brussels Sprouts
recipe by: Garden Gnome

3 lb blade roast
1 L home canned tomatoes
500 ml (2 c) water or tomato stock
1 bayleaf
1 medium onion
1 tsp Herbes de Provence
2 tbsp Worcestershire sauce
sea salt/fresh ground pepper
2 small poatoes
2 c Brussels sprouts

Place the roast in countertop roaster or if cooking in the oven, use a covered roasting pan.  Purée the tomatoes in food blender.  Pour the tomatoes over the roast.  Add bayleaf, sliced onion, Herbes de Provence, Worcestershire sauce, stock, salt and pepper.  Set temperature to 275ºF.  Cook for 2 hours.  Wash potatoes then cut into bite sized pieces.  Add to the roaster.  Continue cooking for 40 minutes or until potatoes are tender.  Trim and wash Brussels sprouts.  Pour over potatoes.  Cook until tender but not mushy.  Remove from roaster and serve hot.


Friday, August 13, 2010

Organic Food Doesn't Have to Break the Bank

One of the biggest complaints I hear about organic food is that it is expensive.  From a home gardener perspective I understand why it it more expensive and why it is healthier for you.  Organic foods don't have the synthetic chemical residues from using synthetic pesticides.  That means those residues don't have a chance to become carcinogenic within your body.  Organic foods are by far a healthier food choice that may prevent health issues as well making them a frugal choice.

marketmore cucumber and brandywine tomato
I organically grow as much produce and herbs possible.  My gardens are even expanding as I struggle to fit yet one more fruit or vegetable into them.  The strongest chemicals I use in my garden is white vinegar (weed control) and a homemade soap solution for controlling insects but only if absolutely necessary.  That's it. In addition to using organic practices I also rely fairly heavily on growing heirloom varieties.  That way I know the seed has not been genetically modified (GM0) and will breed true.

Pictured are the marketmore cucumber and my very first brandywine tomato of 2010.  Don't the look yummy?  Both are heirloom varieties.  They are good, well behaved garden performers that demand minimal attention yet reward you with wonderful tasting produce.  Seeds for either variety should be collected and stored for use in the following year's garden.

organic dinner
Accompanying the beautiful organic cucumber and tomato was organic, hormone free Canadian beef (roasted sirloin tip) and organic vegetables.  The potatoes were cooked in with roast while the green beans were from the jar of home canned recently done that had a lid failure so were reheated.  Everything you see on the plate is organic, pesticide and hormone free!  There are no preservatives or artificial anything.  It is just plain old fashioned, home cooked food!  Rather than thickening the gravy that was made using homecanned tomato stock I left is as an au jour.  Tomato stock is something I experimented canning last year that has been a huge success so I will be canning up a couple of cases of it this year!

So you are likely wondering how much this meal actually cost me?  The total cost for everything including the electricity to cook the meal came in at just under $11.  There was enough for 2 servings over 2 meals which works out to $2.75 per serving or in perspective almost half the price of a McDonald's Happy Meal per person and a heck of a lot healthier!  I would hazard a guess there was a lot more food than in the comparison meal as well.  If you start breaking down the cost benefits of using organic produce, meats and fish it quickly becomes apparent that yes some (not all) is a bit more costly but quite a frugal food choice.  Using organic doesn't have to break the bank.


Tuesday, January 27, 2009

Open Face Roast Beef Sandwich

One of the problems with traveling is there is always the possibility of unexpected delays. So it was on our return flight. First the airplane was delayed by about 2 hours. Once at the airport that kind of short delay isn't too bad as you can amuse yourself online or in the bar (tvs turned to sports) or people watch. We finally boarded where the real problems started. A computer glitch knocked out cabin communications so the plane could not leave. After sitting on the plane for another 2 hours we were deplaned then waited for them to replace the computer which didn't go according to plan so we had to wait for another plane. So we arrived at the point where we were to start the driving leg of our journey home just after 5 am and checked into our room we were supposed to get the night before. By lunch time we were on our last leg of our journey. We stopped at a Meijer's to pick up a few groceries since we wouldn't be home until late and the prospect of grocery shopping over the weekend was not all that appealing.

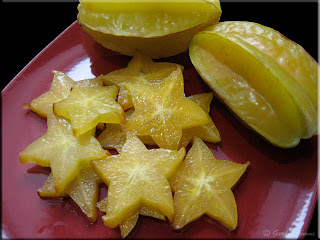
star fruitStar Fruit (Carambola)

I would have loved to have brought home fresh picked Florida oranges but thought this could be a problem at the border since there would be no way of proving origin. So we passed on the oranges. I bought 3 star fruit at Meijer's.

This lovely fruit is difficult to find in our area although it can be found at larger grocery stores. Star fruit has a sweet, tart flavour similar to combining plums, pineapples and lemons. When cut across the ribs, the star fruit forms pretty star shaped slices perfect for garnishing and fruit trays. It can also be eaten as is simply washing without peeling. Star fruit is rich in Vitamin C and free of sodium and cholesterol so this is a good fruit for you although those with chronic renal failure or end-stage renal disease should not eat star fruit.

Open Face Roast Beef Sandwich

We picked up a fresh roast and bread at Meijer's for that night's dinner. I very seldom freeze homemade breads so we had to settle for store bought but that was fine. I cooked it in the counter top roaster with onions and potatoes for a quick, home cooked meal. The snow started the following morning and continued throughout the day.

Sunday's dinner was simple open face roast beef sandwiches. I can remember to the Metropolitan with my Mom on the two trips we made each year to the city. We rode a bus that stopped in our town then another and finally took us to the city. We only had a few hours to shop before we had to be back at the bus stop. Unlike the five and dime in my home town that had really neat smelling, squeaky wood floors and was somewhat dark inside, the Met was huge at least in the eyes of a child. They had a snack bar and soda fountain! We always ate lunch there because my Mom said you could never shop with an empty stomach so the Met was always our first stop. My favourite was their open faced sandwiches either turkey or beef. Oh gosh were they good! I pondered a bit while eating Sunday's dinner then told my husband we should have these more often. Well you didn't hear any complaints from him as he went back for seconds :)

This is a perfect way to use up left-over meat and gravy. Keep a pack or two of meat with gravy in the freezer to warm for a quick meal. You will need a knife and fork to eat these sandwiches. To make an open faced sandwich you will need two slices of bread. Slightly stale bread will work as well since the gravy will soften the bread. Mix the meat with gravy and heat through. Spoon over the bread slices. Serve with a side of coleslaw or tossed salad.


Friday, September 05, 2008

Maple Glazed Pork Roast

Have you ever been looking through your pantry when something catches your eye? It's likely something you haven't had in awhile or and ingredient that would be just perfect for what you were planning on making. I had thawed a small pork shoulder roast for last night's dinner that I was going to do on the grill but it was threatening rain all day so I decided to use the countertop roaster. Glancing around the pantry I spotted maple syrup and ideas for dinner began dancing about in my mind.

French Bread

I make a fair amount of French bread with simple ingredients yet tasty. Usually shaped in elongated loaves, the diameter is determined by what I want to use the loaves for. This is the first bread I've baked in the kitchen since it has been back to being fully functional. Despite the loaves being a bit misshaped the flavour and texture was fine.

My husband had one of the loaves cut literally within seconds of them coming out of the oven. He could barely hold the chunk to spread butter on it. Heavens you would have thought I never bake bread! We went through almost the entire smaller, still hot loaf at dinner.

Maple Glazed Pork Roast

I often pair pork roasts with barbeque or sweet and sour type sauces. These tend to be heavier and thicker textured than a glaze. I decided to make a maple glaze for the pork shoulder roast for a different flavour. Maple syrup goes nicely with pork.

Maple Glazed Pork Roast

2-3 lb pork shoulder roast
⅔ c pure maple syrup
3 tbsp Dijon or honey mustard
2 tbsp cider vinegar
2 tbsp soy sauce

Place the ingredients in a small bowl. Whisk together. Pour over the pork roast. Cook in countertop roaster or roasting pan in oven at 275ºF for 1½ hours. Increase temperature to 350ºF and cook another 15 to 20 minutes, basting glaze over the roast occasionally. Remove from roaster. Allow to rest. Pour glaze over the roast before serving.

Thursday's Dinner

Thursday's dinner was the first real full course meal I had cooked in the kitchen since the renovations were finished. The weather had stayed very hot and muggy so I continued cooking on the grill. Thursday the weather turned cooler with threatening clouds yet remained muggy. I decided to cook indoors instead.

The maple glazed pork roast was served with extra glaze in a dipping bowl. Sides were corn on the cob, brussel sprouts and thick slices of beefsteak tomato (not shown). The corn was brought to a boil in water with about 1 tbsp of butter added. This is a method used at various outdoor food functions and on buffets to keep corn on the cob hot for serving. The brussel sprouts were steamed until just tender and a vivid green.

Maple Baked Apples

Autumn is just around the corner so I'm already thinking of new ways to use the abundant harvest. Paula Red apples are available now until mid-October. This is nice, tart apple that is especially nice for making applesauce as little or no sugar is needed.

I thought I would try baking a couple of Paula Red apples for dessert. Paired with maple syrup and fresh whipped cream it was a lovely taste of autumn.

Maple Baked Apples

½ large, tart cooking apple (eg. Paula Red) per person
pure maple syrup
fresh whipped cream
lemon juice

Wash the apples. Core and cut into wedges. Dip in water with a little lemon juice in. Place in individual baking dishes. Pour a generous amount of maple syrup over the apples. Bake at 350ºF until syrup is bubbly and apples are soft. Remove from oven. Place each baking dish on heat proof covet for serving. Just before serving top with fresh whipped cream. [The cream will begin to melt with the heat of the apples.]

Fresh Whipped Cream

1 c heavy whipping cream (35% MF)
1½ tsp vanilla sugar
½ tsp pure vanilla

Pour the whipping cream into a mixing bowl. Using the whisk attachment whisk until cream forms soft peaks. Do not over whisk or the cream will separate. Whisk in the sugar then stir in the vanilla. Refrigerate until ready to use.


Sunday, August 10, 2008

Ribs Using Dry Rub

Kitchen Update: We are slightly behind our estimated completion of the kitchen tiling for this coming Tuesday. The tiling itself will be completed and grouted but the grout has to cure for three days before we can re-connect the stove and hook-up the sink.

I decided to do ribs on the gas grill Thursday. Ribs can be barbequed using a dry rub or sauce (wet) or a combination of rub and sauce. My preferred method is with sauce. The important thing with ribs is they should be cooked long and slow (low temperature). This keeps the meat tender and juicy. The second thing to remember is too not add the sauce too soon. Most sauces contain sugar that will burn if the heat is too high. Add the sauce about a half hour before the ribs are finished. This allows the sauce to caramelize without burning.

Rib Rub

Rubs are easy to make using herbs and spices. You can tweak and be creative combining your own or use a tried and true recipe. Pre-mixed, commercially prepared dry rubs but by far the best pre-mixed rubs you will find are available from the ribbers at ribfests. Be sure to read the label as some dry rubs contain sugar. I used Blazin BBQ Rib Rub bought from the Blazin BBQ ribbers at the Burlington Rotary Ribfest (2007). Ingredients in the rub are salt, white sugar, paprika, black pepper, lemon pepper, garlic, brown sugar, ginger and parsley. Note that this rub has sugar in it so temperature must be low.

Method: Place the rack of ribs on a sided baking sheet. Pour a generous amount of rub onto the ribs then rub in. Turn the ribs and repeat. Cover and place in the refrigerator for 4 to 8 hours. Heat the grill on low. If cooking on wood or charcoal, it will take 35 to 45 minutes to reach the proper grilling temperature. You should be able to hold your hand palm side down at cooking height over the coals for 5 seconds for low heat*. Add wood or charcoal and spread coals as needed to maintain the temperature. Place the ribs on the grill. Allow to cook until browning then turn and allow to continue cooking. Grilling time should be about 4 hours. A half hour before the ribs are finished top with a wet sauce or glazing sauce if desired.

* 4 seconds - medium, 3 seconds - medium high, 2 seconds - high

The Storm

The ultimate factor in outdoor grilling is the weather. From experience you need to have an alternative plan just in case. Such was the case Thursday as you can see from the wall of rain heading across the water. It took less than a minute from taking this picture when it hit. We have had a series of vicious storms going through the area but Thursday morning the skies gave no hint of storms. The ribs were ready to go on the grill but another storm blew in. It came in with a real furry complete with pelting rain, half inch hail stones and high winds. I thought it would blow over but it didn't. As Zeus and Thor fought out their battle once again I went onto plan B, thankful that the electricity was holding.

Cooking in Countertop Roaster

Since my stove is not hooked up I decided to do the ribs in the countertop roaster set at 200ºF. This appliance cooks a bit faster than either an oven or grill but the results can be just as good. I put ½ c of water on the bottom to prevent sticking. I let the ribs cook for 2½ then added about ½ cup of Diana's Gourmet Sauce (Western Smokehouse) on top of the ribs to add a bit of smokey flavour. Then I added red skin potatoes and continued cooking on low until the potatoes were cooked through. Red potatoes work nicely for this application because they stay firm enough to hold their shape well. Although this was a practical way for me to cook the potatoes the end result was delightful with the potatoes picking up just a hint of the herbs, spices and sauce.

Rib Dinner

The meaty ribs came out tender and juicy with just a little sauce. The rub added a nice nip bordering on spicy so the paprika was hot not sweet. The rub was just a bit saltier than I would have liked so I'm going to be working with the ingredient list to come up with a rub that is not quite so salty and a bit less heat as my husband doesn't like spicy foods with too much bite. The flavour was quite tasty with just a hint of smokiness from the sauce. The same effect could be achieved by adding a drop or two of liquid smoke to the water added to the roaster.

As any cook does when cooking, I had to taste. The reason for this is tasting along the way ensures you don't end up with an unbalanced food that is too salty, sweet, sour or spicy. This is very important when the food will be consumed by those who don't like a lot of heat in their food. Realizing the heat of the ribs was just borderline for my husband, I made a creamy cucumber salad to help tone down the heat. The key to this salad is the yogurt.

Creamy Cucumber Salad

1 whole cucumber
1 c plain yogurt
1 tsp Windermere garlic & onion herb mix

Peel the cucumber and slice. Place in small mixing bowl. Mix the herb mix into the yogurt. Pour over the cucumber slices. Mix well. Refrigerate 1 hour before serving.


Friday, March 14, 2008

Using Left overs & Roasted Pork Chops

Using left overs so they don't taste like left overs can be a challenge however, with today's rising food prices it is more important than ever. For me it is not so much of a price thing but more of a "I can't stand wasting food" thing. That's not such a bad thing with words like recession and famine being tossed around in the media. The reality is both of these could easily be a possibility meaning everyone should be very conscious of wasting food at any level. Ok so I'm off my soap box. One reason aside of being frugal for using left overs it results in a low preparation meal that can be on the table with little effort. The trick is to make a left over dish that differs from the original meal. Some of my favourite ways to use up left over are soups, stews and casseroles but frittatas, omelettes and quiche also come into play. My rule of thumb is to always cook extra. Always keep in mind what you can use the left overs for as well as adding to your freezer quick starts.

Roast Beef Casserole

As promised here is the casserole made from our roast beef dinner. I had a little roast beef, gravy, corn and garlic mashed potatoes left over. I added fresh sauteed mushrooms, steamed spinach and home canned corn. This type of casserole appears on the table anytime I have left over mashed potatoes and meat. The basic idea is to use the starch (mashed potatoes), meat and gravy along with any left over vegetables and make a casserole. At the same time introducing one or more ingredients makes the meal different from the original. Here I combined left overs with new ingredients to make a filling casserole. Serve with a salad and home baked bread.

Basic Method: Cut meat into bite size pieces. Mix with any left over gravy. Place into a casserole dish forming one layer. Layer vegetables on top then finish with the starch layer. Bake at 350ºF until the casserole is warmed through.

Roasted Pork Chops

A half or whole pig custom cut is always a good deal. If you have read this blog you will know that is the way we buy the majority of our pork. Pork chops are always cut 1-inch thick. The reason for this is the way we cook pork chops and that tends to be one of four ways: breaded, roasted, grilled or in mushroom sauce. Thick pork chops are a must for these applications. I roasted thick pork chops in the countertop roaster then served with steamed broccoli and roasted potatoes topped with home canned chili sauce, recipe here.

Method: Place 4 - 1 inch thick pork chops in the roaster. Add 1 ½ c water. Chop 1 small onion and sprinkle over the pork chops. Tuck in bay leaf. Splash liberally (about 2 tbsp) with Worcestershire sauce. Sprinkle on about 2 tbsp Herbs de Provence. Cover and roast at 250ºF until pork chops are cooked through. Add whole, unpeeled potatoes. Continue cooking fro about 20 minutes. Stir in quartered fresh mushrooms. Continue cooking at 250ºF for 15 minutes. Increase the temperature to 350ºF for about 15 minutes. Remove pork chops and potatoes from roaster. Stir in a slurry consisting of corn starch, water, salt, pepper and 1/4 tsp browning (optional).

Pork Chop Casserole

This left over casserole was put together in layers much like the roast beef casserole except I used 1½ pork chop from the night before and the gravy. Originally I was going to add the left over potatoes but since I wanted to use pasta decided against that. I poured the solid contents of a 500 ml jar of home canned beans and the same in home canned niblet corn over the pork chop in gravy. Then I topped with cooked elbow macarroni. I mixed one tin of condensed mushroom soup mixed with one half tin of milk then poured that over the noodles and topped with ¼ shredded cheddar cheese and ½ shredded provolone cheese. I baked the casserole tented with tin foil at 350ºF until hot through then removed the tin foil and allow the cheese to brown. Served with a simple baby greens salad topped with lemon juice it was a nice way to use up left overs.

Enjoy!

Garden Gnome
©2007