When frost is threatening your tomatoes, what do you do with all those green tomatoes? Most people will pick the tomatoes and set them in windowsills to ripen giving them a steady supply of red tomatoes into early winter. But there are other things you can do with green tomatoes. You don't even have to wait until frost threatens. Salsa Verde can be made anytime you have green tomatoes.
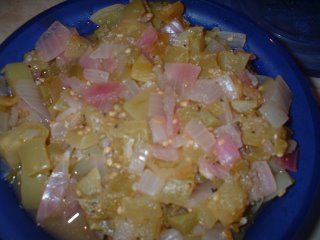
Salsa Verde
Salsa Verde is a wonderful way to use up a few green tomatoes. You will need about 14 medium green tomatoes. You can use either unripe green tomatoes or a variety that is green when ripe. If using unripe tomatoes use when the green colour is pale. Green tomatoes contain solanine which can be toxic in large amounts. Dark green tomatoes contain higher levels of solanine so ripen in a brown paper bag until the intense green pales.
Salsa Verde is a nice change from red tomato salsa. It has a unique flavour that goes well with nacho chips as a dip. It can also be used as a topping on crackers or french bread rounds. Spread cream cheese on the crackers or rounds then top with a bit of salsa verde. Salsa Verde can also be used as a condiment on hamburgers or as a meat accompaniment. However you like it, salsa verde is great to have on hand.
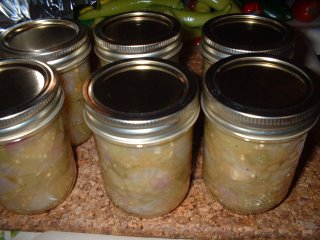
Salsa Verde in Jars
This sauce is pretty in the jars! Any leftovers can be used within a day or two. I think it tastes best when allowed to age at least a month. The flavours meld nicely for a flavourful sauce sure to please.
SALSA VERDE
by: Bernardin, Tomatoes Canning & Speciality Recipes, 2000. Pp. 37
7 cups (1750 ml) chopped green tomatoes, about 3.5 lb (1.6 kg), 14 medium
5-10 jalapeno or scotch bonnet peppers, finely chopped
2 cups (500 mI) finely chopped red onion, about 1 large
1/2 cup (125 mI) lime juice
2 cloves garlic, minced 1/2 cup (125 mI) chopped cilantro
2 tsp (10 mI) cumin
1 tsp (5 mI) oregano 1 tsp (5 mI) Each: salt and black pepper
Place 6 clean 250 ml mason jars in a boiling water canner; fill with water, bring to a rolling boil. Boil SNAP lids 5 minutes - not longer - to soften sealing compound. Keep jars and SNAP Lids in hot water until ready to use. Wash, core, seed and coarsely chop tomatoes; drain off excess liquid. Measure 7 cups (1750 ml). In a large stainless steel saucepan, combine prepared tomatoes, peppers, onion, lime juice and garlic. Bring to a boil. Stir in cilantro, cumin, oregano, salt and black pepper; simmer 5 minutes. Remove from heat. Ladle salsa into a hot jar to within 1/2 inch (1 cm) of the rim (headspace). Using nonmetallic utensil, remove air bubbles. Wipe jar rim removing any stickiness. Center SNAP Lid on jar; apply screw band securely until fingertip tight. Do not overtighten. Place jar in canner. Repeat for remaining salsa. Cover canner; return water to a boil. At altitudes up to 1,000 ft (305 m), process - boil filled jars - 20 minutes. (See page 5, ALTITUDES). Remove jars without tilting. cool upright, undisturbed 24 hours; DO NOT RETIGHTEN screw bands. After cooling check jar seals. Sealed lids curve downward. Remove screw bands; wipe and dry bands and jars. Store screw bands separately or replace loosely on jars, as desired. Label and store in a cool, dark place.
~ Makes about 6-250 ml jars.
My Notes: I replace the screw bands. Let the sauce age for at least one month for the best flavour.
Welcome to our kitchen that truly is the heart of our home! One of life's greatest pleasures is enjoying good food with family and friends. Here you will find recipes, tips for frugal cooking, how-tos for food preservation especially canning and anything else food related. Tea is brewing and warm cookies are fresh from the oven. Please sit a spell and enjoy your stay.
- Garden Gnome
- Ontario, Canada
- I am a wife, mother and grandma who enjoys the many aspects of homemaking. A variety of interests and hobbies combined with travel keep me active. They reflect the importance of family, friends, home and good food.
--Bobby Flay
For Your Information
- [March 19, 2020] - Effective Mar 17, this blog will no longer accept advertising. The reason is very simple. If I like a product, I will promote it without compensation. If I don't like a product, I will have no problem saying so.
- [March 17, 2020] - A return to blogging! Stay tuned for new tips, resources and all things food related.
- [February 1, 2016] - An interesting report on why you should always choose organic tea verses non-organic: Toxic Tea (pdf format)
- Sticky Post - Warning: 4ever Recap reusable canning lids. The reports are growing daily of these lids losing their seal during storage. Some have lost their entire season's worth of canning to these seal failures! [Update: 4ever Recap appears to be out of business.]
Popular Posts
-
Food manufactures have so convinced us that home cooking is not possible without a ready-made mix that many of us actually believe that myth...
-
I am very much a scratch cooking most of the time. One thing that has always been a concern is coming across a recipe I want to try that ca...
-
I got my first job at A&W and only worked there the summer but that is where I met the love of my life. This sauce was made on site by...
Tuesday, August 29, 2006
Salsa Verde
Tuesday, August 22, 2006
Tomato Zucchini Experiment
Yesterday, I decided to do a mini barbeque session consisting of foiled roast, chicken breasts, campstyle potatoes, and a new tomato creation.
The USDA website has information on canning tomatoes and zucchini together but I want to take this a step further. I'm aiming for a smooth sauce that will be pressure canned. Essentially it is the same combination as the USDA recomendation but with seasons added and ingredients pureed to a smooth sauce.
Tomato Zucchini Experiment
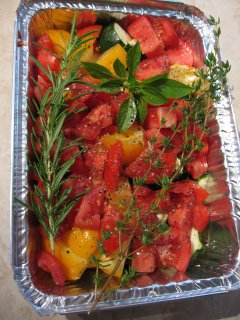
The first step is getting the right flavour. For this experiment, I mixed chopped Lemon Boy and Ultra Sweet tomatoes with zucchini pieces in a 4:1 ratio. The ratio is only important if the sauce will be canned so that's why I used that ratio. Then I drizzled on a little olive oil and added a sprig of thyme, sprig of rosemary and small piece of basil. My intentions when turning this into a smooth sauce is to get the flavour of the herbs without leaving them in the sauce. I finished with a sprinkling of fresh ground pepper, sea salt and a couple of pats of butter. The mixture was roasted on the barbeque until the vegetables were tender. At that point I was going to remove the herb sprigs and puree the vegetables but my husband smelled the dish and decided that would go perfect over a chicken breast for a snack, as he put it. So I didn't get as far as the puree stage. According to him the mixture tasted great so it will be something I make again to help use up the copious amounts of zucchini and tomatoes from the garden.
Despite the best intentions of coming up with a smooth sauce yesterday, plans were foiled yet we discovered another way to use zucchini. I'm still mulling the smooth sauce idea. The butter would need to be left out for canning. Lemon juice would be added to each jar as they were filled. A very small amount of oil on the bottom of the pan to get the vegetable roasting would be ok depending on the amount of vegetables. I do my roasted tomato sauce this way for canning. The purpose for roasting instead of cooking on the stovetop is roasting imparts a rich, deep almost smokey flavour that you can't get on the stovetop. As far as the flavour combination, I think for the next experiment I will add in a few onion pieces to the vegetable mixture.
Monday, August 21, 2006
Herbed Tomato Bread (ABM)
I'm picking tomatoes daily from the garden. This bread is a lovely way to use up a few cherry tomatoes.
Herbed Tomato Bread
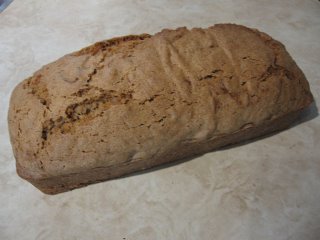
I adapted this recipe from a basic white bread recipe that came with my breadmachine. The first time I made the basic recipe, I felt there was something missing. So I started tweaking the recipe to come up with a rich, moist basic white bread that is good as is but I often modify it further. This recipe is one such modification. While the bread can be baked in the breadmachine, I prefer to bake it and most breads in the oven. The inside of this loaf is a pale pinky orange flecked with greens and reds. Use it for sandwiches or serve with a meal. This bread will likely freeze well but it never lasts long enough here!
Herbed Tomato Bread
by: Garden Gnome
1 1/8 cups milk (or 1 1/8 c water plus 1 tbsp skim milk powder)
1 egg
5-6 cherry tomatoes, left whole
2 tbsp butter*
2 tbsp honey
1 1/2 tsp salt
3 1/4 cups white flour**
1 tsp Italian seasoning or chopped fresh herbs
1 1/2 tsp instant yeast
Measure ingredients into breadmaker baking pan in the order specified by the manufacturer of your breadmachine. The above list is in the order for my breadmachine made by Black & Decker. The tomatoes may be added at the start or when the add signal. I add mine at the start. Select dough setting. When dough is finished remove from baking pan to a floured board. The dough will be slightly sticky. Knead in enough flour to just remove the stickiness. Place the dough in a prepared loaf pan. Cover with a damp towel and let sit in a warm area until doubled. Remove towel. Bake at 400 F for 20 minutes (375 F convection). Lower temperature to 350 F (325 F convection), bake until golden brown and loaf sounds distictly hollow when tapped on bottom. Remove from pan. Cool on wire rack.
Makes one large loaf.
Further Notes:
* you can use shortening but I prefer butter as it adds flavour
** adjust the amount of flour up as needed so the loaf is not too sticky
Enjoy!
Thursday, August 17, 2006
Zucchini Loaf
What do you do when zucchini are in season? Aside of drying, freezing, and grilling zucchini one of my favourite ways to use garden fresh zucchini is in zucchini loaf.
Zucchini Loaf
Zucchini loaf is easy to make and always pleases. Serve piping hot with a little butter for a true taste sensation. We also enjoy this bread with spreadable cream cheese. This is one of my favourite zucchini loaf recipes. It freezes well! I recommend vacuum sealing if possible when freezing. I bake the loaf in a silicone loaf pan on convection heat set to 325°F.
ZUCCHINI LOAF
A large, tender loaf.
2 Eggs
1/2 c Cooking oil
1 c Granulated sugar
1 c Grated zucchini, unpeeled
1 tsp Vanilla
2 cAll purpose flour
1 tsp Baking powder
1tsp Baking soda
1/2 tsp Salt
1 tsp Cinnamon
Beat eggs until frothy. Beat in oil and sugar. Add zucchini. Stir in vanilla. In separate bowl put remaining five dry ingredients. Stir well and pour i.nto zucchini mixture. Stir to moisten. Pour into greased loaf pan 9 x 5 x 3 inch (23 x 12 x 7 cm). Bake for 50-60 minutes in 350°F (180°C) oven until a toothpick inserted in the center comes out clean. Let stand 10 minutes. Remove from pan. Cool on rack. Wrap. Yield: 1 loaf.
Source: Jean Pare, Company's Coming, Muffins & More, 1983. Pp. 76-77
Wednesday, August 09, 2006
Freezing Corn
Yesterday I started freezing corn. We prefer frozen corn over canned corn so the majority of corn processed is frozen. I plan to freeze ten dozen ears and can two dozen along with one batch of corn relish this year.
Corn
I don't grow corn as it takes up a lot of room but I am seriously considering growing it next year. It is very difficult to find old fashioned yellow sweet corn here. What I wouldn't give to have a few dozen ears of Libbey corn! It had nice big, deep yellow kernels that were a treat to process. Everyone seems to be growing a variety of Peaches & Cream corn so that's what I have to settle for. While peaches & cream cultivars are a nice eating from the cob corn, I don't feel it freezes as well.
The weather has been abnormally hot so the corn is a bit smaller and still hasn't come down in price. I decided to start with two dozen ears in the hopes of an upcoming price decrease. The farmer added a few extra ears to compensate for the size. I usually buy from him so he always gives me extra.
Husked
Much of the work for freezing corn is husking. It isn't difficult and not nearly as messy as preparing some fruits or vegetables. I don't compost all the husks as the amount would over burden the compost bin and pile.
Sometimes there is a little damage on the end of an ear, undeveloped kernels, or critters like the corn borer. These are removed along with any surrounding damage. This batch was surprisingly free of most of the previously mentioned. I found one corn borer. They are rather easy to spot as there is a perfectly round hole in the side of the ear through the husks. When the husk is removed there is the little critter to be pulled out.
Blanched
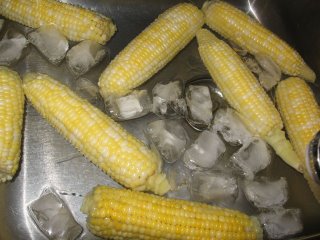
Blanching is necessary for any vegetable that will be stored frozen for more than four weeks with the exception of onions, peppers, and herbs. According to the Ball Blue Book "blanching cleanses the surface of dirt and organisms, brightens the colour, helps retain vitamins and reduces the action of enzymes which can destroy the fresh flavour after about four weeks". (Ball Blue Book, Vol. 1, 2000. Pp. 95). Blanching simply means to place the vegetables in boiling water for certain amount of time then cool as quickly as possible to stop the cooking process. I blanched the corn on the cob in small batches for eight minutes. Each batch was quickly cooled in the sink with cold water and ice cubes. Once the corn was cooled, it was time to cut the corn from the cob.
Cut From Cob
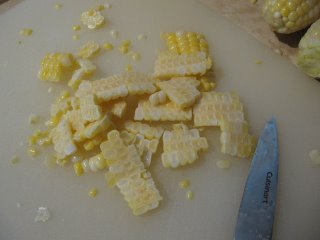
Freezer space is always at a premium even though I have two chest freezers. I seldom freeze corn on the cob for that very reason. To cut the corn from the cob, I stand the cob on end the cut from top to bottom using a sharp paring knife. It is important that the knife is sharp! A dull knife is sure to slip in this application increasing the chances of being injured. A good knife sharpener that sharpens and hones along with a steel are worth their weight in gold in the kitchen.
Niblets
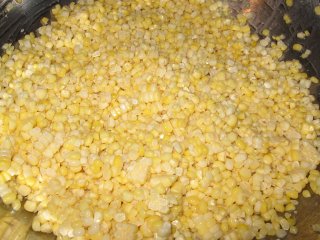
The niblets go into a huge stainless steal bowl. This bowl is about sixteen inches in diameter and about six inches deep. It is my favourite bowl for processing larger batches of fruits or vegetables. Once all the niblets are in the bowl, I separate them using my hands and a swishing motion. I like vacuum sealing the niblets but zip loc bags can be used as well.
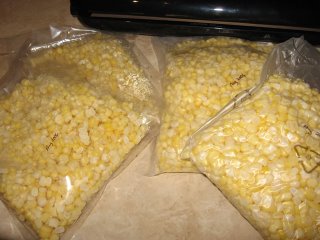
Vacuum Sealed Corn Niblets
I prefer using bags for corn verses containers. They can be stacked saving valuable freezer space. I used two types of bags to vacuum seal the corn using my Rival Seal-A-Meal. On the left, about 1 1/2 c of corn along with a pat of butter was packed into Seal-A-Meal cooking pouches (50068). I bought these pouches through Rival in 1999 and am not sure if they are still available. They are quite convenient for travelling and camping. On the right, the corn was packed into custom made bags then vacuum sealed. These bags each contain about 2 1/2 cups of corn. The bags were placed in the freezer to freeze flat.
Monday, August 07, 2006
Cherry Tomato Powder
The problem with vegetable gardens is quite often you get a lot of one kind of vegetable at one time so preserving what can't be consumed within a reasonable period becomes a concern. Most of my preserving is either canning or freezing. Drying is another method I use but not to a large extent.
Tomatoes can be dried whole for cherry types, slices, or as puree. Dried tomatoes can then be powdered and used to boost the flavour of soups, stews and breads. This is an ideal way to preserve the taste of summer without the work of canning.
Cherry Tomatoes
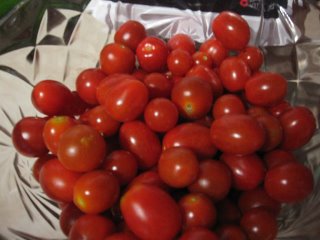
I'm growing two cherry tomato cultivars this year: Tiny Tim and Grape Cluster. Tiny Tim tomatoes are small, round cherry tomatoes while Grape Cluster have the elongated shape of grapes. Both are nice cherry tomatoes with good flavour. Cherry tomatoes can easily overwhelm since a lot come at once. One way to use excess cherry tomatoes is drying. They can be sliced in half and dried or they can be pureed then dried. Cherry tomatoes are perfect for tomato powder because they don't need to be peeled and the seeds are tiny.
Puree
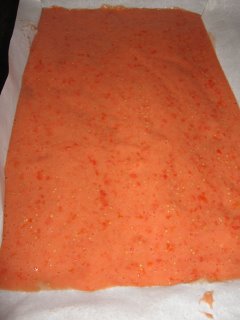
I pureed the cherry tomatoes in the blender. Of all my appliances, the blender is likely the least used so it is time to earn its keep. I used the chop setting first followed by puree. The puree had a wonderful fresh tomato smell! It was poured onto a parchment lined cookie sheet they spred evenly. A silicone baking sheet would worked as well but for this application, I prefer parchment paper. I did a light tap and shake of the pan before placing it into the oven. This just helped to settled the puree evenly.
Dried Tomato Puree
My dehydrator gave up the ghost so I'm now dehydrating in my Jenn Air oven. It has a dehydrating setting. In order to use this setting I have to press "drying" then "convect bake". While I was leary of using the oven at first, I now actually prefer it as I can dry at different temperatures. Foods dry a lot faster using this set up than they did with my old dehydrator. The tomato puree was dried on a parchment lined cookie sheet at 145 degrees farenheit until brittle. The result was a deep, rich reddish sheet of flavourful dried tomatoes.
Tomato Powder
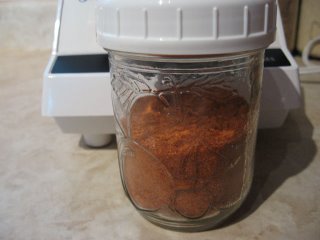
I broke the dried tomato puree into pieces then ground it to a fine powder using the blender. The final result was about 125 ml of very rich, aromatic, flavourful tomato powder. I'll use this powder to enhance soups, stews, breads, gravies, chilies and other ground beef dishes.
Friday, August 04, 2006
Taco Hot Sauce
We use a lot of taco hot sauce. I like making my own because I control the ingredients, heat level and texture. This taco hot sauce is made with tomato paste so if you use commercial tomato paste it can be made anytime of the year. I think it has a nicer flavour if you use homemade tomato paste. This is fairly easy to do. Simply make a batch of tomato paste then measure out 3 cups for the hot sauce recipe. Jar or freeze the remainder of the tomato paste. If canning the remainder of the tomato paste, it must be done separately from the hot sauce as the processing time is longer than that of the sauce. I process the remaining tomato paste first while it is still hot, then I make the sauce and process it.
Taco Hot Sauce
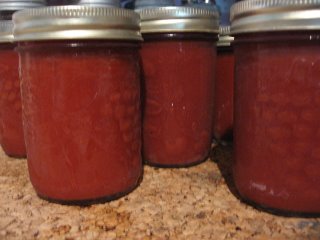
Seven 250 ml jars of taco hot sauce fresh from the canner. I still get a thrill seeing jars of food cooling. Like most canners, I listen for the ping of each lid, an indication that the jar has sealed. Even my husband listens for the ping!
This is a very easy sauce to make! There is little prep other than measuring your ingredients.
Taco Sauce
by: Ball Blue Book Volume 1, Altrista Corporation, Muncie, Indiana. Pp. 81
3 cups tomato paste
5 cups water
1 cup cider vinegar
1/2 cup corn syrup
2 tbsp chili powder
1 tbsp salt
1 tsp cayenne pepper
1/2 tsp hot pepper sauce
Combine all ingedients in a large saucepot. Bring to a boil. Reduce heat and simmer about 1 hour or until thick. As mixture thickens, stir frequently to prevent sticking. Ladle hot sauce into hot jars, leaving 1/4-inch headspace. Adjust two-piece caps. Process 30 minutes in a boiling water canner.
Yield: about 6 half pints
My notes: If using commercial tomato paste use 100% natural with no salt or preservatives added. The sauce can be made hotter by increasing the chili poder, cayenne pepper and hot pepper sauce slightly. I have found the yield to consistently be seven 250 ml (half pint) jars.
Thursday, August 03, 2006
Summer Meal - Taco Salad
Coming up with a new meal that everyone in the family loves is difficult. This meal quickly became a family favourite! I can't even remember where I discovered this meal but it was likely when tacos were becoming popular here. It is a perfect way for me to use my home canned salsa and taco hot sauce as well as the taco meat I keep on hand in the freezer. In the summer it is also a perfect way for me to use garden fresh lettuce and tomatoes. I've experimented with the lettuce as well and have found that Chinese mustard leaves add a nice flavour so you don't need to limit the dish to using only lettuce. It is a perfect quick or summer meal as the meat only needs to be warmed in the microwave. The best thing is the dish is so flexible and doesn't heat up your kitchen in the summer!
Taco Salad
A sure to please, flexible, quick meal. It really is a taco without the shell, sort of. Keep prepared ingredients on hand for a real time saving meal! Be warned, the meal is very filling and eyes can be bigger than tummies sometimes. If you use zip loc containers, any left overs can be refrigerated for lunch the next day so clean-up is rather easy. Kids love it because they can choose their own toppings.
Taco Salad
by: Garden Gnome
note: ingredients are listed without measurements because this is a "make it as you please dish" and depending on family size amounts will vary. The fat content can be reduced using lean ground beef, low fat sour cream and low fat cheddar cheese.
prepared taco meat*
shredded leaf lettuce or lettuce of your choice
salsa, hot or mild (homemade)
chopped tomatoes
chopped spanish onions
chopped green peppers
olives, pitted black or green or stuffed
jalapeno rings
taco hot sauce**
sour cream
shredded cheddar cheese
nacho chips or tortillas
Prepare vegetables. Place each ingredient in a separate serving dish and put on the table. Warm meat and place in serving dish. From there it is build your own. My preference is: meat, salsa, lettuce, vegetables, hot sauce, sour cream and cheddar cheese in that order but really any order is good. When it comes to eating everyone finds their own preferrance. I like to eat as is with a fork. My husband rolls his in a tortilla, wrap style. My kids like scooping their creation up with nacho chips.
*Prepared taco meat: Brown lean ground beef and drain. Stir in taco seasoning. I prefer Tone's or homemade but any brand of taco seasoning will work. Pour in enough water to cover. Mix well. Allow to simmer until liquid absorbed. The meat will be saucy but not runny. Allow to cool if not using immediately. If freezing, divide into meal sized portions. Vacuum seal then freeze or use zip loc bags if you want to use for quick snacks. This prepared meat is ideal for quesedillas, tacos or tacao salad.
**Taco Hot Sauce: I am making a batch of Taco Hot Sauce this afternoon. I'll post pictures and the recipe shortly.
Enjoy!
Tuesday, August 01, 2006
Monday's Processing
Despite the abnormally high temperatures, extreme humidity and torrential thunderstorms, my gardens are thriving and blessing us with an abundance of produce. Yesterday, I decided to freeze zucchini and can beans despite the heat. The garden is producing fast enough that I don't want any produce to go to waste.
Zucchini
I have five zucchini plants growing this year. They will likely just keep up with our family's needs for the following year. Some of course goes to friends and neighbours but a lot is preserved in one form or another. I've always thought zucchini gets a bad rap. I've never understood why as it is such a versatile vegetable. We eat a lot of fresh zucchini when it is in season and I preserve what I can to get us through to the next growing season.
Zucchini Chunks
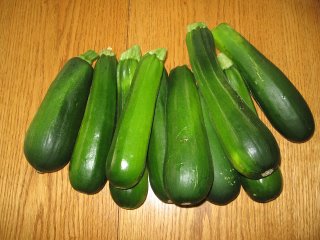
Three zucchini were quarter then cut into chunks and placed into three bowls. The chunks were blanched 2 minutes then cooled in ice water and drained. Blanching is necessary to stop enzyme action in the vegetables. Once drained the chunks were vacuum sealed using a Rival Seal-a-Meal. Vacuum sealing ensures a nice freezer burn free product. I like to vacuum seal in meal sized pouches for later use.
Shredded Zucchini
Shredded zucchini is one of our freezer staples. I use it in quick breads, yeast breads, muffins, meatloaf, and casseroles. A food processor makes quick work of shredding. The shredded zucchini is then steam blanched for 2 minutes and cooled in ice water. I vacuum sealed the shredded zucchini in one cup measurements. This is a convenient size for most recipes. This mini-session yielded eight one cup packages so I will have to do a few more sessions.
I'm going to be trying a few new things with zucchini this year. Zucchini can be dried then ground to a powder to use in soups and stews as a flavour enhancer and thickener. As soon as the heat breaks, I'm going make up some zucchini powder. I plan on drying it in chip form then processing in the food processor. I also want to try canning tomatoes and zucchini together likely as a semi chunky tomato sauce perhaps with mushrooms and onions as well. This of course would be pressure canned.
Beans
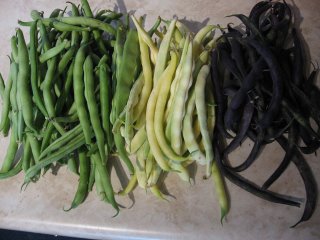
The bush beans have been producing nicely with the pole beans just starting. I tried a couple of new varieties. The yellow wax beans are tasty but not very proliferic. The royal burgundy bush beans are more of a novelty. They turn green when cooked, sort of a built in timer. The slenderetts are a nice looking and tasting green bush bean. They are a good freezer variety. I froze a about four quarts. These were good producers for me this year so I really wanted to know how well they would can.
Canned Beans
I did up three jars of slendettes and one jar of yellow wax beans. It really wasn't enough to run the canner as I prefer processing at least a half canner load full. The slenderettes were ready now and now signs of a lot more coming so I decided to go ahead and can then. These are a smaller bean than Kentucky Wonders, my favourite for canning. So the jars are just a little lighter but at least they will give me a comparison. Kentucky Wonders are pole beans. They are about eight inches long and ideal for canning! I should have enough pole beans for another canning session by the weekend.
Tomatoes
Tomatoes are making a great start! The picture is of Sunday and Monday's tomato harvest. I picked almost that much again today along with the first better sized beefsteak tomato. We've already had BLTs! My husband is trilled beyond belief. Now if I can just keep him out of the tomato beds. I made an entry on my gardening blog about tomatoes and the amount I've been picking. I think I have enough for Savoury Yellow Tomato Spread. This is a dipping sauce for chicken fingers or spreading on barbequed fish. Many of the near future entries will focus on how I preserve and use produce from the garden.