Quite often I work with hampers of produce when home canning. A hamper is 5/8 of a bushel so eight hampers is the equivalent of 5 bushels. My comfort level tends to be 1 to 3 hampers depending on the produce and the complexity of the products being made. This is the amount of that produce I can comfortably process within usually a day but sometimes it spreads into the following morning. I have four of the cheery yellow hampers, courtesy of a relative who is a commercial grower. The vast majority of the hampers of produce I process are not purchased produce. When I buying produce, I take a couple of hampers with me as many vendors are reluctant to part with their own hampers and rightly so as they are expensive. Vendors will transfer the produce into plastic bags or cardboard boxes but I'd rather use my own hampers. Plastic bags can cause produce to sweat and over heat on the journey home and wet produce causes the bottom of cardboard boxes to give way spilling produce everywhere.
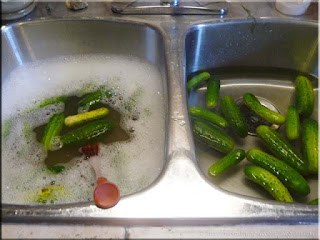
Some produce purchased from roadside stands is not nice and clean like that found in the grocery stores. As you can see, the pickling cucumbers were rather dirty.
Washing the cucumbers is not difficult, just time consuming. It is important to use a vegetable brush when washing them to get dirt out of the crevices. I use the two sink method. I put cold soapy water in one sink then add the cucumbers to be washed in small batches. When washing cucumbers always use cold water to keep them crisp. Once the cucumbers are washed, I rinse under the faucet then transfer to a sink of cold water with a little vinegar in it to soak for 10 minutes. The vinegar removes any residue and surface bacteria. After the rinse, I transfer the cucumbers to a large stainless steel bowl for processing. Of note, the water in both sinks is changed after washing a batch of the cucumbers.
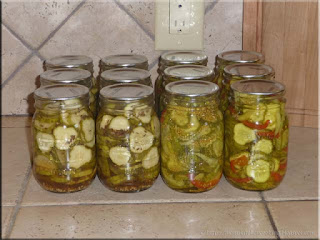
I used 8 lb of the pickling cucumbers to make dill slices and Best Bread-and Butter Pickles. Although a food processor can make quick work of slicing cucumbers, I found I had better results slicing the cucumbers by hand. I had a yield of 6 - 500 ml jars for each kind of pickles. Both pickles looked gorgeous in the jars. The recipes are written as I modified them.
Dill Slices
modified from: Bernardin Ltd., Bernardin Home Guide to Preserving, 2006, Pp.73
4 lb medium pickling cucumbers
4 c pure apple cider vinegar
4 c water
¾ c granulated organic sugar
½ c pickling salt
3 tbsp pickling spice
6 bay leaves
6 garlic cloves
3 tsp mustard seed
6 tsp dried dill seed
1/8 tsp Pickle Crisp (calcium chloride) per jar
Cut a thin slice from each end of the cucumber and discard. Slice into ¼ - inch slices. Set aside. Tie pickling spices into a cheese cloth bag. Combine vinegar, water, sugar and salt in large stainless steel saucepan. Add the spice bag to the vinegar mixture. Bring to a boil and simmer 15 minutes. Remove from heat. Packing one jar at a time: put a bay leaf, 1 garlic clove, ½ tsp mustard seed and 1 tsp of dried dill seed into hot jar. Pack cucumber slices into jar leaving ¾ inch headspace. Add 1/8 tsp Pickle Crisp. Cover vegetables with hot brine leaving ½ inch headspace. Wipe rim. Adjust two piece metal snap lids (or Tattler reusable lids or glass inserts). Screw bands on jars (adjust accordingly if not using metal snap lids). Process for 10 minutes in BWB canner at altitudes up to 1,000 feet above sea level. At higher altitudes refer to altitude adjustment chart on Canning FYI page. Remove from canner. Adjust bands if using Tattler or glass inserts. Allow to cool 24 hours. Remove bands and test for seal. Wash and dry bands and jars. Label and store.
Best Bread-And-Butter Pickles
modified from: Ellie Topp and Margaret Howard, Small-Batch Preserving, 2001, Pp. 143.
4 lb small pickling cucumbers
2 medium onions, thinly sliced
1 sweet green pepper, cut in thin strips
1 sweet red pepper, cut in thin strips
2 tbsp pickling salt
4 c white vinegar
3 c granulated organic sugar
2 tbsp mustard seeds
1 tsp celery seeds
½ tsp turmeric
½ tsp ground cloves
Cut a thin slice from the ends of each cucumber and discard. Slice into ¼ - inch slices. Slice the onions and peppers. Place cucumbers, onions and peppers in a stainless steel bowl. Sprinkle with salt. Cover and let stand 3 hours. Rinse twice and drain thoroughly.
Combine remaining ingredients in large stainless steel saucepan. Bring to a boil over high heat. Add vegetables. Return to a boil and boil 30 seconds or just until cucumbers are no longer bright green. Pack vegetables into jar leaving ¾ inch headspace. Cover vegetables with hot brine leaving ½ inch headspace. Wipe rim. Adjust two piece metal snap lids (or Tattler reusable lids or glass inserts). Screw bands on jars (adjust accordingly if not using metal snap lids). Process for 500 ml for 10 minutes [15 minutes for L] in BWB canner at altitudes up to 1,000 feet above sea level. At higher altitudes refer to altitude adjustment chart on Canning FYI page. Remove from canner. Adjust bands if using Tattler or glass inserts. Allow to cool 24 hours. Remove bands and test for seal. Wash and dry bands and jars. Label and store.


1 food lovers commented:
Thanks, GG. I've bookmarked this post for future use! :o)
Post a Comment