My photo
Ontario, Canada
I am a wife, mother and grandma who enjoys the many aspects of homemaking. A variety of interests and hobbies combined with travel keep me active. They reflect the importance of family, friends, home and good food.
Cook ingredients that you are used to cooking by other techniques, such as fish, chicken, or hamburgers. In other words be comfortable with the ingredients you are using.
--Bobby Flay

For Your Information

Please watch this area for important information like updates, food recalls, polls, contests, coupons, and freebies.
  • [March 19, 2020] - Effective Mar 17, this blog will no longer accept advertising. The reason is very simple. If I like a product, I will promote it without compensation. If I don't like a product, I will have no problem saying so.
  • [March 17, 2020] - A return to blogging! Stay tuned for new tips, resources and all things food related.
  • [February 1, 2016] - An interesting report on why you should always choose organic tea verses non-organic: Toxic Tea (pdf format)
  • Sticky Post - Warning: 4ever Recap reusable canning lids. The reports are growing daily of these lids losing their seal during storage. Some have lost their entire season's worth of canning to these seal failures! [Update: 4ever Recap appears to be out of business.]

Popular Posts

Showing posts with label freezing. Show all posts

Friday, March 21, 2014

Old Fashion Banana Cake

Bananas have had a lot of negative publicity recently in the weight loss industry.  The premise is that bananas will prevent you from losing belly fat.  This is a myth!  I have lost 19 lb since November by enjoying a banana in one form or another almost daily.  Bananas are a nutritional powerhouse full of micronutrients like potassium that helps lower blood pressure.  A medium banana has 105 calories, perfect for a healthy snack.  They have a low glycemic index but high satiety level and they come in their own convenient packaging!

frozen banana
Bananas freeze well.  One of my friends shared her secret for freezing bananas.  Simply pop the banana skin and all in the freezer.  When ready to use, remove from the freezer.  Let thaw just enough to peel off the skin.  Mash while still partially froze.  Pieces of frozen banana can be added to fruit smoothies if desired.

I ran out of fresh bananas (top right) so used one of my frozen bananas.  The banana looked a bit lighter than fresh and the texture was slightly thicker because it was still froze.  This has no effect when the banana is used for smoothies or baking.

baked banana cake
I have a confession...this is the first time I have made a banana cake.  It's not as if I couldn't it's just that my friend sends a banana cake in exchange for a jar of my home canned salsa, much to my husband's delight.  I turned to my trusty Big Red Betty Crocker's Cookbook (circa 1969) to make an old fashion banana cake.

I used my Nami coated baking dish for this cake.  Older cookbooks are my favourite for frugal recipes.  They tend to use simpler and fewer ingredients that can easily be modified for healthier versions.  I used unbleached white flour, sea salt and butter.  I omitted the nuts as my husband does not like nuts in most baked goods.

banana cake with cream cheese frosting
My friend always frosts the banana cakes she sends over so I decided to do the same.  It has always been a cream cheese frosting but she has since changed that.  I chose an easy, deliciously creamy cream cheese frosting.  This frosting is a real keeper, one that can easily be used to frost a wide variety of cakes and cupcakes.  It is very easy to make but when first started it looks like it will be too dry.  It won't be.  A bit of blending is all it takes to get a beautiful, versatile frosting sure to please that pairs nicely with banana bread!


cut banana cake crumb structure
My husband was quite pleased when he spotted the freshly frosted cake sitting on the counter.  We we have a special dinner that night that included the cake for dessert.  It is easy to see why this cake has stood the test of time.  The old fashion banana cake is simply delicious!  The cake is moist and tender with a nice body.  The flavour is wonderful, not too sweet, just perfect and the cream cheese frosting compliments the cake nicely.   The cake is cut into serving sizes directly in the pan.  This makes it a very easy cake for after school snacking.  The unfrosted banana cake, like most cakes, should freeze nicely.  The batter could also be used to make cupcakes.  Hands down this banana cake and frosting combination is a sure winner! 


Wednesday, November 06, 2013

Freezing Butternut Squash

Winter squash is always a bargain in season!  It's high in nutritious and taste but low in calories and price.  Just before we left for Florida, one of the kids brought me two large, home grown butternut squash, a type of winter squash.   Winter squash keeps nicely in a cold, dark location but I decided to freeze the squash instead.  Part of the reasoning was for later convenience but the main reason was not leaving any food that may spoil while we were away. 

preparing the butternut squash for baking
Winter squash have hard outer rinds that many find difficult to remove.  This can be particularly problematic for those with motility issues.  As a result, winter squash is often passed over for another vegetable that is easier to prepare.  There are three work around for cooking winter squash that do not involve peeling.  They do however involve cutting the squash in half and cleaning out the seeds.  The squash can then be covered and baked or cooked in the microwave oven.  My personal preference is steaming on the stove top followed by baking larger quantities in the oven or on the grill.

I uses a chef's knife to cut the butternut squash in half starting at the top on one side then slowly working towards the base of the squash.  Once I reached the base, I continued cutting up the other side.  The seeds are found inside the round base of the squash.  I scooped out the seeds and set aside to be cleaned then air dried for next year's garden.  Of note, saving seeds from produce even store bought is one way to accumulate free seeds for the garden. 

cooked butternut squash
I wrapped the squash pieces in aluminum foil.  I placed the prepared squash on a baking sheet then baked at 350°F until the squash was soft to slight pressure.  When the squash was cooked (pictured), I removed it from the oven and removed the foil.  I then scooped the cooked squash from the skin, leaving the skin for the food disposal or compost. 

This method really is a no mess, no fuss method for cooking squash.  It lends itself nicely for cooking larger winter squash or larger quantities however, I often use this method to cook acorn squash.  When cooking acorn squash, I add a little butter and salt in the cavity.  I didn't add butter or salt for this batch of butternut squash so it would be more versatile for later use.

draining the butternut squash
Wrapping in foil then baking essentially steams the squash in it's own juices.  Even though no water was added, there was a fair amount of liquid draining from the squash (pictured).  There is no reason why the juice cannot be left in the cooked squash for freezing but it will give more watery results when thawed and reheated.  I drained the squash simply by pushing the squash to one corner of the casserole dish then raising that corner slightly allowing the liquid to drain by itself.  I reserved the liquid to freeze separately.  The liquid can be added to soups and stews for added flavour.  Once the squash was drained it was ready for freezing.
 
butternut squash ready for freezer
There are several ways to package squash for the freezer.  My preferred methods are individual serving sizes (4 oz muffin cups) and meal size containers.  I froze this batch of buttermilk squash in meal size containers.  The containers were 4 c (32 oz/946 ml) Ziploc containers with screw on lids.  I filled the containers leaving about an inch headspace.  This space allows for the expansion of the squash when frozen.  There were four servings per container.  That is a good yield for one butternut squash.  The squash in the glass bowl went into the refrigerator for use the following day.

Winter squash will be plentiful and low cost for another month so I plan to freeze a bit more.  It can also be dehydrated and canned.  When dehydrating the squash is shredded then steamed lightly before dehydrating.  It can then be hydrated much the same as you would instant potatoes or the dried flakes can be added as an ingredient in dishes for extra flavour.  Winter squash cannot be safely canned as a purée because it is too thick for proper heat penetration during process.  It can be safely canned in chunks processed in a pressure canner.  Be sure to put up plenty of this budget stretching, versatile and delicious vegetable!


Sunday, January 20, 2013

Quiche Revisited

Years ago when our four kids were still quite young (none in school), I got to know a few young moms with kids.  Our kids played while we chit chatted over coffee, a fairly regular morning routine.  We'd take turns making cookies or some type of snack to enjoy.  A lot of that chit chat revolved around food, sharing recipes and tips.  One of the moms shared her tomato and broccoli quiche recipe.  The first time I made it, I omitted the tomatoes making it a broccoli quiche.  This versatile dish quickly became and remains a family favourite.

quiche
I have made this quiche so many times, I don't need to refer to the recipe.  The original recipe has bacon in it but I have substituted ham.  I have also substituted spinach and Swiss chard for the broccoli.  I normally make the quiche using a home made pie crust.  It is an inexpensive, frugal dish that always goes over well.

Quiche freezes nicely!  We arrived home from our winter vacation on December 20, 2012 to immediately jump into holiday entertaining.  Some of that meant our kids and grandkids staying overnight for a couple of nights so we had quite the full house.  My husband, aiming to make things easy bought four ready to use frozen pie crusts.  Then he bought three dozen eggs thinking we would go through a lot with hot breakfasts.  So the first week of January, I had eggs and a lot of left-overs to use up.

Pictured are two of the four quiches I made to use up some of the eggs and pie crusts.  Two of the quiche were used for dinner that night and my husband's lunch the following day.  Two were wrapped for the freezer.  My freezer space is at a premium right now but it was nice to be able to put a couple of ready meals up for later use.

Normally when freezing quiche, I use home made crust but aluminium pie plates bought at the dollar store.  I usually make six at a time.  The dollar store has a wide variety of aluminium trays in various sizes perfect for freezing casseroles in.  The best price I have found for the deeper dish, rectangular casserole trays is Sam's Club at 30 for $6.98 or 23¢ but you have to buy 30 at a time which is fine for me but if you aren't doing a lot of bulk cooking, the dollar store may be a better option.


Saturday, January 19, 2013

Chile con Carne with Cheesy Garlic Bread

January is very much a laid back, catch-up month for us rounding up the end of our winter vacation in December, the holidays and entertaining, as well as re-adjusting to the cold weather and getting the house up and running smoothly.  The first week of January I started a batch of yogurt, sour cream, sour dough starter and turned my attention to grocery shopping for produce and dairy.  My husband came down with a cold so I focused on home-made comfort meals.  The down time gave me a bit of time to plan what food preservation needed to be done.  Then by the second week of January I was sick and it hung on [I sure wish we would get a hard freeze to kill off all the germs!] so it was relying on the pantry and freezers.

chili from the freezer served with cheesy garlic bread
Chili con carne is one of our favourite home made meals.  Whether made with beef or venison, my version does contain beans that are cooked fresh when making a large batch or home canned if making a small batch.  The reality is, it takes as much work to make a huge batch of chili con carne as it does a smaller one.  I personally prefer to make the largest batch possible.  I home can chili con carne and it freezes nicely.  I usually freeze in 4 to 6 serving size.  It warms up nicely on the stove top or in the slow cooker.  Even if you don't home can the chili, this is one convenience product that can be frozen for a quick meal.

January is very much a fresh start month so we are rather busy but that doesn't mean we can't eat well.  I partially thawed a smaller container of chili con carne from the freezer.  Freezing chile con carne is very easy.  Once it is finished cooking, quick cool then ladle into freezer containers or freezer bags.  It can be froze in a container then popped out into a vacuum bag and vacuum sealed if desired.   If reheating on the stove top the chili need only be thawed enough to be able to get it out of the container.  I put it in a saucepan with just a little water then heat through.  If I am doing a larger amount for entertaining, I thaw the chili then reheat using a slow cooker.

Chili con carne is often served with soda crackers, tortilla or nacho chips, or corn bread.  I like serving it with cheesy garlic bread.  This is very easy to make and there are even ready to use, pre-made garlic bread loaves available, however home-made cheesy garlic bread is ever so easy to make.  I like using a home made French baguette but other breads can be used.

Method:  Use thick sliced home-made Italian style bread to make the cheesy garlic bread.  Lightly toast the bread in the oven.  Cut a garlic clove in half and rub over the surface of the toasted bread.  An alternative method is to brush the bread with garlic butter (finely chopped garlic blended into soft butter with a bit of parsley).  Top each slice generously with shredded mozzarella cheese.  Bake at 400°F until cheese is bubbly and just lightly browning.


Thursday, November 15, 2012

Kitchen Quick Tips - Freezing Cooked Dry Beans

kitchen quick tipsCooked dry beans (eg. kidney, navy) freeze nicely.  Package in an airtight freezer container or freezer bag.  They will keep for up to six months in the freezer.


Thursday, October 25, 2012

Kitchen Quick Tips - Freezing Burger Patties

kitchen quick tipsBurger patties can be made up in advance and frozen for later use.  When packaging burger patties for the freezer, place a piece of wax paper or parchment paper between each patty.  This will allow you to easily separate the frozen patties later.


Saturday, September 22, 2012

Freezing Tomatoes

The first hamper of tomatoes arrived mid-August, about two weeks earlier than normal.  I was quite excited to get a head start on tomatoes with the full intentions of processing ten hampers.  On August 28, my husband picked up the fourth hamper just before noon then headed to the office.  A couple of hours later as I was washing the tomatoes he was back experiencing severe abdominal pain.  I stopped what I was doing to care for him.  By early evening he was feeling fine.  I finished washing the tomatoes.  The next morning I was doing the prep work to make old fashioned chili sauce and a couple of batches of salsa.  I had everything measured for the chili sauce, jars heating in the boiling water bath canner when the door flew open, him back again in sever abdominal pain but even worse than the day before.  I took one look at him, called one of our kids to help me get him to the hospital, stuffed the prepped chili sauce ingredients into the fridge, turned off the stove and changed my shirt.  On the way to the hospital, he continued to deteriorate getting worse by the minute at the hospital and by 8:00 PM was admitted.  I came home around 11:30 PM after I was sure he was settled.  It had been a long, stressful day! 

crushed tomatoes packaged for freezing
The next morning he was scheduled for an ultra sound so before going to the hospital, I took the tomatoes that had been partially prepped for salsa (peeled, cut in half, drained but not seeded yet) out of the fridge.  I knew I wouldn't have time that day to make salsa so I packed the tomatoes tightly into freezer containers.  I don't freeze a lot of tomatoes because with the amount of tomatoes we use, we simply don't have enough freezer space and that's including the freezer compartments of two side-by-side refrigerators plus two chest freezers.  Still, freezing the tomatoes was a better option than having them spoil.

I prefer the rigid freezer containers over the zipper style freezer bags.  The containers with the dark blue lids are Ziploc and the ones with the light blue lids are Ball's new freezer containers.  Both have screw on lids so you know they won't pop off in the freezer.  I put the containers into the freezer then rushed up to the hospital where I stayed until 9:30 PM, arriving home tired but knew I had to do a bit of canning to tidy up.


Sunday, August 19, 2012

Freezing Corn and Corn Stock

I picked up another five dozen ears of corn from the only local farmer close to use selling yellow corn.  Despite the adverse weather conditions and price of peaches and cream corn in town ($6/doz), his price is quite good at $3 per dozen.  He's only about a mile out of town so that is a nice bonus.  Yellow corn is a sweet corn with a lower sugar content than bi-colour corn so it is better for freezing and canning.

whole kernel corn packaged for freezing
One dozen ears of sweet corn should give a yield of 5 to 6 cups of corn.  This corn had beautiful big, evenly distributed kernels on large cobs so I ended up with a little over 7 cups per dozen (35 cups of whole kernel corn) not including the four ears that were set aside for dinner.

Whole kernel corn is sometimes called niblet corn.  It is very easy to freeze for later use.  The corn is blanched on the cob then quickly cooled and cut from the cob.  The cobs are reserved from other corn products (eg. corn syrup, corn stock, corn jelly) while the whole kernels are packaged into freezer bags, labeled and froze.  I ended up with 4 gallon freezer bags and a quart freezer bag of whole kernel corn.  This will not be enough to get us through to the following growing season but it was a good start.

corn on the cob with steamed potatoes and pan fried cod
We had pan fried cod, steamed potatoes and corn on the cob for dinner that night.  Just look at that gorgeous, mouthwatering cob of corn!  Corn on the cob can be prepared in the husk on the grill, steamed or boiled.  By far, we prefer grilling or steaming the corn for a tender, juicer cob that is higher in nutrients than corn that has been boiled.  The nice thing about grilling corn on the cob is there's minimal clean-up.  A little butter and sea salt topping the corn on the cob had our lips smacking!  We only enjoy corn on the cob in season as it takes up too much room in the freezers when left on the cob.  After enjoying our simple yet delicious easy summer dinner it was time to make corn stock.

corn stock
Corn cobs are traditionally a waste product from home food preservation or a meal.  However, if the corn has been cut from the cob for canning, drying or freezing, the cobs can be used to make corn syrup, corn stock and corn jelly.  In essence a lovely edible product is made from what otherwise would go to waste.  Think about it, 5 dozen ears of corn is 60 cobs which is more than enough to make those three products free from something you would normally throw out before throwing out the spent cobs.

Corn stock is one of those must have vegetable stocks to have on hand.  It adds a rich flavour to soups, stews and vegetables.  I made corn stock from one dozen ears of the spent corn cobs.  This was very easy to do.  I simply covered them with water in a large stock pot, brought to a boil then simmered for a little over an hour.  Then I strained the stock, ladled into hot jars and processed in a pressure canner for 35 minutes at 10 lb of pressure.  I didn't have enough of the corn stock to fill the final jar so used a Bernardin storage cap and popped it into the freezer.


Thursday, June 21, 2012

Kitchen Quick Tips - Pancakes

kitchen quick tips

Make a double or triple batch of pancakes then freeze on a cookie sheet after cooking.  Package into freezer bags once froze.  The pancakes can easily be warmed up in the toaster or microwave oven for a quick hot breakfast during the week.


Thursday, May 17, 2012

Kitchen Quick Tips - Preserving Basil

kitchen quick tips
While basil can be air dried it is too delicate to heat dry.  A better method of preserving basil is to make pesto then spoon into ice cube trays and freeze.  Once frozen, pop out the cubes and transfer to a freezer bag for use as needed.


Thursday, May 10, 2012

Kitchen Quick Tips - Preserving Parsley

kitchen quick tips

Parsley can be dried by bunching then hanging upside down until brittle.  For a fresher flavour, pack clean, chopped fresh parsley into freezer bags.  Freeze then use as needed.


Friday, May 04, 2012

Bulk Beef Purchase 2012

We buy beef on the hoof each year.  What this means is the cow is bought as a calf, raised by one of our farming friend then when fully grown we arrange to have the cow taken to the abattoir where it is processed.  The cow  is raised grass fed and hormone free.  We normally keep half of the processed cow ourselves then either the other half or the two quarters to to whoever went in with us on the cow.  If the others don't want the soup bones, heart, tongue or liver we get them.  If left with the abattoir they would simply sell them.

bulk beef purchase 2012
This year's purchase was a half of the cow which worked out to 339 lb.  We paid $630 to our farming friend for our half of the cow, then we paid $225.44 to the abattoir for butchering & disposal, cut & wrap plus HST.  This is the first year we have had to pay HST on the abattoir charges as it went into effect July 1, 2011 but abattoir charges are considered a service so are now taxable.  The total cost for meat and processing was $855.44 which works out to $2.52/lb.

Some question whether we actually save money buying beef in bulk.  The answer is yes AND we are getting a higher quality of beef than we can buy in the grocery stores.  Currently extra lean ground beef is on sale for $2.97/lb (regular $4.59/lb), top sirloin is on sale for $6.99/lb (regular $9.99/lb) and prime rib $8.99/lb.  Regardless of the cut of beef, our cost per pound works out to $2.52/lb, 45¢/lb less expensive than the sale price for extra lean ground beef.  The price per pound is up almost 20¢ per lb from last year but part of that increase is the HST.  This year, we did end up with the extra soup bones, liver, heart and tongue because no one else wanted them.  That isn't factored into the total weight of the half of beef. 

We could not make this type of bulk meat purchase without freezers.  We have two chest freezers and two freezer compartments, both side-by-side.  There are three problems with freezers.  First they are susceptible to food loss due to power outages.  This is less of a problem now that we are urban but still possible because sometimes freezers just stop working.  We actually had a brand new as in not even a month old freezer fail on us while we were on vacation.  Talk about a mess!  In general, a freezer will keep foods froze for up to 4 days if not opened.  It is very important to include a rider for your freezer on your household insurance policy to cover any food loss.  Second, foods not properly packaged for the freezer are subject to freezer burn.  This affects the flavour and texture of the food.  I know of no way to reverse freezer burn.  The food basically has to be tossed.  This abattoir uses freezer paper secured with a special freezer tape unlike the other abattoir we have dealt with that used elastics to secure the packages.  The elastics allow air in.  If packaging foods for home freezing, use a vacuum sealer if at all possible.  Third, from the moment food goes into the freezer it does cost you to store it via electricity usage.  Some home canners simply can a bulk meat purchase like this eliminating freezer costs and while I will can a very small portion (about 40 lb plus stock from some of the soup bones) of this purchase, we like our steaks and roasts.  Lessen electricity costs by using an EnergyStar® certified freezer and keep it full.


Thursday, April 26, 2012

Kitchen Quick Tips - Frozen Meats

kitchen quick tips
If you find a package of meat nearing its limit for freezer storage, defrost it and cook it.  The cooked meat can then be froze for later meals.


Thursday, April 12, 2012

Kitchen Quick Tips - Freezing Bananas

kitchen quick tips
Freeze unpeeled bananas as is.   To use, defrost and cut off the end.  Squeeze the banana out ready to use in your favourite banana bread and cake recipes without mashing.


Thursday, April 05, 2012

Kitchen Quick Tips - Protect Against Freezer Burn

kitchen quick tips
Freezer burn is caused by air during storage.  Protect against freezer burn by vacuum sealing frozen foods.  If you do not have a vacuum sealer, place the food in a zipper style freezer bag then press as much air out of the package as possible or suck the air out using a straw. 


Wednesday, April 04, 2012

Planned Left Overs for Homemade Convenience

Yesterday I wrote about the pot roast with fire roasted tomato basil gravy I made for dinner a couple of nights ago.  This roast was cooked with planned left overs in mind to be made into a couple of homemade convenience foods.  Since I cook mainly from scratch, homemade convenience foods really help sometimes. 

roast beef slices
Roast beef lunch meat is currently priced at $5 for two 300 g joined packages, 600 g/1.32 lb total.  That works out to $3.78/lb.  We buy our beef on the hoof which works out to $2.35/lb across all cuts of beef we get.  One of these days I am going to invest in a meat slicer but thin slicing the beef or any other meat or poultry is not a huge problem.  The Yoshiblade™ ceramic knife does a really nice job of thinly slicing meats but any sharp chef's knife will do the same thing. 

Of note, the price of $3.78/lb for the joined packages applies to ham and turkey, both of which I can get for a better price than beef.  While store bought lunch meat is convenient, it takes little time to slice your own and with homemade you aren't getting all that salt, artificial colourants or flavourings.  This left over chunk of roast beef took me less than 5 minutes to slice into thin sandwich slices. 

vacuum sealed roast beef slices
Anytime I cook a roast beef, turkey, ham or cook extra BLSL chicken breasts, I reserve a portion to make homemade lunch meat slices.  I vacuum seal the slices then freeze to use as needed.  Each packet is about 1 lb which is a comfortable amount of sandwich meat to use up within a few days.  One of our freezer baskets has been dedicated to store these convenient meat packets.  The beginning of each week I take one packet from the freezer and place in the meat keeper of the refrigerator.  It's thawed by Tuesday ready for making sandwiches which works out nicely as usually we have left over meat from Sunday's dinner for Monday's lunch.
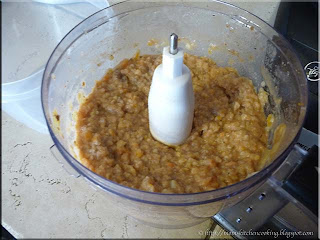
blended roasted vegetables
I cooked the pot roast with potatoes, carrots and cabbage that took on the flavour of the fire roasted tomato basil sauce used to make the final gravy well.  We like cottage pie, aka shepherd's pie made with ground beef or pork.  Years ago I discovered that rustic cottage pie is much more flavourable and more nutritious if you add carrots and/or cabbage to the potato topping.  I pulsed the roasted, richly flavoured vegetables with left over gravy and a little milk in the food processor to make the topping for a small cottage and a vegetable side for another meal.  This really is convenience because all I have to do is thaw and use.  Quite frankly, it would take me about 15 minutes to make a potato, carrot, and cabbage topping but it wouldn't have the extra depth of roasting and it saves me 15 minutes cooking time on a busy night.

blended roasted vegetables ready for freezing
I ended up with about 4 cups of the blended roasted vegetable mixture.  Originally I was going to freeze it together but decided to divide it half so I could vacuum seal.  In order to vacuum sealing this type of dish, it has to be froze first then vacuum sealed.  You can freeze in muffin tins for individual serving sizes or in 2 c containers.  Once frozen, the dish is popped out of the container and placed into a vacuum bag then sealed.

This method is used for anything wet like soups, stews, and some vegetable side dishes.  Whole rolls, loaves of bread and muffins can be frozen then vacuum sealed as well.  This prevents crushing.  The nice thing is you need a lot less freezer containers which translates into less container clutter.

frozen roasted vegetable blend vacuum sealed

Vacuum sealing the frozen dish is highly recommended because it eliminates freezer burn and reduces the freezer space needed.   I use a Sharpie to mark the contents and date just above the seal, right on the bag.  It works well and is low cost.

I like opening bags of foods frozen this way then popping them into a bowl while still frozen to avoid any mess of getting them out of the bag.  I ended up with two 2 c bags of the roasted vegetable mix per bag.  That is enough for one topping of a rustic cottage pie and a side or two cottage pies or two sides.  Not bad for a convenience food, if you ask me :)


Wednesday, November 02, 2011

Preparing a Pork Loin for Three Kinds Cuts

Larger pieces of meat are available in the grocery stores or through your butcher.  Many don't realize that by buying a larger piece of meat then cutting as desired they can actually save overall because some specialty cuts cost more per pound than the large piece.  For example, peameal bacon consistently costs about $5 per lb, cured and ready to use.  A pork loin, the meat the peameal bacon is made from costs $2.30 per lb or less meaning curing the bacon at home is less than half the price of store bought.  I have shown various ways to cut a pork loin on this blog with our two favourite cuts being chops and roasts but here are a few more comments and the reasoning behind it.

the pork loin
My husband is gearing up for hunt camp so I always cure a chunk of peameal bacon for the guys to enjoy there.  I bought an 11.33 lb pork loin at $2.28/lb at Sam's Club for a total of $25.83.  Now, my philosophy is if I'm going to do something like this I might as well get a few extras out of that large piece of meat.  The goal is always to get as many meals and variety as possible.  I usually start with the end in mind as well because I wanted two pieces of peameal bacon and I showed how cutting the loin chops ourselves would save about 70¢ per lb.  I gathered all of the necessary equipment as pictured.  There is organic granulated sugar in the older canning jar and Morton's Tenderquick in the other.  Not pictured is my large cutting board, knives, measuring spoons.

pork loin cut
I cut the pork loin into three distinct cuts.  A pork loin is cut from the rib section of the pig so there is directionality.  Starting at the wider end (closest to the tail end) I cut straight across to even the meat for cutting pork loin chops.  That piece of meat in front of the scale is a bit smaller than a chop.  There is a bit of the trimmings (whitish) in front of it.  I will use this meat and the trimmings for a hearty soup.  I cut eight 1 - inch thick loin chops.  There are six to the right of the trimmings for hunt camp and two to the left for a meal for ourselves.  If I were doing this loin entirely for ourselves, I would have cut four of the loins chops into 1 - inch cubes to be used later for kabobs.  I cut the remaining piece in almost half.  The smaller end piece was 2½ lb and the larger piece 3½ lb.  The weight is important because that determines the amount of cure needed for the peameal bacon.  If I were doing this pork loin just for ourselves I would have left one of the roasts as is without curing.

Aside of the cured meat the rest of the meat was packaged for freezing.  The meat for curing was prepared in zipper style freezer bags then allowed to cure for five days before rinsing and rolling in cornmeal.  The peameal bacon will keep for about a week after curing or it can be froze for longer storage.  It will be sliced for use at hunt camp and either sliced or baked whole for home use.


Tuesday, November 01, 2011

A Mini Bulk Cooking Session

My husband is gearing up for his annual trip to hunt camp.  Although he doesn't hunt himself, enjoys helping to organize and cook the food for the camp.  It has become tradition for me to make a batch of chili, a tray of lasagna and a piece of peameal bacon for the guys to enjoy at hunt camp.  I decided to do a mini bulk cooking session on Sunday since both the chili and lasagna are cooked from scratch then frozen to keep well during the long drive to where the hunt camp is.

my largest stock pot with moose meat chili
Traditionally some of the previous year's catch is taken to the current year's hunt camp but they guys were unsuccessful last year.  One of our friends is a avid hunter who seldom eats any domestic meat. He brought in a very generous amount of ground  moose meat for a chili.  I like working with moose meat.  It is leaner than beef, with a deeper colour and richer flavour but lacking the gameness of venison. 

I used my largest stock pot (10" high, 11" diameter) to make a nice sized batch of moose meat chili.  As with venison, I added a little ground pork to the meat mixture.  All of my chilies take a bit of pre-planning as the dried beans need to soak overnight.  This is one time that while the quick soak method could be used, the time is needed for the long, slow simmer of the chili.  I really need to do up few cases of home canned beans!

trays of moose meat chili
Once the moose meat chili was finished, I removed it from the heat then allowed to cool on the deck before moving the pot to the refrigerator for the night.  We've had frost a few mornings so the air is quite chilly in the evening making the deck a perfect cooling spot.

The next day I ladled the moose meat chili into containers for freezing.  The two larger containers are 12¾" x 10¾" x 2½".  Each tray is enough for 10 to 12 servings of chili.  One will be used for hunt camp while the other will be used one of our larger events this winter.  The two smaller rectangular containers hold 9½ cups.  Each container is enough for 6 good sized servings.  One went into the freezer for ourselves while the other went to one of our kids who was elated to get homemade moose meat chili.  The smaller bowl was put into the refrigerator for my husband's lunch.

trays of lasagne ready for the freezer
Before I start talking about the lasagne, check out one of our new outlets.  My husband and I spent almost the entire day on Saturday replacing electrical receptacles and switches on the main level.  It was a chore and we still have part of the master bedroom and guest room to do.  The ones on the back splash are a bit fancier with larger than standard cover plates and the outlets have a safety feature to prevent foreign objects from being inserted.  The three kitchen outlets on the back splash are split receptacles so I can run more than one small appliance at a time without worrying about blowing a fuse!

My lasagne starts with homemade spaghetti with meat sauce made from scratch using fresh tomatoes (in season) or home canned tomatoes.  Once the sauce is put together with everything but the seasonings and secret ingredients, the cooking begins.  When the sauce gets to the right point I stir in the the remaining ingredients and continue with a low, slow simmer tweaking the flavour as the sauce cooks.  Nothing is measured!  After the sauce is cooled it is ready to make the lasagne.

My record number of lasagne made during one bulk cooking session is 19.  Yes, that is 19!  This was a rather tame session making two large trays and one small tray with the remaining sauce left plain for a later meal of spaghetti with meat sauce.  I used a blend of 8 cheeses in this lasagne with the remaining cheese divided into two zipper freezer bags.  One lasagne and bag of cheese will go to hunt camp.  The cheese is destined for ranch sticks there [I'll post about those later this week.]  The other large tray and sauce went into the freezer, the remaining cheese into the refrigerator and I baked the smaller lasagna for dinner.

smallest tray of lasagna freshly baked
Lasgne (plural) when made from scratch is rather labour intensive but it freezes nicely which is why anytime I make lasagna (singular), I make more than one tray.  I use my homemade meat sauce, cheese blend and regular lasagna noodles made with 100% duram semolina flour.  I don't care for the no-cook lasagna noodles at all.  The bottom layer is always meat sauce followed by cheese and the first layer of noodles.  That noodle layer is topped lightly with the cheese blend, cottage cheese and spinach, then the rest of the layers follow as sauce, cheese, noodles, sauce and ending with a cheese layer.  There are usually 2 noodle layers in the shallow trays (pictured) and 3 or 4 noodle layers in the deeper trays.  I bake at 350ºF with the top tented with tin foil removing the foil for the last 15 minutes of baking.  I increase the baking time if baking from frozen as there's no need to thaw first.


Wednesday, January 26, 2011

What I Did With 16 Chicken Legs Backs Attached

Chicken used to be relatively inexpensive here but over the past several years the price has crept up there.  One of the local grocery stores had their $1 sale on so I decided to take advantage of the chicken that was on sale.  The chicken pieces were legs with back attached.  As little as a year ago these would go on sale for 69¢ per pound but now the sale price is $1 per pound.

packages of chicken
My husband picked up four packages of the chicken.  Usually this store has the chicken packaged in plastic bags but now they are on foam trays with plastic wrap.  I'm not fond of this type of packaging but that is all that was available.  I ended up with 16 legs back attached at a total weight of 5.932 kg (13.07 lb) and cost $2.20 per kg ($1 per lb), $13.05 total cost.  This would break down into 8 meals for us at a cost of $1.63 or about 82¢ per serving for the chicken which is not a bad price given the costs of other meats.  However, I had plans to stretch the chicken out a bit further than 8 meals.  Chicken stock was on the adgenda since I was completely out here although two jars are safely tucked away at our vaction home. 

vacuum sealed chicken for freezer
The first thing I did was vacuum seal eight of the chicken legs into meal sized portions.  That was enough for four packages for the freezer.  As a rule with a sale like this I tend to put up half then use the other half fresh and/or make other products for the pantry.  Of the remaining eight legs I used two for garlic pepper chicken with TPC Sesame Garlic Spaghetti for dinner that night.  Three of the chicken legs went into the stock pot for stock.  Realizing that our Christmas celebration was on the up coming Saturday meaning I would have a turkey left-overs and turkey stock to deal with, I put the remaining three pieces of chicken into the freezer as well.

chicken stock
I allowed the chicken legs to cook through then removed them from the stock and deboned them.  The bones and skin went back into the stock pot for a long, low simmer.  I seasoned the meat then used it for two meals of wraps and chicken tacos.

I ended up with 14 - 500 ml jars of chicken stock which is about my average yield when making stock.  As you can see I used Tattler reusable lids on seven of the jars.  The more I use these lids the better I like them!  For those wondering if I had to buy the chicken stock the equivalent would come in at approximately $20.86 ($1.49 each).  The cost of the homemade stock came in at $2.86 including the lids and electricity for both cooking and processing the stock.  It is easy to see where making homemade stock is very cost effective.  The stock can can be home canned or frozen.  I prefer canning mine for the convenience of ready to use.


Monday, September 20, 2010

Frugal Kitchens 101 - Labeling Home Preserved Foods

Frugal Kitchens 101

Home preserved foods need to be labeled and there are many ways of doing this depending on how the food is to be stored.  Many home canners either buy or print off custom made labels for their home canned foods but the logistics of this is not very practical when doing larger scale canning.  Labels add to the cost of home preserved products and in my opinion an unnecessary cost.  Besides most labels are a pain to get off the jars.  They have to be soaked off or they will gunk up your dishwasher.  However it is still important to label the food and date it was preserved when storing.  This week's Frugal Kitchens 101 discusses how I label foods for storage.

  • home canned foods using single use metal snap lids - I use a Sharpie to write directly on the lid.  It is simple and effective.
  • home canned foods using reusable canning lids - A Sharpie leaves a ghost mark on the lids so I don't want to use that since these lids will be around for a couple of decades.  I started off writing directly on the jar with a Sharpie but have since changed to using painter's tape.  It's a cheap solution.
  • home canned foods stored in boxes - I rotate my home canned foods so quite often it is stored in the cardboard boxes the jars originally came in.  Once I'm out of a row of food on the shelves the food in the boxes is moved to the shelves to replenish the supply.  I label the boxes using painter's tape and a Sharpie.  I include the content, number of jars of each content and year.  I can quickly glance at a box and know when the food should be used up by.  While home canned foods keep much longer that the USDA recommended 1 year they will lose a bit nutritionally so my comfort level hovers at the 2 year mark.  
  • home frozen foods - Our bulk meat purchases come labeled with a stamp from the abattoir's so unless I buy meats from a grocery store I really don't have to worry about labeling.  Any commercially frozen foods is already labeled.  I use a Sharpie to label contents and date for anything I put into vacuum sealed bags or containers.  
  • home dried and bulk dried foods - I store home dried and bulk dried food (eg. rices, pastas, etc.) in glass mason, commercial glass jars and occasionally commercial plastic jars.  I use a Sharpie to label these containers directly on the jar.
