My photo
Ontario, Canada
I am a wife, mother and grandma who enjoys the many aspects of homemaking. A variety of interests and hobbies combined with travel keep me active. They reflect the importance of family, friends, home and good food.
Cook ingredients that you are used to cooking by other techniques, such as fish, chicken, or hamburgers. In other words be comfortable with the ingredients you are using.
--Bobby Flay

For Your Information

Please watch this area for important information like updates, food recalls, polls, contests, coupons, and freebies.
  • [March 19, 2020] - Effective Mar 17, this blog will no longer accept advertising. The reason is very simple. If I like a product, I will promote it without compensation. If I don't like a product, I will have no problem saying so.
  • [March 17, 2020] - A return to blogging! Stay tuned for new tips, resources and all things food related.
  • [February 1, 2016] - An interesting report on why you should always choose organic tea verses non-organic: Toxic Tea (pdf format)
  • Sticky Post - Warning: 4ever Recap reusable canning lids. The reports are growing daily of these lids losing their seal during storage. Some have lost their entire season's worth of canning to these seal failures! [Update: 4ever Recap appears to be out of business.]

Popular Posts

Showing posts with label breads. Show all posts

Friday, April 09, 2021

Double Cheeseburger Bread Bowl

Bread bowls are simply a loaf of bread or larger buns that have been hollowed out to form an edible vessel for serving dishes like stews, chowders, chili, dips and so much more.  They are a lovely, rustic way to present these types of dishes.  Sourdough with it's delightful tang and firmer texture is perfect for bread bowls. 

I hollowed out a full boule of sourdough bread for the Double Cheeseburger Bread Bowl.  Then I lightly seasoned extra lean ground been and divided to make two thin patties about 8" diameter.  I baked the patties but they could have been fried.  The first layer consisted of two cheeses, a burger patty, bacon, sauteed mushrooms and onions, spinach and tomato slices.  I repeated that layer to create a second layer carefully tucking everything into the bowl.  Then I put the top back on and wrapped in foil, placed a weight on top and let it rest for 30 minutes.   I removed the foil* and baked at 350°F for 25 minutes.

The end result was a huge tasty double cheeseburger in a unique presentation.  There was enough for 6 healthy servings!  This bread bowl would be ideal for a smaller get together and work equally well on the grill as in the oven.

My Notes:  Overall I was quite pleased with the results but I would *leave the foil on while baking.  From start to finish this meal took about 80 minutes so it's definitely not a quick meal! 


Thursday, April 01, 2021

Sourdough Daily Bread

We are incredibly blessed to live in Southwestern Ontario, right in the midst of some of the richest and most productive farmland in Canada.  We are also within a stone's throw of the Great Lakes and several connecting tributaries making locally caught fresh fish available year round.  The area is home to orchards, mushroom farms, cheese factories, flour mills, salt mines, maple syrup bushes, apiarys, and multitude of food producers.  We don't buy meat at a grocery store; we buy a cow from a farmer who takes it to an abattoir for processing.  The vast majority of our food is bought directly from several local farmers or producers.  Essentially, we can acquire most of our food locally grown or produced within a 100 mile radius of our home.  So we have been locavores before it ever became a movement.

Unless you live close to a bakery, the best bread you can get is homemade.  I don't even know the cost of bread in the grocery stores!  However, the most basic homemade bread is made with flour, salt, yeast (or starter) and water so very, very inexpensive even using higher end flours.  Moving up, you might use an egg, milk or milk powder, sugar, honey and any number of seasonings or additives like onion, cheese, raisins and etc. that increase the cost but only by pennies.  Aside of the cost savings, you are getting a more nutritious, higher fiber loaf of bread without preservatives or high fructose corn syrup.  If you make sourdough or sprouted grain breads, you are getting an easier to digest bread.

Our Daily Bread is stone ground organic flour from 1847 Stone Milling, a family run mill outside of Fergus, Ontario.   The McKeown's began by grinding small amounts of flour for their own personal use.  They brought a stone burr flour mill from Austria in 2013 and now produce a variety of high quality flours for their customers.  Their customer service is stellar with fast and friendly shipping! 

Daily Bread is made without fortification, bleaching agents or levelers.  This is their all-purpose flour ground from a blend of hard red wheat and soft red wheat to create a perfectly balanced protein level for everyday baking.  The buttery smooth texture has sweet notes of nougat and subtle notes of Brazil nut.   It can be used in place of unbleached white flour in most recipes.  In fact, I would say all recipes to be honest.  Pie crusts would be a bit darker but also more nutritious if made with Daily Bread flour.

I used Daily Bread flour to make a loaf of sourdough bread.  This flour did not disappoint - such a beautiful flour to work with!  The flour itself is silky smooth.  The dough came together nicely and developed into a smooth dough quickly.  The bread had a nice rise with a bit smaller aeroles than sourdough made with unbleached flour.  Unlike breads made with  regular whole wheat, the texture was quite smooth and lovely!  As you can see, it is a bit darker.  Of note, hubby normally doesn't like a full whole wheat bread but he loved this bread. 


Saturday, March 27, 2021

Sourdough Flatbread

I have two sourdough starters on the go which means about 2 cups of sourdough discard daily when fed normally.  Some folks store their sourdough starter in the refrigerator, feeding when needed.  Others feed on a reduced schedule of every third or fourth day. Sourdough discard can be reduced via micro feeding on days you won't be baking. 

An easy way to use up a bit of sourdough discard is flatbread.  Flatbreads are very versatile, easy to make and freeze well.   Each batch makes 6 nice sized flatbreads and uses a cup of sourdough discard.  These are extremely easy to make because there is no rise or proof time.  There is a 30 minute rest time before the dough is ready to be shaped into balls then rolled out.  The shape does not have to be perfect.  In fact a bit oddly shaped is part of the charm.

I roll one out, brush the top with olive oil the place oiled side down in a hot ungreased cast iron skillet.  It is hot enough to cook the flatbread without smoking.  Then I brush the now top with olive oil.  When dark marks appear on the bottom, I flip and let it cook on that side.  While that is cooking, I prepare the next one.  I remove the finished flatbread to cool in a cloth lined basket.  I continue on in this fashion until all the flatbreads are cooked.  The whole process, dough to flatbread takes about an hour.

We like using flatbreads for quick personal homemade pizzas.  Pictured is my Margherita pizza and hubby's cheese pizza.  I used home canned roasted tomato garlic pizza sauce for both pizzas.  A few days later we took a double batch of flatbreads and the fixing to friends for a pizza party.  Their kids had so much fun topping their own pizzas!


Monday, March 22, 2021

Whole Wheat and White Quick Rise Breads

In March of 2020, everyone had seen the warnings and were starting to experience the onset of never ending lockdowns.  While toilet paper became a huge premium, sold out in many areas, others were turning to baking.  By the end of March, social media was inundated with pictures of home baked breads.  By mid-April the new found bakers realized that flour and yeast had also become a premium commodity.

I have baked most of our breads for so ever long, mainly due to some serious gastrointestinal issues that are related to preservatives in commercial breads, not the gluten.  Pictured are two quick rise breads - white, whole wheat.  This was a bit newer but not entirely new technique to me.  Essentially, the liquid added is quite warm which gives a kick start to the yeast.  I like to proof my breads in the microwave oven.  It's a great proofing box.  The bread is then baked in a dutch oven giving the crust a unique texture.  While these do look like sourdough they aren't because there is no sourdough starter used and the rise is solely dependent on added yeast.  However, for those having issues with commercial breads, the white only has: wheat, yeast, salt and water while the whole wheat has : wheat, yeast, salt, local honey and water.

The rise in both breads was lovely with well formed aveoli.  The crumb was quite lovely as well.  The flavour was delightful.  I always pair local honey with whole wheat to give  bit better rise.  The flavours just meld together so nicely.  Both breads make for amazing grilled cheese sandwiches the next day.


Friday, April 26, 2013

40% Whole Wheat Cheese Bread (No Knead)

Part of the beauty of artisan breads is their rustic charm.  It is immediately apparent that artisan breads are not mass produced.  The loaves are never perfectly shaped adding to the eye appeal.  The tops usually have some type of coating whether is be simply plain flour or rolled oats.  Unfortunately if buying an artisan bread in a bakery, you may not get to see the crumb (interior pore formation) prior to bringing it home to cut, but that crumb certainly will not disappoint.  Unlike mass produced breads, the ingredients for artisan breads are simple and unpretentious.  All that is needed for a good loaf of artisan bread is flour, salt, yeast and water.  That's it!

40 percent whole wheat cheese bread
Continuing with my experiments with no knead fermented doughs, I made a loaf of 40% whole wheat cheese bread using the cold ferment 40% whole wheat dough.  I simply cut a strip about 3-inches wide and 10-inches long from the refrigerated dough that was about an inch and a half thick.  I worked in about 1 cup of shredded cheddar cheese using the press and fold method then shaped the dough into a boule.  I placed the boule on a sheet of lightly floured parchment paper, covered with plastic wrap and let rest 3 hours.  During the last half hour of the dough resting, I preheated the Dutch oven at 425°F.  When the Dutch oven was ready, I transferred the parchment paper and dough to the Dutch oven, covered and baked for 40 minutes.  Then I removed the lid and baked for an additional 5 minutes.

The 40% whole wheat cheese bread had a tantalizing, mouthwatering aroma!  This was a lovely looking loaf of bread with a good rise and nice pore formation even though I forgot to slash the top.  The crust and interior texture were perfect.  Like the cheesy bread made with cold fermented dough using unbleached flour, the whole wheat version is a keeper! 


Monday, April 22, 2013

Frugal Kitchens 101 - Artisan Breads

Frugal Kitchens 101
Breads are a fundamental food in every culture and never has there been such a variety under one basic heading.  Breads fall into two main categories, leavened and unleavened.  Leavened beads can be further divided into quick breads and yeast breads.   Yeast breads can be further divided into mass produced, artisan, bread machine, fermented, kneaded and no knead.  There may be overlaps.  For example, a bread machine bread can be also a fermented bread if it uses sourdough starter however, a bread machine bread while home made is not considered an artisan bread because machinery is used to do the mixing and kneading.  Some using stand mixers consider their breads artisan and while they may be outstanding loaves of bread, they really are homemade breads rather than artisan breads.  

The artisan category is simple, hand crafted breads made without the aid of machinery. At their purest, artisan breads are hand mixed, hand kneaded and shaped.  Any yeast bread recipe can be used to make artisan breads.  Artisan breads can be kneaded breads or no knead breads.  No knead artisan breads use either a room temperature fermentation (12 to 18 hours) or a cold fermentation (24 hours to several days).  It is common for artisan bread recipes to use premium ingredients (eg. organic flours, whole grain flours, raw honey, steel cut oats, sea salt) and great attention is paid to the shaping of the loaf as well as slashing the top properly before baking.  Consumers consider artisan breads as gourmet breads and as such these breads bring premium prices.  I have seen artisan loaves of bread as high as $7 a loaf!

The average home cook can easily produce artisan breads at home for about 30¢ per loaf and well under $1 even if using premium ingredients or adding additional ingredients like herbs, cheeses, dried fruits, nuts and seeds.  No knead artisan breads are particularity easy for any home cook to make as all that is involved is the mixing, fermentation period, shaping and baking.  The ingredients can be as simple as flour, salt, yeast and water.  Equipment can be as simple as a bread pan or baking sheet.  If you want a crispy, chewy crust as in store bought crispy rolls, you will need a cast iron Dutch oven or a shallow, oven proof pan to put water in and put on the rack below the baking loaf.  Some have reported good crispy crust results using a regular covered roasting pan.   

I have been experimenting with no knead artisan breads both room temperature fermented and cold fermented over the past couple of weeks.  I want to perfect my method so we can not only to enjoy wonderful artisan breads at home but also at our vacation home where I do not want to buy specialized equipment to do the kneading for me.  I can no longer knead bread to the degree it takes to get a good loaf of bread so use a stand mixer at home.  Here's a few things I have learned making the no knead artisan breads:

  • fermentation - Fermentation is due to the yeast (living organism) consuming the sugar and starch in the flour producing carbon dioxide as a byproduct which is responsible for the pore formation in the baked loaf of bread.  It is a natural process that occurs over time.  In kneaded breads, this is often referred to as letting the dough proof (rise until double) or simply letting the dough rise.  The proof time is generally for a short period of time usually an hour for each rise and the proofing time really doesn't add much to the flavour of the baked bread.  Fermentation takes place over a longer period of time, generally 12 to 18 hours for room temperature fermentation and 24 hours to several days for cold fermentation.  Fermented dough shaped into a loaf still requires a rising (resting) period of 40 minutes to 3 hours before baking. 
  • slashing - Typically the dough is slashed before to aid in the rise of the baking bread.  The slash will determine the direction of the spread as the loaf bakes.  If done properly, the baked loaf of bread will have raised portions along the slash referred to as ears.  The dough should be slashed with a very sharp knife or razor blade at a 30° angle about ¼ - inch deep.  If making more than one slash, wet the knife bread after each slash to prevent sticking especially with sticky doughs.
  • the crust - The texture of the crust is determined by baking conditions.  A regular, soft crust is created when the bread is baked without steam.  If you want a softer crust, brush the bread with butter as soon as it is removed from the oven.  A crispy, chewy crust is created when the bread is baked with steam.  This can be achieved by baking the bread on a baking sheet with a shallow pan of water on the rack below the baking bread or by baking the bread in a covered cast iron Dutch oven, browning lightly after the steam baking process. 
  • the crumb - The crumb of the bread is basically the pore formation that is determined by the fermentation process and/or proofing.  Small, evenly distributed pores as seen in whole wheat breads are caused by a lower rise due to decreased gluten development resulting in a denser loaf of bread.  Doughs with a high gluten development will have a higher rise, larger pores and a lighter, fluffier, softer texture.  
  • experimentation - The baking and proofing times are not written in stone.  A dough with a recommended 40 minute proof time may actually take 2 hours to proof depending on the ambient room temperature.  Baking times may need to be adjusted to achieve the desired results because ovens can vary.  A wide variety of ingredients (eg. herbs, seasonings, dried fruits, cheese) can be added to no knead doughs.   Finding the best way to work them into fermented doughs is by trial and error.  Baking times may need to be adjusted depending on any extra ingredients added.


Sunday, April 21, 2013

Cheesy Bread

Continuing with my bread experimenting, I made the third loaf of bread using the cold fermented dough (five minutes a day artisan bread).  I am finding I really like this dough even though fermenting in the refrigerator does not save any time over using a regular knead dough and the container of dough takes up a fair amount of space in the refrigerator.  It is no easier than the rough temperature fermented dough (no knead crusty dough).  The only difference between using a fermented dough (eg. cold, room temperature, sourdough starter) is flavour. 

cheesy bread
I made a loaf of cheesy bread using the cold fermented dough but made a few adjustments after the results of the cheesy garlic onion bread.  That bread was quite tasty but I was not happy with the crust especially the bottom that was a bit over done.  Clearly the addition of cheese to the dough affected the crust.  So I decided to experiment with timing, temperature and positioning for the cheesy bread.  In most cases, I would just make one adjustment at a time to see the effect but decided to make all three at the same time because they made sense to me.

First, I moved the oven rack up one notch to the middle position in my stove.  This just gets the baking bread a bit further from the heat source, which in my case is at the bottom of the oven.  Second, I reduced the preheat and baking temperature from 450°F to 425°F.  All ovens are different so temperature adjustments are common.  Regardless what temperature the recipe says to bake at, the temperature should be adjust to that which gives you the desired results in your oven.  I have found that I have had to lower the baking temperature on many foods using the natural gas oven which seems to give the same results as my former electric oven but at a lower temperature.  Finally, I reduced the baking temperature to 45 minutes (covered) and 5 minutes (uncovered) for a total bake time of 50 minutes rather than 65 minutes.  This was a smaller loaf of bread that would bake quicker anyway requiring a reduction in baking time but the initial decision to reduce the temperature was based on improving the outcome of the crust. 

A lot of sites and videos showing the results of the Dutch oven baked crusty breads show a very dark crust.  I don't know if this is intentional, lighting or not realizing that the temperature can be adjusted.  The problems with too dark of a crust is it can give a burnt flavour to the bread.  We prefer a golden crust and in this case the goal is a golden crust that is crispy and chewy.  I used a cup of shredded cheddar cheese and pressed it into the crust the same way I did for the cheesy garlic onion bread but this time worked it into the dough using lesser amounts of cheese at a time.  I let the boule rest for 2½, slashed the top, then baked according to my adjustments.  The crust came out exactly as I wanted without the bottom crust being over cooked.  The crust crackled as it cooled, the tell tale sign of a good crispy crust.  The colour was a perfect golden brown.  My husband declared this loaf a keeper!  It definitely was an outstanding loaf of bread with excellent texture and flavour.  It was gone by lunchtime the following day with a request for another loaf. 


Saturday, April 20, 2013

Cheesy Garlic Onion Bread

The dough for the five minutes a day artisan bread (cold fermentation) is enough to make five to six good sized loaves of bread.  Fermentation makes this bread delightfully yummy!  Steam is essential for the development of the crispy yet chewy crust and soft interior.   While this bread can be baked on a baking sheet with a pan of water on the rack below, it is considerably easier to bake this bread and the no knead crusty bread (room temperature fermentation) in a covered Dutch oven.  It creates a controlled environment for baking the bread, keeping the interior of the vessel at a consistent temperature and keeping that steam inside to produce that perfect crust.  An enamel coated, cast iron Dutch oven is rather inexpensive at under $70 for a 4.7 L (5 qt ) depending on the brand. 

ingredients for cheesy garlic onion bread
Continuing with my experiments using the five minutes a day artisan bread dough, I gathered the ingredients to make a loaf of cheesy garlic onion bread.  This was the second loaf of bread from the batch of dough which did level itself after removing dough for the artisan boule (plain) a couple of days before.  Boule is the French term for ball, a common shape for artisan breads.  The dough had a bit stronger sourdough aroma.

Ingredients for the cheesy garlic onion bread were the prepared cold fermented dough, cornmeal, garlic pepper (2 tsp), shredded cheddar cheese (1 c), and chopped onions (2 tbsp).  I used unbleached flour for the prep of the cheesy garlic onion bread.

embedding ingredients for cheesy garlic onion bread into the dough
The normal method of adding extra ingredients to a kneaded bead is directly during the mixing period with the exception of some ingredients like fruits or if making a swirled effect (eg. raisin bread).  According to the sources I found for the no knead crusty bread, additional ingredients can be added during the mixing as well.  Since the dough is already mixed for the long cold fermentation period with the five minutes a day artisan bread, so the ingredients had to be worked into the piece of dough before shaping it.  I cut a piece of dough from the batch and patted it out on a floured cutting board.  Then I sprinkled cheese, onion and garlic pepper over the dough and pressed it in well, turned the dough over and repeated.  I continued working in the additional ingredients by kneading.

prepared cheesy garlic onion bread dough resting
Finally, I shaped the dough into a boule then sprinkled lightly with garlic pepper, onions and cheese.  I placed the boule on a sheet of parchment paper sprinkled lightly with cornmeal on top of a cutting board.  The cutting board added stability so I could move the loaf to a bit warmer location if desired.  I often do this when proofing bread since the dining/livingroom gets quite warm when the sun hits the large southern exposure window, just perfect for proofing bread.  I covered the prepared boule with plastic wrap then let rest for 2½ hours.

I poured 2 cups of water into the Dutch oven and pre-heated it at 450°F during the last half hour that the dough was rising.  Adding water during the pre-heat stage prevents any damage to the Dutch oven.  Any water remaining at the end of the pre-heat period is simply poured out before placing the dough in the Dutch oven.  I cut a slash in the top of the dough before putting it into the Dutch oven.

cheesy garlic onion bread fresh from the oven
I baked the bread covered at 450°F for 50 minutes then removed the lid and intended to bake for another 15 minutes but cut that down to 7 minutes as the crust was getting too dark.  I removed the delicious smelling loaf from the oven to cool on a cooling rack. 

The loaf looked good, quite similar to the cheese and onion bread sold in the grocery store.  The onions were a bit darker than I would have liked and the cheese topping was not as pronounced but still for the first attempt making a cheesy garlic onion bread with the cold fermentation dough, it was a successful loaf.  There was a nice rise and ears on the slash both good signs.  The crust did crackle a bit as it cooled but not as much as the plain loaf did.  The bottom crust was definitely over cooked so I was not happy with that.  Clearly the addition of cheese affected the outcome of the crust causing it to brown in less time than the plain loaf. 

cheesy garlic onion bread crumb formation
While the cheesy garlic onion bread had a nice rise, clearly my method of adding the shredded cheese affected the pore formation.  There were larger pores filled with cheese which isn't necessarily a bad thing but I will be modifying my method to get a bit more even distribution.  I was disappointed that the bottom crust was so dark so the next loaf which will be a plain cheese bread, I have a couple of modifications to try.

In terms of texture and flavour the cheesy garlic onion bread certainly did not disappoint.  The crust was delightfully crispy and chewy.  The interior was soft.  This bread was nicely flavoured with the garlic pepper giving a nice spicy element that paired nicely with the cheddar and onion flavours.  The cheesy garlic onion bread would be a lovely bread to serve with beef stew or cottage pie.  It will definitely be a flavour combination in bread that I will be making again, just tweaking the baking time and method a bit to prevent the bottom of the bread from getting too dark..


Friday, April 19, 2013

First Loaf of Five Minutes a Day Artisan Bread - Artisan Boule

It is busy times in the kitchen between testing the 4ever Recap canning lids and experimenting with crusty artisan breads, currently no knead crusty bread (room temperature fermentation) and five minutes a day artisan bread (cold fermentation).  Fermentation is what gives sourdough bread its characteristic tang.  Both of these breads have a bit of a tang.  It is very mild in the no knead crusty bread and more pronounced in the five minutes a day artisan bread the longer the dough is allowed to ferment in the refrigerator.  That is the first loaf of bread made from the five minutes a day dough will not have as much of a tang as the last loaf that will be made several days later if the dough is used as intended.  Neither of these no knead breads actually save any time in comparison to kneaded breads but they do eliminate the process of kneading.  The second thing both these breads have in common is the crispy, chewy crust with soft interior.  This is due to the high moisture content in the dough and baking the bread in a cast iron Dutch oven so the steam cannot escape until the lid is removed for the final browning stage.

five minutes a day artisan bread dough just out of refrigerator with dough cut and boule shaped
I removed the five minutes a day artisan bread dough from the refrigerator.  It had fallen a bit from when the dough was first refrigerated but according to Jeff and Zoe (developers of the cold fermentation process for this recipe), this is common with the dough.  I found it easiest to cut the dough with a serrated knife.  The dough was sticky but easier to handle because it was cold.  I shaped the piece of dough into a boule (round bread loaf shape) on a piece of floured parchment paper then covered with plastic wrap.  The remainder of the dough was returned to the refrigerator.  The covered boule was left to rise for about 2½ hours.  The longer the shaped dough is allowed to sit, the larger the bread pores will be. 

I placed the enamel Dutch oven in the oven at 450°F and let heat during the last 30 minutes the dough was rising.  Some using this method put their Dutch oven in to heat dry but at least one manufacturer advises against this so I added 2 cups of water to the Dutch oven before heating.  Once the Dutch oven was heated, I removed it from the oven, emptied the remaining water then brought the four corners of the parchment paper together sling style to transfer paper and dough into the Dutch oven.  I put the lid on the Dutch oven then returned it to the oven to bake the bread for 50 minutes at 450°F.  Then I removed the lid and baked for uncovered for 12 minutes.  The recommended timing is 15 minutes but timing needs to be adjusted to your oven.

boule just out of oven
I did not slash the dough as Jeff and Zoe do but will likely experiment with doing so.  Slashing the dough gives a better rise during baking. It is done with a very sharp knife or blade just before putting the dough in the oven.  Slashing at a 45 degree angle gives the characteristic ears during baking giving the loaf of bread a professional look.  Instead, my loaf was a lovely boule without the slashes.

The bread smelled heavenly!  There was a good rise and that characteristic crackling sound as the loaf cooled.  I was quite pleased with the results even without the slashes.  I could not wait to taste test this bread!

artisan plain boule crumb appeal
I cut the bread with a serrated bread knife.  The pours were nicely defined.  The texture was perfect!  The bread did not have a real sharp tang, more of a mellow, subtle tang similar to sourdough bread made using fresh starter before it has a chance to develop a good tang.

All in all, I am having fairly good success baking bread in the Dutch oven.  The plain breads are working out considerably better than expected.  While the dough fermented at room temperature results in an excellent loaf of bread, the dough fermented at cold temperature gives outstanding results in terms of both texture and flavour.

I am experiencing a bit of a timing problem though.  I shaped the dough at 2:30 PM, set aside until 4:30 PM figuring it would be perfect timing for eating just before 6 PM.  However, the dough did not cooperate likely because the kitchen was a bit cooler.  I hadn't been cooking that day so there was no residual excess heat in the kitchen.  This meant it took longer for the dough to get to the point of being ready for baking.  Trying to get dinner ready while still fiddling with bread was not ideal but it is nothing new.  Typically, this happens within the few days after turning the furnace off for the season or the few days before turning the furnace on for the season when the entire house is cooler than normal.  I usually try to compensate by cooking or canning in the morning to heat the kitchen a bit.

The experimentation continues.  I made a garlic, onion and cheese boule and a cheese boule so I will be discussing the results of both those loaves.  That leaves me enough for one very large loaf or two smaller loaves of bread using the five minutes a day artisan dough.  The dough has developed a lovely sourdough smell!  I'm not sure what I will make with the remainder yet but am thinking a plain to gauge the degree of tang I can get using this dough and perhaps a loaf of raisin bread.  I will discuss those loaves as well so be sure to continue reading!  At this point, I will be naming the bread according to the additional ingredients used (eg. Artisan boule) as I did with this loaf with a link as to which base recipe I used, room temperature fermentation or cold fermentation.


Sunday, April 07, 2013

Let's Talk About Homemade Bread

Making homemade breads has been a regular practice in our home since our newlywed days.  I am always excited to discover a new bread recipe or breadmaking technique like the no-knead crusty bread baked in a cast iron Dutch oven.  There is no doubt about it, the tantalizing aroma of bread baking is a true delight.  Enjoying a slice of homemade bread still hot from the oven slathered with butter is a divine culinary experience!

The question with respect to homemade bread aside of the pleasure it brings and that cannot be discounted, is "Is making bread frugal?"  In this context I am using frugal to encompass cost, savings, quality, time and social responsibility.  Mixing of the dough takes almost no time.  At one time, bread was made from scratch and hand kneaded but the home cook no longer has to spend a long period of time kneading dough thanks to stand mixers, bread machines and even some food processors all of which make short work of kneading the dough.  So the dough can be ready for proofing in less than 10 minutes.  The real time comes from the proofing and baking.  There usually are two proofings (allowing the dough to rest while doubling in size) which develop the gluten in the flour.  Bake time is usually around the 40 to 50 minute mark.  A bit of planning ahead is needed then if you want a fresh loaf of bread for dinner.  However, there are no-knead breads that proof over night and a novel 5-minute a day bread that I will share my experiences with shortly.  In reality, the proof times are simply that with nothing for the home cook to do other than wait for the dough to double so other things can be done during that time frame.

Iingredients in Prairie Flour Mils LTD white flour
Let's consider the flour used for baking bread.  Canadian flours have a higher gluten level than American flours so it is quite easy for us to get a beautiful loaf of homemade bread with little effort.  Now, a few days ago I was doing a bit of research when I came across a video where the home cook claimed the only thing in their homemade bread was flour, salt, water and yeast yet they named the brand of flour they had used.  Wheat flours in North America are enriched.  That means they contain niacin, thiamin mononitrate, riboflavin, folic acid and iron.  They also contain azodicarbonamide (ADA) which is an oxidizing agent that may or may not act as a bleaching agent while strengthening the dough.  Malted barley is also an oxidizing agent that results in a strong dough.  Unbleached flour contains ADA because it improves the quality even though the mill may not be technically using it as a bleach.  The bottom line is, ADA is in both bleached and unbleached wheat flours.  Benzoyl peroxide is actually used to treat acne but it is also used as a strong bleaching agent for flour.  Flour bleached with benzoyl peroxide has been prohibited in the UK since 1997.  L-cysteine hydrochloride is a reducing agent that breaks the protein structure in the flour resulting in a stronger dough, reduces mixing time, reduces proofing time and increases machinability.  Unless you can find organic flour with no additives (rather difficult even in Toronto) or grind your own flour from whole grains, the flour you use will contain additives.  Prairie Flour Mills Ltd. has an organic flour with no additives but it is difficult to find.  No name flour contains the same ingredients but also has amylase, an enzyme that improves processing characteristics by breaking down the sugars to allow the yeast to act quicker.

In our little corner of Ontario, Canada we can buy the following brands of flour:  Prairie, No Name, Golden Temple, Robin Hood and Five Roses, all made with hard wheat (high gluten).  Prairie is milled by Prairie Flour Mills Ltd. which is owned, operated and supports the wheat growers of Manitoba.  A 10 kg (22 lb) bag of Prarie is $7.97 or 8¢ per cup.  Of note, Prairie Flour Mills Ltd., distributes under their own label (pictured above) as well as private label meaning a company can get the Prairie milled flour but sell it under their own private label.  No Name brand  is owned by Weston Foods and sold through their Loblaws division.  A 10 kg (22 lb) bag of No Name flour costs $9.97 (10¢ per cup).  Chances are the No Name flour is milled by Prairie Flour Mills Ltd. but sold under the private label of No Name.  If so, the higher price is simply to cover the cost of the private label.  Golden Temple is $10.89 for 9 kg (20 lb) or 12¢ per cup, Robin Hood and Five Roses are $13.97 for 10 kg (22 lb) or 14¢ per cup.  Golden Temple, Robin Hood and Five Roses were Canadian owned and they still are made with Canadian wheat but they are now owned by Smucker Foods of Canada, a subsidiary of US owned The J.M. Smucker Company.  There are also several smaller flour mills some of which are organic and non-GMO within the 100 mile radius of our home so I do take advantage of buying directly from them.

Of these brands, all use Canadian wheat so at some level support the Canadian wheat growers.  The No Name brand can be iffy.  The premiss behind the No Name label and this applies to any food with that label is, Weston Foods who owns Loblaws uses whatever they can get the cheapest to pass on the savings to their customers but they don't always disclose the origin so there is no guarantee that the No Name flour is made with Canadian wheat but I suspect it likely is, and probably made by Weston.  Canada has strong labour laws, high minimum wages and wheat boards so the wheat growers are paid fair compensation while workers enjoy decent working conditions earning enough to enjoy a comfortable lifestyle.

ingredients in D Italiano Italian style bread
Weston Food's bakery division is Weston Bakeries Limited founded by George Weston in 1882 and still controlled by the Weston family.  It produces a wide variety of baked goods including the popular D'Italiano breads.  Pictured is the label from the D'Italiano Italian style bread.  This is where the chemical components of the ingredients show for commercially made breads.  The label is a bit misleading as the ingredients in the flour (niacin, thiamine mononitrate, riboflavin and folic acid) are not listed in the ingredients although they are included in the nutritional information.  Many bread manufacturers do include the flour ingredients along with the list of other ingredients.  Of note is the canola oil which is definitely GMO!  Calcium propionate is a bacterial and mold inhibitor (aka preservative) which extends the shelf life of the bread.  Sodium stearoyl-2-lactylate is a salt that is used as an emulsifier/plasticizer/surface action agent to ensure consistent product qualtity.  This wonderful cocktail of chemicals only costs $2.27 for a 675 g (1.5 lb) loaf of bread.

ingredients in Walmart bakery Italian style crusty bread
Our Walmart has a bakery section for their fresh baked in store bakery goodies.  Most of their loaves of bread are $2.97 except their crusty Italian and French style that are only 97¢ for a 400 g (.88 lb) loaf of bread.  They are good at including some of the ingredients that are in the actual flourlike ADA but make no mention of the B vitamins or iron.  Ascorbic acid (Vitamin C) is a reducing agent similar to L-cysteine hydrochloride that strengthens the dough and the development of the gluten. Of not is the canola oil which is GMO and the 'contains: milk, wheat, rye, soy" and the 'may contain: tree nuts, peanuts, egg, sesame".  This is especially important for those folks who have food sensitivities to or who are allergic to any of these ingredients. 

crusty bread cut
Let's talk homemade bread!  

A small bakery opened up in town a couple of years ago.  This was a bit abnormal in a time when many small town bakeries have been closing up shop.  I checked it out always looking for ideas and more than willing to buy a loaf or two to duplicate at home.  At first, I didn't think they would stay in business with an average price of $3 per loaf of bread but they seem to be hanging in there and at only a couple of pennies per loaf more than the Walmart bakery and some brand names, there may be hope for this bakery after all. What this bakery has going for it is the bread is about as close to homemade as you can get without making it yourself. 

Homemade breads can save you a substantial amount of money.  While Walmart's Italian style crusty bread (.88 lb) only cost 97¢, my homemade no-knead version cost a total of 29¢ for a 1.5 lb loaf of bread, almost twice the weight of the Walmart bread saving me in essence over $1.50 on one loaf of bread.  Compared to the D'Itananio, (675 g/ 1.5 lb) I saved $1.98.  At three loaves of bread per week and saving at least $1.50 per loaf of bread, it works out to an annual savings of $234.   

In terms of quality, homemade bread is far superior to mass produced breads.  Did you know that bakery and homemade breads are so popular in the Netherlands they don't even have mass produced breads?  Instead they bring in artisan breads from Germany daily to stock the many bakeries.  That says something about the quality and popularity of artisan breads!  I use enriched unbleached flour for any white breads or any breads requiring a portion of white flour that I make.  That means my breads do contain all the additives (ADA, niacin, thiamin mononitrate, riboflavin, folic acid and iron) that are in the enriched flour.  The exception is when I have access to organic, additive free, unbleached flour. I also use dough enhancers (lethicin, gluten flour) from time to time but not on a regular basis.  Other ingredients that I may add tend to be organic, in the case of eggs they are free range, salt is sea salt not iodized, and I prefer using local raw honey, maple syrup, molasses or rice syrup as a sweetener over refined sugar.  If I do use sugar, it is organic.  Unlike some commercially baked breads, my homemade breads have no preservatives or added emulsifiers.  A surprising number of brands of whole wheat and whole grain breads contain artificial flavours or colours and they are HFCS free.  My whole wheat and whole grain breads contain none of these.  My fermented breads (eg. sour dough, crusty breads) develop a natural tang that eludes store bought breads, much more like what you would find in an artisan bakery.

Making your own bread is one of the most frugal things you can do in terms of quality and cost.  You need only a mixing bowl, a baking sheet and/or bread pan, the ingredients and your hands to make good bread.  Both a stand mixer and breadmachine take a lot of the work out of making bread.  The cost of both either can quickly be recovered in the money you save not buying store bought breads.  A Dutch oven is nice is you want to make crusty bread or rolls.  An inexpensive one new will cost about $40 on sale but these are also common yard sale and resale store finds for around $5.  The ingredients for making good bread are inexpensive and simple ranging from only flour, salt, yeast and water to a few other low cost additions if desired.  Even using organic, additive-free flour that is more expensive will still save you money while putting a far superior bread on your table in comparison to mass produced breads.  There are many ways to reduce the actual hands on time it takes to make bread but really most of the time involved with bread-making is waiting for the dough to rise.   At any rate, if you have not tried making your own bread, now is the time to start.  You will be pleasantly surprised!


Friday, April 05, 2013

No Knead Crusty Bread

I bake a lot of bread, averaging now about three loaves a week but when the kids were still at home I averaged more.  Over the years, I have developed some of my own bread recipes and we do have our family favourites.  The one bread that has always eluded me is crusty bread.  A good crusty bread has a crispy, crunchy crust with chewy interior.  It is one of the very few breads that I resorted to buying because I couldn't make it.  Crusty bread is not so much about the recipe, it is about the baking method which involves steam.  I was showing my new Lagostina cookware set to a couple of our kids and our daughter said, you know you can bake bread in the cast iron Dutch oven.  Well, my interest was peaked especially since steam would be created if the lid were in place so I reasoned this may be a way for me to get that elusive crusty bread.

An online search quickly brought up several references to Jim Lahey's  no knead crusty bread recipe and method of baking in a cast iron Dutch oven that originally appeared in The New York Time's Minimalist column.   His method is based on fermentation much the same as a sour dough bread to develop the flavour.  He used little yeast (on 1/4 tsp) and a lot of water to make a sticky, wet dough that was then allowed to ferment 12 to 18 hours before being shaped, proofed and baked in a Dutch oven with the lid on.  Several folk have modified his basic recipe, adding a bit more yeast or decreasing the amount of water and the various additions like sharp cheddar cheese take the basic artisan recipe to the artistic level.  The flour can be entirely unbleached or it can be a combination of whole wheat or rye and unbleached flours.  There is even a gluten free version using brown rice flour, potato starch and tapioca starch!  Jim has a video on YouTube (Speedy No-Kneed Bread Revisited)  to modify the fermentation period to only 4 hours but I don't mind the longer fermentation period for flavour development.  So the possibilities for this bread once you learn the basics is endless.  I will warn you now, there are a lot of pictures for this post because I wanted to show you each step I did.

scruffy dough ready for proofing
No Knead Crusty Bread
(modified Jim Lahey recipe)

3 c unbleached flour
1¾ tsp sea salt
½ tsp instant yeast
1½ c luke warm water

Mix ingredients together to form a shaggy dough.  Cover bowl with plastic wrap.  Ferment 12 to 18 hours.  Shape into round on floured parchment paper.  Let proof 30 minutes while Dutch oven pre-heats at 450°F.  Place loaf on the parchment paper into Dutch oven.  Cover and bake at 450°F for 30 minutes.  Remove lid and continue baking for 15 minutes.  Remove from oven.  Place on rack to cool.

The dough takes less than 5 minutes to make.  There is no kneading at all.  Simply mix and set aside for fermentation.  The dough will be quite sticky and it certainly does look shaggy in comparison to other bread doughs that are smooth and elastic looking.  I covered the bowl with plastic wrap and set it on the counter to ferment overnight.
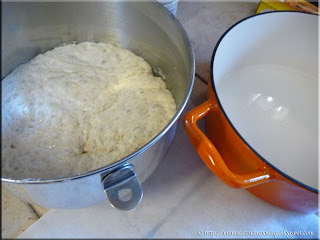
dough sponge ready for second proofing
I started my dough at 8:30 PM figuring it would be ready for baking at 3:30 PM the following day.  The following morning at about 9 AM the dough was nice and bubbly, ready for baking.  This is exactly what the dough should look like before moving to the next step.  I decided to go ahead and make the bread then even though my fermentation period was only 12 hours.  Once the dough is at the bubbly stage, if left too long it can fall because all of the starch and sugar in the flour has been consumed by the yeast.  This commonly happens when making sour dough sponge if left too long so it is important to move to the next stage once the sponge is ready.   If the sponge falls, the fix is to add a bit more flour to feed the yeast.  Once the sponge returns to bubbly, then use. 

I placed about a cup of water in my Dutch oven, put the lid on then put it into the oven at 450°F for 30 minutes.  Some folks are not adding water to their Dutch ovens for this pre-heating but others are as their brand cannot be heated empty.  I decided to err on the side of caution.  After the pre-heat period, the water was completely evapourated so next time I will add more water then empty just before putting the dough in.

shaped dough on parchment paper covered with plastic wrap
While the Dutch oven was pre-heating, I floured a piece of parchment paper then shaped the dough into a ball on the parchment paper and covered with plastic wrap to proof for 30 minutes.  Some folks do not use parchment paper but others find getting the loaf into the hot Dutch oven is a lot easier if using parchment paper.  The paper goes right into the Dutch oven along with the loaf of bread so the loaf itself is not disturbed while being transferred.  With such a sticky dough, the less handling the better for a nicely shaped loaf.  I found the parchment paper method extremely easy and fool-proof.

Some bread doughs can tolerate a heavy hand when shaping but I used a lighter touch to shape this loaf.  I did not notice any remarkable increase in size of the dough during the 30 minute proof although the dough itself did not look quite as shaggy.   Once the dough had proofed for 30 minutes it was time to put the loaf into the heated Dutch oven.

prepared dough in heated Dutch oven
I removed the Dutch oven from the oven and the plastic wrap from the dough.  Then I carefully brought up each corner of the parchment paper to form a sling.  Holding the four corners together, I carefully transferred the dough into the Dutch oven.  I trimmed the corners of the parchment paper so they would not stick out of the Dutch oven or over the dough when baking.  I put the lid on the Dutch oven and put it back into the heated oven.  I let the bread bake at 450°F covered for 30 minutes then removed the lid and baked the bread for an additional 12 minutes rather than the 15 minutes others were using.  The initial bake is what gives the interior of the bread that nice chewy texture.  The final bake turns the crust a golden brown with that wonderful crunchy, crisp texture.  Oh my gosh, did it ever smell heavenly baking!

baked bread in Dutch oven just out of the oven
I had the light on in the oven for the final 15 minutes so I could remove the loaf before it darkened too much.  Ovens vary in temperature so it is always best to monitor the progress carefully during the last few minutes of baking.   I found that the loaf looked quite lovely after a final 12 minutes of baking. 

I carefully lifted the loaf of bread and parchment paper from the hot Dutch oven.  The Dutch oven itself, was still clean as if nothing had ever baked in it!  On the other hand, properly baked yeast breads usually do leave the baking pan quite clean.  Still, the loaf of bread looked good just out of the oven.

With anticipation mounting, I set the loaf of bread on a cooling rack, anxious to cut it for the final taste results.  The loaf of bread was gorgeous with a lovely rise, beautiful golden brown crust and tantalizing aroma.  The piece de resistance was the crust cracking as it cooled.  This is the ultimate sign of a good crusty loaf.  I was so excited that I even took a video to capture that cracking sound.

The loaf had a lovely rustic quality.  I really wanted to cut into that loaf of bread while it was still hot!  However, the bread was destined for dinner last night so I had to resist.   It was only 10 AM and had I cut into the loaf, it would have been gone by dinner time!

crusty bread wrapped in t-towel
Once you have a nice crusty bread, the secret is keeping it crusty.  If you have ever bought crusty bread from a bakery, you will have noticed it is never packaged in plastic.  Plastic traps the moisture causing the crust to soften and lose it's wonderful crunch.  Instead, crusty breads are placed in paper bags usually with the end open to prevent any moisture from becoming trapped.  The easy home solution is to wrap the bread in a t-towel, in this case one of the bar towels I use in place of t-towels.  This prevents moisture from becoming trapped while preventing the bread from drying out too quickly.  The bread sat on the counter, safely wrapped in the t-towel until dinner time. 

Loaves of crusty bread destined for gift given can be place into a t-towel lined basket then covered with a t-towel.  An alternative method is to place the loaf of bread in the middle of a t-towel then bring up the corners and secure with a ribbon.  As such, the t-towel becomes part of the gift so I like keeping a few new t-towels on hand for this purpose.

crusty bread cut
I used a serrated bread knife to cut the loaf of crusty bread.  The pores formed from gaseous bubbles produced by the yeast were nicely formed, large, open and irregular as opposed to the finer small pores found in store bought white breads.  This structure is a result of a high water content combined with the no-knead method.  The final test before giving this bread two thumbs up was of course the taste test.  It certainly excelled there!  There is less of a yeast more of a wheat flavour.  The crust was delightfully crunchy yet the inside tender and chewy.  Finally, I had made a wonderful homemade loaf of crusty bread!

This no-knead crusty bread is very easy to make and is very versatile.  The dough is simply mixed, covered and set aside until bubbly.  If you want fresh bread the following day, just mix the dough the night before which takes less than 5 minutes.  The following day, it will take 2 minutes to shape the dough, 30 minutes heating of Dutch oven and proofing of the dough,  30 minutes initial bake time and 12 to 15 minutes final bake time for a total of 84 to 87 minutes (1 hr 45 min to 1 hr 17 min).  This really is not bad considering there is practically no prep and the resulting bread is beyond delicious!  While there are a lot of variations from Jim Lahey's original ingredients as far as quantity, the basic recipe consists only of flour, salt, yeast and water combined with a long fermentation period.  The fermentation period allows the dough to develop both rise and flavour so while some are trying to reduce the fermentation period, it will not be something I tinker with.  The reason being, I have made enough sourdough breads to appreciate the extra flavour longer fermentation periods impart to the bread.  Some have added butter or oil and/or sugar taking the bread a step away from the original.  Others have added other ingredients like nuts, herbs, cheese, seasonings, cranberries or raisins.  Some of these combinations get rather creative!   Even the baking method has been altered from using a Dutch oven to using a slow cooker, countertop roaster and make shift covered pots.  Still, a Dutch oven is likely the easiest way to get the crispy crust.  I also saw where some used the no-knead recipe and simply baked as a regular loaf of bread without covering.  This of course would not give the crispy crust and for those of us who use a Kitchen Aid stand mixer for kneading bread doughs, it would not save much in the way of time.  It would save time for those who are kneading by hand.

The bottom line is, this bread recipe and method is a real keeper!  The basic recipe is delicious without any further additions but it can also serve as the basis for a wide range of creative breads.   I will be posting more on some of my creations made using the basic recipe.  In the meantime, if you want a few ideas or to see how others have modified the original recipe, search online with the key words "no knead crusty bread" or "no knead bread".



Saturday, January 19, 2013

Chile con Carne with Cheesy Garlic Bread

January is very much a laid back, catch-up month for us rounding up the end of our winter vacation in December, the holidays and entertaining, as well as re-adjusting to the cold weather and getting the house up and running smoothly.  The first week of January I started a batch of yogurt, sour cream, sour dough starter and turned my attention to grocery shopping for produce and dairy.  My husband came down with a cold so I focused on home-made comfort meals.  The down time gave me a bit of time to plan what food preservation needed to be done.  Then by the second week of January I was sick and it hung on [I sure wish we would get a hard freeze to kill off all the germs!] so it was relying on the pantry and freezers.

chili from the freezer served with cheesy garlic bread
Chili con carne is one of our favourite home made meals.  Whether made with beef or venison, my version does contain beans that are cooked fresh when making a large batch or home canned if making a small batch.  The reality is, it takes as much work to make a huge batch of chili con carne as it does a smaller one.  I personally prefer to make the largest batch possible.  I home can chili con carne and it freezes nicely.  I usually freeze in 4 to 6 serving size.  It warms up nicely on the stove top or in the slow cooker.  Even if you don't home can the chili, this is one convenience product that can be frozen for a quick meal.

January is very much a fresh start month so we are rather busy but that doesn't mean we can't eat well.  I partially thawed a smaller container of chili con carne from the freezer.  Freezing chile con carne is very easy.  Once it is finished cooking, quick cool then ladle into freezer containers or freezer bags.  It can be froze in a container then popped out into a vacuum bag and vacuum sealed if desired.   If reheating on the stove top the chili need only be thawed enough to be able to get it out of the container.  I put it in a saucepan with just a little water then heat through.  If I am doing a larger amount for entertaining, I thaw the chili then reheat using a slow cooker.

Chili con carne is often served with soda crackers, tortilla or nacho chips, or corn bread.  I like serving it with cheesy garlic bread.  This is very easy to make and there are even ready to use, pre-made garlic bread loaves available, however home-made cheesy garlic bread is ever so easy to make.  I like using a home made French baguette but other breads can be used.

Method:  Use thick sliced home-made Italian style bread to make the cheesy garlic bread.  Lightly toast the bread in the oven.  Cut a garlic clove in half and rub over the surface of the toasted bread.  An alternative method is to brush the bread with garlic butter (finely chopped garlic blended into soft butter with a bit of parsley).  Top each slice generously with shredded mozzarella cheese.  Bake at 400°F until cheese is bubbly and just lightly browning.


Wednesday, January 09, 2013

Artisan Sweet Cherry Bread

I grew up in a small town (pop. ~ 2,000).  One of my greatest pleasures as a child was waking up to the smell of bread baking from the local bakery less than a two minute run from our house.  I would quickly dress, get 50¢ from my Mom then out the door I would go anticipating the delicious flavour of fresh baked bread.  I'd arrive back at the house with the bread still warm.  This really was the best of artisan bread!

At one time, small Mom & Pop bakeries could be found in most villages, towns and even cities all featuring artisan breads.  Artisan breads are those crafted in small batches rather than massed produced.  Great attention is paid to the quality of ingredients.  Unlike massed produced 'stay fresh forever' breads, artisan breads do not contain HFCS, preservatives, artificial flavours or artificial colours.  As a result artisan breads do not keep as long so are best used within a day or two.  They are healthier for you!  Home-made breads made from scratch and baked in the oven or on the grill are considered artisan.  Breads made in a bread-machine are not because part of the results differ from handmade, oven baked.  Artisan breads are as much about the process as they are the ingredients and delicious end results.  Artisan breads are often referred to as speciality breads.

artisan sweet cherry bread
The small bakery of my childhood is no longer a bakery.  The very small, and I do mean small bakery in the village (pop. ~ 1,100) we lived in a few years back closed leaving the villagers quite disappointed.  The bakery in the town (pop. ~11,000) closed back in the 1980's leaving the town without a bakery.  About three years ago, a small bakery opened up down town featuring artisan breads.  I bake a lot of bread and always have, mostly artisan breads.

We have been fairly lucky at finding artisan bakeries during our travels.  One tourist village a few kilometres from where we enjoyed camping had a very tiny (about 8' square) bakery but the bread was baked in the most amazing outdoor oven I've ever seen.  That bread was incredible!  We haven't found an artisan bakery near our vacation home but there is an onsite small bakery at the Publix featuring fresh baked, artisan breads.  What has become increasing more common is small artisan bakeries selling their products through the big box stores.

We stopped at a Meijer's on the way home from our vacation.  They carry a small selection of artisan breads from a Michigan artisan bakery.  I thought the sweet cherry bread topped with icing would be a festive dish to take to the party we were attending the following day.  This was a delicate pink yeast bread dotted with maraschino cherries.  The icing was a simple thick icing sugar icing with just a hint of almond.  Almond extract is often used with cherries because it enhances the flavour of the cherries.  This would be rather easy to duplicate at home using a sweet yeast bread base (eg. the base used for cinnamon bread) then substitute maraschino cherries for the raisins and almond extract for the cinnamon, then adjusting to desired consistency.  I would add the cherries in just before finishing the first knead to prevent too much crushing.  Hmm, sounds like a bread experiment in development :)