My photo
Ontario, Canada
I am a wife, mother and grandma who enjoys the many aspects of homemaking. A variety of interests and hobbies combined with travel keep me active. They reflect the importance of family, friends, home and good food.
Cook ingredients that you are used to cooking by other techniques, such as fish, chicken, or hamburgers. In other words be comfortable with the ingredients you are using.
--Bobby Flay

For Your Information

Please watch this area for important information like updates, food recalls, polls, contests, coupons, and freebies.
  • [March 19, 2020] - Effective Mar 17, this blog will no longer accept advertising. The reason is very simple. If I like a product, I will promote it without compensation. If I don't like a product, I will have no problem saying so.
  • [March 17, 2020] - A return to blogging! Stay tuned for new tips, resources and all things food related.
  • [February 1, 2016] - An interesting report on why you should always choose organic tea verses non-organic: Toxic Tea (pdf format)
  • Sticky Post - Warning: 4ever Recap reusable canning lids. The reports are growing daily of these lids losing their seal during storage. Some have lost their entire season's worth of canning to these seal failures! [Update: 4ever Recap appears to be out of business.]

Popular Posts

Showing posts with label baking. Show all posts

Friday, April 19, 2013

First Loaf of Five Minutes a Day Artisan Bread - Artisan Boule

It is busy times in the kitchen between testing the 4ever Recap canning lids and experimenting with crusty artisan breads, currently no knead crusty bread (room temperature fermentation) and five minutes a day artisan bread (cold fermentation).  Fermentation is what gives sourdough bread its characteristic tang.  Both of these breads have a bit of a tang.  It is very mild in the no knead crusty bread and more pronounced in the five minutes a day artisan bread the longer the dough is allowed to ferment in the refrigerator.  That is the first loaf of bread made from the five minutes a day dough will not have as much of a tang as the last loaf that will be made several days later if the dough is used as intended.  Neither of these no knead breads actually save any time in comparison to kneaded breads but they do eliminate the process of kneading.  The second thing both these breads have in common is the crispy, chewy crust with soft interior.  This is due to the high moisture content in the dough and baking the bread in a cast iron Dutch oven so the steam cannot escape until the lid is removed for the final browning stage.

five minutes a day artisan bread dough just out of refrigerator with dough cut and boule shaped
I removed the five minutes a day artisan bread dough from the refrigerator.  It had fallen a bit from when the dough was first refrigerated but according to Jeff and Zoe (developers of the cold fermentation process for this recipe), this is common with the dough.  I found it easiest to cut the dough with a serrated knife.  The dough was sticky but easier to handle because it was cold.  I shaped the piece of dough into a boule (round bread loaf shape) on a piece of floured parchment paper then covered with plastic wrap.  The remainder of the dough was returned to the refrigerator.  The covered boule was left to rise for about 2½ hours.  The longer the shaped dough is allowed to sit, the larger the bread pores will be. 

I placed the enamel Dutch oven in the oven at 450°F and let heat during the last 30 minutes the dough was rising.  Some using this method put their Dutch oven in to heat dry but at least one manufacturer advises against this so I added 2 cups of water to the Dutch oven before heating.  Once the Dutch oven was heated, I removed it from the oven, emptied the remaining water then brought the four corners of the parchment paper together sling style to transfer paper and dough into the Dutch oven.  I put the lid on the Dutch oven then returned it to the oven to bake the bread for 50 minutes at 450°F.  Then I removed the lid and baked for uncovered for 12 minutes.  The recommended timing is 15 minutes but timing needs to be adjusted to your oven.

boule just out of oven
I did not slash the dough as Jeff and Zoe do but will likely experiment with doing so.  Slashing the dough gives a better rise during baking. It is done with a very sharp knife or blade just before putting the dough in the oven.  Slashing at a 45 degree angle gives the characteristic ears during baking giving the loaf of bread a professional look.  Instead, my loaf was a lovely boule without the slashes.

The bread smelled heavenly!  There was a good rise and that characteristic crackling sound as the loaf cooled.  I was quite pleased with the results even without the slashes.  I could not wait to taste test this bread!

artisan plain boule crumb appeal
I cut the bread with a serrated bread knife.  The pours were nicely defined.  The texture was perfect!  The bread did not have a real sharp tang, more of a mellow, subtle tang similar to sourdough bread made using fresh starter before it has a chance to develop a good tang.

All in all, I am having fairly good success baking bread in the Dutch oven.  The plain breads are working out considerably better than expected.  While the dough fermented at room temperature results in an excellent loaf of bread, the dough fermented at cold temperature gives outstanding results in terms of both texture and flavour.

I am experiencing a bit of a timing problem though.  I shaped the dough at 2:30 PM, set aside until 4:30 PM figuring it would be perfect timing for eating just before 6 PM.  However, the dough did not cooperate likely because the kitchen was a bit cooler.  I hadn't been cooking that day so there was no residual excess heat in the kitchen.  This meant it took longer for the dough to get to the point of being ready for baking.  Trying to get dinner ready while still fiddling with bread was not ideal but it is nothing new.  Typically, this happens within the few days after turning the furnace off for the season or the few days before turning the furnace on for the season when the entire house is cooler than normal.  I usually try to compensate by cooking or canning in the morning to heat the kitchen a bit.

The experimentation continues.  I made a garlic, onion and cheese boule and a cheese boule so I will be discussing the results of both those loaves.  That leaves me enough for one very large loaf or two smaller loaves of bread using the five minutes a day artisan dough.  The dough has developed a lovely sourdough smell!  I'm not sure what I will make with the remainder yet but am thinking a plain to gauge the degree of tang I can get using this dough and perhaps a loaf of raisin bread.  I will discuss those loaves as well so be sure to continue reading!  At this point, I will be naming the bread according to the additional ingredients used (eg. Artisan boule) as I did with this loaf with a link as to which base recipe I used, room temperature fermentation or cold fermentation.


Tuesday, April 09, 2013

Healthier Versions of Two Family Favourites - Peanut Butter Cookies and Banana Bread

My husband and I have always believed in eating good foods which for us translates in home cooked from scratch.  Over the past few years I have modified many of our family favourites so they are slightly to moderately healthier versions without losing the tried and true flavour of the original dish.  Why would I do this?  The culinary world and that does include home cooking like any discipline is constantly evolving.  New knowledge comes to light that gives insight into the nutritional aspect of cooking, improved cooking methods and in many ways how to use old fashioned methods in an ever changing modern world. 

healthier peanut butter cookies and banana bread
We eat a rather healthy diet by avoiding food preservatives, artificial food additives, HFCS, excess sugar and salt.  We eat hormone free meats, free range chickens and eggs and rely heavily on locally grown produce as well as grow our own.  It is little wonder that about 90% of the baked goods we consume are home made from scratch, including most breads.  There is always room for improvement in healthy cooking. 

Let's face it, cookies are not as healthy of a snack choice as a carrot stick but they are certainly a lot healthier than some snack choices.  Home baked cookies are healthier for you than the chemically laden mass produced cookies.  I've been making the very same peanut butter cookie recipe from the 1969 Betty Crocker's Cookbook.  The recipe calls for either butter or margarine.  I use butter as we do not use margarine in our home.  I substituted organic additive free unbleached flour for the all-purpose flour and organic granulated sugar for the white granulated sugar.   I substituted Kraft light 25% less fat smooth peanut butter for regular peanut butter and reduced the salt (I only use sea salt) because there is salt in the peanut butter.  The cookies tasted the same as always!  The next batch I am going to use homemade peanut butter.  If that works well, I will have reduced the fat in the cookies by a fair amount.  I also want to try making the cookies with spelt, an ancient grain that is healthier.

Mass produced peanut butter is not as healthy for you as the food industry would have you believe.  It is laden with fat and sugar giving it a smoother texture than homemade peanut butter.  It doesn't separate like homemade peanut butter because vegetable oil is added to prevent separation.  It also contains corn dextrin, something of concern to those with a corn allergy or insensitivity.  We are not huge consumers of  peanut butter at under a purchased 1kg jar per year for cookies if that and about half of that in homemade peanut butter.    I'm hoping homemade peanut butter will work in these cookies just as well!

Banana bread is wonderful for breakfast or snacking and it travels well for lunches.  It is my frugal standby for using up over ripe bananas.  I have been making this same banana bread recipe since our newlywed days.  It is handwritten in my very first cooking journal, overwritten with copious modifications to the recipe it has become today.  I have experimented using whole wheat flour in place of all purpose flour which gives the loaf a denser, grainier texture but is still quite good.  The combination that works well for texture is 1 c of unbleached flour and ¾ whole wheat flour, both healthier than all-purpose flour.  I use sea salt rather than iodized salt, organic sugar rather than regular white sugar an butter instead of shortening.  Recently, I have been making this bread with organic bananas that have just recently become available at our local Walmart.  The organic bananas are currently 10¢ per pound more expensive than regular (57¢ per lb) and I doubt they will go on sale the way regular bananas do but time will tell.  Aside of trying this recipe using spelt in place of the unbleached flour, it is about as healthy as it is going to get.

It is surprising how a few simple and inexpensive changes can make a recipe healthier without affecting the taste.  These changes are part of moving towards a healthier diet while still enjoying the comforts of your favourite dishes.  I have found pretty much any organic substitutes without a problem for its non-organic equivalent.  Canola oil (GMO) can be substituted with an non-GMO light tasting oil.  Cane syrup is a good substitution for corn syrup.  Whole wheat pasta and pastas enriched with vegetables pretty much have the same colour and texture as plain pastas although there may be a colour difference.  Through trial and error, it is surprisingly rather easy to find healthier ingredients for your favourite reciepes. 


Sunday, January 22, 2012

Wilton Cake Release Clone Recipe

Many turn to spray oils to help with their baking however, I don't like to use aerosol sprays due to additives.  They tend to be a lung irritant, they are expensive and they are not eco-friendly.  I use a health mister which is a reusable spray bottle filled with your oil of choice.  However, when it comes to baking cakes you need a bit more of a release agent even if using silicone bakeware.  Here is a clone recipe for Wilton Cake Release.  It is quick and easy to make but not very photogenic (sorry, no picture).  The cake release will keep nicely in the pantry without refrigeration.  I make it a 1 cup total measure but if you do a lot of cake and muffin baking you may need to make a larger batch.  This recipe will cost you only pennies, well under $1 depending on how much you make in comparison to Wilton Cake Release at $5.99 per can.

Wilton Cake Release
recipe by:  unknown

1 pt light flavoured vegetable oil
1 pt organic, unbleached flour
1 pt vegetable shortening

Place the ingredients in a food blender.  Blend until smooth and creamy.  Scoop into an airtight container for shelf storage.  Use a pastry brush to coat the pan then use the pan as normal.  


Friday, January 13, 2012

Baked Cod with Bacon Wrapped Scallops

My husband and I both love our beef but we also eat fish once or twice a week, sometimes more often.  By far, we enjoy locally caught fish (eg. perch, bass, pickerel) on a regular basis.  Next to that is cod and Atlantic wild salmon.  Cod is traditionally used in beer battered, deep-fried, English style fish but cod can also be pan fried, baked or grilled.  I buy a good portion of the cod fillets we consume from Elite Gourmet Food Service.  True to their word, this is some of the best cod available. 

baked cod with bacon wrapped scallops
I made a simple seafood dinner consisting of baked cod and bacon wrapped Digby scallops.  Now, bacon wrapped scallops are usually served as an appetizer.  I decided to serve them as part of the main course instead along with a simple baked potato.  It was a very easy, oven based dinner that was surprising a lot more filling than it first appeared.  An orange sauce would have been nice on the cod which reminds me I need to can up a few jars.

Some of the very best scallops come from Digby, Nova Scotia.  I can order fresh scallops from the fisheries there that will arrive at my doorstep the following day for about $85 dollars with shipping which works out to $1 per scallop.  The local grocery store price is about $2 per scallop.  I can also buy from Elite Gourmet Food Services a 5 lb box for $115.  While that sounds expensive that box will last us for quite some time because we tend to use scallops as an accent flavour to add a bit of something special to the meal (aka a treat).  I should note that my husband could easily polish of a box of scallops or a couple of pounds when I buy them fresh.  I like the sweetness of scallops and while I do enjoy scallops, I do not share his enthusiasm for them.   

Cod is very, very easy to bake.  Simple place the cod fillets in a baking dish.  Top with a little butter and seasonings (optional) then bake at 350ºF until opague.  They are ready for serving.  Top with orange or lemon glaze or serve simply with homemade tartar sauce.


Simple Homemade Tartar Sauce
note: I do not measure

Miracle Whip or mayonnaise
prepared yellow mustard
sweet pickle relish

Place about 1 c of Miracle Whip in a mixing bowl.  Squeeze about a half tsp of mustard on top then about 2 tbsp of relish.  Mix well.  Adjust the flavour if necessary by adding more relish. 


Thursday, December 15, 2011

Kitchen Quick Tips - Baking Powder

kitchen quick tips

Baking powder loses its potency over time so it is best to buy in smaller containers.  To test if the baking powder is still good, pour ½ tsp of baking powder into ⅓ c of hot water.  If it bubbles vigorously then the baking powder is still good to use. 


Sunday, November 20, 2011

Ten Dozen Peanut Butter Cookies

I don't make a lot of cookies and I don't make them often yet when I do I turn to my Betty Crocker's Cookbook (circa 1969) for easy recipes.  There is a lot of history behind that cookbook!  My Mom gave it to me as a wedding gift that has served me well over the years.  It is my most prized and cherished cookbook and while I have a smaller Betty Crocker's New Cookbook (1996) and the newest copy of the the big red Betty Crocker Cookbook (2011), I still turn to my cherished 1969 edition. 

peanut butter cookies in the oven
My husband's favourite cookie is peanut butter.  I make them a couple of times a year using my tried and trusted recipe for peanut butter cookies from Betty Crocker's Cookbook (circa 1969).  I have used this recipe since being a newlywed.  It has brought many a smile over the years. 

If you have been following this blog you will know we recently moved and I made the ultimate decision to switch to natural gas as a cooking fuel.  This was a hard decision as I seriously loved my Jenn-Air slide in range.  I was determined to switch to natural gas with this move due to the ever rising costs of hydro in Ontario, Canada as well as being able to accommodate the larger stock pots and pressure canners I use on a regular basis.

I made a large batch of peanut butter cookies a couple of days ago, ten dozen to be precise.  I have read a lot of complaints about natural gas ovens with respect to them having hot spots so was a bit nervous baking cookies for the first time.  Pictured is a tray of the peanut butter cookies in the oven.  Granted I have gone from three oven racks to two but other than that, the cookies baked nicely without a problem.

ten dozen peanut butter cookies
So what does ten doezen peanut butter cookies look like?  Voila!  The white tray was prepared for a larger event we were hosting last Saturday.  I apologize for the quality of the picture as the cookies were not over baked!  I'm getting used to the lighting in the new kitchen that is resulting in a few less than ideal pictures. 

Peanut butter cookies freeze nicely so I set the tray aside for the weekend, filled a container with cookies for my husband to take to the office then packaged the rest for freezing.  It was a very productive evening!  Oh my gosh did the house ever smell good and my husband was in seventh heaven seeing that many peanut butter cookies.  Next up, shortbread cookies!


Sunday, November 13, 2011

First Batch of Bread in New Natural Gas Oven

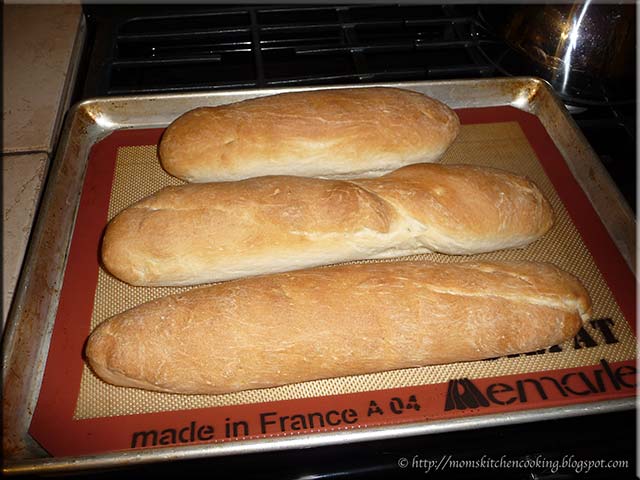
My husband came home from hunt camp yesterday so I wanted the house warm and welcoming when he arrived.  I made a slow-cooker Tuscan chili (watch for the recipe next week) and my tried and tested, favourite French bread.  As planned the house smelled wonderful, filled with the tantalizing aroma promising a delicious evening meal.

French bread baked in my new natural gas oven
Our dining/living room has a beautiful large south facing window with a half circle window over it.  On sunny days this end of the house gets quite warm making it a perfect spot for proofing bread.  I made the dough, let it proof then shaped into three loaves. 

I did not anticipate any problems baking bread in the new natural gas oven as I've baked bread often in the outdoor grill.  The loaves baked as they normally would although a bit quicker than in the electric oven.  My experience has been bread cooks about 5 minutes faster using natural gas and 8 - 10 minutes faster using propane when compared to using hydro.  So far, I am enjoying my new gas range immensely, quite pleased with the results combined with lower cooking costs.  I'm no longer watching the clock to see when I can do a bit of cooking at the lower TOU hydro rates.  Initially I was concerned switching to a gas oven as I've heard they can be problematic for hot spots but this one seems to be quite good so far. 

There are many reasons why a home cook changes cooking fuel with the most common being relocating.  The cooking fuel they were used to using simply is not available at their new location.  My Mom had a horrible time adjusting from cooking with natural gas to electricity when she moved into an apartment.  Her solution was simple to do minimal cooking and more eating out.  Many find themselves in the same situation.  My recommendation is to use tried and tested recipes during the learning curve period of using a new cooking fuel.  Keep the various dishes simple to avoid frustration.  With a bit of practice and patience you will easily master cooking using a different cooking fuel than you were used to. 


Tuesday, June 28, 2011

Baked Chicken Breasts

There are so many ways to cook chicken and each method gives different results.  Chicken is higher in fat than some alternatives but that can be reduced by removing the skin along with any remaining fat before cooking.  Removing the fat can result in drier meat especially if grilling or baking.  It can also result in a less flavourful meat.  The work around for both is to use some type of sauce that will provide both moisture and flavour when using a dry cooking method (eg. grilling, baking) or use a moist cooking method (eg. braising, slow cooking, pan frying).    It is also important to not over cook chicken especially when using dry cooking methods.  Cook until the juices run clear and/or use a meat thermometer for an internal temperature of 165ºF (74ºC).

baked chicken breasts
Baking chicken is one low fat method of cooking chicken.   I like using a sauce when baking boneless, skinless chicken breasts.  Diana Sauce is always a nice tomato based sauce for oven baked chicken.  An alternative to sauces is chutneys, jellies and marmalades.  I served the baked chicken breasts with home canned Old Vermont beans and baked potatoes. 

I discus home canned foods here quite a bit because that is what is in my pantry.  There is a myth that commercially canned foods are safer and generally better than home canned foods.  That simply is not true.  In fact, home canned foods are safer and better than commercially canned foods.  Government standards for commercially canned foods actually allow a low level of bug parts in commercially canned foods.  The allowable bug parts in my home canned food is zero.  With home canned foods you know the source, control the quality and eliminated food additives that can cause food allergies and other health problems.  

Dried beans are very economical even in comparison to store bought canned beans.  Cooking dried beans takes a bit of planning as they need to soak overnight before cooking.  An alternative method is the quick soak method where the beans are covered with water, brought to a boil then covered and allowed to soak for one hour before cooking.  However, dried beans can also be home canned at a fraction of the cost of store bought canned beans. 


Wednesday, April 13, 2011

Panko Encrusted Pork Chops

Breading, specifically bread crumbs is often used as a coating for meats, poultry and seafood.  While I am not a huge fan of heavy coating I'm a bit partial to coconut fried shrimp and my husband's famous signature pork chops.  Panko is a Japanese style of bread crumb made from a custom baked bread that results in airy, crispy crumbs that give a delicate crunch without burning problems.  These bread crumbs are more expensive than store bought bread crumbs and considerably more expensive than homemade bread crumbs.  I paid $3.49 for a 227 g box so that is rather expensive.  This is not the type of bread crumb you would use on a regular basis but it does lend itself well to specific culinary applications so well worth keeping a box on hand. 

panko encrusted pork chopsMost applications for panko call for deep frying and believe me it really is the only bread crumb to use if you want delectable coconut fried shrimp.  I decided to use them for panko encrusted pork chops baked in the oven.  This was just an easy, quick meat serving.

I set up three bowls - one with seasoned flour, one with panko bread crumbs and dried parsley flakes, and one with beaten eggs.  Then I dipped each boneless pork loin chop into the egg mixture, then flour, then egg and finally panko mixture.  I baked at 400ºF until golden brown.

I served the panko encrusted pork chops with leftover slow cooker baked bean, home canned green beans and oven baked potatoes.  The chops were absolutely delightful!  They were moist and tender inside yet crunchy on the outside which gives me an idea for pork nuggets.  All in all I was rather pleased with the results.


Tuesday, July 06, 2010

Maple Glazed Salmon (2)

Salmon is one of our favourite fish so we have it fairly often.  I was buying salmon steaks from M & M Meat Stores when it was on sale but NoFrills® is now carrying Highliner wild Pacific salmon fillets.  There are 4 fillets in a package for $5.97.  This is just enough fish for a dinner for two although most times we end up with one fillet leftover.

baked maple glazed salmon
I previously posted a maple glazed salmon recipe.  I modified that recipe to make the glaze for this maple glaze by adding 3 tbsp of butter.  Butter has a wonderful, rich flavour that pairs nicely with fish.  Butter also adds moisture to fish when it is cooking so it just seemed appropriate adding butter to the original glaze.  I kept the baking temperature at 180ºC (350ºF) then baked with the glaze for 20 minutes uncovered.

The addition of the butter added both flavour and moisture so the fillets were quite tasty.  I served the salmon fillets with Basmati rice and home canned wax beans.  It was a simple yet tasty meal.


Friday, April 23, 2010

Marmalade-Glazed Chicken Thighs

Oh my gosh, I get inspiration for recipes from so many sources including recipe books and magazines.  One thing you won't find in any of my recipe books or magazines is dog ears.  I honestly think that is so disrespectful!  What you will find ind several and I do mean several post-it note flags of the recipes I want to try.  When I'm looking for something a bit different I'll check out one of the flagged recipes then go from there.

marmalade glazed chicken thighs
So it was a couple of days ago when I wanted something just a little different but not radically different for dinner.  I found a great grill recipe that would use up a bit of marmalade.  It turned very cold so I thought grilling outdoors would not be quite as appealing and cleaning the indoor grill of a sugar based marinade was not quite on my idea of clean-up.  This is one area where indoor and outdoor grills differ.  Sugar based marinades make a huge mess on indoor grills that need to be cleaned off taking extra time and effort whereas this can simply be burned off on an outdoor grill.

Pictured is the marmalade-glazed chicken I made.  It was supposed to be grilled but I baked it instead.  I also used bone in, skin on chicken thighs so really the only thing left of the actual recipe was the marinade itself and I changed that as well.  The end result was flavourful, tender chicken paired with steamed in season Ontario asparagus and baked red potatoes.  It was a delightful, simple meal with a lot of flavour.

Marmalade-Glazed Chicken Thighs
source:  inspired from Canadian Living, August 2009, Pp. 59.

2 tbsp lemon juice
1 tbsp extra virgin olive oil (EVOO)
⅓ tsp dry rosemary
½ tsp garlic powder
¼ tsp sea salt
¼ tsp fresh ground pepper
2 tbsp orange marmalade

8 chicken thighs

Warm the marmalade to melt.  Wisk in the other ingredients.  Place the chicken wings in a baking pan.  Pour the marinade over then lightly brush to even out with a silicone brush.  Let sit 30 minutes.  Bake covered at 350ºF until chicken is cooked through about 40 minutes. Remove from oven and serve as desired.


Monday, March 22, 2010

Frugal Kitchens 101 - Baking

Frugal Kitchens 101

According to the results of our latest poll: out of 41 votes 51% (21) baked less than 1 a week; 34% (14) baked 1 to 3 times a week; 4% baked 4 - 6 (2) times a week; 4% (2) baked daily; and 4% (2) did not know they had an oven. If the extremes are removed, then the average reader here baking somewhere in the 1 to 3 times a week. That is a fairly good number.

Home baking can save a considerable amount of money in comparison to store bought bakery products. Baking really falls under a couple of categories but the two main ones are baking entirely from scratch or baking using ready made doughs or mixes. Some use a combined method in which everything is scratch except a certain ingredient such as puff pastry, phyllo dough or pie crust. By far the cheapest for home baked products is entirely from scratch. The most expensive for home baking often coming in at close to the store bought price is baking entirely from mixes. In between these two is the happy medium of using a pre-made ingredient or two with the rest from scratch that often becomes the more frugal choice for home baking.

Let's face it some despite multiple attempts some just cannot make a good pie dough so rather than waste the ingredients and time, buying a pre-made pie dough is a reasonable alternative. At the same time both phyllo dough and puff pastry are time consuming and can be very frustrating to make. I follow the tip from some of the food channel chefs and use store bought. On the other hand most store bought cake mixes, bread mixes, refrigerator doughs, cookie doughs and those types of things really are not a good value for your dollar. For example, a package of refrigerator cinnamon buns will cost about $2.50 for 8 buns. The made from scratch ingredients will cost about 30¢ for 12 so clearly you are paying for the convience of the refrigerator buns. The same holds true to other mixes and doughs. If you want the convenience of mixes and pre-made doughs, take a few minutes to make your own.

Homemade refrigerator/freezer slice and bake cookie dough will take about 10 minutes total from measuring to freezer. Homemade cake, cookie and bread mixes can be made assembly line style in about 10 minutes for about 6 to 10 mason jars. Bread dough can be made in less than 5 minutes in a bread machine or stand mixer, remove just after the knead then package in zipper style freezer bags. When you want a fresh loaf of bread remove and let thaw and proof then bake. Just using the above examples you could have a considerable amount of homemade mixes in the pantry and bread dough in the freezer by investing about 25 minutes of time. The bonus to this is of course the substantial amount of money you save.


Saturday, February 06, 2010

Baked Pork Kabobs

Each year we support a local charity during their fund raiser where they sell case lots of meats like kabobs, sausages and hamburger patties. A portion of the cost of every box sold goes directly to the charity. We usually spend $100 which gives about 4 boxes of meat. Part of last year's purchase included pork kabobs.

kabobs marinatingIn Sauce

The pork kabobs are unseasoned lean pork on skewers. They would be ideal on the indoor or outdoor grill. Plain pork kabobs lend themselves nicely to marinating so in terms of flavour they are quite versatile. I really wanted to used these up as our new pork and beef will be ready within the next month or so. That means emptying down the freezers. We also have started a renovation project so I took a bit of an easy way to prepare the pork kabobs.

I placed the kabobs on a bed of Sweet Bay Ray's honey barbeque sauce in a baking dish then covered with more sauce. Then I covered the baking dish and let sit in the refrigerator for 3 hours before baking at 180ºC until cooked through and sauce was slight caramelized.

baked pork kabobsBaked Pork Kabobs

The baked pork kabobs came out nice and tender with a lovely flavour. Sweet Baby Ray's honey barbeque sauce has a sweet, tangy and slightly smokey flavour. I had opened the bottle for the ranch pizza yesterday so will be making a couple more dishes to use up the bottle. In general I like to use up any opened, commercially prepared sauces within 5 to 7 days.

I served the pork kabobs with baked potatoes, peas and tomato slices. It was a simple yet tasty meal that allowed us to continue working on our current rennovation project while it cooked. This actually is a huge plus as it is amazing how much can be done in the short period of time a meal is cooking in the background. By the time clean-up for the evening was finished the meal was ready for serving :)


Wednesday, December 23, 2009

Gingery Maple Thins

Traditionally I did the bulk of my cookie baking the last day the kids were in school before Christmas. I found this greatly increased my yield as more dough was made into cookies rather than getting popped into the mouths of helping elves. My husband was usually out shopping that day so it meant less taste testing if you know what I mean. Times have changed but I still like the house to myself when baking cookies. The Tuesday of this Christmas week I went a bit wild with cookies making 12½ dozen peanut butter cookies, 7 dozen shortbread cookies and a new cookie called gingery maple thins. The new recipe only made 22 cookies but with a bit of tweaking this will become a holiday favourite.

crystalized gingerCrystalized Ginger

There's just something warm and comforting about the aromatic smell of ginger! It beckons Ginger just goes hand in hand with the holiday season. But ginger is not just a pretty face. Ginger is a wonderful natural remedy for nausea. This recipe called for crystalized ginger.

Crystalized ginger is peeled ginger root that has been briefly cooked in a light syrup then dried. The dried ginger is then lightly coated in sugar and stored until use. It can be used as is for medicinal or culinary purposed. Pictured to the left is whole crystalized ginger pieces. The recipe called for minced crystalized ginger so I simply chopped the pieces very fine (arrow).

gingery maple thinsGingery Maple Thins

Glancing through the newest edition of Cook's Country I noticed the Holiday Cookie Contest with a runner-up entry by Diane Nemitz of Ludington, Michigan. Her cookie recipe definitely said holiday cookies to me so I decided to try it. What is nice about this recipe is there is no salt added. I have to tell you this dough is quite sticky to work with so I modified the method to chill the dough slightly similar to when I make peanut butter cookies. Chilling serves two purposes. First it makes it easier to work with the dough and second it helps control the spread of the cookie.

The recipe said to make the dough balls 1½-inch which I did but that really is too big. The next time I will reduce the dough size to 1-inch. Aside of that the cookies looked quite lovely with a nice golden colour, a soft, chewy texture and pleasant gingery flavour. I think they are going to be a huge hit!

Gingery Maple Thins
source: Cook's Country, December/January 2010. Pp. 5

1½ c unbleached flour
1 tsp baking soda
½ c softened butter
½ c packed brown sugar
1 large egg
¼c plus 1 tsp 100% pure maple syrup
3 tbsp minced crystalized ginger

¼ c granulated sugar

Cream the sugar and butter. Mix in the egg and maple syrup Mix the dry ingredients in a separate bowl. Stir the crystalized ginger into the sugar mixture then mix in the dry ingredients blending well. Chill dough 1 hour. Roll into balls then roll the balls into granulated sugar. Place balls on Silpat® lined cookie sheet. Flatten with bottom of glass. Bake at 160ºC/325ºF convection until golden brown. Remove from oven and allow to cool 5 minutes on the cookie sheet before transferring to a wire rack to complete cooling.


Monday, November 16, 2009

Frugal Kitchens 101 - Holiday Baking

Frugal Kitchens 101
The topic for this week's Frugal Kitchens 101 is holiday baking. It has long been a tradition for many to do extra baking for the Christmas holidays. Typically the baking includes fancier decorated cookies such as sugar cookies and gingerbread men along with fruitcakes. The problem for many especially in today's economy is the extra cost of holiday baking coincides with increased winter utility costs and combined holiday costs (gift giving, entertaining, decorating, travel) along with unemployment and threat to job security. Holiday baking can have a huge impact on your holiday budget simply because many popular holiday recipes use higher priced ingredients like candied fruits, chocolate and nuts. This is the time to rely on frugal kitchen skills.

  1. start early and with a plan - This is one case where planning early is a must. I would recommend you start planning right after the previous holiday season. Take notes of likes or dislikes and amounts needed, what didn't go over well and what did. This allows you almost a full year to pick up all the necessary supplies and take advantage of sales.
  2. KISS (keep it simple silly) - The holiday season is busy enough so keep your holiday baking simple. It is surprising how many baked goods can be made using simple ingredients. The thing is they don't have to look like they are simple ingredients and most don't after baked.
  3. don't forget the recipe - The recipe is a must for some home baked goods so print it out either by printer or handwritten for a gift that will be cherished. Check the craft section of dollar stores for pre-cut tags perfect for using as the recipe instructions or print your own on cardstock.
  4. ingredients - Buy any ingredient you use for holiday baking in bulk if at all possible. Most baking ingredients will keep for upwards of a year or longer. There are two ways to save here if you have a bulk food store. Those ingredients that you may only need a tsp or so buy in bulk in double the amount you need. That way you have enough for another batch. Those ingredients that you use more of buy in bulk simply because bulk usually is cheaper per unit and avoids the pesky packaging. Now, the exception to this is if an ingredient is on sale and/or you have a good coupon or rebate then figure out the unit price as sometimes it might be less expensive to use this method over the bulk food method. If at all possible rather than a large expenditure just before the holiday season, gradually stock up throughout the year.
  5. energy usage - Where ever possible use the full capacity of your oven. Once your cookies are baked use the already heated oven to cook your dinner. Small batch baking can be done using your toaster oven or countertop roaster.
  6. no time to bake - Give the gift of cookies, soups, breads and brownies by making gifts in jars (homemade mixes). Essentially you assemble the dry ingredients in a mason jar or similar then add a recipe tag and any other desirable embellishments. The recipient adds any liquid, oil or egg when they are ready to make their gift.


Thursday, October 22, 2009

Kitchen Quick Tips - Baking Adjustment

kitchen quick tips

When cooking in glass pans, reduce the temperature by 25ºF.


Wednesday, March 11, 2009

Baked Peameal Bacon Roast

Before Christmas I bought a pork loin on sale, cut it into three pieces then cured it for peameal bacon. After curing I froze the three pieces to keep them for the holiday season. One piece safely travelled with us to Wisconsin. One of our kids recently moved there so needed a taste of home in the form of real Canadian peameal bacon. The second was thawed then sliced and fried as a breakfast meat during the holidays and let me tell you oldest grandbaby loves peameal bacon! I thawed the last 1 kg (2.5 lb) piece of peameal bacon for dinner last Thursday knowing that we would get 3 or more meals from it.

peameal bacon roastBaked Peameal Bacon Roast

Our favourite way to prepare peameal bacon is pan frying but sometimes I make a baked peameal bacon roast. It always goes over well. It bakes quickly with excellent results. I don't always add water and in fact this roast was baked dry giving what I feel is a nicer but firmer result. Adding a bit of water gives a moister result. Both are equally appealing to the palet. Baked peameal gives a different texture from pan fried in that pan fried is a bit grainer. Baked peameal has a slightly smoother texture because it is cut after cooking. This is most pronounced if the peameal bacon roast is cooled then cut thin as a lunch meat.

Oven baked potatoes compliment baked peameal bacon roast nicely. To bake simply wash the potatoes well then poke with a fork and bake at the same time as the roast. This really is just simple comfort food that really doesn't need anything fancy or complicated. At most keep the topping for the potatoes to butter or perhaps a little sour cream. If you want to accent that comfort food flavour top the potatoes with old fashioned chili sauce.

peameal baconPeameal Bacon Dinner

Peameal bacon makes for a quick cooking yet very flavourful dinner meat. We often fry up sliced peameal bacon as a dinner meat. It is a lean, low calorie choice that is sure to please. A little peameal bacon goes a long way too because it is considerably more filling than regular bacon. It is similar to ham so think along those proportions for serving sizes. I find two slices cut about ½ inch thick is a good serving size for most adults although some may want a bit more.

Baked peameal bacon just pairs lovely with oven baked potatoes. I like serving steamed broccoli or spinach as a side with sautéed mushroom. A garnish is not really needed but thinly sliced sweet peppers adds another splash of colour to the plate.

peameal bunPeameal on a Bun (2)

I previously posted how to make peameal on a bun using fried peameal bacon. This was a simple dish featuring fried peameal bacon with cheese. There really are so many ways you can take peameal bacon on a bun with one of the most common ways is a breakfast sandwich with peameal bacon, egg and cheese.

I made peameal bacon on a bun with all the fixings quite similar to those for a hamburger for dinner on Sunday. I used thick slices of left-over peameal bacon roast. Toppings included: cheddar cheese, romaine lettuce, tomatoes, onions, mayo and mustard. The side was a simple garnish of bread and butter pickles. It was a simple yet substantial meal.


Thursday, November 01, 2007

Twice Baked Potatoes

Folks have been emailing asking for menu suggestions. Unfortunately, unless it is a special occasion I simply don't do menus and never have. Most people are quite surprised to hear I don't do menus. There a few reasons why. With a well stocked pantry and freezers menu planning isn't a real must. I can walk into the pantry and something will strike my fancy so that night's dinner will be based on that. Other times the inspiration will come from the Food channel or a find from the farmer's market. Sometimes my husband will call with "I'm in the mood for for dinner tonight". Then there are times like this past week when my husband and son were down with nasty colds that homemade chicken noodle soup was a must have. So by not doing menu planning I have a greater opportunity for creativity (aka mussing) in the kitchen.

Twice Baked Potatoes

Yesterday was a mussing day as I looked for a couple of different things to try. We eat a lot of potatoes most often baked, steamed or grilled and they usually are undressed with the exception of a little butter and salt or chili sauce in the winter. So yesterday I decided to fancy up the potatoes a bit. The end result was twice baked potatoes served with glazed country cut pork ribs and home canned carrots. The potatoes were a big hit!


Twice Baked Potatoes

6 medium sized potatoes
¼ c cream cheese
¼ c plain yogurt
1 tbsp butter
2 tbsp milk
3 strips bacon
1 c shredded cheddar cheese
½ c steamed broccoli

Bake the potatoes at 350ºF until they give when pinched. Cut across the strips of bacon to form small pieces. Fry the bacon and drain on paper towel. Steam the broccoli until tender. Cut across the flowerettes to form small pieces. Cut potatoes in half. Scoop out the centres of the potatoes leaving about ¼ - inch of flesh on the skins. Place the scooped out portion of the potatoes in the KitchenAid® stand mixer bowl. Add cream cheese, yogurt, butter and milk. Mix on speed 3 until well blended. Scoop or pipe mixture into potato skins. Top with cheddar cheese, bacon and broccoli. Bake at 350ºF until cheddar cheese is bubbly.
Yield: 12 halves


Monday, April 16, 2007

Maple Glazed Salmon

You will notice a few changes to my blog today. Some of you may have seen several different and sometimes weird changes as I worked with the template. More changes are planned as soon as I get a couple of changes to actually work as they should. Thanks for your patience during the construction.

Salmon is one of the most nutritious fish you can eat. It is rich in Omega-3 essential fatty acids and low in calories and saturated fats. Salmon is also a good source of niacin and vitamin B-12. We have salmon quite often not only for it's health benefits but because we find it very flavourful and easy to prepare.

In keeping with our weekend fish theme, Sunday's dinner was maple glazed salmon served with basmati rice and homecanned green beans. Wild rice or a wild rice mixture is also a perfect side dish for salmon prepared this way. Other side dishes like steamed potatoes go well with maple glased salmon.

Maple Glazed Salmon

The flavour of pure maple syrup melds nicely with wild salmon. Maple glazed salmon is quick and easy to make. Salmon fillets are a good choice for this dish.

Maple Glazed Salmon

2 5oz wild salmon fillets
1/2 c pure maple syrup
1 tsp dijon mustard
1/2 tsp fresh or dried parsley chopped

Pre-heat oven to 350ºF. Wisk maple syrup and mustard together. Pour half into a baking dish. Place salmon skin side down into the mixture. Pour the other half of the syrup mixture over the salmon. Bake until fish is firm when pushed in centre. Do not over bake. Remove from baking dish and garnish with parsley.
Serves 2