My photo
Ontario, Canada
I am a wife, mother and grandma who enjoys the many aspects of homemaking. A variety of interests and hobbies combined with travel keep me active. They reflect the importance of family, friends, home and good food.
Cook ingredients that you are used to cooking by other techniques, such as fish, chicken, or hamburgers. In other words be comfortable with the ingredients you are using.
--Bobby Flay

For Your Information

Please watch this area for important information like updates, food recalls, polls, contests, coupons, and freebies.
  • [March 19, 2020] - Effective Mar 17, this blog will no longer accept advertising. The reason is very simple. If I like a product, I will promote it without compensation. If I don't like a product, I will have no problem saying so.
  • [March 17, 2020] - A return to blogging! Stay tuned for new tips, resources and all things food related.
  • [February 1, 2016] - An interesting report on why you should always choose organic tea verses non-organic: Toxic Tea (pdf format)
  • Sticky Post - Warning: 4ever Recap reusable canning lids. The reports are growing daily of these lids losing their seal during storage. Some have lost their entire season's worth of canning to these seal failures! [Update: 4ever Recap appears to be out of business.]

Popular Posts

Showing posts with label presentation. Show all posts

Friday, April 09, 2021

Double Cheeseburger Bread Bowl

Bread bowls are simply a loaf of bread or larger buns that have been hollowed out to form an edible vessel for serving dishes like stews, chowders, chili, dips and so much more.  They are a lovely, rustic way to present these types of dishes.  Sourdough with it's delightful tang and firmer texture is perfect for bread bowls. 

I hollowed out a full boule of sourdough bread for the Double Cheeseburger Bread Bowl.  Then I lightly seasoned extra lean ground been and divided to make two thin patties about 8" diameter.  I baked the patties but they could have been fried.  The first layer consisted of two cheeses, a burger patty, bacon, sauteed mushrooms and onions, spinach and tomato slices.  I repeated that layer to create a second layer carefully tucking everything into the bowl.  Then I put the top back on and wrapped in foil, placed a weight on top and let it rest for 30 minutes.   I removed the foil* and baked at 350°F for 25 minutes.

The end result was a huge tasty double cheeseburger in a unique presentation.  There was enough for 6 healthy servings!  This bread bowl would be ideal for a smaller get together and work equally well on the grill as in the oven.

My Notes:  Overall I was quite pleased with the results but I would *leave the foil on while baking.  From start to finish this meal took about 80 minutes so it's definitely not a quick meal! 


Thursday, December 12, 2013

Hot Chocolate Baubles

Several years ago, I discovered clear glass Christmas bulbs that can be used for personalized baubles.  The first year I used a favourite picture of each of the kids printed on acetate for a very special Christmas keepsake bauble.  Each year I have used the clear baubles to create decorated baubles for gift giving and adding to our collection.  The clear glass baubles can be decorated in so many ways!

hot chocolate bauble ingredients
This year I discovered clear plastic baubles (88¢) at Walmart.  Unlike the clear glass version, the plastic bauble filled with candies or other seasonal dry goodies without the fear of breakage.  I also discovered Kraft Jet-Puffed Mallow Bits (dehydrated mini marshmallows), a new product that is perfect for gifts in jars or this purpose.  They are in the same aisle as the hot chocolate mixes not the aisle where the marshmallows are if you are looking for them.  I used Nestle hot chocolate packets for convenience but any hot chocolate mix including homemade can be used.  Each bauble uses 2 packets of hot chocolate mix.  I crushed a 100% natural candy cane to add that holiday sparkle to the mix. 

filling the hot chocolate bauble
Filling the baubles is not difficult but can be a bit tricky given their design.  There is no flat bottom so they won't stand up by themselves for easy filling.  I used a bowl to help steady the bauble for filling.   A funnel really helps with the filling to keep the layers neat and tidy.  A make-shift funnel can be made using a sheet of wax paper.  I poured two packets of the hot chocolate mix into the bauble.  I removed any hot chocolate powder film from the inside with a Q-tip.  There wasn't a lot but I like neat layers for these types of projects.  I added the mallow bits being careful not to disturb the hot chocolate powder.  I used a knife to help distribute the mallow bits.  Then I added crushed candy cane, not a lot, just enough to give the hot chocolate a holiday sparkle.  It's important to keep the bauble level so the layers don't mix together.

hot chocolate bauble ready for decorating
Once the bauble was filled, I added the curling ribbon bow.  This ribbon easily forms spiral curls when lightly pulled over the back of a knife or scissors.  It isn't expensive and comes in a variety of colours including prints.  Most dollar stores carry a good selection of curling ribbon.  With the ribbon in place, I added the bauble top and a piece of curling ribbon for hanging.  I was quite pleased with the results.  I'm sure the grandkids will be pleased to get their hot chocolate baubles!

The clear plastic baubles could be filled with: loose leaf tea, fruit and tea blends, candies, trail mix, dried fruit mix and so much more.  I recommend filling only half full and use light weight ingredients for the filling.  The bulk food store (eg. Bulk Barn) is an excellent source for fillings suitable for the baubles.  Depending on the recipient, you could also add a small toy if desired.  The limitation will be the size of the opening of the bauble which is about an inch.  Other than that, just let your imagination create a special unique gift for those on your gift giving list.  I hope you enjoy making these Christmas baubles!


Wednesday, December 11, 2013

Candy Cane Christmas Magic

If you have ever did a bit of shopping in the quaint little shops in tourist villages, you likely have seen the creative efforts of enterprising folk.  These little packets of goodies have their origins in holiday bake sales and craft shows.  Some of these are so cute, they have gone into commercial production.  These include the little bags of snowman poop (mini marshmallows), bear droppings (chocolate covered raisins), doughnut seeds (Cheerios) and similar.  They generally have a cute little saying which just adds to their appeal.  A couple of days ago, a friend of mine posted a similar idea for growing candy canes on Facebook.  I don't know where she got the idea but I thought it was cute enough to pass along this little piece of Christmas magic!
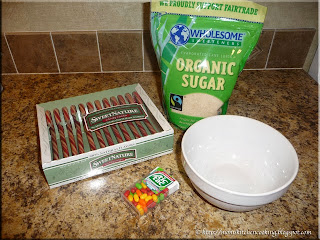
ingredients for candy canes
This project is really cute, easy to make and kid friendly.  Although granulated sugar and Tic Tacs are used, they are not consumed.  Of note, I had to buy the Tic Tacs specifically for this project as they are not a product we use.  Tic Tacs come in a wide range of colours so you should be able to find a colour to match whatever kind of candy cane you use.  The only thing that is eventually consumed are the candy canes.

I used organic granulated cane sugar because that is what I use but regular granulated sugar could be substituted.   I used SweetNature candy canes made using 100% natural flavours from natural food sources and stripes created from natural colouring found in vegetable juice (likely beet).  While these candy canes are a little more expensive they have no artificial flavour or colours  and they are free of major allergens so I feel a bit better giving them to our grandkids.

planting the candy cane seeds
Any type of container can be used so one with a holiday theme would be really cute.  Initially, I was going to use the bowl in the first picture but substituted a juice glass for demonstration purposes.  I filled the glass with sugar as pictured then planted the candy cane seeds (red Tic Tacs).  Filling the container and planting the seeds is meant to be for your child to do but since I was home alone, well you know how that goes :)  Once your child completes this part, the container can be set in a safe spot until a given time.  For example, let your child plant the seeds a few days before Christmas Day then when he or she wakes that morning, there are the much awaited for candy canes.

grown candy canes
Once your child is safely tucked into bed, fast asleep the night before the candy cane seeds are to sprout, carefully remove the Tic Tacs.  Replace them with the same number of candy canes.  Place the container back into the same position for your child to discover when they wake.  Isn't is a cute idea?

I thought this was really a cute way to create a bit of Christmas magic for the little ones.  I'm sure our grandkids will be filled with anticipation waiting for their candy cane seeds to grow!  It might just be the perfect spot for that Elf on the Shelf to rest while the little ones open presents...


Sunday, March 10, 2013

Not Quite a Birthday Cake!

My husband and I married at the age of 18 by choice.  Some called it puppy love but almost thirty-six years later we are still madly in love.  Seriously, I think he walks on water!  I do think we lucked out when it comes to food because we are both very much foodies.  He loves to eat and I love to cook but he is a rather descent cook in his own right and there are some dishes he has mastered to perfection that I have not.  We love to cook together sharing our love of food and cooking with our kids.  Our kids are now grown with their own kids (aka the most adorable grandkids you have ever seen) who are passing on our love of food and cooking with them.   Food draws us together as a family.  There is nothing more precious than spending a bit of quality time cooking with loved ones!

cookie pizza
My husband was going to a friends house to play cards and celebrate his birthday.  I was going to make a cake but decided on something a bit different.  Implementing that plan was a bit more difficult than I thought.  We live in a small community of 11,000 with a No Frills and a Walmart.  Finding specialty ingredients is pretty much a bust.  Neither had the plain strawberry fruit roll-ups for the pepperoni and I cold find nothing that looked like bacon.  Oh, and neither had the Pillsbury sugar cookie tube I really wanted so we were off on an adventure that turned out rather sweet and whimsical! 

As a frugal shopper, I tend to very much brand loyal when it comes to certain commercial products but only if they have proved their worth to me.  In this case, I went with Pillsbury refrigerator chocolate chip cookie dough, Betty Crocker fruit roll-ups, McCormicks spearmint leaves, Cake Mate cookie icing, Mars bar and a Snickers.  I knew this was going to be a sugar overload but it turned out rather cute.  I used a clean pizza box for the presentation. 

Method:  Line a pizza pan with aluminum foil.  Squeeze the full tube of cookie dough onto the pan.  Spread evenly with you hands.  The warmth of you hands will help it spread easier.  Bake according to instructions.  Let the cookie base cool.  Spread the Cake Mate cookie icing over the cookie base for the sauce.  Fill a 4 oz bowl with white chocolate chips then melt in the microwave oven.  Use a spoon to drizzle the melted chocolate over the sauce.  Cut the fruit roll-up into circles and thinly slice any remaining topping you want to add.  Top the cookie pizza then place into a clean pizza box for serving. 


Thursday, February 28, 2013

Kitchen Quick Tips - Easy Cake Decorating

kitchen quick tips
An easy way to decorate a cake is with two paper doilies.   Place the cake on a cutting board.  Place a small doily to fit the surface on the cake.  Sprinkle icing sugar, sugar cinnamon or cocoa powder over the doily covering all open spaces.  Lightly brush off excess on the doily.  Carefully remove the doily to reveal a beautiful lacy pattern on the cake.  Place a large doily on a cake plate then place the decorated cake on top of the doily for presentation. 


Wednesday, February 06, 2013

Concession Stand Style Nachos

We hosted a Superbowl party last Sunday and while I would love to tell you everything offered was healthy, it wasn't.  The bottom line is we eat healthy 95% of the time so we can not feel guilty eating unhealthy 5% of the time.  Now hosting an event is very much different than eating in that you want to offer your guests some of the things they enjoy, especially for special events like the Superbowl.  These are the popular pub grub and concession stand foods.  Don't worry though, as there were plenty of healthy choices offered and this year instead of chili I baked a ham for ham buns complete with lettuce and the fixings along with baked beans, and a friend brought a lovely hot potato salad.  I also had vegetable, fruit and pickle trays.  Anyway, we had a lot of fun!

some of the concession stand ingredients needed for nachos
Every single football stadium, hockey arena, ball park and sports event has nacho chips with cheese.  And trust me, we have been to a lot of these venues since my husband is a bit of a sports fanatic.  Concession stand nachos are famous for their thick, round tortilla chips topped with a heavy dose of orange cheese product with jalapeƱo peppers.  That's it.

The best price I have found for the ingredients for concession style nachos is Sam's Club.  Medellion original round 2-3 lb bags ($7.92).  They used to always be just under $5 but that's inflation.  The Baker's & Chefs nacho cheese sauce, 6 lb at $5.82 is the best tasting nacho cheese sauce we have found.  This is a commercial grade sauce that is what a lot of concession stands use.  It can be diluted with 2 cups of water or 3 cups of whole milk to increase the yield.  I don't dilute it.  The clear plastic nacho trays are for presentation.  A 125 ct bag costs $4.98 and while I know they are not eco-friendly they are a huge crowd pleaser and for home use can be re-used.  I use home canned jalapeƱo peppers but Sam's Club sells them for $3.24 for 64 oz.  I also add home canned salsa which you may or may not want to do.

the self-serve nacho stand set up
Self-serve works well for several applications when entertaining.  I set up the self-serve nacho station on the snack cart under one of the televisions in the games room.  Of note is how I present it.  I use the small squatty mason jars as serving bowls for the salsa, sour cream and peppers.  That means at any given time I only have at max a cup of each out.  When a refill is needed the jar is replaced with a fresh jar along with the refill.  It does make for a bit more dishes to wash but it is a lot safer than adding fresh to a serving bowl that has been sitting out for a over an hour or more.  I also only use half the can of cheese and about a quarter of a bag of the tortilla chips at a time, replenishing as necessary.  Once I notice the interest in the nacho bar is waning, I just simply clear it out replacing it with the next snack.

concession stand nachos presentation
Concession stand nachos are usually served in plastic, two compartment trays.  Usually they are simple round tortilla chips laden with warm, spicy, gooey nacho cheese sauce .  Extra cheese sauce or peppers is placed in the smaller compartment.  I've never seen sour cream or salsa at concession stands for the nachos.  Not that some don't offer it just I've never run across it.  I added sour cream and salsa just to kick the snack up a notch.  These nachos get rave reviews!

If you want to make authentic concession stand style  style nachos, get your food supplies at Sam's Club or a restaurant supply.  Presentation adds to the snack so be sure to use nacho trays.  The nacho trays will be available at either or you can find them at party stores.  The most important thing is have fun with this type of dish. There really isn't any way you can mess it up so enjoy!


Sunday, August 26, 2012

Mini Taco Shell Bowls for Serving Presentation

Two weekend we met up with the kids for dinner at Moxie's Grill & Bar in London located at 441 Richmond Street.  This is a premium casual restaurant that was founded in Calgary in 1986, now operating 63 restaurants in seven provinces.  The atmosphere is delightful, their wait-staff are very friendly, the food is delicious but their presentations are outstanding!  The children's ice cream came served in a bowl surrounded by a cloud of fog (caused by dry ice) that was quite impressive especially for our little grandkid (age 4).  I really wanted to share that picture but my policy has always been to not post pictures with my family in them. 

Moxies nachos
We have enjoyed a lot of nachos over the years.  The most common presentation is the toppings over the nachos.  The second most common presentation is the sour cream and salsa served in little plastic cups with lids.  Moxie's did something a bit different.  First they used coloured nacho chips and second they served the sour cream and salsa in mini taco bowls.  These are a bit different than the restaurant style deep fried taco bowls but equally easy to make at home.  I have a mold I will show you how to use to make larger taco bowls but for now here is how to make the small bowls.

Method:   Make or buy corn (or wheat) tortillas that are about 6 - inches in diameter.  Gently fold each tortilla into quarters without creasing.  Put each folded tortilla into a non-stick muffin tin.  Open the tortilla pressing lightly but firmly against the bottom and sides of the muffin tin.  Bake at 350ĀŗF until just lightly browned.  Remove from oven and cool.  Fill as desired.


Friday, September 30, 2011

Olive Oil for Dipping Breads

I can remember years ago when my Mom would buy the new wonder spread called margarine.  Previous to that it was sold uncoloured and came with a capsule to mix in to get the creamy yellow but really a bright, fake butter look.  I have never, ever liked margarine.  Margarine is made from a low quality, chemically extracted, refined vegetable oil that loses it's natural Vitamin E through heat processing.  It also contains colourants and additives.  I don't like the taste, the texture or the fact it is not a whole food so we use butter or olive oil in our home for cooking, baking or as a spread.

olive oil dipping bowl

We don't eat a lot of sandwiches but most sandwiches we do eat do not have butter used as a spread.  I often serve homemade French, French sourdough or sourdough bread with olive oil for dipping.  It is healthier than margarine with a lot more flavour.  The oil can be left plain, seasoned with herbs or you can stir in pesto or sun dried tomatoes.

The choice of olive oil is important.  The darker the oil the stronger the flavour.  I prefer a cold pressed, extra virgin olive oil with it's light, fruity flavour for this purpose.  Pictured is the sourdough bread with olive oil dipping bowl I made for dinner.  The olive oil was seasoned lightly with dried oregano and thyme the served with sourdough bread.

Some are tempted to make up extra of the seasoned olive oil.  Don't do this especially if using fresh herbs or fresh garlic as there is a risk of botulism.  The toxin that causes botulism is colourless, odourless, and tasteless.  The amount of size of a pin head can make you quite sick or result in death.  Make only the amount of seasoned olive oil that you will use for that meal.  Discard any left-over seasoned olive oil.  In this case the frugal choice is discarding the left-over oil rather than risking a potential food borne illness.


Friday, September 23, 2011

Peameal Bacon Buns Tray

There are times in the kitchen where saving both time and energy is much appreciated.  So it was during our recent move.  The thing is you have to eat and I like food presented nicely but with the kitchen and dining areas in semi-chaos mode I decided to take a couple of short cuts.  Peameal bacon is one of my favourite quick cook meats.  Not only is it tasty, it is lower in fat and calories than regular bacon.

peameal bacon buns tray
I had left-over peameal bacon roast from my first day cooking with natural gas.  Well, I really shouldn't say my first day cooking with natural gas as I grew up cooking with natural gas and one house we rented eons ago had a natural gas range, but it has been a very long time since I have cooked with natural gas.

I cut part of the left-over roast in half then sliced it so it would fit on the store bought dinner rolls.  Then I cut pre-sliced Swiss cheese in half and added thinly sliced iceberg lettuce to the tray.  Not pictured is the honey mustard and Miracle Whip that was served on the side.  This was a quick to prepare snack tray that used minimal kitchen resources at lunchtime during the move.  It was a very quick clean-up as well, something I really appreciated!  I repeated the peameal bacon tray the following day but on a larger scale for entertaining.  The guys really enjoyed it!


Wednesday, December 22, 2010

Theme Park Funnel Cake Presentation

I recently wrote about making a popular country fair snack, the funnel cake, at home.   This sure to please, tasty snack is quite easy to make at home.  Pouring the batter into the deep fryer using a squeeze bottle or funnel takes a little practice but the technique is easily mastered.  For best flavour serve warm with desired toppings.

funnel cake
Funnel cakes at some fairs tend to be on the plainer side simply sprinkled with icing sugar.  I ordered a funnel cake at a theme park where there were several additional toppings available.  Toppings included icing sugar, banana slices, chocolate sprinkles, apple pie filling, and glazed strawberries.   Just look at the beautiful presentation! 

The glazed strawberries are easy to duplicate at home as well using instant Clear Jel®.  [Note that this is not the cooking Clear Jel® used in canning pie filling.]  Instant Clear Jel® and similar glazing products can be found in the produce aisle of most grocery stores.


Sunday, November 28, 2010

Caesar Salad Presentation

As a foodie I like to pay attention to presentation when eating out.  Presentation goes well beyond what the food actually looks like.  Unique cutlery or serving pieces can accent even a mediocre dish, giving it eye appeal mixed with a bit of pizzaz. What's interesting is a bit of uniqueness goes a lot ways when it comes to food presentation.

Caesar salad presentation
A few days ago we were out for an afternoon of fun at the casino.  Well, more precisely my husband had a businessman's luncheon to attend so he dropped me off at the casino where he would meet up after the luncheon.  I decided to stop at the bar there to get a Caesar salad.  The salad was pretty much average and at $4.95 you couldn't expect much more although there were real pieces of bacon and fresh grated Parmesan cheese. 

Just look at the bowl design the Caesar salad was served in.  Isn't it interesting?  I took the picture with the bowl facing 90Āŗ turned just to give you an idea of the presentation.  The ecliptic bowl sat on a very distinct angle displaying the salad to the diner.  I think the presentation had great eye appeal.  It was a unique presentation that made the salad feel a bit special.  I may just have to look for similar salad bowls!


Sunday, October 24, 2010

Octopus on a Bed of Seaweed

I hope the title peaked your interest!  Since October is National Pasta Month I thought is would be a bit fun to come a very kid friendly pasta dish.  I wanted something that would be easy to make yet a bit of fun for the little ones.  The criteria was quite clear that the dish be fun and kid friendly but I also wanted it to be Mom friendly.  I also wanted everything to be entirely edible so no toothpicks holding things together or any non-edible props.  Our grandchildren are all under the age of 5 so this was important to me. 

children's octopus pasta dinner
Pictured is the octopus on a bed of seaweed I came up with for a kid friendly meal.  I was looking for some type of blue liquid to set this meal up on and I suppose I could have used blue jello but I don't think the sweetness of jello would go well with the other ingredients so I used a blue plate.  The seaweed is organic spinach spaghetti.  I cut the all beef wiener to give 8 legs then cooked the wiener in boiling water that curled the legs slightly.  Mr. Octopus's hat is a hollowed out small plum tomato half.  His eyes and face is spreadable cream cheese.  Swimming around feeding off the seaweed are gold fish crackers.  I though he came out rather cute.  What do you think?

In hind sight there are a few little extras I could have added like a couple of cooked macaroni shells.  Some type of a treasure chest would be rather neat too and I thought about adding a cheese flag on a thin carrot stick flag pole.  The possibilities are really endless.  As the dish stands though I think any little one would enjoy eating it!


Friday, October 22, 2010

How to Make a Restaurant Style Deep Fried Mexican Crispy Taco Salad Bowl

I've talked about taco salad presentation before where the salad is served in deep fried tortilla bowls.  I love this presentation!  It really is a bit unique as the prepared tortilla bowls aren't readily available in the stores so you really have to make them yourselves or enjoy them prepared for you at a restaurant.  Your family and/or dinner guests will be impressed to be served taco salad in these bowls at home!

Here is a short video clip that demonstrates the method I used for making the taco salad bowls.  The video is illustrative only but easy to follow the method without a commentary.  


Making taco salad bowls is not difficult but will increase your meal prep time by about 2 minutes per bowl plus the oil heating time.  I made thtee taco salad bowls to serve taco salad for dinner.  I set the deep fryer to 190ĀŗC (375°F), frying one bowl at a time.  I modified the method to use a silicone ladle to form the bowl shape as I was using the smaller 6 - inch tortilla shells.  I drained the bowls upside down on wire racks.  Once cooled the bowls were ready for filling.  The bowls could be prepared the day before or earlier in the day then placed in an airtight container if making enough for 6 or 8 servings.  I would think they will keep their crispy texture for a day or two.

I was quite pleased with my first attempt making taco salad bowls.  While you can fill these bowls with any arrangement of the normal taco salad toppings, quite often the base layer is refried beans that helps to protect the bottom of the bowl from getting soggy too fast.  I used my standard taco salad toppings - seasoned ground beef, lettuce, homemade salsa, homemade taco hot sauce, chopped vegetables (tomatoes, green peppers, onion, black olives, lettuce), sour cream and cheddar cheese.  Tortilla shells come in three different sizes here - small (6"), medium (8") and large (10").  The larger the tortilla shell the more pronounced the bowl shape and the more the bowl will hold.  I found the small tortillas just perfect in comparison to many restaurant taco salads that are simply too much for one person to eat.  The limiting factor as to how big of a tortilla shell that can be fried for a taco salad bowl at home is the size of the deep fryer.   I can go as large as the medium sized tortilla shell.


Tuesday, October 05, 2010

Fresh Baked Bread with Dipping Oil

Bread is a fundamental part of most dinner meals.  The best breads are homemade, piping hot from the oven ready to drizzle with butter and savour every morsel!  Few can resist the tantalizing aroma of fresh baked bread.  Restaurants know this which is one reason warm breads are served before the entrĆ©e almost as an appetizer then the bread basket is usually filled during the meal.

fresh dinner breads
Dinner breads are traditionally served on a cutting board with a serrated knife to cut as desired.  Dinner rolls are traditionally served in a lined wicker bread basket.  The basket itself allows steam to escape the hot bread from below so the crust does not become soggy.  At the same time the lining which is usually a cloth serviette keeps the bread or rolls warm.

Pictured is the beautiful dinner roll basket we enjoyed at Middle Grounds (more on this restaurant in future posts).  The rolls were a variety of mulit-grains and not shaped in the traditional roll style.  The shape was achieved by rolling out the dough then cutting into rectangles that when baked softened the edges.  They were hearty yet delightful dinner rolls to say the least!

dipping oil
The wonderful dinner rolls were not served with butter but rather a seasoned extra virgin olive oil in which to dip the bread.  This is quite customary where the bread is torn from the loaf then dipped into the oil to be enjoyed and it is a healthier yet just as tasty choice as using butter.

Dipping oil is not difficult to make and in fact you don't even need to add any herbs or seasonings.  The key ingredient is good quality extra virgin olive oil.  Look for cold first pressed olive oil for the best flavour.  If using as is all you need to do is pour the olive oil into a shallow saucer for dipping the bread into.  Pictured is the dipping oil served with the fresh dinner bread.  It was seasoned with fresh basil and garlic.  Oh my, it was simply amazing!  I could have eaten nothing else and still been quite satisfied.


Friday, August 06, 2010

Grilled Rib Steak With Accordion Potatoes

Potatoes tend to be the main starch of choice in our house.  Our two favourite year round ways to cook potatoes is steamed or baked.  In the summer potatoes are wrapped in foil or cubed into foil pouches for cooking on the grill.  A few days ago I was doing a bit of blog hopping and came across a different way to prepare potatoes.  The potatoes were cut accordion style then baked for a lovely presentation.

before and after cooking
The potatoes are more of a method rather than a recipe.  I modified the method to use the grill using 2 large baking potatoes.  I poured a little olive oil in the bottom of a foil pan.  Then I cut the potatoes into partial slices not cutting fully through the bottom and place them in the pan.  I topped with a healthy dab of butter and sprinkled with garlic pepper.    I covered with tinfoil then put on the grill on indirect medium-high heat for about 40 minutes.

rib steak with accordion potatoes
The accordion potatoes were served with grilled rib steak and roasted beets.  Despite being baked potatoes the accordion potatoes almost have a deep fried potato texture somewhat like thick French fries.  The presentation is quite lovely as well.  A flipper is needed to plate the potatoes but they aren't quite as fragile as they look. 

Fresh beets are a real delight!  I bought fresh beets at the organic farm.  I peeled the  beets then placed in a foil packet with a little olive oil for cooking on the grill.  They took about the same cooking time as the potatoes.  It was a wonderful summer grilled meal!


Friday, June 25, 2010

Kiddie Vegetable Tray

Last Saturday oldest grandbaby and Mom were visiting.  I had a heads up that oldest grandbaby wasn't feeling much like food lately so I decided to make a dip & finger food based meal.  On the menu: chicken strips with honey, homemade potato wedges with ketchup, and a vegetable tray with ranch dressing.  The honey, ketchup and ranch dressing were in individual dipping bowls.  Kids just seem to love dipping foods so I thought this would be a good menu choice.

cheese and cookie cutters
I seldom buy American processed cheese unless it is for a special project.  Instead we use pre-cut cheddar cheese slices or simply cut cheese slices ourselves.  The week before we hosted a large event where we served grilled hamburgers, hot dogs and sausages resulting in a few left-overs including cheddar cheese slices.  I decided to use mini cookie cutters to cut out cheese shapes for the vegetable tray. 

Originally I planned to use three shapes but as things progressed I ended up using only the duck shape.  Cutting the cheese shapes was quite easy.  I cut one slice of cheese at a time getting 6 shapes out of each slice of cheese.  The cheese stuck in the cookie cutter but popped right out with a gentle poke.

kiddie veggie tray
I arranged the cheese ducks arround the rim of a serving platter.  I added cut pieces of pepperettes, sliced cucumber, baby carrots and green pepper slices.  I served individual dipping bowls of ranch dressing to go with the vegetables.  I thought the overall presentation came out nicely.  The little one aka oldest grandbaby really enjoyed the vegetable tray and dipping the vegetables.  This is the type of tray that could easily be adapted to meet the likes of the child.  I can get away with using a lot of vegetables because our grandkids love vegetables.

Oh a bigger scale this is an easy way to add a theme to any vegetable tray for entertaining.  It would be a great way to add that special touch for holiday entertaining.  This will be a presentation that I expand on!


Sunday, May 09, 2010

Toads-in-the-Hole

Happy Mother's Day
Years ago when I was knee high to a grasshopper my Mom made hot breakfasts on Sundays something we continued with our kids.  We very seldom eat a hot breakfast at home unless it is on a Sunday morning although we do indulge on hot breakfasts when on vacation.  Mom's hot breakfasts were porridge, cream of wheat, Red River cereal, pancakes or toads-in-the-hole.  Toads-in the-hole was my favourite!  Our kids were introduced to toads-in-the-hole pretty much as soon as they were able to sit in a highchair.   This is not the British Toad-in-the-hole which is a sausage in a Yorkshire pudding batter, usually served with vegetables and onion gravy which is surprising as my Mom (not biological) was born in England.  Rather this is a egg dish likely creatively named by Mom to get us kids to eat eggs.

toads in the hole
I have no idea where my Mom learned to make toads-in-hole and she never said.  For all I know she just came up with this idea on her own.  She had a lot of neat kid friendly foods that she would make.  Toads-in-a-hole really is just a novel way to cook dipped eggs and toast.  The presentation is cute and kids love them!

My Mom simply used a round water glass to cut out the middle of the bread then buttered the the bread slice and the piece cut out on both sided.  The bread was toasted on one side then flipped and an egg cracked into the opening.  She placed a lid over to help the egg cook.  The cut-outs were toasted in the fry pan at the same time.  Pictured is a bit of a dressed up version using a flower shaped cookie cutter for the hole with a little chocolate raspberry sauce in the centre of the flower cut-outs.  Toads-in-the-hole are still one of my favourite breakfast meals.  Thanks Mom for this wonderful breakfast memory!


Sunday, April 18, 2010

Cheese Lace Salad Bowl

Cheese is one of my favourite foods.  In fact it's more like a food group :) 

making cheese lace
I discovered cheese lace quite some time ago.  It is extremely easy to make and most hard cheeses can be used so there are endless possibilities for flavour.  I used an aged cheddar for the cheese lace bowls.  For a lacier effect you can stir a about 1 tsp flour into the shredded cheese before placing on baking sheet or spread the plain shredded cheese apart more.   Cheese lace can be left as rounds, formed into bowls, formed into smaller cracker sized rounds or broken to be used as a salad topping.  Since most of the oil has been removed, cheese lace is low fat yet packs a lot of flavour.

Method:  Spread shredded cheese in a circle on a Silpat (1).  Bake at 350ĀŗF until melted, edges are golden and centre firming (2).  Carefully transfer the cheese lace to cover the inverted bottom of a glass (3).  If you want a slightly more compact bowl light press the cheese lace closer to the glass as it cools.  Once cooled remove from the glass.  Set on a paper towl and place a wadded up piece of paper towel in the lace bowl to absorb any additional oil (4).  Fill as desired just before serving. 

cheese lace salad bowl
I like using cheese lace bowls as edible salad bowls.  They make such a lovely presentation!  Cheese lace bowls would also be suitable for serving cheese cubes or shorter breadsticks.  If using for salad, do not add any salad dressing until served.

I filled each cheese lace bowl with leaf lettuce, cucumber slices, green onion, green pepper and mushroom slices sprinkled with sunflower seeds.  The salads were topped with  simple vinaigrette then served with grilled Oktoberfest sausages. 


Monday, April 05, 2010

Frugal Kitchens 101 - Edible & Organic Servingware

Frugal Kitchens 101
Coming up with a different presentation for foods can be a bit tricky but not if you turn to using the food itself as part of the presentation. This is a fun way to use parts of the food that would normally be discarded to the compost bin. While some food parts mentioned could also be used to create other foods (eg. candied citrus slices, watermelon pickles) for the most part these are going to be the peelings and outer shells you would not normally consume. This week's Frugal Kitchen 101 focuses on some of these edible and non-edible organic servingware for a fun presentation that costs you nothing other than creativity.

  1. oranges - Cut an orange in half the scoop out the contents to form 2 shells. Place on small plate. Fill the orange shells with orange parfait, orange jello or orange sherbert. If using sherbert garnish then serve immediately. If using parfait or jello return to refrigerator to set well then garnish just before serving.
  2. coconuts - One classic use for whole coconuts is as a large beverage holder. Carefully cut or saw the top off a husked coconut. Pour off any coconut milk. Fill with drink of choice just before serving. Place the coconut uncut end down into small bowl to prevent tipping while filling. Add a long straw and fancy drink umbrella.
  3. cucumber - Cut an English (seedless) cucumber into 1 - inch pieces. Hollow out the inside so only a half inch of cucumber remains. Fill with prepared tuna fish salad. Serve as an appetizer. Cut an English cucumber into 2 - inch pieces removing inside except for half inch. Fill with vegetable dip for individual serving sized vegetable dips. Cut an English cucumber into 4 - inch pieces removing inside except for half inch. Chill well then fill with summer cocktail.
  4. melons - Just about any melon can be carved into a lovely basket for holding melon balls or cubes. The simplest design is cut in half to form 2 serving bowls. Form your balls or cube, add grapes and strawberries then fill each bowl. Get a bit fancier by shaping into a basket with handle or even use a design for a higher end look. Chill bowl well before filling with fruit mixture.
  5. peppers - Sweet peppers are ideal for stuffing that can be served either hot or cold.
  6. tomatoes - Cut a small tomato in half. Hollow out just the inner portion (seeds) leaving the outer thick portion. Fill with herbed feta cheese then garnish as the centre for indiviual side salads.
  7. breads - Yeast breads make great serving bowls for dips and stews.
  8. cheese - Melt cheese into lace then form over a cup to form a bowl. When cooled fill with salad greens just before serving.
  9. tortilla shells - Not only can tortilla shells be used as wraps they can be fried and formed for tacos or as a bowl for salads.
  10. potatoes - Bake potatoes as normal. Split in half then scoop out the insides. Set this aside to add other ingredients to for twice baked potatoes or if making potato skins use the potato flesh for mashed potatoes, soups or potato bread.


Sunday, November 15, 2009

Gift From the Kitchen - White Chocolate Chip Cookies

A couple of our kids need a bit of extra loving so I decided I wanted to make something special from the kitchen. I ended up testing out a gift in the jar idea so in essence the kids became taste testers but in this case I doubt they will mind. Besides who can resist a bit of Mommy's love straight from the kitchen?

gift from the kitchen ingredientsIngredients

One of the neat things about gifts from the kitchen is you can incorporate a definite craft element. True the gift itself is edible but the presentation is very much on the craft making side. So aside of the edible ingredients there were extras needed to make this gift special. For the extras I relied on my scrapbooking and crafting supplies.

Extras include things like decorative brads, eyelets, ribbon, punches and wooden spoons. Surprisingly most of these can be bought at department stores and increasingly at dollar stores so you don't need to invest a lot to give a nice presentation. You will also need craft scissors or an exacto knife to avoid using kitchen scissors for this project. You will need one 1 - L mason jar with lid and ring to package the finished mix in. I should point out that any of the decorative elements can be eliminated. In general they add a lot towards the presentation and very little towards the expense but they are entirely optional.

gift from the kitchen tagGift Tag

One of my favourite scrapbooking mediums is card stock. This is a heavy weight paper available in many different colours allowing me a variety of options. I scanned the tag then with a bit of Photoshop® magic I ended up with an instruction tag suitable for this project. What is really neat about this method is I can pretty much customize the tag as I want then size it to fit anywhere from 3 to 6 tags per sheet to print. Once the sheet is printed I can further customize it using any number of scrapbooking techniques ranging from adding embellishments like eyelets or brads to using decorative scissors or punches. So this really becomes a very personalized approach. In this case it was extremely important for me to use a heart on the tag to symbolize that little extra needed hug from Mom.

white chocolate chip cookies in a jarWhite Chocolate Chip Cookies

Making gifts in a jar is actually quite fun. It really becomes more of a craft project even though it is edible. There is a chance to branch out just a bit further to tweak that creativity. For this gift I really wanted something that said hey I'm thinking about you and I love you. So I chose to make a white chocolate chip cookie gift in the jar. It was really important to me that a heart appeared on the tag and oh my gosh did that heart brad cause me problems but I finally got the results I wanted. This seriously is a project from start to finish that you could easily put together in about 15 minutes and while I did not calculate the actual cost it would definitely come in under the $2 mark. This type of gift is not about the cost though. It is about the thought that goes behind the gift to make the gift fit the recipient. I'm sure the kids are going to love these cookies, just what they need a taste from home :)

White Chocolate Chip Cookies in a Jar

¾ c granulated sugar
¾ c lightly packed brown sugar, divided
1 c chocolate chips
2¼ c unbleached flour
1 tsp baking soda
½ tsp baking powder
½ tsp sea salt

Pour the sugar into a 1 L mason jar then shake slightly to form a level layer. Add half of the brown sugar and pack down tightly (seriously push down hard as this mixture will fill the jar). Pour in the chocolate chips then the remaining brown sugar. Again pack down tightly. Mix the flour, baking soda, baking powder and salt well. Pour the flour mixture into the jar. You will have to tap it down and even carefully tamp down to get the mixture to fit. Wipe the rim then place the 2 piece lid on top and tighten.

Garnish with a wooden spoon and recipe secured with a ribbon.