My photo
Ontario, Canada
I am a wife, mother and grandma who enjoys the many aspects of homemaking. A variety of interests and hobbies combined with travel keep me active. They reflect the importance of family, friends, home and good food.
Cook ingredients that you are used to cooking by other techniques, such as fish, chicken, or hamburgers. In other words be comfortable with the ingredients you are using.
--Bobby Flay

For Your Information

Please watch this area for important information like updates, food recalls, polls, contests, coupons, and freebies.
  • [March 19, 2020] - Effective Mar 17, this blog will no longer accept advertising. The reason is very simple. If I like a product, I will promote it without compensation. If I don't like a product, I will have no problem saying so.
  • [March 17, 2020] - A return to blogging! Stay tuned for new tips, resources and all things food related.
  • [February 1, 2016] - An interesting report on why you should always choose organic tea verses non-organic: Toxic Tea (pdf format)
  • Sticky Post - Warning: 4ever Recap reusable canning lids. The reports are growing daily of these lids losing their seal during storage. Some have lost their entire season's worth of canning to these seal failures! [Update: 4ever Recap appears to be out of business.]

Popular Posts

Showing posts with label beef. Show all posts

Tuesday, April 27, 2021

Rainbow Stew

In very stressful times, folks turn to cooking out of necessity.  During the 1900's we had homecanning as a means of surviving the Canadian winters.  It made a resurgence during the Great Depression which also introduced a style of cooking known as Depression Era Cooking.  When women went to help the war efforts then remained in the work force, convenience foods like tv dinners and packaged foods made their appearance.  There was a resurgence in home canning with homesteading and survivalism.  That grew during the period leading up to y2K.  Cooking shows coined the term foodie, so anyone who  could cook was inspired by their favourite tv chef.  Now into the 2000's, we have the popularity of food kits and pandemic cooking.  


Once again we are seeing a resurgence in home cooking, canning and food preservation in general.  Many are cooking for the first time because they have to.  Restaurants are closed, take-out is limited and then there's stay-at-home restrictions.  People do not want to spend a lot of time at the grocery stores.  Two trends have emerged as a result: inexpensive food kit availability and most smaller food producers are offering online shopping with reasonable shipping.  This opened the door to people discovering a wide range of ingredients they normally wouldn't find locally and at the same time, they discovered a multitude of ingredients they could get from local food producers.

Earlier this year, I began buying organic produce from a local grower who delivers weekly.  I've dealt with this farmer for ages so when he offered the delivery service, I supported it.  Each week, I place an order based on availability so have been experimenting with a few neat ingredients.  

I made this delightful stew for dinner, quickly named Rainbow Stew because of the bright colours. Unlike most stews, potatoes are not included. It is chock full of nutritious ingredients including purple top turnips, celeriac, corn and rainbow swiss chard. The bay leaf (middle left) was fresh picked from my bay laurel plant! The new to me ingredient in this dish was celeriac.  It's definitely an ingredient I will use again.  Very tasty stew!


Friday, March 19, 2021

Jalapeño Garlic Roast Beef

Our slowcooker is one of the least utilized kitchen appliances second only to the microwave oven.  I much prefer using a stovetop pressure cooker to the slowcooker.  On the other hand, one of our kids uses the slowcooker a few times a week.  A slowcooker is also a very popular kitchen appliance at our vacation home in the south.  It's all about what is available, what fits your needs and what you get used to. 

jalapeño garlic roast beef

In February of 2020, I decided to use the slowcookers a bit more frequently.  My primary use had been soups and stews.  So, I lightly seared a rib roast then put in the slowcooker with stock, sliced jalapeño peppers, garlic cloves  on low for about 7 hours.   When finished, I thinly sliced the roast as it didn't shred nicely.  The flavour was quite lovely though with a nice heat, perfect for serving over rice.  

The meat warmed nicely the following day for buns.  I froze about a 500 ml bag to see how it would freeze.  I am curious as to whether this could be canned.  As far as safety, there isn't an issue but flavour and texture may change. 

Notes:  

A rump or chuck roast would have shredded better.  There was nice heat but was in need of a bit more depth of flavour.  Next time I will add tomato stock or whey to help tenderize the meat.  Other possibilities are onion, bayleaf, Worchestershire sauce or red wine.


Monday, January 05, 2015

Smoked Rump Roast

I have been wanting a smoker for quite some time so in 2013, I borrowed a friend's small electric True North smoker for The Great Smoker Experiment Part 1 and Part 2.  I prepared a batch of sliced beef for jerky.  Half was prepared in my traditional method using my dehydrator and the other half prepared in the smoker.  I liked the results so set out to find a suitable smoker. While another friend is getting excellent results with a variety of smoked meats especially summer sausage using the True North smoker, I decided I did not want an electric smoker.  The price of electricity in Ontario is the highest in Canada and threatening to go higher plus electricity is not the most efficient way to cook anything to begin with.

dyna glo smoker assembled
When we were at Sam's Club in January of 2014, I spotted a Dyna-Glo smoker that I thought would work nicely.  We went back in lat February and they no longer had it so I went online to Walmart.ca and found the same smoker with free shipping to my door!  The smoker arrived then sat in the box on the lower level while we spent the month of May in Florida and Aruba.  Finally, back home and settled, my husband put the smoker together for me.

This propane gas smoker has a 15,000 BTU burner, heavy duty enameled steel wood chip box, heavy duty steel water bowl, 4 adjustable smoking racks and electronic ignition.  The temperature can easily be adjusted.  There is a thermometer making it easy to keep an eye on the smoking temperature. 

The smoker was assembled on our old deck.  Two days after I seasoned and experimented with this smoker for the first time, my husband moved it to the garage where it sat during the tear down of the existing deck and construction of the new deck.  The main portion of the new deck is 20' x 30, the attached lower pool deck is still being worked on as are portions of the main deck.  It has been a huge project!

prepared rump roast
Smoking adds a lovely element to foods.  The flavour is very much dependent on the kind of wood chips used.  There is a wide range of smoking chips available wherever grilling accessories are sold.  I used sugar maple chips for the rump roast experiment.

I rubbed a 3.6 lb rump roast in garlic pepper.  It was an easy prep, simply making sure the roast was well covered.  As I get better at smoking, I will be experimenting with rubs but first things first.  My goal with this roast was putting the smoker through its paces and getting an edible result.  Don't laugh!  Sometimes, a goal of edible is all it takes to get a bit creative in the kitchen.

rump roast in the smokerI seasoned the smoker then it was ready for its maiden run.  Smoking differs from other methods of cooking in that you really do need to keep an eye on it.  There's no running to the store or leaving the smoker unattended for any length of time.  It is important that the water bowl does not run dry.   If it does, the meat will be dried out instead of moist and tender.  It is also important to keep the smoker at the proper temperature.  Too high of a temperature will result in dry, over cooked meat while too low of a temperature will allow pathogens to multiply that can result in food borne illness. 

Once the smoking begins, the smoking chamber is left closed tightly.  The lower chamber houses the burner and water bowl.  It can be opened briefly to add water if necessary.  While it is called a water bowl, you can actually use other liquids like stock to impart more flavour to the food being smoked.

smoked rump roast
Larger chunks of meats are smoked according to weight.  I smoked this rump roast at 225°F for 5 hours 24 min (1.5 hr/lb).  I did run the water bowl dry briefly but caught it before any excessive drying occurred.  I simply added more water and noted it in my kitchen journal as a lesson learned.

The resulting smoked roast had developed a lovely, hard crust with a nice smokey aroma.  I thought the crust was a bit dark but checking online saw that it was fine.  I wanted nice slices for lunch meat.  Once the smoked rump roast was cooled, it was ready for slicing.  Cooled meats always slice nicer than warm meats. 

slicing the smoked rump roast
I bought a Hometrends Food Slicer on sale at Walmart while waiting for the smoker to arrive.  I have also wanted a food slicer for homemade lunch meats for quite some time.  This food slicer is premium coated steel and die cast aluminum housing featuring a heavy-duty 130 watt motor, adjustable and removable 7.5” (19 cm) hardened blade, adjustable thickness control knob, removable carriage system for easy cleaning and suction feet for stable, non-slip operation.

I adjusted the thickness to quite thin then placed the smoked rump roast on the food slicer bed.  The slicer made quick work of slicing the meat into thin slice of uniform thickness perfect for lunch meat.  My only complaint is the sliced meat falls onto the counter at the back of the slicer so it is necessary for the counter to be squeaky clean before using the slicer then cleaned again after but other than that, I'm pleased with the results.

sliced rump roast
The true test of a successful smoking is the pinkish smoke ring.  I actually had a smoke ring!  The next test of course is the taste.  I was pleasantly surprised at the flavour.  My husband declared the slice smoked roast delicious as he pile his ciabatta bun!  I packaged the rest of the slices into Ziploc bags then popped them into the freezer.  The packages were for lunch meat while camping with the kids and grandkids the following week.

The smoke rump roast slices were a hit while camping.  I'm looking forward to doing a lot more experimenting with smoking.  Smoking a roast for lunch meat is a definite keeper!  I'll experiment with rubs but really the garlic pepper gave good results.  I will be careful to not let the water bowl run dry next time but other than that I am very pleased with the results. 


Tuesday, June 03, 2014

Steak and Zucchini Stir Fry

The first part of the May trip at our vacation home is quite the adjustment as we are coming off of a four month schedule of up at 3:30 AM and into be by 8 PM.  Suddenly we are thrust back into somewhat normal hours without any time to get used to the change.  We generally spend the first few days of our trip rather low keyed and relaxed.  The second day of any of our Florida vacations is always grilled steak.  The Publix there has a nice meat counter so we buy a couple of extra thick cut steaks.  There is always enough steak left over for snacking and another meal!

steak and zucchini stir fry
Zucchini melody is one of our all time family favourites!  This simple dish consists of sautéed zucchini, mushrooms and onions.  Not only is zucchini melody tasty by itself, it can be quickly converted to a full meal stir fry as I did with the left over steak.

Basic Method:  Heat about a teaspoon of olive oil and a little butter in a non-stick fry pan.  Add the onions and cook until translucent.  Add the mushrooms and continue cooking until onions start to caramelize.  Add the zucchini pieces. Cook, stirring often until zucchini is tender.  Remove from heat and serve.

For the steak and zucchini stir fry modification, I added fresh green beans with the zucchini.  Once the vegetables were tender, I stirred in slices of left over steak cooking just to warm through.  The result was a delicious, quick to prepare stir fry to enjoy on the lanai while chatting about our plans for the rest of our vacation. The following day we would be picking up my husband's sister and her son.  They would be staying with us for four days so we were excited about the days to come. 


Saturday, November 09, 2013

Homemade Roast Beef Lunch Meat Packets

The Earl of Sandwich was clearly on to something with his culinary invention that remains a dietary staple today.  Basically a sandwich is a filling between two pieces of bread, quite often including some type of meat.  Commercially prepared, thin and evenly sliced lunch meats are only as far away as the nearest grocery store.   Packages often go on sale or are regularly priced at very low prices to encourage consumers to buy them.  This type of lunch meat is not without fault.  Sure, you are getting it for a very low price but like most commercially processed foods, lunch meat is laden with preservatives, food additives and sodium.  One slice of roast beef lunch meat contains as much as 300 mg of sodium in comparison to 6 oz of home cooked roast beef that contains 92 mg of sodium.  A sandwich made using two slices of roast beef lunch meat contains 600 mg of sodium in just the lunch meat without adding in the sodium content of the bread, condiments or extras.  In perspective, those two pieces of roast beef lunch meat contain almost 30% of the sodium RDA set by Health Canada.  Clearly, if you are on a sodium restricted diet lunch meat is not a food that you should consume on a regular basis.  However, the problem with commercially prepared lunch meats  is more than just sodium.  Sodium nitrate, a known carcinogen, is used as a preservative in commercially prepared lunch meats.  Expectant mothers are advised not to consume lunch or deli meats due to risk of Listeria to the feotus.  Commercially processed lunch meats may also contain a number of food additives including high fructose corn syrup.  All that aside, I have to admit not liking commercially prepared lunch meats and never have.  My work-around is simply making homemade versions of lunch meats using whole cuts of meat, home cured meats and cooked meat loafs, all thinly sliced.

slicing cooked roast beef for freezing
When I am making roast beef, I usually cook two.  It takes the same temperature and time to cook two as it does one.  Part of one roast is used for dinner with the remainder for planned left-overs.  The other roast is typically prepared for homemade lunch meat.  Commercially prepared lunch meat is typically thin sliced.  Using a chef's knife to slice cold roast beef will give nice, thin slices with a bit of practice.  A meat slicer has been on my list of kitchen wants but I haven't bought one yet, so a chef's knife it is.  I slice across the grain, trimming any fat if necessary. 

In general, I find leaner roasts work best for lunch meat slices.  I generally do not add a lot of seasoning other than garlic pepper, onion and Worchestershire sauce although sometimes I add tomato stock.  Once the roast is fully cooked, I let it cool then refrigerate until cold.  The cold meat is easier to slice thinly.

sliced roast beef vacuum sealed ready for freezer
I package the thinly sliced meat in the amount we will comfortable use within three or four days into vacuum bags then vacuum seal for freezing.  Vacuum sealing prevents freezer burn.  The packets thaw nicely in the refrigerator.  We use one sometimes two packets of homemade lunch meat a week.

This method of freezing and storing lends itself nicely to thinly sliced turkey breast, meat loaf, home cured summer sausage, home made pastrami, and wild game.  I have found the price per pound of the home made lunch meats to be generally less expensive than commercially prepared lunch meat.  The quality of the product is significantly higher though with lower sodium content, no preservatives or additives, and it tastes better.  Prep time for freezing the meat is minimal at only slicing and vacuuming time.  Overall, homemade lunch meats are a healthier, cost effective alternative to commercially prepared lunch meat!


Saturday, September 14, 2013

Home Canned Beef and Mushrooms

Throughout the seven years that I have authored this blog, I have given considerable coverage on home canning.  Home canning is one of the most economical and eco-friendly activities a frugal home cook can do.  The bottom line is home canning very much fits in with my philosophy of home cooking so a lot of the dishes I make use my own home canned foods.  Like many who cook from scratch, I do appreciate using certain convenience products.  Unlike many, the vast majority of the convenience products I use are also homemade. 

home canned beef and mushrooms
One homemade convenience product I made with some of the mushrooms I recently bought was home canned beef and mushrooms.  This is a very versatile product that can be used as a soup or stew base, a sauce addition or the juice can be thickened for a rich beef and mushroom meat serving or meat pie filling.  The possibilities are endless.  A jar of beef and mushrooms combined with a handful of frozen vegetables along with pasta, rice, potatoes or bean and a mouthwatering dinner can be on the table in 15 minutes!  I made seven 500 ml wide mouth jars of this delicious homemade goodness that will be a welcomed addition in our pantry. I think the jars of beef and mushrooms look great!

Canning meats at home is not difficult and it can save considerable time and money.  It is a wonderful way to take advantage of those great meat sales you find.  Meats are low acid so must be processed in a pressure canner.  I use an All American model 921 pressure canner for all of my low acid canning needs.  I prefer using wide mouth jars for canning meat products if at all possible as it is easier to remove the contents for reheating later.  Standard mouth jars can be used but the shoulders can make it a little more difficult to get some meat products out of the jars later.  The jars pictured are the older Bernardin embossed pints that are slightly taller than their newer embossed 500 ml jars. 

Meats invariably have fat that can cause a seal failure.   Meats should be trimmed well before canning to remove excess fat and connective tissue.  I wipe the rim with alcohol to remove any grease that could prevent proper sealing.  A layer of fat will form on most home canned meat products once they have cooled.  Ideally, this will be minimal as pictured.  This fat can easily be removed before reheating if desired. 


Saturday, August 17, 2013

The Great Smoker Experiment (Part 2)

When I am testing a new method I like to use a tried and true food we like for the comparison.  So it was with my great smoker experiment.  Beef jerky is a family favourite that I have been making since my kids were knee high to a grasshopper.  Homemade beef jerky is a healthier version to mass produced beef jerky.  It is very easy to make requiring minimal equipment and a few simple ingredients.  I normally make beef jerky using a dehydrator and the dehydrator setting on the oven when I had the Jenn-Aire range.

prepared beef slices for jerky
Although beef jerky can be made using ground beef, I don't.  There is a higher risk of contamination using ground beef because of the increased surface area.  Beef jerky is not cooked but rather dried to 160°F/71°C which is a high enough temperature to kill off bacteria and remove moisture to preserve the meat.  I use a lean cut of beef sliced into thin strips either by the butcher shop or myself to make traditional beef jerky. 

A marinade is optional but is usually used to add extra flavour to the beef jerky.   There are numerous marinade recipes ranging from very simple to complex or a commercially made barbeque sauce can be used.  I marinated the hand cut beef strips in Sweet Baby Ray's barbeque sauce overnight.

meat slices in the dehydrator
The main purpose for this cooking experiment was to see what if any differences there were in the finished product by changing the drying method.  For a valid comparison, it was important to use beef strips that had been treated identically up to the actual dehydration process.  That would mean any differences in flavour or texture would be due to the drying method used.   I would be using my Nesco American Harvest dehydrator and the True North smoker for this cooking experiment.

The next morning I divided the beef slices into two portions.  I placed the first portion of the strips on the prepared dehydrator trays and set the temperature to 160°F/71°C.  In all honesty, I love my dehydrator and have even expanded it BUT if I were doing larger scale dehydrating, I would consider buying a dehydrator with rectangle or square racks as they are a bit more versatile.  At any rate the Nesco dehydrator works well for my needs.

meat slices in the smoker
I loaded the second portion of the beef strips directly onto the smoker racks.  The need for a drip tray quickly became apparent but that is the case with drying beef jerky regardless of the drying method.  I loaded up the wood chip pan with mesquite wood chips then set on the burner and plugged the unit in.  Once the smoking began, I removed the door to take a picture then replaced it.  The door was removed again to refill the wood chip pan a couple of times, then finally for the removal of the finished beef jerky.  Of note, when the smoker door is opened you will be greeted with a large puff of smoke meaning your clothes, hair and anything in the general vicinity of the smoker will smell like smoke!

a comparison of smoked to dehydrated beef jerky
This was a rather interesting cooking experiment.  Clearly there are pros and cons to using both methods.  A smoker can only be used outdoors whereas a dehydrator can be used both indoors and outdoors.  Both need to be sheltered from the elements when in use outdoors.

The results:   The drying time was considerably shorter for the beef jerky dried in the dehydrator, with the jerky drying in a little over half the time of that in the smoker.  In terms of colour and texture, the beef jerky dried in the dehydrator was almost identical to that dried in the smoker.  The beef jerky dried in the dehydrator may have been just a little darker.  So, either way the colour and texture is pretty much the same.  The big difference was the flavour!  The beef jerky dried in the dehydrator had a lovely flavour with just a hint of smokiness from the Sweet Baby Ray's.  By hint, it really was barely noticeable, yet a flavour element none the less.  The beef jerky dried in the smoker was heavy on the smoky flavour, over powering the Sweet Baby Ray's that became more of a flavour note.  Two weeks later, test strips of retained their colour, texture and flavours nicely.

The bottom line:  I was quite impressed with the smoker results.  I will definitely be experimenting with more smoked meats and am one step closer to buying a smoker.  The dehydrator gave consistent results in a shorter period of time with less fussing.  There was more fussing to the beef jerky dried in the smoker but I was new to the process and there was no temperature control or wood chip indicator on the basic smoker I borrowed so those were factors.  The smoke gives great flavour that can't be duplicated by the dehydrator.  If using a smoker, I think the marinade can be kept simple.  It is an easy way to get great flavour without any of the calories of barbeque sauce too. 


Friday, August 09, 2013

Barbeque Rib Roast

Beef, venison and pork roasts lend themselves nicely to cooking on the outdoor grill.  They can be cooked directly on the grill racks, wrapped in foil, in a covered or uncovered pan or on a spit.  Roasts can be cooked without season, with a rub or sauce, or a combination of rub and sauce.  Regardless of the way they are cooked on the grill, roast turn out moist, tender and flavourful!

barbeque rib roast just off the grill
We cooked a rib roast in a covered pan with sauce on the grill.  While a regular roasting pan could have been used, I used an aluminum foil pan.  I poured a health dose of Sweet Baby Ray's barbeque sauce over the roast then added half an onion cut into slices.  Then I covered the pan with aluminum foil and placed on medium indirect heat.  Mid-way through cooking, I added two large potatoes.  Potatoes cooked this way absorb flavours from the roast and sauce.

Adding saucer at the start of cooking gives the roast a lovely flavour throughout however, there is a risk of the sauce burning.  When cooking this way, you want the sauce to cook to the point of burning for the rich caramelization flavour but you don't want it to burn enough to cover the entire bottom of the pan or give the roast a burnt flavour.  This is why I used a disposable baking pan.

barbeque rib roast plated
Despite first appearances with the burnt sauce edging on the pan, the rib roast comes out a sure fire winner!  The meat is richly flavour, melt in your mouth, fork tender.  It falls off the bone!  There is not as much sauce left as you would expect.  The thick sauce is perfect for topping the meat if desired.  Doesn't the meat look delicious?

This has to be one of our favourite ways to cook roasts during the hot summer months.  The results are consistently delicious!  Any barbeque sauce can be used so don't be afraid to experiment.  We like the deep rich, smokey flavour of Sweet Baby Ray's or bourbon whiskey grilling sauce


Wednesday, July 10, 2013

Grilled Round Steak

We just picked up our beef on the hoof purchase for 2013 but I still had a few packages left from last year's beef purchase.  A couple of those packages were round steaks.  Some cuts of beef are better for grilling than others, however even those cuts that give less than ideal results can be grilled if you modify how you do the grilling.  So it is with round steak.  A round steak is from the round primal cut of beef.  It is comprised of  the eye (of) round, bottom round, and top round still connected.  The bone may or may not be included.  A round roast is lean but moderately tough due to the lack of fat and marbling.  This makes round steak dry out when cooked with dry-heat cooking methods like roasting or grilling.  Slow moist-heat methods including braising, to tenderize the meat and maintain moisture are commonly used to cook round steak.  Round steak can also be sliced thin, then dried or smoked at low temperature to make jerky.

sugar maple wood smoking chips
During our camping days we often brought cherry wood with us to use for cooking on the campfire.  Cherry wood gives a beautiful deep ruby red embers and tantalizing sweet smoke.  Smoking chips are available in a variety of woods including hickory, sugar maple, cherry and mesquite.   Although wood smoking chips can be used with any meat, fish or poultry, some wood flavours are more suitable than others for certain meats, fish or poultry.  Wood smoking chips can even be used to add extra flavour to grilled vegetables, breads and pizza!

Wood smoking chips can be found in the grilling aisle of most box stores, specifically Canadian Tire and Home Hardware here in our corner of beautiful Ontario, Canada.  They are not expensive at about $7 for 220 cubic inch bag and the bags often go on sale near the end of the summer when there is less demand for them.   I look for all natural 100% organic, pesticide free wood smoking chips.   You can also use wood chips from woodlots and orchards providing it is pesticide free.  Quite often the wood will be free or very low cost from either source.

grilled round steak
Round steaks are quite large.  The bone in round steak I grilled (pictured) was about three quarters of an inch thick.  I decided to experiment by grilling the steak low and slow over charcoal enhanced with wood smoking chips to medium rare.  I reasoned this would give flavourful results without drying the meat.  I soaked a good handful of sugar maple wood smoking chips in water for about 30 minutes.  According to the bag, sugar maple is perfect for pork and poultry but I thought it would work well for the beef as well.  Once the coals were hot, I put about a third of the prepared wood chips on the coals then put the steak on the grill when the chips began smoking.  I let the steak grill slowly, adding a few more pieces of charcoal and wood chips as required to keep a low, slow heat. 

slicing round steak for freezing
Once the steak was cooked to medium rare, I removed it from the grill and let it rest for 5 minutes.  Resting ensures the meat stays moist, tender and juicy.  I was very pleased with the end result!  It was a nice flaourful steak that wasn't dried out.  The smoky element was delightful and what a difference it made in the flavour of the steak.  The key to this was the low, slow grilling.  After resting, I cut the steak into thin slices then divided into meal sized portions and vacuum sealed for freezing.  These cooked steak strips will be used for salads and wraps. 

I am quite impressed that the steak did not become dry and tough during the cooking process.  Overall, I would rate this experiment a 9 out of 10.  One portion of the steak was cooked a bit more than I would have liked but other than that, I have no complaints.  The real beauty of using the smoking chips is the flavour they add to the foods.  While the results are good using the wood chips on the outdoor grill, I want to do more smoking that requires a smoker.  I'm borrowing a smoker from one of our friends this week to see if I really want to buy one.  I have one round steak left that I will be smoking for beef jerky so will report back on the results.  I am very much encouraged by the results so far.


Sunday, May 26, 2013

Grilled Porterhouse Steak

This is the time of year that many Canadians turn their thoughts to cottage life, camping and spending times around backyard pools or day-tripping to area beaches.  We camped for years when our kids were growing up.  When we moved to waterfront property about ten years ago, it was like we were cottage living on a daily basis.  That house and the next one we bought also on waterfront property originally were cottages that had been converted for year round living so essentially we were cottage living.  Still we tossed around the idea of buying a cottage in Ontario then in the spring of 2010, we bought our vacation home located in Florida and eighteen months later sold our waterfront property to buy our new urban setting house.  Living in an urban setting we have a greater appreciation for our vacation home.  We spend about three months of the year at our vacation home, divided into three trips.  Vacation homes and cottages present a few cooking challenges because many including ourselves want a break from the normal routine.  At the same time, vacation homes and cottages tend to be not as well equipped as your home kitchen so the emphasis is on delicious meals and snacks that are easy to prepare.

porterhouse steak
The grill is our favourite piece of cooking equipment at our vacation home, much like it is at home and was when we camped.  Aside of using a grill for quick and easy meals, we use our grill much the same way as an oven so we enjoy fresh baked food and bread during the hot summer months without heating up the kitchen.  Grilled steak is our number one go to meal while at our vacation home!  We quickly established a tradition of the first home cooked dinner is always grilled steak enjoyed on the lanai.  The nearby Publix grocery store has a lovely meat and seafood counter.  The meat is fresh and high quality so that is where we buy our fresh meat when at our vacation home.

Pictured is the 2.17 lb (984.29 g) porterhouse steak we bought for the first dinner of this year's spring trip.  Isn't it a beauty?  A porterhouse steak is similar to a T-bone steak except it has a tenderloin whereas a T-bone steak does not have a tenderloin.  This nicely marbled cut of beef promised to be tender and juicy when grilled.  The porterhouse steak cost $19.41 on sale, saving $6.51.  Now, that might sound expensive but in comparison to the cost of two steak dinners eaten out, it isn't.  This size steak is enough for a dinner for us plus left-overs for a stir fry and wraps.

porterhouse steak thickness
We like keeping the side dishes for grilled steaks simple, easy, and delicious.  We decided to have both asparagus and potatoes with the steak but cooked them a bit differently.  Foil wrapped potatoes is a grilled side dish that we often serve.  It is an easy way to prepare whole potatoes for the grill lending the perfect easy side for grilled steaks, chops or chicken. 

Method:  Cut enough squares of aluminum foil for the number of potatoes you want to grill.  Place each potato on a square of aluminum foil.  Drizzle extra virgin olive oil over the potato.  Sprinkle with Montreal steak seasoning or garlic pepper.  Wrap the foil tightly around the potato.  Place on the hot grill on indirect medium high heat.  The potatoes will take about an hour depending on size.  They are ready when finger soft to a pinch.

My husband put the steak on about 15 minutes before the potatoes were ready.  He grilled the steak on one side turning a quarter to form hash marks then  flipped the steak to finish grilling repeating the hash marks.  He moved the potatoes to the side, off  the top rack to the lower grate where they would stay hot.  Foil wrapped potatoes will keep quite warm even when removed from the grill for a half hour or more but it is safer to keep them at temperature on the grill until ready to be served.  He put the asparagus spears on the grill just after turning the steak.  While extra virgin olive oil can be used on asparagus spears being grilled in this fashion, we didn't use any.  As long as the asparagus is grilled lightly just to cook through, it will remain tender without drying out if the oil is omitted.  The asparagus was turned once while grilling.  Asparagus grilled to al dente this way with  nice grill marks and just a hint of smokiness then drizzled with a little butter  is delightfully delicious.  

porterhouse steak resting before serving
My husband grilled the porterhouse steak to medium rare with a warm red centre, pink throughout and nice hash marks.  He didn't use any seasoning salt, marinade or barbeque sauce.  This is how we typically grill steaks, letting the flavour of the beef shine rather than being masked by other flavours.  He removed the porterhouse steak from the grill and let rest 8 minutes just shy of the 1 min per 100 g some chefs recommend.   Whole pieces of meat like steaks, chops and roasts should be rested after cooking.  During the grilling (cooking) process, juices are driven towards the centre of the meat.  Resting the meat before serving allows the juices to redistribute throughout the meat ensuring it will be moist, tender and juicy when cut. 

porterhouse steak dinner
The first dinner at our vacation home always reminds me of those camping days of our past.  By the time we get out of the airport, drive to our vacation home stopping for groceries along the way, it is usually after 3 PM.  We are tired from the trip, need to do a bit of unpacking and ready to relax while anticipating a few weeks spent filled with great food, pleasant weather, reuniting with friends and  rejuvenation. 

My husband and I shared the delicious steak dinner sitting on the lanai, listening to the sounds of wildlife change from day to evening. The steak was melt in your mouth, butter knife tender with an amazing flavour!  The potatoes were tender, nicely flavoured from the seasoning.  The asparagus spears were done to perfection!   The evening was warm and slightly balmy, a nice change from the cooler northern weather we had come from earlier in the day.  As we enjoyed the first dinner of our spring vacation, we chatted about how we would spend our time.  After dinner, we went for a ride around the park in our golf cart letting the warm air brush over our bare arms.  And so the first trip to our vacation home of 2013 began...


Saturday, April 27, 2013

Grilled Rib Steak & Refried Rice Using Grilled Rib Steak Left Overs

While much of the discussion on this blog throughout the past week focused on my adventures in making no knead breads, it has been a whirlwind of activity here.  We decided to makeover the master bedroom completely including new furniture and at the same time finish the guest room.  The furniture (Vaughan-Bassett) for the master bedroom had an estimated time of arrival of three weeks giving me plenty of time to shop for accessories and work on the crochet bedspreads for each room.  The bedspreads are a huge undertaking given one is king and the other queen size, so a lot of work.  Shopping for accessories meant several shopping trips with many foodie stops!  Much of the focus was stocking up on herbal teas, K-cups, various flours and cherry picking the sales.  I did manage to find a few interesting foods to try so will talk about them as they are used.  Oh, and I just couldn't resist the cute salt and pepper shakers in just the perfect deep red for the kitchen, a new tea ball and a couple of kitchen organizers.  At the same time, I was experimenting with the no knead breads and testing the 4ever Recap canning lids.  Even though it has been rather busy, regular cooking continued.

grilled rib steak with baked potato and steamed broccoli
It has been a cold, wet spring with wet snow a couple of days ago and frost on the roofs yesterday morning.  Still, we have been doing more grilling.  The deck off the kitchen is quite protected from the winds making it perfect for grilling in all but the most unpleasant weather.   Early this week the sun made a rare appearance so I thawed a couple of rib steaks for grilling.  The steaks were grilled to medium rare, served with baked potatoes and steamed broccoli.  It was a delicious meal! 

We seldom marinate or use barbeque sauce on our steaks.  Instead, we let the flavour of the gorgeous, hormone free beef shine!  I love baked potatoes baked in the oven but just can't wait to start baking them on the grill again.  The grill gives a bit of extra flavour yet keeps the skin crispy and flesh tender. 

All of the steaks from our beef on the hoof purchase are large, cut to our specifications of 1 - inch thick.  While the whole steak looks luscious for the photo shoot, it is too much steak for either of us although if my husband is in the right mood, occasionally he will polish off a steak this big.  At any rate, anytime we have steak for dinner we have left overs.  Although steak does reheat nicely to enjoy as is, I also use left-over steak in other dishes.

refried rice made using left over rib steak
The following day, I cooked rice for dinner which is so nice now that I've mastered cooking it on the stovetop.  The rice comes out perfect every time, something I attribute to the gas burners that are considerably easier to control than electric burners that retain residual heat after being turned off.  I used the rice to make refried rice.

Refried rice is an extremely easy and inexpensive way to use left over rice and beef, chicken or pork that can be made in 15 minutes or less.  It uses soy sauce which is incredibly high in sodium content.  Even the low sodium soy sauces have over 500 mg of sodium in 1 tbsp!  I use Rooster Brand Dark Soy Sauce which has 800 mg of sodium per 1 tbsp but because it has a deeper, richer flavour, less is needed.  It does give a darker colour to any dishes it is used in. Neither of us are on a sodium restricted diet however, we do tend to eat fairly low sodium so refried rice is a dish we enjoy only a very few times a year.

Method:  Cook rice or use left over rice.  I used 3 cups of cooked rice.  Cut left over steak (chicken or pork) into strips or pieces.  Heat a little olive oil in a non-stick skillet.  Pour in the rice.  Stir in about 1½ tbsp dark soy sauce, mixing well.  Stir in prepared meat and about 1 c of frozen peas.  Mix.  Make a well in the centre of the rice.  Pour in three beaten eggs.  Stir and continue stirring while incorporating the rice mixture into the eggs as they cook.


Sunday, April 14, 2013

Garlic Roast Beef with Roasted Garlic Mashed Potatoes and Home Canned Green Beans

Garlic has been richly entrenched in folklore for warding off vampires.  This likely stemmed from the practice of wearing garlic around the neck in days long ago.  Garlic is a tasty culinary herb but it also has medicinal properties.  It has antibiotic properties (contains the sulfur compound allicin), lowers blood pressure, is good for the circulatory system, promotes heart health, promotes a healthy immune system, increases bile production, decreases liver fat and reduces cholesterol.  Furthermore, ingesting garlic offers protection against mosquitoes which in turn protects you from contracting diseases via mosquito bites (eg. West Nile Disease).  Chewing on a raw clove of garlic releases allicin which kills the strep throat bacteria.  Other medicinal uses include relieving the pain of insect bites; treating sprains, toothache, tonsillitis, bruising, ringworm and clearing sinuses.  While you can buy garlic capsules, incorporating an abundance of fresh garlic into your diet works better and is less expensive.

searing the cross cut rib roast in Dutch oven
We are nearing that time of year again when our beef on the hoof will be ready.  This year the estimated time we will be getting it is the first week of June which gives me a bit more time to pare down our freezer contents.  Still, we are in high gear eating from the pantry and freezers!

I thawed a cross cut rib roast to cook for garlic roast beef  in my new enamel coated Dutch oven.  I often cook roasts without thawing so this was a bit different.  I let the roast thaw for a little over 24 hours in the refrigerator.  The roast was tied, very close to rectangular shaped.  I heated extra virgin olive oil in the Dutch oven then quickly seared the roast on all four sides.   Normally I don't sear roasts unless cooking is a slow cooking but this time I wanted to cook at a low temperature so seared for flavour.

seared cross cut rib roast seasoned
I pre-heated the oven to 200°F.  I seasoned the cross cut rib roast with Worcestershire sauce and garlic pepper then topped with whole cloves of garlic and slices of onion.  This gave me two elements of garlic, fresh and powdered for flavour.  The fresh garlic would roast as it cooked but not to the degree of plain roasted garlic that has a deeper caramelized note mingling with a hint of sweetness.  I added about a three quarter cup of water to the bottom of the Dutch oven.  The lid of the Dutch oven is designed to be self basting so reasoned that there would be just enough gravy for that night's dinner.  Once the roast was prepared, I covered it and place the hot Dutch oven into the pre-heated oven.  I cooked the covered  roast at 200°F for 1½ hr  then raised the temperature to 275°F for ½ hr. 

garlic roast beef
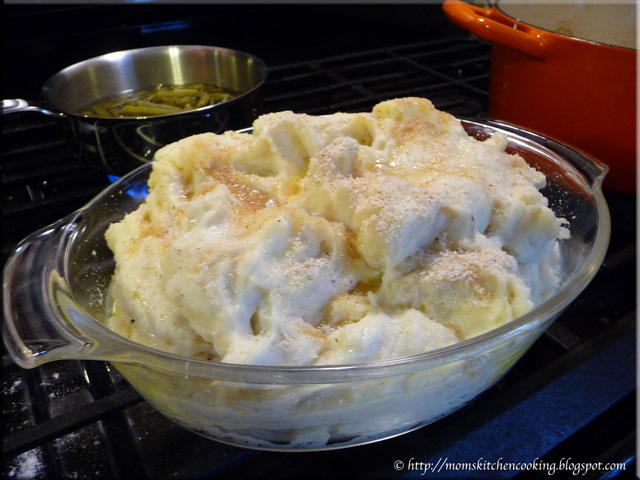
While the roast was cooking, I prepared the roasted garlic mashed potatoes (recipe below).   These would be reheated during the last ½ hr of the roast cooking.  The garlic mashed potatoes can actually be made ahead of time and refrigerated until you want to warm them for a meal. 

I was rather pleased with the results!  The roast was nicely browned for nice eye appeal with a rich looking au jus that could have been strained then used without thickening.  The aroma was divine!  I removed the roast to rest.  I lightly strained the au jus, mashing in the roasted garlic then thickened with a lightly seasoned corn starch slurry.  Really, there is nothing wrong with leaving the onion slices and garlic pieces in the au jus for serving.  Mashing the garlic just adds more flavour to the au jus.

roasted garlic potatoes
Swedish potatoes have been a long time family favourite with their rich, creamy texture and just a bit of tang in the flavour.  I originally learned to make them from my Mother-in-Law and while I still make the original, I have developed several potato dishes based on the original.  The original Swedish potato dish is heavy on sour cream, cream cheese, butter and heavy cream all of which make this dish higher in fat content.  My roasted garlic mashed potatoes cut that fat significantly.  The potatoes are not as creamy as I purposely leave in smaller chunks of potatoes but the flavour is a sure winner!  These potatoes freeze and reheat well.

Roasted Garlic Mashed Potatoes
recipe by: Garden Gnome

8 - 10 medium sized potatoes
½ c sour cream
½ c cream cheese
½ small onion
2 cloves garlic
1 tbsp roasted garlic
½ tsp fresh cracked pepper
1 tbsp butter
½ c 2% milk

topping:
dry bread crumbs
1 tsp butter
garlic chives (optional)

Wash and peel the potatoes.  Cut into chunks.  Peel garlic cloves.  Thinly slice the onion.  Place potatoes, onion slices and garlic cloves into steamer basket.  Steam until the potatoes are fork tender.  Pour the potatoes, garlic and onion mix into stand mixer bowl.  Add the remainder of the ingredients.  Mix until semi-smooth (mainly smooth with some small chunks).  Spoon the mixture into an oven proof casserole dish.  Divide the topping butting into small dabs and scatter over top of the potatoes.  Sprinkle a light coating of dry bread crumbs on top.  Sprinkle chopped garlic chives on top.  Heat in oven until top is lightly golden.

garlic roast beef with roasted garlic mashed potatoes and home canned green beans
I served the garlic roast beef with the roasted garlic mashed potatoes, home canned green beans, and a side salad with homemade creamy garlic dressing.  Home canned green beans are one of our favourite side dishes so I can a lot of them.  I'm very much looking forward to the upcoming growing season as there are only 4 - 500ml jars of green beans left!

This was a sure to please, easy to prepare dinner packed full of garlic goodness!  Each of the layers of garlic (fresh, roasted, dry) added their own distinctive notes yet were not over powering.  Garnishing the potatoes with garlic chives will add another subtle garlic note.  The end result was delightfully delicious!  And no we did not have garlic breath :)


Saturday, March 23, 2013

Winter Grilling - Rib Steaks

My husband and I love grilled foods year round even though we live in beautiful Ontario, Canada where the temperatures dip below zero.  We have no problem grilling in rain, freezing rain, sleet, snow or sub-zero temperatures.  This love of grilling has taught us a lot and is reflected in where our outdoor grill is located, as close to the kitchen as possible. Grilling outdoors during in-climate weather especially the colder temperatures takes a bit more time for the grill to heat properly but the prep work is the same.  I thought I would share a few winter grilling tips with you today.

grilled rib steaks
A few days ago, I thawed two rib steaks intent on grilling them.  It didn't matter that we had had freezing rain that afternoon and by the time the grill was fired up it was snowing.  When my husband arrived home the grill was heated ready for the steaks.  The baked potatoes were almost ready, the mushrooms were browning and home canned green beans were in the pot ready to be heated.  My mouth was watering just at the thoughts of a nice, juicy grilled steak!  Pictured is the grilled rib steak dinner.  Doesn't is look delicious?

Winter Grilling Tips:
  • place the outdoor grill in a protected location away - Our grill is located in the corner formed between the side of the house and attached garage, on the deck about two feet from the kitchen patio doors.  It is shielded from the northeast winds (house side), south winds (garage side), and west winds (neighbour's house).  It does get some wind but it is considerably reduced than if the grill were out in the open.  Some grill in their garage in the winter but that is not advisable with an attached garage or if you don't want everything in the garage to smell like smoke.
  • keep the outdoor grill covered - There are two schools of thought on covering outdoor grills.  The first is a cover protects them and it does as long as moisture does not get under the cover, hence the second school of thought that covering promotes rusting.  It also provides cover for rodents although that is not usually a huge concern in most areas.  We keep our outdoor grill covered as it is stainless steel so there aren't the rusting concerns and we don't have to clean off the grill before using it in the winter months.
  • use an easy fuel - Although you can use charcoal, natural gas or propane is considerably easier at getting the grill to temperature quickly.  There's less going in and out to check the temperature of the grill meaning less of the indoor heated air is being lost. 
  • mainly meats and vegetables - We use our outdoor grill as an oven for many foods but during the winter months, the focus is mainly on meats, tender vegetables (eg. zucchini, red pepper, onions) and portabello mushrooms.  In other words, those foods that are finished grilling within 20 minutes or less.  In a pinch, if the power is out you could still use the outdoor grill as an oven in the winter but you will go through more fuel.  Or, if you don't mind going through more propane just to get that flavour for longer foods using the grill as an oven, by all means do so.  
  • mise en place - It is very important when grilling outdoors during the winter months to have everything in place before you start heating the grill.  The less times you have to open the door between the house and grill the less heated air will escape from the house.  We set up the various dishes assembly line style based on cooking time.  
  • timing - Timing of the side dishes should be such that they are ready when the meat is finished grilling.  In this respect, grilling during the winter is no different than grilling during the nicer weather.  The only difference is meat will quickly cool once removed from the grill in the chilly air.


Monday, January 28, 2013

Frugal Kitchens 101 - Grass Fed Beef

Frugal Kitchens 101
Years ago well before our kids ever started school, my husband and I always dealt with local beef farming friends for our beef who believed as we did that grass fed beef is healthier for us.  Cannings Free Range Butchers is one larger scale farm producing grass fed beef and free range animals.   We actually took it further because our pork and chicken are free range, locally raised by people we know.  They are small scale producers with only 5 to 10 cattle.  The organic farmer I get my chickens and eggs from only has about 20 chickens and a rooster.  There is a notion that grass fed, hormone free beef is more expensive but that simply is not the case.  We pay about $2.30 per lb across board for all cuts of beef, so one pound of sirloin steak will cost us $2.30 as will one pound of ground beef.  The reality is, overall we pay less for our grass fed, hormone free beef than we would pay for store bought than store bought, farm factory raised beef.  We know the cows were treated in a humane fashion during their life-time.  The bottom line is, grass fed, free range beef is the healthier choice in frugal kitchens.  Here's a few pointers:

  • ethical and humane treatment -  Animals raised for food still deserve good and humane treatment over their life-time.  That means they are not caged in areas so small they can barely move.  The farmer usually is a small time producer with a herd numbering under 20 depending on the animal but it is definitely not large scale farming.  The farmer and/or family is tied to the farm and the welfare of the animals meaning they are the primary care givers for those animals.  In most cases, they don't have hired help and if they do, it is likely a seasonal worker to help out if they are away but more likely it is a family member or neighbour that comes in to help the farmer if needed.
  • grass-fed - I honestly cannot stress enough the importance of free-range grazing aka grass-fed.  That means the livestock is not being fed grain, usually corn.  Corn, as used for livestock feed is most likely GMO and proteins from the corn can be rather problematic for the growing number of folks experiencing severe corn allergies.  Grass-fed livestock tend to have stronger immune systems so are healthier requiring less intervention via antibiotics, another growing concern.  Antibiotics given to livestock can leave trace residue in the meat that later affect humans consuming the meat.
  • no growth hormones - Farm factory raised meats are often given growth hormones to get them ready for market quicker.  That is not the case with local producers raising grass-fed beef or other livestock.  Growth hormones can cause a lot of problems in children and are now implicated in the earlier onset of puberty in young girls.
  • eco-friendly - In general, those farmers using grass-fed and free-range methods are those who are most concerned about the environment.  They tend to use green growing methods that have lower carbon footprints.  In most cases, the livestock they sell is sold locally meaning lower transportation costs from farm to table and they don't use practices that pollute the land or waterways.


Sunday, January 13, 2013

Pot Roast

There is nothing better than enjoying a pot roast on a cold winter's day.  The beauty of a pot roast is a whole meal is made with very little effort.  The roast itself need not be thawed either depending on your cooking method.  Not only is there minimal prep, the house smells tantalizing as the roast cooks filling the air with mouth watering aromas.  A pot roast is a win, win regardless of how you cook it.

pot roast
Pot roast is a braised beef dish are generally the less tender cuts of beef like rump or chuck roast.  The slower cooking combined with liquid and vegetables help tenderize the meat.  The thing is a pot roast is about as old of the hills, appearing on our ancestors' tables eons ago and pot roast is still about one of the most frugal winter meals you can make.

There are several ways to cook a pot roast but first things first.  There are the basic ingredients you will need in addition to the roast.

  • meat - Choose a nice cut of beef, trimmed of excess fat.  This is one time you do want to trim the fat because you likely won't be defatting the gravy before serving.
  • vegetables - The most common additions for a pot roast are potatoes, onions and carrots.  Parsnips and mushrooms are good additions as is cabbage wedges.  There is no reason why you cannot add whole kernel corn, small pieces of corn on the cob or even rutabaga or squash.  If adding tender vegetables like sweet peas or broccoli, add them very close to the end of cooking or cook them separately to serve as a side dish.
  • liquid - The most common liquid used for a pot roast is water but you get better results using beef stock, tomato stock (tenderizer, flavour boost), red wine or beer.  
  • thickeners - The most common thickener is a cornstarch slurry however, you can use tapioca, wheat or arrowroot flour.  You can also choose to not thicken the gravy.
  • seasonings -  In general, you don't need a lot of seasonings to make a good pot roast.  I usually add garlic pepper or Canadian steak spice, a bay leaf, Worcestershire sauce and quite often browning sauce.
Next up is cooking methods.  Remember you are braising which means using some type of liquid.  That means you have a few pieces of kitchen equipment to work with.  At your disposal are: roasting pan in oven or outdoor grill, countertop oven, slow cooker and pressure cooker.  You can even use an aluminium foil packet on the grill.  All can give very good results.  By far, the pressure cooker is the quickest way to get a tender pot roast on the table but busy home-makers may prefer the slow cooker.
  • pressure cooker - A pressure cooker operates at 8 lb pressure (low) or 15 lb pressure (high) so food cooks fast and the pressure tenderizes tougher cuts of meat.  In general, a tender and juicy pot roast takes a total of 56 minutes on low or 30 minutes on high.  Browning the roast in the bottom of the pressure cooker before cooking will add both flavour and colour.  The roast need not be thawed just increase the cooking time.
  • roasting pan - The traditional roaster is the way most folks cook pot roasts in the oven or on the grill.  It is low cost, effective with good results but takes a longer cooking time.  The roast need not be thawed but if starting from frozen, you will need to increase the cooking time.  Start the prepared roast at 275°F in covered roasting pan adding root vegetables and mushrooms mid-way through cooking, add thickening slurry after removing vegetables and meat for serving.  Strain the gravy.
  • clay baker - I really love doing a small pot roast in the clay baker.  While it works pretty much the same as a roasting pan, it gives moister results.  The reason being is a clay baker is always soaked before using so moisture is high during the cooking process.
  • countertop roaster -  A countertop roaster is a bit more energy efficient and doesn't heat the kitchen like the oven does.  It does cook faster and at a lower temperature because there is a reduced volume.  Start cooking the prepared roast at 225°.  The roast need not be thawed. After the half-way mark for cooking add root vegetables and treat as you would using a roasting pan.  
  • Dutch oven - Traditionally a pot roast was cooked in a cast iron Dutch oven hung over the fire in the fireplace.  When we heated with wood and when camping, I cooked many a pot roast using a Dutch oven.  A cast iron Dutch oven gives wonderful results when cooking a pot roast.  It is used much like a roaster but cooked over wood fired heat.
  • slow cooker -  Newer slow cookers run a bit hotter than older models so do consider that.  In general it will take 4 to 6 hours cooking a pot roast in a slow cooker depending on the setting.  In this case, you do want to start with a thawed roast.  Essentially and unlike other pot roast cooking methods, everything except the slurry and tender vegetables are added at the same time then allowed to cook together for the entire period.  For best results, the roast should be browned before adding to the slow cooker for both colour and flavour.  


Sunday, December 23, 2012

The Importance of Marbling in Steak

In recent years, dietary fat has gained a very bad reputation.  Health conscious folks limit their fat intake to the point it can actually be damaging to their health.  I honestly do not believe in ultra low-fat diets.  A certain amount of fat is necessary for the proper brain development in infants and children.  It is needed for the formation of the myelin sheath, the outer white insulating sheet surrounding nerve fibres. Think of myelin as the plastic coating on electrical wires.  If there is reduced myelin, signals cannot travel normally from the brain through the nerve cells.  My graduate thesis involved de-myelination in the proband that lead to a Wernkie's-Korsakoff presentation in an 18 month old child.  Mild loss of myelin can result in reduced brain function, nerve  problems and confusion.  The worst part is, once the myelin is destroyed, no amount of fat is going to replace it.  So it is very, very important to not restrict dietary fat to the point of causing a deficiency.  The second factor in restricting dietary fat comes from the fact that fat makes fat.  In reality, fat comes from starch that was converted from sugars (carbohydrates).  If the body cannot use the sugars ingested, it converts them to starch which is then converted to fat, likely part of our evolutionary make-up to provide nourishment from within when food was sparse.

New York Strip steak marbling
We have made a tradition of the first meal at our vacation home being grilled steak.  We always choose steaks that are well marbled.  Marbled is just a fancy word for nice fat distribution.  It is apparent by the white throughout the steak as well as a layer of fat around the steak.

Fat add flavour, flavour, flavour!  At the same time it makes the meat tender and juicy.  While some trim the excess fat from steaks, we do not trim if grilling.  Excess fat can cause flare-ups on the grill but flare-ups can be easily controlled.  The outer fat drips down into the grill adding to the smoke flavour.  Fat is easily cut off before eating the steak.  The inner fat (marbling) reduces when grilling while keeping the meat moist and juicy.

grilled New York strip steak
A good steak is all about flavour.   It should be tender and juicy, never over cooked but rather just to perfection according to desired doneness.  Be aware that doneness does change over time.  I used to always like my steaks well done but now prefer medium rare.  If you are cooking steaks for others, always ask how they would like their steaks cooked.  We often add caramelized onions or sautéed mushrooms. Both enhance the flavour of grilled steak without overpowering it the way barbeque sauces, steak sauces and seasonings can.  Both of us agree, when you want steak it is that flavour that should shine.  Marbling brings out the flavour of beef.  So, don't shun a bit of fat on any beef cut especially if grilling or broiling.  Choose nicely marbled steaks then trim after grilling for the best flavour.


Saturday, December 08, 2012

Easy Pulled Beef Dinner

Still working our way through the 40 lb of Ontario produce, I decided to make a quick, easy pulled beef dinner.  I keep packets of pre-cooked meats in the freezer as quick meal starts and homemade versions of lunch meats.  While some of the meat packets are left-overs, the majority of them are meats cooked then frozen specifically as quick meal starts and lunch meats.  When we need a quick meal, I simply pull a packet from the freezer to reheat and add sides that usually come from the pantry.

easy pulled beef dinner
Normally, when I get a good deal on produce the rule of thumb is 50% is for fresh use with the remainder being preserved for later use.  Some will preserve the full amount but this is one of those things that you do what works best for your family.  I thawed a packet of pulled beef then added fresh sides.

Pulled beef or pork is very easy to make but it basically takes a day of slow cooking.  You can cook the meat long and slow on the grill, in the oven or use a slow cooker.  I often cook two roasts (beef or pork) at a time, one for immediate eating and the other for quick meal starts.  Pulled meat is cooked long and slow usually with some type of barbeque sauce added although gravy works well too.  The meat is pulled into strands using two forks.  It is wonderful on sandwiches but can also be used as the meat for dinner.

I served the pulled beef with rustic mashed potatoes and French cut green beans.  Rustic mashed potatoes are very easy to make.  They are delicious as a side dish but also make a wonderful topping for cottage pie.  Simply wash and cut potatoes and carrots into chunks.  Add two wedges of cabbage then steam the vegetables until tender.  Pour the cooked vegetables into the bowl of a stand mixer.  Add a bit of sour cream, cream cheese, butter and milk.  Sorry, I don't measure so can't give you the actual amounts.  Mix until just creamy with a few lumps.  Stir in salt and pepper to taste.

French cut green beans is really all about the cut.  The cut is longitudinally from end to end of the bean giving long thin strands as opposed to the normal cross cut for green beans.  It is a bit more work but gives a different look and textural component.  Quite often if you buy French cut green beans commercially canned they come with bits of pimento (red chili pepper) and onion.  I can them plain without pimento or onions.

The holiday season is the time of year you really appreciate getting a nice, nutritious meal on the table without a lot of effort or time.  This meal was on the table in 15 minutes making it a very nice choice for quick meals.  This is one reason to cook ahead specifically dishes that can be used as homemade yet healthy convenience.


Sunday, November 04, 2012

New York Strip Steaks

My husband and I love our beef.  We are used to eating very good quality, hormone free, grass-fed beef that we buy as a calf that is then raised to slaughter age by one of our friends.  It is not surprising that we do enjoy our steaks.  The first dinner at our vacation home with the exception of our very first trip when we were just setting up the house, has been grilled steak.  The morning following our arrival we head into town to get groceries for a few days.  Good steaks, ingredients for a salad and potatoes are always part of the groceries the first trip.

custom cut New York strip steaks
At home we are well acquainted with local growers and know where to find the best quality meat possible.  Unfortunately, we cannot say the same about the area around our vacation home although we are learning quickly.  At home, I'm used to buying from a small mom & pop butcher shop or the abattoir aside of our annual bulk meat purchase.
We like shopping at Publix when at our vacation home although we have bought groceries at Sweetbay, Sam's Club and Wal-mart.  The Publix closest to us has just had a gorgeous make-over but it was nice before.  Their meat counter is very nice and we can get custom cut like we are used to.  Our bulk beef purchase for 2012 cost us $2.52 per lb so seeing a $7.99 price per pound was a bit discerning on the surface.  In perspective, a steak entrée will cost $25 or more in restaurants so the price per pound really is not that bad.

Aside of having nice quality meat at reasonable prices, Publix prints out the cooking instructions on the labels for their custom cut and meat counter meats.  This is an extra feature I haven't seen elsewhere.  I've seen cooking instructions on pre-packaged meats like those wrapped in plastic wrap on a styrofoam tray but not this custom print-out.  Another nice thing Publix does is if you buy a cut of meat that should be baked, they package it in an ovenproof container, something that was very much appreciated during our first trip to our vacation home when we literally had zilch as far as far as kitchen supplies and equipment.

New York strip steaks
As steak lovers we both agree that a good steak should be close to an inch thick.  Thinner cuts can quickly turn into shoe leather when grilling.  The only time we use a thin cut of steak is when delicating it or making a rolarde.  Leftover steak can be used to make wraps, stir frys or soups.

We bought two inch thick, custom cut New York strip steaks for $12.30.  New York strip steaks are cut from the short loin.  This is a muscle that isn't used much so the meat is quite tender.   Don't they look delightful?  They grilled up perfectly, just what we needed to start our fall vacation off on a good note.

Honestly, the meat counter at the Publix we go to is just as friendly as our local butcher shop and they do cut the meat to our specification.  They are quite attentive to our needs and aim to please.  It's nice that we have found a solution to our meat purchases at our vacation home.  I'd still like to find a mom & pop butcher shop there but so far have had no luck.  I think a lot has to do with the location.  The town is actually considerably larger than the closest city to us at home but it is very much geared towards snowbirds visiting for the winter months.  At any rate we shall keep looking...


Sunday, September 30, 2012

Prepping Ahead and Slow Cookers

September has notoriously been an extremely busy month ever since we were newlyweds.  Two of our kids were born in September, a year apart.  September signifies the end of summer so it always meant closing the pool, canning copious amounts of tomato products and back then getting kids ready for school.  I began my undergraduate studies the year our youngest started kindergarten.  This involved a daily round trip commute of three hours on a good day.  Yet I was determined to put healthy food on the table and eat dinner as a family each night.  I quickly developed a lot of techniques to help me achieve that goal.

filled vacuum seal canisters
I always took the kids fishing Saturday mornings whenever the weather was nice.  It was a fun way to bond, always with the hopes of a large enough catch for dinner.  On the way home, we would stop at a couple of orchards and roadside stands for fresh produce.  During the winter months, we took the kids to the grocery store on Saturday mornings for fresh produce.  They were allowed to choose what they wanted.  We'd come home and as a family would prep about half of the produce for easy healthy snacking during the week.   Vegetables went into the fridge and fruits into the never-ending fruit bowl.

The kids are grown with kids of their own.  I still prep vegetables for the week ahead of time but now I put them in FoodSaver canisters.  This keeps them fresh longer and they are in plain sight to encourage healthy snacking.  This is a great easy lunch idea for those dreaded school lunches.  The produce is already cleaned and ready to use!

meatballs in Sweet Baby Ray's sauce
Shortly after starting my academic career that spanned a total of ten years including a graduate degree, I started once-a-month cooking then quickly modified the concept to meet our family's needs.  I used my slow cooker to make chili and meatballs.  I would make a large batch of meatballs then freeze them for an easy to warm up, go to meal starter.  I also used the slow cooker to

I have three slow cookers, now used mainly for bulk cooking sessions and entertaining.    However, all of them are in use when doing a bulk cooking session.  They are wonderful for compact cooking.  One of our kids uses their slow cooker almost daily through-out the week.  I'm old school so rely on my pressure cookers but seriously, the slow cooker is the way to go for ready to eat, healthy meals for the busy family.  The meal is basically ready to eat when you walk in the door making the slow cooker an ideal tool for the busy home kitchen

nacho station set-up
My slow cookers really see the most use when entertaining.  That is because I can make a dish in the slow cooker then set it to warm.  My smaller slow cooker is used mainly for entertaining as it is not programmable.  It does do a lovely job of warming cheese sauce and keeping it warm.  It's also nice for cooking smaller batches of chili and soups.

This is a presentation I did for an gathering earlier this year.  The 250 ml squatty Elite mason jars do double duty as serving bowls.  That is home canned salsa and hot peppers as well as homemade sour cream.  The neat thing is you could easily tailor this for a kid's after school snack.  You can put the toppings in containers in the fridge, sauce in the slow cooker and corn chips in a bowl still in the package ready to be used.  Easy, peazy!