My photo
Ontario, Canada
I am a wife, mother and grandma who enjoys the many aspects of homemaking. A variety of interests and hobbies combined with travel keep me active. They reflect the importance of family, friends, home and good food.
Cook ingredients that you are used to cooking by other techniques, such as fish, chicken, or hamburgers. In other words be comfortable with the ingredients you are using.
--Bobby Flay

For Your Information

Please watch this area for important information like updates, food recalls, polls, contests, coupons, and freebies.
  • [March 19, 2020] - Effective Mar 17, this blog will no longer accept advertising. The reason is very simple. If I like a product, I will promote it without compensation. If I don't like a product, I will have no problem saying so.
  • [March 17, 2020] - A return to blogging! Stay tuned for new tips, resources and all things food related.
  • [February 1, 2016] - An interesting report on why you should always choose organic tea verses non-organic: Toxic Tea (pdf format)
  • Sticky Post - Warning: 4ever Recap reusable canning lids. The reports are growing daily of these lids losing their seal during storage. Some have lost their entire season's worth of canning to these seal failures! [Update: 4ever Recap appears to be out of business.]

Popular Posts

Showing posts with label grilling. Show all posts

Friday, August 09, 2013

Barbeque Rib Roast

Beef, venison and pork roasts lend themselves nicely to cooking on the outdoor grill.  They can be cooked directly on the grill racks, wrapped in foil, in a covered or uncovered pan or on a spit.  Roasts can be cooked without season, with a rub or sauce, or a combination of rub and sauce.  Regardless of the way they are cooked on the grill, roast turn out moist, tender and flavourful!

barbeque rib roast just off the grill
We cooked a rib roast in a covered pan with sauce on the grill.  While a regular roasting pan could have been used, I used an aluminum foil pan.  I poured a health dose of Sweet Baby Ray's barbeque sauce over the roast then added half an onion cut into slices.  Then I covered the pan with aluminum foil and placed on medium indirect heat.  Mid-way through cooking, I added two large potatoes.  Potatoes cooked this way absorb flavours from the roast and sauce.

Adding saucer at the start of cooking gives the roast a lovely flavour throughout however, there is a risk of the sauce burning.  When cooking this way, you want the sauce to cook to the point of burning for the rich caramelization flavour but you don't want it to burn enough to cover the entire bottom of the pan or give the roast a burnt flavour.  This is why I used a disposable baking pan.

barbeque rib roast plated
Despite first appearances with the burnt sauce edging on the pan, the rib roast comes out a sure fire winner!  The meat is richly flavour, melt in your mouth, fork tender.  It falls off the bone!  There is not as much sauce left as you would expect.  The thick sauce is perfect for topping the meat if desired.  Doesn't the meat look delicious?

This has to be one of our favourite ways to cook roasts during the hot summer months.  The results are consistently delicious!  Any barbeque sauce can be used so don't be afraid to experiment.  We like the deep rich, smokey flavour of Sweet Baby Ray's or bourbon whiskey grilling sauce


Saturday, August 03, 2013

Foil Packet Beets

During a recent trip to my hometown, I discovered a couple from up north had taken over a greenhouse operation that had been in business years ago.  The business had been sold to the bother of one of my girl friends but he moved on leaving the business in limbo for several years before this nice young couple bought it.  They really are super, full of wholesome back-to-the-land ideals which is a win:win for everyone who stops by to enjoy their offerings of organic produce.  Many of the varieties they grow are heirloom as well!  Their prices are more than reasonable, under the price of the grocery stores as well. 
  

fresh organic beets
I bought a small bunch of mixed heirloom beets.  The dark red beets are Detroit Dark Red, an old time heirloom beet dating back to 1892.  The candy stripe beets are a pre-1840's heirloom variety called Italian Chioggia, commonly referred to as bullseye or candy stripe beets.  The Detroit Dark Red beet remains a favourite for home gardeners but both heirloom varieties are easily grown in the home garden.

Candy stripe beets are gorgeous raw but the red bleeds into the white when they are cooked.  They retain their colour better if roasted or steamed rather than boiled.  I used a foil packet to cook the beets on the grill.  

organic beets grilled in foil packet
Foil packets are one of the simplest way to cook vegetables on the grill.  I use them quite often because foil packets give consistently good results.  Foods steam nicely in the foil packet retaining both their vibrant colour and flavour.  I brush a little olive or coconut oil on the foil sheet, put the desired vegetables on top then dab with a little butter and seasoning of choice then tightly close the foil packet.  This particular method is great for on the grill but also lends itself nicely for cooking camp sides. 

The Detroit Dark Red beet colour bled into the candy stripe beets as I knew they would.  Don't let the paler colour of the candy stripe beets fool you though as these are really tasty beets!  


Monday, July 22, 2013

Shrimp on the Barbie

Congratulations to Prince William, Duke of Cambridge and Catherine Elizabeth Kate, nee  Middleton, Dutchess of Cambridge on the birth of their first child, a son!

Shrimp on the barbie is a phrase made famous by Paul Hogan (Crocodile Dundee, 1986) in a series of television advertisements by the Australian Tourism Commission that ran from 1984 through 1990.  That phrase has always stuck in my mind so I get a little chuckle every time we grill shrimp.  Shrimp is ever so easy to cook on the grill because it has it's own built in timer, changing from grey to pink orange-pink when cooked.

shrimp on the barbie
Shrimp is generally viewed as being expensive, and in many cases it is unless you live near a local source.  Here in our corner of beautiful Ontario, Canada I buy frozen raw shrimp mainly from Elite Gourmet Food Service but if I am out, I buy Zipperback Black Tiger Shrimp shrimp at No Frills in 454 g (1 lb) for $8.  This shrimp has a firm texture with mild flavour perfect for grilling.  It is deveined ready to thaw and cook.  Three bags of this shrimp will comfortably serve four adults.

Quite often shrimp are cooked on skewers on the grill but we like using a grilling basket instead.  The grilling basket takes a lot of the fuss out of grilling shrimp.  Pictured is the thawed jumbo Black Tiger Shrimp shortly after putting onto the grill in the grilling basket.  These were the 16/20 count shrimp, the perfect size for grilling.  I didn't use a marinade although one could be used with this method.  I lightly sprayed the grilling basket with cooking oil then placed the prepared shrimp in the basket.  As you can see the raw shrimp is grey in colour.  As it cooks, the shrimp changes colour and the flesh turns opaque.

grilled shrimp ready for serving
Shrimp cooks rather fast on the grill.  It is important to not over cook the shrimp as this will cause the texture of the shrimp to become rubbery.  Using a grilling basket allows you to quickly turn the shrimp with a flipping motion.  The cooked shrimp turns a beautiful orange-pink with golden overtones.  This mouthwatering shrimp is delicious as is or served with home canned seafood cocktail sauce.

The shrimp was part of dinner celebrations for our youngest's birthday.  It was a milestone birthday, a reminder of time marching on!   We enjoyed the delicious meal on the deck, letting the cooler summer breeze brush our shoulders while enjoying simply being together.  It was a wonderful way to celebrate such a special day!


Wednesday, July 10, 2013

Grilled Round Steak

We just picked up our beef on the hoof purchase for 2013 but I still had a few packages left from last year's beef purchase.  A couple of those packages were round steaks.  Some cuts of beef are better for grilling than others, however even those cuts that give less than ideal results can be grilled if you modify how you do the grilling.  So it is with round steak.  A round steak is from the round primal cut of beef.  It is comprised of  the eye (of) round, bottom round, and top round still connected.  The bone may or may not be included.  A round roast is lean but moderately tough due to the lack of fat and marbling.  This makes round steak dry out when cooked with dry-heat cooking methods like roasting or grilling.  Slow moist-heat methods including braising, to tenderize the meat and maintain moisture are commonly used to cook round steak.  Round steak can also be sliced thin, then dried or smoked at low temperature to make jerky.

sugar maple wood smoking chips
During our camping days we often brought cherry wood with us to use for cooking on the campfire.  Cherry wood gives a beautiful deep ruby red embers and tantalizing sweet smoke.  Smoking chips are available in a variety of woods including hickory, sugar maple, cherry and mesquite.   Although wood smoking chips can be used with any meat, fish or poultry, some wood flavours are more suitable than others for certain meats, fish or poultry.  Wood smoking chips can even be used to add extra flavour to grilled vegetables, breads and pizza!

Wood smoking chips can be found in the grilling aisle of most box stores, specifically Canadian Tire and Home Hardware here in our corner of beautiful Ontario, Canada.  They are not expensive at about $7 for 220 cubic inch bag and the bags often go on sale near the end of the summer when there is less demand for them.   I look for all natural 100% organic, pesticide free wood smoking chips.   You can also use wood chips from woodlots and orchards providing it is pesticide free.  Quite often the wood will be free or very low cost from either source.

grilled round steak
Round steaks are quite large.  The bone in round steak I grilled (pictured) was about three quarters of an inch thick.  I decided to experiment by grilling the steak low and slow over charcoal enhanced with wood smoking chips to medium rare.  I reasoned this would give flavourful results without drying the meat.  I soaked a good handful of sugar maple wood smoking chips in water for about 30 minutes.  According to the bag, sugar maple is perfect for pork and poultry but I thought it would work well for the beef as well.  Once the coals were hot, I put about a third of the prepared wood chips on the coals then put the steak on the grill when the chips began smoking.  I let the steak grill slowly, adding a few more pieces of charcoal and wood chips as required to keep a low, slow heat. 

slicing round steak for freezing
Once the steak was cooked to medium rare, I removed it from the grill and let it rest for 5 minutes.  Resting ensures the meat stays moist, tender and juicy.  I was very pleased with the end result!  It was a nice flaourful steak that wasn't dried out.  The smoky element was delightful and what a difference it made in the flavour of the steak.  The key to this was the low, slow grilling.  After resting, I cut the steak into thin slices then divided into meal sized portions and vacuum sealed for freezing.  These cooked steak strips will be used for salads and wraps. 

I am quite impressed that the steak did not become dry and tough during the cooking process.  Overall, I would rate this experiment a 9 out of 10.  One portion of the steak was cooked a bit more than I would have liked but other than that, I have no complaints.  The real beauty of using the smoking chips is the flavour they add to the foods.  While the results are good using the wood chips on the outdoor grill, I want to do more smoking that requires a smoker.  I'm borrowing a smoker from one of our friends this week to see if I really want to buy one.  I have one round steak left that I will be smoking for beef jerky so will report back on the results.  I am very much encouraged by the results so far.


Tuesday, July 09, 2013

Easy Grilled Potatoes

For many, hot summer days means outdoor grilling which means an easier, laid back cooking style.  While grilled hotdogs, burgers and sausage are quite popular so to are meats, poultry and fish that need easy sides to make the meal.  My husband is really a meat and potatoes kind of guy so we often cook potatoes on the grill.

grilled potatoes
Grilled potatoes are an excellent side that pairs nicely with grilled meats and fish. Potatoes can be baked on the grill whole as is or wrapped in foil.  Each give a slightly different result.  We have cooked grilled sliced or cubed potatoes for years in foil packets on the grill.  One of my husband's friends uses a metal loaf pan which makes a lot of sense when trying to reduce waste.  This method allows for a slight higher degree of caramelization which means extra flavour.   Unlike using a foil packet, the pan method makes it easy to check whether the potatoes are cooked as desired without having to guess or go by feel.

Potatoes grilled this way are quite delightful!  They are ever so easy to make.  These potatoes sure winner as a side dish.  

Ingredients:  potatoes, sweet onion, sea salt, pepper
 

Method:  Wash the potatoes.  Thick slice them.  Slice onion.  Pour a little olive oil in the bottom of a metal non-stick loaf pan.  Layer in potatoes and onion slices.  Drizzle with a little olive oil.  Add a couple of dabs of butter.  Season with sea salt and pepper or garlic pepper or seasoning of choice.  Cover the pan with aluminum foil.  Place on the grill on indirect heat.  The potatoes take about 40 minutes to cook with nice caramelization.  Stir midway through the cooking process for best results.


Tuesday, June 25, 2013

Bacon Ranch Sliders - Creation Stage Recipe

Ladies and gentlemen, I am pleased to say I was selected as one of Canada's top online influencers to participate in this years Hidden Valley RanchTM Ranchify Recipe Challenge.  This is the second year running for me.  Last year's entry for the Hidden Valley RanchTM Recipe Challenge was Grilled Zucchini Boats.  Although it was not a winning entry, it is still a very good recipe perfect for summer time grilling.  This year only one recipe can be submitted so I've been busy working on a few to narrow down my choice.  The deadline is July 1st at 12 AM.  The recipes will be judged by Chef Ned Bell.

bacon ranch patties in grilling rackNote:  This is a recipe in the creation stages with the goal of a possible entry into a contest.  No creation stage recipe will be posted here however, the final recipe may appear here after the entry deadline closes so please check back. 

Mini burgers aka sliders have become rather popular so I decided to create slider recipe, more specifically a bacon ranch slider recipe.  I started with hormone free, grass fed lean ground beef to ensure a high quality burger pattie.  While I won't disclose all the ingredients that went into the patties, I will tell you that I used no fillers (eg. bread crumbs) so they are all beef patties and I used Hidden Valley RanchTM Spicy Creamy Dressing & Dip as an ingredient.  Additional ingredients and a spin on the patties remain a secret for now but don't worry as I will tell you what I did in the final version after the contest closes.

I shaped the prepared meat mixture into large meatballs then flattened to fit into the mini burger grilling rack.  This helped me keep the burger patties uniform shaped while making it easier to grill.  The grill rack is made by Cuisinart but other brands are available.  These can be found in the grilling section wherever outdoor grills are sold.

mini sesame seed burger buns
Sensations is a Sobey's brand.  We no longer have a Sobey's close by but during one of my recent travels I found one.  Sobey's tends to have a few extras that No Frills doesn't.  Anyway, I spotted these cute mini burger buns with sesame seed tops. I thought they would be perfect for my contest creation stage recipe

Buns plan an important role in any burger.  I chose this bun because it was cute and perfectly shaped so each slider would look the same for presentation.  Each bun measures about 2½ - inches in diameter and about 1½ - inches combined thickness.  A package of 12 cost $2.79 so they are a bit pricer than regular burger buns.  I was after a particular look for this contest creation stage recipe with the full intentions of substituting a homemade bun for the final recipe.

bacon ranch patties on the grill
Homemade burger patties should not look like those used in fast food restaurants.  There are burger presses on the market that will allow you to make your own burger patties, uniformly shaped and perfect for freezing but honestly, hand shaped gives a nicer homemade touch.  A grilling rack simply keeps the smaller burgers in one piece while grilling, making them easier to turn.

I sprayed the inside of the rings with cooking oil in a health mister help prevent the patties from sticking.  I grilled the patties on medium high direct heat turning once.  I liked the hash marks the grill rack gave the patties!

bacon ranch sliders
I tested the patties on lightly toasted and toasted buns.  I topped each slider with Asiago cheese and a dollop of ketchup - simple and easy.  The end result was quite delicious!  The patties were nicely flavoured, tender and juicy.  I immediately knew I was heading in the right direction with this recipe!

Regardless of the initial success that my husband declared a winner, I knew I would have to get a bit more creative if I wanted a winning recipe.  So it was back to the drawing board, armed with a few tweaks to test.  Ketchup was ok but common.  I had something else in mind!  The buns were good and while I liked the texture from toasting, I had plans to kick them up a notch.  I was off on a culinary adventure.  Stay tuned...


Friday, June 21, 2013

Grilled Corn on the Cob

Summer time fun goes hand-in-hand with outdoor living!  For many, including us that means spending a lot of time with family and friends.  Keeping the food prep and clean-up is always appreciated but more so for summer meals 

grilled corn on the cob ready to be husked
Grilled corn on the cob is delightful!  It develops a lovely flavour with just a hint of smokiness to accent the sweetness of the corn.  This really is an easy way to cook corn without having to heat a huge pot of boiling water.  Be warned that corn on the cob can take up a significant amount of grill real estate so plan accordingly.

Of note, corn is prone to European corn borers and corn beetles.  Corn borers as their name implies bore into the corn.  These greyish white worm-like pests can be flicked out of the kernels with the tip of a knife then cut the affected kernels off.   Genetically modified corn (Bt corn) has be transgenetically altered to include a gene from Bacillus thuringiensis ssp. kurstaki to produce a toxin to kill off the corn borer.  This corn while beautiful looking and damage-free from the corn borer should be avoided as evidence is now coming out that the gene remains active in the human gut causing gastro-intestinal problems (eg. leaky gut, IBS, and etc).  Corn beetles are sometimes found around the silk end of the cob.  They can easily be brushed off.

Method:  Soak the corn in the husk for 15 minutes.  Remove from the water and place on hot grill.  Grill for 30 minutes turning to cook evenly.  The husks will get quite charred.  Hold the cob of corn with an oven mitt then peel back the husk.  The silk will come off easily with the husk.  Serve

grilled corn on the cob husked
Just look at those mouthwatering golden kernels of delicious corn just waiting for a little butter and sea salt!  The grilled corn kernels are plumb, tender and juicy, full of flavour.  The reason being the corn is steamed in its own husks so flavour is not lost  Although this cob of corn did not get any grill marks on it, sometimes there are.

Grilled corn on the cob is one of our favourite sides with grilled steak and foil wrapped potatoes.  However, grilled corn on the cob need not be reserved for summer meals.  We have been known to grill up a couple of dozen ears of corn to enjoy around the campfire as a snack.   There's no need to fire up the grill either when the corn can be grilled right on the campfire!  Hmm, I think a camping trip this summer is in order...


Tuesday, June 18, 2013

Grilled Stuffed Mushrooms

We love our mushrooms!  Mushrooms are quite versatile as they can be eaten raw or cooked, and they can be cooked in a variety of ways.  My preference is to buy mushrooms directly from one of the local mushroom farms especially for canning, freezing or bulk cooking.  However, a fair share of the mushrooms we buy also come from the grocery store.  When buying from either source there is the option to get larger stuffing mushrooms, one of our favourite ways to enjoy as an appetizer.

grilled
Large mushrooms (aka stuffers) can be stuffed with a fruit or vegetable mixture, bread stuffing, escargot, or a seafood mixture.  The possibilities are almost endless.  Stuffed mushrooms are delicious but grilled stuffed mushrooms are divine!  Grilling adds a hint of smokiness to the grilled stuffed mushrooms that can't be duplicated in the oven. 

I made grilled stuffed mushrooms as an appetizer at our vacation home.  The stuffing was simply cubed bread with a little butter, sea salt, pepper, finely chopped onions and homemade poultry seasoning.  I mixed the bread cubes with the butter and seasonings then formed into generous sized balls to fit inside the cap of each mushroom.  I placed the stuffed mushrooms into a foil baking dish then topped with shredded mozzarella cheese.  The stuffed mushrooms were cooked on indirect medium heat on the grill until the cheese was bubbly with golden brown highlights.  The grilled stuffed mushrooms delicious and ever so easy to make, perfect as an appetizer!


Sunday, June 16, 2013

Grilled Peameal Bacon

Boneless pork loin is a good budget stretching meat as not only is it lower price per pound, it is a very versatile meat that can be used fresh or cured.  Last week I shared how I prepare a boneless pork loin at our vacation home.  Half is cured for peameal bacon, our must have taste of home while the other half is sliced into thick chop for grilling.  If need be, the chops can be cut into slices or pieces for other dishes.

grilled peameal bacon
One of the most common questions I get with respect to peameal bacon is "What do you do with it?"  The simple answer is, peameal bacon can be used much the same way you would use a ham.  The texture and flavour differs from ham.  The most common way to use peameal bacon is thin sliced then fried as bacon but it can be cooked other ways.  Thick sliced peameal bacon is quite lovely when grilled. 

I cut the peameal bacon into about three quarters of an inch thick slices.  Thick slices ensure the meat does not become dry while cooking.  I place the peameal bacon slices on a pre-heated medium hot grill.  Once the grill marks form nicely on one side, I turn and grill until the marks form on the other side.  The peameal bacon slices are then ready for serving.  They pair nicely with zucchini and baby carrots, both of which cook quickly on the grill.  Simply cut the zucchini in half lengthwise and brush with olive oil then sprinkle with a little sea salt.  Grill cut side down until grill marks are nicely formed and the squash is tender.  Baby carrots cook quickly in a foil pouch on the grill.  This entire meal can be cooked on the grill in about 20 minutes.  Complete the meal with a tossed salad sprinkled with fresh squeezed lemon juice and sliced watermelon for the perfect low fat and low calorie meal that is sure to please! 


Sunday, June 09, 2013

Boneless Pork Loin

We travel by car or by plane to our vacation home for a total of three times a year.  Both modes of transit have their pros and cons with respect to length of time and what we can bring with us from home.  Car trips are less restrictive to what we can bring but take a considerably longer period of time.  Air travel while restrictive as to what we can bring, means we are usually at our vacation home and settled in by late afternoon with a morning flight.  Our mode of travel is determined by flight costs for the desired time using driving as a back-up plan if we can't get a good price but other factors influence our choice as well.

We flew for our spring 2013 trip, May 6 through May 29.  After reaching the airport and picking up our rental vehicle, our first stop is at the Publix near our resort.  We have tried other grocery stores in the area but the Publix is our favourite even though it is a bit higher priced.  The meat and fish counter there is quite nice!  What we really appreciate is the wide variety of organic and natural products available at Publix.

preparing the pork loin
A pork loin roast is always included with our first grocery purchases at our vacation home.  Publix has all natural, fresh never frozen pork loins that have no preservatives or artificial ingredients and are minimally processed.  This is comparable to the quality of pork we buy at home.  We bought a 4.13 lb boneless pork loin for $11.17 ($2.69/lb).

Pork loin is a versatile cut of meat.  A four pound pork loin will comfortably give a yield of five meals for the two of us with left overs.  I cut the pork loin in half.  One half was cured for peameal bacon while the other was cut into pork loin chops.   Pork loin chops can be grilled as is, breaded and baked, or they can be cut into cubes or strips to be used in casserole dishes and stir fry.  Peameal bacon is our must have taste of home, a true southwestern Ontario delicacy.  This versatile home cured meat has a five day cure time so is the first thing to be set up at our vacation home.

I could not find Morton's Tender Quick in the nearby grocery stores so ended up bringing a 2 lb bag with me one trip.  I routinely buy Morton's Tender Quick in Michigan and have never had a problem at the border.  However, airport security did do an extra check even though it was in the original, unopened bag.  Next time I need specialty food products at our vacation home, I will either send them ahead or take them with us when we drive.

grilled pork loin chops
We saw the first signs of local asparagus the day we left for our Florida home.  That was enough to trigger cravings for asparagus!  We picked up asparagus along with our other grocery purchases.  Our second home cooked dinner at our vacation home was grilled boneless pork loin chops with baked potatoes and asparagus cooked on the grill.

The chops were grilled on medium heat to form well defined hash marks.  They were generously coated with Sweet Baby Ray's barbeque sauce  then allowed to cook until the sauce started to caramelize.  It was a simple, delicious meal enjoyed on the lanai listening to the sounds of evening setting in.  After dinner we took a ride in the golf cart so capture the sights and sounds of wildlife, chatting about what we would do the following day.  It was a beautiful end to another day in paradise!


Sunday, June 02, 2013

Barbeque Chicken

We were excited when we bought our vacation home in sunny Florida.  Not only did this make it possible for us to spend extended periods of time on vacation, it gave us a means to still enjoy home cooked meals.  Don't get me wrong as we do love eating out and fining new dining experiences while in Florida, but we also want our taste of home too.  Our vacation home is located in a resort community with a park-like setting and full amenities.  There are ample photo opportunities.  The house itself is a 2 bedroom plus den, 2 bathroom, 2007 Fleetwood manufactured home with carport and lanai.  Our vacation home kitchen is almost as well equipped as our home kitchen so cooking is not a problem.

barbecue chicken legs with backs attachedWe spent most of May at our vacation home arriving back in beautiful Ontario Wednesday night.  During our stay we enjoyed a lot of great food although this trip we ate out a bit less.  It was hot and humid with pop-up thunderstorms the last week of our stay but that didn't stop us from doing a bit of grilling.  Our meats of choice at our vacation home tend to be pork (loin,ribs), beef (steak, ground) and seafood even when eating out.  I spotted a lovely package of chicken legs with their backs attached when we were at Publix and thought that would be a nice change.

Years ago as newlyweds the only way we cooked chicken on the grill was with barbeque sauce.  The biggest problem with grilling chicken was always the flare-ups.  A friend told us to bring the chicken to a boil then drain and finish barbequing.  That method worked to remove some of the fat causing the flare-ups but it also removed flavour.  Overall, chicken cooked this way is grilled as the cooking time is fairly short.  We discovered using lower temperature and a beer spritz to control flare-ups then using a barbeque sauce as a wet mop during the last 15 minutes of cooking gave lovely, moist, barbeque results.  We haven't cooked chicken like this in ages.  I'm not sure why because it is ever so delicious!

The difference between grilling and barbequing is timing.  Grilling is short, quick and high heat sometimes using a marinade whereas barbequing is long, slow with low heat often using a dry rub and/or wet mop (sauce).  Barbequed meats are moist, tender, and fall off the bone delicious.  The sauce is nicely caramelized but not burnt or charred. 

Method:  Heat the grill to medium.  Place the chicken on the grill.  Cook the chicken slowly turning when the first side just starts to brown.  If flare-ups occur, spritz with water or beer.  Continue cooking the chicken turning as needed until both sides are a light golden brown.  Apply the sauce, coating generously.  Cook until sauce begins to caramelize.  Turn the chicken and apply sauce on the other side.  Cook until caramelized. 


Sunday, May 26, 2013

Grilled Porterhouse Steak

This is the time of year that many Canadians turn their thoughts to cottage life, camping and spending times around backyard pools or day-tripping to area beaches.  We camped for years when our kids were growing up.  When we moved to waterfront property about ten years ago, it was like we were cottage living on a daily basis.  That house and the next one we bought also on waterfront property originally were cottages that had been converted for year round living so essentially we were cottage living.  Still we tossed around the idea of buying a cottage in Ontario then in the spring of 2010, we bought our vacation home located in Florida and eighteen months later sold our waterfront property to buy our new urban setting house.  Living in an urban setting we have a greater appreciation for our vacation home.  We spend about three months of the year at our vacation home, divided into three trips.  Vacation homes and cottages present a few cooking challenges because many including ourselves want a break from the normal routine.  At the same time, vacation homes and cottages tend to be not as well equipped as your home kitchen so the emphasis is on delicious meals and snacks that are easy to prepare.

porterhouse steak
The grill is our favourite piece of cooking equipment at our vacation home, much like it is at home and was when we camped.  Aside of using a grill for quick and easy meals, we use our grill much the same way as an oven so we enjoy fresh baked food and bread during the hot summer months without heating up the kitchen.  Grilled steak is our number one go to meal while at our vacation home!  We quickly established a tradition of the first home cooked dinner is always grilled steak enjoyed on the lanai.  The nearby Publix grocery store has a lovely meat and seafood counter.  The meat is fresh and high quality so that is where we buy our fresh meat when at our vacation home.

Pictured is the 2.17 lb (984.29 g) porterhouse steak we bought for the first dinner of this year's spring trip.  Isn't it a beauty?  A porterhouse steak is similar to a T-bone steak except it has a tenderloin whereas a T-bone steak does not have a tenderloin.  This nicely marbled cut of beef promised to be tender and juicy when grilled.  The porterhouse steak cost $19.41 on sale, saving $6.51.  Now, that might sound expensive but in comparison to the cost of two steak dinners eaten out, it isn't.  This size steak is enough for a dinner for us plus left-overs for a stir fry and wraps.

porterhouse steak thickness
We like keeping the side dishes for grilled steaks simple, easy, and delicious.  We decided to have both asparagus and potatoes with the steak but cooked them a bit differently.  Foil wrapped potatoes is a grilled side dish that we often serve.  It is an easy way to prepare whole potatoes for the grill lending the perfect easy side for grilled steaks, chops or chicken. 

Method:  Cut enough squares of aluminum foil for the number of potatoes you want to grill.  Place each potato on a square of aluminum foil.  Drizzle extra virgin olive oil over the potato.  Sprinkle with Montreal steak seasoning or garlic pepper.  Wrap the foil tightly around the potato.  Place on the hot grill on indirect medium high heat.  The potatoes will take about an hour depending on size.  They are ready when finger soft to a pinch.

My husband put the steak on about 15 minutes before the potatoes were ready.  He grilled the steak on one side turning a quarter to form hash marks then  flipped the steak to finish grilling repeating the hash marks.  He moved the potatoes to the side, off  the top rack to the lower grate where they would stay hot.  Foil wrapped potatoes will keep quite warm even when removed from the grill for a half hour or more but it is safer to keep them at temperature on the grill until ready to be served.  He put the asparagus spears on the grill just after turning the steak.  While extra virgin olive oil can be used on asparagus spears being grilled in this fashion, we didn't use any.  As long as the asparagus is grilled lightly just to cook through, it will remain tender without drying out if the oil is omitted.  The asparagus was turned once while grilling.  Asparagus grilled to al dente this way with  nice grill marks and just a hint of smokiness then drizzled with a little butter  is delightfully delicious.  

porterhouse steak resting before serving
My husband grilled the porterhouse steak to medium rare with a warm red centre, pink throughout and nice hash marks.  He didn't use any seasoning salt, marinade or barbeque sauce.  This is how we typically grill steaks, letting the flavour of the beef shine rather than being masked by other flavours.  He removed the porterhouse steak from the grill and let rest 8 minutes just shy of the 1 min per 100 g some chefs recommend.   Whole pieces of meat like steaks, chops and roasts should be rested after cooking.  During the grilling (cooking) process, juices are driven towards the centre of the meat.  Resting the meat before serving allows the juices to redistribute throughout the meat ensuring it will be moist, tender and juicy when cut. 

porterhouse steak dinner
The first dinner at our vacation home always reminds me of those camping days of our past.  By the time we get out of the airport, drive to our vacation home stopping for groceries along the way, it is usually after 3 PM.  We are tired from the trip, need to do a bit of unpacking and ready to relax while anticipating a few weeks spent filled with great food, pleasant weather, reuniting with friends and  rejuvenation. 

My husband and I shared the delicious steak dinner sitting on the lanai, listening to the sounds of wildlife change from day to evening. The steak was melt in your mouth, butter knife tender with an amazing flavour!  The potatoes were tender, nicely flavoured from the seasoning.  The asparagus spears were done to perfection!   The evening was warm and slightly balmy, a nice change from the cooler northern weather we had come from earlier in the day.  As we enjoyed the first dinner of our spring vacation, we chatted about how we would spend our time.  After dinner, we went for a ride around the park in our golf cart letting the warm air brush over our bare arms.  And so the first trip to our vacation home of 2013 began...


Sunday, May 12, 2013

Beer Grilled Chicken Legs

Yesterday, I wrote about cooking with non-alcoholic beer.  Basically, you can have all the flavour and the health benefits of beer without the alcohol content or the higher price of beer.  Be warned that non-alcoholic beer still has caloric content ranging from 35 to 100 calories per 355 ml serving and some brands have added sodium so be sure to read the nutritional label.  If you are replacing regular beer with non-alcoholic beer then you will reduce the calories in the dish as non-alcoholic beers are lower in caloric content than regular beers.  If however, you are replacing water with non-alcoholic beer you will be increasing the calories in the dish.  Calories aside, those non-alcoholic beers containing sodium could be problematic for those on a low-sodium diet so choose a non-alcoholic beer without sodium added.

When it comes to grilling, one way to add flavour without adding calories involves smoke.  The smoke is generally created using wood chips but liquids can be used to extinguish any flames which can impart a flavour to the resulting smoke.  The smell of beer on the grill is amazing imparting a wonderful flavour to the grilled meat.  It has a deep nutty, almost sweet aroma.  That flavour permeates into whatever is being cooked on the grill.  What I was looking for when testing out the non-alcoholic beers was flavour combined with results consistent with using regular beer without the alcohol, getting that same aroma and flavour when grilling with a non-alcoholic beer.

grilled chicken seasoned with non alcoholic beer
Chicken has been a long time favourite for grilling.  Years ago as young newlyweds fiddling with our first charcoal grill, we learned how to control flare-ups when grilling chicken by spritzing beer over the chicken and flames.  Chicken grilled this way remains tender and juicy.   Used in this manner, I highly doubt there would have been any residual alcohol in the food.  The beer adds a wonderful flavour without adding extra calories. 

I grilled four chicken legs on the propane side of our outdoor grill on medium high heat.  Once small flames appeared, I spooned non-alcoholic beer over the legs and continued grilling until flames appeared again and repeated the beer application.  A baster can be used to apply the beer if desired.  I continued in this fashion, turning the legs and applying beer until they were golden brown with nice grill marks and the juices were clear.  Despite being very simple the additional subtle flavour was impressive.  I used about a half can of President's Choice Blonde non-alcoholic beer (355 ml can: <0.5% ABV, 80 cal, 17 g carbohydrates, 55 mg potassium, 3 g protein) to baste the chicken legs as they grilled.  This is a nice, smooth flavoured non-alcoholic beer perfect for pairing with poultry.  PC Blond is brewed for Loblaws by Brick Brewing Co. in Waterloo, Ontario and distributed throughout the Loblaws Companies chain stores (eg. RCSS, No Frills, Zehrs, etc.).  If you cannot find PC Blonde, Our Compliments (Sobey's brand) or O'doul's would be fairly similar in flavour.  Even a stronger flavoured non-alcoholic beer would work for this method.

The chicken was delicious!  It was golden brown with slightly crispy skin, moist and tender flesh nicely flavoured from the beer.  Basting chicken with beer is an excellent way to get extra flavour without the calories.  It is an easy method to see if you like the flavour the beer imparts because it is a bit more subtle than infused beer (eg. beer can chicken) or beer used in part or whole as a marinade for grilling. 


Saturday, April 27, 2013

Grilled Rib Steak & Refried Rice Using Grilled Rib Steak Left Overs

While much of the discussion on this blog throughout the past week focused on my adventures in making no knead breads, it has been a whirlwind of activity here.  We decided to makeover the master bedroom completely including new furniture and at the same time finish the guest room.  The furniture (Vaughan-Bassett) for the master bedroom had an estimated time of arrival of three weeks giving me plenty of time to shop for accessories and work on the crochet bedspreads for each room.  The bedspreads are a huge undertaking given one is king and the other queen size, so a lot of work.  Shopping for accessories meant several shopping trips with many foodie stops!  Much of the focus was stocking up on herbal teas, K-cups, various flours and cherry picking the sales.  I did manage to find a few interesting foods to try so will talk about them as they are used.  Oh, and I just couldn't resist the cute salt and pepper shakers in just the perfect deep red for the kitchen, a new tea ball and a couple of kitchen organizers.  At the same time, I was experimenting with the no knead breads and testing the 4ever Recap canning lids.  Even though it has been rather busy, regular cooking continued.

grilled rib steak with baked potato and steamed broccoli
It has been a cold, wet spring with wet snow a couple of days ago and frost on the roofs yesterday morning.  Still, we have been doing more grilling.  The deck off the kitchen is quite protected from the winds making it perfect for grilling in all but the most unpleasant weather.   Early this week the sun made a rare appearance so I thawed a couple of rib steaks for grilling.  The steaks were grilled to medium rare, served with baked potatoes and steamed broccoli.  It was a delicious meal! 

We seldom marinate or use barbeque sauce on our steaks.  Instead, we let the flavour of the gorgeous, hormone free beef shine!  I love baked potatoes baked in the oven but just can't wait to start baking them on the grill again.  The grill gives a bit of extra flavour yet keeps the skin crispy and flesh tender. 

All of the steaks from our beef on the hoof purchase are large, cut to our specifications of 1 - inch thick.  While the whole steak looks luscious for the photo shoot, it is too much steak for either of us although if my husband is in the right mood, occasionally he will polish off a steak this big.  At any rate, anytime we have steak for dinner we have left overs.  Although steak does reheat nicely to enjoy as is, I also use left-over steak in other dishes.

refried rice made using left over rib steak
The following day, I cooked rice for dinner which is so nice now that I've mastered cooking it on the stovetop.  The rice comes out perfect every time, something I attribute to the gas burners that are considerably easier to control than electric burners that retain residual heat after being turned off.  I used the rice to make refried rice.

Refried rice is an extremely easy and inexpensive way to use left over rice and beef, chicken or pork that can be made in 15 minutes or less.  It uses soy sauce which is incredibly high in sodium content.  Even the low sodium soy sauces have over 500 mg of sodium in 1 tbsp!  I use Rooster Brand Dark Soy Sauce which has 800 mg of sodium per 1 tbsp but because it has a deeper, richer flavour, less is needed.  It does give a darker colour to any dishes it is used in. Neither of us are on a sodium restricted diet however, we do tend to eat fairly low sodium so refried rice is a dish we enjoy only a very few times a year.

Method:  Cook rice or use left over rice.  I used 3 cups of cooked rice.  Cut left over steak (chicken or pork) into strips or pieces.  Heat a little olive oil in a non-stick skillet.  Pour in the rice.  Stir in about 1½ tbsp dark soy sauce, mixing well.  Stir in prepared meat and about 1 c of frozen peas.  Mix.  Make a well in the centre of the rice.  Pour in three beaten eggs.  Stir and continue stirring while incorporating the rice mixture into the eggs as they cook.


Saturday, March 23, 2013

Winter Grilling - Rib Steaks

My husband and I love grilled foods year round even though we live in beautiful Ontario, Canada where the temperatures dip below zero.  We have no problem grilling in rain, freezing rain, sleet, snow or sub-zero temperatures.  This love of grilling has taught us a lot and is reflected in where our outdoor grill is located, as close to the kitchen as possible. Grilling outdoors during in-climate weather especially the colder temperatures takes a bit more time for the grill to heat properly but the prep work is the same.  I thought I would share a few winter grilling tips with you today.

grilled rib steaks
A few days ago, I thawed two rib steaks intent on grilling them.  It didn't matter that we had had freezing rain that afternoon and by the time the grill was fired up it was snowing.  When my husband arrived home the grill was heated ready for the steaks.  The baked potatoes were almost ready, the mushrooms were browning and home canned green beans were in the pot ready to be heated.  My mouth was watering just at the thoughts of a nice, juicy grilled steak!  Pictured is the grilled rib steak dinner.  Doesn't is look delicious?

Winter Grilling Tips:
  • place the outdoor grill in a protected location away - Our grill is located in the corner formed between the side of the house and attached garage, on the deck about two feet from the kitchen patio doors.  It is shielded from the northeast winds (house side), south winds (garage side), and west winds (neighbour's house).  It does get some wind but it is considerably reduced than if the grill were out in the open.  Some grill in their garage in the winter but that is not advisable with an attached garage or if you don't want everything in the garage to smell like smoke.
  • keep the outdoor grill covered - There are two schools of thought on covering outdoor grills.  The first is a cover protects them and it does as long as moisture does not get under the cover, hence the second school of thought that covering promotes rusting.  It also provides cover for rodents although that is not usually a huge concern in most areas.  We keep our outdoor grill covered as it is stainless steel so there aren't the rusting concerns and we don't have to clean off the grill before using it in the winter months.
  • use an easy fuel - Although you can use charcoal, natural gas or propane is considerably easier at getting the grill to temperature quickly.  There's less going in and out to check the temperature of the grill meaning less of the indoor heated air is being lost. 
  • mainly meats and vegetables - We use our outdoor grill as an oven for many foods but during the winter months, the focus is mainly on meats, tender vegetables (eg. zucchini, red pepper, onions) and portabello mushrooms.  In other words, those foods that are finished grilling within 20 minutes or less.  In a pinch, if the power is out you could still use the outdoor grill as an oven in the winter but you will go through more fuel.  Or, if you don't mind going through more propane just to get that flavour for longer foods using the grill as an oven, by all means do so.  
  • mise en place - It is very important when grilling outdoors during the winter months to have everything in place before you start heating the grill.  The less times you have to open the door between the house and grill the less heated air will escape from the house.  We set up the various dishes assembly line style based on cooking time.  
  • timing - Timing of the side dishes should be such that they are ready when the meat is finished grilling.  In this respect, grilling during the winter is no different than grilling during the nicer weather.  The only difference is meat will quickly cool once removed from the grill in the chilly air.


Thursday, January 10, 2013

Kitchen Quick Tips - Cooking Bacon on an Outdoor Grill

kitchen quick tips
Cooking a larger amount of bacon is a cinch using an outdoor grill.  Heat the grill to medium then brush of the grate.  Place the strips of bacon directly on the grate across the rungs.  Cook moving the strips as necessary to prevent flare-ups, turning once until desired crispness.  Remove from grill.  There's no need to drain.


Sunday, December 23, 2012

The Importance of Marbling in Steak

In recent years, dietary fat has gained a very bad reputation.  Health conscious folks limit their fat intake to the point it can actually be damaging to their health.  I honestly do not believe in ultra low-fat diets.  A certain amount of fat is necessary for the proper brain development in infants and children.  It is needed for the formation of the myelin sheath, the outer white insulating sheet surrounding nerve fibres. Think of myelin as the plastic coating on electrical wires.  If there is reduced myelin, signals cannot travel normally from the brain through the nerve cells.  My graduate thesis involved de-myelination in the proband that lead to a Wernkie's-Korsakoff presentation in an 18 month old child.  Mild loss of myelin can result in reduced brain function, nerve  problems and confusion.  The worst part is, once the myelin is destroyed, no amount of fat is going to replace it.  So it is very, very important to not restrict dietary fat to the point of causing a deficiency.  The second factor in restricting dietary fat comes from the fact that fat makes fat.  In reality, fat comes from starch that was converted from sugars (carbohydrates).  If the body cannot use the sugars ingested, it converts them to starch which is then converted to fat, likely part of our evolutionary make-up to provide nourishment from within when food was sparse.

New York Strip steak marbling
We have made a tradition of the first meal at our vacation home being grilled steak.  We always choose steaks that are well marbled.  Marbled is just a fancy word for nice fat distribution.  It is apparent by the white throughout the steak as well as a layer of fat around the steak.

Fat add flavour, flavour, flavour!  At the same time it makes the meat tender and juicy.  While some trim the excess fat from steaks, we do not trim if grilling.  Excess fat can cause flare-ups on the grill but flare-ups can be easily controlled.  The outer fat drips down into the grill adding to the smoke flavour.  Fat is easily cut off before eating the steak.  The inner fat (marbling) reduces when grilling while keeping the meat moist and juicy.

grilled New York strip steak
A good steak is all about flavour.   It should be tender and juicy, never over cooked but rather just to perfection according to desired doneness.  Be aware that doneness does change over time.  I used to always like my steaks well done but now prefer medium rare.  If you are cooking steaks for others, always ask how they would like their steaks cooked.  We often add caramelized onions or sautéed mushrooms. Both enhance the flavour of grilled steak without overpowering it the way barbeque sauces, steak sauces and seasonings can.  Both of us agree, when you want steak it is that flavour that should shine.  Marbling brings out the flavour of beef.  So, don't shun a bit of fat on any beef cut especially if grilling or broiling.  Choose nicely marbled steaks then trim after grilling for the best flavour.


Sunday, November 18, 2012

Balsamic Mushroom Slices

We often have friends and relatives stay with us at our vacation home.  During our fall vacation in October, four of the guys arrived the same day my husband's sister and our nephew left.  They were down for a week of serious golfing while enjoying the sun.  While do a fair share of eating out when they are down, we also cook meals.  Most of the breakfasts and lunches are made at home as well as about half of the dinners.  Don't get me wrong as we love eating out but getting into relaxed mode makes it easier to eat at home some days.

frying the mushrooms
The nice thing is, most of our family and friends are foodies as well so they love to help with the cooking and KP duty.  This is a wonderful way to share recipes and lots of good conversation peppered heavily with laughter.

My husband picked up rib eye steaks to grill for dinner.  Sautéed mushrooms are almost a must have with steak followed closely by caramelized onions.  One of the guys was making his specialty caramelized onions in a bourbon reduction.  I decided to get creative with the sautéed mushrooms.  I started them as I normally do in a mixture of extra virgin olive oil and butter.  When the mushrooms were at the sweat point, I made a change.

balsamic vinegar added to the mushrooms
Balsamic vinegar reduction is absolutely delightful and ever so easy to make.  Simply pour balsamic vinegar into a fry pan then bring to a simmer.  Continue cooking until it is reduced to the consistency of a medium thick syrup.  It is a lovely, rich, full bodied  sauce ideal for serving over meats but also works nicely over some sweets like vanilla icecream.   I reasoned a balsamic vinegar reduction would go nicely with the mushrooms while complimenting the flavour of the grilled steaks.  Instead of making the balsamic vinegar reduction separately, I added about a half cup of balsamic vinegar to the cooking mushrooms.  I thought it would infuse the mushrooms with the rich flavour of the reduction.  

balsamic mushrooms ready for serving
I continued cooking the mushrooms until the balsamic vinegar was nicely reduced.  The mushrooms were nicely sautéed with a lovely hint of caramelization but with a deeper, richer colouring.  The aroma was tantalizing!

The whole kitchen smelled heavenly between my mushrooms and our friend's onions!  Both took about the same time to cook.  Both were simple variations of traditional toppings served with steak.  My husband had raved about our friends bourbon onions so I kept my fingers crossed the balsamic sautéed mushrooms would  be equally well received.

balsamic mushrooms served
The meal was rather simple yet quite delicious consisting of grilled rib eye steaks, grilled potatoes,  balsamic sautéed mushrooms and bourbon caramelized onions, and a garden salad.  I could not believe how such simple variations by adding balsamic vinegar to the mushrooms and bourbon to the onions, made such a difference.  That is not sour cream on the potatoes.  It is Greek style yogurt that is lower in fat with a bit richer flavour than sour cream.

This really is what makes cooking so much fun.  It really doesn't take much to change a recipe for a totally different result.  Simply substituting one type of vinegar for another can change the flavour of a dish.  I found that out years ago with canning recipes.   Adding in flavour enhancers like bourbon, sherry or wine can make a huge difference in the flavour as well.  So don't be afraid to do a bit of experimenting substituting one or more ingredient with a variant of that ingredient.


Wednesday, November 07, 2012

WildSide Bar & Grille in Kissimmee, Florida

My husband and I spent our fall vacation (October 2 - 23, 2012) at our vacation home in sunny Florida.  This vacation is very much a family, friends and golf vacation which means we end up making a few trips to two different airports depending on where family and friends are flying into and out of.  We arrived in Tampa late on October 2 then made the drive to our vacation home.  My husband's sister and her pre-teen arrived on October 5 on a bit earlier flight in Orlando to spend the Canadian Thanksgiving weekend with us.  We decided to go for dinner before picking them up.  So we pointed Lucy (our GPS) in the direction of a restaurant we wanted to try close to the airport.  That ended up in a field of nothing!  We told Lucy to take us to our next choice and again were greeted with an empty field.  So, we drove around heading towards downtown Orlando where we found a nice little gem of a restaurant.

WilSide Bar and Grille in Orlando Florida
We are huge barbecue and grilling fans.  Although the terms are used interchangeably  there is a difference.  Barbeque is low, slow cooking (hours) which gives tender, juicy, fall off the bone results.  Grilling is high heat that seals in the juices giving nice hash marks.  The best of both worlds combined with smoking is to do the BBQ then finish off with grilling.  Well, we spotted a huge smoker outside of a restaurant and knew that was it so we stopped in for dinner.

WildSide Bar & Grill has three locations, two in Orlando and one in Kissimmee.  We stopped at the Kissimmee location at 7725 W. Highway 192 just a short distance from the Walt Disney World Resort.  There is a really lovely piece of wall art on the side of the building where we parked (to left of photo out of camera range).  I was going to include it as well but five pictures is about the maximum for a blog post.  There is covered outdoor seating on the front porch and in the gazebo, both facing Highway 192 (W Irlo Bronson Memorial Hwy).  After taking several pictures, we decided to eat indoors out of the misty rain, high humidity and threatening a heavier shower.
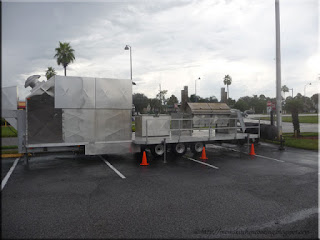
WildSide impressive outdoor smoker
Just take a look at this gorgeous smoker set-up. Isn't it impressive?  I would have loved to see it in action so that is on our to-do list for our winter vacation.  The black smoker unit on the far right is a separate smoker from the larger unit.  The larger grey unit is part of their full service catering for any special occasion but I imagine they fire it up on premises as well.

We dodged the rain, noting patrons enjoying a drink and bit of quiet time on the covered patio shielded from the rain.  It looked cozy and inviting but in Florida with rain comes humidity so we made our way into the restaurant to the comforts of air conditioning.

WildSide cozy interior with open pit grill
Oh my, this place immediately hit you with a warm and welcoming feeling.  It has almost a British pub feeling yet more.  The restaurant is two levels high, with a lot of wood.  To the right on the lower level is an open fire grill.  The picture was taken from our table just to the bottom of the picture right beside the last opening in the wood railing.  There were an abundance of HD televisions to indulge in as many sports as desired.  Now this place definitely had atmosphere!

We were promptly greeted and the wait staff made us feel like they had nothing else to do but wait on us.  They were extremely friendly, very attentive to our needs, and just downright pleasant.    The wait staff themselves make this a must stop at restaurant.  They are absolutely delightful!  This is a very good indication that management here treats their staff well which is reflected in the service they give to their patrons.

WildSide Baby Back Ribs
The restaurant offers a variety of appetizers, salads, sandwiches, pasta dishes, chicken, ribs and seafood.  My husband told me to order the lobster tails which normally I would be very tempted but I was in the mood for good BBQ.

After our drink orders, a photographer came around to take our picture.  We declined.   We often get one of the waitresses to take a picture of us anyway but we prefer having the photo on our camera where we have control of where it goes.   We aren't comfortable having our pictures online but that doesn't appear to be the case with WildSide.  It's more of a souvenir photo to remember your visit to the WildSide.

We knew we had to meet a flight so didn't have a lot of spare time after encountering a large detour to get around a massive accident.  Surprisingly, we did not have to wait long for our meals at all even though we never told our waiter that.  Our meals came with a small loaf of warm bread that was brought out within a few minutes of ordering followed by my salad.  My husband ordered the half rack of baby back ribs ($15.99) that came with a choice of two sides.  Extra sides are available at a small charge if desired.  The ribs were dry rubbed then grilled to perfection.  He had macaroni $ cheese and BBQ baked beans as the sides.  As promised, the baby back ribs were grilled to perfection -  mouth-watering, tender and flavourful.  He was quite pleased with his meal!

WildSide half smoked chicken
I ordered the half smoked chicken ($12.99) that came with a choice of two sides.  My side choices were roasted red potatoes and a garden salad with Thousand Island dressing (not pictured).  My gosh, the potatoes were delicious perfectly complementing the chicken.  The chicken was nicely seasoned, delightfully tender and aromatic.  They really could have done without the nachos to help fill up the plate as they didn't go with anything.  Besides, with warm loaves of bread who needs nachos?  This proved to be too large of a serving for me but then I wasn't feeling well to begin with.  I would have loved to take the left-overs back to the vacation home but we didn't have a cooler with us.  We still had to pick up my husband's sister and young one at the airport then make our way back to our vacation home.

The only negative thing I can say about this restaurant is I wish we had a bit more time to relax and enjoy it. With Lucy taking us on wild goose chases we lost a bit of time and even though their plane took off 15 minutes late, they arrived early so we got the phone call midst meal they had just landed.  It was skedaddle time but rest assured this is going to be one restaurant we will be revisiting during our winter vacation!


Sunday, November 04, 2012

New York Strip Steaks

My husband and I love our beef.  We are used to eating very good quality, hormone free, grass-fed beef that we buy as a calf that is then raised to slaughter age by one of our friends.  It is not surprising that we do enjoy our steaks.  The first dinner at our vacation home with the exception of our very first trip when we were just setting up the house, has been grilled steak.  The morning following our arrival we head into town to get groceries for a few days.  Good steaks, ingredients for a salad and potatoes are always part of the groceries the first trip.

custom cut New York strip steaks
At home we are well acquainted with local growers and know where to find the best quality meat possible.  Unfortunately, we cannot say the same about the area around our vacation home although we are learning quickly.  At home, I'm used to buying from a small mom & pop butcher shop or the abattoir aside of our annual bulk meat purchase.
We like shopping at Publix when at our vacation home although we have bought groceries at Sweetbay, Sam's Club and Wal-mart.  The Publix closest to us has just had a gorgeous make-over but it was nice before.  Their meat counter is very nice and we can get custom cut like we are used to.  Our bulk beef purchase for 2012 cost us $2.52 per lb so seeing a $7.99 price per pound was a bit discerning on the surface.  In perspective, a steak entrée will cost $25 or more in restaurants so the price per pound really is not that bad.

Aside of having nice quality meat at reasonable prices, Publix prints out the cooking instructions on the labels for their custom cut and meat counter meats.  This is an extra feature I haven't seen elsewhere.  I've seen cooking instructions on pre-packaged meats like those wrapped in plastic wrap on a styrofoam tray but not this custom print-out.  Another nice thing Publix does is if you buy a cut of meat that should be baked, they package it in an ovenproof container, something that was very much appreciated during our first trip to our vacation home when we literally had zilch as far as far as kitchen supplies and equipment.

New York strip steaks
As steak lovers we both agree that a good steak should be close to an inch thick.  Thinner cuts can quickly turn into shoe leather when grilling.  The only time we use a thin cut of steak is when delicating it or making a rolarde.  Leftover steak can be used to make wraps, stir frys or soups.

We bought two inch thick, custom cut New York strip steaks for $12.30.  New York strip steaks are cut from the short loin.  This is a muscle that isn't used much so the meat is quite tender.   Don't they look delightful?  They grilled up perfectly, just what we needed to start our fall vacation off on a good note.

Honestly, the meat counter at the Publix we go to is just as friendly as our local butcher shop and they do cut the meat to our specification.  They are quite attentive to our needs and aim to please.  It's nice that we have found a solution to our meat purchases at our vacation home.  I'd still like to find a mom & pop butcher shop there but so far have had no luck.  I think a lot has to do with the location.  The town is actually considerably larger than the closest city to us at home but it is very much geared towards snowbirds visiting for the winter months.  At any rate we shall keep looking...