My photo
Ontario, Canada
I am a wife, mother and grandma who enjoys the many aspects of homemaking. A variety of interests and hobbies combined with travel keep me active. They reflect the importance of family, friends, home and good food.
Cook ingredients that you are used to cooking by other techniques, such as fish, chicken, or hamburgers. In other words be comfortable with the ingredients you are using.
--Bobby Flay

For Your Information

Please watch this area for important information like updates, food recalls, polls, contests, coupons, and freebies.
  • [March 19, 2020] - Effective Mar 17, this blog will no longer accept advertising. The reason is very simple. If I like a product, I will promote it without compensation. If I don't like a product, I will have no problem saying so.
  • [March 17, 2020] - A return to blogging! Stay tuned for new tips, resources and all things food related.
  • [February 1, 2016] - An interesting report on why you should always choose organic tea verses non-organic: Toxic Tea (pdf format)
  • Sticky Post - Warning: 4ever Recap reusable canning lids. The reports are growing daily of these lids losing their seal during storage. Some have lost their entire season's worth of canning to these seal failures! [Update: 4ever Recap appears to be out of business.]

Popular Posts

Showing posts with label casseroles. Show all posts

Thursday, January 08, 2015

Creamy Turkey Bake

We are in food crisis mode here!  Our pantry is overflowing, both chest freezers are stuffed and things are falling out of the refrigerator freezers.  Part of the problem stems from us being out of country for three months last year so we are using our pantry stores in the manner we were accustomed to.  My husband wants to extend our time at our vacation home to four months this year so for the foreseeable future, we will not be needing a full year's supply of food at home.  The bottom line is, I need to pare down the pantry and freezers so that means meals from both supplemented with fresh produce and dairy combined with reduced stocking.  I have a plan so we'll see how successful it is.

turkey bake ingredients
It is quite cold here so extra heat from the oven sounded good.  Last night's dinner used the rest of the milk, turkey and last roll of puff pastry from the freezer, a jar of home canned beans and mushroom soup from the pantry, two potatoes and Old Bay Seasoning to make a simple yet tasty casserole.  The bulk of the meal's ingredients came from the freezers and pantry, not bad for a start.  It doesn't seem like a lot but using something from the freezers and pantry to make a meal should make a difference.  It will be important to do this for every dinner so ideally five days a week since we eat out twice a week.  Some meals will use a bit more from both but others less.

assembling the turkey bake
There really isn't a recipe for this casserole.  I used one sheet of the puff pastry and about 2 1/2 c of cooked turkey cut into bite sized pieces, and a can of milk.  I cooked the potatoes in the microwave oven until just tender, then let cool enough to cut into bite sized pieces.  I drained the beans then mixed the turkey, potatoes and beans in a casserole dish.  I mixed the soup, milk and about a teaspoon of Old Bay Seasoning in a separate bowl.  I poured the soup mixture over the turkey mixture as pictured then placed the sheet of puff pastry on top.  The puff pastry didn't fully cover the top, leaving about an inch open on each end.  I baked the casserole at 400°F for about 30 minutes until the filling was bubbly and the crust golden brown.

turkey bake
This casserole did not cut into neat, tidy squares.  Cutting through the crust then scooping out with a large spoon worked well.  The yield was 6 generous servings.  The turkey bake topped with the light, flaky crust was rich and creamy, warm and steamy just perfect for a frigid winter dinner.  Overall, I was pleased with the casserole.  It was just a bit higher in sodium than I would like but other than that the nutritional values were good. 

The sodium came from the puff pastry and soup, mainly the soup.  This is a problem with all commercially canned soups, one reason I seldom use them.  However, cream of mushroom soup is a pantry staple I use for quick sauces.  I will have to rethink that plan once I've exhausted my supply.  Thank goodness I only have a couple more cans left!

Nutritional information per serving:  518 cal, 47 g carbs, 17 g fat, 34 g protein, 1,046 mg sodium, 8 g fiber


Wednesday, April 03, 2013

A Blast From the Past

Over the past couple of years as I have upgraded or purchased new pieces of kitchen equipment, I have shared them on this blog.  I thought it would be rather fun to share some of my blasts from the past during April.  Over the next month I will share a few things like my pre-Depression Era tea set (Fairfax by Fostoria), Depression glass (mainly American Sweetheart by MacBeth) and a few other treasured pieces that despite their age are still in full service, some daily in our home.

I am a collector of books, jars and anything kitchen related mixed with a few dolls and antique furniture.  A piece makes its way into our home not because of its value but because I like it.  The piece may have character or the colour appeals to me or sometimes it is bought for nostalgic reasons like my ancient Sunbeam stand mixer.  I seldom ever think of selling a piece even though I usually know their value but some pieces have been gifted to our kids.

promotional character jars
During the Depression Era, it was common for companies to include pieces of dinnerware or other novelties in their product as an incentive to buy that product.  In the midst of that, some companies got creative by using character shaped jars that were intended to be used as penny banks when empty.  I have five such jars.  The small one with the metal lid (far left) is 16 oz Gattuso Bambino Olives penny bank.  There is a slot in the lid.  This jar was made sometime between 1900 and 1950 but I have not found an actual date.  It is on display with some of my antique mason jars.  It's value is about $35.  The three bear shaped jars are from Kraft peanut butter circa 1988.  It is quite common to find these types of jars without the lid.  I still buy them because at some point I may find a lid and if I don't they make for a cute flower vase.  Each of these jars cost me 50¢ but are valued between $25 and $30.  The pig shaped jar in front was made by Libby St. Clair in Wallaceburg, Ontario.  It has the marking for the penny slot but it was never cut through so the jar is perfect for storing dry beans.

promotional metal containers
I love promotional tin cans of which I have several.  They are perfect for holding homemade gifts from the kitchen so a lot of what I pick up tend to go out the door.  I keep a few for myself for regular use like the Maxwell House Coffee can (1992), the Ritz Cracker (1990) can and the Uncle Ben's Rice (1987) can.  The Ritz Cracker tin was issued in Canada and features Fred Astair and Ginger Rogers.  It is currently valued at $15. The Uncle Ben's rice tin is valued at $6 and the Maxwell House Coffee at $8.  Of note, if these cans contained their original contents and were still sealed they would be valued close to the $50 mark.  The value decreases with rust or scratches.  My cans are in rather good condition, perfect for protecting food from rodents while bringing a bit of whimsy into the kitchen.  The coffee and cracker tins sit on my counter, containing tea bags and soda crackers.  The rice tin is in the pantry and it does have rice in it. 

Pyrex divided casserole dish
Even as a newlywed over 30 years ago, I never got into the plasticware craze.  While my friends were turning their cupboards into walking billboards for Tupperware, I was busy collecting old mason jars.  Glass does not absorb odours and the contents can easily be seen.  I saw no need to buy plastic storage containers when foods could be stored in the refrigerator in the very same dish they were baked in.

This Pyrex divided casserole dish was one of the first pieces I acquired that was fancier than the plain glass Anchor Hocking rectangular, round and square casserole dishes.  This piece has a brown base with copper highlights.  The glass lid is clear and stamped with Pyrex on the end.
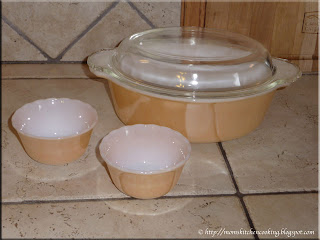
Anchor Hocking Fire King peach lusterware
I have two round nesting sets of Anchor Hocking oven and microwave safe glass bowls with plastic lids bought about 4 years ago.  I use them for storage in the refrigerator, occasionally in the microwave oven but not for regular oven use. All of my other Anchor Hocking bakeware (2 rectangular casseroles, square casserole, 2 round casseroles) with the exception of my vintage pieces are circa late 1970's and early 1980's.  I still have the rigid plastic lids for them as well as the two round glass lids for the round casseroles.  I prefer the older and vintage Anchor Hocking because it was made with low expansion borosilicate glass, perfect for oven use.  Newer Anchor Hocking is made with tempered soda-lime-silicate glass which is prone to shattering due to thermal shock especially if a dish in the refrigerator is put into a hot oven.  There have been reports of shattering simply upon removal of the newer glassware from the oven.  

Fire King is a brand of pressed glassware that was manufactured from the 1940's through the 1970's by Anchor Hocking.  Fire King in script or block letters with or without the Anchor Hocking logo is embossed on the bottom of Fire King pieces. Basically if the piece says Anchor Hocking Fire King or just Fire King, it is a vintage piece.  The age can be determined by the font used in the embossing.  However, some of the later Fire King pieces lack the embossing due to the mold wearing which was replaced with a sticker that usually is missing.  Fire King was meant for daily use so it is normal to see signs of wear.  Pieces with chips or cracks should not be used for cooking although if a piece really appeals to you, it can be used for a non-cooking purpose (eg. holding potpourri). Fire King was originally manufactured for refrigerator and oven use prior to microwave ovens.  I don't use my Fire King pieces in the microwave simply because I am not sure if it would damage the finish.  I doubt there would be a problem with the clear pieces but I'd rather be a bit cautious.

Peach lustre was produced by Anchor Hocking Fire King in the 1950's and 1960's which makes it vintage although if using the 50 year mark to determine if antique, these pieces are getting close to being antique.  I have the 1½ casserole dish (467) with matching lid (lid also has 467 on the ends) and two custard cups.  These pieces are still in use.  I don't wash them in the dishwasher though just to be on the safe side as I don't want the dishwasher detergent clouding the finish.

Anchor Hocking Fire King casserole dishes and bread pan
I have a 1½ quart clear glass casserole dish with lid (433), a 1½ quart Sheaths of Wheat on milk glass without lid (cira 1952 to 1963), a blue cornflower on milk glass bread pan, and a 12 oz clear glass casserole dish with lid (1072).  All of these vintage pieces are in regular use both in the oven and refrigerator.  Each is valued around the $15 mark.  The value does decrease if the lid is missing or if there are any chips. 

It is quite common to find the bottom piece of the casserole dishes without the lids.  These are usually round or oval.  The lids are missing because they are the piece most commonly broke during use.  I often pick up lids at the resale shops for 10¢ to 25¢.  If the lid belongs to a piece of Pyrex, it will have the word Pyrex embossed on the ends just over the handles of the lid.  If the lid is for an Anchor Hocking Fire King piece it will have a number that co-responds to the number on the base it belongs to but this can vary as neither of my clear pieces have any indication as to brand on the lids.  The single clear glass lid (lower right) is a duplicate to the glass lid on the clear glass casserole dish so perhaps I will get lucky and find a base for it sometime.  The bread pan was manufactured without a lid so is complete as is.  These pieces are also hand washed as I don't want any dulling of the finish.  There are other Fire King pieces available (mixing bowls, mugs, nesting bowls, dinnerware, and jade-ite restaurant ware) but I like the casserole dishes.  I did have a few of the Fire King mugs but haven't seen them for awhile.  They are likely in one of the many boxes of mugs and glassware that are still unpacked in the garage.  Martha Stewart brought out a line of based on jade-ite restaurant ware made with new molds and stamped Fire King, 2000 not to be confused with the vintage jade-ite restaurant ware made with the original molds.

The biggest problem some folks have with vintage pieces is using them for fear of breaking something they may not be able to replace.  While I am somewhat protective of my pre-Depression and Depression Era glass, and even that does get used, I am not as protective of my vintage pieces.  The do see regular use!  The casserole dishes are the perfect size for cooking for two!  Anytime I stop at a resale shop, I am always on the look-out for vintage Fire King pieces.  They are also perfect for holding gifts from the kitchen for those folks who enjoy using the vintage pieces as much as I do.  If you are looking for vintage Fire King, be careful especially if buying jade-ite pieces as there are recent reproductions from China that some dealers are selling as authentic.  If you stick with the pieces clearly embossed with Fire King on the bottom, you will know for sure you have an authentic vintage piece.  Keep in mind that some later authentic Fire King pieces did not have the embossing but rather stickers so always compare to those pieces with the embossing.  The style will be the same on authentic pieces even if the embossing isn't there whereas there will be deviations from the original style in a reproduction piece.  I'm sure once you have used a piece of vintage Fire King you will want more pieces.  They are practical, affordable and they look great!


Wednesday, March 06, 2013

Faux Lasagna

It has been eons since I bought a boxed ground beef helper.  Why?  These types of convenience foods are expensive for what you get and the are laden with food additives.  I checked a box for the ingredients at the grocery store the other day.  Most contain maltodextrin (a corn sugar that is highly addictive creating cravings for it), monosodium glutamate (triggers headaches and allergic reactions), modified milk ingredients, natural flavour (could be anything!) and if the product has cheese, the cheese is dried.  A pasta based helper perhaps has a cup of dried pasta, the seasoning packet and you provide the meat and liquid at a cost of more than four times the cost of dried pasta bought on sale and adding your own fresh ingredients and cheese.  I have several versions of homemade ground meat helper, all fresh and easily prepared in about the same time it takes to prepare a boxed version AND they eliminate the cost of the boxed mix along with all the additives.

faux lasagna casserole
Even if you use a boxed ground beef helper you have to brown the ground beef.  I have found I can make the actual convenient dry mix for about a quarter of the price of store bought but I can also make the entire casserole from scratch in pretty much the same time at a quarter of the price as well.

The other day, I made a faux lasagna casserole using 2 lb of lean ground beef.  It had a lovely flavour, very much like lasagna without the work.  Quite frankly, I don't find lasagna a lot of work even making the sauce from scratch but I wanted a quick meal that night.

Faux Lasagna
source: Garden Gnome

2 lb lean ground beef
2 c broad egg noodles
2 c shredded mozarella cheese
½ c shredded cheddar cheese
¼ c cottage cheese
1 c shredded Parmesan cheese (divided)
1 L (4 c) roasted Italian garden sauce with mushrooms

Brown the ground beef and drain.  Cook and drain the pasta.  Pour ground beef into a large mixing bowl.  Pour the sauce over the meat. Mix well.  Stir in the pasta then all the cheese reserving ½ c of the Parmesan cheese.  Mix well.  Pour into oven proof baking dish.  Sprinkle the remaining Parmesan cheese on top.  Bake at 350°F for 15 minutes or until warmed through and bubbly.

faux lasagna
This homemade faux lasagna casserole took 5 minutes longer prep time and 3 minutes longer cooking time than the boxed version.   I didn't factor in the time it takes to bring the boxed version to a boil though so in terms of timing the homemade version was really quite close to the boxed version.  However, I ended up with a less expensive and tastier dish than the boxed version.  The homemade version not only eliminated all the food additives, it was lower in sodium as well.  Unlike the boxed version, I didn't have to take time to stir occasionally either freeing up that time to do other things.

The proof is in the taste and hands down this faux lasagna is a winner.   It is rich, creamy and cheesy sure to satisfy any lasagna craving in short order.  I usually use 7 to 9 cheeses in my homemade lasagna but this recipe only had 4 cheeses.  The mozzarella cheese could easily be reduced to 1 c then add in another cup of any desired cheese.  Over all though, this was a very nice casserole!


Friday, February 22, 2013

Scalloped Potatoes

We live in beautiful Ontario, Canada where the winter days can be somewhat blustery, grey and cold.  On the flip side, there can be a blanket of snow on the ground, an amazing clear blue sky and bright sunshine that makes the snow sparkle like a million diamonds.  That means we need comfort meals especially on the cold, dreary days.  And, for those not familiar with Canadian winters a bit of extra fat is always welcomed in the diet during the winter months because we have to shovel snow, walk through snow, and get outdoors to get our bodies to make Vitamin D.  We have been focusing on making winter comfort foods at home.  Some dishes are just beyond comfort food.  Now if that dish happens to be a creamy casserole, well you have it made!

scalloped potatoes
I have always made scalloped potatoes the same way my Mom did.  The only difference is sometimes I don't peel the potatoes.  In fact, I seldom peel potatoes if I don't have to as both nutrients and fiber are lost when potatoes are peeled.

Method:  I use a food processor to slice the washed potatoes uniformly.  A mandolin can also be used.  I place an even layer of potatoes on the bottom of a lightly buttered oven proof baking dish.  Then I sprinkle the surface of the layer of potatoes with flour, salt, pepper,2 - 3 dabs of soft butter and chopped onions.  I continue layering in this fashion ending with a flour layer.  Sometimes I add chopped chives to the top layer as well.  I then pour scalded milk over the potato layers until the milk reaches just under the top layer.  I find it is best to place a shallow baking sheet with water on the rack under the casserole dish in the oven as scallop potatoes are famous for boiling over.  I bake at 350°F until the top is golden and sauce is bubbling.

scalloped potatoes with home canned beans and home cured pea meal bacon
Scallop potatoes baked this way are rich and creamy just perfect for pairing with home cured pea meal bacon and home canned green beans. On a cold winter's night this is the perfect easy to make comfort meal!  Aside of the potatoes, the meat and beans take only about 15 minutes making the meal a rather low prep one.

These scallop potatoes will cut nicely into squares.  They reheat well and can be frozen for later use.  They are just a bit creamier if you peel them.  The nice thing is they are just about a fool proof to make as possible.  Paired with home cured pea meal bacon, the entire meal is low fat.  Don't be tempted to omit the butter as that does add flavour but the entire casserole dish has less than 2 tbsp of butter if that.  I use 2% milk.  Whole milk (4%) or heavy cream will give extra creaminess but I find the 2% milk works nicely without adding extra fat.  Skim milk works as well but I have not tried them using soy milk.  However, soy milk can be substituted for cow's milk in many recipes so I don't see why it wouldn't work in this recipe.


Friday, February 01, 2013

Mom's Surprise (Mix & Match) Casserole

I can't believe it is February already!  Much of January has seen us dealing with one of the nastiest cold strains either of us has ever had.  My husband's started just before New Year's and he still has a cough.  Mine has been a bit more problematic with complications so I'm still under the weather. While good, healthy and nutritious food is important any time  it is especially important when you are sick to help your body heal.  That is the time you want to pack in as much extra nutrition as possible.  We have been relying heavily on casseroles, home-made/home canned soups, and salads to get us though.

Of note, everyone knows to avoid dairy if the illness includes a gastrointestinal upset.  However, leafy green salads should also be avoided in this case as they make digestive system work harder.  The alternative way to get your leafy greens if you have a gastrointestinal upset is through juicing once you are well enough to be off of clear fluids.

ground beef version of mix and match casserole
I have been making a casserole that goes mainly by Mom's Surprise Casserole since I was a young bride, before we even had kids but the dish was actually named by out kids later.  I have several versions of it because it constantly changes by what I have on hand.  This casserole is basic comfort food, a great way to pack in extra nutrition and it is very frugal to make.

Have you seen those charts in the women's magazine's that give you a choice of meat, vegetable, starch and extras to make different versions of the same dish?  Well, Mom's Surprise Casserole is exactly the same except I've never taken the time to make a chart.  Here's a bit of an idea of what I mean for choices:

  • ground meat - beef, chicken, turkey, venison, pork
  • vegetables - corn, potatoes, carrots, peas, green beans or whatever vegetable strikes your fancy
  • soup - any kind of condensed soup (I prefer using my home canned soups), vegetable soup, smooth soups
  • topping - cooked macaroni, cooked rice, mashed potatoes
  • cheeses - your choice of any cheese you like; I like to add a soft cheese (eg. cream cheese, yogurt cheese or Cheez Whiz) stirred into the pasta until melted before topping then adding shredded hard cheese after topping.  This is a great way to use up those little bits of left-over cheese!
To get you started, here is the way I made the ground beef based casserole earlier this week.  Note that this is a bit higher in fat for extra nutrition and calories as well as adding to the creaminess.  Extra fat is necessary when healing from certain illnesses like a cold as it helps your body absorb fat soluble nutrients.  Also of note, while it does look like the casserole in the picture is overflowing with melted cheese, the overflow is actually bubbling home canned tomato soup. 

Mom's Surprise Ground Beef Casserole
source:  Garden Gnome

2 lb ground beef
8 oz sliced mushrooms
1 c each cooked cubed potatoes, carrot medallions, whole kernel corn, sweet peas
1 L (quart) home canned tomato soup
½ c milk
2 c dried elbow macaroni
1 c cream cheese
2 tbsp butter
½ half & half
1½ c shredded cheddar cheese

Bring salted water to a boil then stir in the macaroni.  While the macaroni is cooking, brown and drain the ground beef.  Spread it evenly over the bottom of 9 - inch X 13 - inch oven proof casserole dish.  Clean, slice and brown the mushrooms.  Spread evenly over the meat.  Wash, cut and steam the potatoes and carrots.  Spread evenly over the mushrooms.  Mix the frozen (no need to thaw) corn and peas together then spread even over the potatoes and carrots.  Drain the macaroni then mix well with cream cheese, half & half and butter.  Divide the shredded cheese in half.  Spread half the cheese over the thus far assembled casserole.  Top with the macaroni mixture.  Mix the tomato soup with the milk and pour the tomato soup evenly over the top.  Top with the remainder of the shredded cheese.  Place the assembled casserole dish on a baking sheet to catch any drips as it will have a bit of overflow.  Bake at 350°F until bubbly and cheese topping is golden brown.  Remove from oven and serve.


Sunday, January 20, 2013

Quiche Revisited

Years ago when our four kids were still quite young (none in school), I got to know a few young moms with kids.  Our kids played while we chit chatted over coffee, a fairly regular morning routine.  We'd take turns making cookies or some type of snack to enjoy.  A lot of that chit chat revolved around food, sharing recipes and tips.  One of the moms shared her tomato and broccoli quiche recipe.  The first time I made it, I omitted the tomatoes making it a broccoli quiche.  This versatile dish quickly became and remains a family favourite.

quiche
I have made this quiche so many times, I don't need to refer to the recipe.  The original recipe has bacon in it but I have substituted ham.  I have also substituted spinach and Swiss chard for the broccoli.  I normally make the quiche using a home made pie crust.  It is an inexpensive, frugal dish that always goes over well.

Quiche freezes nicely!  We arrived home from our winter vacation on December 20, 2012 to immediately jump into holiday entertaining.  Some of that meant our kids and grandkids staying overnight for a couple of nights so we had quite the full house.  My husband, aiming to make things easy bought four ready to use frozen pie crusts.  Then he bought three dozen eggs thinking we would go through a lot with hot breakfasts.  So the first week of January, I had eggs and a lot of left-overs to use up.

Pictured are two of the four quiches I made to use up some of the eggs and pie crusts.  Two of the quiche were used for dinner that night and my husband's lunch the following day.  Two were wrapped for the freezer.  My freezer space is at a premium right now but it was nice to be able to put a couple of ready meals up for later use.

Normally when freezing quiche, I use home made crust but aluminium pie plates bought at the dollar store.  I usually make six at a time.  The dollar store has a wide variety of aluminium trays in various sizes perfect for freezing casseroles in.  The best price I have found for the deeper dish, rectangular casserole trays is Sam's Club at 30 for $6.98 or 23¢ but you have to buy 30 at a time which is fine for me but if you aren't doing a lot of bulk cooking, the dollar store may be a better option.


Tuesday, January 15, 2013

Baked Pizza Penne

After a busy holiday season right on the heels of returning from our vacation home only a day before the holiday festivities started for us, I have been relying on tried and tested home cooked meals.  At the same time, I am anxious to try out a few new dishes always in the hope of finding that next family favourite.  The new Foodland Ontario calendar arrived just before we left in late November so I didn't have a chance to go through it.  Last week I had a chance to read through the recipes for 2013 and immediately decided to make the Baked Pizza Penne (March) for dinner that night.

The calendar specifies Ontario is several of the ingredients which is great since they are promoting our beautiful province but you can get the same results by using local produce from your are if outside of Ontario.  Both my home canned tomato products were made with Ontario tomatoes but then the vast amount of the foods we consume are grown or produced in Ontario.  A wide variety of produce during the winter months.

baked pizza penne just out of the oven
Reading through this recipe I quickly realized it would be very easy to modify to include your favourite pizza toppings while leave the base flavours.  I modified the recipe because as always a recipe is just the starting point and I'm a firm believer in using what's on hand.  The original recipe can be found in the calendar and on the Foodland Ontario website.  My version follows below.

The baked pizza penne just out of the oven smelled delicious and it looked very much like the picture in the calendar so I was rather pleased.  I baked it in the largest stoneware casserole dish (9" x 13") of my KitchenAid 5 piece set bought at 70% off at Canadian Tire shortly after we moved here. Canadian Tire is the store to watch the sale flyers, one day sales and clearance bins as kitchen items are often on sale 40% to 70%.  I find that the stoneware gives nicer results for most casseroles in comparison to my ancient but still very function glass casserole dishes.

baked pizza penne served
I used bulk sausage in place of the pepperoni as I had some left-over from holiday entertaining that I wanted to use up.  I used home canned tomato paste and crushed tomatoes.  There is a flavour difference using home canned over store bought.  I also used organic raw coconut oil in place of the vegetable oil and used grated Guyere in place of the Parmesan as I had run out.  It was a cold, wet day with high winds that I didn't feel like walking to the store.  I omitted the hot pepper flakes and reduced the salt.

The baked pizza penne certainly did not disappoint!  It had nice mild pizza flavour and I did like the texture.  This is a casserole I would tweak just a bit more the next time I make it.  My husband said it needed more cheese to mimic the extra cheese we like on our pizza.  I thought it could have a bit strong pizza flavour.  What I really like about this recipe is the versatility!  You could use one or more meats of your choice to mimic a meat lover's pizza, you could eliminate the meat for a cheese pizza flavour and add anything that strikes your fancy as a pizza topping.

Baked Pizza Penne
modified from:  Foodland Ontario, 2013 Calender, March

1 onion chopped
2 cloves garlic, minced
1 red sweet pepper
2 tbsp organic raw coconut oil
3 c (750 ml) home canned crushed tomatoes or 28 oz store bought crushed or diced
2 tbsp tomato paste
1½ tsp dried basil
1½ tsp organic granulated sugar
1 tsp dried oregano
½ tsp sea salt
2 c browned mild bulk sausage
2½ penne pasta
1 1/3 c shredded mozzarella cheese
¼ c shredded Guyere cheese

Cook the pasta in boiling water 8 to 10 minutes until al dente.  Drain well and return to pot.  While the pasta is cooking chop the onion, mince the garlic and dice the sweet pepper.  Brown the sausage, breaking up the pieces well.  Drain.  Heat the oil in a deep frypan then stir in vegetables.  Cook over medium heat 5 minutes.  Stir in tomatoes,tomato paste, herbs, sugar, salt.  Bring to a boil then stir in sausage.  Simmer 15 minutes.  Pour the sauce over the pasta and mix well.  Pour mixture into baking dish.  Top with cheeses.  Bake at 400°F/200°C for 20 minutes or until cheese is golden brown.


Saturday, December 15, 2012

Venison Cottage Pie

We spend most of the month of October at our vacation home in Florida.  The day after returning No Frills had a great sale on potatoes, beets, carrots and onions at $1.88 for a 10 lb bag each so of course I had to take advantage of that.  The week after returning home, my husband left for hunt camp with the guys.  He doesn't hunt himself so along with another good friend they are chief cook and bottle washer.  The guys have a lot of good old fashion fun and always share the rewards of any catch.  This year they took down a five point buck, so there was each of them brought home a little over 20 lb of venison each.

vegetables ready to steam for rustic potato topping
I've talked about making rustic potatoes in the previous posts.  Rustic potatoes have a lot of flavour and nutrition and because the skins are left on the potatoes, extra fibre.  Now, the carrots add sweetness, colour and texture but cabbage is a must.  A lot of folks turn their nose up at cabbage or only relate cabbage to coleslaw, but cooked cabbage takes on a mellow sweetness.

I like to steam the vegetables when making rustic potatoes.  In fact, I prefer steamed vegetables to those boiled.  Steamed vegetables lack the sogginess that comes with boiling vegetables.  They are higher in nutrition as well plus steaming vegetables are an eco-friendly way to cook vegetables because they use less water and energy.  Oh and if all those benefits weren't enough, they are very, very inexpensive and beyond easy to make, something every frugal cook loves to hear.

preparing the rustic potato topping
Once the vegetable mixture is tender, I pour it into the bowl of the KitchenAid stand mixer.  Then I add cream cheese, sour cream, milk or stock, a little butter, seasonings (garlic powder, onion powder, white pepper).  I don't add salt so while the dish is higher if fat, it is low sodium.  Low fat sour cream and cream cheese can be used if desired because it really is the flavour that counts in these potatoes, not the fat.  I always use 2% milk if using milk or de-fatted chicken stock depending on how the potatoes will be used.  Then I lightly whip the mixture leaving slightly lumpy but not starchy, adjusting the liquid if needed to get the consistency I want.

Rustic potatoes are ideal as a side dish and topping cottage pies or other casseroles.  They can be used as a pierogi or hot pocket filling as well.  I have also used rustic potatoes as a filling for rolled meatloaf.  A rolled meatloaf has a spiral effect.  The rustic potatoes look lovely when used this way while getting more nutrition into the finished dish.  These potatoes freeze nicely so make up a large batch then make a few dishes for the freezer for a bit of homemade convenience.

prepared venison cottage pie ready for oven
I made a venison cottage pie using the rustic potatoes.  A cottage pie is basically the same thing as a Shepard's pie except it is made with with ground meat other than lamb.  Lamb is traditionally used when making a Shepard's pie. Semantics (vs nomenclature) aside, the resulting dish consists of ground meat with some type of gravy topped with a layer of corn or mixed vegetables and a final layer of mashed potatoes then baked until warmed through and bubbly.   I added a thin layer of shredded extra old cheddar because I had a piece I wanted to use up.  Any shredded cheese can be used but is optional.

I used a covered glass casserole dish for the venison cottage pie.   At this point, I could have froze as is then popped out the frozen casserole and vacuum sealed it or instead of using a glass casserole dish, an aluminium baking tray is what I normally use for casseroles destined for the freezer.  If freezing in aluminium trays, I cover the top of the casserole with wax paper then seal tightly with aluminium foil.  Venison cottage pie can also be frozen in individual serving sizes using large muffin tins to freeze then pop out and vacuum seal.

venison cottage pie ready for serving
The venison cottage pie using up some of my Ontario produce purchase was destined for dinner that night.  Venison is an interesting meat to work with.  It is very low fat and what fat it does have has a poor mouth feel if the meat gets luke warm.  The solution to this problem is to add ground pork to ground venison in about a 1:2 ratio (ground pork:ground venison).  The abattoir that processed the venison actually did this when he ground it but most abattoirs don't.  The ground venison can also be browned in bacon fat.  Once the venison is browned, I drain it and use the drippings to make a gravy seasoned with a bit of Worcestershire sauce.  The pan can be de-glazed with red wine if desired then thickened to make a gravy using a roux but can be made gluten free by simply reducing somewhat and stirring into the meat.  If the corn is substituted with a gluten free vegetable, the venison cottage pie can easily be converted to gluten free if desired.

The venison cottage pie just out of the oven looked delicious and smelled divine   The rustic potato topping is a perfect  match for the rich flavour of the venison.  This was a good sized casserole that gave a yield of six to eight generous servings.  The cooked venison cottage pie reheats nicely.

venison cottage pie serving
Shepard's or cottage pie is usually shown plated as a square as the common restaurant presentation much the same way lasagne is plated.  However, when I serve it, the result is anything but a square.  Neither is my lasagne.  The reason being, both are served piping hot so it does not hold a firm shape.  The cream cheese in the rustic potato topping and gravy added to the meat means the cottage pie will not hold a firm shape.  At the same time, the addition of the gravy and cream cheese gives nice moist results eliminating the need for topping with separate gravy.  Homemade bread and a garden salad rounded out the meal.


Wednesday, May 09, 2012

Rustic Cottage Pie Revisited

I wrote about my recent mini bulk cooking session a couple of days ago.  Essentially what I did was make three casseroles in advance to help get us through a very busy weekend ahead.  One of the casseroles was cottage pie sometimes erroneously referred to as shepherd's pie. Technically, shepherd's pie is made using ground lamb while cottage pie is made using any type of ground meat except game meat (eg. moose, venison) then it is called hunter's pie.  If using fish it is called Maritimer's pie.  There you be, a short lesson on naming essentially the same dish based on the type of meat used.

cottage pie
Cottage pie is a very frugal, easy to make, nutritious casserole.  I often cook two roasts at a time which gives me double the gravy.  I freeze the extra gravy for later use.  In general, meat or poultry gravies freeze nicely but those thickened with corn starch thin slightly.  I browned the ground beef, drained the seasoned lightly and stirred in about a cup of the beef gravy.  That formed my meat layer.  I topped the meat layer with seared mushrooms, sweet peas and niblet corn.  The potato mixture was mashed steamed potatoes, steamed carrots, herb & garlic cream cheese, sour cream and a little beef stock.  I used the rest of the gravy to top the cottage pie servings.

Note the layering of the beef flavours by the use of three beef ingredients - ground beef, beef stock and beef gravy.  Each form of the beef adds a slightly different element while enhancing the flavour of the other beef variants.  This was a very simple, frugal dish using about a pound of lean ground beef yet giving a yield of 6 good sized delicious servings.  Cottage pie does freeze nicely.  Simply freeze after assembly without cooking then reheat right from frozen without thawing.


Saturday, May 05, 2012

A Mini Bulk Cooking Session

Years ago I came across an idea called once a month cooking (OAMC).  The premise was that you took a weekend to prepare enough meals for the freezer to last the entire month.  Well, the concept was not new to me as I had been doing mini bulk cooking sessions for years.  An actual OAMC session can be quite over whelming. It is hectic with the extensive shopping, prep work, cooking and packaging for freezing.  My modified method fills the freezer without using an extensive cooking session.  The day following picking up our bulk meat purchase I did a mini bulk cooking session.

taco salad
We had been out of ground beef for about five weeks before I picked up our bulk beef purchase.  Oh sure, I could have ground up one of the roasts but I didn't.  The thing is we really really were missing our ground beef.

I took 4 lbs of ground beef from the freezer to do a bit of bulk cooking.  One pound went to make to plain browned ground beef.  My husband loves it just like that on bread.  The second pound went towards taco salad, one of our absolutely favourite summer meals.  The next two pounds were used to make a couple of ground beef casseroles for the weekend.

browning ground beef
The beauty of ground beef is you really can brown up several pounds then divide it down into what you want to use.  Once browned you can add whatever seasonings or sauce you want.  I browned up two pounds of the ground beef.  When the ground beef was browned, I divided it into two portion - on for the base of the hamburg casserole and the other for the base of a cottage pie.  It ended up being a pound of browned ground beef being used for each casserole.  I used about 2 cups of homemade gravy with the browned ground beef to from the base for the cottage pie.  Really, using homemade gravy is best if at all possible.

some of the ingredients for mini bulk cooking session
The other ingredients were fairly simple and while there was a bit of overlap in the ingredients something that is desirable when bulk cooking, there was enough of a difference to delineate the two casseroles.  I like using a lot of fresh ingredients as you can see and while some of the ingredients do overlap for both of the casseroles the end result is two very different casseroles.  The ingredients were those that are on hand in the pantry and freezers.

casseroles ready for the oven
I made a hamburg casserole (left) and a cottage pie (right).  I will say that I very seldom use just a plain potato topping for cottage pie.  I like using unpeeled steamed potatoes with one or more vegetables, cream cheese, sour cream or plain yogurt as the topping for cottage pie.  It adds a bit of rustic texture while adding a lot of flavour.  I always use homemade gravy to form the base of the cottage pie as well.

There was leftover elbow macaroni from the hamburger casserole so I decided to make a small mac and cheese.  I used one of the new KitchenAid ceramic baking dishes.  I seriously love these new baking dishes!  In the end I had one hamburg casserole, one rustic cottage pie, one mac and cheese with leftover cheddar cheese sauce.

homemade mac and cheese
My husband took one look at the casseroles then declared the mac and cheese for dinner.  Doesn't it look scrumptious?  The beauty of doing a mini bulk cooking session, is not only do you have the food in the freezer you have several meals for the rest of the month.

The casseroles I made all would freeze nicely and they were more than enough for easy eating for the weekend without being froze.  The nice thing is I really didn't spend a lot of time putting the casseroles together.  What is important when doing these types of canning sessions is flexibility.  In this case I had extra elbow macaroni so immediately made a tray of mac and cheese but had there been extra of another ingredient I would have used it in some way.


Friday, December 16, 2011

Sweet Potato Casserole

During the Christmas holiday season we manage to attend several events that have buffet style dinners followed by entertainment.  It's interesting to see the various foods offered as they tend to be a bit on the fancier side than normal. The nice thing about buffet foods is most of them are easily made at home and for the most part buffet foods tend to be quite economical.

sweet potato casserole
Sweet potato casserole is an easy to prepare, low cost dish that quite often appears on the buffet table during the holiday season.  It can be used as a side dish or topped with a drizzle of maple syrup, fresh whipped cream and chopped pecans as a dessert.  I personally find sweet potato casserole too sweet to use as a side dish.  If you love pumpkin pie but are eating gluten free or are avoiding the crust of pumpkin pie, then sweet potato casserole is a lovely substitute.

Sweet Potato Casserole
recipe by:  Garden Gnome

3 large sweet potatoes
2 large eggs
3 tbsp soft butter
2 tbsp packed dark brown sugar
1 tsp sea salt
½ c milk
½ tsp ground cinnamon
½ tsp ground ginger
1/8 tsp ground nutmeg
1/8 tsp fresh ground pepper
¼ c coarsely chopped pecans (optional)

Scurb the sweet potatoes.  Pierce each potato with a fork the bake at 400° until tender.  Set aside to cool.  Scoop the sweet potato flesh from the skins.  Place in medium bowl and mash until smooth.  Slightly beat the eggs in a separate bowl.  Mix eggs, milk, butter, brown sugar, and seasoning into the sweet potatoes.  Mix until smooth.  Pour the mixture into 8 x 8 - inch a non-stick baking pan.  Sprinkle the top with pecans if desired.  Bake for 30 to 40 minutes until casserole is a bit puffy.  Serve casserole hot.


Tuesday, November 01, 2011

A Mini Bulk Cooking Session

My husband is gearing up for his annual trip to hunt camp.  Although he doesn't hunt himself, enjoys helping to organize and cook the food for the camp.  It has become tradition for me to make a batch of chili, a tray of lasagna and a piece of peameal bacon for the guys to enjoy at hunt camp.  I decided to do a mini bulk cooking session on Sunday since both the chili and lasagna are cooked from scratch then frozen to keep well during the long drive to where the hunt camp is.

my largest stock pot with moose meat chili
Traditionally some of the previous year's catch is taken to the current year's hunt camp but they guys were unsuccessful last year.  One of our friends is a avid hunter who seldom eats any domestic meat. He brought in a very generous amount of ground  moose meat for a chili.  I like working with moose meat.  It is leaner than beef, with a deeper colour and richer flavour but lacking the gameness of venison. 

I used my largest stock pot (10" high, 11" diameter) to make a nice sized batch of moose meat chili.  As with venison, I added a little ground pork to the meat mixture.  All of my chilies take a bit of pre-planning as the dried beans need to soak overnight.  This is one time that while the quick soak method could be used, the time is needed for the long, slow simmer of the chili.  I really need to do up few cases of home canned beans!

trays of moose meat chili
Once the moose meat chili was finished, I removed it from the heat then allowed to cool on the deck before moving the pot to the refrigerator for the night.  We've had frost a few mornings so the air is quite chilly in the evening making the deck a perfect cooling spot.

The next day I ladled the moose meat chili into containers for freezing.  The two larger containers are 12¾" x 10¾" x 2½".  Each tray is enough for 10 to 12 servings of chili.  One will be used for hunt camp while the other will be used one of our larger events this winter.  The two smaller rectangular containers hold 9½ cups.  Each container is enough for 6 good sized servings.  One went into the freezer for ourselves while the other went to one of our kids who was elated to get homemade moose meat chili.  The smaller bowl was put into the refrigerator for my husband's lunch.

trays of lasagne ready for the freezer
Before I start talking about the lasagne, check out one of our new outlets.  My husband and I spent almost the entire day on Saturday replacing electrical receptacles and switches on the main level.  It was a chore and we still have part of the master bedroom and guest room to do.  The ones on the back splash are a bit fancier with larger than standard cover plates and the outlets have a safety feature to prevent foreign objects from being inserted.  The three kitchen outlets on the back splash are split receptacles so I can run more than one small appliance at a time without worrying about blowing a fuse!

My lasagne starts with homemade spaghetti with meat sauce made from scratch using fresh tomatoes (in season) or home canned tomatoes.  Once the sauce is put together with everything but the seasonings and secret ingredients, the cooking begins.  When the sauce gets to the right point I stir in the the remaining ingredients and continue with a low, slow simmer tweaking the flavour as the sauce cooks.  Nothing is measured!  After the sauce is cooled it is ready to make the lasagne.

My record number of lasagne made during one bulk cooking session is 19.  Yes, that is 19!  This was a rather tame session making two large trays and one small tray with the remaining sauce left plain for a later meal of spaghetti with meat sauce.  I used a blend of 8 cheeses in this lasagne with the remaining cheese divided into two zipper freezer bags.  One lasagne and bag of cheese will go to hunt camp.  The cheese is destined for ranch sticks there [I'll post about those later this week.]  The other large tray and sauce went into the freezer, the remaining cheese into the refrigerator and I baked the smaller lasagna for dinner.

smallest tray of lasagna freshly baked
Lasgne (plural) when made from scratch is rather labour intensive but it freezes nicely which is why anytime I make lasagna (singular), I make more than one tray.  I use my homemade meat sauce, cheese blend and regular lasagna noodles made with 100% duram semolina flour.  I don't care for the no-cook lasagna noodles at all.  The bottom layer is always meat sauce followed by cheese and the first layer of noodles.  That noodle layer is topped lightly with the cheese blend, cottage cheese and spinach, then the rest of the layers follow as sauce, cheese, noodles, sauce and ending with a cheese layer.  There are usually 2 noodle layers in the shallow trays (pictured) and 3 or 4 noodle layers in the deeper trays.  I bake at 350ºF with the top tented with tin foil removing the foil for the last 15 minutes of baking.  I increase the baking time if baking from frozen as there's no need to thaw first.


Wednesday, April 27, 2011

Ham and Mushroom Casserole

Ham is a rather frugal meat in that it is mainly all meat.  Even a bone in ham is cost effective as the meat can be cut from the bone then the bone used to make a ham based soup with the meat used for another dish.  That is what I did with the leftover ham from our Easter dinner.

ham and mushroom casserole
Quite often my casserole start off the same way as my soups, based on one ingredient as the inspiration.  I had a fair amount of leftover ham so ham was the inspirational ingredient in the casserole I created.  I wanted a creamy end result so turned to my favourite ingredient, condensed cream of mushroom soup.  The other ingredients just came together.  The end result was a rich, sinfully creamy casserole that got two thumbs up from my husband.

I served the casserole with quick biscuits.  These are a long time stand-by when I don't have fresh made bread.  I actually started making the quick biscuits as a newlywed.  They can be made using a homemade baking mix, regular Bisquick or Bisquick Heart Smart™ baking mix.  I discovered the Bisquick Heart Smart™ baking mix during our first trip to the vacation home.  Unlike our permanent residence where homemade mixes are the norm, it is more cost effect to use small package commercial mixes that can be used up while we are there.  We rent our vacation home out when we aren't there so can't store a lot of food.  Logistically we can only bring food home with us if we drive as we are too restricted when flying.   
These biscuits are ever so easy to make!  I mix about 2 cups of the baking mix with enough milk to form a moderately stiff dough that can be dropped by the spoonful onto a greased baking sheet.  I drop by the desert spoon (3 tbsp) spread about 2 inches apart.  I bake at 375ºF until golden brown.  Sometimes I stir in shredded cheese which is always a hit. 

Ham and Mushroom Casserole
by:  Garden Gnome

2 c cooked ham, diced
1 c frozen sweet peas
1½ c sautéed sliced mushrooms
1 tbsp olive oil
1 tbsp butter
2 cans condensed cream of mushroom soup
¾ can milk
½ tsp Old Bay Seasoning
1 tsp prepared mustard
2 c shredded cheddar cheese
4 c cooked elbow macaroni

Heat oil and butter in frypan.  Sauté the mushrooms in the oil and butter until golden brown.  Remove from heat and drain.  Cook macaroni in salted, boiling water until al dente.  Drain.  Measure out 4 c into large mixing bowl.  Add remain ingredients.  Stir well to mix.  Pour into 2 qt baking dish.  Cover with tin foil.  Bake at 275ºF until warmed through and cheese starts to bubble.  Remove tin foil.  Increase temperature to 350ºF and bake until just turning golden brown on top.


Friday, March 04, 2011

Roasted Chicken Casserole

Last month we were able to take advantage of whole chickens on sale.  Whole chickens have been on the high priced side in recent years.  I was quite happy to cook three whole chickens while putting the other three in the freezer.  I'm looking forward to rotisserie chicken on the outdoor grill!

roasted chicken casserole
Creamed turkey is traditionally a leftover meal when I roast a turkey.  I decided to make a similar dish from the leftover roasted chicken.  We ate half of the roasted chicken the first night.  The next day I de-boned the other half freezing the bones for the next stock making day. 

This is a no measure casserole in that I just add what amounts look right and fit the size of the casserole dish.  This casserole had roasted chicken, home canned mushrooms, niblet corn, condensed mushroom soup, milk and garlic pepper.  We had about half of the small casserole for dinner with enough leftovers for two lunches the following day.  


Friday, February 18, 2011

Superbowl Party Foods

We host a Superbowl Party each year and this year was no exception.  Unfortunately this time of year the weather can be a bit unpredictable so while we were expecting about thirty we ended up with about half that.  It really was a rather nasty day and evening with a fair amount of snow and drifting.  The party usually starts about 11:30 AM and runs into the wee hours of the morning depending on weather conditions.  It is not uncommon to have a few overnight guests as well.  This means I have to plan for afternoon and evening snacking as well as dinner.  The offerings included: pigs in a blanket, sausage rolls, nachos with salsa and cheese, chili with toppings and dinner rolls, mac & cheese (my husband's insistence), vegetable tray with sesame garlic dip, potato chips, pretzels and peanuts.   I had decided on what I was serving earlier that week so it didn't take much to pull things together.   One of our guests brought meatballs and venison sausage.  There was a lot of food and I had back-ups to bring out if necessary.

superbowl chili
I made the chili the day before the party.  Now this is my famous from scratch chili and I do mean from scratch.   I use home canned tomatoes, home canned tomato sauce and home canned kidney and black beans.  Sometimes I use the beans from dry after being soaked overnight.  It is a long, slow cook chili that takes several hours then is always left overnight to allow the flavours to develop. 

We were expecting about thirty.  I found that my largest stock pot was taking a bit too much attention while the chili slowly simmered.  We devised plan B by pouring the chili into two roasting pans and letting them reduced enough so that the chili would fit in the largest roasting pan.  This roaster will easily hold a 24 lb turkey.  As you can see it was quite full!  I put some of the chili into the slow cooker to warm the next day

my husband's superbowl mac and cheese
During our recent trip to our vacation house we enjoyed a multitude of some of the best BBQ ever.  My husband loves anything with cheese!  One of his favourite sides during our BBQ adventures was a mac & cheese with a smokey flavour.  He set about duplicating the dish.  I will tell you his recipe is not for the faint of heart but it was ever so tasty!  He made a large batch that went in a flash with only about a cup left over that I scooped out for his lunch the next day.

Superbowl Smokey Mac & Cheese
source:  Mr. Garden Gnome aka my dear husband

1 - 900 g package elbow macaroni
1½ c mozzarella cheese
¾ large spanish onion, chopped
1 lb Velveeta cheese
1 lb Monterray jack/cheddar cheese mix
½ lb cheddar cheese
¼ lb butter
3 tbsp cottage cheese
4 tbsp sour cream
3-4 drops liquid smoke

Shred cheeses.  Finely chop onion.  Cook and drain elbow macaroni according to instructions on package.   Pour hot macaroni into roasting pan.  Stir in remaining cheeses and liquid smoke.  Stir well to mix.  Let cool and refrigerate until the next day.  Place the roasting pan in the oven at 250ºF about a 1½ hrs before serving.  Heat through until golden brown on top and cheese is melted.

Serves 20 - 25


Tuesday, August 03, 2010

Country Breakfast Casserole

My husband and I were shopping recently which is a rather rare event because I am not a shopper at least in the convention way.  While going through the check-out I notice a Taste of Home booklet of Bacon Recipe cards.  Now here's the thing...bacon is a food group all by itself!  I briefly debated then decided to buy the booklet.  It was $4.99 but each recipe is on a card so if I used recipe cards that would be useful.   What I was really interested in were new ideas to use one of my favourite foods.

country breakfast casserole
The kids, parents to oldest and youngest grandbabies were home on the weekend so I decided to try the country brunch skillet recipe in the booklet but quickly realized I'd have to do a bit of modifying since I needed to feed 8 rather than 6.  My 20 - inch skillet wasn't quite big enough so I decided to change the cooking method to the oven.  The resulting casserole started with the original recipe but ended up quite different.  It did go over well so this breakfast casserole goes into my file of family favourites.

Country Breakfast Casserole

6 bacon strips
1 750 g (1.6 lb) bag cubed frozen hash brown potatoes
1 c broccoli, chopped
1 small onion, chopped
8 eggs
¾ c  shredded colby cheese
2 tbsp butter
salt
pepper

Cut bacon across strips, fry, drain and reserve.  Melt the butter then pour into casserole pan. Mix vegetables together and pour into the casserole pan.  Sprinkle lightly with salt and pepper.  Cover with tin foil and bake at 175ºC (350ºC) for 15 minutes.  Remove casserole dish from oven.  Make 8 wells in the vegetable mixture.  Crack an egg into each well.  Cover and return to oven for 8 - 10 minutes or until eggs are completely set.  Sprinkle with bacon pieces and cheese.  Bake for 5 minutes or until cheese is melted. 

Serves 8


Friday, July 30, 2010

Cheese & Mushroom Stuffed Meatloaf

During the summer months we are used to hot and humid weather.  However the weather has been rather unpredictable this year.  A couple of days ago the weather turned cool so I took advantage of that to make meatloaf.  Meatloaf in the summer is great hot on cooler nights but slices nicely for sandwiches the next day.  It also freezes nicely for later use for sandwiches or wraps. 

cheese and mushroom stuffed meatlaof
I seldom use an actual loaf pan for meatloaf.  I hand forming into a baking pan which results in oblong cuts or I use a deeper (about 8" x 9" x 4")  but smaller baking pan.  I made a basic meatloaf base consisting of lean ground beef, mustard, eggs, ketchup, seasonings and bread crumbs.  Then I pressed ¾of the mixture into the pan pushing up the sides to form a type of shell.  Once the shell was formed I filled with raw spinach, sautéed onions and bacon pieces, and provolone cheese.  When the well was stuffed I topped with the remaining ¼ of the meat mixture forming a top.  I baked the meatloaf at 180ºC (350ºF) for about 45 minutes.

Meatloaf stuffed with cheese oozes its rich, yummy goodness so I've never had it cut neatly.  We cut meatloaf cooked in the wider baking dishes into squares rather slices.  This makes for a nice substantial piece of meatloaf easily topped with sauce and big enough to appreciate the stuffing.  I served the meatloaf with oven baked russet potatoes and sautéed, garden fresh zucchini with spanish onions in butter.  The zucchini was picked from the garden moments before doing the sautée!  This is the way I like to have fresh vegetables when the garden is producing.  This is very much a summertime comfort meal on the cooler days.


Wednesday, June 30, 2010

Porcupine Balls

Casseroles flexible dishes requiring less preparation needed making them the ideal dish for the busy home cook.    Most casserole recipes do not have to be followed exactly.  Slight changes in the amount of the main ingredients will have little effect on the finished casserole.  An appealing aspect of casseroles is they only take a few minutes to put together.  While they are baking your time is freed up to do other things.    Adding to the convenience of casseroles is most of them can be frozen for later use.  I often make two casseroles at a time, popping one into the oven for that night's dinner and the other into the freezer for another night. They are a good way to use up those little bits of leftovers and casserole leftovers reheat well too.

porcupine balls prep
When it comes to casseroles ground beef reigns supreme.  Ground beef is an economical meat choice that lends its well to the use of extenders.  Ground beef can also be shaped into meatballs, patties and loaves adding to the versatility of this inexpensive meat.  For best results, grind lean beef at home or have it ground for you as part of your beef on the hoof or bulk beef purchase.  It is possible to substitute ground pork, turkey, chicken or venison for ground beef in most casserole recipes.

Porcupine balls are tasty meatballs that get their name from the cooked rice sticking out from the surface.  Grated carrot or zucchini can be added to the meat mixture if desired.  They can be baked, cooked in a crockpot or covered frypan.  Once cooked they do freeze well for later use. 

Porcupine Balls

1 lb lean ground beef
½ c uncooked long grain rice
1 small onion, finely chopped
1 egg, lightly beaten
¼ tsp garlic powder
¼ tsp sea salt
¼ tsp pepper
¾ tsp Italian seasoning
2 c (500 ml) jar home canned tomato soup*

Finely chop the onion.  Mix all ingredients except the soup together.  Form the meat mixture into walnut sized meatballs either by hand or using a meatball former.  Place meatballs in a single layer in a baking pan.  Pour the tomato soup over the meatballs.  Cover and bake at 180ºC (350ºF) for 45 minutes.  Remove cover.  Bake an additional 15 minutes.
Yield: 24 meatballs

* If using commercially canned 10 oz soup add ¾ c of water to the soup before pouring over the meatballs.

porcupine balls
The meal pictured consisted of the porcupine balls, baked potatoes and home canned wax beans.  I put two large potatoes in the oven to bake along with the porcupine balls.  This meal would definitely fit into the comfort meal category because it just has that wonderful taste of homemade.  The meatballs are a sure kid pleaser!

My husband said the meatballs tasted a lot like the filling in cabbage rolls and they did.  I found the meatballs a little on the bland side so will be increasing the seasonings the next time I make them.  I will also use home canned roasted tomato soup for a flavour boost.


Friday, March 26, 2010

Layered Venison Casserole

Casseroles are one of those dishes that can be tweaked to your heart's content and they are still comfort meals. I think for me the only thing that remains consisent when I make a casserole is using a casserole baking dish. Like many of the dishes I make casseroles simply start with an idea rather than a recipe in mind. Sometimes the casserole is based on a meat that I want to use and other times it will be a vegetable that I want to build around. Casseroles are also a great way to use up a few left-overs. My experience has been that casseroles reheat nicely as well. That versatility is what makes casseroles the frugal home cook's friend.

layered venison casserole ready for ovenReady for Oven

Venison is a extra lean red, game meat that can be used in place of beef. It has a bit stronger, gamey flavour than beef and because it is so lean it should be served hot and paired with pork for a better mouth feel. Venison works nicely for any casserole that calls for ground beef. A couple of nights ago I made a layered venison casserole that came out nicely. It had a lot of flavour!

Layered Venison Casserole
recipe by Garden Gnome

1 lb ground venison
1 lb pork sausage without casing
¼ c bacon fat
1 c marinara sauce
2 lg potatoes
1 c frozen peas
1 c frozen niblet corn
¾ c milk
2 c (500 ml) jar home canned cream style corn
2 c (500 ml) jar home canned tomato soup
2 c shredded cheddar cheese

Microwave potatoes until just tender. Slice then set aside to cool. Melt bacon fat on medium high. Brown venison and sausage. Remove from heat and drain well. Pour browned meat into casserole dish spreading evenly. Pour marinara sauce over the meat. Place potato slices on top then sprinkle on corn and peas. Pour cream style corn then tomato soup over the layers. Pour over the milk over the layers. Place the shredded cheese over top, spreading evenly. Tent with tin foil. Bake at 350ºF until bubbly. Remove tin foil tent and continue baking for 15 minutes to allow cheese to brown slightly.

Layered Venison Casserole

Pictured is the layered venison casserole as served. Very few of my casserole will cut neatly into squares or wedges but that's fine. When it comes to casseroles it is all about the flavour but I like using colours that will give great contrast in the finished casserole. I especially like going for a rich, creamy background texture as well. I just love the gorgeous bright colours! I served the casserole with sourdough bread and a simple side salad for a complete meal. As meals go this was not a fancy meal but rather a comfort meal, rich and flavourful. We really enjoyed this casserole!


Wednesday, February 10, 2010

Turkey and Mushroom Pie

Quite often the starts of a casserole is inspired by an ingredient that catches my eye when I'm in the pantry. One of my purchases in my recent foodie finds was Nishiki rice. This is a new medium grain rice variety that is ideal for sushi. As things sometimes happens with foodies, I was pouring the rice into a mason jar for vacuum sealing when a strong craving for sticky rice came over me. I was off on another tangent. I set up the rice maker to make 3 cups then waited patiently for my sticky rice. When the rice was cooked I scooped out a cup, added a pat of butter and just a dash of salt. While I was eating my delicious little snack I got a what if moment for using up the rest of the sticky rice. Here's what I came up with.

turkey and mushroom pieTurkey and Mushroom Pie

Sticky rice is called sticky because the higher starch content causes it to stick together, a rather desirable trait when making sushi. Based on that same principle I reasoned that sticky rice could be shaped into a crust then filled. I decided to use left-over turkey from the freezer in keeping with using something from the freezer daily. The end result was a lovely, casserole type dish that had a lot of flavour!

Turkey and Mushroom Pie
recipe by: Garden Gnome

2 c cooked sushi rice
3 tbsp butter
2 c cooked turkey
½ small onion
½ c frozen peas
½ tsp garlic/onion seasoning
½ tsp Old Bay Seasoning
2 cans condensed mushroom soup
⅓ c milk
1 c sliced sautéed mushrooms

Cook the sushi rice. Mix 2 tbsp of the butter with the rice while still warm then press into glass pie plate. Set aside. Chop the onion then caramelize in the remaining butter. Remove from heat and drain. Sautée mushroom slices in a little butter. Remove from heat and set aside. Cut turkey into bite sized pieces. Pour turkey pieces into mixing bowl then stir in onions, seasonings, soup and milk. Stir in peas last. Pour the filling into the prepared rice shell. Top with sautéed mushrooms. Bake at 180ºC/350ºC until centre is hot. Remove from oven. Serve.

Bon Appétit!