My photo
Ontario, Canada
I am a wife, mother and grandma who enjoys the many aspects of homemaking. A variety of interests and hobbies combined with travel keep me active. They reflect the importance of family, friends, home and good food.
Cook ingredients that you are used to cooking by other techniques, such as fish, chicken, or hamburgers. In other words be comfortable with the ingredients you are using.
--Bobby Flay

For Your Information

Please watch this area for important information like updates, food recalls, polls, contests, coupons, and freebies.
  • [March 19, 2020] - Effective Mar 17, this blog will no longer accept advertising. The reason is very simple. If I like a product, I will promote it without compensation. If I don't like a product, I will have no problem saying so.
  • [March 17, 2020] - A return to blogging! Stay tuned for new tips, resources and all things food related.
  • [February 1, 2016] - An interesting report on why you should always choose organic tea verses non-organic: Toxic Tea (pdf format)
  • Sticky Post - Warning: 4ever Recap reusable canning lids. The reports are growing daily of these lids losing their seal during storage. Some have lost their entire season's worth of canning to these seal failures! [Update: 4ever Recap appears to be out of business.]

Popular Posts

Showing posts with label quick breads. Show all posts

Saturday, March 22, 2014

Black Bean Beer Bread

As a foodie, I love checking out the many little gift shops we come across in our travels.  Many of them offer locally baked goodies and locally produced foods.  Quite often I will buy something to bring home.  I am not a huge fan of boxed mixes simply because they tend to be overpriced and laden with food additives.   I have two rules when buying boxed mixes or any food at these types of gift shops.  First, it must be locally made.  This is a way of discovering and enjoying foods from that particular region.  Second, it has to be natural or very close to it.  That means no food additives or ingredients like HFCS.  I also consider the trip itself because given our plans it is not always possible to buy something fresh at the start of our trip and get it home safely four or five days later. 

black bean beer bread
I bought a box of Creekside Grains (Traverse City, Michigan) Black Bean Beer Bread when we were visiting the area.  Creekside Grains uses all natural ingredients without the addition of artificial food additives with the exception of a couple of ingredients (chocolate chips, mint chips, root beer and black cherry walnut extracts) used in a very small number of their products.  Essentially, they are using the very same flours and other ingredients that I would be using at home cooking from scratch.  The combination of black bean and beer sounded interesting.  I decided to make the bread for our special dinner last Wednesday. 

The instructions were simple.  Add 12 oz of your favourite beer, mix then place the dough in a mound in the centre of a cookie sheet lined with parchment paper and bake.  My first instincts that the resulting bread would be more like a brick but it wasn't.  The ingredients were unbleached unbromated wheat and malted barley flour, black bean flour, sugar, multi spice blend, baking powder, corn starch and salt putting this bread in the quick bread category.  I used de-alcoholized beer rather than regular beer.  The rustic loaf of bread was quite tasty.  The rise was good with small pores and a crumbly texture. I served the bread with lightly seasoned extra virgin olive oil for dipping.

Surprisingly there was no nutritional value label for this bread on the box, however as explained on their website this is due to an FDA technicality not because they don't want to put it on.  I would make an educated guess that it came in at about 100 calories per 50 g serving, a half slice about a half inch thick cut across the loaf.  There was nothing in the list of ingredients that would drive the calories higher than that.  Regular white bread is about 190 calories per 75 g serving (2 slices).  This bread is quite dense so has a higher satiety level.  I liked this bread so I'm working on a homemade clone version!


Tuesday, March 18, 2014

Banana Peanut Butter Muffins

Muffins are one of my favourite baked goodies.  They can be sweet or savoury and with a bit of attention to the ingredients used, fairly healthy.  Homemade muffins can be made super sized just like those sold at the doughnut shops but I prefer to make regular sized or mini muffins.  Regular sized muffins are the perfect grab and go, quick meal or snack.

banana peanut butter muffins
Muffins can easily be made into healthier versions by substituting original ingredients with healthier alternatives.  It is easy to boost the protein content by using alternative flours or adding additional ingredients like protein powder. Quick cooking oats is another good addition because it has 5 g protein per half cup while being low in calories.

I made a tasty, gluten-free banana peanut butter muffin that came in at almost half the caloric value of some protein bars yet with a nice protein content of 8 g.  That makes these muffins a win:win that I'm sure out friend who is gluten intolerant will enjoy.  I added Vega sport performance protein powder made from protein.  It is only 130 calories per 33 g scoop with 25 g protein.  You can use any protein powder you want but it will change the nutritional value of the muffins.

Banana Peanut Butter Muffins
recipe by:  Garden Gnome

¾ c mashed banana
¾ c egg white
 ½ c vanilla Greek yogurt, 0% MF
2 scoops Vega sport performance protein powder, vanilla
¾ c quick cooking oats
¼ c Truvia baking blend
1 tsp baking powder
1 tsp baking soda
1 tbsp PB2 powdered peanut butter

Place the oats in food processor bowl.  Pulse until the consistency of flour.  Add the remaining dry ingredients.  Pulse until well blended.  Transfer to mixing bowl.  In a separate bowl, mix together the banana, egg white and yogurt.  Pour the wet mixture into the dry ingredients.  Stir to mix.  Spoon the batter into lightly greased silicone muffin tins.  Bake at 350°F until muffins are golden brown and test clean when poked with a toothpick.

Yield: 12

Nutritional value per muffin:  83 calories, 13 g carbohydrates, 1 g fat, 8 g protein, 186 mg salt, 1 g fibre


Wednesday, April 27, 2011

Ham and Mushroom Casserole

Ham is a rather frugal meat in that it is mainly all meat.  Even a bone in ham is cost effective as the meat can be cut from the bone then the bone used to make a ham based soup with the meat used for another dish.  That is what I did with the leftover ham from our Easter dinner.

ham and mushroom casserole
Quite often my casserole start off the same way as my soups, based on one ingredient as the inspiration.  I had a fair amount of leftover ham so ham was the inspirational ingredient in the casserole I created.  I wanted a creamy end result so turned to my favourite ingredient, condensed cream of mushroom soup.  The other ingredients just came together.  The end result was a rich, sinfully creamy casserole that got two thumbs up from my husband.

I served the casserole with quick biscuits.  These are a long time stand-by when I don't have fresh made bread.  I actually started making the quick biscuits as a newlywed.  They can be made using a homemade baking mix, regular Bisquick or Bisquick Heart Smart™ baking mix.  I discovered the Bisquick Heart Smart™ baking mix during our first trip to the vacation home.  Unlike our permanent residence where homemade mixes are the norm, it is more cost effect to use small package commercial mixes that can be used up while we are there.  We rent our vacation home out when we aren't there so can't store a lot of food.  Logistically we can only bring food home with us if we drive as we are too restricted when flying.   
These biscuits are ever so easy to make!  I mix about 2 cups of the baking mix with enough milk to form a moderately stiff dough that can be dropped by the spoonful onto a greased baking sheet.  I drop by the desert spoon (3 tbsp) spread about 2 inches apart.  I bake at 375ºF until golden brown.  Sometimes I stir in shredded cheese which is always a hit. 

Ham and Mushroom Casserole
by:  Garden Gnome

2 c cooked ham, diced
1 c frozen sweet peas
1½ c sautéed sliced mushrooms
1 tbsp olive oil
1 tbsp butter
2 cans condensed cream of mushroom soup
¾ can milk
½ tsp Old Bay Seasoning
1 tsp prepared mustard
2 c shredded cheddar cheese
4 c cooked elbow macaroni

Heat oil and butter in frypan.  Sauté the mushrooms in the oil and butter until golden brown.  Remove from heat and drain.  Cook macaroni in salted, boiling water until al dente.  Drain.  Measure out 4 c into large mixing bowl.  Add remain ingredients.  Stir well to mix.  Pour into 2 qt baking dish.  Cover with tin foil.  Bake at 275ºF until warmed through and cheese starts to bubble.  Remove tin foil.  Increase temperature to 350ºF and bake until just turning golden brown on top.


Saturday, July 03, 2010

Lemon Loaf

Quick loaves are about as close to making muffins as you can get except they are cooked in a loaf pan then sliced.  The beauty of these loaves is they are quick to make.  Quite often quick loaves use basic pantry staples as well so it is easy to whip up a loaf for any occasion.  Essentially all that is required is mixing the batter, pouring into the loaf pan then baking. Quick loaves can be savory or even rather plain to be used as the bread component for dinner or they can be sweet or semi-sweet to be used as a breakfast, tea or snack bread.

lemon loaf
My husband was going over to one of the guys for a card game.  As is customary for these types of events I made something for him to take.  I made a lemon loaf that I thought would go over well.  The loaf is sweet but not too sweet and the glaze adds a lovely lemony flavour without being too sweet.  Lemon loaf is an excellent breakfast or tea bread not as sweet as a pound cake but lots of refreshing flavour!

Lemon Loaf
modified from: Jean Paré, Company's Coming Muffins & More. 1983. Pp. 60

½c butter
1 c organic sugar
2 eggs
½ c half & half
1½ c unbleached flour
1 tsp baking powder
½ tsp sea salt
1 tbsp lemon zest

glaze
¼ c organic sugar
juice of one lemon


Cream butter, sugar and 1 egg.  Beat in second egg then blend in half & half.  In a separate bowl mix the flour, baking powder, salt and zest.  Stir the dry ingredients into the egg mixture.  Spoon mixture into a greased loaf pan.  Bake at 180ºC (350ºF) for 1 hour or until centre tests done with toothpick.  Combine lemon juice and sugar in small saucepan.  Heat and stir to dissolve sugar.  Remove from oven and evenly pour glaze over loaf.  Cool 10 minutes.  Remove from pan.  Place on serving tray for slicing.


Saturday, February 27, 2010

Cinnamon Coconut Loaf

Quick breads are even easier to make than muffins. They can be used for breakfast, snacking or deserts. In most cases quick bread use few ingredients most of which are basic ingredients in most pantries. The versatility of quick breads make them a must make in any kitchen.

cinnamon coconut loafCinnamon Coconut Loaf

Cinnamon is one of my favourite spices so I'm always looking for new recipes using it. I came across this recipe for a cinnamon coconut loaf that just sounded like it would be really good. The recipe said that there would be a nice swirl pattern when the loaf was cut and while that didn't happen for me, the smell was heavenly. The taste was beyond being heavenly!

Cinnamon Coconut Loaf
modified from: Jean Paré, Muffins & More. Edmonton, Alberta. 1983. Pp. 47

2 eggs
¼c cooking oil
1 c organic sugar
1 c sour cream
1½c unbleached flour
1½tsp baking powder
1 tsp baking soda
¼ tsp sea salt
½ c shredded coconut
¼ c brown sugar, packed
2 tsp cinnamon

Beat eggs in a mixing bowl until frothy. Beat in oil, organic sugar and sour cream. In a separate bowl, mix together flour, baking powder, baking soda and salt. Mix well then mix into wet ingredients. Stir coconut, brown sugar and cinnamon together in a small bowl and set aside. Pour half of the batter into a 9 x 5 x 3 inch loaf pan. Sprinkle ½of the cinnamon mix over the batter. Pour the rest of the batter over top then the rest of the cinnamon mix. Use a knife to cut through the batter to give a swirling, marbled effect. Bake at 180ºC/350ºF for 1 hour or until centre come clean when poked with a toothpick. Remove from oven and let stan 10 minutes. Remove from pan then allow to continue cooling on a wire rack.


Friday, February 27, 2009

A Taste of Summer

I don't know about you but I am more than wintered out! It's been a long, cold winter that started early and just doesn't want to go away. At the start of this week I decided to make a couple of dishes to give us a taste of summer. It was just the little change we needed!

Lunch Goodies

My husband takes a homemade lunch to the office. Sometimes it is left overs but quite often I make him something different. Lunches tend to be garbage free meaning no paper, no wrappings and anything compostable is brought home. I have a few plastic lunch containers used only for cold foods (more on the plastics issue later). Anything that needs reheating is sent on a regular dinner plate or in a covered glass dish. Monday's lunch was chicken caesar salad (1). I assembled the salad in a lunch kit (2) leaving the dressing separate to prevent the romaine lettuce from becoming soggy. This is a hard plastic lunch kit that came with a small container perfect for dressing or sauce and a fork in the outside compartments. This is a perfect container for salads and wraps but nothing that will be reheated. Despite the fact the container is labeled as being microwave safe, it will only be used for foods that do not need heating.

A couple of weeks ago I bought a 24 mini cup Wilton muffin pan. While I have a 12 mini cup muffin pan, it is used mainly for freezing small amounts of things like roasted garlic. I thought the larger Wilton pan would be perfect for making snack and grandbaby sized muffins. Tuesday I made bran muffins using the new pan. Half of them went to the office for my husband's snack. Tuesday night I made a lovely batch of tuna salad, a summer favourite.

Guacomole

When the winter drags on who can resist the beautiful bright colours of fruits and vegetables to brighten the day? I just love the colours of the fruits and vegetables in guacomole almost as much as I like eating guacomole! I make guacomole using ripe avocados, ripe tomato, onion, lemon and lemon. Aren't they just simply gorgeous?

I simply chop half of the tomato and half of the onion fine. They I cut the avocados in half and remove the pits for growing. I scoop the avocado flesh into a small mixing bowl. I cut the lemon and lime in half and squeeze the juice over the avocado and mash to make a smooth, lightly chunked mixture. Then I stir in the chopped onions and tomatoes. That's it. It's nice and simple yet very tasty and always goes over well.

I usually serve guacomole with round corn tortilla chips (if I'm serving as a snack. However, two ways I really enjoy guacomole is using it as a filling for either soft tortilla shells or leaf lettuce. Both are very tasty appetizers sure to please!


Thursday, December 11, 2008

Cooking with Dave - Corn Bread

The theme for Frugal Kitchens 101 this month has been bread. I've heard so many people say they use a mix for making cornbread. If you look at the ingredients there is under 50¢ total in the mix yet you are paying $2 or more! So each time you make cornbread you could be saving at least $1.50. If you want the convenience of a mix, mix all the dry ingredients together and store in a mason jar. Then when you want to make cornbread use your homemade mix and add the wet ingredients. I'm not planning on making cornbread in the next few days so found this video to show you how easy it is to make. I wrote out Dave's cornbread recipe for you. Following his recipe is the recipe I use.


Dave's Cornbread

1 c self rising flour
¼ c sugar
1 c cornmeal
⅓ vegetable oil
1 c milk

Preheat oven to 400ºF. Lightly butter cast iron corn bread baking pans. Heat the pans before filling with batter to prevent sticking. Combine the ingredients. Pour into heated baking pans. Bake at 400ºF for 25 minutes.

Corn Bread
source: Betty Crocker's Cookbook (old copy date missing). Pp. 49 with modifications by me (Garden Gnome)

1 c yellow cornmeal
1 c unbleached flour
2 tbsp organic sugar
4 tsp baking powder
½ tsp sea salt
1 c milk
¼ c shortening
1 egg

Pre-heat oven to 425ºF. Grease 8x8x2 baking pan. Place ingredients in KitchenAid® stand mixer bowl. Mix well. Increase speed to 3 for 1 minute. Pour into prepared pan. Bake 20 to 25 minutes or until golden brown.


Monday, December 08, 2008

Frugal Kitchens 101: Breads (1)


The holiday season is upon us meaning more people are baking so I debated which Frugal Kitchens 101 article to post first. As one reader guess from the poll the topic of breadmaking would be featured at some point. Who can resist the urge to cut a thick slice of piping hot bread just out of the oven? Of the 65 who participated 35% did not make any bread at home and the majority 49% made 1 to 3 loaves of bread weekly. Bread in some form is a fundamental part of many meals and snacks. It is the first choice for lunches eaten at home, taken to work or school and when eating out. One of the most popular ways breads are used is in the form of buns for the American favourite hamburger. The reason bread has been such a staple throughout history and continues to be a staple is because bread is inexpensive to make with a few simple ingredients making breads one of the best budget stretching foods possible.

Despite this making bread at home has for the most part fallen out of favour although breadmachines has brought some of that back over the past decade. It's just too easy to stop at the grocery store and buy a loaf of over priced bread conveniently sliced and stuffed into a plastic bag. If you really want that homemade aroma you can buy the over priced refrigerator rolls or dough in the freezer section or over priced bread machine mix. More discriminate buyers will opt for the often over priced specialty breads. The common theme here is over priced. You are really paying for that convenience while buying products in most cases heavily laden with preservatives.

Breads fall into three categories:

  1. unleavened breads - These are simple breads that do not rise. Examples: flat breads - naan, pita, tortilla, pocket breads
  2. yeast breads - These breads use yeast as a leavening agent. Examples (click links for recipes): sweet breads (cinnamon rolls), pumpernickel, twelve grain, 100% whole wheat, bagels as well as several others in the archives for this blog
  3. quick breads - These are breads that use baking powder or baking soda/buttermilk as leavening agents. Examples: soda breads, pancakes, muffins, zucchini loaf, banana bread, corn bread
Why is making your own bread a good budget stretching strategy? The most expensive ingredient in most breads is flours. All other ingredient (salt, sugar, yeast, oil) costs are so low that they barely more than a couple of cents to the overall cost of the bread. Time to do some math. If we do a cost comparison of my French bread that makes 2 large loaves or 3 large baguettes the store bought equivalent at our prices would cost me $4.47. The cost to make the loaves myself including the electricity for baking 32¢ for the flour, < href="http://momskitchencooking.blogspot.com/2006/11/party-sandwich-canned-carrots.html">basic white bread is more expensive to make because it has an egg (10¢) and milk (5¢) as ingredients that at my costs add an additional 15¢ to the overall cost of that loaf. However, this loaf of bread is far superior to the cheap, sandwich bread in the stores. It is more in line with the more expensive packaged breads or bakery type breads that cost anywhere from $2.49 to $3.29 per loaf so even though this breads cost me under 73¢ to make I am still saving a considerable amount of money. Similar saving can be shown for quick breads and flat breads. In short, there are very few breads that you can buy that cannot be made cheaper at home. If you substitute just one loaf of store bought bread for homemade per week you will be saving money.

People often use the excuse that making bread at home is too difficult or time consuming. For quick breads there is nothing more involved than measuring and mixing the ingredients then baking. Quick, easy and budget stretching! Yeast breads involve a little more prep work but need not be difficult or time consuming. Once the dough has been kneaded, the only time involved is waiting for proofing and baking of which you can be doing something else while you wait. First, the dough can be made:
  1. by hand - This involves manually mixing and kneading the dough. It is the most time time consuming but is cheaper because it eliminates any special equipment or additional electricity.
  2. breadmachine - These little workhorses take the guess work out of breadmaking. Simply dump the ingredients into the baking pan, hit the desired setting and the machine does the rest. However, I highly recommend you watch the dough to ensure it is not too dry or too stick after the knead and adjust the flour or liquid if needed. Many people are using breadmachines on dough setting only then baking in the oven because they don't like the bread baked in the machine.
  3. KitchenAid® stand mixer or similar - A stand mixer gives you the greatest degree of control without the time involved by hand. It allows you to increase or decrease the knead time as desired. It also allows you to make the dough for more than one loaf of bread at a time.
I've discussed the monetary savings so now will give some tips on ways you can save time to make breadmaking an enjoyable experience. Did you know that you can make yeast bread doughs then refrigerate up to 4 days or freeze for later use? Well you can and that can be one of your biggest time savers. Make a batch of yeast bread dough for two to four loaves. Bake one or two then put the rest in the fridge or freezer to use as needed. Do the same thing with pizza dough or any other sweet dough. Allow to come to room temperature then shape as desired then proof and bake. You can even make muffin (one recipe here) and pancake batter ahead of time and keep it in the refrigerator to use later. Now here is the beauty of keeping these kinds of doughs in your refrigerator or freezer. For a fraction of the cost of store bought and with in most cases under 10 minutes prep time you have created a convenient way for you to enjoy homemade bread throughout the week.

*this is a general estimate for basic low cost ingredients (salt, sugar, yeast, oil)


Tuesday, May 13, 2008

Golden Puffs

When our kids were younger, the weekends became the time for hot breakfasts and special treats. One of the treats I used to make quite often were Golden Puffs. I wanted a breakfast type snack to take with us on the first leg of our vacation so turned to this tried and true family favourite.

These light, puffy, golden doughnut-like little treasures are sure to please. Fried to a crispy coating with soft insides then rolled in seasoned sugar, well it just doesn't get much better! They are quick and easy to make but just be sure to make extras as trust me on this one, there won't be any left behind!

Golden Puffs

2c unbleached flour
¼ c organic sugar
2 tsp baking powder
1 tsp salt
1 tsp nutmeg
¼ c vegetable oil
¾ c milk
1 egg

½ c organic sugar
1 tsp cinnamon

Heat oil to 375ºF/190ºC in deep fryer. Mix dry ingredients together except for the last two ingredients. Mix wet ingredients together. Mix the wet ingredients into the dry ingredients on speed 2 of KitchenAid stand mixer. Beat until smooth. Drop bater by teaspoonful* into hot fat. Fry four or five at a time about 3 minutes or until golden brown on both sides. Drain.

Stir together the sugar and cinnamon. Roll the warm puff in this mixture.

Yield: 2 dozen

* too large and the puffs will not cook through


Saturday, October 20, 2007

Pumpkin Pureé & Pumpkin Loaf

Pumpkins are botanically a fruit but are used as a vegetable for culinary purposes. They are a member of the squash family. Did you know that pumpkins are good for your health? They have no cholesterol*, have a very low sodium content and a high water content. pumpkins are high in beta carotene which helps reduce certain types of cancer and reduce the risk of heart disease. At only 80 cal per cup of pumpkin pureé combined with the health benefits, pumpkin is a good food choice. Pumpkin can be served as a vegetable (steamed, boiled, baked) or used to make delectible baked goods.

Pumpkin Loaf

Pumpkin loaf has a rich, aromatic flavour that is sure to please. It is a quick bread with a nice texture perfect for any occasion. The loaf freezes nicely so be sure to make extra. In a previous entry, I gave the method for canning pumpkin chunks. These can be warmed to serve as a vegetable but if you want to make pumpkin pie, you will need to pureé the pumpkin. Fresh pumpkin pureé is easy to make. It freezes nicely so be sure to make a lot.

Pumpkin Pureé

Wash the pumpkin. Remove the top and clean out the seeds. Cut the pumpkin in half then into 1 - inch strips. Peel each strip. Cut strips into 1 - inch pieces. Place the pieces in a large pot and cover with water. Bring to a boil. Boil until the pieces are soft. Remove from heat and drain. Pureé the pumpkin pieces in small batches using a blender on the pureé. Allow to cool. Place into freezer containers in 1 cup and 2 cup amounts. Freeze. To use, thaw and stir then use in your favourite pumpkin recipes.

Pumpkin Loaf

1 c brown sugar
½ c grapeseed oil
1 ⅔ c pureed pumpkin
2 eggs
2 ½ c unbleached flour
3 tsp baking powder
½ tsp salt
½ tsp ginger
½ tsp ground cloves
1 tsp cinnamon

Pre-heat oven to 350ºF. Beat together sugar, oil, pumpkin and eggs. Put dry ingredients in Kitchen Aid mixing bowl and mix on speed 2. Pour in pumpkin mixture and mix on speed 2 until well blended. Spoon the batter into a large greased loaf pan. Bake at 350ºF for 1 hour or until toothpick comes out clean. Cool slightly and remove from pan.

* While pumpkin itself does not contain cholesterol, many pumpkin recipes are high in cholesterol because of their egg content.

Enjoy!

Garden Gnome
©2007


Monday, August 20, 2007

Tomato Season is Starting! Zucchini & Cabbage Casserole with Quick Cheese Buns

This is the time of year I go through the pantry to use up any left-over jars of tomato products from last year's harvest. The tomato harvest is beginning here but the weather has turned cool and blissfully rainy so an improtu casserole embarrassing fresh garden goodies will be wonderful tonight!


I am going to be needing the help of the gnomes and other magical beings to be able to things going for the tomato season. I haven't quite got the flow of the new kitchen and if you recall it is still undergoing renovations. I have a hand cranked food mill but this year I will be using KitchenAid attachments to speed up the sauce making. Still any help from gnomes and other magical beings will be greatly appreciated.

I'm working on my last few jars of roasted tomato sauce products and have been out of whole tomatoes for a month or so

Husked Corn

I did as my mom used to say "make hay while the sun shines" yesterday and froze up three dozen ears of yellow corn. The farmer gave us extra so it was a few more ears than that which is always a welcomed bonus! For those following our new kitchen remodel, no the installers have not arrived for the new coutertop despite several promises. We are toying with going right to ceramic tile as it appears it will be at least another two weeks before they can get out and yes I am rolling my eyes big time! So we might actually end up doing a DIY project instead. We know how to tile so the project itself is not daunting and had we known the installers were going to be this way we could have had the tile installed in time for our party the first week of August. At any rate we have to work with what we have for the moment and harvest season is not going to wait for a more convenient time.

I've made a few entries about freezing corn and my preferred method so search for vegetables or FoodSaver in the archives. I've been adding labels to earlier entries to make searching a bit easier for those interested. I've also been mirroring this blog given the latest nonsense from blogger regarding another one of my blogs. So watch for more information on that shortly.

Zucchini & Cabbage Casserole

I don't have a lot of home canned tomato sauces left to use up before the new season starts. With the weather turning cooler and rainy, tonight was a great opportunity to experiment. I took the flavour for this casserole from a family favourite, cabbage rolls then expanded on it to use up a few more bounties from the garden as well as using last year's preserves. This casserole would freeze well.

Zucchini & Cabbage Casserole

1 1/2 c cooked long grain rice
3 c lean ground beef, browned and drained
1 c blanched corn niblets
1 1/2 c shredded zucchini
1 1/2 c shredded cabbage
1/2 lg Spanish onion, chopped
2 pints home canned roasted tomato/zucchini sauce*
1 c extra sharp cheddar cheese, shredded
1 c medium cheddar cheese, shredded

Prepare rice, ground beef and vegetables. Cut the kernels off of two cobs of corn and blanch for 3 minutes. Drain. Layer the casserole: beef, rice, vegetables. Pour the sauce over top of the casserole with just enough water to clean out the jars. Top with cheeses. Bake at 250ºF for 30 minutes or until warmed through. Increase heat to 350ºF until cheeses bubble. Remove from oven. Cut into squares for serving.

*substitute tomato sauce of your choice but it will change the flavour

Quick Cheese Buns

Quick breads and buns are a nice companion to casseroles. Bisquick or a homemade baking mix should be considered a pantry staple. Adding a few simple ingredients like cheese and seasoning turns plain buns into something special. The only limitation when adding extras to the mix is your imagination. These buns are so quick and easy to make so you will be tempted to make fresh buns often.

Quick Cheese Buns

2 c Bisquick or homemade baking mix
3/4 c sharp cheddar cheese
1 tsp Old Bay seasoning
1 - 1 1/2 c milk

Mix ingredients together adding just enough milk to make a lumpy batter. Spoon onto lightly greased baking sheet. Bake at 350ºF for 10 minutes or until golden brown.


Monday, May 21, 2007

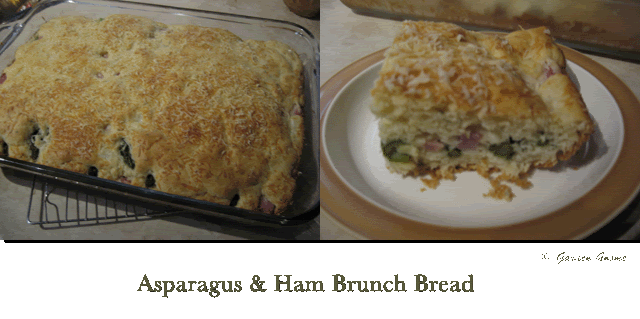
Asparagus & Ham Brunch Bread

Asparagus is one vegetable I haven't experimented a lot with despite the fact we eat a lot of it. So when I saw the recipe for asparagus in the Ontario Foodland Gazette, I just had to try it. Everyone enjoyed this unique quick bread. The results and recipe follow.


Asparagus & Ham Brunch Bread
source: Foodland Ontario Gazette, 2007

3 c biscuit mix
1 tsp dried tarragon
1/2 tsp dry mustard
1/2 tsp white pepper
2 eggs, lightly beaten
1 1/2 c milk
2 lb fresh asparagus
1 c Black Forest ham, diced
1 c onion, diced
1 c fresh grated Parmesan cheese

Mix biscuit mix, tarragon, mustard and pepper in a larg bowl. Combine eggs and milk in another bowl. Pour over the dry mixture and stir until smooth. Spread half of mixture in greased 13' x 9' cake pan. Cut ends from asparagus. Arrange in a single layer over the batter. Sprinkle ham, onion and half the cheese over the asparagus. Top with the rest of the batter. Sprinkle with remaining cheese. Bake at 375ºF for 35 to 40 minutes or until golden brown. Let cool in pan on rack for 20 minues before serving warm or at room temperature.

Notes: The instructions said to divide the asparagus and ham in half then spred on the first layer, top with biscuit mix and top with the second half. I only did one layer of the vegetables and was happy with the results. I think sauteed mushrooms would be a nice addition.


Tuesday, February 06, 2007

Banana Bread & Homemade Chicken Noodle Soup

Comfort food is always appreciated but more so when you aren't feeling well. That usually means a nice homemade bread and homemade soup here.


Banana Bread
This is the banana bread recipe I have been using almost from the time we were wed. It is a nice breakfast, desert or snack bread just perfect for using up a couple of well ripened bananas. While the original recipe calls for white flour, I've made a few modifications. Whole wheat flour gives good results so be sure to read the notes section for this recipe.
Banana Bread
source: unknown but TNT using modifications in notes section after the recipe

1 3/4 c flour
1/4 tsp baking soda
2 tsp baking powder
3/4 tsp salt
1/3 c shortening
2/3 cup sugar
2 eggs
1 c mashed bananas

Combine flour, baking powder, baking soda and salt. Set aside. Cream shortening and sugar. Add eggs, beating after each one. And bananas and blend. Add flour mixture a bit at a time blending after each addition. Pour into a well greased loaf pan and bake at 350ºF (325ºF, convection) for 50 minutes or until toothpick inserted in centre is clean.

My notes: I use whole wheat flour, Member's Mark® Organic Sugar and add 1 tsp of pure vanilla extract.

There is nothing like homemade chicken noodle soup when you are feeling under the weather or suffering from a cold. It is packed full of nutrition and it's soothing warmth will have you feeling fit as a fiddle in no time. My homemade chicken noodle soup is made from scratch and like most of my soups there is no set recipe. The list of ingredients for the most part remains the same as does the method as it it meant to pack in a lot of nutrition. This soup does freeze nicely even with the noodles added. If you want to can this soup do not add the noodles. Essentially this soup is made in two steps. Note, I use a 15 or 20 quart stock pot depending on how much soup I want to make. Once the noodles are cooked, that will leave about two or three inches headspace in the pot.


Homemade Chicken Noodle Soup

While this method looks complicated it really isn't. What you end up with is a wonderful homemade chicken noodle soup that will sooth both the spirit and body. Make enough to last you until you are feeling a better as it will keep a few days in the fridge. For little ones, instead of using broad egg noodles try alphabet noodles. It will be a big hit and make them feel very pampered!


Homemade Chicken Noodle Soup
recipe by Garden Gnome

Stage 1:
2 - 4 chicken legs with backs attached
1 medium unpeeled onion, washed with both ends cut off
2 stalks celery, washed with ends lightly trimmed, cut into 2 inch pieces
1/2 celery heart, washed with end removed (about 4 small stalks with leaves)
2 large carrots, washed, unpeeled, cut into 2 inch pieces
1 parsnip, washed, unpeeled, cut into 2 inch pieces
two pinches coarse sea salt
water to cover

Bring these ingredients to a boil, reduce to simmer and allow to simmer and hour or more. Cool then defatted. Remove the vegetables and meat and place on burner for stock to reheat. Remove the skin from the chicken and cut the meat from the bone. Cut meat into bite size pieces and return to stock. Place the bones and vegetables (optional) into a smaller sauce pan with just enough water to cover and bring to a rolling boil. Strain. Add this liquid to your stock. Repeat if desired or add one quart of homemade stock from your freezer or canning shelf to the chicken stock and meat.

Stage 2:
2 green onions, washed and sliced thinnly (or one medium onion, chopped fine)
fresh ground pepper to taste
a pinch of coarse sea salt to taste
3 - 4 splashes of Maggi (see note!)
1 package broad egg noodles
fresh or frozen chives, chopped

Add all the ingredients tasting stock except the noodles and chives as you go. Adjust any seasoning then bring the stock and meat to a boil and stir in the noodles. I just estimate so some batches will take the full package of noodles while others won't. When noodles are cooked, ladle into soup bowls. Garnish with a dash of Maggi, a bit of fresh grated pepper and a sprinkling of chopped chives.

My Notes: Maggi contains both peanut and corn protein so do not use this if you or anyone in your family is allergic to these products. Instead substitute your favourite soy sauce. I like Kikkoman but other soy sauces will work fine. It might sound like there is a lot of onions in this soup but really their is not. The first onion adds a nice flavour, nutrients and natural colour to the stock. The second addition adds flavour and colour.


Thursday, August 17, 2006

Zucchini Loaf

What do you do when zucchini are in season? Aside of drying, freezing, and grilling zucchini one of my favourite ways to use garden fresh zucchini is in zucchini loaf.

Zucchini Loaf

Zucchini loaf is easy to make and always pleases. Serve piping hot with a little butter for a true taste sensation. We also enjoy this bread with spreadable cream cheese. This is one of my favourite zucchini loaf recipes. It freezes well! I recommend vacuum sealing if possible when freezing. I bake the loaf in a silicone loaf pan on convection heat set to 325°F.

ZUCCHINI LOAF

A large, tender loaf.

2 Eggs
1/2 c Cooking oil
1 c Granulated sugar
1 c Grated zucchini, unpeeled
1 tsp Vanilla

2 cAll purpose flour
1 tsp Baking powder
1tsp Baking soda
1/2 tsp Salt
1 tsp Cinnamon

Beat eggs until frothy. Beat in oil and sugar. Add zucchini. Stir in vanilla. In separate bowl put remaining five dry ingredients. Stir well and pour i.nto zucchini mixture. Stir to moisten. Pour into greased loaf pan 9 x 5 x 3 inch (23 x 12 x 7 cm). Bake for 50-60 minutes in 350°F (180°C) oven until a toothpick inserted in the center comes out clean. Let stand 10 minutes. Remove from pan. Cool on rack. Wrap. Yield: 1 loaf.

Source: Jean Pare, Company's Coming, Muffins & More, 1983. Pp. 76-77