My photo
Ontario, Canada
I am a wife, mother and grandma who enjoys the many aspects of homemaking. A variety of interests and hobbies combined with travel keep me active. They reflect the importance of family, friends, home and good food.
Cook ingredients that you are used to cooking by other techniques, such as fish, chicken, or hamburgers. In other words be comfortable with the ingredients you are using.
--Bobby Flay

For Your Information

Please watch this area for important information like updates, food recalls, polls, contests, coupons, and freebies.
  • [March 19, 2020] - Effective Mar 17, this blog will no longer accept advertising. The reason is very simple. If I like a product, I will promote it without compensation. If I don't like a product, I will have no problem saying so.
  • [March 17, 2020] - A return to blogging! Stay tuned for new tips, resources and all things food related.
  • [February 1, 2016] - An interesting report on why you should always choose organic tea verses non-organic: Toxic Tea (pdf format)
  • Sticky Post - Warning: 4ever Recap reusable canning lids. The reports are growing daily of these lids losing their seal during storage. Some have lost their entire season's worth of canning to these seal failures! [Update: 4ever Recap appears to be out of business.]

Popular Posts

Showing posts with label desserts. Show all posts

Monday, January 20, 2014

Easy Fruit Tarts

My husband and I left our vacation home in Florida on December 22, 2013 to make the long drive home just in time for Christmas.  In all honesty, we would have stayed longer but had already made plans for our family Christmas gathering on December 26, we had our monthly games night on the 28th and my husband had tickets to go to the Winter Classic on January 1.  We arrived home just after dinner on the 23rd leaving us the 24th to tidy up Christmas shopping and get the house ready for the 26th.  That meant a lot of prep in a rather short amount of time and only one day to pick up any extras needed, no easy feat after spending two long days on the road.

filling the tart shells
Mincemeat tarts are a family tradition for the holidays.  Normally, they are readily available in the grocery stores but this year, there were none to be found!  We finally found one of the few remaining jars of mincemeat to make mincemeat tarts at home.  Mincemeat is one of the few products I haven't home canned yet but intend to this year. 

I used a package of No Name tart shells (30 shells).  This is one convenience food I keep in the freezer on a regular basis because with very little effort I can easily have a quick dessert or savory dish.  All I need is a little filling!   I also use a jar of home canned low sugar strawberry jam in addition to the the mincemeat. 

cutting out the decorative pastry topping
Fruit tarts are typically topped with some type of crust before baking or whipped cream after baking.  Store bought mincemeat tarts are usually topped with a small circle of crust. I'm not sure why a circle is used but have noticed even the bakeries use a circle of dough for mincemeat tarts.  A dough topper is fairly easy to do with the pre-made tart shells.  I used six of the tart shells to make the toppers by lightly flattening them and cutting with mini cookie cutters. The scrap dough sticks together to maximize the number of the small bits of dough for topping.    I used a flower shape for the mincemeat tarts and a duck shape for the strawberry tarts.  The different shapes for the dough topping are practical.  They make it very easy for the little ones to tell the difference.

prepared tarts ready for baking
I put about 2 tablespoons of filling in each tart shell then topped with the appropriate dough topper.  There was no need to flatten the filling or distribute evenly as it would even out from the baking.  I placed the shells on a Silpat lined baking sheet.  In the event of any filling spilling over, this would make for easy clean-up.  Normally, the filling doesn't spill over with proper filling so the prepared tart shells can be placed close together on the baking pan.  I baked the prepared tarts at 375°F until the filling was bubbling and the crust golden brown.
baked tarts cooling
Once the tarts were baked, I removed them from the oven to cool on cooling racks.  After cooling, I placed the tarts in a covered serving dish and set them on the table along with the plate of oranges and bowl of nuts.  These are must haves for our Christmas celebrations.  The oranges and nuts are a long family tradition I brought to our family from my childhood days.  My Mom always had oranges and nuts on the coffee tables during the holiday season.  She had lived through the Great Depression so viewed both as symbols of being affluent enough to afford such luxuries.  The mincemeat tarts are from my husband's family holiday traditions, always appearing during the holiday season.

Our grandkids are very much foodies!  Our third little one (age 4) climbed up to the table for a tart.  Instead of taking a strawberry tart, he took a mincemeat one like Papa.  The kids just chuckled because his Mom did not inherit Papa's love of mincemeat tarts.  The little one ate that tart then a few minutes later he was walking around with another one.  So the taste buds skipped a generation! Oh and he can roll his tongue like Papa too :)


Wednesday, January 16, 2013

Homemade Verses Store Bought Plain Waffles

There are a multitude of small kitchen appliances available, many of which can save you a substantial amount of money over their lifetime.  Some are a more frugal choice than others and as always it depends on your needs.  For example, if you are buying store bought frozen waffles to have on hand for quick hot breakfasts, then consider a waffle maker.  They start at under $20 on sale ranging into the high end of about $150.  Consider too that waffles aren't just for breakfast any more.  You can make some rather tasty desserts using waffles and savory waffles can be used in the place of biscuits for dinner. The payback period on a waffle maker is about 6 months to a year depending on how you use it.

the new Cuisinart Belgian waffle maker in action
One of our kids very generously gifted us with a Cuisinart 4-Slice Belgian Waffle Maker (WAF-100C).  This maker produces waffles with deep pockets to hold more toppings.  There are five settings for browning control as well as ready-to-bake and ready-to-eat lights with audible signals.  The plates are non-stick so only need washing then a light oiling before use.

Another of our kids who has had a waffle maker for a few years showed me how to use the waffle maker while giving me a few tips.  The grandkids and adults enjoyed fresh made waffles for breakfast that morning.

The following week I decided to do a test run myself.  I had two goals in mind.  The first goal was learning how to use the waffle maker and find the sweet spot for perfect browning.  The second goal was to do a comparison of the price of store bought frozen waffles, to those made with a store bought mix, then finally to waffles made with homemade batter.

waffles just cooked in the waffle maker
I had just enough Krusteaz pancake and waffle mix to make four waffles.  This is a mix that only requires the addition of water that the guys like for hunt camp.  I mixed up the batter then poured into the heated waffle maker.

According to the manual, it takes a bit of experimenting to determine the right amount of batter needed.  They suggest two cups of batter poured evenly over the bottom then quickly spread with a heat resistant spatula before closing the lid.  Obviously, I have to work on my technique a bit but as my first attempt, I was rather pleased.

comparing the rise on store bought mix verses homemade
The next batch of waffles was made with the basic waffle recipe that came in the Cuisinart manual.  I did a test batch by halving the recipe to make 8 waffles.  What really impressed me was the higher rise using the homemade batter (right).  Clearly, the homemade batter gave nicer results but the true test was the taste.

The waffles made with the store bought mix were good.  They were fluffy with a nice flavour.  The waffles made with the homemade mix were fluffier with a cleaner flavour (aka no chemical overtones).

Basic Waffles
modified from: Cuisinart Instruction Booklet, WAF-100, Pp. 7

3 c unbleached all-purpose flour
3 tbsp organic granulated sugar
1½ tbsp baking powder
¾ tsp baking soda

¾ tsp sea salt
2½ c milk
½ c plus 1 tbsp vegetable oil
3 large eggs, slightly beaten

Combine the ingredients in the order listed in the bowl of a stand mixer.  Blend until smooth.  Let the batter rest 5 minutes before using.  Pre-heat the waffle maker then pour about 2 c of the batter onto the centre of the lower grid.  Spread evenly with a heatproof spatula.  Close the lid and cook until the tone sounds.  Open lid and carefully remove the waffles.

cooled waffles ready for packaging
Overall, I was very impressed at the ease and cost of using a homemade waffle mix.  The results in terms of rise and flavour was superior to using a store bought mix.  Store bought frozen waffles cost about $4 for 12 or 43¢ each.  Homemade waffles using a store bought mix cost about 8¢ each and those using a scratch batter cost about 6¢ each.  Now there isn't a huge difference in cost between store bot mix and scratch batter but with scratch you aren't getting all the additives.  You are getting 8 ingredients rather than a whole list of chemicals.  Another thing you aren't getting with home-made is all that extra packaging.  Homemade waffles are about 20% larger than the store bought frozen version so that's something to consider as well.
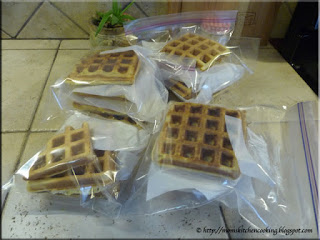
waffles ready for the freezer
The cooled, stacked waffles were ready for packaging for the freezer.  Home-made waffles reheat in the toaster just like store bought so you still have the convenience of a quick, hot breakfast.  I packaged 4 waffles per freezer bag each separated by a piece of parchment paper and pressing the air out of the bags.  I didn't vacuum seal them as they are meant for short term storage in the freezer.

This is just a really easy way to put healthy, hot breakfasts on the table with a minimal of effort while saving a considerable amount of money.  The two batches took me under 15 minutes so I can't complain at being able to stock the freezer with waffles ready to pop into the toaster being time consuming at all.  An easy way to do this would be to make a double batch of batter, then freeze what isn't used that day.  On the other hand, if you are making waffles for a family and need a larger amount, in a half hour you can easily make 64 waffles by making a triple batch of the basic (recall I halved so double then triple).  The cooking time is very minimal so you can really make a lot of these in a very short period of time.


Wednesday, May 16, 2012

Orange Cream Cheese Coffee Cake

As a self admitted internet junky, I do a lot of surfing.  Well, about a year ago when I was laid up with a leg injury, I rediscovered Facebook.  I had a Facebook account for years but never used it and quite frankly I didn't like their privacy policy.  Boredom does strange things so I started exploring Facebook back then and now it is my number one way to keep in touch with our kids when away as I can always find a Wi-Fi hotspot so communication is free.  I'm on Facebook daily now.  On the sidebar of the Facebook dashboard there are advertising links.  Well this link for an orange cream cheese bread finally caught my interest. Reading through the recipe I thought it would be a keeper but knew right off the bat that it would not be a bread texture, rather more of a coffee cake texture.  I made a few adjustments so the recipe is different but quite delicious!

orange cream cheese coffee cake
Looking at a recipe and knowing instinctively what to change is a good thing.  Always remember that a recipe is just a starting point.  There is nothing written in stone that a recipe cannot be modified.  That's what makes cooking so much fun!

This coffee cake was simply delicious!  It was lightly flavoured, moist and tender.  We sliced the loaf then cut into 1 - inch fingers, topping them simply with a mixture of strawberries, blueberries and blackberries.  It was a nice end to a beautifully grilled dinner!

Orange Cream Cheese Coffee Cake
source:  Garden Gnome

1 c spreadable cream cheese
½ c shortening
1⅔ c organic granulated sugar
2 eggs
2¼ c unbleached flour
1 tsp sea salt
1 tbsp baking powder
1 c milk
2 tbsp grated orange peel
¼ c fresh squeezed orange juice
icing sugar

Pre-heat oven to 350°F/175°C.  Cream cream cheese, shortening and sugar in bowl of stand mixer.  Add eggs blending well after each.  Blend in milk.  In a separate bowl, mix the flour, salt, baking powder and orange peel.  Slowly beat the dry ingredients into the wet ingredients.  Pour the mixture into a lightly greased loaf pan.  Bake until a toothpick inserted into the centre of the loaf comes out clean.  Remove from oven and cool 5 minutes.  Remove from loaf pan and allow to cool.  Place loaf on the cooling rack on a large plate.   Poke several holes in the top of the loaf with a tooth pick.  Pour the orange juice slowly over the top of the loaf.  Let sit to absorb the juice.  Transfer the loaf to serving platter.  Sprinkle with icing sugars.  Serve topped with fresh berries if desired.


Friday, April 27, 2012

Cupcakes

I had to slip to the pharmacy today and while waiting to check out my prescription, I spotted the mini Taste of Home Cupcakes & Mini Dessert magazine.  While I don't buy a lot of magazines, I am rather partial to Taste of Home and Cook's Illustrated so occasionally splurge.  We will be doing a bit more entertaining this summer so I'm looking for a few easy but different, easy desserts.  Now everyone loves homemade cupcakes and the ladybug picnic cupcakes on the cover were just so cute, I couldn't resist the magazine.  All of the desserts are individual serving size which will make it quite easy to serve them for summer entertaining.

cupcake soaps
Cupcakes are so well loved that some brides are serving them instead of wedding cake.  Special cupcake display stands are available at baking supply shops for this very purpose.  Homemade cupcakes were one of the favourite things our kids loved to help make in the kitchen.  Trust me, nothing tastes better than a homemade cupcake decorated by little helping hands!

Homage to the love for cupcakes goes further than that. Just look at these two delicious cupcakes.  To the left is Oreo Cookie and to the right is Pina Colada.  Don't they look scrumptious?  Surprise!  They are not edible but they sure are adorable and they are regular cupcake size.  They are two decorative soaps I bought for the bathroom.  Despite all the cooking I do, there are a fair number of non-edible products that I make as well in the kitchen like homemade soaps, homemade toiletries and candles (beeswax, soy).  When the kids were young I made goop, playdough, cornstarch sand, and oceans in bottles for them to play with in the kitchen while I cooked.  Of course, we made various renditions of the erupting volcano and various school science projects.  Ah, a trip down memory lane...


Friday, February 03, 2012

15 Garlic Clove Prime Rib Roast

We have been working on the kitchen for almost two weeks meaning I haven't been doing a lot of cooking.  Last Tuesday I was to the point of doing the finer detail touch-up and while there is still more to do, I was able to get the kitchen back somewhat in order enough to back into cooking mode to prep for Superbowl weekend.  I still need to add the finishing touches then will share with you the new look next week.  I must we are both pleased the way the kitchen has been transformed!

15 garlic clove prime rib roast
We did a bit of cooking in a makeshift kitchen area using a slow cooker but I didn't want to actually cook in the kitchen to avoid steam and grease from affecting the paint.  Besides all of the stove and microwave were covered to protect them.  The first cooked meal out of the new kitchen came together on a bit of a whim.  We both love garlic and I had a small prime rib roast so decided to cook the roast in the clay baker with potatoes, onions and lots of garlic.  Roasted garlic is simply delightful!  I served the roast topped with a rich gravy from the drippings and steamed broccoli.  It was a wonderful meal to welcome in the new colour to our kitchen!

15 Garlic Clove Prime Rib Roast
source:  Garden Gnome

3 lb prime rib roast
10 - 12 mini red potatoes
15 whole cloves of garlic
1 c tomato stock
½  medium onion
sprinkle of sea salt/fresh ground pepper
1 tsp browning
2 tbsp cornstarch
2 - 3 tbsp water

Pre-soak the lid of the clay baker in water for 30 minutes.  Peel garlic cloves.  Place roast in clay baker.  Add potatoes, onions and garlic cloves.  Sprinkle with salt and pepper.  Cover with lid.  Bake at 300ºF for 1½ hours or until potatoes are tender and the meat is nicely browned.  Remove the roast and allow it to rest 10 minutes before serving.  Remove vegetables.  Make a cornstarch slurry using the cornstarch and water.  Pour the drippings into sauce pan.  Stir in the browning.  Bring to a low boil over medium heat.  Stir in the slurry then continue cooking until thickened.  Remove from heat.  Plate the roast and vegetables then top with the gravy.  Serve with a vegetable side (eg. steamed broccoli).

spirited peaches with French vanilla ice cream
Since we were celebrating being back to cooking in the kitchen I opened a jar of spirited peaches for dessert.  Spirited peaches are made using peach schnapps although other suitable liqueurs can be substituted.  I don't make a lot of home canned products using alcohol but those I do make tend to be reserved for special occasions.

I topped French vanilla ice cream with slices of the spirited peaches.  Then drizzled a little of the syrup from the peaches over the ice cream.  It was a lovely dessert with the peach slices accenting the vanilla flavour in the ice cream.  This would be a great combination for an adult frozen cocktail. 

It's been a long and tiring job painting the kitchen right back-to-back painting the main bathroom.  The paint has been very testy as reds usually are but it was testy right from the point of picking out the colour.  I finally opted to have the paint custom matched to my dinnerware.  Then the wood cover for the exhaust fan literally fell apart so that will be another job for our friend who is doing all the custom woodworking in our house.  We still haven't found a range hood, sink, faucet or disposal but simply have little time to go shopping.  I have a huge, and I do mean huge project (top secret) aside of my winter project to paint all the rooms in our new home so it is going to be a very busy time!  This is one time we really need the home cooking to comfort and nourish us, body and soul.


Friday, December 30, 2011

Gluten Free Snowman Cake

Incorporating special diet dishes into your menu at the best of times but when only one person has special dietary needs it can be rather challenging when hosting a get-together.  I have a fair amount of experience dealing creating dishes for those who are lactose intolerant, diabetics, those with certain food alleries and those on sodium restricted diets but until this past year had no experience creating dishes for those who eat a gluten free diet.  One of our friends cannot have gluten so I have been looking for gluten free recipes.  Earlier this year I wrote about how happy I was to find Betty Crocker gluten free cake mix

Betty Crocker gluten free cake mix and snowman cake pan
During the holiday season and when hosting larger gatherings I like to rely on tried and true, easy recipes.  I was quite impressed with the gluten free cake mix so bought another box.  As much as I love cooking and baking, I have never mastered the finer art of decorating cakes.  I tend to use simple glazes, frostings, fruits or a dry topping.  Thankfully a few formed cake pans help to make it a bit easier.

Specialty cake pans (as pictured) are available in a wide range of sizes and themes.  They are available in the box stores at a very reasonable price but limited selection.  The best selection can be found in specialty kitchen or baking stores.  Some can be pricey but if you make a lot of cakes can be well worth the small investment.

decorated gluten free snowman cake
This is precisely why I don't make decorated frosted cakes!   I was not overly pleased with the decorating results but the cake was declared a success without so much as a crumb left.  The icing was a simple buttercream.  I used a cupcake stencil for the holly leaves and berries.  The eyes, nose and buttons are mint M&Ms.   The mouth is a thin slice of Australian candy similar to Twizzlers.

I had a lot of fun making the cake, happy knowing I would be able to offer a dessert he could have.  Next on my agenda is to find a few gluten free recipes to add to my tried and true entertaining recipes.  I best work on my cake decorating skills as well!


Friday, December 16, 2011

Sweet Potato Casserole

During the Christmas holiday season we manage to attend several events that have buffet style dinners followed by entertainment.  It's interesting to see the various foods offered as they tend to be a bit on the fancier side than normal. The nice thing about buffet foods is most of them are easily made at home and for the most part buffet foods tend to be quite economical.

sweet potato casserole
Sweet potato casserole is an easy to prepare, low cost dish that quite often appears on the buffet table during the holiday season.  It can be used as a side dish or topped with a drizzle of maple syrup, fresh whipped cream and chopped pecans as a dessert.  I personally find sweet potato casserole too sweet to use as a side dish.  If you love pumpkin pie but are eating gluten free or are avoiding the crust of pumpkin pie, then sweet potato casserole is a lovely substitute.

Sweet Potato Casserole
recipe by:  Garden Gnome

3 large sweet potatoes
2 large eggs
3 tbsp soft butter
2 tbsp packed dark brown sugar
1 tsp sea salt
½ c milk
½ tsp ground cinnamon
½ tsp ground ginger
1/8 tsp ground nutmeg
1/8 tsp fresh ground pepper
¼ c coarsely chopped pecans (optional)

Scurb the sweet potatoes.  Pierce each potato with a fork the bake at 400° until tender.  Set aside to cool.  Scoop the sweet potato flesh from the skins.  Place in medium bowl and mash until smooth.  Slightly beat the eggs in a separate bowl.  Mix eggs, milk, butter, brown sugar, and seasoning into the sweet potatoes.  Mix until smooth.  Pour the mixture into 8 x 8 - inch a non-stick baking pan.  Sprinkle the top with pecans if desired.  Bake for 30 to 40 minutes until casserole is a bit puffy.  Serve casserole hot.


Wednesday, December 14, 2011

Easy Red Velvet Cake

'Tis the season for yummy treats!  There is an abundance of cookies, desserts and snacks at every holiday get together.  I have a repertoire of holiday recipes that I use during the Christmas holiday season.  One thing I look for when adding a new recipe to that collection is that it must be easy.  I don't want to be rushing out the door to pick up an ingredient to make a treat an hour before company is coming.

red velvet cake
Red Velvet Cake is a nice, easy to make holiday cake.  I use the Easy Red Velvet Cake recipe from the Betty Crocker website.   The nice thing about this easy recipe is it is a perfect recipe for Christmas baking with kids to make holiday baking a family affair.   Like many easy recipes, this recipe does not require a lot of ingredients or special equipment.  The recipe uses buttermilk or water.  I recommend using buttermilk for a richer flavour.  The red food colouring does not add any flavour, it just adds a festive touch to the cake.

Red Velvet Cake is generally served as a cake, cut into pieces but I like making mini Red Velvet Cupcakes for a delectable tiny treat.  I use the Christmas theme mini cupcake paper liners for the cupcakes to add a festive look.  After frosting the mini cupcakes, I garnish with a few chocolate sprinkles.  These are perfect for the dessert table and for bake sales.  They are a keeper  for the holiday season!


Friday, August 12, 2011

Strawberry Cups

We don't eat a lot of desserts, definitely not on a daily basis.  Rather desserts are more of a special event or holiday offerings.  Last week my husband and I were celebrating the sale of our house.  It has been a long time coming so we were elated.  I made an easy summer dessert to go with our meal.

strawberry cups
Strawberry Delight has always been an easy to make summer treat using either Cool Whip or fresh whipped cream.  I modified the basic strawberry delight to make strawberry cups.   They were easy to make and just a bit dressed up.

Strawberry Cups
 
1 box strawberry jello
2 c water
2 cup Cool Whip Lite
6 strawberries mashed
1⅓ c Oreo cookie crumbs
2 tbsp butter
¼ c granulated sugar

Prepare the jello as per instructions on the box.  Let jello set up.  Mix with Cool Whip then stir in the mashed strawberries.  Refrigerate.  Mix cookie crumbs, butter and sugar together.  Press into muffin tins covering the bottom then partially up the sides to form a cup.  Bake at 350ºF for 5 minutes.  Cool.  Fill with the strawberry mixture.  Chill until firm.  Carefully pop the cups out of the muffin tins.  Garnish with sliced strawberries.


Wednesday, July 27, 2011

Lemon Bean Cake

We have been to the dietician to help get us on track for my husband's impaired glucose tolerance (pre-diabetic).  Our diet in comparison to most is quite healthy because of cooking from scratch, home canning and avoiding things like HFCS, excess salt, artificial additives and preservatives.  The dietician was quite impressed since this makes her job a bit easier as we are both open to any recommended dietary modification.  There is a wealth of information there including recipe booklets.  I've been working on getting more beans into our diet so I picked up The Supreme Bean by the Ontario Bean Producers recipe booklet.  It has a lot of interesting recipes.

lemon bean cake
Beans are a very healthy choice as they are gluten-free, high fiber, low cholesterol and they act as an appetite suppressant.  Beans are digested slowly causing a low, sustained increase in blood sugar.  I was surprised to learn that beans and bean flour can be used to make healthy, gluten free desserts and muffins as well. 

I made the lemon bean cake in the recipe booklet.  I omitted the fresh fruit sauce for the cake, choosing to simply garnish with icing sugar, lemon peel curls and strawberries.  The cake is made with well-cooked white pea beans.  Note the well-cooked as I don't think I cooked mine long enough so the texture was slightly grainy.  My husband didn't like the texture so next time I will cook the beans until they are quite mushy.  The flavour was very good so with a bit of tweaking this will be a lovely cake to add to my gluten free recipes!

Lemon Bean Cake
modified from: The Supreme Bean by the Ontario Bean Producers recipe booklet.

1 lemon (zest, ¼ c juice)
2 c well cooked white pea beans
3 eggs
1 c organic granulated sugar
1 tsp baking powder
icing sugar

Pre-heat oven.  Wash then zest the lemon setting aside.  Juice the lemon and set aside.  Place drained beans in food processor.  Add all but ½ tsp of the zest (reserve for garnish) and juice.  Process until smooth.  Add eggs, sugar and baking powder.  Process until ingredients are well mixed.  Pour into prepared 9" - round cake pan.  Bake at 180ºC (350ºFº) for 45 minutes or until the centre tests clean with toothpick.  Cool then invert onto serving plate.  Dust with icing sugar.  Garnish with fresh fruit and remaining lemon zest.


Wednesday, July 13, 2011

Betty Crocker Gluten Free Cake Mix

Gluten is a protein found in wheat, rye and barley.   About 1% of the general population suffer from celiac disease.  Gluten damages the small intestines impairing it's ability to absorb nutrients.  As a result a lot of foods that are wheat based should be avoided including breads and other bakery products, many cereals both dry and hot as well snacks containing gluten.  The recommended treatment is a gluten-free diet.  However, about 15% of the general population while not having celiac disease have a gluten sensitivity.  In recent years some have noticed an improvement in their child's autism by following a gluten free diet.  There are only two reliable studies connecting autism to gluten and one of them found no correlation between autism and gluten but both studies involved a small study sample.  At any rate, a gluten-free diet is a must for some and desired by others.  One of the biggest problems faced by those wanting or needing this special diet was the lack of convenience products.  In smaller communities even finding the gluten-free raw ingredients can be a problem.

I am interested in gluten-free products for entertaining purposes.  This past year, a wonderful friend who cannot have gluten joined our monthly parties.  Not only does he have a gluten sensitivity requiring a gluten-free diet, he also has multiple food allergies.  As someone who is lactose intolerant as well having both food sensitivities and allergies, I try to be very cognizant and accommodating of these types of problems when entertaining.   General Mills has introduced two gluten-free cake mixes.  I was ecstatic! 

I had a box of Betty Crocker gluten-free devil's food chocolate and golden cake mix to try.  It is very important for me to do a test run of any product or recipe before serving it too my guests.  I decided to make the gluten-free golden cake mix into cupcakes.

The ingredients in the gluten-free cake mix are:  rice flour, sugar, potato starch, baking soda, xanthan gum, salt, sodium acid pyrophosphate and monocalcium phosphate.  The product may contain soy ingredients.  Ingredients needed to complete the batter are 2/3 c of water, 1/2 c butter, 2 tsp vanilla extract and 3 eggs.  The batter was quite easy to make, similar to any other cake mix.  I used my KitchenAid stand mixer then baked in a silicone muffin tin for 20 minutes at 350ºF.

I did not put any icing on the cupcakes, the reason being I wanted to be able a assess the cupcakes with respect to flavour and texture without icing distracting the taste test.  Oh my gosh, these were really good!  They would make excellent mini cupcakes.  I think a butter cream  or chocolate icing would be quite lovely.  Life Made Delicious has a few more easy recipes using this cake mix but essentially use it just the way you would any cake mix.


Wednesday, June 01, 2011

Dinner at California Hotel and Casino in Las Vegas

Las Vegas is not just about gambling!  Surprisingly it is quite possible to enjoy Las Vegas without ever gambling.  The food choices are limitless!  We always make a point to eat at the California Hotel and Casino each trip.  The food is excellent especially their prime rib and mahi mahi!  The butterfish is quite tasty as well.  Each dinner special comes with salad bar, main course, beverage and dessert.  Their menu is available online.

mahi mahi dinner
I ordered the mahi mahi with papaya seed vinaigrette special ($7.95).  Sides included a generous sized baked potato and mixed vegetables as well as salad bar and dessert.  Mahi mahi is a delightfully mildly flavoured fish.  It is an oceanic fish that with quick growth patterns in the warm currents.  Unfortunately I do not get to enjoy mahi mahi with the exception of a dinner in Las Vegas when we are there.  Mahi mahi, despite being a commercially important fish, is not as eco-friendly as it could be unless line caught  but it is a low mercury fish.  I occasionally see it in the frozen food section in the grocery stores here but it really is a hit a miss.

prime rib dinner
My husband ordered the prime rib special ($7.95).  This special is not on the menu but it is well worth getting.  The prime rib is ordered according to desired doness.  As you can see my husband ordered his medium rare.  Sides included green beans and baked potato. 

The generous portion of prime rib was cooked to perfection.  That is one thing to stress about any meal in Las Vegas.  The portion sizes are very, very generous especially for the price.  Honestly, I doubt you could eat at a fast food restaurant for this low price and you certainly would not get the quality of food at a fast food restaurant.

vanilla ice cream
We are not big dessert fans, seldom having dessert at home other than special occasions.  When dining out my husband sometimes orders vanilla ice cream.  Dessert was included with the meal at California's so my husband ordered vanilla ice cream.  It came with a generous dollop of whipped cream and a sugar cookie wedge.  I like the presentation!  Sugar cookie wedges are ever so easy to make or you can use any cookie that is crispier when baked.

Method:  Roll your dough of choice to about 1/8-inch thick.  Cut an eight inch circle then cut the circle into wedges pie shaped.  Bake as normal.  Cool then use as a garnish for ice cream.


Friday, May 06, 2011

Peach Delight

The amount of home canning that I do seems to mystify many.  It's funny that one question that always pops up is "How do you use it".  Using home canned foods is no different than using store bought, commercially canned foods other than you have a larger variety to choose from.  For example, I canned spirited peaches last year.  I have to admit that I don't can many products containing alcohol simply because I prefer product I can serve to everyone including our grandkids.  Of the foods I can numbering between 1,200 and 1,400 jars annually, there are only three products that contain alcohol.  These are specialty products of which I can understand the question as to how to use the product. 

peach delight
The spirited peaches was a canning experiment this year using peach schnapps.  I only made a couple of jars to see if we liked them.  Since they do have alcohol in them serving these peaches with toast for breakfast didn't seem like a very prudent idea.  I made a peach delight using one of the jars instead.

Peach delight is very easy to make.  I used one sheet of store bought butter puff pastry but    homemade puff pastry can be used.  I cut the puff pastry into six squares then placed the squares in muffin tins and baked at 375ºF until golden brown.  I placed three or four slices of peaches over each pastry shell then topped with fresh whipped cream. 

Fresh whipped cream is a true culinary delight and ever so easy to make.  I use 35% heavy whipping cream in the food processor but a blender or egg beaters can be used.  The trick is to not over beat otherwise the fats will separate giving you butter and buttermilk.  We prefer the whipped cream unsweetened with just a light splash of vanilla to highlight the buttery smoothness.


Sunday, September 26, 2010

Baked Haddock

We eat a lot of locally caught fish like perch, pickerel and bass.  When we travel in the Grey Bruce area of Ontario we bring back a lot of locally caught whitefish.  I'm not a huge fan of heavily coated fish like beer battered English style fish.  While I like the texture of the fish cooked this way I always pick the coating off.  Quite often the only way some restaurants serve fish is with this heavy coating so it is always a treat when they offer the same fish without the coating.

broiled haddock
The clubhouse has a lovely haddock special on Fridays for $7.95.  Haddock is a popular mild flavoured, flaky whitefish. It can be baked, broiled, or coated for pan or deep frying.  Unfortunately we don't often have haddock mainly because I don't think to buy it.   In 2010 haddock was added to Greenpeace International's seafood red list because there is a high risk of it being sourced from unsustainable fisheries.  This is increasingly something to be aware of when it comes to many foods.  Haddock from the North East Atlantic (eg. Iceland, Norway, Faroe) comes from sustainable fishing grounds unlike haddock from Europe so look for the source of the haddock when purchasing to be sure it is from sustainable fishing grounds.

Pictured is the broiled haddock special served with hushpuppies, corn fritters, corn on the cob, potato weaves and cole slaw.  The haddock was lightly seasoned then broiled to perfection.  I really enjoyed it!  Surprisingly the corn fritters were on the sweet side but quite tasty.  So this will be a side I will be making at home as well.

pecan icecream ball
We seldom have dessert even when eating out.  On the rare occasion we order dessert when out it tends to be ice cream or pie a la mode.  We ordered dessert with our meals on this occasion.  Pictured is the gorgeous pecan ice cream ball topped with butterscotch syrup, whipped cream and a cherry.

Making coated ice cream balls at home is quite easy presentation.  It makes for a lovely present  You can use chopped nuts, candy coated chocolate or crushed candy canes.  Place the coating of your choice in a shallow dish.  Scoop ice cream shaping into a ball.  Quickly roll the ball of ice cream in the coating.  Drizzle syrup of choice over the ice cream.  Top with whip cream then garnish with a cherry or berries.


Saturday, June 19, 2010

A Strawberry Kind of Day

Ontario strawberries are now in season.  The season will last for about 10 days depending on the weather.  This year's berries a gorgeous!  Many of them are almost the size of a golf ball.  The beautifully coloured red berries certainly don't disappoint with their nice and juicy, deep strawberry flavour.  We will be eating a lot of strawberries this year!

flat of strawberries
My husband picked up a flat of strawberries for me.  A flat of strawberries now contains 6 quarts of strawberries.  The going rate for a flat of already picked berries is $18.  If picking at the U-pick, a flat will cost $15 which doesn't sound like a lot of savings but for those putting up a lot of strawberry products the U-pick is preferred.  Picking strawberries is easy and goes quickly so picking enough for two or three flats can be done is about an hour or less if you have a pair of helping hands.

I sort the berries as I wash and hull them into three sizes: small, medium and large.  The small berries are best for jam making, medium berries are for freezing and the large ones are for fresh eating.  I use this same sort as I clean method for other produce like mushrooms.  
prepping berries for freezing
Freezing strawberries is quite easy!  I simply wash and hull the berries.  After being patted dry I arrange the berries in a single layer on a baking pan.  I place the filled baking pan into the freezer.  Once the berries are frozen I remove them from the baking sheet an place them into a zipper style freezer bag with as much air as possible removed.

Normally I prefer to vacuum seal foods for the freezer.  However, quite often I want only a couple of berries to pop into fruit smoothies.  Zipper style freezer bags make it easy to remove only a couple of berries without having to re-vacuum seal.  The yield for the frozen berry portion was a one gallon bag of strawberries.

strawberry jam
I made a batch of low sugar strawberry jam making two modifications to the recipe.  I increased the sugar to 3 cups from the 2 cups.  Since I am using Pomona's pectin, a low methoxy pectin that uses calcium water for achieving the gel rather than sugar, modifying the amount of sugar does not affect the gel.  Sugar adds sweetness, bulk and texture in jams.  The extra cup of sugar was just enough to give a yield of 4 - 500 ml (pint) jars with a couple of tablespoons left-over.  The second modification I made was adding a teaspoon of pure vanilla.  Vanilla pairs nicely with strawberries heightening the flavour and giving it just that little extra special nuance.

vanilla strawberries
I used the largest berries to make a simple glazed strawberry dessert.  The glaze is very easy to make by pouring vanilla sugar over the berries then covering and setting in the refrigerator for an hour or so.  The berries can then be used as is or topped with fresh whipping cream or vanilla flavoured yogurt.  They can also used as a topping for vanilla ice cream or gelato.  The glazed berries can also be chopped then stirred into vanilla flavoured yogurt then poured into popsicle molds for a healthy, kid friendly summer treat.  Notice again I'm pairing vanilla with strawberry then layering the vanilla flavour.  These two flavours really go nice together! 


Sunday, June 13, 2010

Rhubarb Tart

Rhubarb is the first fruit (technically a vegetable) here.  This is such a common home garden plant in our area that it is quite difficult to find it in the stores.  Even if the home owner doesn't have a vegetable garden chances are still very good they have a rhubarb patch!  Rhubarb can be eaten fresh dipped in a little sugar, stewed then canned or made into delicious fresh pie or the pie filling can be canned for later use as well.  Not only that but rhubarb is a great extender fruit when making jams using more expensive berries like strawberries.  In fact strawberry/rhubarb is a very popular combination!

rhubarb tart
Friends of ours brought a lovely cutting of fresh rhubarb.  I have been trying to get a rhubarb patch growing since we moved here.  It was nicely taking off then someone emptied their cigarette tray near it resulting in it's demise.  Nicotine is quite toxic to some plants.  So I'm back to square one restarting the rhubarb and relying on the generous gifts of others.

I used homemade puff pastry to make a quick, easy to make rhubarb tart for dessert.  The filling was a simple rhubarb pie filling.  The end result was a nice rhubarb tart perfect for a spring dessert.  This dessert would pair nice with vanilla ice cream.

Rhubarb Tart Filling
3 c fresh rhubarb
1 c organic sugar
¼ c Clear Gel*
1 tbsp butter

Wash and trim rhubarb.   Cut into half inch pieces.  Pour sugar and Clear Gel over the rhubarb and mix well.  Pour the rhubarb mixture onto the puff pastry dough in the centre.  Dab with butter.  Pull the edges up of the dough up and over the filling.  Bake at 220ºC (425ºF) until pastry is golden brown and filling is bubbly.

*This is the Clear Gel used in cooking and canning not the instant Clear Gel.  It gives nicer results than flour or regular corn starch.


Tuesday, May 25, 2010

Gelato

Frozen desserts are a family favourite whether they be homemade or store bought.  An ice cold treat just tastes so good on a hot summer day!  I can  still remember running down to the Tasty Freeze with my quarter held tightly in my hand to get a frozen yogurt cone.  Over the years there has been a variety of homemade ice creams, homemade popscicles, sherberts and freezer pies along with store bought versions.  We recently discovered another frozen treat, gelato.

gelato
I first heard about gelato on the food channel.  Gelato is Italy's version of ice cream so most of the ingredients found in ice cream will be found in gelato.  However, gelato has a considerably lower butterfat content of about 4-8% versus 14% for ice cream and a lower sugar content.   This results in gelato having less than half the calories of ice cream.  The Dorgel gelato vanilla (pictured) has 90 calories per half cup verses 230 calories Ben & Jerry's vanilla bean icecream.  The sugar content is balanced with the water content in gelato, acting as an anti-freeze to prevent the gelato from freezing solid.  The mixture used for gelato is made using a hot process, which includes pasteurization.  The mixture is then aged for several hours after pasteurization is complete then the gelato is frozen very quickly in individual small batches in a batch freezer that incorporates air or overage into the mix as it freezes.

gelato with berries
As a result of the pasteurization and aging process the ice crystals in gelato are quite small giving a smooth, creamy texture.  Gelato has an overage of20% to 35% so is denser than ice cream with an
overage up to 50%.  It also has a more intense flavour than icecream. 

I served the gelato with mixed fresh berries in a light vanilla syrup made by sprinkling vanilla sugar over the fresh berries and letting them sit in the fridge for an hour.  This really was a lovely dessert with the berries providing a nice contrast to the rich, creamy gelato.


Saturday, April 10, 2010

Low Brow Gourmet Mac & Cheese with Jello Parfait

As many of you know I keep a very well stocked pantry.  Part of responsible pantry management is rotating foods before they have a chance to spoil.  Some of my pantry stock is emergency preparedness items that normally would not be used unless absolutely necessary.  However, these stocks still need to be rotated to prevent spoilage.  Spring is an ideal time to go through the pantry ensuring lesser used items like emergency preparedness items are rotated.

easy mac & cheese
Velveeta cheese is the only processed cheese I keep on hand.  The main reason for this is Velveeta cheese is shelf stable until opened making it an ideal cheese product for emergency preparedness.  A couple of nights ago I came up with a really quick, easy, low brow mac & cheese to use up left over ham, fresh asparagus and some of the Velveeta.  This would be a great 30 minute meal anytime of the year.

Low Brow Gourmet Mac & Cheese

3 c cooked elbow macaroni
1 c diced cooked ham
1 c raw asparagus cut into 1-inch pieces
1½ c Velveeta cheese

Prepare ham and asparagus.  Cut about a 3-inch piece of Velveeta into cubes.  Cook the macaroni until al dente then drain.  Stir in ham, cheese and asparagus.  Put the lid on the pot and place on burner.  Let sit 5 minutes then stir.  Let sit 10 minutes more, give a good stir then serve.

jello parfait
Jello is part of my regular pantry stock as well as my emergency preparedness supplies.  Jello is one of those versatile items to keep in the pantry not only for quick desserts but also to use as a drink when ill.  I decided to make a quick jello parfait that while quite easy to make looked a bit on the fancy side.  Low brow gourmet at its best!

Jello Parfait

1 box jello
1 c boiling water
1 c ice water
1½c Cool Whip
2 marichino cherries

Make the jello as normal.  Place 2 tall glass cappiccino mugs on an angle in a bowl that will suport that angle.  Use a turkey baster to place about a half cup of plain jello into the mugs.  Place the mugs in the refrigerator to set up.  Place the remaining jello in the fridge to set up.  When the remaining jellow is set up blend in 1¼c of the Cool Whip.  Spoon this over the plain jello in the mugs.  Top with remaining Cool whip and a cherry.


Tuesday, March 30, 2010

New York Style Cheesecake

Cheesecake is one of my husband's favourite desserts. Not being a huge dessert fan he doesn't get homemade cheesecake very often. Occasionally he gets my quick no bake cheesecake that while quite good it definitely is not New York Style cheesecake like The Cheesecake Factory sells. I've been on a quest to get that rich, creamy flavour of New York Style cheesecake.

crust prepCrust Prep

Traditionally baked cheesecake is made in a spring pan. Well the problem is I have 2 large spring pans but not a small one so I improvised using a 2-piece flan pan (top right). It was wider in diameter but shallower. The prepared crumbs were poured into the pan (top left) then formed using the bottom of a stainless steel measuring cup (bottom right) resulting in the prepared crust (bottom left).

New York Style Cheesecake

1¼c graham cracker crumbs
2 tbsp granulated sugar
3 tbsp butter

19 oz cream cheese, softened
1 c granulated sugar
1 tsp lemon zest
¼ tsp pure vanilla
3 eggs

Mix graham cracker crumbs with 2 tbsp granulated sugar. Melt butter then stir well into the graham cracker crumb mixture. Pour into baking paan and form into crust. Bake at 350ºF for 10 minutes. Remove from oven and let cool.

Reduce oven temperature to 300ºF. Beat cream cheese until uniform using stand mixer. Slowly add in sugar while continuing to beat. Beat until fluffy then add one egg at a time beating until smooth. Mix in vanilla and lemon zest. Pour into prepared crust. Bake for 1 hr or until centre is set. Remove from oven. Cool then refrigerate 3 hours before cutting.

New York style cheesecakeNew York Style Cheesecake

New York style cheesecake surprisingly does not have a high sugar content. It is rich and creamy but not all that sweet. A lot of the sweetness comes from what you top the cheesecake with. I topped the cheesecake slices with low sugar chocolate raspberry sauce that added a deep depth to the overall richness. Next time I will warm the sauce then do that really neat swizzle effect over the cheesecake slices but for this one, the taste test was most important. I'm still tweaking cheesecake recipes so the recipe is a combination of a few recipes with my own ideas tossed in. The texture is right up there so that's encouraging. The end result was a nicely flavoured and textured cheesecake.


Saturday, February 13, 2010

Quick Apple Dessert Pizza

If you have been following this blog you will already know I do a lot of canning and as such there are a fair number of canning recipes on this blog. What it not as apparent is how I use all my home canned products. One reason for this is a lot of them are used much the same as you would commercially canned foods. In essence home canned foods only differ from commercially canned in that they don't have a artificial colourants or flavourings, they don't have preservatives and since they are canned in jars there is a lot less chance of having BPA residues in the food. All metal cans used in North America have a plastic coating containing BPA that does leach into the food during the processing. Home canned foods are in glass jars with only the lid having this plastic coating but when properly canned food should not come into contact with the lid.

quick apple dessert pizzaApple Dessert Pizza

I can a few types of apple pie fillings each year. The method of canning does not change but the apple variety and seasonings used do. This puts a convenient, ready to use product in my pantry.

After Superbowl Sunday I was left with a couple of packages of Greek style (pocketless) pitas to use up. I use these to make thicker sandwich wraps in the summer. One of my kids gave me the idea of using them for quick pizzas that have become a huge hit at our larger get togethers. I usually make two types, one with sauce and cheese and the other with melted butter and garlic. I decided to do something a little different this time.

I used the pitas as the crust for dessert pizza. This is really easy to make. I used about a cup of home canned apple pie filling that had a touch of cinnamon and nutmeg to spread over the pittas then topped with a generous topping of mozzarella cheese. I baked at 180ºC/350ºF until the chesses was bubbly with just a hint of browning. It was a quick, easy dessert using something from the pantry as well as left-overs from the party.