My photo
Ontario, Canada
I am a wife, mother and grandma who enjoys the many aspects of homemaking. A variety of interests and hobbies combined with travel keep me active. They reflect the importance of family, friends, home and good food.
Cook ingredients that you are used to cooking by other techniques, such as fish, chicken, or hamburgers. In other words be comfortable with the ingredients you are using.
--Bobby Flay

For Your Information

Please watch this area for important information like updates, food recalls, polls, contests, coupons, and freebies.
  • [March 19, 2020] - Effective Mar 17, this blog will no longer accept advertising. The reason is very simple. If I like a product, I will promote it without compensation. If I don't like a product, I will have no problem saying so.
  • [March 17, 2020] - A return to blogging! Stay tuned for new tips, resources and all things food related.
  • [February 1, 2016] - An interesting report on why you should always choose organic tea verses non-organic: Toxic Tea (pdf format)
  • Sticky Post - Warning: 4ever Recap reusable canning lids. The reports are growing daily of these lids losing their seal during storage. Some have lost their entire season's worth of canning to these seal failures! [Update: 4ever Recap appears to be out of business.]

Popular Posts

Showing posts with label fruits. Show all posts

Friday, March 21, 2014

Old Fashion Banana Cake

Bananas have had a lot of negative publicity recently in the weight loss industry.  The premise is that bananas will prevent you from losing belly fat.  This is a myth!  I have lost 19 lb since November by enjoying a banana in one form or another almost daily.  Bananas are a nutritional powerhouse full of micronutrients like potassium that helps lower blood pressure.  A medium banana has 105 calories, perfect for a healthy snack.  They have a low glycemic index but high satiety level and they come in their own convenient packaging!

frozen banana
Bananas freeze well.  One of my friends shared her secret for freezing bananas.  Simply pop the banana skin and all in the freezer.  When ready to use, remove from the freezer.  Let thaw just enough to peel off the skin.  Mash while still partially froze.  Pieces of frozen banana can be added to fruit smoothies if desired.

I ran out of fresh bananas (top right) so used one of my frozen bananas.  The banana looked a bit lighter than fresh and the texture was slightly thicker because it was still froze.  This has no effect when the banana is used for smoothies or baking.

baked banana cake
I have a confession...this is the first time I have made a banana cake.  It's not as if I couldn't it's just that my friend sends a banana cake in exchange for a jar of my home canned salsa, much to my husband's delight.  I turned to my trusty Big Red Betty Crocker's Cookbook (circa 1969) to make an old fashion banana cake.

I used my Nami coated baking dish for this cake.  Older cookbooks are my favourite for frugal recipes.  They tend to use simpler and fewer ingredients that can easily be modified for healthier versions.  I used unbleached white flour, sea salt and butter.  I omitted the nuts as my husband does not like nuts in most baked goods.

banana cake with cream cheese frosting
My friend always frosts the banana cakes she sends over so I decided to do the same.  It has always been a cream cheese frosting but she has since changed that.  I chose an easy, deliciously creamy cream cheese frosting.  This frosting is a real keeper, one that can easily be used to frost a wide variety of cakes and cupcakes.  It is very easy to make but when first started it looks like it will be too dry.  It won't be.  A bit of blending is all it takes to get a beautiful, versatile frosting sure to please that pairs nicely with banana bread!


cut banana cake crumb structure
My husband was quite pleased when he spotted the freshly frosted cake sitting on the counter.  We we have a special dinner that night that included the cake for dessert.  It is easy to see why this cake has stood the test of time.  The old fashion banana cake is simply delicious!  The cake is moist and tender with a nice body.  The flavour is wonderful, not too sweet, just perfect and the cream cheese frosting compliments the cake nicely.   The cake is cut into serving sizes directly in the pan.  This makes it a very easy cake for after school snacking.  The unfrosted banana cake, like most cakes, should freeze nicely.  The batter could also be used to make cupcakes.  Hands down this banana cake and frosting combination is a sure winner! 


Wednesday, February 19, 2014

Strawberry Dream Smoothie

You might be wondering why I have been posting so many smoothie recipes lately.  Smoothies have quickly become a breakfast staple for busy families trying to get everyone out the door and on their way for the day.  They are also very popular for the fitness crowd.  You can pack a lot of nutrition into a smoothie with very little effort and minimal muss.  It's a way of getting the nutrition of vegetables like spinach without the taste of spinach.  Surprisingly, spinach is one of those vegetables that you can't even taste in a smoothie!  Most smoothies will keep nicely in the refrigerator for the day as well so any left overs can be used as an easy, nutritious after school snack.  At any rate, I am experimenting with smoothies for those reasons but I also have another goal in mind that I will share with you shortly.

strawberry dream smoothie
I made a strawberry dream smoothie for us to share on Valentine's Day.  The pretty pink colour was quite appropriate to welcome the start of this special day.  A little dash of cocoa on top would have been a nice addition but I didn't think about it at the time.  If you aren't weighing your ingredients, use the amounts in brackets for this delicious smoothie.

Strawberry Dream Smoothie
recipe by:  Garden Gnome

40 g Body Fortress 100% Whey Protein Powder, Vanilla Creme (1 scoop)
170 g strawberries (5 extra large)
136 g banana (1 large)
500 ml (2 c) Silk almond milk original

Place the ingredients in a blender.  Blend until smooth.  Serve.

Yield: 1.125 L (4.5 c)
Serving size: 355 ml (12 oz)
Nutritional value per serving: 111 calories, 17 g carbohydrates, 2 g fat, 7 g protein, 101 mg sodium, 2 g fibre


Tuesday, February 11, 2014

Chocolate Monkey Smoothie

Smoothies are easily modified for fitness training and weight loss, however they can also be simply enjoyed as a healthy beverage.  The real challenge when it comes to smoothies is to not make them too high calorie.  The work around for the calorie challenge is to reduce the serving size.  Most of the smoothies I make give a yield of about 685 ml with a total caloric value of 450 calories or more.  I usually plan on four 170.4 (6 oz)  servings with a caloric value of about 120 calories depending on the ingredients.  Since most smoothies will keep for a day or two in the refrigerator, one smoothie is enough for two breakfast servings for us when combined with other foods like fruit, cheese, or oatmeal.
  

chocolate monkey smoothie
The chocolate monkey has been a popular milk shake flavour that is easily duplicated in a smoothie.  I like to use almond milk that is lower in calories that 2% milk and is lactose free.  Almond milk is lower in protein than 2% milk which is why I like to add ingredients higher in protein.  Protein powder greatly boosts the protein content but unless you are training it isn't really necessary.  Peanut butter is a good alternative protein booster.  The chocolate monkey smoothie combines the flavours of chocolate, peanut butter and banana into a deliciously delightful, silky smoothie that is sure to please!

Chocolate Monkey Smoothie
recipe by:  Garden Gnome

500 ml (2 c) Silk original almond milk
5 g (1 tbsp) Fry's premium cocoa powder
31 g (2 tbsp) Kraft smooth peanut butter
144 g (1 large) banana

Place the measured ingredients in blender.  Blend until smooth.  Serve

Makes 4 - 170.4 ml (6 oz) servings

Nutritional value per serving:  112 calories, 15 g carbohydrates, 3 g protein, 114 mg sodium, 2 g fibre

*The calculated nutritional value is based on the specified ingredient brands used.  Other brands can be substituted but may change the nutritional value.


Sunday, February 09, 2014

Avocado Dream Smoothie

I have never been a breakfast eater simply because my stomach does not tolerate anything well until I've been awake for a hour or so.  My normal breakfast time is about 11 AM regardless of how early I get up.  One recommendation for improving weight loss is to not eat anything for 12 hours before exercising which forces your body to burn fat rather than sugar.  That method suits me just fine.  I can eat up to about 9 PM then start my exercise the following morning at 9 AM.  I'm usually up before 7 AM and have a cup of black coffee about a half hour before exercising, something I did not think my stomach would tolerate but so far it is.  My current exercise routine is 90 to 120 minutes depending on what sessions I'm working on.  That means by the time I eat, I really need the protein!

avocado dream smoothie
I have been experimenting with smoothies to be used primarily as a source of protein for after my work-outs.  Yesterday, I shared my Berrilicious Protein Smoothie recipe.  That recipe used Life Clearly Fibre to add fibre to the smoothie but there are other ways to add fibre.  Avocados are high in protein, fibre and healthy fat.  Their rich, creamy almost buttery flavour make avocados perfect for smoothies.

The avocado dream smoothie  has a delightful delicious smooth, creamy flavour.  You would not know the spinach is an ingredient other than the green flecks.  A 6 oz serving has 8 g of protein and 3 g of fibre yet only 121 cal making this an ideal post exercise beverage.  I used weight measurements for accurate caloric tracking and replication.  If you are not tracking calories, you can use the amounts in brackets to make this delicious smoothie.

Avocado Dream Smoothie
recipe by:  Garden Gnome

500 ml almond milk
34 g baby spinach (small handful)
83 g strawberries (3 extra large)
112 g avocado (1 medium)
39 g Body Fortress 100% Whey Protein Powder, Vanilla Creme

Place ingredients in blender.  Blend until smooth.  Serve

Makes 4 - 170.4 ml (6 oz) servings

Nutritional value per serving:  121 calories, 10 g carbohydrates, 6 g fat, 8 g protein, 109 mg sodium, 3 g fibre


Saturday, December 07, 2013

Perfect Gift for the Holidays - Apple Butter

Our little grandkids love apple butter!  Apple butter is one of those culinary delights that can be difficult to find in the grocery stores and if you do, it is likely filled with sugar, artificial flavours and colours or preservatives.  However, all natural apple butter can be found at farmer's markets as well as specialty food shops.  Apple butter is extremely easy to make!
 

apple butter
Essentially apple butter is cooked down applesauce.  I don't add any sugar or seasonings but many do.  I wash the apples and quarter then place the unpeeled pieces in a stock pot with just enough water in the bottom to prevent sticking.  I allow the apples to cook until soft, stirring often.  Once the apples are cooked, I run them through the Kitchen Aid food strainer attachment to remove the peels, seeds and core.  At this point depending on the apple used, the purée is thick enough to be canned as applesauce.  Sugar and seasonings (eg. cinnamon) can be added at this point also.  If they are added, the sauce is reheated and boiled down to the desired thickness.  Applesauce is home canned in a boiling water bath canner for 10 min at altitudes 1,000 feet above sea level.  At higher altitudes, the processing time is 15 minutes. 

Once the applesauce is made rather than leave as is, it can easily be made into apple butter or apple leather.  Both are excellent for gift giving!  To make apple butter, pour the prepared applesauce into a large Dutch oven.  Cover partially then let bake at 120°C/250°F, stirring occasionally until reduced by about half.  The butter with be thick with a nice caramelization and mounds on the spoon.  Once it has reached the desired thickness, the apple butter can be ladled into hot jars and processed in a boiling water bath canner as per applesauce. 

Our grandkids will be elated to find a jar of apple butter for each of them under Grandma and Papa's Christmas tree!  Shhh...we won't tell them about the other jars of apple butter stored safely in Grandma's pantry :)


Sunday, November 24, 2013

Dehydrated Apple Slices

As mentioned in yesterday's post, I have been doing a bit more dehydrating this year.  Dehydrating is an easy way to preserve fruits and vegetables for long periods of time.  Apples can be dehydrated anytime throughout the year.  I prefer to dry them when in season.  Apples were just starting shortly before we left on the first leg of our winter vacation in early October.  That gave me just enough time to run a batch of applesauce as well as dry apple slices. 

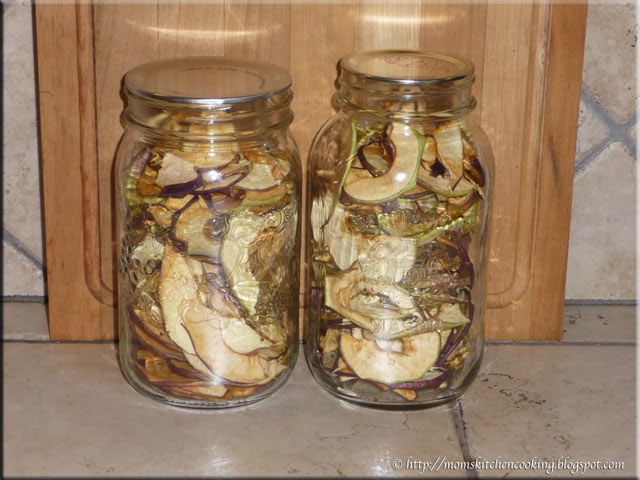
dehydrated apple slices vacuum sealed for storage
Apple slices are a versatile, easy to make product for the pantry.  They can be used for snacking, reconstituted for baking or added to beverages for a delightful, natural flavour.  One of our favourite fall beverages is mulled apple cider made in the crockpot.  I add dried apple slices to the mulled apple cider for extra flavour.   I also like adding a dried apple slice to a hot cup of tea for subtle flavour boost.

Apples need only be washed well, cored, sliced then dipped in an ascorbic acid solution to prevent browning before drying.  I  dried the apple slices at 135°F/57°C until they were leathery feeling.  Once dried, I vacuum sealed the apple slices in mason jars for storage.  Each mason jar held a dehydrator load of 6 trays.  I will have to dry more as two jars is not enough to last through the winter! 


Wednesday, October 30, 2013

Home Canned Pears

I was elated to discover three peach trees and a pear tree on our property when we bought our new house in September 2011.  I did a bit of research on caring for the trees then anxiously awaited the following spring.  Unfortunately, March of 2012 saw an unseasonable two weeks of summer-like weather with temperatures in the 80's (F).  This unseasonably hot weather caused the premature blooming of fruit trees in our area that immediately succumbed to the sudden hard frost followed by a cold, rainy remaining spring.  We ended up losing two of the peach trees, one which we suspected was close to being dead when we moved in.  The remaining peach tree and pear tree gave a yield of a couple of shopping bags worth of fruit, if that. 
our pear tree laden with pearsThis spring was cold to the point we were still wearing winter jackets a couple of days before leaving for our vacation home in Florida in May.  I figured it would be another year of low yield, small fruit.  Wrong!  The peach and pear trees flourished.

The peach tree was so overladen with fruit the branches bent to the ground!  The fruit was numerous but small and quite tasty.  The pear tree was also laden but the fruit was quite large.  Clearly we need to do some heavy pruning next spring.  I am beyond excited!  We are in the process of completely renovating our backyard.  The end result will see the majority of the backyard under decking leaving me just enough room for two 10' long square foot gardens for a total of 80 square feet growing space.  The peach and pear trees will be incorporated into the deck plans.  So, the spring of 2014 will see the start of utilizing a lot of small space gardening skills I've developed and mastered over the years.

home canned pears
We ended up with almost three bushels (about 150 lb) of pears which is really a nice yield for our first real pear harvest.  I expect the yield to be lower in 2014 as a result of the pruning but it should still be good, weather permitting.  Our pears are organically grown without the use of any pesticides.  Aside of the frost, the only problem we have had is the ripe pears attracting yellow jackets.  Since the pear tree is close to the pool, we were extra careful to clean-up any wind blown fruit.  This is good gardening practice anyway to deter pests and disease.  Other than that, our pear tree needs little in the way of maintenance but as this year showed, it has a big reward.

We gave a box of pears to a friend and another to a neighbour.  I canned pear quarters, two batches of 8 for a total of 16 - 500 ml jars.  The first batch was hot packed in a light syrup (pictured), the second raw packed in a light syrup (not pictured).  Both batches were processed in a boiling water bath canner.  The pears look lovely jarred up ready to be enjoyed during the winter months! 


Thursday, September 26, 2013

Kitchen Quick Tips - Ascorbic Acid

kitchen quick tips If you need to use ascorbic acid to prevent browning in fruit but have none, substitute a Vitamin C tablet.  A substitute for Fruit Fresh which our grocery stores are no longer carrying is a solution of lemon juice and a Vitamin C tablet in water.


Thursday, July 25, 2013

Kitchen Quick Tips - Strawberries

kitchen quick tips Choose plump, fragrant strawberries that are firm, bright and fresh-looking,  free of mold or bruised spots.  Refrigerated unwashed berries as soon as you get home.  Do not wash or hull berries until you are ready to use them.


Thursday, March 28, 2013

Kitchen Quick Tips - Storing Fresh Berries

kitchen quick tips
Swirl fresh berries in a solution of 1 part vinegar to 10 parts water before refrigerating to prevent the berries from getting moldy or soft.


Saturday, October 13, 2012

Home Canned Applesauce

Despite the fact that I have been focusing on home canning tomato products, other home canned products tend to get processed at the same time.  I took a bit of a breather from tomatoes to do a batch of applesauce.  This type of break serves as both a mental and physical change in pace.  A mental break in processing one type of produce helps to stimulate your creative thoughts so it is not uncommon to decide to process some type of sauce rather than just the plain product when you return to processing it.  A physical break helps to prevent repetitive stress injuries.  Each type of produce has specific methods of preparation, some of which (eg. seeding tomatoes) can cause repetitive stress injuries that can range from mild to severe and lingering.  It is best to avoid or minimize the impact of these types of injuries whenever possible.

home canned applesauce
Apples are just starting here so I picked up a 10 lb bag of Courtland apples at the local orchard.  I am so excited they decided to open this year!  They sold the orchard to a rather seedy character who took off in the middle of the night leaving them to clean up the financial mess he left behind.  They are in their late 70's so I really didn't expect they would re-open this year.

Applesauce is very easy to home can.  I simply wash then quarter the apples and put just enough water into a large saucepan to prevent sticking.  Once the apples are soft, I run them through the Kitchen Aid food strainer to remove the skins, seeds and core.  I do not add any sugar or flavouring to my home canned applesauce.  The reason being is I use applesauce as an ingredient for baking so plain works better for this purpose.  Applesauce made this way will take on a hint of colour from the skins of the apples as well as the flesh so the sauce will be a pale yellowish as this one was to having a slight pinky tinge.  I experienced a bit of separation in this batch of applesauce.  That can happen.  I simply stir the applesauce after opening the jar.


Wednesday, October 03, 2012

Jars of Home Canned Tomato Products Adding Up

Once my husband was out of the hospital and on the mend it was back to canning tomato products.  I had lost a bit of time but nothing I couldn't make up to reach my goal.  Tomatoes are funny in that they come in a rush but if the frost hits them they are unfit for consumption.  Tomatoes started about two weeks earlier this year so I already had it in the back of my head that they would be ending two weeks earlier.  Sure enough, my husband picked up the last hamper of tomatoes on the Sunday and Monday morning we woke to a rather heavy frost.
 

jars of salsa
I was in a canning frenzy once my husband was out of the hospital.  A lot of folks don't really realize how much home canning can disrupt a kitchen.  My kitchen was basically chaos for the entire month of September with jars cooling, jars ready to be filled, jars waiting to be moved to storage and jars upon jars.  Pictured are 24 jars of salsa and 5 jars of seafood cocktail sauce all just fresh out of the canners.  Now technically these jars are supposed to sit for 24 hours undisturbed.  Mine tend to sit about 18 hours then are carefully moved to counter space out of camera range.  The thing is I need that spot for filling jars and removing hot jars. 

So the jars are adding up and I do have a rather nice system.  The jars go from the canners to this spot then are moved to their final cooling spot.  The I remove the rings, wash the jars and move them back to this spot for their photo.  Then they are labeled and moved into a basket for taking down to the pantry.  I do have a system :) 


Tuesday, September 25, 2012

Tomato Stock

My tomato canning season in 2011 was almost non-existent.  September 1, 2011 saw us living between our new house with the new gas range not hooked up and the kitchen packed up enough at the old house that canning was pretty much impossible.  We signed all the formal paper work on September 15 making the house officially ours and September 18th headed down south to our vacation home in Florida.  Somehow in the chaos of the move about 2 L of tomato stock along with a few more refrigerator items didn't make their way from a cooler to refrigerator.  I was so dismayed loosing that tomato stock!

tomato stock
As a result we had only a very few jars of tomato stock until this tomato season.  My tomato stock is like liquid gold.  It is cold collected so never exposed to heat before the canning process.  That gives it a deep amber colour full of rich tomato flavour.  It is beyond delightful!  While I use tomato stock for cooking, I have been told is can be used to make delicious cocktail drinks as well.
Pictured are the first 8 - 250 ml jars I canned of tomato stock this year.  By the end of the season I canned 16 - 250 ml jars and 4 - 500 ml jars of tomato stock.  I had one problem with a 500 ml jar so should have had 5 of them but decided to err on the side of caution.  I will talk about that in a bit.  Doesn't the tomato stock look lovely in the jars?


Saturday, September 22, 2012

Freezing Tomatoes

The first hamper of tomatoes arrived mid-August, about two weeks earlier than normal.  I was quite excited to get a head start on tomatoes with the full intentions of processing ten hampers.  On August 28, my husband picked up the fourth hamper just before noon then headed to the office.  A couple of hours later as I was washing the tomatoes he was back experiencing severe abdominal pain.  I stopped what I was doing to care for him.  By early evening he was feeling fine.  I finished washing the tomatoes.  The next morning I was doing the prep work to make old fashioned chili sauce and a couple of batches of salsa.  I had everything measured for the chili sauce, jars heating in the boiling water bath canner when the door flew open, him back again in sever abdominal pain but even worse than the day before.  I took one look at him, called one of our kids to help me get him to the hospital, stuffed the prepped chili sauce ingredients into the fridge, turned off the stove and changed my shirt.  On the way to the hospital, he continued to deteriorate getting worse by the minute at the hospital and by 8:00 PM was admitted.  I came home around 11:30 PM after I was sure he was settled.  It had been a long, stressful day! 

crushed tomatoes packaged for freezing
The next morning he was scheduled for an ultra sound so before going to the hospital, I took the tomatoes that had been partially prepped for salsa (peeled, cut in half, drained but not seeded yet) out of the fridge.  I knew I wouldn't have time that day to make salsa so I packed the tomatoes tightly into freezer containers.  I don't freeze a lot of tomatoes because with the amount of tomatoes we use, we simply don't have enough freezer space and that's including the freezer compartments of two side-by-side refrigerators plus two chest freezers.  Still, freezing the tomatoes was a better option than having them spoil.

I prefer the rigid freezer containers over the zipper style freezer bags.  The containers with the dark blue lids are Ziploc and the ones with the light blue lids are Ball's new freezer containers.  Both have screw on lids so you know they won't pop off in the freezer.  I put the containers into the freezer then rushed up to the hospital where I stayed until 9:30 PM, arriving home tired but knew I had to do a bit of canning to tidy up.


Tuesday, September 18, 2012

Tomato Tips and Home Canned Tomato Juice

Before I start the tomato posts, I thought it would be nice to give a few tips for processing tomatoes.  Aside of the tomatoes I grow, I get hampers of field tomatoes for processing.  A hamper is 5/8 of a bushel or 15 kg (33.1 lb).  Many tomato product recipes call for a certain number of kilograms or pounds while others indicate the required weight followed by the number of milliliters or cups of prepared tomatoes needed.  This gives you and estimate of how many tomatoes to buy if necessary.  On average, 454 g (1 lb) of tomatoes will give a yield of 500 ml (2 c) chopped tomatoes or 625 ml (2½ c) sliced tomatoes or 375 ml (1½ c) crushed or puréed tomatoes.

Tomatoes should be firm and ripe.  Do not use tomatoes with signs of spoilage.  It is common to lose as much as 10% in weight due to spoiled tomatoes in a hamper.  The longer a hamper sits, the more that will be lost to spoilage so only buy or pick what you can comfortably process within a 48 hour period.  Washed well in soap to remove any soil.  Rinse then transfer to a sink of cold water with about a 125 ml (½ c) of white vinegar.  Let soak about 10 minutes.  This will remove any contaminants as well as kill of surface bacteria.  Tomatoes can then be blanched to slip the skins off if desired.

I usually make two or three products per hamper of tomatoes.  When tomatoes are cut, pectase is activated causing the tomato to drain liquid.  Seeding and draining tomatoes that will used for certain products is desirable as it reduces the cook time.  The liquid can be collected, strained and made into tomato stock.  Most of my tomato products are home canned using a pressure canner wherever possible although a few are processed in a boiling water bath canner (BWB).  However, many can also be frozen if you don't want to can them.  All home canned tomato products must be acidified with citric acid, lemon juice or vinegar.  Home frozen tomato products do not need to be acidified.

home canned tomato juice
Commercially canned tomato juice is not expensive but home canned tomato juice is by far superior in flavour.  Home canned tomato juice lacks the tinny flavour many complain about because it is canned in glass jars rather than metal cans.  It is also a great way to use up excess tomatoes from the garden as any variety of tomatoes work well for juice.

I canned 5 L of plain tomato juice in the pressure canner.  I have also been experimenting with a Clamato juice clone which is a spice up version to tomato juice using clam juice as an ingredient (more to come).  Tomato juice can be processed in a BWB canner (500 ml jars 35 min, 1L jars 40 min or 1.5 L jars 50 min) or in the pressure cooker (500 ml or 1 L 15 min at 10 lb pressure) at altitudes up to 1,000 feet above sea levels.  Refer to the altitude adjustment chart on the Canning FYI page if you are above that altitude for timing and pressure adujstment.


Wednesday, September 12, 2012

Peach Syrup

Home canners by nature tend to be a rather frugal segment of the population.  While the primary goal is to put safe, healthy, additive food on the table as well as provide a cushion in the form of a well stocked pantry, the economics of home canning cannot be overlooked.  Home canning can save a considerable amount of money and more so if you know how to use the waste or excess from home canning that might otherwise be discarded. 

peach syrup
I canned peach slices using a light syrup (2¼ c sugar in 5¼ c water).  There was about a cup of the syrup leftover so I let it cool then refrigerated.  The following day, I made another solution of the light syrup and added to the first to cook peaches for a batch of candied peach slices.  Essentially the wonderful flavour of peaches was infused into the remaining syrup.  Many would be tempted to discard the syrup but why? 

This delicious syrup is perfect for topping ice cream, pancakes or waffles and it can be used in baking and cooking.  I brought the syrup to a boil and ladled into hot jars then processed for 15 minutes in a boiling water bath canner.   The yield was 7 - 250 ml jars of peach syrup.  That's not bad considering I took a waste product of canning and turned it into a usable, delicious product for the pantry. 


Sunday, September 09, 2012

Summer Salsa

This has been a rather interesting summer with respect to produce.  Adverse spring and growing conditions has affected my home garden as well as local produce.  The asparagus and berry seasons were shorter.    Unlike other years, there hasn't been a break between the various produce.   Cucumbers ran into peaches that ran into tomatoes with pears starting as well.  I was starting peaches the same day I was finishing up peaches.  Tomatoes were about two weeks early so I was still doing peaches when the first of the tomatoes arrived.

summer salsa
I made a half batch of summer salsa to use up a few of the remaining peaches that also incorporated tomatoes and pears.  This was a good way to ease into the next produce while using up produce from the garden.  It was also a nice way to do a test batch of a new pantry product.

Summer salsa has a sweet, mellow flavour unlike the light, lively and spicy flavour of the popular tomato based salsa.  It would be good as a dip, condiment or as a topping for cream cheese based appetizers.  It is delicious!

Summer Salsa
modified from:  Bernardin Complete Guide to Home Preserving, 2006. Pp. 60

2 c peeled, seeded, chopped tomatoes
1 c peeled, chopped peaches
1 c peeled, chopped pears
½ c finely chopped red pepper
½ c chopped red onion
2 finely chopped jalapeño peppers
¼ c finely chopped fresh parsley
zest and juice of ½ lemon
2 tbsp balsamic vinegar
½ tbsp finely chopped fresh mint
¼ c liquid honey

Wash and prepare vegetables and fruit.  Combine prepared fruits and vegetables in large stainless steel saucepan.  Bring to a boil.  Stir in parsley, lemon zest and juice, balsamic vinegar, mint and honey.  Boil gently 5 minutes.  Ladle into hot jars.  Wipe rims.  Adjust two piece metal snap lids (or Tattler reusable lids or glass inserts).  Screw bands on jars (adjust accordingly if not using metal snap lids).  Process for 250 ml for 15 minutes  in BWB canner at altitudes up to 1,000 feet above sea level.  At higher altitudes refer to altitude adjustment chart on Canning FYI page.  Remove from canner.  Adjust bands if using Tattler or glass inserts.  Allow to cool 24 hours.  Remove bands and test for seal.  Wash and dry bands and jars.  Label and store.

Yield: 5 - 250 ml jars


Friday, September 07, 2012

Island Spiced Peach Chutney

I was finishing up canning peaches in mid-August and decided to make a peach chutney.   One of our favourite chutneys is mango chutney.  Peaches are similar in texture and flavour to mangoes so I was sure the peach chutney would be equally good.  A chutney is a rich, smooth, mellow, sweet-sour condiment containing a mixture of spices and vegetables and/or fruits.  Chutneys originate from South Asian cuisine.  The texture can range from fine to coarse.  Like salsas, chutneys can be made fresh or home canned for a delightful addition in the pantry. 

peach chutney
I chose a peach chutney recipe that had two options for spices.  The first was an island blend consisting of cinnamon, nutmeg and cloves.  The second was the Calcutta (traditional) spice blend of curry powder, celery seed and mustard seed.  I chose the island blend to make a half batch of the chutney.  With cinnamon, nutmeg and cloves it was a guaranteed winner!

Island Spiced Peach Chutney
modified from:  Bernardin Complete Guide to Home Preserving, 2006. Pp. 89

3¼ lp prepared peaches
1 c malt vinegar
1 c lightly packed brown sugar
 ¼ c fresh gingerroot, chopped
1 medium onion, finely chopped
1 green pepper, seeded & finely chopped
½ hot banana pepper, seeded & finely chopped
¾ c golden raisins
¾ c Sultana raisins
½ tbsp pickling salt
½ tsp ground cinnamon
¼ tsp ground nutmeg
pinch ground cloves

Combine peaches and vinegar in large stainless steel sauce pan.  Stir in sugar.  Bring to a boil and cook until peaches are tender.  Tie ginger in spice bag.  Add spice bag and remaining ingredients.  Return mixture to a boil.  Reduce to simmer.  Simmer until thick, about 45 minutes, stirring frequently.  Remove from heat.  discard spice bag.  Ladle into hot jars.  Adjust two piece metal snap lids (or Tattler reusable lids or glass inserts).  Screw bands on jars (adjust accordingly if not using metal snap lids).  Process for 500 ml for 10 minutes [15 minutes for L] in BWB canner at altitudes up to 1,000 feet above sea level.  At higher altitudes refer to altitude adjustment chart on Canning FYI page.  Remove from canner.  Adjust bands if using Tattler or glass inserts.  Allow to cool 24 hours.  Remove bands and test for seal.  Wash and dry bands and jars.  Label and store.


Tuesday, September 04, 2012

Peach Salsa

Salsa is a Spanish term for sauce.  In North America, salsa  usually refers to the spicy, tomato-based hot sauces typical of Mexican cuisine.   Salsa made its appearance in North America with the growing popularity of Tex-Mex cuisine and fast food restaurants (Taco Bell, Taco Express) as well as restaurants featuring Mexican cuisine (eg. Chi-Chi's).  In recent years the focus on eating healthy has made salsa a tasty, low fat alternative to fat laden dips.  Salsa is a very popular pub grub offering with nachos and it has become a staple in most homes.  It is one of those sauces that everyone likes!  I make several types of salsa (black bean & corn salsa, zesty salsa, salsa verde) and while my signature tomato based salsas (mild, medium, hot) remain the family favourite, salsas that are not tomato-based are quickly becoming family favourites.

peach salsa
I made a test batch of peach salsa when I was canning peaches.  Oh my, did it ever smell delicious cooking!  As soon as I get a break in canning tomatoes I'm going to pick up more peaches for a full batch of the salsa.  It will go nicely as a condiment with chicken or pork, as a topper for cream cheese appetizers and as a dip.

Peach Salsa
modified from:  Bernardin Complete Guide to Home Preserving, 2006. Pp. 61.

3 c prepared peaches
½ c plus 2 tbsp red onion, chopped
4 jalapeño peppers, finely chopped
½ c red pepper, chopped
¼ c parsley, finely chopped
¼ c white vinegar
1 tbsp liquid honey
1 small clove garlic
¾ tsp ground cumin
¼ tsp cayenne pepper

Blanch, peel, pit and chop peaches.  Measure 3 cups.  Prepare vegetables.  Press garlic through garlic press.  Combine ingredients in stainless steel saucepan.  Bring to a boil, stirring constantly to prevent scorching.  Boil gently, stirring frequently, 5 minutes.  Remove from heat.  Ladle into hot jars leaving ½-inch headspace.  Adjust two piece metal snap lids (or Tattler reusable lids or glass inserts).  Screw bands on jars (adjust accordingly if not using metal snap lids).  Process for 500 ml for 20 minutes  in BWB canner at altitudes up to 1,000 feet above sea level.  At higher altitudes refer to altitude adjustment chart on Canning FYI page.  Remove from canner.  Adjust bands if using Tattler or glass inserts.  Allow to cool 24 hours.  Remove bands and test for seal.  Wash and dry bands and jars.  Label and store.


Sunday, September 02, 2012

Candied Peach Slices

I like to experiment in the kitchen, always looking for one more great dish or food product that will go on to become a family favourite.  As I was preparing the peaches for canning sliced peaches, I decided to prepare extra for drying.  Fruits and most vegetables to be dehydrated must be blanched first to destroy enzymes that can cause spoilage during the drying stage and storage.

candied peach slices and peach leather
I blanched about the equivalent slices of three large peaches then puréed in a food processor and poured onto the fruit leather tray.  Once dried this is rolled as a fruit roll or can be dried a little crisper to be powdered.  The end result is in the large jar.

I lightly cooked the remaining peach slices in a light syrup then spooned the slices using a slotted spoon onto lightly oiled dehydrator trays.  Cooking in the syrup rather than blanching in water gives a candied effect.  The slices were dried at 135ºF (58ºC) until no moisture beads showed when the fruit was bent in half.  The slices were removed from the trays, packed into mason jars and vacuum sealed for storage.

Candied peach slices are a lovely addition in the pantry.  They can be used as a snack, an ingredient in trail mix or simply presented by themselves in a fancy bowl on a buffet table when entertaining.  These are sure to be a hit with the kids!