My photo
Ontario, Canada
I am a wife, mother and grandma who enjoys the many aspects of homemaking. A variety of interests and hobbies combined with travel keep me active. They reflect the importance of family, friends, home and good food.
Cook ingredients that you are used to cooking by other techniques, such as fish, chicken, or hamburgers. In other words be comfortable with the ingredients you are using.
--Bobby Flay

For Your Information

Please watch this area for important information like updates, food recalls, polls, contests, coupons, and freebies.
  • [March 19, 2020] - Effective Mar 17, this blog will no longer accept advertising. The reason is very simple. If I like a product, I will promote it without compensation. If I don't like a product, I will have no problem saying so.
  • [March 17, 2020] - A return to blogging! Stay tuned for new tips, resources and all things food related.
  • [February 1, 2016] - An interesting report on why you should always choose organic tea verses non-organic: Toxic Tea (pdf format)
  • Sticky Post - Warning: 4ever Recap reusable canning lids. The reports are growing daily of these lids losing their seal during storage. Some have lost their entire season's worth of canning to these seal failures! [Update: 4ever Recap appears to be out of business.]

Popular Posts

Showing posts with label stocks. Show all posts

Saturday, May 15, 2021

Canning Stock

I honestly don't cook with water if I can help it.  Why?  Water adds liquid but no flavour.  Stocks, juices, whey, milk and so many other liquids add that extra nutrition and flavour so necessary in pandemic cooking.  Meat stocks are one of the most frugal and easiest products to can.  It is the one product that I can never have enough of.

All meat stocks are canned basically the same way.  You need bones, filtered water, onion, carrot, celery, peppercorns and bay leaves.  For best flavour, roast the bones for an hour before making stock.  Always add a little apple cider vinegar to increase the calcium content of your stock.  Apple cider vinegar causes calcium to leach out of the bones increasing the nutrient density of the stock.  I use a pressure cooker to actually make the stock because it is a lot quicker but you can make stock in a stock pot or slow cooker.
 

When you buy beef or other meats in bulk, you get thinks like soup and neck bones.  Our friend is raising chickens for us so I get necks and feet.  I'm working on freezer clean-outs because we have new meats coming soon.  This is the time of year that I like canning stocks using bones from the freezer. 


Tuesday, May 14, 2013

Sealing Problems Canning Beef Stock

It's that time of year to get a bit of canning done before the busy canning months start.  This is a great time of the year to clean out the bones from the freezer that have been saved to make stock to free up a bit of freezer space in preparation for the arrival of our beef on the hoof purchase.  I like running a full load (16 - 500 ml jars) in the pressure canner.  A couple of weekends ago I decided to take a bit of time to can beef and turkey stocks.  I ended up using two large beef soup bones for the beef stock and 2 turkey carcasses for the turkey stock.

beef stock using tattler metal and 4ever recap lids showing 4 seal failures
I have been testing the 4ever Recap reusable canning lids.  The lids performed nicely as expected until I ran the first load of beef stock.  Pictured is the first load of beef stock.  The five jars on the left had Tattler reusable lids with one seal failure.  The six jars in the middle had metal snap lids with no seal failures.  The five jars on the right had the 4ever Recap reusable lids with three seal failures.  In terms of seal failures, a total of 4 of 16 or 25% seal failure is certainly not acceptable!

At this point, many home canners would blame the reusable lids and go back to using the metal snap lids.  That certainly happened when the manufacturers changed the metal lid colour from gold to silver, resulting in many complaints that the silver lids had a higher seal failure.  In reality they did not as the only difference was the colour.  Seal failures again increased when the manufacturers changed the plastisol sealant on the metal jars.  The old sealant required the lids to be scalded but the new sealant only needs to be warmed.  Over heating the new sealant results in seal failure so the real reason for these seal failures was user error.

I can't say I was happy about the seal failures but had to deal with them which meant doing a bit of trouble shooting.  I put the stock into the refrigerator then washed the lids and rings well and set about making the turkey stock.  The plan was to re-process the beef stock along with processing the turkey stock.  Re-processing is as much work as the original processing.  While stock can handle re-processing, some home canned foods cannot.  If this type of food does not seal, the only choice is to refrigerate and use within a couple of days. 

beef and turkey stock showing two more 4ever recap seal failures
All went well with filling and processing the jars.  I ran the seal failures first even though I don't like running only a few jars in the canner.  That 1 - 500 ml jar beef stock with Tattler lid and 3 - 500 ml jars.  I ran the turkey stock in a separate load.

The following morning I removed the bands.  Pictured are all of the jars beef and turkey stock (sealed and unsealed).  The jar with the Tattler lid and one with a 4ever Recap lid that did not seal from the first processing sealed with the second processing.  The two unsealed jars of beef stock from the first load to the right had 4ever Recap lids.  They failed to seal with the second processing.  All of the turkey stock sealed.  By now I was getting a bit frustrated, having run the canner three times and still getting seal failures!  In my mind though, there had to be another problem besides just the 4ever lids because of the three that had not sealed in the first load, one had sealed in the second load.  The third load had no re-usable lids and no seal failures.

using alcohol to clean rims of mason jars
I was determined to find out what was causing the seal failures.  Meat products can be difficult to home can because there is a bit of natural oil in the product.  If that oil gets onto the rim of the jar where the ring/gasket or plastisol sealant sits, it can cause a seal failure.  If you watched the video of jars of beef stock fresh from the pressure canner, it is easy to see how boiling stock could actually be forced between the lid and rim of the jar.  In this case, proper headspace had been left so I did not feel that leaking stock was the problem.  There was no indication of any leakage in the pressure canner, reinforcing this conclusion.

Even though I used a funnel to fill the jars, I decided to use isopropyl alcohol (rubbing alcohol) to wipe the rims of the jar to ensure there was no oil on them. I normally do not do this as my jars go through the dishwasher just before using them so there should be no oil unless spilled on during filling which is unlikely but still possible when using a funnel.  Many home canners routinely wipe the rims of their jars with vodka or white vinegar but I use a paper towel dampened with water.

thread problem on golden harvest mason jar
As I was filling the three jars (2 beef stock re-cans, 1 turkey left-over from run 3), I noticed a problem with the metal band seating on the threading of one of the jars.  At one time, occasionally there would be a problem with a band seating.  This seemed to be isolated to using newer bands on older Imperial mason jars but I haven't ran into that problem in years.  The jar in question was a Golden Harvest, manufactured by Jarden Home Brands in the US.  This is now the same manufacturer of Ball, Kerr and Bernardin mason jars.  This particular 500 ml jar came from a box of jars filled with food that I had to clean out.  The box was purchased in 2010 from Home Hardware so the jars are not old although that doesn't mean the jar itself could be older.  At any rate, it is not an old jar.

Both Tattler and 4ever Recap reusable lids require tightening the band then turning back a quarter an inch for processing.  As I tightened the band, it popped off.  I tried again with the same results.  I quickly poured the hot stock into another prepared jar, positioned the lid and tightened the band then turned it back.  Once the jars were safely in the processing, I turned my attention to the jar.  After trying four different bands, I realized the problem was not with the bands at all but rather the threads on this jar were defective.  They were just off slightly yet the first time through the canner, a band had held just enough but did not tighten enough for the 4ever Recap lid to form a seal.

There is a misconception that new mason jars are flawless.  This simply is not the case.  I have seen brand new canning jars with air bubbles in the glass, small chips in the rim, a droop in the rim and slightly misshaped openings.  It happens.  A defective thread is a difficult one to catch and in fact if a band catches just enough, you might not catch it especially if using a boiling water bath canner.

finally all jars sealed
The two jars of beef stock, one with fresh jar and 4ever Recap, the other with same jar and 4ever Recap sealed.  The turkey stock jar with a 4ever Recap lid sealed as well.  I marked the jar with the defective rim.  Unfortunately this jar will not be suitable for canning or dry storage requiring a screw band closure.  It can however, be used for vacuum sealing.

Finally, after running the canner four times all my jars of stock were sealed.  Two of those loads experienced seal failures.  In total, there were 4 seal failures, 1 was Tattler, the other 3 were 4ever Recap lids. At the end of the fourth run, all lids had sealed.  The only problem I found that accounted for one seal failure was the defective threads on one jar.  I still have no idea why the other 3 lids failed to seal originally.  There was nothing apparent that would contribute to the seal failure.  I do not feel that any of the seal failures were due to the lids considering two brands of reusable lides were affected.  It is possible that I did not turn the band back enough when putting the reusable lids on or I may not have tightened the band enough when just out of the canner even though I took great care during both steps. 

In comparison to the Tattler reusable lids, the 4ever Recap reusable lids perform just as well.  I do like the look of the 4ever Recap reusable lids that have a bit of a raised ridge on top giving them a rather unique look.  One thing I did notice because I reused both lids and rings in this canning session was the absence of sealing marks on the silicone rings.  I'm looking forward to doing a lot of canning reusing the 4ever Recap lids and rings.  It is encouraging that the silicone rings should not wear out under normal use! [retracted November 10, 2013 as all jars using the 4ever Recap reusable lids lost their seals during storage1
!]


Sunday, May 05, 2013

Jars of Beef Stock Fresh From the Canner

While many home canners like myself can year round, the busy home canning season (mid-May to mid-October) is just around the corner.   Home canning is a very satisfying and rewarding frugal activity.  It saves a tremendous amount of money!  I've been home canning well over thirty years so know what to expect and what to troubleshoot if something goes wrong.  Those new to home canning often panic thinking there is a problem when what they observe is a natural part of the process.  They are also prone to those accidents that can cause food spoilage and/or physical harm.

At each step of the way, the home canner is dealing with glass that can break due to thermal shock and hot foods that can cause rather nasty burns.  A safety rule is children and pets should not be in the canning area.  If you must have either in the kitchen when canning, set up a safe zone so they do not accidentally get in the canning area.  Aside of avoiding canning when tired or distracted (easier said than done), I minimize the risk for both by:

  • prepare ahead -  Everything I need for that canning session is ready to use in the order it will be needed.
  • avoiding thermal shock - Glass can break if it is cold and a hot liquid is poured into it or if a canning jar is placed into the canner with too much of a temperature difference.  I keep everything hot!  The jars are hot, the food is hot and the canner is hot ready for the hot prepared jars.  Even though my counter top is ceramic tile it could cause thermal shock during the filling stage and when the jars are removed from the canner.  I always work on a cork trivet when filling the jars which eliminates any thermal difference.  I place hot jars from the canner onto a folded t-towel to cool.  Jars being removed from the canner are particularly susceptible to thermal shock if they are hit with a cold draft.  During the canning process and jar removal,  I close the patio door (we don't have a kitchen window), turn off the exhaust fan if it is on and turn off the ceiling fan.  Cooling jars are always placed so they will not get a draft until they reach room temperature.
  • personal safety - I have my hair tied back and wear slip proof socks, capris and a t-shirt when canning.  I don't wear anything loose or baggy that could catch on canning equipment.   I keep a damp t-towel to clean up any spills on the floor as they happen.  I keep another damp t-townel handy to wipe any spills on the counter.  I make sure the dishwasher is empty before starting to can so any utensils or dirty dishes go immediately into the dishwasher as to not clutter up the counter. 

I processed 16 - 500 ml jars of beef stock in the pressure canner yesterday.  Meat stocks are low acid so must be processed in a pressure canner.  They cannot be safely canned in a boiling ,bath canner!  Jars are most susceptible to breakage during the filling stage, loading into the canner and removing from the canner.  Here is a video I took that will give you a bit of a perspective on jars just out of the pressure canner.


The video is of beef stock just out of the canner.  The lids to the left are Tattler reusable lids, the middle are metal snap lids and to the right are the 4ever Recap reusable lids I'm testing.  A pressure canner processes at 240°F rather than the 212°F of a boiling water bath canner.  Foods taken out of a boiling water bath canner are hot.  Foods taken out of a pressure canner are hotter!  If you look close you will see the contents still boiling in the jars.  The contents will continue to boil for ten minutes or more.  That means if a jar were to break, you have a very good chance of being hit with shattering glass as well as boiling food.  The second thing you will notice is the ping.  Home canners love to talk about the ping!  It is important to realize that the ping only occurs with the metal snap lids.  There is no ping with reusable lids (eg. Tattler, 4ever Recap, glass inserts).  There are two types of pings.  The first type of ping is what you are seeing right from the pressure canner in response to the boiling contents of the jars.  This pinging will continue until the contents cool enough to form a vacuum at which time there will be a final ping.  The first type of ping does not occur with foods processed in a boiling water bath canner.

The first type of ping on pressure canned foods explains why leaving the proper amount of headspace when filling jars is critical.  The boiling contents can force their way between the lid and rim of the jar which in turn can cause seal failures.  Not enough headspace can also cause pressure on the lid which can make the lid buckle, also affecting the seal.  Some foods are quite prone to leakage when being pressure canned especially dried beans.  Even if your jars lose liquid or there is signs the jars leaked into the canner, do not panic.  Remove the jars for cooling.  Once cool, check the seal.  If they have sealed, they are fine so simply wash, label and store.  If one or more did not seal, either reprocess or refrigerate and use within a couple of days.  Reprocessing is every bit as much as the initial processing right from heating the jars and food, filling and timing.  In general, I tend to avoid reprocessing if at all possible.  It is not cost effective to run the pressure canner to reprocess only a couple of jars.  If I'm canning something similar later in the day or the next day I will run those jars with it, otherwise I freeze or refrigerate. 


Saturday, October 27, 2012

Tomato Stock Problem

If you have been following this blog you will know I do a lot of home canning.  Each year I process somewhere between 1,100 and 1,400 jars of food.  For the most part, I experience few problems but those that I do, tend to have me shaking my head because sometimes I just can't explain why the problem occurred.  I have over 35 years of home canning experience so know what to look for with respect to home canning problems which tend to be few and far between.   I know what kind of problems to expect and what to do to prevent the problems from happening in the first place.  Normally, I can pin point the root to any home canning problems.

tomato stock problem
I canned my third batch of tomato stock in 500 ml jars.  I normally can this stock in 250 ml jars but I was down to 4 empty jars and simply did not want to buy more jars.  The stock was perfect!  I brought it to a boil then ladled into hot jars and processed in the pressure cooker for 30 minutes at 10 lb pressure with no problems.  Once the pressure came to zero, I removed the jars from the canner for their 24 hour cooling period (pictured).  I immediately noticed one jar (far right) was a bit cloudy but the others were clear with a little tomato pulp on the bottom just the way they should be.

I decided to let it sit for the cooling period to see if the stock would clear.  The following day, it was still cloudy.  I removed the rings from the 4 jars, washed and stored but left the cloudy jar out.  In my mind, I thought if it didn't clear after 36 hours I would toss.  My mantra with home canning is always if in doubt toss it out.  Well, the jar of stock did not clear and despite smelling delicious, I emptied it out.  I have no idea what happened.  It was from the same batch, put into hot prepared jars that had gone through the same dishwasher load and processed in the same canner load.  Jar contamination should not have been a problem given I ran all jars prior to filling through the dishwasher and yet that is the only conclusion I can come up with.  Had the stock itself been contaminated, all the jars would have been cloudy.  I know there was no bacterial growth because the stock had been pressure canned. The contents of jars of food coming out of the pressure canner are still boiling inside the jars.  Adding to the mystery, the cloudy jar of stock sealed fine during the cooling period so that wasn't the problem.  At any rate, the problem remains a mystery.


Tuesday, September 25, 2012

Tomato Stock

My tomato canning season in 2011 was almost non-existent.  September 1, 2011 saw us living between our new house with the new gas range not hooked up and the kitchen packed up enough at the old house that canning was pretty much impossible.  We signed all the formal paper work on September 15 making the house officially ours and September 18th headed down south to our vacation home in Florida.  Somehow in the chaos of the move about 2 L of tomato stock along with a few more refrigerator items didn't make their way from a cooler to refrigerator.  I was so dismayed loosing that tomato stock!

tomato stock
As a result we had only a very few jars of tomato stock until this tomato season.  My tomato stock is like liquid gold.  It is cold collected so never exposed to heat before the canning process.  That gives it a deep amber colour full of rich tomato flavour.  It is beyond delightful!  While I use tomato stock for cooking, I have been told is can be used to make delicious cocktail drinks as well.
Pictured are the first 8 - 250 ml jars I canned of tomato stock this year.  By the end of the season I canned 16 - 250 ml jars and 4 - 500 ml jars of tomato stock.  I had one problem with a 500 ml jar so should have had 5 of them but decided to err on the side of caution.  I will talk about that in a bit.  Doesn't the tomato stock look lovely in the jars?


Wednesday, May 02, 2012

Home Canning Defatted Meat Stocks

As the time approached for the arrival of our beef on the hoof purchase, I transferred what I could from the large chest freezer to the smaller chest freezer and the freezer compartments of both refrigerators.  A common trick many home canners use when needing freezer space is can anything possible.  Rather than continuing to store the remaining two packages of beef soup bones, a package of chicken bones, and a litre container of uncooked crushed tomatoes, I decided to can them up. 

using a gravy separator to defat chicken stock
I spent two canning sessions canning meat stocks which actually ended up in three canning sessions due to seal failures on three jars.  I always defat my meat stocks because it results in a low fat stock that looks nice in the jars.  The fat and skin is left in the stock when making it because it adds flavour.  Stock making is usually a two day process when defatting as allowing the stock to cool completely makes it rather easy to simply lift the fat off the surface of the stock.

Chicken fat does not harden like beef fat does.  So I came up with an easier method for defatting the chicken stock.  I strained the hot stock then poured it into the gravy separator and let is settle.  Then I slowly poured the stock into the jars and repeated the process until all the jars were filled.  This worked so nicely that I might eliminate the cooling period for other meat stocks.

home canned defatted beef, tomato beef and chicken stocks
Pictured is the stock I made during the first canning session. I make tomato beef stock (far right), beef stock (middle) and chicken stock (far left).   The following session I made tomato beef stock and beef stock.  The total number of jars for the two canning sessions was 27: tomato beef stock (9), chicken (6), beef 12).  Of the total jars, one chicken and two beef did not seal.  Notice I used mainly Tattler reusable lids on the jars in this batch and all Tattlers for the second batch.  The following day, I reheated the stock in the jars that did not seal and reprocessed.  Of those three jars, two did not seal meaning my technique with Tattlers is off just slightly.   The method has been updated to tighten finger tight rather than tight with a quarter inch turn back.  I was still using a box of Tattlers from my first purchase not realizing that the method had been revised until my new shipment came in.

I put those two cooled jars into the freezer rather than process for a third time.  I could have reprocessed them but I seldom reprocess jars with seal failures as I don't like to run the pressure canner unless at least half full.  Besides, I was pressed for with the blind installers coming out and the kids arriving the same day.  I could have put them in the refrigerator to use within the next few days but we already had plans so freezing was the best option.


Monday, April 30, 2012

Frugal Kitchens 101 - Tips for Making Stock

Frugal Kitchens 101
I make a lot of stock because I cook with a lot of stock.  My reasoning is there is no point using water which has no flavour when flavour can be added using stock.  More importantly using stock adds nutritional value.  Meat or vegetable stocks can be used as the liquid in mashed potatoes or the liquid for cooking pasta, rice, barley, beans or vegetables in.  It can be used as a liquid in some breads and biscuits.   Stocks are also used for making soups, stews and casseroles.  So in the big picture, the average home cook who cooks from scratch can use a lot of stock.

Homemade stocks are tastier and considerably less expensive than store bought stocks.  Made from meat scraps (eg. bones, fat, skin) that many would toss, the frugal home cook realizes the potential savings.  A litre of homemade stock comes in at only pennies in comparison to store bought that costs about $2 per litre.  Contrary to popular belief that it takes hours to make a good stock, one can easily be made in a couple of hours using a pressure cooker.  Here are a few tips for making stock:

  • meat/bones - Choose bones with a little meat left on.  You can use any type of meat: ham, beef, venison, moose, chicken, fish.  Bones and meat scraps can be froze until you have enough to make stock.  Roast meat bones and scraps for a richer flavoured stock with deeper colour.  Place meat scraps and bone in countertop roaster or roast in the oven until browned.
  • include the fat and skin - Both fat and skin add a lot of flavour to the stock so be sure to include those types of meat scraps in your stock making pot.
  • vegetables - Good stock includes vegetables for flavour.  The vegetables are removed later during the straining process.  Typically, the vegetables for meat stocks include: onion, carrots, celery and/or celery leaves, and parsnip.  Tomato may be added for a flavour boost in beef stocks.  Wash but do not peel  the vegetables.  Cut both ends off the onion then quarter and add the unpeeled onion to the stock pot.  The onion skin adds natural colour to the stock.  Cut both ends from the 1 - 2 carrots and 1 parsnip.  Cut into about 2 - inch pieces and add these to the stock pot.  There is a lot of nutrition just below the skin on carrots and parsnips so this keeps the nutrition in the stock.  Parsnip adds a lovely note to the stock.  Celery should be washed then trimmed and cut into about 3 - inch pieces.  Celery leaves add wonderful flavour to the stock.  If using tomato, cut an unpeeled washed tomato into quarters and add to stock pot or use about a cup of crushed tomatoes.
  • seasonings - Unless making a stock for a specific purpose, I don't heavily season my stocks.  The reason being, it makes the stock more versatile.  I use 1 bay leaf, 5 - 6 whole peppercorns, a splash of Worcestershire sauce for red meat stocks, and about a half teaspoon sea salt. 
  • cooking - Stock making is generally a long, slow cook process unless using a pressure canner.  If using a regular stock pot, cover the bones and vegetables with water to about 2 - inches below the top of a large stock pot.  Bring to a boil, reduce heat to a simmer.  Cover and let simmer adding more water if necessary for about six hours.  If using a pressure cooker, cover bones and vegetables with water to the 2/3 mark.  Cover and bring to pressure.  Reduce the heat just low enough to maintain pressure.  Cook at pressure for 50 to 90 minutes.  Turn off heat and allow pressure cooker to de-pressurize.
  • straining - Remove any chunks of meat with a slotted spoon and reserve for soup.  Strain the remainder through a colander to remove bones, skin and vegetables.  Strain the stock again through a cheese cloth lined mesh strainer. 
  • defatting - Defatting the stock gives a lovely flavoured, low-fat stock suitable for most culinary purposes.  Allow the stock to cool completely.  Peel the hardened fat off the top.  Chicken stock can be defatted using a gravy separator while it is still warm.
  • concentrating - Stock can be reduced to a concentrated stock, ideal for culinary applications where you want the flavour but not a lot of additional liquid.  Bring the defatted stock to a boil then reduce heat to a low boil.  Boil until the stock is reduced by half or three quarters.  Concentrated stock will gel when cooled.
  • storage - Stock can be refrigerated for 3 days in the refrigerator for use that week as well as  home canned or froze for longer storage.  Home canned gives a ready to use, shelf stable stock without having to thaw.  Concentrated stock can be spooned into ice cube trays, froze then popped out and stored in a zipper freezer bag in the freezer for convenient use.  A 2 oz frozen concentrated stock cube is equivalent to 4 to 8 oz of stock depending on how much you reduced the original stock.


Wednesday, January 04, 2012

Two Holiday Canning Opportunities

As a result of our house being on the market for 18 months and finally moving, my pantry stock needs replenishing.  That means I am taking advantage of every home canning opportunity I can now that we are back from our vacation home.  Between Christmas and New Year's I actually had three wonderful canning opportunities.  The first two will be covered in this post and the last one in Friday's post.

home canned turkey stock
We had a 22 lb turkey for our Christmas dinner.  It fed eleven of us nicely with lots of left-overs.  Some of the left-overs were used that week while the rest went into the freezer for later use.  The carcass went into the largest stock pot to make turkey stock.

Stock making is always a two day process for me if I intend canning it because I like to defat the stock before canning.  Pictured are the thirteen beautiful 500 ml (pint) jars of turkey stock fresh from the canner.  While have used the water bath canner, this was the first run of the pressure canner on my new gas stove.  I was pleasantly surprised at how much easier it was to maintain the pressure during processing!  The pressure canner worked flawlessly actually giving better results with a lot less fiddling trying to maintain the pressure.  I will never can on an electric stove again, well technically I will at our vacation home but that will not involve using a pressure canner.  It will be water bath canner only.


home canned orange cranberry sauce
In our corner of beautiful southwestern Ontario we tend to get fresh cranberries in time for our Thanksgiving (2nd Monday in October) and again just in time for Christmas.  I don't think they are great sellers here as the stores tend to bring them in, in limited quantities so if you want fresh you have to get to the stores early.  I usually buy a couple of extra bags to toss in the freezer.

I took an extra bag out of the freezer just in case I needed more sauce in addition to the fresh made sauce.  We didn't need that bag so I made an orange cranberry sauce to can.  I guestimated that the 340 g bag of thawed cranberries would give a yield of 3 cups or 3 - 250 ml (half-pint) jars.  The yield was just shy of that mark.  I processed all three jars anyway.  The next morning after cooling one of the full jars failed to seal.  I have no idea why.  I've had very few seal failures over my more than 30 years of canning so the occasional one doesn't bother me.  I removed the metal two piece lid from that jar and the partially filled jar, replacing them with plastic storage lids and popped the two jars into the freezer.  The remaining sealed jar went into the pantry.


Thursday, February 17, 2011

Kitchen Quick Tips - Cooling Stocks for Defatting

kitchen quick tips
Meat stocks are best prepared with the fat for flavour then defatted for freezing or canning.  Strain the stock to remove solids.  Allow to come to room temperature then place the stock pot in in the sink on a bed of ice.  Surround the stock pot with ice.  Once cooled, peel off the layer of fat.  Strain again then proceed with canning or freezing.


Friday, February 04, 2011

A Stock Making Week

We arrived home from our vacation home to realize my stock supply with the exception of tomato stock that I guard like gold was at rock bottom.  I had to scrounge through the freezer to find enough chicken stock for the comfort meal I wanted to make!  There are two reasons why my stock supply was low.  First our house has been on the market since March of 2010 meaning I've been reducing canning where I can to allow the house to be shown more often.  Second, I took a total of a case down to our vacation home over the last two trips.  I'm used to cooking with my home canned stocks so wanted a taste of home there as well.

beef and chicken stocks
I had no choice but to get busy making stocks.  Stock making is always a two day event here.  I prefer making stocks in the dead cold of winter because the stock can sit in the sunporch over night for defatting rather than take up refrigerator space.  First on the agenda was beef stock (far left) with a yield of 12 - 500 ml jars.  Next on the agenda was chicken stock (right) with a yield of 14 - 400 ml jars.  Within 4 days total but nowhere near that time length in work 26 - 500 ml jars were stored safely in my pantry.

That very weekend we were having our belated Christmas celebrations complete with a 22 lb turkey.  I knew I would be canning turkey stock the start of the week.  There is absolutely no reason to let a perfectly good turkey carcass go to waste!

turkey stock
My turkey stock is never nice and clear even if I strain it.  One reason for this is the turkey carcass has bits and pieces of meat and stuffing which affects the clarity of the stock.  I always make stuffing (in the bird) rather than dressing (outside the bird).  Another reason is the turkey carcass has a higher percentage of collagen that causes gelatin to be released so the stock gels somewhat that gives a cloudy appearance when cooled.  My yield for the turkey stock was 16 - 500 ml jars.

As far as cost effectiveness goes, homemade stock is always a frugal choice.  I ended up with 42 - 500 ml jars that if bought in the grocery store at $1.49 each would have cost me $62.48.  My costs for 3 batches cooking for 3 hours each (total time 9 hours),  processing time at 20 minutes each (total time of 1 hour),  24 metal snap 2 - piece lids (18 were Tattler reusable lids) and miscellaneous supporting ingredients (onions, carrots, celery, peppercorns, bay leaves, and etc) came out to a total of $3.40 for a grand savings of $59.08.  Now the beauty of making homemade stocks aside of the huge cost saving is you can freeze them if you don't want to can them.  I can mine because it is then ready to use so more of a convenience product.  I use a lot of stock in everything from soups and stews to bread and muffins!

If you notice on each batch of stock I have used the Tattler reusable lids for some of the jars.  At the moment I have 2 dozen vintage glass inserts,  6 dozen Tattlers and about 70 dozen metal snap lids.  I am reusing my Tattler lids as soon as I empty enough jars to get another canner load.  I plan to buy several more dozen Tattler lids this spring in preparation for the busy canning season.  Eliminating the single use metal lids will reduce my canning costs by 8¢ to 12¢ per jar.  At an average of 1,2,00 to 1,400 jars per year that alone will be a nice savings!


Wednesday, January 26, 2011

What I Did With 16 Chicken Legs Backs Attached

Chicken used to be relatively inexpensive here but over the past several years the price has crept up there.  One of the local grocery stores had their $1 sale on so I decided to take advantage of the chicken that was on sale.  The chicken pieces were legs with back attached.  As little as a year ago these would go on sale for 69¢ per pound but now the sale price is $1 per pound.

packages of chicken
My husband picked up four packages of the chicken.  Usually this store has the chicken packaged in plastic bags but now they are on foam trays with plastic wrap.  I'm not fond of this type of packaging but that is all that was available.  I ended up with 16 legs back attached at a total weight of 5.932 kg (13.07 lb) and cost $2.20 per kg ($1 per lb), $13.05 total cost.  This would break down into 8 meals for us at a cost of $1.63 or about 82¢ per serving for the chicken which is not a bad price given the costs of other meats.  However, I had plans to stretch the chicken out a bit further than 8 meals.  Chicken stock was on the adgenda since I was completely out here although two jars are safely tucked away at our vaction home. 

vacuum sealed chicken for freezer
The first thing I did was vacuum seal eight of the chicken legs into meal sized portions.  That was enough for four packages for the freezer.  As a rule with a sale like this I tend to put up half then use the other half fresh and/or make other products for the pantry.  Of the remaining eight legs I used two for garlic pepper chicken with TPC Sesame Garlic Spaghetti for dinner that night.  Three of the chicken legs went into the stock pot for stock.  Realizing that our Christmas celebration was on the up coming Saturday meaning I would have a turkey left-overs and turkey stock to deal with, I put the remaining three pieces of chicken into the freezer as well.

chicken stock
I allowed the chicken legs to cook through then removed them from the stock and deboned them.  The bones and skin went back into the stock pot for a long, low simmer.  I seasoned the meat then used it for two meals of wraps and chicken tacos.

I ended up with 14 - 500 ml jars of chicken stock which is about my average yield when making stock.  As you can see I used Tattler reusable lids on seven of the jars.  The more I use these lids the better I like them!  For those wondering if I had to buy the chicken stock the equivalent would come in at approximately $20.86 ($1.49 each).  The cost of the homemade stock came in at $2.86 including the lids and electricity for both cooking and processing the stock.  It is easy to see where making homemade stock is very cost effective.  The stock can can be home canned or frozen.  I prefer canning mine for the convenience of ready to use.


Saturday, September 04, 2010

Tomato Stock

Tomatoes yield very little waste when processed.  The reason for this is the entire tomato can be used.   The pulp can be used in sauces, chutneys and salsas, the skins can be dried for tomato powder and the natural juice that is released can be used for stock.  Tomatoes contain high levels of the enzyme pectase (pectinerterase) that is activated when tomatoes are cut.  This results in separation of the pulp and juice in home canned tomatoes.  The enzyme is destroyed at temperatures over 180ºF (82ºC).  Using this knowledge it is possible to force tomatoes to separate in order to make two products, one from the pulp and the other from the separated juice.

tomato stock
Removing the juice from the pulp results in a thicker pulp that takes less time to boil down to the desired consistency for sauces, ketchups and paste.  Reserving that liquid to can as tomato stock puts one more product on your pantry shelves but once you have tried it you will see why I rave a little about it.  It has a lovely, mellow flavour.  Tomato stock gives an amazing flavour to roast beef during cooking and to the resulting gravy.  The stock is also wonderful added to soups or stews as well as using as the liquid for cooking rice or pasta. 

Each hamper of tomatoes will give a yield of about 20 - 250 ml (half-pints) of tomato stock.  This particular hamper was processed into two sauces, one that did not have the juice removed so I ended up with 10 half-pints.  Every time I make a sauce where the tomato juice can be separated from the pulp I do.  I'd like to finish the season with 60 - 250 ml (half-pint) jars of tomato stock for the upcoming year.  I'm using half pints because I prefer that size.  It is the perfect amount for adding to roasts and stews.  The tomato stock can be processed in 500 ml (pints) jars as well as L jars.  I process at 10 lb pressure for 15 minutes.


Sunday, February 07, 2010

Alphabet Soup

This past winter I feel like I could easily pass for The Soup Nazi on Cramer verses Cramer. The soup pot aka pressure cooker here has been in high gear with homemade soups being made a couple of times a week. The fact that I can put a great homemade soup from scratch on the table in under an hour is very appealing. More appealing is simply by changing out a few ingredients I can end up with a totally different soup so while we have had a lot of soup this winter all have be different.

how to make alphabet soupThe Prep

Beef soup bones (1) are one of my favourite starters for homemade soup. There is just enough meat on them for the resulting soup. Soup bones are packed full of flavour and they are very inexpensive. This soup started with the soup bones, a carrot, celery and chunk of onion with enough water to fill the pressure cooker 2/3 full (3). After 30 minutes in the pressure cooker the meat was falling apart and the stock rich (4). I removed the bones then removed the meat and set aside then strained the stock. Additional ingredients (2) were tomato stock, beef stock, a bay leaf, browning, Worcestershire Sauce, tomato powder, carrot powder, diced carrots, frozen peas, celery, and alphabet pasta. I was going to add corn but decided not to after the picture was taken.

alphabet soupAlphabet Soup

The two key ingredients in this soup that really made the flavour was the tomato stock and the tomato powder! Both added a depth of flavour that took this soup well beyond a regular beef based soup. Of course any kid or kid-at-heart would love scooping up the alphabet pasta. This really was a gorgeous soup!

Pictured is the alphabet soup in a porcelain bow with platinum detailing. I seriously have 6 complete set of dishware, one homemade, and extra odd pieces. Now before you say that is a lot of dishware unless I absolutely have to I prefer to serve my guests on real dishware not paper or plastic. As an aside, I have enough dishware and cutlery to serve comfortably 36. The red and black set are are daily dishware so you really don't get to see a lot of the other dishware except when I want a change for some reason. Of this set, the cappuccino cups and saucers get used the most. I like the contrast of the soup against the platinum although I don't like the reflective glare.


Thursday, November 26, 2009

Kitchen Quick Tips - Saving Bones

kitchen quick tips
Larger cuts of meat with bone in and whole birds (duck, turkey, goose) are often served during the holiday season. All of the bones are ideal for making stocks but there may not be time to do so. After the meat or bird has served, debone then pop the carcass into the freezer. Once the holidays are over remove the bones from the freezer and make your stock as normal.


Friday, October 23, 2009

Left Over Turkey

Anytime we have a turkey dinner there are left-overs. It's a given there will be lots of left-overs and always, always a batch of turkey stock. One of the biggest complaints I've heard about turkey left-overs is they are dry. If the turkey was moist to begin with the left-overs will be moist as well however the reheating process can dry out the meat. I like using moist reheating methods for left-over turkey. One of our favourite left-over turkey dishes is creamed turkey casserole.

creamed turkey casseroleCreamed Turkey Casserole

A lot of recipes are tweaked or created then handed down from generation to generation. This is a recipe handed down to me from my late mother-in-law. Coming from a large family and raising a large family she was an excellent and frugal cook. What was so impressive was her cooking was never just a recipe; it was I'm making this come and see how I do it. It was very much a hands on learning opportunity! I am extremely lucky that she shared some of her wonderful cooking expertise with me. I will be forever grateful for that.

Creamed turkey casserole is a quick and easy yet frugal meal that we usually make the day after the turkey meal. This is one recipe that I have not really tweaked. It is very much a homey, comfort meal.

Creamed Turkey Casserole
source: Garden Gnomes MIL

2 cans condensed mushroom soup
2 c cubed cooked turkey
2 c cooked rice
1½ c cooked niblet corn
½ small onion
1 c half & half
½ c Asiago cheese

Chop the onion. Mix all ingredients except the cheese in a large mixing bowl. Pour into an oven proof baking dish. Grate cheese. Top with the grated cheese. Bake at 180ºC (350ºF) until warmed though and lightly golden.
Serves 6

turkey stockTurkey Stock

Every turkey carcass is turned into turkey stock here. Now I have a confession some will find a bit odd. I love the flavour of turkey stock and having a number of jars of turkey stock on hand but I seriously hate the smell of turkey stock cooking! It is one of the very few foods that just don't agree with me while they are cooking. At any rate, I made turkey stock ending up with 16 pints canned and 1½ L for the freezer.

Homemade stock is one of the most frugal products you can make in the kitchen. My turkey stock is never clear and that is because I stuff my turkey so when the bones go into the stock pot there is a small amount of stuffing that stuck to the bones which causing clouding. This is fine with me. I also add the neck bone to the stock pot and cook the giblets separately adding the liquid to the stock. The stock is defatted and strained twice before canning.

As always never put up any food by one method only. In this case most of the stock was canned but some was froze. Using two or more methods of preservation ensures you always have a back-up in the event one method fails. If you do not home can then freezing stock is your alternative. It is not as convenient as opening a jar and using but it still useful and frugal. Just take a container out of the freezer to thaw in the morning.


Monday, January 19, 2009

Frugal Kitchens 101 - Stocks

Frugal Kitchens 101

Many people over look a fundamental way to save in the kitchen simply by not making their own stocks. However stocks are made using many food items that are going to be tossed or put into the compost bin anyway. Essentially you are taking a waste product and turning it into something useful while eliminating a commercial product from your pantry. If you use 2 L (quarts) of stock per week at a cost of purchased stock $1.59 you will over the year save $165.36 and you will have a healthier product.

Consider how useful stocks are. Used in place of water they add flavour to breads, rice and pasta dishes. They form the basis for homemade soups. The problem is most people think it takes a long time to make stock when in fact it doesn't. In general you will want a good variety of vegetable and meat based stocks. You can home can or freeze them. There are three basic ways of making stocks.

  1. long stove top cook - This is the age old method of making stocks. Essentially the bones along with carrots, onions and celery are cook for an extended period of time on simmer until the meat falls off the bone. The stock is then strained, cooled and defatted. If canning it is reheated then canned or if freezing it is packaged into freezer containers and froze.
  2. pressure cooking - This is my preferred method of making smaller batches of stock. Unlike the long cook method you can easily make a tasty and rich stock in 40 minutes or less. Once strained the stock can be froze or used as the base for soup. Unless you have a yield of 7 pints or more I don't recommend canning simply because you will be running the canning at well under full capacity adding to the cost of the final product. That doesn't mean you can't can stock using the pressure cooker method only that it will cost you more to make.
  3. slow cooker - This method is very similar to the long stove top method except you are using a slow cooker. Place your bones, onions, celery and carrots in the slow cooker then cover with water and set on low for the day. Strain. This method limits the amount of stock that can be made at one time but it is still a very useful method.
There are a few ways to make a richer stock. Using these methods takes little time but are well worth the effort.
  1. roast your bones - Any bones used for making stock should be roasted. This will add depth, colour and flavouring to your stock. I suggest roasting the bones uncovered at 350ºF for 40 minutes prior to using the bones to make stock.
  2. add fat and skin - Fat adds an incredible amount of flavour to your stocks as does the skin. Make sure both are added to your stocks as they are cooking. Remove when the stock is finished cooking and defat prior to canning or freezing. If making wild game stocks such as venison add a couple of pieces of bacon because a fat is needed not only for flavour but for the mouth feel. Remove the fat after cooling.
  3. add vegetables - Always add onion with the skin, a couple of washed but unpeeled carrots and a stock or two of celery or preferably the center leaves of celery to your stock pot. Add a bay leaf to beef stocks. Surprisingly adding a washed, unpeeled parsnip really boosts the flavour and richness of any meat or poultry stock as well as vegetable stocks.
  4. when making vegetable stocks - Every vegetable is fair game. Be sure to use a wide variety then strain well after cooking.
  5. in general - Do not add seasonings, salt or pepper. This will give you a versatile stock that can be used for many purposes.


Sunday, December 28, 2008

Entertaining Leftovers

We hosted a large dinner party on the 19th but the horrid weather conditions saw a lower attendance than expected. Several appetizers (crabmeat dip*, jumbo shrimp with cocktail sauce, vegetable tray with homemade garlic & onion dip, venison balls) and drinks were served for the social hours before dinner. The menu included tossed salad, roasted turkey, spiral ham, mashed potatoes, corn, stuffing, gravy, home canned whole cranberry sauce, pickle tray and three kinds of homemade dinner rolls. Desserts included Victorian lavender cookies, shortbread cookies, chocolate dessert shells and banana cake. [Clicking the links will take you to the recipes for these dishes.] I was faced with the problem of a fair amount of left-overs, very limited freezer space and knowing that we were going to be away over the holidays.

Saturday we hosted a smaller get together so some of the turkey and dinner rolls were used for that as well as most of the cookies. I sent some of the left-overs home with the kids who were visiting for the weekend. Sunday morning we deboned the turkey and I set about making stock with the carcass. There was a fair amount of the ham left so I cut it from the bone and divided into two large vacuum seal bags, vacuum sealed then froze. I did the same with the ham bone to make soup with later. There were about 2 dozen of the whole wheat dinner rolls left so I decided to make bread crumbs.

Defatting Stock

Fat is a necessary part of making stocks because it adds a lot of flavour. It adds an element of depth and richness to the stock that cannot be achieved without the fat. Using the fat when making stock allows to to utilize all the flavour in the little bits of meat and skin that come along with the fat. Even though the fat is needed for good stock, the stock should be defatted for a healthier product.

Once the stock has been made it should be cooled completely either before or after straining the bones and vegetables out. The fat will harden as a layer on top of the stock. As pictured the fat layer can easily be removed using a large spoon. You can melt down the fat and strain for use in cooking if desired. The remaining stock is then strained again then canned or frozen for later use. You can also boil down the stock to make a concentrate and freeze it for later use.

Bread Crumbs

Homemade yeast breads do not keep well for extended periods of time. I find it best to make a loaf of bread or dinner rolls every second or third day rather than making a lot at one time. Homemade bread or dinner rolls that is starting to go stale is not tossed to the birds or discarded here as that would be wasteful on a few levels. What I do is turn it into bread crumbs. Making your own bread crumbs even if using store bought bread makes good frugal sense as you are using up something that would otherwise go to waste and you are eliminating one more commercial product you have to buy. Any yeast bread can be used for this purpose although I find dark rye and pumpernickel bread crumbs a little tricker to use in

Making bread crumbs using a food processor is as simple as breaking the bread into chunks and process a few at a time using the grind setting on pulse. The bread does not have to be totally dried to make bread crumbs when using the food processor resulting in a softer crumb suitable for quiche and quick stuffing. If you don't have a food processor and blender on grind and pulse will work as well. A KitchenAid® stand mixer or similar with a food grinder attachment is the preferable appliance to use for drier bread crumbs suitable for making meat loafs. I used a food processor for this batch of bread crumbs.

Stock & Crumbs

The yield from the turkey carcass was 7 L (quarts) of canned and 1 L frozen turkey stock. This is about the normal yield for turkey stock which allows the canner to run at full capacity. The remaining stock is usually used in a soup or stew for dinner that night if we are home or frozen for later use. I like using plastic freezer containers with screw on lids when freezing anything that is not going to be vacuum sealed.

The left over dinner rolls made enough bread crumbs for two 1 L freezer containers. These were frozen for later use. To use thaw although there is no need to thaw prior to using frozen bread crumbs as they tend to break apart quite easily. Any clumps can be broken apart using the prongs of a fork.

Quick Turkey Noodle Soup

Using a few simple pantry ingredients you can quickly put a nice meal on the table with very little effort. When we deboned the turkey, I cut the meat into cubes instead of slices. Dinner Sunday night was a simple soup using turkey that took under 15 minutes to prepare.

Ingredients

2 284 (10 oz) cans condensed mushroom soup**
1 can turkey stock
½ can whole milk
2 generous handfulls broad egg noodles
2 cup turkey

Cook the noodles until al dente in salted water. Drain. Stir in remaining ingredients. Heat through. Serve with home made dinner rolls or bread.

* I used homemade cocktail sauce in place of the ketchup and horseradish mix. The result was even tastier!
** Substitute the equilivant home made cream of mushroom soup to equal 3½ cans of reconstituted soup total.


Tuesday, November 20, 2007

Pressure Canning & Pressure Cooking - Pork

After a very busy weekend, yesterday was a catch-up day for preserving. Once I decided on how I was going to use the food, things progressed somewhat smoothly with the exception of a glitch for dinner. I started with two sweet potatoes, four acorn squash, one rutabaga, one pumpkin, two lb lean ground beef, about a 4 lb ham, 4 chicken thighs with backs attached and about 10 lb of apples. The goal was to get as much processed and use some for dinner.

Unfortunately all did not go according to plan but a good portion got done but the rest will get done shortly so all is well. I managed to process the squash and half the rutabaga for freezing in individual serving sizes. The rest of the rutabaga went for dinner. The ground beef was used for a canning test batch of meatloaf while the ham was canned along with the resulting stock.


Pressure Canners & Cookers

I've talked quit a bit about pressure canning yet have mentioned little about pressure cooking. There is some confusion over pressure canners and pressure cookers. To qualify as a pressure canner according to the USDA there must be a holding capacity (different than total volume) of 4 - 1 quart jars with the ability to adjust the pressure to 5, 10 or 15 lb pressure. So, a pressure canner can be used as a pressure cooker but not all pressure cookers can be used as pressure canners.

I have two pressure cookers (1, 3) that can be used for pressure cooking only. One is a Jasi 6 qt (1) and the other a Fagor 4 qt (3). The Jasi is a first generation, rocker control model whereas the Fagor is a second generation, regulator in the handle model. I find both easy to use but the Fagor is quieter. My two pressure canners (2, 4) are huge beasts. One is an older All American 21 quart (2) and the other a Mirro 22 qt (4). When it comes to pressure canners the quarts stated is total volume not the number of actual jars you can process. At full capacity for either the total number of quart jars that can be processed is 7. With stacking they can process 36 - 250 ml (half pints), 26 - 500 ml (pints) standard or 20 - 500 ml (pints) wide mouth jars. During the busiest canning season, the canners run at full capacity but the rest of the year at half capacity or less.

All pressure canners and cookers with the exception of the All American require gaskets. Weighted gauges (4) do not need to be checked if using for canning but dial gauges (2) do. Gaskets need to be replaced as well for either so be sure to check the availability of replacement parts. With proper care, pressure cookers and canners will give you years of dependable service. Both will save you time and money so are a worthwhile investment.

Canned Meatloaf, Ham & Stock

I belong to a few preserving groups as well as running my own group. There has been some discussion on canning meatloaf so I decided to try it using the 2 lb of ground beef. I canned 3 - 500 ml jars of meatloaf (5) using my normal recipe along with 2 - 500 ml jars of ham (6) and 5 - 500 ml jars of ham stock (7).

Method (meatloaf): The meatloaf was mixed then packed raw into hot, sterilized 500 ml wide mouth jars leaving 1 - inch head space. Wipe the rim. Adjust the two piece caps. Process 75 minutes at 10 lb pressure.

The canned ham once again came out nice looking in the jars but I was not pleased with the look of the meatloaf. This is one reason why test batches are beneficial when preserving foods. When in doubt and before committing a large amount of food to any preserving project, always do a test batch! Test batches allow you to troubleshoot as well as taste the finished product before committing. As far as the meatloaf goes, I haven't opened a jar yet. It definitely will be considered as a convenience food on my pantry shelves. There is little that can be done about the looks in the jar so as long as it tastes good it will be on the pantry shelves. Aesthetics is likely one reason commercial food processors tend to favour tin cans since the consumer is much more likely to buy the product if it doesn't look unappealing.

Pork Chops with Vegetables

A pressure cooker saves both time and money. It is one piece of kitchen equipment that I highly recommend. Unlike other quick cook methods, you can have a nice meal on the table from start to finish within 30 minutes. Unlike slow cookers or microwave ovens, you can brown the meat giving it not only flavour but visual appeal. One of the best online resources for pressure cooker recipes is Miss Vickie's Pressure Cooker Recipes, a site dedicated only to pressure cooking.

I had decided on pressure canning the chicken for dinner but fate stepped in the way. The chicken that was purchased Saturday was off! So I did a quick adjustment using 1 - inch thick pork chops and continued with the meal plan. I paired the meat with rutabaga, onion, potatoes, carrots and corn. When pressure cooking a liquid is needed. For this meal I used 1 c water and 1 c apple juice. I thickened the liquid with a corn starch slurry for serving. This meal from start to finish took 5 minutes for the pressure cooker to come to pressure, 15 minutes cooking and less than 10 minutes prep time so qualifies for an under 30 minute meal. If you want to save the time at the dinner hour, prep the vegetables earlier in the day. Either way you do it, you will quickly appreciate the value of a pressure cooker.

Method:

Brown the pork chops in a little olive oil in the pressure cooker bottom, lid off. Prepare the vegetables. Choose vegetables with similar cooking times. Chop the vegetables and pour over the meat. Pour in at least 1 1/2 c of desired liquid. Shut the lid and bring to pressure. Reduce heat to where pressure can be maintained. Cook at pressure 15 minutes. Depressurize using quick method. Serve.

So if you don't have a pressure cooker or are debating whether you need one, get yourself down to the nearest store and pick one up. If you have one sitting on the shelf collecting dust, get it out. These are the ultimate time savers! I think they are better than slow cookers or microwave ovens too.


Tuesday, May 08, 2007

Chicken Stock Revisited

Anyone following this blog will know I've been focusing on chicken for the last almost two weeks. The sale ends on Wednesday so my husband picked up another twelve chicken breasts (4.286 kg, $18.64) yesterday and I told him to pick up more today. So it was a surprise when I saw someone was googling to find out why their chicken stock was not clear and stumbled upon my blog. I thought that would be a great post since I have been canning a lot of stock lately.

Quick Cool

I posted earlier on how I make stock. For those who do not wish to go back a couple of posts, I use chicken bones, skin, onion with skin on, celery, carrot and a bayleaf.

I wanted a clear chicken stock for part of this batch. By far the majority of he chicken stock I make is not clear as seen in the following picture. That doesn't bother me but there are sometimes you want a nice clear stock. The first trick to a clear stock is a quick cool. The way to do this is remove the stockpot from the burner and immediately immerse it in a sink filled with iced water.

The second trick to a clear stock is to remove all the chicken fat. Once well chilled, peel off the the chicken fat without disturbing the stock. When the fat has been removed, carefully pour the stock through a fine mesh strainer double lined with cheese cloth. Try not to disturb any solids during this process. Return the solids and water to make regular chicken stock.

Clarified and Regular Chicken Stock

This photo shows the difference between clarified and non-clarified chicken stock. I canned up seven pints of regular and six pints of clear chicken stock. As you can see the regular stock is cloudy likely due to a slower chill but the biggest factor to the cloudy appearance is I mush everything. Then I bring the much to a boil and pour the strained liquid into the stock. The clarified chicken stock has this step eliminated and a quick chill so the result is a much clearer appearance. As far as taste, both stocks are fairly similar but the regular may be just a bit stronger. The clear stock will be slightly lower in fat if that is a concern. Processing time for pints for both is 25 minutes at 10 lb pressure.


Monday, November 06, 2006

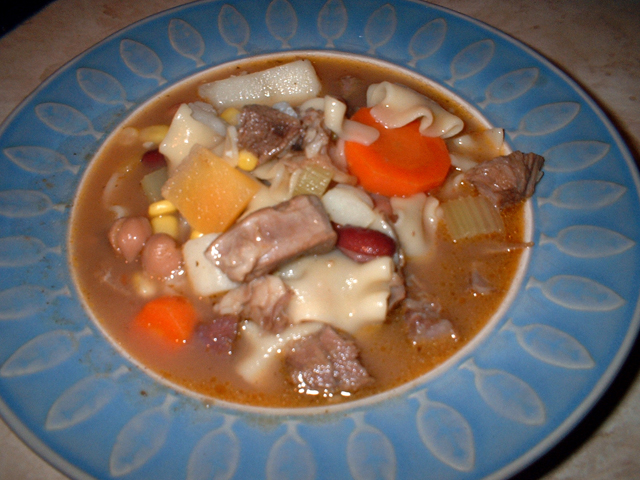
Vegetable Beef Soup


Vegetable Beef Soup

Soup is one of the easiest budget stretchers there is. Not only can you use up leftovers but you can also use what is in season. I don't really have a recipe for vegetable beef soup but the base is always home made beef stock. Beef Stock beef bones * carrots onion celery small tomato bay leaf water
This is more of a method than a recipe. Roast the bones at 350ºF for one hour. Remove from oven and pour everything into a large stock pot. Add enough water to cover the bones by at least one inch. Peel a carrot or two, cut in half and add to pot. Cut an unpeeled onion in quarters and add to pot. Add one to two stocks of celery cut in half and one small tomato cut in half. Bring to a boil then reduce the heat and allow to simmer for a couple of hours. Strain the stock and cool. Remove any fat layer. From there you can freeze it in freezer containers or can. To can process pints 20 minutes and quarts 25 minutes at 10 lbs pressure.
*freeze leftover bones from steak or roasts then do a large batch of beef stock for later use.
Now my beef soup will vary depending on what is in season or what I have on hand. This beef soup started with about 2lbs of stew beef. I browned the been then put it into a stock pot. From there I added beef stock, potatoes, carrots, rutabaga, celery, corn and kidney beans (home canned). Once the vegetables were softening, I added broad egg noodles and 1/4 c beer. The beer burns off but imparts a very nice flavour. Be sure to use a preservative free beer. A dry sherry or red wine will do the same if you don't have beer. Then because it was beef based, I added in a sprinkle or two of Worchestershire sauce. The result was a very pleasant soup, full of body and sure to please. This soup does freeze nicely. If canning, I would omit the noodles and can at 10 lb pressure for 60 minutes pints or 70 minutes quarts.