My photo
Ontario, Canada
I am a wife, mother and grandma who enjoys the many aspects of homemaking. A variety of interests and hobbies combined with travel keep me active. They reflect the importance of family, friends, home and good food.
Cook ingredients that you are used to cooking by other techniques, such as fish, chicken, or hamburgers. In other words be comfortable with the ingredients you are using.
--Bobby Flay

For Your Information

Please watch this area for important information like updates, food recalls, polls, contests, coupons, and freebies.
  • [March 19, 2020] - Effective Mar 17, this blog will no longer accept advertising. The reason is very simple. If I like a product, I will promote it without compensation. If I don't like a product, I will have no problem saying so.
  • [March 17, 2020] - A return to blogging! Stay tuned for new tips, resources and all things food related.
  • [February 1, 2016] - An interesting report on why you should always choose organic tea verses non-organic: Toxic Tea (pdf format)
  • Sticky Post - Warning: 4ever Recap reusable canning lids. The reports are growing daily of these lids losing their seal during storage. Some have lost their entire season's worth of canning to these seal failures! [Update: 4ever Recap appears to be out of business.]

Popular Posts

Showing posts with label meats. Show all posts

Thursday, March 18, 2021

Home Canned Venison Chili and Pulled Pork

homecanned chili and pulled pork

Sometimes there's this nagging little feeling that something is not quite right.  In February of 2020, I was in high gear canning, dehydrating and prepping.  February is my normal month for canning meats, stocks, soups and dry beans.  While I don't can a lot of meats or soups, it's nice to have a few jars on hand as convenience foods.    

I made a large batch (16 qt) of venison chili.  Part was for a couple of dinners, part was froze and the remainder canned (4 x 500 ml).  That's the perfect size for chili cheese fries for two!  At the same time, I had the slowcooker going with a small batch of pulled pork for sandwiches and canning.  Both meats were pressure canned in the same load rather than run the canner twice.  This is possible when canning like products in the same size jar so processing times are the same.


Tuesday, July 16, 2013

Meat Glue - Oh My!

How would you feel if you paid a premium price for a prime cut of beef only to find out it had been manufactured to appear like a prime cut from scrap meat?  Well, if it were me I would be very angry!  I have moved beyond feeling betrayed by the food industry.  For the most part, a very large portion of the food industry lies, cheats, misleads and manipulates consumers into believing the food they produce is safe and good for us.  What they omit is the fact that food additives are not only tricking us into believing we are buying a healthy product, they are actually making us sick.  So what if the food we eat causes allergies, asthma, ADD/ADHD, leaky gut, IBS, diabetes and the list goes on increasing daily, as long as the shareholders of the huge companies behind the food industry line their greedy little pockets?

Well, now the food industry has added an enzyme called transglutaminase that binds protein together.  The manufacturer can add this enzyme to scrap meat to form what appears to whole pieces of meat that are then cut into steaks.  These factory formed eye filets sell for a premium price and you wouldn't even know they were not the real McCoy!  Even experts can't tell the difference between a real eye filet when cooked and a factory formed one.  And, it is not just beef!  Pork, lamb and chicken pieces are all stuck back together using meat glue.  Transglutaminase aka meat glue is banned in the European Union but not in North America.


The use of transgluatminase is misleading consumers causing them to spend top dollar for scrap meat.  That is bad enough.  Of more concern is the microbial issues with transgluaminase.  This meat is sold as a whole piece of meat when in fact it is not, it only appears to be whole.  That means an increased surface area much the same as with ground meats which gives a larger surface for microbes (eg. E. coli) to grow as well as providing more nooks and crannies for the microbes to hide and grow.  Each piece of the meat scrap has microbes that when stuck together makes the resulting glued meat have a higher initial microbe content, hundreds of times higher than a regular whole piece of meat.  The use of meat glue is more widespread than you would think especially in restaurants. 

The only way you can lessen the chance of paying premium dollars for glued meat is to know your meat source.  If at all possible buy directly from the farmer and have the meat processed yourself at an abattoir like we do for beef and pork.  Alternately, buy meat from a reputable butcher shop where there is considerably less or no risk of buying glued meat.  Avoid buying cryovac steaks and even larger pieces of meat unless you are sure of the source.  Avoid buying shaped meats like bacon wrapped steaks or poultry toronados, fish sticks and chicken nuggets.  While it may be a bit more difficult avoiding glued meat in restaurants, a restaurant that prides itself in its quality of food and reputation is not going to be serving glued meat.  If in doubt ask and definitely check out reviews for any new restaurant prior to visiting them.


Thursday, April 26, 2012

Kitchen Quick Tips - Frozen Meats

kitchen quick tips
If you find a package of meat nearing its limit for freezer storage, defrost it and cook it.  The cooked meat can then be froze for later meals.


Thursday, December 01, 2011

Kitchen Quick Tips - Ground Meats

kitchen quick tips

Ensure the ultimate freshness (aka best flavour) in ground meats and poultry by grinding shortly before using them.  In most cases you will save money by grinding the meat yourself.  


Monday, March 15, 2010

Frugal Kitchens 101 - Grinding Your Own Meats

Frugal Kitchens 101
Ground meats especially beef have long held the reputation for a frugal meat choice. While it is true that ground meat is a good way to use cheaper, less tender cuts of meat, the idea that store bought pre-ground meat is a frugal meat choice is a myth. In my opinion a better frugal choice is to buy cheaper cuts of meat then grind them yourself. The reason for this is on any chunk of meat there can be a low level of bacteria, the worst being E. coli. If the meat is ground then left to sit for even a few hours this bacteria can multiple enough that if the meat is improperly cooked it can make you quite sick leaving long term residual effects or worse. The increased surface area greatly aids hiding spots for microbial growth and quicker spoilage times. Complicating this issue is if the commercial meat grinder is used to grind other meats besides beef such as pork or poultry then not proper cleaned cross contamination can occur. A final problem with buying ground meats especially turkey and pork is in smaller communities they simply may not be available on a regular basis. Today's Frugal Kitchens 101 gives a few tips on grinding your own meats.

Grinding your own meats can actually less espensive than buying store bought because you can take advantage of meat sales. The equipment is not expensive either ranging on the lower end about $25 to the higher end of $150. If you have a KitchenAid® stand mixer the grinder attachment will cost about $40. Here's a few tips for grinding meats and poultry:

  • Plan on cooking the meat the day you grind it. If you want to grind extra for later meals, cook it then vacuum seal for quick meal starts. If you want to freeze the ground meat raw, grind then vacuum seal and freeze immediately.
  • Trim any fat, ligment or silver covering and skin from the meat. The silver coating will clog the grinder.
  • Cut the meat into strips that will easily feed through the hopper of the grinder.
  • Place the strips in the freezer until they are very cold or just starting to freeze.
  • Put the coarse grinder plate into the grinder and tighten.
  • Feed the meat through the hopper one strip at a time, guiding with a food pusher but do not force.
  • For best results feed the ground meat through the hopper again with the fine grinder plate. Do not do this with fatty meats; only grind these meats once.
  • If you want to grind 2 kinds of meat such as beef followed by chicken the grinder should be thoroughly cleaned before switching to the next meat unless all the ground meat is to be used in the same dish (eg. 3 meat meatloaf).


Monday, June 08, 2009

Frugal Kitchens 101 - Meat Grinder

Frugal Kitchens 101
Years ago if you wanted ground meat, you ground it yourself, went to a butcher shop or an abattoir. Now the vast majority of people buy their ground meat at their local grocery stores. With the advent of large meat processing plants, the meat is often ground several days before you purchase it. The actual ground meat is usually a combination of meats from several sources mixed together so the package of ground beef you put in your cart could contain a combination of ground meats from several farmers! Quite often the ground beef is sold in opaque tubes in a pre-measured amount so you can't see the meat that were packaged off site. All of these practices are meant to keep the price per kilogram low for ground beef. In recent years ground chicken, ground turkey and ground pork have become more popular however in smaller communities finding these ground meats is hit or miss at best. If you buy beef or pork on the hoof you pay a flat price per kilogram whether the meat is ground or not. If you have wild game you either have to grind it yourself or whoever packages it for you will likely grind if you ask.

So, how can a meat grinder save you money? First off ground meat spoils very quickly because of the large surface area. If there is a pathogen on the surface of a steak it will be destroyed by cooking but with ground meat there is a lot more surface area that aids in the multiplication of bacteria. Whenever someone else grinds your meat you are relying on them to use safe preparation methods but we all know that doesn't always happen. Grinding your own meats just before using them gives you the freshest ground meat possible. Even if there was surface bacteria on the meat chunk you ground, it would not be in levels enough to cause spoilage or illness. The mains ways you can use a meat grinder to save you money are:

  • cutting out the middle man - Grinding your own meats eliminates the person(s) who do the grinding. That is reflected in the cost of grinding that is built into the ground meat product.
  • avoid spoilage - If you have used ground meat then you will know it is very discouraging to open a package only for it to have that off smell. Some will go ahead and use the ground beef while others such as myself will not. If you use the ground beef then end up sick or worse. If you don't use it which I highly recommend you waste the price of the meat. Grinding your meat just before using reduces the spoilage problem.
  • meats on sale - Grinding your own meats allows you to take advantage of meats on sale. For example chicken with backs attached go on sale for 79¢/lb. If you remove the skin and bone then grind you get ground chicken for that price instead of the much higher price of about $2.49/lb for pre-ground. Watch for in store specials or just those really great meat deals then grind your own. A local grocery store had an in store special on pork loin shoulder at $1/lb. I bought several to can as barbeque shredded pork but also used a couple to make fresh ground pork.
  • grind novelty meats - A meat grinder allows you to grind meats you can't readily get at your grocery store. These include pork, turkey, chicken and game meats that can be store bought, raised by yourself or from a successful hunt camp. A meat grinder is a must for making homemade sausages!
  • use to grind other foods - Use your meat grinder to: prepare cucumbers for relish, grinding cooked meats for dips and spreads, grinding cheeses and making bread crumbs.
There are three basic styles of meat grinders: manual, electric or attachment for another electric appliance. A manual model clamps to your countertop. It will cost about $80 new but will last a lifetime however finding used manual meat grinders at yard or estate sales is rather easy. Expect to pay anywhere from 50¢ to a few dollars. The nice thing about a manual meat grinder is just that. You can grind meat and other foods anywhere! If you have a lot of food to grind or do a lot of canning and bulk food cooking consider and electric meat grinder. These start at the $120 range and go higher. If you have a stand mixer check for an affordable food grinder attachment. I bought the food grinder attachment (FGA) for my KitchenAid® for $35 in their discount section which was a $30 savings.

Regardless of the style of meat grinder you use, cut the meat into thin strips then feed them into the hopper. I find cold or partially frozen meat works best as does twice grinding. Run a slice of bread through the hopper when you are finished grinding the meat to make clean-up easy. Unfortunately you should not put these bread crumbs into the compost or out for the birds as they will have small bits of meat in them. If you do not want to waste a slice of bread simply do as I do. Disassemble and hand wash in hot, soapy water.


Wednesday, March 19, 2008

Easy Homemade Sausage

Not only are home cured meats less expensive they are very easy to make. You control the quality of the ingredients and can adjust the seasonings to your own tastes as well. The two basic methods for curing are brining which uses a salt solution and dry curing that uses a mixture of curing salt and sugar. Both methods usually include using spices as well (eg. corned beef) but some like peameal bacon do not. and sausage. Sausage can be uncured (fresh, eg. chicken sausage) or cured and unsmoked or smoked. Fresh sausage must be refrigerated and cooked thoroughly before eating. Cured sausage can be either cooked (usually smoked) or dried. The basic method for curing sausage is to mix the cure ingredients and spices well with the ground meat then wrap tightly in foil or stuff into casings, refrigerate for a short period of time then oven cook, hang to dry or smoke.

Oven Cooking

This easy homemade beef sausage is wrapped in foil and refrigerated for curing then it is cooked. It is important to make sure the sausage is wrapped tightly for the curing process. Shown here is one sausage roll during the cooking process. To cook, place the roll(s) on a lined baking sheet as there will be some leakage. This is normal but will make a baked on mess if the baking sheet is not lined. The easiest liner to make is a shallow tin foil box as the foil will hold the up turned sides nicely. To make the box, fold each long side by about and inch then open so they rise from the sheet. Repeat with the two narrow ends. Pinch the corners together tightly. This will keep your baking sheet clean while keeping the liquid contained.

Easy Homemade Sausage

Pictured is the easy to make homemade beef based sausge I finished yesterday. The curing period is 24 hours. There is no filler in the sausage so the beef flavour shines through and while very similar to salami is not as spicy. The texture is firm for easy slicing. This tasty sausage is perfect for snacking or using as an appetizer. It pairs nicely with cheeses and mustards. I prefer making the roll about 2½ inch diameter for pairing with cheese and crackers however the roll can be made in a larger diameter for sandwiches.

Easy Homemade Sausage
Notes: The ingredients are for one pound of sausage. Multiply as needed for the quantity of beef being used. The sausage can be vacuum sealed then froze for up to 6 months.

1 lb lean ground beef
1½ tsp Morton's Tender Quick
1 tsp granulated sugar
1 tsp liquid smoke
½ tsp mustard seed
½ tsp garlic onion seasoning mix
1½ tbsp water

Measure the ingredients into a mixing bowl. Mix well with your hands. Form into a roll about 2½ inch in diameter. Place on a sheet of tin foil. Form foil into a tight pocket by folding long edge together tightly until it reaches the top of the meat roll. Twist ends tightly. Refrigerate the roll for 24 hours. Pre-heat oven to 300ºF (150ºC). Place the roll onto a lined baking pan. Cook for 2 hours. Cool.


Thursday, February 21, 2008

Chickpeas, Another Mini Cheesecake and Tips on Buying Meat in Bulk

This entry is going to be all over the place because that is really how things are going in the kitchen right now. Health problems are causing a few limitations and at the same time we are working on the kitchen renovation. The prep work is finished and the cabinet restorer arrives tomorrow. We are picking up the sink and ceramic tile tomorrow night so everything is a go. If the restorer doesn't work as expected we have a cabinet maker who will make new cabinet doors for us.

So cooking has been rather laid back here. I canned a few jars of black beans and chickpeas today. It will be the last canning until after the countertops are tiled. Krissi from Cooks Academy asked me to post some entries on buying meat in bulk. My tips for buying meat in bulk follows the blurbs on today's cooking ventures. This is a longer entry with a lot of information.

Black Beans & Chickpeas

My husband discovered he liked black beans during our recent trip to Florida. I decided to take advantage of that and can up a few jars. To fill the bottom layer of the canner, I added in some chickpeas. Both will be a convenient product on my pantry shelves.

Method: [I used the quick soak method for the black beans and chickpeas.] Rinse the beans then cover with water. Bring to a boil and let boil 2 to 3 minutes. Remove from heat, cover and let sit at least one hour. Spoon the beans using a slotted spoon into hot, sterilized jars until the jars are half full. Pour boiling water over the bean leaving 1 - inch headspace. Wipe rim. Process at 10 lb pressure 75 minutes for 500 ml (pints) or 90 minutes for 1 L (quarts) at altitudes to 1,000 ft above sea level. For higher altitudes follow the chart here.

Tacos

You really can't get much easier than tacos for dinner. Normally we turn the fixings into taco salad but tonight decided to make tacos instead. I used pre-made white corn taco shells. The meat was boiled then seasoned unlike the normal frying for taco salad. Boiling gives a bit drier texture suitable for taco shells.

Method: Place the ground beef into a saucepan with strainer. Cover with water and bring to a boil, breaking up the meat as it cooks. When fully browned remove from heat and drain. Return to pot with a little of the juice, chopped onions and taco seasoning to taste. Heat thoroughly. Drain any liquid before filling taco shells.

Toppings: homemade salsa, shredded mesclun mix, tomatoes, green onions, onions, jalapeno peppers, sliced olives, sour cream and shredded cheddar cheese

Mini Cheesecakes (2)

I stumbled upon a recipe for mine cheesecakes using vanilla cookies. I would have pulled out the digital and took a picture of the recipe, something I do quite often, but this seemed pretty basic and something I could adapt to my regular no cook cheesecake recipe. I used blueberry jam for the final topping.

Mini Cheesecakes

12 paper cupcake liners
12 vanilla waffers
2 - 8oz packages cream cheese
1 c granulated sugar
2 c CoolWhip
fruit topping

Line each cupcake holder with a paper. Place one vanilla waffer in the bottom of each. Blend the cream cheese, sugar and CoolWhip with a stand mixer. Spoon the mixture evenly over the waffers. Dab a generous teaspoon of your favourite topping on the filling.

Tips on Buying Meats in Bulk
(by request)

The vast majority of the meats we eat have been bought in bulk. Bulk means:

  • sales/family packages bought in multitude
  • butcher shop packages - 50 lb at a time or similar
  • whole/half/quarter - bought through a butcher shop or directly from the farmer
In this context we use 99% the third option and 1% the first option although we have considered the second option.

Why?: If I buy directly from the farmer, I know the farming practices, how the meat was handled and in many cases can see the cow(pig) raised from a calf (piglett). Price per pound is always cheaper.

Finding a Source (aka farmers): One of the best ways to find a reputable farmer selling good meat is word of mouth. So if your friends or family has had a good experience with a bulk meat purchase they will have no problem recommending who to go to. We live in a rural area where we are fortunate to have a rather wide social network. Word of who to avoid buying from for whatever reason spreads like wildfire. In larger communities this may not be the case but always talk around. Ask at local butcher shops. Check the local Yellow Pages. If you are considering buying from Farmer Brown ask if he has any referrals. Talk directly to the farmer before ever committing to buy.

Choosing a Source: This gets complicated depending on where you live. Ideally you want grass fed beef because it it lower in fat and calories while being higher in Omega-3. But location matters. We live in Ontario so that means if we get a cow early spring it has more than likely been grain fed. The reason being during the winter what grass there is is covered with snow. If we get a cow in the fall it is grass fed knowing the farmers we deal with so we normally like to buy our bulk beef in the fall. Be sure to ask the farming practices such as the use of growth hormones. Visit the farm and look around. The number one thing to look for is cleanliness.

Considerations: The price is per pound plus a cutting and wrapping fee. Generally you pay the farmer directly for the cow/pig. He gets the cow/pig to the abattoir who will then cut to your specifications. Once out of the farmer's hands it is your responsibility. You need to know what these are. For example my some of my cutting specifications are:

beef:
  • hamburg - 1 lb packages
  • 3-5 lb roasts
  • 1" thick steaks
  • keep soup bones
pork
  • 1" thick pork chops, 2 per package
  • side bacon (not cured)
You need to know if you want the soup bones, tongue, heart and etc. Then you pay a separate fee for cutting to the abattoir. Once your cutting choices have been made the only thing left is picking up the meat. A quarter of beef will weigh 200 lb or better. That's a lot of weight. You will need boxes as they normally aren't supplied. I recommend smaller boxes to keep the weight down as you are transferring from car to house.

That should cover the basics but if you have anything on this topic that needs clarifying or even just questions, leave a comment and I will do my best to answer.

Tips for Buying Eggs in Bulk

Again, it is important to find a farmer who practices good husbandry. The key consideration with chickens for eggs is whether they are free range or grain fed. Free range chickens produce eggs with a deeper flavour and beautiful yellow yolk. Grain fed chickens produce lighter coloured yolks that lack the depth of flavour, Fresh from the farmer eggs regardless whether free range or grain fed will always taste better than store bought. The best deals are in flats of 2.5 dozen.


Thursday, April 26, 2007

Slowcooker (Crockpot) Pork Shoulder Roast

I've mentioned in other entries that I am not a huge fan of crockpots even though I have two. They are mainly used during bulk cooking sessions. With the house being on the market I decided to do a few more meals in the crockpots for a couple of reasons. These include having a ready to eat meal without a lot of mess since for some obscene reason people insist on viewing the house during the dinner hour. The side effects are the house smells wonderful and if needbe a short delay doesn't mean a burnt dinner. But I think what it is also providing is nice homecooked meals consistent with our lifestyle or in short giving us comfort food to help ease the stress.

Crockpot Pork Shoulder Roast

Normally I like cooking pork shoulder roast in the oven but I knew the day was going to be hectic so hauled out the crockpot. I knew I would be away for the morning but the house was pretty much ready for showing. This was so easy!

Method: I placed a frozen pork shoulder roast in the crockpot, added about 1/2 c of water then tossed in a medium onion chopped and set the crockpot to low. That was about 8 am in the morning. I had no idea what sides I was going to serve but already had an idea for the sauce. When I got home about 2:30 pm I poured in 3/4 of a bottle of Dianna Sauce® Original Flavour over the roast then let it continue cooking. About 1/2 hour before serving, I thickened the juices with a little flour slurrey (flour mixed with water to a runny consistency).

Serving Suggestion: This meat literally melts in your mouth, it is so tender! I served it with balsmatic rice, homecanned green beans and a tossed salad. Left overs are ideal for sandwiches the following day.


Tuesday, April 24, 2007

Sirloin Strip Steaks


Don't you wish you had smell-a-vision?

Fresh Cut Sirloin Steaks

My husband likes to cut our steaks just before cooking. He insists on the steaks being left at room temperature as well before grilling. Steaks should be thick for good grilling so his rule of thumb is about an inch thick. This piece of sirloin was cut into six generous steaks.

He doesn't like to add seasonings, marinates or sauces when he grills the steak. His reasoning for this is he wants the full flavour of the steak. I will admit to liking a little Montréal Steak spice on my steak but have mended my ways much to his relief!


Medium Rare

The secret to a good grilled steak is a hot grill and patience. Resist that temptation to flip the steak! Do not flip it. Place it on the hot grill then wait. Do not puncture it in any way. Allow the steak to grill on one side until the grill marks are well defined. Flip the steak and repeat until the steak gives a bit under touch. Remove from grill and let rest.

Steak grilled this way really doesn't need any seasoning. You will get nice juicy, melt in your mouth steak with the full flavour of steak. There is no need to mask it with steak sauce or seasonings. That's not to say you can't use them if you choose but sometimes undressed is best! Serve with baked potatoes and a salad for a lovely well rounded meal.


Friday, April 13, 2007

Sirloin Tip Meatloaf

Back by popular demand is my old template. I would like to spiff up the background and header so over the next few days you will see a few changes. So if you notice any weird things going on, it's just me playing with the template. Sorry for the inconvenience.

Ok, who the heck would make meatloaf using sirloin tip? Well, sometimes when you don't have much choice that's what you do. My husband picked up fresh, twice ground sirloin tip for kibby late the Thursday afternoon before Good Friday. He bought extra because the weekend was already slated for a lot of visitors and since one batch was going to a family gathering, he thought I would make one for those coming to the house. Along with all the Easter gatherings, our first grandbaby was baptized Easter Sunday. I would have ground the meat myself but with everything else going on (house sale), I was runny on empty.

We eat kibby raw so whatever is not consumed that day is baked then sliced for sandwiches. However, I found myself with about 2 lb of twice ground raw sirloin that need to be used and not a whole lot of energy to be creative. The problem is once frozen it can't be used for kibby and there was no way I was going to let this meat go to waste.

Sirloin Tip Meatloaf

We get the sirloin tip will as much fat as possible cut off because we eat it raw. Normally I mix in shredded vegetables for my regular meatloaf but I wanted this meatloaf to give firm slices when cooled. We seldom buy lunchmeat because I routinely slice meat and freeze it for making sandwiches later.

The following list of ingredients is just a guideline but close in amounts I used.

Sirloin Tip Meatloaf

2 lb twice ground sirloin tip
2 eggs
2 1/2 c dry bread crumbs
1 tbsp tomato powder
1 tbsp carrot powder
1 tbsp zucchini powder
1 tbsp mushroom powder
1/2 c Heinz 57
1 tbsp ketchup
1 tsp mustand
2 good splashes of Lea & Perrins Worchestershire sauce

Pre-heat oven to 350ºF. Mix the ingredients together then place in a loaf pan. Bake for approximately 40 minutes until centre is cooked through.


Sliced

This meatloaf gives firm slices when cooled. Of course we had some of it for dinner that night served with a tossed salad, baked potato and sauteed mushrooms. After dinner, I allowed the meatloaf to cool enough to put in the refrigerator. This is a bit of an aside. Up until recently I always had a fridge with metal racks. The new fridge has glass shelving so I'm a bit concerned over thermal shock at putting something too warm on them. So I set the pan on a folded tea towel just in case.

Once the remaining meatloaf was fully cooled, I sliced it thinly. It isn't as thin as what you would get at a deli but then the thickness is just right for a hearty sandwich. It has a wonderful flavour that will go just perfect with beefsteak tomatoes! I'm getting hungry just thinking of a slice of this meatloaf, a slice of beefsteak tomatoes, fresh garden greens, a couple rings of onions, a bit of mayo and mustard all sandwiched between fresh 12 grain bread.

Vacuum Sealed

Garden goodies are awhile away so beefsteak tomatoes are just a dream. From the looks of it, I will more than likely be planting in containers and move them but there is a chance of early possession which means the garden will continue as normal. I mentioned that I routinely make sandwich slices from whatever meat I cook.

I don't have a meat slicer but that may change in the new house if all goes well. What I do is cool the meat thoroughly. I find it best to let the meat cool overnight in the fridge. Then I cut into slices about 1/8 to 1/4 inch thick depending on the meat. I like to vacuum seal the slices for freezing. With drier meats like most meatloaves, turkey, and chicken there is no need to flash freeze before vacuum sealing. For moister meats like ham, I place then in the vacuum sealer bag then into the freezer. Once semi-frozen, I vacuum seal them.


Thursday, April 12, 2007

Homemade Beef Stew

With the house being listed and already shown, I've decided this is a good time to haul out my slowcookers. Life is already busy and it just got busier. Besides a meal cooking in the slowcooker fills the house with yummy smells. This just dawned on me when unexpectedly yesterday a couple wanted to see the house right this minute and since they were from out of town I figured the real estate agent should go ahead and show it. I had put stew in the crockpot for dinner so it was cooking as the house was being shown. The house smelled good and the three of them were pretty close to staying for dinner.

Beef Stew

Like soups, my stews tend to vary with what I have on hand. I don't measure but rather do a toss in thing. I have to admit, I am not a huge fan of crockpots even though I have two. They are used for stews, pulled meat, hot apple cider and sometimes chili. They are used more during bulk cooking sessions.

My beef stew always starts out with about two and a half pounds of stew beef, olive oil, potatoes, carrots, onion, corn, fresh mushrooms, bay leaf, Montreal Steak spice and Worchestershire sauce. From there any vegetable is fair game and I have even added kidney beans to stew. I added rutabegga to this stew. So while there is no actual recipe, here is the method.

Method - Brown the stew beef in olive oil in a large frypan. Sprinkle a little Montreal steak spice over the browned beef. Pour the beef mixture into the crockpot. Splash 2-3 good dashes of Worchestershire sauce on top of the beef. Stir in prepared vegetables (bite size) and bay leaf. Pour in water or beef stock just until you can see it. Set the crockpot to low and leave it alone for about 8 hours. If adding greens like broccoli add just before thickening. For thickening use a flour slurry seasoned with salt and pepper 15 minutes before the stew should is ready to serve.


Tuesday, April 10, 2007

Simple Glazed Ham

Ham just seems to be the meat of choice for Easter. I consider ham a frugal meat choice especially if it is a bone in. The meat is low fat and the bone makes an excellent bean soup. My family knows after ham comes bean soup and ham sandwiches. Ham can be froze in either cubes or slices. It can also be home canned.

Simple Glazed Ham

There is a wide variety of glazes for hams and while I've made many of the more complicated ones, I decided to use a simple glaze for this ham. This is a bone in ham about 10 lbs. I roasted it at 350ºF for about 45 minutes. The glaze was simply 1/2 c honey and 1 tsp dijon mustard wisked together then brushed over the ham and allowed to roast about 15 minutes then a quick baste over. The result was a nice, tender ham with just a hint of honey. Sometimes less is more as in this case.


Thursday, March 29, 2007

Glazed Pork Shoulder Roast

Pork shoulder roast is a family favourite. I like using some type of sauce usually tomato based or semi-sweet glaze. Quite often the semi-sweet glaze has a home canned jam, jelly or chutney as an ingredient for my glazes. Last night I decided on a semi-sweet glaze for the pork roast and as normal used the clay baker. A clay baker needs to be soaked in water before using for best results but it does cook a pork roast beautifully!

Glazed Pork Shoulder Roast
The glaze for this roast is very easy to make and can be use in one of two ways. Depending on the desired thickness of the glaze, pour over roast while raw (thicker) or about 15 minutes before the roast is cooked (thinner). For a variation, substitute the French dressing with Catalina or Russian dressing.

This pork roast was glazed while raw, then then basted a few times while cooking allowing the flavours of the glaze to penetrate the meat. I used low fat French dressing since there was a nice layer of fat on the pork roast. The apple jelly was homemade using the recipe in an earlier entry. The roast was served with basmati rice and home canned Kentucky Wonder green beans.

Glaze
1 c French dressing (low fat)
1/2 c apple jelly
1 tsp honey
3/4 tsp dijon mustard

Wisk together and pour over roast.


Thursday, March 01, 2007

Grilled Steaks

The smell of grilling steak filled the air last night all from the indoor comforts of our home. The weather has turned and we have been having a bit of nasty stuff so firing up the outdoor grill wasn't too appealing.

Steaks on Indoor Grill

Pictured here are the three about 1-inch thick rib eye steaks we grilled last night. There are a couple of tricks to grilling indoors. For years we used a table top indoor grill but now have one as part of our stove. There should not be any flare-ups although we have seen very small quick flames, here then gone. If there are larger flare-ups is turn off the heat! All indoor grills will smoke but some deal with this problem better than others. If you have a table top model of grill add about 1/2 inch of water to the bottom then grill. The water will help reduce the smoking. My stove has a downdraft system so the smoke is sucked right out. We set it to low.

Now you can't really see much from this picture as far as cleaning but it is best to let everything cool before cleaning. The two black grill come off as does the white centre vent that does get pretty dirty when grilling. Soak all of these in hot soapy water after cooling. At this point cleaning a table top model and built-in is the same. However, a built-in has a grease drain so what you have to do is pour hot water down the drain. It will take a couple of cups to be sure the tube is clean. Empty the drain cup, wash with hot water and replace. There you go!


Grilled With Mushrooms

This is a picture of one of the rib eye steaks grilled and topped with sauteed mushrooms. Steaks are generally grilled to medium rare here but sometimes rare. Sauteed mushrooms are a given. We sauté the mushrooms in butter then pile them on the steak. This is just the perfect accompaniment for any steak. Served with an oven baked potato an corn, you have a hearty meal.

I guess I should mention about seasoning steaks for grilling. I like adding a little Montreal Steak Spice when grilling steaks. My husband does not season expecting instead his skills to make the full flavour of the meat shine and he always does! He has a knack of knowing exactly when to turn the meat and it is only turned once, that's the rule.


Saturday, February 24, 2007

Homemade Meatballs

Meatballs are everyone's favourite not only because they are so tasty but because they are very versatile. They can be made with different kinds of meat or poultry so the possibilities are endless. I bought the Kitchen Aid food grinder attachment mainly for grinding chicken, turkey and pork. The availability of these ground meats tend to sporadic here and while we get ground pork when we buy a half pig, there never seems to be enough ground pork. My husband has a poker game today so I decided it would be the perfect time to try out the grinder.

Kitchen Aid Food Grinder Attachment

The food grinder attachment comes with two grinding plates, fine and coarse. It is easy to assemble and comes appart for easy cleaning. The parts are dishwasher safe with the exception of the knife and grinding plates. The wooden food stomper has now been replaced with a combined heavy plastic food stomper wrench that is dishwasher safe as well. An additional food tray can be ordered to provied a convenient surface of additional food. When doing bigger lots it would be quite beneficial. This grinder can also be used for grinding cooked meats, firm vegetables, dried fruits, cheese, and bread for crumbs. The food processor is already starting to sulk!

Grinding meat works best when the meat is cold and cut into long, thin strips. It is best to work with a well sharpened knife. For this ground meat I used a 5 lb shank roast bought from the butchershop. This was the cut recommended for lean ground beef.

Once the roast was cut into strips, I started grinding. My only problem was having to stand on a wide based step stool in order to feed the strips into the hopper. After the first pass through using the coase grinding plate, the meat was again ground using the fine grinding plate.

Fresh Ground Shank Roast

Surprisingly, grinding twice which is recommended did not take much time at all. I think it helped that I've used a manual food strainer for quite some time so the method was basically the same only a lot less work. I will definitely be buying the Kitchen Aid food attachment shortly to replace my manual one.

The ground meat was so fresh looking! I usually make meatballs in large batches then flash freeze to keep separate, package into meal sized bags and vacuum seal. These are always handy for quick meals. Because I will be using the meatballs in various ways, I tend not to season a lot. The meat will later pick-up the flavour of whatever sauce I use. I also do not like using any fillers in my meatballs.

Meatballs
Milk is used as the binder resulting in a very moist, meaty meatball.

5 lb lean ground beef
1 - 2 tbsp Worchestershire sauce
1 tsp onion powder (optional)
1 tsp ground cumin (optional)
milk - about 1 c
grapeseed oil

Start with very cold ground meat. Add seasonings and mix well with your hands. Gradually mix in milk until the meat will hold shape when pressed into a ball about the size of a walnut. Pour about 1 tbsp of grapeseed oil into a large sautee pan and heat. Form meatballs using a meatball former. Carefully add to the pan as they are made. Turn the first ones as browned then removed when browned through. Continue in this manner adding newly made meatballs, flipping and removing until all the meatball mixture is used.

Once all the meatballs are cooked, if freezing, flash freeze them then package. If using right away, proceed with your favourite sauce.

Hawiian Sweet & Sour

I will admit to cheating with this sauce. The meatballs were destined to travel to today's poker party. The host specifically reqesting this particular sauce that he had had before but could not find which foiled my plans for my homemade sweet & sour sauce. I found some at Sam's Club so decided to use that. The sauce is Mr. Yoshida's Hawiian Sweet & Sour. It was just mixed into the meatballs in the crockpot then the cold meatballs were packed into a cooler for travelling. Still my husband declared them quite good even though they were still cold. All he has to do is plug the crockpot in when he gets there and part of their all day snacking. Warning: Poker parties are hazardous to your waistline!


Thursday, October 26, 2006

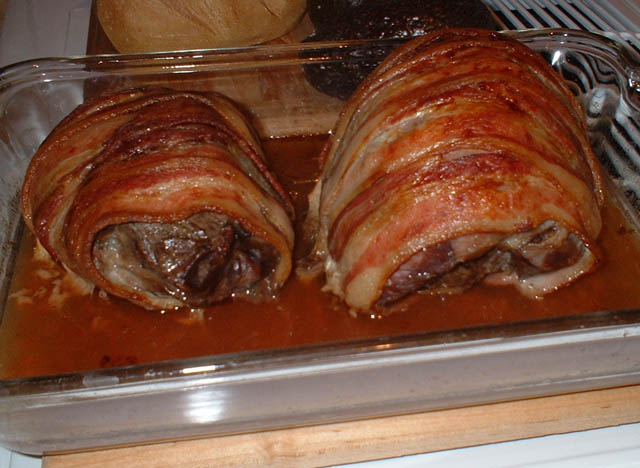
Roasted Venison

Soon it will be hunting season and every hunter hopes to lucky enough to bag a deer. Preserving the meat is important but the real fun comes in cooking the venison. I thought I would make a few entries on some of the ways I preserve and cook venison. Watch for other venison methods and recipes to be published over the next week or so.

Venison roast is a nice change from pork or beef roasts. Here is how I make venison roast.

Venison Roasted

There are a few important things to know when cooking venison. Venison is very lean so a fat needs to be added when cooking. Usually the fat is ground pork if cooking ground venison or bacon for roasts. Do not over cook venison or it will be too dry. When I was first looking for recipes for cooking venison, one source indicated to soak in salt water but most sources say to avoid salting the meat prior to cooking. If there is any connective tissue on the roast, remove that as it will give an unpleasant taste.

I started with two frozen venison roasts, one was sirloin tip and the other rump. The roasts were thawed in the refrigerator overnight. Any connective tissue was cut away. Each roast was wrapped with bacon strips and placed in a glass baking dish. Wrapping the roast is easy. Just start at one end wrapping around the roast then move slice by slice until the entire roast is wrapped.

I cooked the uncovered roasts at 300 degrees farenheit on convection oven setting until the interal temperature was 140 degrees farenheit.

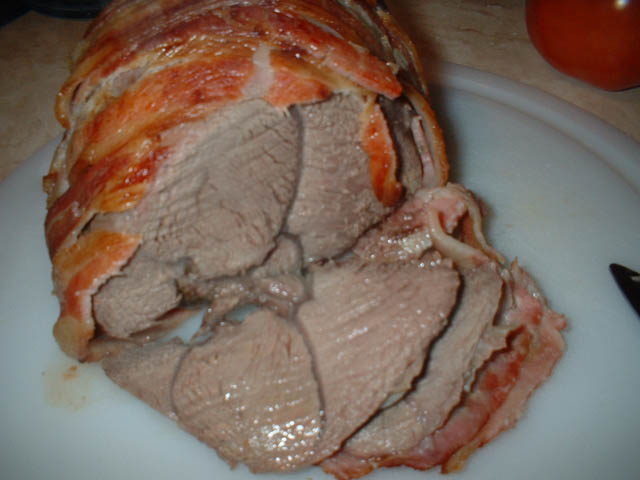
Venison Cut

The roasts where carefully removed from the baking pan and allowed to rest before cutting. There was enough juices for gravy but they needed to be put through a gravy separator to remove the fat first. Then I placed the juices in a sauce pan, added a little Worchestershire sauce and brought to a light boil. I used an arrowroot flour slurry to make a thin gravy. When the gravy was finished it was time to cut the meat.

Each slice of meat has an outer layer of bacon that looks nice when plated especially with a little gravy. I like to keep roasted venison meals more like old fashioned country cooking. This venison was served with baked potatoes, carrot coins and homemade sour dough bread.

Enjoy!

Garden Gnome


Monday, September 25, 2006

Sunday Delights!

I seldom do any canning on Sundays because we often have company or do a little travelling ourselves. The weather has been quite cool here the past few days. Neither of us felt like going outso it ended up being a rather laid back day. I decided to make us a little comfort food.

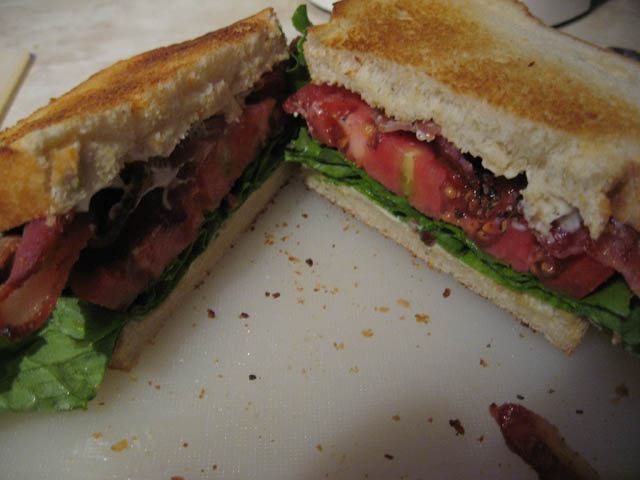
The Perfect Sandwich

There is nothing more comforting this time of year than BLTs! I toasted sourdough bread then added mayonnaise, romain lettuce, a thick slice of fresh picked Beefmaster tomato, topped with peppered bacon and just a hint of Kosher salt. My husband declared them a delicious lunch! We sure will miss these tomatoes when the season is over. I sacrified one of the Beefmasters to save the seeds for next year.

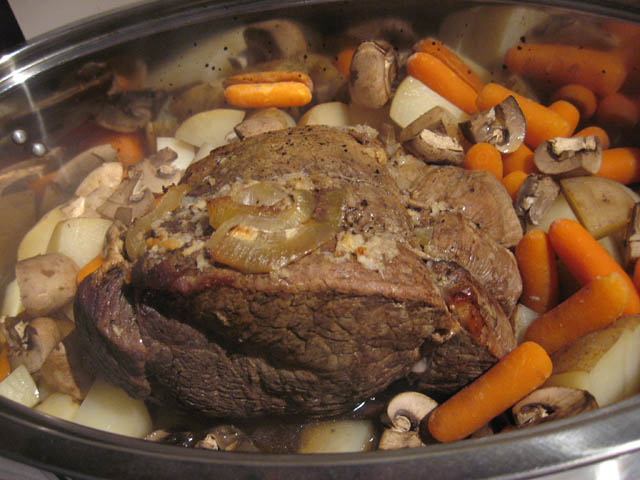
Sunday Pot Roast

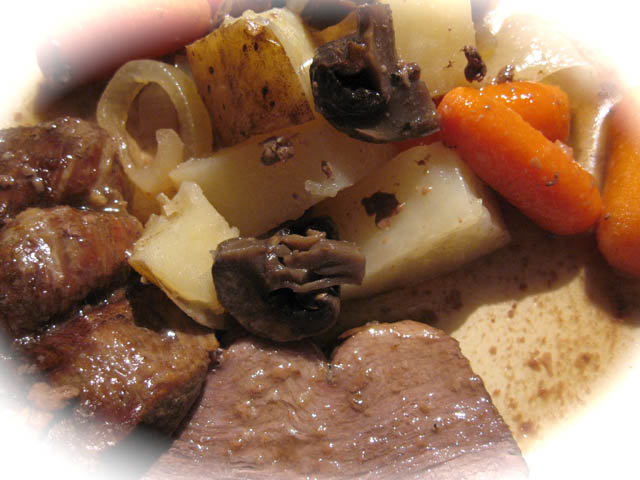
When the weather turns cooler, we enjoy pot roast some Sundays. This was a sirloin tip roast placed on a rack in a stainless steel roaster. I seasoned it with a sprinkling of garlic powder, and little onion powder, Lea & Perrins Worchestershire sauce and sliced fresh onions. The roast was slow roasted in the oven set to regular bake at 250 degrees farenheit, covered with vents open. After about three and a half hours at this temperature, I added chopped "new" potatoes, baby carrots and quartered mushrooms. The temperature was increased to 350 degrees farenheit. The vegetables were roasted until almost ready. The lid was then removed and the roast along with vegetables was allowed to brown a little. The roast was removed and allowed to rest while the vegatables were removed from the rack and kept hot. I made a thinner type gravy, served up a garden greens salad with homemade vinaigrette and the meal was ready.


Pot Roast Plated

This nice comfort meal looked great on the plate and tasted even better. The meat fell apart without having to cut. The vegetables accented with the gravy came out just the way we like them. There were a lot of left overs that were packaged for one of our kid's care packet and for Monday's lunch.

I've been experimenting with the options in iPhoto. I liked the effect of the plated meal with this matte even though it does not show the actual plate. I'll be using a few more of these effects in future.

Enjoy!