Pages

Thursday, September 30, 2010

Kitchen Quick Tips - Labeling Foods

kitchen quick tips

Don't use labels!  Use a Sharpie or old fashioned grease pencil to label food packages for the freezer, canning jars or other food storage containers.  A Sharpie can be cleaned off using rubbing alcohol or a Mr. Clean Magic Eraser while a grease pencil will wipe off with a little rubbing.

Wednesday, September 29, 2010

Sparerib Dinner

In many ways this has been the year of pork.  I can't remember a time that we have ever eaten so much pork but in all honesty there have been such great deals on pork throughout 2010 that we would be foolish to not take advantage of them.  A few days ago I found a great deal on pork spare ribs.  We have had houseguests since the 18th so followed by more houseguests arriving on the 24th .

ribs with damp mop
There were 3 large racks of ribs in the package for $29.07.  This was enough ribs for 4 adults with leftovers with one rack of ribs into the freezer for 2 adults later.  As far as meal costs go it averages out to $4.85 per person for the meat but that's a lot of meat.

Most folks have a method for pre-cooking spare ribs before grilling them.  This time I used a bit of a different method.  I placed the ribs on a sheet of tin foil then formed a pocket sealing on three sides.  I poured in one cup of water and sealed the fourth side.  The ribs were cooked on low, indirect heat until tender then my husband opened up the packet, discarded liquid and foil then grilled the ribs on direct heat until browned.  He finished off with a mopping sauce (Sweet Baby Ray's) that was grilled on the ribs until caramelized.

spare rib dinner
During the hot weather it is desirable to keep any extra heat from cooking out of the house if at all possible.  This foil pocket method is quite nice in that everything was done on the grill without the use of any additional pots or pans.  This method for pre-cooking the spareribs works nicely without drying them out.  The end result was tender, melt in your mouth ribs packed full of flavour.  I served the ribs with  home canned green beans, accordion potatoes with onions, pickled beets and a baby greens side salad.  It was a lovely summer meal with many compliments from our guests.

Tuesday, September 28, 2010

Sushi

Part of the fun of eating out is discovering new foods.  We are particularly fond of oriental buffets because of the wonderful opportunity to experience foods we don't normally cook at home.  It's a nice way to try a wider variety of small amounts of new foods without committing to a larger entrée size.  It is also a great way to find out how a particular dish is supposed to look and taste like before attempting to make the dish at home.

sushi
Sushi is the Japanese term for vinegared rice but "colloquially, the term is used to describe a finger-size piece of raw fish or shellfish on a bed of rice Japanese style"1.  Sashami is raw fish served sliced as is but not on a bed of rice or in a roll.  An interesting read on sushi and sashami is The Definitive Guide to Sushi and Sashami.  Pictured are three uramakizushi (inside-out rolls) rolls, cooked shrimp and oysters with seafood sauce and wasabi.  The roll nearest the shrimp was coated with imitation crab meat.  The roll to the front (green) is topped with Tobikko (flying fish roe) that adds a crunchy texture.

Sushi is one of those foods that is a bit more intimidating to make at home but with a bit of practice good results can be achieved.  You need a good short grain sticky rice, nori sheets, white rice vinegar and whatever fish and/or vegetables you are using.  A bamboo sushi rolling mat (makisu) is quite helpful for getting the sushi rolled properly.  Sushi can be made without using raw fish as well as in California rolls that uses cucumber, imitation crab meat and avocado or mango.

Monday, September 27, 2010

Frugal Kitchens 101 - Be An Informed Consumer

Frugal Kitchens 101

It boggles my mind how much blind faith the general public puts on the food industry!  The food industry would have you believe that they are protecting your best interests when if fact that is the furthest from the truth.  In reality the food industry is a group of businesses which means economics 101 comes into play which really means the food industry is interested in turning a profit regardless of how they do it and that includes cutting down the quality of the foods put out.  Take for example the case of high fructose corn syrup.  Despite the fact there is good evidence that high fructose corn syrup is responsible for increased autism, ADHD and ADD the food industry continues to use high fructose corn syrup because it is cheaper.  That is how much the food industry actually cares about our kids!  If we don't say enough is enough the food industry is going to continue on their quest for profits while hindering us and future generations.  This week's Frugal Kitchens 101 is all about being an informed consumer.

To be an informed consumer you need to know:
  • the current issues - My gosh!  Never have we lived in a time where food contamination has been such an issue.  There are foodborne poisonings that are causing serious illnes that has resulted in deaths.  The food industry in some respects sees this as collateratal damage.  With any luch they won't be sued but even if they are these companies are protected to the point even if they file bankruptcy the worst that is lost is the company and any assets that likely have been protected from loss anyway.  On a global scale it is becoming increasingly important to deal with sustainable and organic growers, those grower who treat their farm larbour in an ethical and fair manner and companies who pay a fair price to the farmers growing the foods for them.  
  • food recalls and contaminations notices - One alarming trend is increasing foodborne illnesses due to food contamination.  In Canada the Canadian Food Ispection Agency (CFIA) issues food recall and health allert notices.  Most people check their email daily so it is a good idea to sign up for their email notification system.
  • current terminology and what to look for - The food industry is great at signage because that gets the public to buy the food.  Organic, genetically modified (GM), trans-fats, sodium, cholesterol, irradiated, local, grown locally and low fat are all food industry buzz words.  Of these GM is used the least at the moment because it is not widely accepted by the general public but just give it time.  Health Canada releases the current information on GM foods in Canada so this is one site you should be keeping an eye on.  You really need to know what each of these terms mean with respect to the food you buy.  If I buy vegetables from a local organic farm I know it is both local and organic but if I buy aat the grocery store, well I'm trusting that's what I'm buying but chances are that isn't what I'm buying.  I prefer to take my chances going directly to the source.
  • labelling - The food industry has been very good at using buzz words on labelling because those words help sell their food.  In Canada we now have nutritional labelling and ingredients must be disclosed.  Nutrional labelling is a whole issue that really needs to be readdressed.  Some of the nutritional labelling is misleading at best.  When it comes to the ingredient list certain ingredients do not need to be disclosed.  So the term spice or artifical flavour can be used without disclosing exactly what it is.  
  • price tagging - All produce seems to have those horrible little stickers on them now.  If the code starts with 9 it is organic but if it starts with 4 it is not organic.  Knowing this you can choose organic produce in the grocery store even if it is not labeled as such.
  • dyes - Two food dyes have been indicated in food allergies.  They are yellow dye # 5 (tartrazine) and red dye # 2 (carmine and cochineal extracts) but there are likely others.  Some of these can cause severe asthmatic reactions.
  • sodium - If an product ingredient has the word sodium in it, it means extra salt.  It is called hidden salt and the food industry is very good at hiding salt in our food.
  • sugars - Surcrose (common table sugar), matose, fructose, lactose, and maltose are all sugars.  If you see an ingredient in a product ending in ose that means sugar.
  • organic - This term simply means the produce was grown without the use of synthetic pesticides.  In this case it really does pay to know the grower but if you buy in a grocery store certified organic means the produce and growing conditions have to meet specific regulatory standards.  A farm cannot be certified organic unless it has been free of pesticides and synthetic chemicals for a certain number of years and many organic growers reduce the chances of possible contamination by not using motor driven vehicles on their property.  This is one reason why organic produce is more expensive.  It is more expensive to produce.

Sunday, September 26, 2010

Baked Haddock

We eat a lot of locally caught fish like perch, pickerel and bass.  When we travel in the Grey Bruce area of Ontario we bring back a lot of locally caught whitefish.  I'm not a huge fan of heavily coated fish like beer battered English style fish.  While I like the texture of the fish cooked this way I always pick the coating off.  Quite often the only way some restaurants serve fish is with this heavy coating so it is always a treat when they offer the same fish without the coating.

broiled haddock
The clubhouse has a lovely haddock special on Fridays for $7.95.  Haddock is a popular mild flavoured, flaky whitefish. It can be baked, broiled, or coated for pan or deep frying.  Unfortunately we don't often have haddock mainly because I don't think to buy it.   In 2010 haddock was added to Greenpeace International's seafood red list because there is a high risk of it being sourced from unsustainable fisheries.  This is increasingly something to be aware of when it comes to many foods.  Haddock from the North East Atlantic (eg. Iceland, Norway, Faroe) comes from sustainable fishing grounds unlike haddock from Europe so look for the source of the haddock when purchasing to be sure it is from sustainable fishing grounds.

Pictured is the broiled haddock special served with hushpuppies, corn fritters, corn on the cob, potato weaves and cole slaw.  The haddock was lightly seasoned then broiled to perfection.  I really enjoyed it!  Surprisingly the corn fritters were on the sweet side but quite tasty.  So this will be a side I will be making at home as well.

pecan icecream ball
We seldom have dessert even when eating out.  On the rare occasion we order dessert when out it tends to be ice cream or pie a la mode.  We ordered dessert with our meals on this occasion.  Pictured is the gorgeous pecan ice cream ball topped with butterscotch syrup, whipped cream and a cherry.

Making coated ice cream balls at home is quite easy presentation.  It makes for a lovely present  You can use chopped nuts, candy coated chocolate or crushed candy canes.  Place the coating of your choice in a shallow dish.  Scoop ice cream shaping into a ball.  Quickly roll the ball of ice cream in the coating.  Drizzle syrup of choice over the ice cream.  Top with whip cream then garnish with a cherry or berries.

Saturday, September 25, 2010

Grilled Garlic Pepper Pork Chops with Red Beans and Rice

Two more of our friends arrived a couple of days ago.  My husband want to play with out fancy new grill again and after a long travel day for them I decided a homemade meal was in order.  We bought a large pork loin (about 10 lb) for $19 on our first grocery shopping trip so I cut it into thirds.  One third is in the fridge curing for peameal bacon later in the week.  I'm sure everyone will appreciate a taste of home!  One third went into the refrigerator for me to decide what to do with and the other third was turned into boneless garlic pepper pork chops.


seasoned pork loin
It was rather interesting as I didn't have an actual menu plan for the dinner.  I just started pairing things together knowing I wanted to use up part of the pork loin.  I rolled a pork loin piece in garlic pepper to create a nice coating then set in the refrigerator until ready to be cut for grilling.  I cut the seasoned pork loin into 1 - inch chops for grilling as pictured.  The chops were nicely flavoured, tender and juicy.


Grilled Garlic Pepper Pork Chops


about 3 lb pork loin
about ½ c garlic pepper

Place the pork loin onto a cutting board.  Sprinkle one half of the garlic pepper over the pork loin and press in a bit.  Turn the pork loin over and repeat.  Flip the pork loin a couple of times to be sure all sides are well covered with the seasoning.  Place the pork loin into a zipper style bag or large container.  Refrigerate until ready to grill.  Remove from refrigerator.  Slice into 1 - inch thick chops.  Grill on direct heat on medium until marked with nicely defined grill marks.  Turn and repeat.

garlic pepper pork chops with red beans and rice
I mentioned earlier this week that we stopped at a Popeye's for chicken.  One of the sides we ordered was red beans and rice.  Well now, we love just about any bean out there and we love rice so it made a lot of sense to try this Louisiana specialty dish that is served both in restaurants and at home.  I love finding a dish like this that are rather easy to duplicate at home!

Traditionally red beans and rice is a side dish served on Monday to help use up pork from Sunday's dinner.  I cheated on this recipe using a can of cooked small red beans but sure shooting I am taking a lot of dried small red beans home to can up.  I honestly was flying by the seat of my pants while creating this side as well, tasting as I added ingredients to get the taste I wanted.  The beauty of this simple recipe is it very easy to tweak as far as seasonings and extras.  Popeye's version was a bit spicier but didn't have the extra vegetables.  I think the extra vegetables compliment this dish nicely.  I really like how it came out!

Red Beans and Rice

beans:
1 - 15 oz can small red beans (500 ml/16 oz home canned)
¼ small green pepper
1 small stock celery
 ¼ small onion
1 bay leaf
½ tsp garlic pepper
½ tsp thyme
¼ tsp cayenne pepper

Chop the pepper, celery fine.  Divide in half reserving the remainder for garnishing.  Pour the beans into a small saucepan.  Stir in the vegetables.  Add bay leaf and seasonings.  Bring to a low boil, cover and remove from heat.  Let sit until cooled then refrigerate to let the flavours meld.  Before serving bring back to a low boil.  Pour into serving bowl for spooning over rice.  Garnish with remaining uncooked vegetables if desired.

rice:
The only tried and true method I use for cooking rice is a rice maker.  The only thing I insist on is to always use another liquid with flavour if at all possible

serving:
Place the rice in a serving bowl, the beans in another serving bowl and the remaining uncooked vegetables in a third serving bowl.  Assemble directly on the plate as desired.

Friday, September 24, 2010

Taco Salad (Clubhouse Version)

Taco salad is one of those dishes that has as many variations as there are cooks.  It's quick and easy to make, low cost and always a crowd pleaser so it isn't surprising to see this particular dish as a popular pub food. I started making taco salad years ago when the kids were small as an easy, sure to please camping meal.  Some restaurants and pubs have a nice presentation using a deep fried tortilla shaped into a bowl like the  taco salad at Magnolia's.

taco salad clubhouse version
We stopped for dinner at the clubhouse where I ordered the taco salad.  Their presentation is a bit different in that the edible bowl is shallow and the meat covers most of the toppings rather than forming the base.  Instead the base was refried beans.  Additional toppings included a tex-mex blend of shredded cheese, chopped tomatoes, lettuce, salsa with sour cream on the side.

I really need to do a bit of experimenting with making the tortilla shell bowls.  I haven't seen any forms for making these but I have a couple of ideas that should work.  I also found a method for making baked tortilla bowls so I will be trying those as well.  Deep frying gives the lovely, flakey air pockets in the finished bowl while baking gives a denser, crunchier bowl so it will be interesting comparing the two methods.  I will post my results as I make them.

Thursday, September 23, 2010

Kitchen Quick Tips - Food Measurements

kitchen quick tips

Have you ever wondered what 'medium' size piece fruit or vegetable means in a recipe?  Here is a great site to help you get the right size providing you use a kitchen scale http://www.nal.usda.gov/fnic/foodcomp/search/  Another good source is Book of Food Counts by Dr. Art Ulene (1996, ISBN 0-89529-667-5).

Wednesday, September 22, 2010

Using Up the Leftover Ribeye Steak

We eat a lot of beef which means we eat a lot of steak as well but it is good quality meat.  We are very fortunate that we are able to buy organic, hormone free beef on the hoof from a couple of local farmers that we have dealt with for years.  When the cow is ready for slaughtering it is taken to a local abattoir that we have dealt with forever where it is custom cut to our specifications, wrapped and frozen ready for our freezer.
leftover ribeye steak
I'm always thinking ahead to the next meal or two whenever I'm cooking.  In essence I'm planning how to use whatever leftovers there are.  Quite often if I know we will be grilling steaks for dinner I will take out an extra one to be grilled then used over the next couple of days for easy meals like steak wraps.

Once grilled the extra steak along with any additional steak leftovers are cooled then refrigerated.  I find that slicing just before reheating gives the best results too.  In the pictured dish I sliced red onion then sautéed until translucent in olive oil with a tablespoon of butter.  The butter really boosts the flavour!  Then I added sliced portobello mushrooms and continued cooking until the mushroom were cooked through.  I leveled the onion and mushroom mixture the placed the steak slices on top while continuing to cook on low heat.  A couple of stirs an the meat was warmed through for serving.

This particular leftover ribeye steak ended up feeding three adults with healthy appetites while leaving enough of the meat mixture left for sandwiches the following day.  As pictured the prepared steak leftovers can be used for wraps, sandwiches, the meat portion of an entrée, or as a topping for mashed potatoes, rice or noodles.  It can also be cooled then froze as a quick meal start.  The possibilities are endless!

Tuesday, September 21, 2010

Ribeye Steaks on the Grill

We had to buy an outdoor grill for our vacation home.  Unlike our home grill that runs on natural gas so there are no tanks to fill the one for our vacation home runs on propane with a refillable tank.  The plus side to propane grills is they can be moved anywhere you want as long as the surface is level for grilling.  This is rather handy when grilling in windy conditions.  The downside to propane grills is the tanks need refilling.  They have an uncanny knack of running out right in the middle of cooking dinner as well.  While a propane outdoor grill is certainly possible at home it is not as practical given the distance we have to travel to get the tank refilled.  Cost is also a factor.  An outdoor grill that uses natural gas costs slightly more but the cost of natural gas is less expensive than propane so a natural gas grill ends up being the better choice for at home.  The situation is different at the vacation home where natural gas is not available.

ribeye steaks on the grill
As with all cooking fuel choices it is always wisest to go with the least expensive fuel possible.  In this case there is a real trade-off at home.  One cubic foot of natural gas contains 1,030 BTU whereas one cubic foot of propane contains 2,516 BTU.  In other words you get more than twice the heat out of propane and that is certainly reflected in how well the grill performs.  Still propane is more expensive per BTU than natural gas.

My husband firmly believes the true test for any grill is how well it performs when grilling steak.  This grill is a Brinkman 4 burner outdoor grill with side burner and electronic ignition.  It is a rather heavy duty unit that should last several years with proper maintenance.  Having grilled using natural gas for so long my husband ada the grill master immediately noticed the difference in how this grill performs.  There is no doubt that this grill runs hotter but in fairness it is new and a 4 burner.  Just look at those beautiful grill marks!  To duplicate the grill marks when grilling steak grill to where there is a well defined grill mark then turn the steak one quarter of a turn to create the hash mark.  The steaks were every bit as good as they look.

Monday, September 20, 2010

Frugal Kitchens 101 - Labeling Home Preserved Foods

Frugal Kitchens 101

Home preserved foods need to be labeled and there are many ways of doing this depending on how the food is to be stored.  Many home canners either buy or print off custom made labels for their home canned foods but the logistics of this is not very practical when doing larger scale canning.  Labels add to the cost of home preserved products and in my opinion an unnecessary cost.  Besides most labels are a pain to get off the jars.  They have to be soaked off or they will gunk up your dishwasher.  However it is still important to label the food and date it was preserved when storing.  This week's Frugal Kitchens 101 discusses how I label foods for storage.
  • home canned foods using single use metal snap lids - I use a Sharpie to write directly on the lid.  It is simple and effective.
  • home canned foods using reusable canning lids - A Sharpie leaves a ghost mark on the lids so I don't want to use that since these lids will be around for a couple of decades.  I started off writing directly on the jar with a Sharpie but have since changed to using painter's tape.  It's a cheap solution.
  • home canned foods stored in boxes - I rotate my home canned foods so quite often it is stored in the cardboard boxes the jars originally came in.  Once I'm out of a row of food on the shelves the food in the boxes is moved to the shelves to replenish the supply.  I label the boxes using painter's tape and a Sharpie.  I include the content, number of jars of each content and year.  I can quickly glance at a box and know when the food should be used up by.  While home canned foods keep much longer that the USDA recommended 1 year they will lose a bit nutritionally so my comfort level hovers at the 2 year mark.  
  • home frozen foods - Our bulk meat purchases come labeled with a stamp from the abattoir's so unless I buy meats from a grocery store I really don't have to worry about labeling.  Any commercially frozen foods is already labeled.  I use a Sharpie to label contents and date for anything I put into vacuum sealed bags or containers.  
  • home dried and bulk dried foods - I store home dried and bulk dried food (eg. rices, pastas, etc.) in glass mason, commercial glass jars and occasionally commercial plastic jars.  I use a Sharpie to label these containers directly on the jar. 

Sunday, September 19, 2010

Extra Crispy Deep-fried Style Chicken

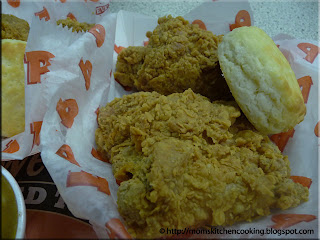
We had to stop for gas on our road trip so found a TA thinking there would be one of the trucker's restaurants there.  Usually there is but this was a smaller one so all they had was Popeye's Chicken, Pizza Hut and Subway.  We settled for the 2 can dine for $9.29 with 5 pieces of mixed chicken, 2 sides and 2 biscuits.  The sides we ordered were red beans with rice and potatoes with gravy.  The chicken reminded me of KFC's extra crispy chicken but was a bit different.  This is a rather easy chicken to duplicate at home even if you don't have a deep fryer.  It's all in the coating and what makes this coating extra crispy is corn flake cereal!

extra crispy deep-fried style chicken
Years ago when our now grown kids were kids of our own one of my girlfriends told be the only way her kids would eat chicken was with corn flakes.  Our kids being the offspring of foodies were not quite so picky enjoying chicken just about anyway we could prepare it.  I feel just a bit guilty not making the extra crispy deep-friend style chicken using corn flakes when they were younger.  At any rate this is a good recipe, one that comes fairly close to Popeye's Lousanna style extra crispy chicken.
  
Extra Crispy Deep-fried Style Chicken

1 ¾ c crushed corn flake cereal
1 egg
1 c milk
1 c. unbleached  flour
½ tsp sea salt
¼ tsp pepper
½ tsp paprika
3 lbs frying chicken pieces
3 tbsp. butter, melted

Crush corn flake cereal into a shallow dish and set aside.  Wash and dry chicken pieces.  Beat egg and milk slightly in small mixing bowl.  Mix in flour, salt, paprika, and pepper.  Dip the chicken in the batter then coat with the crushed cereal.  Place the chicken, skin side up, in a greased shallow baking pan.  Drizzle with melted butter.  Bake at 350°F uncovered and without turning until chicken is tender and juices are no longer pink.

Yield: 6 servings.

Saturday, September 18, 2010

Large Marge

I have to say we love our burgers but not the burgers most people thing of when you say burger.  The burger we go for are anything but fast food burgers.  The ones we enjoy tend to have a bit of a history and story behind them.  They are always hand made from scratch as well.

large marg burger
A favourite southwestern Ontario drive-in restaurant that has been in business longer than we've been married [our kids are grown and we have grandkids] makes a specialty burger called the Large Marge.  They have a whole story behind the Large Marge and pictures of everyone who has ever eaten a Large Marge on their wall except for my husband who can eat a Large Marge but we always get take-out so they have never taken his picture.  The Large Marge is a good 6 - inch diameter burger with 2 handmade beef patties (1 lb), lettuce, tomato, pickles, ketchup, mayonnaise, mustard and onion rings on a sesame seed bun.  Yes, onion rings!  It is an amazing burger to say the least.  This is a burger that you could duplicate at home but you would have to make the buns as well.  The heart of this burger is the handmade beef patties but the crowning glory is the onion rings.

Friday, September 17, 2010

A Busy Tomato Canning Session

My husband brought home the fourth hamper of tomatoes last Thursday evening.  I set about canning them.  This canning session spanned over 2 and a half days because this year I started the heaviest of the canning season tired to begin with.  Rather than ruin a batch of food being put up I've been going at a bit of a slower pace.  There was a bit more prep work in peeling the tomatoes and chopping all the great vegetables that go into my signature salsa for this session as well.  Clicking any of the links will get you to the recipe for the product mentioned.  While I don't give out my recipe for my signature salsa I have included an approved salsa recipe for canning that I have also tried.

home canned tomato products
Starting at the right there is 1 - 500 ml jar of pizza sauce.  There were 2 but my husband declared it a good batch so made quick pizzas for a snack.  The next three rows (17 - 250 ml jars) are also pizza sauce.  Following that is 14 - 250 ml and 1 - 125 ml jars of seafood cocktail sauce.  This is one of the nicest tasting seafood cocktail sauces, so much nicer than store bought and considerably less expensive.  My signature salsa is in the 11 - 500 ml jars just to the left of the centre of the picture.  Three of the salsa jars have Tattler reusable lids on them.   The next 4 - 500 ml jars are tomato stock, one of my favourite new products from last year's canning.  To the far right is 8 L of raw packed whole tomatoes.  This is the second year I've raw packed whole tomatoes and I'm still not impressed with the aesthetics of the jars!  The whole tomatoes have a deep tomato flavour and good texture but the jars lose a lot of liquid so they just don't look nice.  The next batch of whole tomatoes will be hot packed in water and will still be pressure canned.

The following recipe is one that has been tested and is approved for home canning.  Do not change the amounts of the hot peppers in this recipe as it is important to keep the low acid to high acid vegetable ratio the same.  You can tweak the heat by using a hotter pepper, adding the hot pepper sauce or adding 1 tsp of hot pepper flakes.  You can also substitute white vinegar for the cider vinegar but be sure whatever vinegar you are using is 5% acetic acid.  Be sure to wear surgical or rubber gloves when preparing the hot peppers to prevent your hands from being burned.

Zesty Salsa
source:  Ball Blue Book, 2001. Pp. 81

10 c prepared tomatoes
5 c prepared green peppers
5 c onions, chopped
2½ c prepared hot peppers
1¼ c apple cider vinegar
3 cloves garlic, minced
2 tbsp cilantro, minced
3 tsp salt
1 tsp hot pepper sauce (optional)

Wash, peel, seed and core tomatoes.  Chop and seed all of the peppers measuring out the amount needed.  Prepare onions, garlic and cilantro.  Combine the ingredients in large sauce pot.  Add hot pepper sauce if desired.  Bring the mixture to a low boil then simmer for 10 minutes.  Ladle the sauce into hot jars leaving ¼- inch headspace.  Wipe the rim and adjust two piece metal lids (or us Tattler lids).  Process 15 minutes in boiling water bath canner (BWB).  At altitudes over 1,000 feet above sea level refer to altitude adustment chart on canning information page.  Remove from canner and allow to cool in a draft free location.  Remove the rings and test for seal.  Wash jars and rings.  Dried rings can be loos

Thursday, September 16, 2010

Kitchen Quick Tips - Brown Sugar Substitute

kitchen quick tips
If a recipe calls for brown sugar the substitution is 1 c brown sugar = 1 c granulated sugar plus 2 tbsp molasses mixed well.

Wednesday, September 15, 2010

Peeling Tomatoes

Of all the tomato products that I can and freeze there are very few that I've used unpeeled tomatoes.  Instead the tomatoes are either passed through the food strainer or hand peeled.  The pulp of tomatoes passed through the food strainer is used to make smooth tomato sauces.  The remaining skins and seeds that aren't dried end up in the compost bin.  Tomatoes that are hand peeled are used to make chunkier sauces, salsas as well as whole or stewed tomatoes.  Those being used for chunkier sauces are cored and seeded.  The tomato meat is rough chopped for the sauces.   The seed sacks are left to drain in a strainer.  The liquid is reserved for making tomato stock and the seeds prepared for seed saving.  I don't core or seed th tomatoes that are canned as whole or stewed.  The peels are dried down for tomato powder.

chilling the tomatoes
A surprising number of home canners do not like to peel tomatoes.  Aesthetically peeled tomatoes look nicer however the end product has a better texture without the peels.  One year I used a stick blender to blend the skins into a batch of roasted tomato sauce.  Looking at the sauce you couldn't tell they were there but the texture wasn't as nice as roasted tomato sauce that had been passed through the food strainer. 

Peeling tomatoes is not a difficult task.  I wash and rinse the tomatoes well then transfer them to my huge stainless steel bowl.  I clean out the sink then fill about a quart of the way full with cold water.  I use a large pot filled about half way with water.  I bring the water to a boil then place as many tomatoes as will comfortably fit and return the water to a boil.  I leave the tomatoes about 1 minute or until the skin cracks (green arrow).  I continue in this fashion until the sink is full adding more cold water as necessary.  Then I put on a pair of surgical gloves.  I hold the tomato in my left hand, cut across the stem end with a paring knife, give a little squeeze and the tomato pops out of the skin.  The top piece goes into the compost bucket, the peeled tomato goes into another large bowl and the skins go into a bowl where they later be spread out for drying.

peeled tomatoes
I let the whole tomatoes sit in the large bowl where they will release some of their liquid.  This will be used to make tomato stock.  If the tomatoes are to be cored and seeded I cut each tomato into quarters lengthwise then with a scraping motion of my thumb each quarter is quickly seeded.  I turn the quarters to line up lengthwise and cut across for a rough chop.  I then put the cut pieces into a 4 c measuring cup.  When the cup is filled I pour the cut tomatoes into a strainer over the tomato liquid bowl where they will continue to drain while I get the next 4 c portion of cut tomatoes ready.  In this manner anytime I am using peeled or peeled and cut tomatoes I end up with the desired product, tomato stock and tomato powder. 

Even though my method sounds time consuming and a bit complicated it really isn't.  I set up everything assembly line fashion so the tomatoes go from the hamper to the sink for washing then as everything else is done is succession.  From start to finish I can have a hamper to tomatoes peeled, seeded and chopped in about an hour.  At the same time I usually have a sauce on the go with the first of the chopped tomatoes and by the time the tomatoes are finished being peeled it is ready for the canner.  So everything works together rather smoothly despite a high level of multi-tasking.

Tuesday, September 14, 2010

Basic Refrigerator Cookies

Refrigerator cookies have become popular in the grocery stores because all you have to do is open the package, slice the dough and bake for yummy, hot cookies.  The problems with the store bought refrigerator cookie dough aside of the price is the packaging and preservatives.  Refrigerator cookie dough takes about 5 minutes to make.  Once made keep two or three rolls of the dough in the refrigerator for homemade convenience.

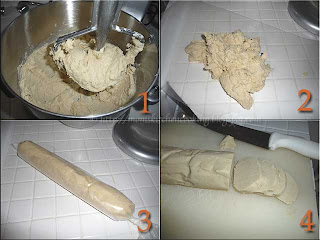
steps for making refrigerator cookies
Awhile back I was asked if I had any refrigerator cookie recipes.  Well as life goes I forgot to post about refrigerator cookies.  Here is a basic refrigerator cookie recipe that can be modified to make a few other cookies.  I will post those modifications as I make them various cookies using the basic refrigerator cookie recipe.

Refrigerator cookies are very easy to make.  Mix the dough (1).  The dough will be soft and sticky.  Scrape the dough onto wax paper (2) and form into a log shape.  Wrap the wax paper around the dough log and twist the ends to seal (3).  Refrigerate the dough for several hours.  Remove from refrigerator and slice for baking (4). 

refrigerator cookies
The ingredients for this batch of basic refrigerator cookies cost about $1.20 in comparison to store bought refrigerator dough that costs about $2.49.  The homemade version makes 3 dozen large cookies or 90 - 1" diameter cookies whereas the store bought dough makes 2 dozen medium sized.  The homemade version can be frozen as well.  Within a short span of about 15 minutes you could easily make several rolls to enjoy hot cookies fresh from the oven any time you want them. 

These cookies have a wonderful, sugary vanilla flavour.  They are soft in the middle with just a bit of crunch on the edges.  The dough does spread considerably when baking so next time I will make the log a bit smaller in diameter.

Basic Refrigerator Cookies
source: Kate Aitken's Canadian Cook Book, 1965. Pp. 123

⅔ c softened butter
1 c granulated sugar
1 egg, well beaten
1 tbsp pure vanilla extract
1¾ c unbleached flour
½ tsp baking soda
½ tsp sea salt

Cream the butter and sugar together in bowl of stand mixer.  Add egg and blend until creamy.  Mix in vanilla.  In a separate bowl mix flour, baking soda and salt together.  Turn mixer on and slowly mix in dry ingredients to the butter mixture.  Scrap the dough onto waxed paper.  The dough will be soft and sticky.  Form into a log.  Wrap with the waxed paper securing the ends.  Place in the refrigerator for 24 hours.  Slice the chilled log to form cookies.  Bake on an ungreased cookie sheet at 375ºF until firm an golden brown.

Monday, September 13, 2010

Frugal Kitchens 101 - The Queen of Jars

Frugal Kitchens 101

As you know if you have been following this blog I do a lot of canning.  Essentially if I can home can it myself I do.  This means I can somewhere around 1,200 or more jars of food each year.  Now that doesn't mean I have 1,200 jars of food sitting in my pantry, it just means that is the total number of jars of food canned each year while recycling empty jars and refilling them.  This week's Frugal Kitchens 101 is all about being the Queen of Jars.


I love glass jars of all sizes and shapes!  Glass is the ideal storage container because it doesn't stain, it can be vacuum sealed to keep out humidity and it doesn't let out any food odours to attract insects and rodents.  There are some jars like MiracleWhip® amd René's dressings I reuse for BWB canning.  Even though the USDA says to expect more breakage, I haven't experienced that.  In general if a commercial jar will fit a mason jar lid I will try it especially for BWB processing.  A few years ago I discovered commercial sauce jars stamped with Mason.  Mason is NOT a brand name but rather the jars are named after their inventor John Landis Mason in 1858 and the patent specifically applies to the design of the threads on the jar, not the glass or anything to do about the glass.  So Mason doesn't mean tempered glass or anything else but if a jar is stamped Mason it means it has the Mason thread on the jar which means these jars will accept the modern Mason rings and lids.  However, the jars stamped with Mason on them are quite suitable for BWB canning

I put the word out to family and friends that I'm saving these jars.  I am not above buying a commercial product in a jar I can reuse but only if I can use the product which doesn't happen a lot.  In this case I tend to go towards the large 2 gallon jars because they are great for dry storage.  So I get the product and the jar.    I also get institutional sized jars from restaurants.

Glass jars can be reused for:
  • home canning in a boiling water bath canner (BWB) if they are stamped with Mason or the rings will screw on tightly
  • dry food storage - vacuum seal to keep out humidity
  • arts & crafts - smaller glass jars can be turned into snow globes or used for craft supply storage
  • terrariums - 1 gallon and 2 gallon glass jars are ideal for making terrariums
  • vases
  • rooting jars for continuous indoor gardening

Sunday, September 12, 2010

Bacon Potato Salad

I usually make most dips from scratch so the question always arises what to do with the leftover dip.  A little thinning down with milk or water easily turns leftover dip into a salad dressing.  Left as is the dip can be stirred into mashed potatoes for a nice flavour sensation.  I wanted to make a rather spruced up potato salad.  Here's what I came up with.

bacon potato salad
Potato salad is a summertime staple and most times I make it the same way I always do but sometimes adding a bit of sparkle is in order.  I decided to take advantage of a bit of leftovers to create a unique potato salad.  I used the leftover onion and garlic dip that I made using one of my basic dip base of sour cream, cottage cheese and MiracleWhip®.  The end result was a lovely, tasty potato salad with just that extra twist of flavour that  I will definitely be making again.

Method:  I cooked the bacon pieces until browning then drained and steamed the potatoes then let cool.  I combined the potatoes with the bacon then stirred in sliced green onions and fresh chopped chives then stirred in the leftover onion and garlic dip.  I garnished with more fresh chopped chives.

Basic Dip Base

½ c cottage cheese
½ c sour cream
⅓ c MiracleWhip® salad dressing
1 finely chopped green onion
1 - 2 tsp herb or seasoning blend of choice

Place the first three ingredients and herb or seasoning blend into a mason jar if using the mason jar blender method or into the blender if not using this method.  Blend until smooth.  Remove from blender.  Stir in green onion.  Refrigerate 1 hour to allow flavours to meld. 

Note: This basic dip base is easily modified for both flavour and texture.  Add 2 tbsp of milk when blending to make a creamy salad dressing.

Saturday, September 11, 2010

Freezing Greens

I grow a lot of greens year round but this time of the year some of them produce better than others.  Ideally I would like to can a few jars but greens cook down so much there is no way I am going to run the canner for a couple of jars of greens.  I tend to freeze excess greens as I get them.  The method is quick and easy suitable for low levels of preserving greens as they come in.

swiss chard
A few days of go I picked excess Swiss chard.  We have extra this year even though we eat a lot of in season chard.  I decided rather than let the extra go to waste it was time to preserve some.  The problem is canning the greens while quite doable, there were not enough greens to can.  Well there were but unless I can run a full or at the least a half canner load in the pressure canner I prefer not to.  If I had enough of the Swiss chard to run at least 7 - 500 ml jars then I likely would have canned it.

As it stands this beautiful Swiss chard ended up being frozen.  While it was a lovely amount it just wasn't enough to can much more than one 500 ml jar, definitely not worth running the canner for!

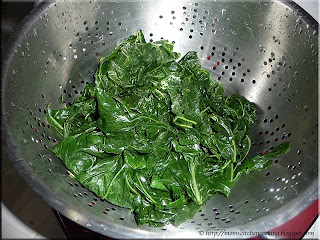
blanched swiss chardI steamed blanched the Swiss chard for 2 minutes.  Blanching deactivates enzymes that can cause food spoilage when freezing foods.  Once the chard was blanched I placed it into a strainer for draining. As you can see like most greens a large amount of greens reduces down to a small amount of greens for preserving.

Greens in general tend to hold a bit of water even with just a light steam blanching.  Once the greens are cooled I like to squeeze out a bit of any remaining liquid to give a bit drier frozen product.  If you are canning them you would definitely want to squeeze out the extra liquid. 

packaged swiss chard for freezer
I packaged the drained, squeezed Swiss chard into a 500 ml (2 c) screw top, Ziploc® container.  I like these containers for the freezer specifically for the air tight closing mechanism.  They keep glass out of my freezers while performing much like mason jars.

It doesn't look like a lot of greens that I put up today but it is enough greens for at least one meal.  It eliminates the problem of extra greens going to waste.  Essentially this is small batch freezing.  By freezing foods from the garden as you harvest them rather than waiting  for enough produce to do a larger you prevent wastage from the garden for smaller yielding crops.  Essentially preserve as you go.

Friday, September 10, 2010

Fire Roasted Italian Pasta Sauce With Mushrooms

Roasted tomato sauce is one of my signature sauces that I make each year.  It is one of my most requested sauces.  It is a versatile sauce that can be used as a pasta sauce or as a tomato sauce for dishes like cabbage rolls or as an ingredient in dishes using tomato sauce.  Roasting on the grill over an open flame gives the sauce it's unique flavour that can't be duplicated by other cooking methods.  In addition to canning roasted tomato sauce I have been experimenting using the sauce as a base for other sauces like  fire roasted tomato basil sauce.

fire roasted Italian pasta sauce with mushrooms
Last week I processed the third hamper of the season.  The entire hamper of tomatoes was fire roasted on the grill.  As the tomatoes were roasting I formulated a plan for making a fire roasted Italian pasta sauce with mushrooms.  When creating tomato sauce recipes the guidelines are no more than 3 c of low acid vegetables to 22 c of tomatoes if processing in a BWB canner.  I process most of my tomato sauces in a pressure canner so this restriction can vary with processing time is adjusted to that of the lowest acid ingredient. 

The resulting sause was medium textured with chunkier vegetables in a smooth base.  The flavour was amazing!   Pictured is the canned fire roasted Italian pasta sauce with mushrooms.  There were 7 L jars and 4 - 500 ml jars of the roasted sauce so the canner ran twice.  I added a 500 ml and 250 ml jar of plain seasoned tomato sauce that was left over from a previous canning session that I had froze until I could add it to a part canner load. 

Method:  I placed the base notes in a large roasting pan then slow roasted adding more as necessary as they roasted down until the entire hamper of tomatoes had been used.  Once the roasting was complete I ran the sauce through the KitchenAid® food strainer.  Making the roasted tomato base takes a good part of the day so I quick chilled the sauce for refrigeration to finish the sauce for canning.  The following morning I prepared the high note vegetables and added them to the sauce that I had brought to a low boil.   Then I added the accent notes and adjusted to taste.  I let the sauce simmer about 30 minutes until it had reduced a bit then ladled into hot jars, acidified with citric acid and capped the jars.  I processed this sauce for 45 minutes at 10 lb pressure.

base notes (roasted):  tomatoes, onion, carrot, garlic, celery
high notes:  onion, green pepper, celery, mushrooms
accent notes: fresh/dried herbs (oregano, parsley, basils, thyme),  cinnamon, brown sugar

Thursday, September 09, 2010

Kitchen Quick Tips - Buttermilk Substitute

kitchen quick tips
If a recipe calls for buttermilk and you don't have any substitute with equal amount of plain yogurt or add 1 tbsp of lemon juice or vinegar to enough milk to make 1 c and let stand 5 minutes before using.

Wednesday, September 08, 2010

Pomona's Pectin

[Note:  I have no affiliation with Workstead Industries or Harvest Plus other than being a satisfied customer.  The following summary of Pomona's pectin is my opinions only.]

Many of the jam and jelly recipes I make do not use regular pectin (eg. Certo liquid or powdered) but rather use Pomona's pectin, a topic of a recent Frugal Kitchens 101.  Pomona's pectin is not readily available in most stores but can be found Amish and Mennonite country stores, natural/health food stores or can be ordered online directly from them through Workstead Industries (US, International) or Harvest Plus (Canada).   It is available in smaller packages as well if you don't want to commit to buying a larger quantity.

Pomona's pectin is a citrus based, low methoxy pectin that unlike other pectins does not require sugar to gel.  With regular pectins the fruit to sugar ratio is critical so you cannot substitute the sweetener or reduce it otherwise the jam or jelly will not set.  Pomona's pectin instead relies on calcium water.  When you buy Pomona's pecting (mason jar) it comes with a small packet of monocalcium phosphate.  The calcium water (blue arrow) is made by mixing ½ tsp with ½ c of water.  Once the calcium water is made it can be stored in the refigerator between uses where it will last for several months.  Shake before use.  If the white settled powder in the jar discolours, discard it and make a fresh solution.

Pictured is my remaining supply of Pomona's pectin and monocalcium phosphate.  The pectin is over a year old which is fine as this pectin has no expiry date, making it ideal for long term storage.  I'm about halfway through the 1 lb I purchased and am getting ready to place another order simply to avoid a price increase.  One pound equals 128 tsp at a total cost of 37.5¢ per tsp.  Most batches of jams or jellies that I make use 2 tsp of the pectin which works out to 64 batches of jam or jelly.  Syrups take half the amount and jelled candies take double the amount.

It is very important to understand that in the recipes where I specify using Pomona's pectin that I have developed that recipe specifically for that pectin.  You cannot substitute with other pectins.  There are a few recipes in the archives that use regular pectin.  In my opinion Pomona's pectin is a valuable, must have addition to my canning supplies.  Not only is this pectin cheaper than regular pectins, it give me the flexibility for creativity when making jams and jellies.  It can also be used to thicken homemade yogurt, syrups and make jelled candies (eg. gummy bears).

Tuesday, September 07, 2010

Canning and Freezing Red Haven Peaches

I tend to go in spurts with certain produce when putting it up.  If I can get what I don't grow for a good price then I will can enough for 2 seasons which gives me a cushion if the price is too high the following year.  This looks like the year of the peach as far as canning goes.  The first peaches I put up were spirited and non-spirited peaches.  I used a cling free (freestone) variety but not Red Haven peaches.

Red Haven (Prunus persica) peaches are a cling free variety that is juicy, sweet with excellent flavour suitable for all purposes.  They are wonderful for canning as the pit pretty much pops out with little effort.  The natural blush adds a lovely colour to the canned peaches.

My quartering method for peaches works wonderfully with Red Haven peaches.  It takes very little time to peel the peaches without having to blanch to slip the skins.  I find that not blanching to slip the skins give a nicer canned product.  As I peel the peaches I slip them into water with a little lemon juice to prevent browning before canning or freezing.

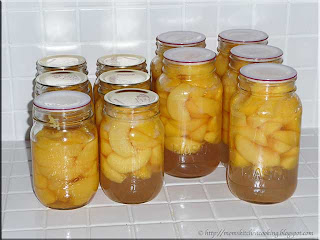
canned red haven peaches
Home canned peaches are a true winter delight.  They are wonderful for breakfast with buttered toast, as an afternoon snack or as an easy dessert.  Pictured are the Red Haven peaches I canned.

I used a light syrup to raw pack the peaches.  The gold lids are the standard Bernardin single use metal canning lids.  The white lids are the Tattler reusable canning lids I'm testing.  All of the jars sealed and look rather nice.  Floating fruit is to be expected with any raw packed fruit and that is because the fruit shrinks somewhat during the canning process.  The L (quart) jars with Tattler lids had no problems but there was a slight problems with the Tattler used on the 500 ml (pint) jar.  The Tattler lids have a slightly different method for using.  In this case the jar lost liquid yet sealed.  The suspected reason for this is the way I put the lid on prior to canning.  When using Tattler lids it is important to tighten the ring then turn the ring back ¼- inch.  This method takes a bit of getting used to so I'm sure I perhaps turned back the ring a bit more than I should have.

read haven peaches for freezing
I don't freeze a lot of peaches.  If anything I may freeze one large bag I decided to freeze some of the Red Haven peaches rather than run another canner load.  I don't use a syrup or any sugar when freezing peaches.  I simply drain the peaches from the lemon water then load into a freezer bag.  Alternately the slices can be froze in a single layer on a baking sheet then packaged into a zipper style freezer bag.

I used about 3 L of the prepared sliced peaches.  This gave about a gallon bag of peach slices for the freezer.  This is the perfect size for dessert when all the kids and grandbabies are home or for when we are entertaining. 

Monday, September 06, 2010

Frugal Kitchens 101 - Cutting Boards

Frugal Kitchens 101

Using kitchen knives is still one of the most popular ways to prepare chopped, sliced, julienned and diced foods.  There are all kinds of mechanical devices to do this ranging from manual mandolins and slap choppers to electric food processors to stand mixer attachments.  Still the knife rules supreme for small, quick food prep jobs.  Cutting boards are a necessary piece of equipment in any home kitchen to help with the use of knives during food preparation.  They protect both your counter surface as well as the knife blade.  This weeks Frugal Kitchens 101 addresses the issue of cutting boards in the kitchen.

Cutting boards come in three materials and they range in cost from dollar store to higher end kitchen specialty store prices.  They come in a variety of sizes and colours as well.  Cutting boards can be built into the counter or they can be fully portable.  The current recommendations are you should have at least 3 cutting boards - one for fruits and vegetables, one for red meats and one for poultry.  I have 12 cutting boards in various sizes and compositions.  Here are my opinions on cutting boards based on what I have.
  • glass - Glass cutting boards are generally pebbled on the cutting surface.  Glass is easy to clean, dishwasher safe and non-staining.  Glass cutting board inserts were quite a popular countertop built-in addition for a few years.  Built-ins are still available if desired.  The problem with glass is it will dull your knives.  While I do have one glass cutting board it doesn't see a lot of use and I don't recommend them.
  • wood - Wood cutting board options range from butcher block built-in or stand alone models.  A true butcher block surface is a lovely addition to any kitchen.  Wood cutting boards require a bit of maintenance to keep their finish achieved by careful washing followed by oiling when dried.  Bamboo cutting boards are gaining favour.  These boards have a natural anti-bacterial action and resist staining with no need for maintenance other than hand washing.  Awhile ago I wanted to switch out all of my cutting boards in favour of bamboo but those is service are in too good of condition to do that.
  • plastic - Plastic cutting boards can be flexible so you can roll them up for storage or rigid.  By far I prefer the rigid plastic ones.  All are dishwasher safe with the biggest complaint being they do stain.  During tomato canning season my plastic cutting boards turn bright orange that gradually fades over the following year.  Some plastic compositions stain considerably less than others though.  If staining does not bother you these low cost cutting boards are the way to go!
The price of cutting boards is not always indicative of their quality or thickness.  My cutting boards break down into: 4 IKEA, 2 dollar store (1 bamboo, 1 plastic), 2 generic, 1 glass, 2 wood (custom made) and 1 Rubbermaid (commercial).  The only one that doesn't see much use is the glass one that was likely the most expensive.  Surprisingly the dollar stores are a good source for smaller cutting boards.  IKEA sells theirs in a package of 3 or 4 and you can even get colour coded for about $5.  My Rubbermaid cutting board is 15½ x 18" so it gets used for more than just cutting.  One of our kids made one of the wooden cutting boards while a friend made the other.  I like using the wood cutting boards for cutting breads.  A small investment of $20 should give you a wide range of durable cutting boards to suit your needs.

Cleaning cutting boards is not difficult.  I spray any plastic cutting board with an 80% ethanol solution then run them through the dishwasher.  We are a chlorine bleach free home so I don't worry about any staining on plastic cutting boards.  I also use the same solution on the wood cutting boards except for the bamboo which is naturally resistant.  Once the wood boards are cleaned I oil with a little vegetable oil then wipe dry.    I don't oil the bamboo cutting board.   It is simply washed and allowed to dry.

In summary, cutting boards are a must have piece of kitchen equipment that can be purchased for a small amount of cash outlay.  If you are starting out with none at all I would recommend bamboo followed by wood and plastic.  I don't recommend the glass cutting boards at all although if you happen to have one they are good for setting a nice planted herb display on in the kitchen.

Sunday, September 05, 2010

Tattler Reusable Canning Lids Review

Tattler reusable canning lids

I announced that I was experimenting with Tattler reusable canning lids the first week of August.  I have now had a month to test out these lids on various home canned products.  I tested 3 dozen of these lids under various conditions looking at several variables that were important to me.  Here is my full review of these lids.  [This is not a paid review and I have no affiliation with S & S Innovations, Corp.  The opinions expressed here about these canning lids are my opinions. ]

Abstract:
  • product - Tattler reusable canning lids are a BPA-free heavy plastic reusable canning lid made in the USA.  The lid requires a separate rubber ring that is included with the lids.  Additional rubber rings can be purchased to replace damaged rubber rings. 
  • why? - Currently the only approved lids for canning are the two piece metal, single-use snap lids.  The three problems with these metal lids are:  1) single-use which adds to landfills; 2) availability which isn't guaranteed; and 3) BPA content in the plastic coating on the metal lids.
  • test conditions - I tested the Tattler lids under normal home canning conditions using different sizes of jars, boiling water bath (BWB) and pressure canner (PC) processing.  I also tested the lids for ease of use, seal failures, staining, reusing, vacuum sealing, cost, storage and miscellaneous problems.
Results:
  • cost - The metal, single-use snap lids cost me 10¢ per lid at their lowest price.  The Tattler's cost me an 84¢ per lid investment meaning I need to reuse each lid 8 times before realizing a payback but after that they will cost nothing to use saving me about $100 per year.
  • ease of use -  The Tattler reusable canning lids have a slightly different preparation method.  Once the lid is placed on the jar it and the ring tightened it is extremely important to turn back the ring by ¼- inch for proper venting during the canning process.  I used the 'A' in Tattler to gauge this by tightening the ring then turning back the size of the 'A'.  I really did not have a problem adjusting the method for using the Tattler lids.
  • processing method - The Tattler lids performed equally well in BWB and PC conditions.
  • jar sizes - The Tattler lids performed well on all jar sizes I tested on: 125 ml, 250 ml, 500 ml and 1 L.
  • seal failures - I experienced 3 seal failures during the testing period.  All were directly due to learning the proper method and there is a learning curve.  
  • reusing -  I tested using the lids canning water both in BWB and PC.  I then reused the lids to can other foods and I reused the seal failure lids.  Lids that were reused performed as well as new lids.
  • staining - I used the lids on blueberry and several tomato products.  I experienced no lid staining. 
  • storage - Anyone doing larger scale home canning can relate to the storage issues for both filled jars as well as new lids and rings.  I remove the rings, wash and dry rings and jars then replace the rings loosely for storage as per Bernardin's instructions.  Storing large numbers of reusable lids could be a problem especially with larger scale canning.  I plan to store the lids and rings not in use in a large plastic tote.  Not storing the jars with rings on has already created a back-up of rings but in some ways that is good because I can cull out some of the older, well used rings.  However, not storing the jars with rings prevents convenient stacking of filled jars using the ring to hold the next layer steady.  My solution is line the filled jars single layer on shelving and to repack any overflow into the original canning jar boxes to stack. 
  • vacuum sealing - The Tattler lids outperform the metal snap lids for vacuum sealing!
Miscellaneous Problems:
  • the ping - The most notable difference with Tattler lids is there is no audible ping to indicate the lid has sealed!  I'm going to miss that.  If a Tattler lid doesn't seal it simple lifts off the lid so it is quite noticeable eliminating any guess work as to whether the lid has sealed.
  • burr - There is a slight burr on the lid that is annoying.  While this does not affect performance it can cause problems like a slight cut on your fingers.  I solved this problem by using a nail file of the burr.  It's not a huge problem but would be nice if I didn't have to deal with it.
  • labeling - I label my jars using a Sharpie permanent marker on the lid.  It is not possible to use this technique on a Tattler lid.  I tested this on one lid and after 30 minutes of set time even using a Mr. Clean Magic Eraser there was still a ghost mark on the lid.   I don't like using labels on my jars so my solution on Tattler jars is to write the product name and date directly on the jar.  A Sharpie works well but I will be switching to an old fashioned grease pencil to eliminate off gassing from the Sharpie markers.
  • gifting - Cost is an issue when it comes to home canned foods that will be gifted.   Our kids and most of our friends are very, very good at returning my jars for refills so I would not hesitate to send a jar or two of food home with them with a Tattler lid because I know it would get back to me.  However, some of my home canned foods go out to friends that don't know the rule is to return the jar for a refill.  The cost of Tattlers is prohibitive for single use so I will be using the single use metal lid which means my work around is to can foods for home use with Tattlers and those designated for gift giving with the metal snap lids.  
  • shipping -  I do think the shipping is a little high especially since sending to a US address address via Priority Post would cost about $4 while they charged $9.33 so that is just a tad excessive in my book.  I'm sorry but this has to be one of my biggest complaints with the lids! 
Conclusion:

My inital investment on the Tattler lids was $30.28 for 3 dozen lids.  I tested the Tattler lids on several home canned products.   I am extremely impressed with the performance of the Tattler lids!  I actually found myself preferring the Tattler lids over the metal lids.  In my opinion once you get over the learning curve for using these lids they are far superior to the metal lids.

As someone who cans well over 1.000 jars of food annually I am elated to be able to secure a reliable source of reusable canning lids while reducing what is going to the recyclers or landfill.  In my opinion this makes Tattler lids the eco-friendly addition to home canning.  In general I found these lids seal better than the metal lids.  With a metal lid there can be a false seal where it looks like the jar is sealed but later it becomes unsealed.  With the Tattler lids if a lid is not sealed it is immediately apparent so it removes the whole issue of false seals.  Any of the problems I encountered were easily solved other than the shipping costs.

The Tattler lids are one product I will recommend based on my initial testing.  I was impressed enough with these lids that I ordered a second time.  I did not order the larger 500 lid amount because I am really curious as to how these lids will perform under repeated test conditions.  Also there is very little price incentive for ordering the larger amount.  You do get a 5% cost reduction on the lids at 500 lids but there is an larger inital investment however the costs work out to 60¢ per lid giving a lower pay back period.  Once I do the long term testing on reusability for these lids I will place an order for the 500 lid count if the results are favourable.

Saturday, September 04, 2010

Tomato Stock

Tomatoes yield very little waste when processed.  The reason for this is the entire tomato can be used.   The pulp can be used in sauces, chutneys and salsas, the skins can be dried for tomato powder and the natural juice that is released can be used for stock.  Tomatoes contain high levels of the enzyme pectase (pectinerterase) that is activated when tomatoes are cut.  This results in separation of the pulp and juice in home canned tomatoes.  The enzyme is destroyed at temperatures over 180ºF (82ºC).  Using this knowledge it is possible to force tomatoes to separate in order to make two products, one from the pulp and the other from the separated juice.

tomato stock
Removing the juice from the pulp results in a thicker pulp that takes less time to boil down to the desired consistency for sauces, ketchups and paste.  Reserving that liquid to can as tomato stock puts one more product on your pantry shelves but once you have tried it you will see why I rave a little about it.  It has a lovely, mellow flavour.  Tomato stock gives an amazing flavour to roast beef during cooking and to the resulting gravy.  The stock is also wonderful added to soups or stews as well as using as the liquid for cooking rice or pasta. 

Each hamper of tomatoes will give a yield of about 20 - 250 ml (half-pints) of tomato stock.  This particular hamper was processed into two sauces, one that did not have the juice removed so I ended up with 10 half-pints.  Every time I make a sauce where the tomato juice can be separated from the pulp I do.  I'd like to finish the season with 60 - 250 ml (half-pint) jars of tomato stock for the upcoming year.  I'm using half pints because I prefer that size.  It is the perfect amount for adding to roasts and stews.  The tomato stock can be processed in 500 ml (pints) jars as well as L jars.  I process at 10 lb pressure for 15 minutes.

Friday, September 03, 2010

Second Annual He Said/Shed Said Contest Summary

Earlier this month I announced the Second Annual He Said/She Said Contest. The focus of this year's contest was Company's Coming Heart-Friendly Cooking by Jean Paré, one of my favourite cookbook authors. Originally the contest was designed to have 4 recipes from this cookbook each for a total of 8 recipes made during the month of August. As luck would have it or simply bad timing life managed to get in the way so we ended up with 3 recipes each resulting in a total of 6 recipes. Of the 6 recipes 4 were definite keepers.  Don't worry as there are still a lot of great recipes in this book that we will be trying and I will be blogging about them as well.  Click on any of the pictures to take you to the recipe.  It would be great to hear the feedback as to which recipe you liked the most. 

crunchy vegetable macaroni
poached sole rolls