My photo
Ontario, Canada
I am a wife, mother and grandma who enjoys the many aspects of homemaking. A variety of interests and hobbies combined with travel keep me active. They reflect the importance of family, friends, home and good food.
Cook ingredients that you are used to cooking by other techniques, such as fish, chicken, or hamburgers. In other words be comfortable with the ingredients you are using.
--Bobby Flay

For Your Information

Please watch this area for important information like updates, food recalls, polls, contests, coupons, and freebies.
  • [March 19, 2020] - Effective Mar 17, this blog will no longer accept advertising. The reason is very simple. If I like a product, I will promote it without compensation. If I don't like a product, I will have no problem saying so.
  • [March 17, 2020] - A return to blogging! Stay tuned for new tips, resources and all things food related.
  • [February 1, 2016] - An interesting report on why you should always choose organic tea verses non-organic: Toxic Tea (pdf format)
  • Sticky Post - Warning: 4ever Recap reusable canning lids. The reports are growing daily of these lids losing their seal during storage. Some have lost their entire season's worth of canning to these seal failures! [Update: 4ever Recap appears to be out of business.]

Popular Posts

Showing posts with label bread. Show all posts

Monday, May 28, 2012

Frugal Kitchens 101 - Bread

Frugal Kitchens 101
Years ago when I was knee high to a grasshopper my Mom make homemade bread by hand, bought from the local bakery and very occasionally bought a loaf of bread at the grocery store.  Prior to that, bread was homemade made, baked a couple of times a week.  Bread baking is a very frugal thing to do especially if making specialty breads but even plain white homemade bread is less expensive than store bought.  Back in the 1980's I bought a bread machine to save a bit of wear and tear on my wrists.  It ended up being a glorified bread dough mixer and proofer with the actual baking done in the oven but I still made a fresh loaf of bread almost daily.  A few years ago I bought a KitchenAid® stand mixer and now use it for making fresh, homemade bread two or three times a week.

Homemade bread really takes very little time to prepare.  Seriously, mixing and kneading the dough takes only about 7 minutes using a stand mixer.  Once the dough is ready, the real time eaters are proofing and baking but nothing beats homemade bread in terms of flavour and price. Or, you can shorten the prep time by making a batter/quick bread that takes only a few minutes to mix and no proof time. Here's a few tips on how to save a bit extra when making homemade bread.  Don't forget homemade breads can be either quick beads or yeast breads and both are very good!

  • buy in bulk - Yeast is sold in 2 lb packages at some grocery and warehouse stores for considerably less than the price of those little packets or jars  so if you make a lot of bread buy yeast in bulk.  Watch for flour to go on sale then buy in the largest package possible with the lowest unit price.  The bulk food stores are ideal for buying other ingredients like lecithin granules as well as some sugars and flours.    
  • keep it simple - You can use the same recipe yet make it into loaves or rolls.  The shape doesn't matter all that much so keep it simple.
  • fancy it up - Ok, this is quite contrary to the last point but you can easily make a homemade bread taste like a gourmet artisan bread by simply tossing in an extra ingredient or two into your regular white loaf of bread dough.  If your recipe calls for water substitute juice, stock or milk  Brush the top with a little butter which softens the crust then sprinkle sesame seeds or oat flakes over it.  Toss in a quarter cup of fruit or vegetables for a wonderful flavour burst. Toss in a couple of cherry tomatoes and tsp of Italian seasoning for a delightfully pinkish yet savory loaf of bread.  Combining a bit of shredded cheese and onion pieces results in a delightful loaf of bread.  The possibilities are endless and need not be expensive either.
  • soft insides - Certain ingredients make the bread softer.  These include lecithin, milk or powdered milk, potato flakes, yogurt, sour cream and egg.  Add a tbsp of powdered milk to the water in the recipe or substitute the same amount of fresh milk.
  • crusty crust - The trick to a crusty, chewy crust is adding steam when the loaf of bread is cooking.  The easiest way to do this is to place an oven proof baking dish with about 2 - inches of water in the oven on the rack below where the bread will be baking.  
  • salt - Salt is balances the flavour in breads but it inhibits the growth of yeast.  Do not use iodized salt as the iodine will kill off the yeast.  Do not increase or decrease the amount of salt in a bread recipe.
  • sweeteners - Sugar supports the growth of yeast.  Honey will add to the moisture of the bread.  Maple syrup and molasses can be used in bread making as well.  Artificial sweeteners should not be used as the yeast will not react properly with them.
  • liquids - Any liquid used in bread making should be luke warm before adding to the dry ingredients.  You can be creative with the liquid substituting milk, stock, potato water or juice for the water.  If using juice, use unsweetened.  Water alone gives a crispier crust while milk gives a smoother texture and softer crust.  Juices add flavour.  For example, apple bread made with water is very good but apple bread made with apple juice is divine!  If using stock, use de-fatted stock that will give flavour without extra calories.
  • flours - A wide range of flours can be used to make breads and you can grind you own if desired.  I prefer using unbleached flour for white breads.  Whole wheat flour is lower in gluten content so is usually mixed with white flour but if you want to make a 100% whole wheat bread add gluten flour or lecithin to the dry ingredients to increase the rise.
  • the rise - Bread recipes give a timing for the dough to double but that is not carved in stone.  Let the dough rise until double even if it takes an extra half hour or so.  In particular, sour dough bread doughs benefit from a longer rise than most recipes state.  The longer rise helps to develop the sour dough flavour.


Sunday, November 13, 2011

First Batch of Bread in New Natural Gas Oven

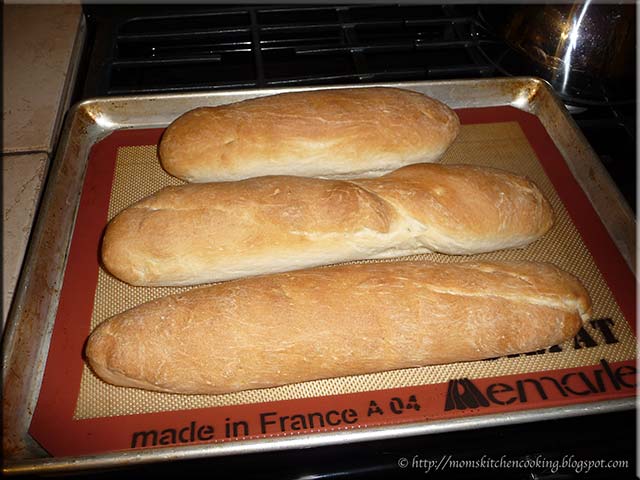
My husband came home from hunt camp yesterday so I wanted the house warm and welcoming when he arrived.  I made a slow-cooker Tuscan chili (watch for the recipe next week) and my tried and tested, favourite French bread.  As planned the house smelled wonderful, filled with the tantalizing aroma promising a delicious evening meal.

French bread baked in my new natural gas oven
Our dining/living room has a beautiful large south facing window with a half circle window over it.  On sunny days this end of the house gets quite warm making it a perfect spot for proofing bread.  I made the dough, let it proof then shaped into three loaves. 

I did not anticipate any problems baking bread in the new natural gas oven as I've baked bread often in the outdoor grill.  The loaves baked as they normally would although a bit quicker than in the electric oven.  My experience has been bread cooks about 5 minutes faster using natural gas and 8 - 10 minutes faster using propane when compared to using hydro.  So far, I am enjoying my new gas range immensely, quite pleased with the results combined with lower cooking costs.  I'm no longer watching the clock to see when I can do a bit of cooking at the lower TOU hydro rates.  Initially I was concerned switching to a gas oven as I've heard they can be problematic for hot spots but this one seems to be quite good so far. 

There are many reasons why a home cook changes cooking fuel with the most common being relocating.  The cooking fuel they were used to using simply is not available at their new location.  My Mom had a horrible time adjusting from cooking with natural gas to electricity when she moved into an apartment.  Her solution was simple to do minimal cooking and more eating out.  Many find themselves in the same situation.  My recommendation is to use tried and tested recipes during the learning curve period of using a new cooking fuel.  Keep the various dishes simple to avoid frustration.  With a bit of practice and patience you will easily master cooking using a different cooking fuel than you were used to. 


Saturday, May 28, 2011

Hawaiian French Toast

There is no end to the selection of eateries under the canopy on Fremont Street in Las Vegas.  Most of the Fremont Street casinos offer deli style, buffet and restaurant dining.    Mermaid's is a small, slots only casino that offers such culinary delicacies as foot long hotdogs and deep fried Twinkies.  Fitzgerald's has a good size McDonald's and a Krispy Creme in addition to their buffet and restaurant.   The Four Queens has a Subway, Burger King, and Chicago Brewing Company for those wanting pizza in addition to their café (Magnolia's Veranda) and higher end Hugo's Cellar .  Some like the Golden Nugget offers a café, six specialty restaurants (steakhouse, seafood, asian, sushi, etc), the buffet, The Chocolate Box (gourmet chocolates) and a Starbucks.

Hawaiian French Toast
We ate breakfast at Carson Street Café  located in the Golden Nugget.  It is a wonderful restaurant with sides open café style, a railing separating diners from passersby.  The wait-staff are some of the friendliest there are.  The food is wonderful!

My husband and ordered our standard egg breakfast with a side of biscuits and gravy.  One of our friends ordered the Hawaiian French Toast.  My gosh, it looked so good!  The French toast was made using Hawaiian sweet bread then topped with maple syrup, fresh strawberries, banana and chopped walnuts.

Hawaiian French toast would be very easy to make at home.  The limiting factor would be finding Hawaiian sweet bread in areas where it is not popular.  The alternative is to use homemade Hawaiian sweet bread.  There are several recipes for this bread available online.  I will be posting the recipe I decide using here when I make the bread.


Sunday, December 05, 2010

Potato and Leek Soup with Ciabatta Bread

Our kids grew up with a plethora of homemade soups especially in the autumn months so it is only natural that they make their own homemade soups now that they are adults.  The beauty of homemade soups is even with starting out with a few common ingredients the soup can take a whole direction of its own.  The end result is an entirely new creation!

potato and leek soup with ciabatta bread
We recently took a day to go visit our grandkids in two Ontario communities.  One of our kids made a lovely potato and leek soup for lunch.  It differed from my potato and leek soup in that no stock had been used to make the soup.  Yet the soup was rich, creamy and full of flavour!

The soup was served with ciabatto bread.  Ciabatto means slipper.  According to the kids this bread is all the rage in the Greater Toronto Area (GTA).  The modern version has only been made since 1982 and it was introduced to North American in 1990s by the Cleveland firm, Orlando Bakeries.  The bread has crisp crust with an open, airy appearance with a dense crumb.  The characteristic flavour and appearance is from the sponge the bread starts with, similar to sourdough bread.  I will be testing a couple of ciabatto recipies this week so watch for that recipe with my comments. 


Tuesday, October 05, 2010

Fresh Baked Bread with Dipping Oil

Bread is a fundamental part of most dinner meals.  The best breads are homemade, piping hot from the oven ready to drizzle with butter and savour every morsel!  Few can resist the tantalizing aroma of fresh baked bread.  Restaurants know this which is one reason warm breads are served before the entrée almost as an appetizer then the bread basket is usually filled during the meal.

fresh dinner breads
Dinner breads are traditionally served on a cutting board with a serrated knife to cut as desired.  Dinner rolls are traditionally served in a lined wicker bread basket.  The basket itself allows steam to escape the hot bread from below so the crust does not become soggy.  At the same time the lining which is usually a cloth serviette keeps the bread or rolls warm.

Pictured is the beautiful dinner roll basket we enjoyed at Middle Grounds (more on this restaurant in future posts).  The rolls were a variety of mulit-grains and not shaped in the traditional roll style.  The shape was achieved by rolling out the dough then cutting into rectangles that when baked softened the edges.  They were hearty yet delightful dinner rolls to say the least!

dipping oil
The wonderful dinner rolls were not served with butter but rather a seasoned extra virgin olive oil in which to dip the bread.  This is quite customary where the bread is torn from the loaf then dipped into the oil to be enjoyed and it is a healthier yet just as tasty choice as using butter.

Dipping oil is not difficult to make and in fact you don't even need to add any herbs or seasonings.  The key ingredient is good quality extra virgin olive oil.  Look for cold first pressed olive oil for the best flavour.  If using as is all you need to do is pour the olive oil into a shallow saucer for dipping the bread into.  Pictured is the dipping oil served with the fresh dinner bread.  It was seasoned with fresh basil and garlic.  Oh my, it was simply amazing!  I could have eaten nothing else and still been quite satisfied.


Saturday, May 22, 2010

Popovers

It is surprising how many foods can be made using a few basic ingredients!  More impressive is some of these very simple foods look a lot more complicated than they are.  I am always on the look-out for quick, easy recipes using few ingredients for those times I want something a bit different but still using basic ingredients that I have on hand all the time.   The best place to look for recipes using basic ingredients are older cookbooks especially those from the Depression era.  I came across a recipe for popovers, a type of dinner bread.  This recipe uses 4 very basic ingredients but tastes and looks a lot more complicated.

popovers
Popovers get their name from their spectacular appearance while baking.  When the batter is baking it literally pops up and over the baking cup giving popovers a unique but characteristic look.  The popover batter can be baked as is for plain popovers or baked in the meat drippings where it is known as Yorkshire pudding.  Despite the looks these delectable, chewy treats are ever so easy to make.

Popovers
modified from:  Betty Crocker's Cookbook (1969), Pp. 50.

2 eggs
1 c milk
1 c unbleached flour
½ tsp sea salt

Heat oven to 230ºC (450ºF).  Grease 6 custard cups or large muffin tins.  Crack eggs then place in stand mixer bowl and beat about 30 seconds.  Stir in milk, flour, and salt.  Beat until just smooth but don't over beat. Fill cups ¾ full.  Bake  25 minutes.  Lower temperature to 180ºC (350ºF) and bake 15 to 20 minutes longer or until deep golden brown.  Remove from pan and serve hot.

The night before we went to get our bulk beef purchase (beef on the hoof) for this year we grilled the last two steaks from last year's purchase.  I was actually quite impressed as they were the only remaining pieces of beef in our freezers so I would not have to worry about mixing any old beef with the new.

I served the popovers with the grilled blade steaks, oven baked new potatoes and left-over imitation crabmeat salad.  It was a simple, easy to make dinner with little prep work.  The popovers got rave reviews.  They are ideal for sopping up meat juices according to my husband.  The popovers have a wonderful outer crust with chewy insides so they are quite different than your normal dinner bread.  They will definitely be appearing at more meals here!


Wednesday, April 28, 2010

Sunny Orange Bread

Part of the fun of bread making is the the immense diversity of breads in and of themselves.  There are leavened (quick, yeast) breads and unleavened breads.  Breads range in flavours from sweet to savory to aromatic to plain white breads.  With a little practice there is absolutely no reason to eat a plain white bread again unless of course you want to.

sunny orange bread
As with all cooking I Iike substituting a liquid with flavour for water.  Orange juice is a great flavour booster but one that is not often thought of when baking bread.  However, orange juice makes a wonderful base flavour for a breakfast bread spread thickly with cream cheese and/or orange marmalade.

I made sunny orange bread a couple of days ago.  This bread has a lovely delightful flavour.  The orange juice gives the bread a golden tint yet does not overpower the flavour.  The sunflower seeds add a nice texture.  This bread is sure to become a family favourite!

Sunny Orange Bread

½ c orange juice
¾ c water
1 tbsp butter
2 tbsp honey
1 tsp sea salt
3¼ c unbleached flour
2 tbsp sunflower seeds
1 tsp orange zest (optional)
1½tsp instant yeast

Warm the water then mix in butter and honey.  Place the dry ingredients in stand mixer bowl.  Mix well on setting 1.  Continue mixing while pouring in water, butter and honey mix then pour in the orange juice.  When dough cleans sides of the mixer bowl turn mixer to setting 3 and knead until smooth and elastic.  Remove from mixer bowl.  Form into a loaf and place in buttered loaf pan.  Lightly brush butter over the loaf.  Cover with moist T-towel.  Let rise until double.  Bake at 200ºC (400ºF) until golden brown and loaf sounds hollow when tapped.  Remove from oven.  Slice with a serrated knife.


Sunday, April 25, 2010

Yogurt Bread

I've been making most of our breads for quite some time and while I have the family favourite recipes, I'm always looking for a new bread recipe to try.  I made yogurt bread a couple of years ago and it quickly moved right into the family favourite bread recipes.  It has good texture and flavour that is sure to please!

yogurt bread
I make a lot of yogurt because we use a lot of yogurt not only for eating as is but for making dips, cooking and baking.  Yogurt is a great tenderizer for meats but it really shines in baked goods.  It adds a subtle flavour that really falls under secret ingredient in that it is not a distinctive flavour but rather the flavour notes that make the dish If you love crusty style bread with a moist, fluffy inside you are going to love this yogurt bread!  It is a good dinner bread as well as being a great sandwich bread.

Yogurt Bread

1⅓ c plain yogurt
1 tbsp brown sugar
1 tsp sea salt
3¼ c unbleached flour
1½ tsp instant yeast

Mix dry ingredients together in stand mixer bowl on setting 1.  Pour in yogurt.  Mix until dough cleans side of bowl.  Turn mixer to setting 3 and knead until smooth and elastic.  Remove from mixer bowl.  Form into a loaf and place in buttered loaf pan.  Lightly brush butter over the loaf.  Cover with moist T-towel.  Let rise until double.  Bake at 200ºC (400ºF) until golden brown and loaf sounds hollow when tapped.  Remove from oven.  Slice with a serrated knife. 


Wednesday, March 31, 2010

Potato Bread Using Instant Potatoes

There seems to be a fear of deviating from the recipe when it comes to baking breads. Yet yeast breads can be tweaked a fair amount while still resulting in a great loaf of bread. Essentially all you need to make a good loaf of bread is yeast or starter, flour, and salt. Practically all other ingredients can be substituted or altered somewhat. I routinely substitute liquids because why use water if I can add flavour and I like substituting sweeteners. But some of my best loaves of bread have come about from blatant mistakes. Two examples of this are my favourite white bread and herbed tomato bread.

potato bread using instant potatoesPotato Bread

Potato bread is a great way to use up left over potatoes but I came across a recipe using potato flakes. I didn't have potato flakes so I looked around to see how I could make this bread using what I had on hand. From there I used the original recipe as a guide but modified a fair amount so this became a test loaf of bread. The resulting loaf was very moist, flavourful and nicely textured. It made an ideal sandwich bread but was also nice for toasting.

Potato Bread Using Instant Potatoes
recipe by: Garden Gnome

1 c buttermilk
⅓ c water
1 tbsp butter
1 tbsp organic sugar
1½ tsp sea salt
⅓ c instant mashed potatoes, complete mix
2½ c unbleached flour
1½ tsp instant yeast

Combine buttermilk, water and butter in large measuring cup. Warm slightly in microwave to just under room temperature. Place remaining ingredients in bowl of stand mixer. Mix on speed setting 1 to blend well. With mixer still on setting one slowly start pouring in liquids. Mix until dough cleans sides of bowl. Adjust with necessary with a little extra water if too dry or flour if too wet. Knead on setting 3 until dough is smooth and elastic. Remove dough ball from bowl. Wipe bowl with vegetable oil. Return dough ball to bowl. Cover with damp towel. Place in warm area and leave until dough is doubled. Punch down the down then form into a loaf and place in prepared baking pan. Let rise to double. Bake at 200ºC/400ºF until golden brown or loaf sounds hollow when tapped.


Wednesday, March 17, 2010

Irish Soda Bread (1)

Happy St. Patrick's Day!

Many in North America celebrate St. Patrick's Day where the two traditional meals are Irish Stew or corned beef with cabbage usually served with some type of bread and washed down with green beer. My husband and I tend to eat out that night savouring a bit of American Irish cuisine combining celebrating St. Patrick's Day with another social event.

Irish soda breadIrish Soda Bread

It just seems natural to serve Irish Soda bread with the St. Patrick's Day meal. Irish Soda bread is an Irish staple with the traditional version made without yeast. The rise comes from the interaction of the buttermilk and baking soda. This recipe originally written for a bread machine uses yeast to ensure a good rise but still has all the flavour of a traditional Irish Soda bread. I've converted the recipe to use a stand mixer. While this bread does have sodium in the form of baking soda (sodium bicarbonate) it is considerably less than most loaves of bread pushing this bread into the low sodium category. The result is a lovely bread to serve with the meal as well as make corned beef sandwiches for the following day's lunch.

Irish Soda Bread
source: Garden Gnome

1 c buttermilk
1 tbsp butter
1 tbsp honey
¼ tsp baking soda
¼ c rolled oats
2¼c unbleached flour
1 tsp instant yeast

Place dry ingredients in stand mixer bowl. Mix to blend. Measure buttermilk in measuring cup then add in the butter and honey. With stand mixer on setting 1 (mix) slowly pour in the wet ingredients. Mix until dough cleans the side of the bowl. Set to setting 3 for kneading. Knead until smooth and elastic. Remove dough hook. Remove dough, lightly oil bowl then return dough to bowl for proofing until doubled. Punch down and form into loaf on Silpat lined baking sheet. Allow to rise until double in size. Cross-hatch if desired. Bake at 200ºC/400ºF until golden brown and loaf sounds hollow when tapped.


Tuesday, March 16, 2010

Dark Rye Bread

I usually make homemade bread a couple of times a week or more depending on how the week unfolds. By far the three types of bread I make the most are basic white, sourdough and French but any bread is fair game. I love experimenting with making specialty and whole grain breads. This really is where baking bread a home really pays off not only in flavour but in freshness.

dark rye breadDark Rye Bread

Dark rye bread is a richly flavoured, specialty bread that we use for corned beef or beef sandwiches as well as enjoying topped with cream cheese. It is also a nice appetizer bread. This bread gets its deep, rich colour from black coffee which is a good way to use up left-over coffee from the morning pot of coffee. Molasses and the actual dark rye flour also add to colour as well as the flavour. I think it makes for a beautiful loaf of bread.

Dark Rye Bread
source: Garden Gnome

1½ c cold black coffee
3 tbsp butter
3 tbsp molasses
2 tbsp brown sugar
2 tsp salt
3½ c white flour
1¼c dark rye flour
3 tbsp gluten flour
1½tsp instant yeast

Place the dry ingredients into bowl of stand mixer. Mix on speed 1 until well mixed. Measure coffee, butter and molasses into measuring cup. On speed 1 slowly pour wet ingredients into the dry ingredients. Adjust moisture level if necessary with a little extra coffee. Mix well then increase speed to 3 and knead until smooth. Remove dough hook. Form into a ball and place back in the bowl. Cover with damp towel. Allow to proof until doubled in size. Punch down, form into desired shape, let rise until doubled then bake at 200ºC/400ºF until loaf sounds hollow when tapped.


Tuesday, January 19, 2010

Homemade Stovetop Stuffing

I am very much a scratch cooking most of the time. One thing that has always been a concern is coming across a recipe I want to try that calls for a convenience packaged food that in most cases I would never purchase. The bottom line is two fold. First I don't like using convenience packaged food that tends to be heavily laden in excess salt, sugar, artificial flavour and colour as well as preservatives. Second, I want to make a recipe with foods I have on hand rather than make a mad dash to the grocery store. One ingredient that I've come across in some recipes is StoveTop® stuffing.

bread prep for stovetop stuffingBread Prep

I decided to make a clone recipe of StoveTop® stuffing. After all it could not be that difficult since the ingredients are quite simple. I honestly don't know how much a box StoveTop® stuffing is going for so I'm going to guess $1.50 per box. Here I made pretty much the same amount as 3 boxes for about $1 or 33¢ each but that was because I was working with store bought rolls rather than homemade bread. Had I used homemade bread the cost would be more in the range of 10¢ per jar of stuffing.

Method: I cut the dinner rolls into cubes then baked at 180ºC/350ºF until golden brown. Then I let the cubes cool.

ingredients for stovetop stuffingIngredients

Aside of the left over dinner rolls I used sea salt, fresh cracked pepper, dried onion flakes and homemade poultry seasoning. This combination is directly related to the way I make stuffing in poultry. Additional ingredients are dried parsley and instant bouillon mix. I used a tsp of parsley per jar but no instant bouillon to keep the sodium level low and since I want to use homemade stock when making the stuffing I didn't want an actual meat flavour being added. This will allow me to make any flavour of stuffing I want. This is also a great way to use up homemade bread that is just on the stale side.

homemade stovetop stuffingHomemade Stovetop Stuffing

This will be a nice homemade pantry product! Now I can make a couple of those recipes I want to try using the convenience of my homemade version! It should substitute nicely. The homemade stovetop stuffing is quite easy to make. After the toasted bread is cooled I filled 3 - 1 L canning jars with the bread. I added a sprinkling of sea salt, couple of twists of fresh ground pepper, 1 tsp dried parsley, 1 tbsp poultry seasoning and 1 tbsp dried minced onions. Then I vacuum sealed the jars and wrote the instructions on the lid. When I want to use a jar I will add 1 tbsp butter and 1½ cup stock of choice.


Wednesday, March 18, 2009

Sourdough French Bread (Oven Baked)

Sourdough breads are always a delight. What sets sourdough breads apart from other breads is the slight tangy flavour derived from the sourdough starter. The starter gets it's flavour and leavening properties from wild yeast. Traditionally sourdough breads were a staple in pioneering days. Starters were protected to ensure being able to make future loaves of leavened breads. The started was passed from family member to family member as well as often being dried to keep the starter safe while traveling. I have previously written about plain sourdough bread, sourdough French bread (ABM), and sourdough muffins. Last Saturday I made two loaves of sourdough French bread baked in the oven.

Drying Sourdough Starter

When you have an established starter with just the right flavour you will want to save some of it for future use. To dry sourdough starter thinly spread the starter on a sheet of parchment paper. Allow it to dry naturally out of direct sunlight. Peel off the dried starter and break it into small pieces. It will be quite brittle. Place the dried starter pieces in a mason jar. Vacuum seal and store in a dark cool location.

Sourdough French BreadSourdough French Bread Loaves Cut

This is essentially the same recipe as the sourdough French bread (ABM) however the results are quite different due to the cooking method. This is considerably closer to a traditional sourdough French bread. The addition of yeast ensures a lower rise time however, if you want to make this bread traditional omit the yeast and give it an extended rise time. This may take longer but the results are very good. Trust me on this one, the method is a bit more involved but the bread is oh so good you will want to make it quite often!

Sourdough French Bread

1½ c sourdough starter
½ c water
1½ tsp organic sugar
1½ tsp sea salt
3½ c unbleached flour
3 tsp instant yeast


Measure the dry ingredients in into the bowl of a KitchenAid® stand mixer or similar. Mix on setting 1 and mix thoroughly. With the mixer still on setting 1 mix in starter and water. If necessary add just enough water for the dough to clean the sides of the bowl. Set the mixer to setting 2 and knead until the dough is smooth and elastic. Remove the dough hook. Cover with a warm, moistened tea towel until dough is doubled in size. Punch down the dough. Divide in half and form into two elongated loaves. Sprinkle ¼ c cornmeal on a Silpat® lined baking sheet. Place the loves on the cornmeal. Cover with a warm, moistened tea towel and let rise until double.

Cut 4 deep, diagonal slices across the tops of the loaves. Combine 1 tsp cornstarch and ½ c water in a sauce pan. Heat to just boiling without boiling. Remove from heat and allow to cool. Place a large baking pan with ¼-inch boiling water in the oven. Preheat oven to 400ºF. Brush the loaves with the cornstarch mixture. Place the dough in the oven above the water. Bake 25 minutes or until golden brown and the loaf sounds hollow when tapped.

sourdough French bread oven bakedSourdough French Bread (oven baked)

Sourdough French bread baked in the oven is absolutely wonderful! It is rich and tangy with a beautiful golden, chewy crust due to the baking method. Adding humidity during the baking process is what gives the chewy crust texture.

Pictured is the the beautiful golden crust and lovely inside. The inside is denser than a regular loaf of bread but that adds to it's character. It's very good, piping hot from the over with just a little butter. When cooled cream cheese goes nicely with it or cut on a diagonal for making sandwiches. Two of my favourite ways to use sourdough French bread when entertaining is to use the bread as a base for garlic bread with cheese or lightly grill slices then top with bruschetta in a jar toppings.


Thursday, March 05, 2009

Kitchen Quick Tips - Bread Glazes


Before baking bread:
For a dark, shiny glaze, brush on 1 beaten egg yolk. For shine without colour, brush on 1 egg white mixed with 1 tbsp water.

While bread is still hot:
For a softer crust, brush with butter.


Monday, December 29, 2008

Frugal Kitchens 101 - Breads (4) Using/Storing

Frugal Kitchens 101
For the past month I have been discussing homemade breads, why they are frugal and how to save further when making them. This will be the final article on homemade breads in this series so please watch for a new poll that will give you a hint for January's topic. In this Frugal Kitchens 101 article I will focus on how to use and store your homemade breads.

Homemade bread is at its prime piping hot from the oven as anyone who has cut a thick slice then slathered it with butter can attest. The following day the homemade bread is good sliced for sandwiches. If there is any left after that it croutons or bread crumbs. So basically we are looking at a 3 day window for fresh bread storage. The reason for this is unlike store bought breads, homemade breads are not laden with preservatives to extend shelf life. For that reason I prefer to make several loaves spanning a number of days rather than making several loaves in one day.

Storing homemade breads:

  1. fresh storage - Allow the bread to cool then wrap in wax paper (preferred) or plastic wrap. Store the wrapped loaf in a closed bread box. My bread box sits on a shelf inside a kitchen cabinet. A breadbox adds extra protection from both rodents and insects.
  2. refrigerator - Some people keep store bought breads in the refrigerator. This does not work well for homemade breads as it tends to dry them out. If you want to store bread doughs or bread batters in the refrigerator, yeast doughs will keep 3 to 4 days while batters will keep up to 6 weeks. Bring yeast dought to room temperature, shape as desired, proof then bake. Batters can be used straight from the refrigerator.
  3. freezer - Many freeze yeast and quick breads. I do not for the simple reason that from the moment a food goes into the freezer you are paying storage until you use it. Bread products simply are not what I consider frugal use of freezer space just on that one point. Compounding the problem is breads tend to develop freezer burn rather easily making then unpalatable reinforcing my reasoning for not freezing bread products. The exceptions to this is I do freeze bread crumbs in vacuum sealed packets and I keep a loaf or two of quick breads on hand for unexpected company. The bread crumbs are made from homemade breads. My experience has been that quick breads freeze better than yeast breads. Yeast dough freezes nicely when well wrapped. Thaw and bring to room temperature then proof and bake as normal.
Just because a dough is listed as a bread dough there is no reason why it cannot be shaped into rolls or smaller loaves or rounds. French bread dough can be shaped into baguettes and basic or whole wheat dough can be shaped into dinner rolls. Any bread dough can be changed by adding fresh or dried herbs. One of my best breads came about by tossing in a few cherry tomatoes! The dough can be set on corn meal or flour sprinkled with any number of toppings such as sesame seeds or oatmeal. With only a few basic yeast bread dough recipes you can make an incredible number of variations. Quick breads are even easier to change. Toss a handful of dried fruit or coconut or even nuts into muffin batter to make new and yummy combinations. Add blueberries, cranberries, chunks of apple, pear or peaches to pancake batter. There is room to experiment and have fun while having healthier breads on your table AND don't forget how much money you are saving per loaf!


Sunday, December 28, 2008

Entertaining Leftovers

We hosted a large dinner party on the 19th but the horrid weather conditions saw a lower attendance than expected. Several appetizers (crabmeat dip*, jumbo shrimp with cocktail sauce, vegetable tray with homemade garlic & onion dip, venison balls) and drinks were served for the social hours before dinner. The menu included tossed salad, roasted turkey, spiral ham, mashed potatoes, corn, stuffing, gravy, home canned whole cranberry sauce, pickle tray and three kinds of homemade dinner rolls. Desserts included Victorian lavender cookies, shortbread cookies, chocolate dessert shells and banana cake. [Clicking the links will take you to the recipes for these dishes.] I was faced with the problem of a fair amount of left-overs, very limited freezer space and knowing that we were going to be away over the holidays.

Saturday we hosted a smaller get together so some of the turkey and dinner rolls were used for that as well as most of the cookies. I sent some of the left-overs home with the kids who were visiting for the weekend. Sunday morning we deboned the turkey and I set about making stock with the carcass. There was a fair amount of the ham left so I cut it from the bone and divided into two large vacuum seal bags, vacuum sealed then froze. I did the same with the ham bone to make soup with later. There were about 2 dozen of the whole wheat dinner rolls left so I decided to make bread crumbs.

Defatting Stock

Fat is a necessary part of making stocks because it adds a lot of flavour. It adds an element of depth and richness to the stock that cannot be achieved without the fat. Using the fat when making stock allows to to utilize all the flavour in the little bits of meat and skin that come along with the fat. Even though the fat is needed for good stock, the stock should be defatted for a healthier product.

Once the stock has been made it should be cooled completely either before or after straining the bones and vegetables out. The fat will harden as a layer on top of the stock. As pictured the fat layer can easily be removed using a large spoon. You can melt down the fat and strain for use in cooking if desired. The remaining stock is then strained again then canned or frozen for later use. You can also boil down the stock to make a concentrate and freeze it for later use.

Bread Crumbs

Homemade yeast breads do not keep well for extended periods of time. I find it best to make a loaf of bread or dinner rolls every second or third day rather than making a lot at one time. Homemade bread or dinner rolls that is starting to go stale is not tossed to the birds or discarded here as that would be wasteful on a few levels. What I do is turn it into bread crumbs. Making your own bread crumbs even if using store bought bread makes good frugal sense as you are using up something that would otherwise go to waste and you are eliminating one more commercial product you have to buy. Any yeast bread can be used for this purpose although I find dark rye and pumpernickel bread crumbs a little tricker to use in

Making bread crumbs using a food processor is as simple as breaking the bread into chunks and process a few at a time using the grind setting on pulse. The bread does not have to be totally dried to make bread crumbs when using the food processor resulting in a softer crumb suitable for quiche and quick stuffing. If you don't have a food processor and blender on grind and pulse will work as well. A KitchenAid® stand mixer or similar with a food grinder attachment is the preferable appliance to use for drier bread crumbs suitable for making meat loafs. I used a food processor for this batch of bread crumbs.

Stock & Crumbs

The yield from the turkey carcass was 7 L (quarts) of canned and 1 L frozen turkey stock. This is about the normal yield for turkey stock which allows the canner to run at full capacity. The remaining stock is usually used in a soup or stew for dinner that night if we are home or frozen for later use. I like using plastic freezer containers with screw on lids when freezing anything that is not going to be vacuum sealed.

The left over dinner rolls made enough bread crumbs for two 1 L freezer containers. These were frozen for later use. To use thaw although there is no need to thaw prior to using frozen bread crumbs as they tend to break apart quite easily. Any clumps can be broken apart using the prongs of a fork.

Quick Turkey Noodle Soup

Using a few simple pantry ingredients you can quickly put a nice meal on the table with very little effort. When we deboned the turkey, I cut the meat into cubes instead of slices. Dinner Sunday night was a simple soup using turkey that took under 15 minutes to prepare.

Ingredients

2 284 (10 oz) cans condensed mushroom soup**
1 can turkey stock
½ can whole milk
2 generous handfulls broad egg noodles
2 cup turkey

Cook the noodles until al dente in salted water. Drain. Stir in remaining ingredients. Heat through. Serve with home made dinner rolls or bread.

* I used homemade cocktail sauce in place of the ketchup and horseradish mix. The result was even tastier!
** Substitute the equilivant home made cream of mushroom soup to equal 3½ cans of reconstituted soup total.


Monday, December 22, 2008

Frugal Kitchens 101 - Breads (3) Ingredients

Frugal Kitchens 101
So far I have discussed why making your own breads at home is frugal, the money you can save by making your own breads and the equipment needed. In today's Frugal Kitchens 101 I will be discussing ways to save on breadmaking ingredients. Combining these tips with those previously discussed for breadmaking will maximize your savings.

There are a couple of basic rules to saving on ingredients that can be applied to most food items:

  1. unit shop - Always compare the unit prices. A larger box does not always mean a cheaper unit price. Even the sale price does not always mean a cheaper unit price. By shopping unit prices you will end up getting the best value for your dollar.
  2. bulk shop - Staples such as flours, sugars, salts, thickeners, leaveners, shortening, powdered milk and anything else you consider a food staple should be purchased in bulk in the largest package possible at the lowest unit price. Doing so will ensure you have a good supply on hand to use as needed. It will also ensure you save money but also reduce extra packaging so is an environmentally friendly way to shop. Bulk does not always refer to the amount but more the way the food is purchased. If you have a store that sells herbs and spices in bulk where you have to dispense it yourself in the amount you want into a plastic bag you will save a considerable amount over buying herbs and spices in those little, pricey bottles. Second to that is buying those seasonings you use a lot of in large containers. An example of this is Tone's Ground Cinnamon, 18 oz container for $3.87 at Sam's Club. Notice how you are getting 15 oz more for about the same price as the 3 oz bottles in the grocery store? Tone's has a wide variety of spice and herbal blends all in large containers that are very inexpesive. French's, Lawry's and Old Bay also have the inexpensive larger container sizes. Some grocery stores are now selling these larger containers so if you don't shop in warehouse stores then check your grocery store and it is possible to order these larger containers online.
  3. proper storage - Staples as well as all dry foods should be stored in glass, metal or heavy plastic bins with lids in a dark, cool location. Light is one of the worst enemies for any herbs or spices causing them to degrade quicker and loose their flavour. Foods can be left in their original packaging if desired but in areas with high humidity vacuum sealing in glass jars will ensure no loss due to humidity. These types of containers will protect against water damage, rodents, insects and humidity. Plastic food grade 5 gallon pails with lids can found at doughnut shops and restaurants. They are often given away free but some may charge a nominal fee of $1. Larger 1 gallon and 2 gallon glass jars with lids can be found through many restaurants by making a phone call or two. You can sometimes get them through nursing homes or any other place that uses food packaged in institutional sized jars. There is seldom a charge for the glass jars. Other inexpensive sources include yard sales, word of mouth and of course recycling a jar if you buy something in that size jar.
The following tips are more bread specific:
  1. mixes - There are several types of bread mixes available for both quick breads and yeast breads. Many home cooks rely on muffin and biscuit mixes. In general these types of mix will contain a couple of cups of flour, baking soda or baking powder, instant milk, salt, sugar and additional ingredients such as a few dried blueberries at a cost of about $2 to $3 per package compared to the cost of about 16¢ for flour and master baking mix. Essentially anything you can use Bisquick® for you can use master mix and the best part is the homemade mix is considerably cheaper than the store bought. Some manufacturers of breadmachines have been including a breadmachine mix with their machines sending the message to new users that they need to buy a mix. There is absolutely no reason to use a breadmachine mix and in fact it is a total waste of money!
  2. flours - In most cases the unit prices of larger bags of flour are the lowest. Bleached flour should be avoided because of the associated health risks. There really is no need to buy special bread flour as you can get a good rise by using a dough enhancer such as gluten flour or a more complicated homemade dough enhancer. However, two tricks to increase the rise without costing a penny is to increase the knead time which develops the gluten and to increase the proofing time. Whole grain flours and specialty flours such as rye flour are more expensive but by only 1 or 2¢ per cup so they are still very inexpensive to use. In some areas such as our it is a bit more difficult to find specialty flours so when I do find them I buy the largest size I can. Typically here specialty flours such as gluten, 7 grain, 12 grain and spelt flour cannot be found in the regular grocery stores but they are available a specialty shops and the Bulk Barn so you may have to check around for these or shop online.
  3. salt - For best results use non-Iodized salts when making breads. The cheapest of this type of salt is Morton's Kosher salt although Kosher salt may be available under all other brand names. A large box is quit inexpensive at about $1.50 and will make several loaves as well as being able to use for other culinary purposes. Non-Iodized sea salt is slightly more expensive but works nicely.
  4. yeast - One of the most expensive ingredients for many breadmakers is yeast and that is because they are buying those little packages sold in a strip of 3 or individually. There is one tablespoon of yeast in each package for a price of 40¢ or more per package! These packages also produce waste packaging that cannot be recycled so it ends up in the landfill. That might not seem like a lot but at 3 loaves of bread per week that can add up to 156 of those little empty packages per household going to the landfill. When breadmachines became popular Fleischmann's® came out with larger 4 oz jars of instant yeast that sell for about $3.50. So while these are cheaper and more convenient that the packages as well as being packaged in recyclable jars, the price per tablespoon is still more per tablespoon than yeast purchased in bulk. Sam's Club sells 2 - 1 lb packages of Fleischmann's® instant yeast for $4.16 which is almost a 7th of the cost of the jars! Consider the same amount in jars would be 8 or $28 but buying the 2 - 1 lb packages is only $4.16 for a total savings of $23.84 and a lot less packaging. Yeast will keep almost indefinitely in the freezer. What I do is freeze one package immediately then pour what I will use within a month or so into a lidded glass jar kept in the refrigerator and freeze the remaining to refill the jar as needed.
  5. fruits/vegetables - The easiest way to save on these bread additives is to buy in season and use fresh or preserve for later use. Fruit sauces, dried fruits and dried zest are great additions that are very cheap to make at home. When zucchini is in season pick up a medium sized one as opposed to a baseball bat sized one. Shred it up and package into 1 c servings and freeze to give you enough zucchini for about 20 loves of zucchini bread or trays of muffins. In the northern hemisphere some fruits are never really in season but are available in the grocery stores. Take advantage of sales and quick clearance especially for bananas. Extra ripe bananas make for the best banana bread, muffins and cakes! Freeze bananas for later use as is, unpeeled.


Saturday, December 20, 2008

Dinner Rolls

A common myth is you need to have several yeast dough recipes, one each for a specific purpose. That is simply not the case. What you need is a good white bread recipe, a good whole wheat recipe, a good sweet dough recipe and a few multi-grain bread recipes. Using these basic recipes you can tweak if desired and contrary to some beliefs, yeast dough can be formed into any shape you desire. That means your favourite white bread recipe can be used for bread or rolls or hamburg bun or any other shape.

Forming Dough

Thursday night I made three batches of yeast dough in preparation for Friday's party. The dough included white bread, whole wheat and 12 grain. Instead of making full loaves I decided to make rolls and mini loaves. To make each roll distinctive I used three different shapes.

When I was growing up the local bakery that was famous for their white icing doughnuts made various dinner rolls for the Ladies Auxillary of The Royal Canadian Legion when they catered special events. My Mom would bring a few of these wonderful rolls home for us to enjoy. The bakery as will all stores in our small little Canadian town was closed on Sundays, Wednesday afternoons and after 5 pm the other days with the exception of a few days during the Christmas season. I was always given the task of running down to the bakery with 50¢ to get a dozen rolls and oh how I loved that! The bakery always smelled heavenly!

This shape is called cloverleaf and was one of their specialty shapes. It is formed by rolling the dough into walnut sized balls then placing three balls as pictured in a muffin tin. I used a silicone muffin tin with rack. The rack comes in handy for stabilizing the muffin tins. Once the muffin tins were filled it was time for baking. There was enough dough left over for an oblong shaped small loaf.

Baked

I baked the rolls at 400ºF until they sounded hollow when thumped and were golden brown. I allowed them to cool a bit in the muffin tins then turned them out to finish cooling on baking racks. The end result pictured is very similar to my childhood memories. They break easily into 3 mouth watering pieces ready to be spread with butter.

I love the looks of this shaping for dinner rolls! It's very easy to do yet looks like you spent a lot of time shaping them and they make for a lovely presentation. Warm slightly before serving.


Monday, December 15, 2008

Frugal Kitchens 101: Breads (2) Equipment

Frugal Kitchens 101

In the last Frugal Kitchens 101 article I gave you some of the ways that making your own breads can save you money. Today I'm going to focus on how to save on the equipment needed for breadmaking. Even if you make bread by hand you will need good baking sheets, loaf pans, muffins tins and a few other items that will make baking breads easy. If you are using mechanical means you will need a breadmachine, KitchenAid® stand mixer or similar or larger capacity food processor.

The first thing to consider is how you are going to make your flat bread, yeast dough or quick bread batters. In general for making all breads types at home you will need: large stainless steel mixing bowl, dry measuring cups, wet measuring cups, heavy duty mixing spoon (suggested Paderno or similar), baking sheet (2, suggested Wilton, preferred restaurant grade), cast iron pan, coated loaf pans (2, suggested Wilton), silicone loaf pan (2), silicone muffin tin, rolling pin and cooling racks. Optional but not essential are silicone baking cups and Silpat non-stick baking sheets. Both of these will reduce using paper products such as parchment paper and paper cupcake liners something every frugal kitchen should strive for. They will also reduce the cost of food prep by not using disposable prep equipment. Chances are good you already have most of this equipment so you likely won't have to buy a lot since most of the aforementioned equipment has other culinary uses. Silicone bakeware is now quite inexpensive and often goes on sale so if you don't have the mentioned bakeware, wait for it to go on sale. I do not recommend buying a full set of silicone bakeware as you will likely end up with pieces you will seldom use but the sets also go on sale quite often so it's one thing to keep in mind.

Breadmachines - These small appliances have been on the market for over a decade so have come down greatly in price. They tend to be either and I love it or an I hate it appliance for a few reasons. The primary reason people love it is because you can dump the ingredients in the baking pan then simply press a button so the machine does the rest including the baking. It eliminates extra prep equipment and clean-up. The primary complaint with this very convenient appliance is the bread itself. People often complain about the quality of the bread crust and the hole the paddle leaves. The work around many use is to make and proof the dough in the breadmachine then shape and proof as desired. Bake in the oven, convection oven or grill. The second complaint is the amount of room these single use appliances take on the counter. Many kitchens simply do not have the room to have a breadmachine sitting on the counter all the time. The work around is to store the breadmachine off the counter or set it up on a cart to use as needed. If you do not have a breadmachine, new ones are relatively inexpensive at under $50 especially this time of year. However, good used breadmachines can often be found for less than $10 at resale stores, yard sales and estate sales. You may be able to find one on your local Freecycle or check Craig's List.

KitchenAid® stand mixers and similar - The first thing to look for in a stand mixer is the wattage. The higher the wattage the more load that machine can handle. You should also look for additional attachments to extend the versatility of your machine. I have the KitchenAid® stand mixer Professional Series HD (475 W) that I recommend. They are multi-functional so will earn their keep even in kitchens with limited counter space. Stand mixers make quick work of mixing and kneading dough. You can easily add additional ingredients and adjust the knead time as desired. Another benefit of using a stand mixer is the ability to make enough dough for two or more loaves of bread so you can make larger batches of dough to use that day or refrigerate or freeze for later use. Expect to pay in the $250 or better price range for a new stand mixer but considering it is multi-function and can replace a few single-use appliances it may be the best choice for you just in this aspect. Again check the sources indicated for finding breadmachines at a lower cost. Another good source for stand mixers especially used is eBay.

I cannot stress this enough, if you buy a breadmachine or stand mixer take the time to read the manual! Doing so will save you a lot of frustration and give you tips for troubleshooting. Very few bread recipes cannot be converted to using a stand mixer and virtually all breadmachine recipes can be converted however, converting conventional bread recipes requires a bit more. You must first reduce the total amount of flour to be less than the recommended amount of total flour for your breadmachine as recommended by your manufacturer. You must add the ingredients to the breadmachine in the order that your manufacturer recommends. If you buy a used breadmachine that doesn't not have a manual check online for a manual you can either order for a charge or print out. Not all manuals are available this easily so ask on forums and blogs if necessary.

As you can see the equipment necessary for successfully making bread at home is not extensive and need not be expensive. Keep in mind that each loaf of bread you make at home goes towards paying for your equipment investment as well as saving you money on your grocery bill.


Monday, December 08, 2008

Frugal Kitchens 101: Breads (1)


The holiday season is upon us meaning more people are baking so I debated which Frugal Kitchens 101 article to post first. As one reader guess from the poll the topic of breadmaking would be featured at some point. Who can resist the urge to cut a thick slice of piping hot bread just out of the oven? Of the 65 who participated 35% did not make any bread at home and the majority 49% made 1 to 3 loaves of bread weekly. Bread in some form is a fundamental part of many meals and snacks. It is the first choice for lunches eaten at home, taken to work or school and when eating out. One of the most popular ways breads are used is in the form of buns for the American favourite hamburger. The reason bread has been such a staple throughout history and continues to be a staple is because bread is inexpensive to make with a few simple ingredients making breads one of the best budget stretching foods possible.

Despite this making bread at home has for the most part fallen out of favour although breadmachines has brought some of that back over the past decade. It's just too easy to stop at the grocery store and buy a loaf of over priced bread conveniently sliced and stuffed into a plastic bag. If you really want that homemade aroma you can buy the over priced refrigerator rolls or dough in the freezer section or over priced bread machine mix. More discriminate buyers will opt for the often over priced specialty breads. The common theme here is over priced. You are really paying for that convenience while buying products in most cases heavily laden with preservatives.

Breads fall into three categories:

  1. unleavened breads - These are simple breads that do not rise. Examples: flat breads - naan, pita, tortilla, pocket breads
  2. yeast breads - These breads use yeast as a leavening agent. Examples (click links for recipes): sweet breads (cinnamon rolls), pumpernickel, twelve grain, 100% whole wheat, bagels as well as several others in the archives for this blog
  3. quick breads - These are breads that use baking powder or baking soda/buttermilk as leavening agents. Examples: soda breads, pancakes, muffins, zucchini loaf, banana bread, corn bread
Why is making your own bread a good budget stretching strategy? The most expensive ingredient in most breads is flours. All other ingredient (salt, sugar, yeast, oil) costs are so low that they barely more than a couple of cents to the overall cost of the bread. Time to do some math. If we do a cost comparison of my French bread that makes 2 large loaves or 3 large baguettes the store bought equivalent at our prices would cost me $4.47. The cost to make the loaves myself including the electricity for baking 32¢ for the flour, < href="http://momskitchencooking.blogspot.com/2006/11/party-sandwich-canned-carrots.html">basic white bread is more expensive to make because it has an egg (10¢) and milk (5¢) as ingredients that at my costs add an additional 15¢ to the overall cost of that loaf. However, this loaf of bread is far superior to the cheap, sandwich bread in the stores. It is more in line with the more expensive packaged breads or bakery type breads that cost anywhere from $2.49 to $3.29 per loaf so even though this breads cost me under 73¢ to make I am still saving a considerable amount of money. Similar saving can be shown for quick breads and flat breads. In short, there are very few breads that you can buy that cannot be made cheaper at home. If you substitute just one loaf of store bought bread for homemade per week you will be saving money.

People often use the excuse that making bread at home is too difficult or time consuming. For quick breads there is nothing more involved than measuring and mixing the ingredients then baking. Quick, easy and budget stretching! Yeast breads involve a little more prep work but need not be difficult or time consuming. Once the dough has been kneaded, the only time involved is waiting for proofing and baking of which you can be doing something else while you wait. First, the dough can be made:
  1. by hand - This involves manually mixing and kneading the dough. It is the most time time consuming but is cheaper because it eliminates any special equipment or additional electricity.
  2. breadmachine - These little workhorses take the guess work out of breadmaking. Simply dump the ingredients into the baking pan, hit the desired setting and the machine does the rest. However, I highly recommend you watch the dough to ensure it is not too dry or too stick after the knead and adjust the flour or liquid if needed. Many people are using breadmachines on dough setting only then baking in the oven because they don't like the bread baked in the machine.
  3. KitchenAid® stand mixer or similar - A stand mixer gives you the greatest degree of control without the time involved by hand. It allows you to increase or decrease the knead time as desired. It also allows you to make the dough for more than one loaf of bread at a time.
I've discussed the monetary savings so now will give some tips on ways you can save time to make breadmaking an enjoyable experience. Did you know that you can make yeast bread doughs then refrigerate up to 4 days or freeze for later use? Well you can and that can be one of your biggest time savers. Make a batch of yeast bread dough for two to four loaves. Bake one or two then put the rest in the fridge or freezer to use as needed. Do the same thing with pizza dough or any other sweet dough. Allow to come to room temperature then shape as desired then proof and bake. You can even make muffin (one recipe here) and pancake batter ahead of time and keep it in the refrigerator to use later. Now here is the beauty of keeping these kinds of doughs in your refrigerator or freezer. For a fraction of the cost of store bought and with in most cases under 10 minutes prep time you have created a convenient way for you to enjoy homemade bread throughout the week.

*this is a general estimate for basic low cost ingredients (salt, sugar, yeast, oil)