My photo
Ontario, Canada
I am a wife, mother and grandma who enjoys the many aspects of homemaking. A variety of interests and hobbies combined with travel keep me active. They reflect the importance of family, friends, home and good food.
Cook ingredients that you are used to cooking by other techniques, such as fish, chicken, or hamburgers. In other words be comfortable with the ingredients you are using.
--Bobby Flay

For Your Information

Please watch this area for important information like updates, food recalls, polls, contests, coupons, and freebies.
  • [March 19, 2020] - Effective Mar 17, this blog will no longer accept advertising. The reason is very simple. If I like a product, I will promote it without compensation. If I don't like a product, I will have no problem saying so.
  • [March 17, 2020] - A return to blogging! Stay tuned for new tips, resources and all things food related.
  • [February 1, 2016] - An interesting report on why you should always choose organic tea verses non-organic: Toxic Tea (pdf format)
  • Sticky Post - Warning: 4ever Recap reusable canning lids. The reports are growing daily of these lids losing their seal during storage. Some have lost their entire season's worth of canning to these seal failures! [Update: 4ever Recap appears to be out of business.]

Popular Posts

Showing posts with label Kitchen Aid. Show all posts

Wednesday, March 17, 2010

Irish Soda Bread (1)

Happy St. Patrick's Day!

Many in North America celebrate St. Patrick's Day where the two traditional meals are Irish Stew or corned beef with cabbage usually served with some type of bread and washed down with green beer. My husband and I tend to eat out that night savouring a bit of American Irish cuisine combining celebrating St. Patrick's Day with another social event.

Irish soda breadIrish Soda Bread

It just seems natural to serve Irish Soda bread with the St. Patrick's Day meal. Irish Soda bread is an Irish staple with the traditional version made without yeast. The rise comes from the interaction of the buttermilk and baking soda. This recipe originally written for a bread machine uses yeast to ensure a good rise but still has all the flavour of a traditional Irish Soda bread. I've converted the recipe to use a stand mixer. While this bread does have sodium in the form of baking soda (sodium bicarbonate) it is considerably less than most loaves of bread pushing this bread into the low sodium category. The result is a lovely bread to serve with the meal as well as make corned beef sandwiches for the following day's lunch.

Irish Soda Bread
source: Garden Gnome

1 c buttermilk
1 tbsp butter
1 tbsp honey
¼ tsp baking soda
¼ c rolled oats
2¼c unbleached flour
1 tsp instant yeast

Place dry ingredients in stand mixer bowl. Mix to blend. Measure buttermilk in measuring cup then add in the butter and honey. With stand mixer on setting 1 (mix) slowly pour in the wet ingredients. Mix until dough cleans the side of the bowl. Set to setting 3 for kneading. Knead until smooth and elastic. Remove dough hook. Remove dough, lightly oil bowl then return dough to bowl for proofing until doubled. Punch down and form into loaf on Silpat lined baking sheet. Allow to rise until double in size. Cross-hatch if desired. Bake at 200ºC/400ºF until golden brown and loaf sounds hollow when tapped.


Sunday, January 06, 2008

Cheese 'N' Onion Bread and 100% Whole Wheat Bread

Today was warm for the season and it was rainy. That meant it was good for the heating bill but not so good for things like making bread. The weather plays a huge role in cooking, baking and home food preservation something that many fail to take into consideration. For example, low front days or rainy days are not good candy making days. High humidity or too dry days will affect bread dough even if with air conditioning and heating. So the next time you try cooking or baking something and it doesn't turn out as expected, consider the effects of weather.

I wanted to bake breads today so that meant adjusting for the weather. With any bread recipe I always measure out about a half cup of flour. Once the bread is mixed the extra flour is added just enough to get a dough that is not sticky. On damp days like today more flour is needed. I ended up using the bread proofing setting on my oven, something I seldom do. Even with that the bread was sluggish taking longer to rise. Had it been only one loaf of bread I could over looked the weather but when both were tried and true loaves, behaved poorly with needing extra flour and longer proofing time I knew it was the weather. Problems aside, I ended up with two lovely tasting loaves even though they would not have won awards for symmetry but both were perfect for sandwiches.

Cheese 'N' Onion Bread

Breads do not need to be plain and while white and whole wheat tends to be the most common, there are so many more varieties. Any white bread can be changed by a few additions. This recipe started out as it was meant to be, not a white bread. I modified it significantly for when I made the loaf in a bread machine then again for the stand mixer.

Cheese 'n' Onion bread is a good way to use the homemade dried onion pieces I have spoke with in earlier entries. Extra sharp cheddar cheese packs a punch of flavour. Be sure to use a good quality cheddar for best flavour. If you want the top crust soft, brush with butter while the loaf is hot as I did with this loaf. Also, if you let the bread sit and cool as in the picture the bottom will be quite soft because of condensation. This is fine for pictures but for best results move the bread on the rack over a half sink or sit above a cake pan to give more air circulation allowing the bottom crust to cool without becoming too soft.

Cheese 'N' Onion Bread
ABM recipe modified for KitchenAid® stand mixer

1 ⅔ c milk
3 tbsp organic sugar
1 ½ tsp sea salt
4 tsp dried onion
1 c extra old cheddar cheese, grated
4 ½ c unbleached flour
2 tsp instant yeast

Place the dry ingredients in the stand mixer bowl. Mix on speed 2 for 30 seconds. Continue mixing while slowly adding milk. The dough should clean the sides of the bowl. If not add just a little extra flour until the dough cleans the sides of the bowl as is not sticky. Knead on speed 2 for 3 minutes or until the dough is smooth and elastic. Turn off mixer and remove dough hook*. Cover the bowl with plastic wrap and let rise until double. Punch down and form into a loaf. Place in loaf pan and let rise until double. Bake at 205ºC (400ºF) until golden brown and loaf sound hollow when thumped with the back of a spoon. Turn the loaf out onto a baking rack to cool.

*Always make sure the mixer is unplugged before attaching or removing attachments.

The original recipe for this wonderful whole wheat bread started as a bread machine recipe but I was never happy with the results so I did a lot of tweaking. Many bread machine recipes use water and skim milk powder. That is so you can use the delay setting. However, actual milk gives a much nicer result. Milk adds a softness to the bread as does oil and honey. The original recipe called for using shortening. Now there are times when shortening is the only thing that will work but this isn't one of them. Shortening also adds softness but no flavour so butter is a better choice since it adds flavour and it makes more sense given that I insist on as natural as possible ingredients.

100% Whole Wheat Bread

Whole wheat bread is a good breakfast and sandwich bread so I try to make a loaf a week. This particular loaf has a lovely flavour. The flavour comes from all natural ingredients. A longer rise time is well worth the taste of this loaf.

Whole wheat flour can result in a shorter, denser loaf of bread because of a lower gluten content. There are two ways to increase the volume of the bread. The easiest way is to add 1 tbsp gluten flour for every 3 c of whole wheat flour. The second method and the one that should be used by those on gluten-restricted diets is to use a longer knead time along with a longer rise time. If using the second method the rise time can be as much as doubled so plan on making the bread earlier in the day for dinner or later afternoon for breakfast the next day.


100% Whole Wheat Bread
ABM recipe modified for KitchenAid® stand mixer

1 ½ c milk
3 tbsp butter
2 tbsp local honey
2 tbsp fancy molasses
2 tsp sea salt
4 c whole wheat flour
1 ½ tsp instant yeast
1 tbsp gluten flour (optional)**

Place the dry ingredients in the stand mixer bowl. Mix on speed 2 for 30 seconds. Mix wet ingredients together in a small mixing bowl. Continue mixing on speed 2 while slowly adding milk. The dough should clean the sides of the bowl. If not add just a little extra flour until the dough cleans the sides of the bowl. Knead on speed 2 for 3 minutes or until the dough is smooth and elastic. Reduce speed to 1 and slowly add in raisins until well mixed. Turn off mixer and remove dough hook*. Cover the bowl with plastic wrap and let rise until double. Punch down and form into a loaf. Place in loaf pan and let rise until double. Bake at 205ºC (400ºF) until golden brown and loaf sound hollow when thumped with the back of a spoon. Turn the loaf out onto a baking rack to cool.


Friday, December 21, 2007

Gingerbread Spritz Cookies & Glazed Chicken

I decided to finish up my Christmas cookie baking today as I will have little time tomorrow. The two most requested cookies for Christmas are shortbread and peanut butter which suits me just fine. So I start off with a few fancier cookies for entertaining and finish off with the shortbread and peanut butter signaling the end to my holiday cookie baking.

I made a batch each of Classic and Gingerbread Spritz cookies this morning. This afternoon I made large batches (10 dozen each) of shortbread and peanut butter cookies. What really helps when making larger batches is my KitchenAid® stand mixer. Don't get me wrong as it makes short work of smaller batches but I really appreciate how well the KitchenAid® stand mixer works for larger batches.

Gingerbread Spritz Cookies

A cookie press is ideal for making several dozen cookies in a short amount of time. If you haven't tried a cookie press you will be pleasantly surprised. They are easy to use and practically fool proof. The smaller yet nicely shaped cookies are a delight.

Now if I made gingerbread cookies my family would make the expected ohs and ahs then ask for peanut butter cookies. However, gingerbread is a Christmas tradition so I make gingerbread and gingerbread spritz cookies. Our family enjoys both and I'm sure you will too.

Gingerbread Spritz Cookies
source: Manual for Wilton Cookie Master™ Plus, downloaded from http://www.wilton.com

1 c butter, softened
⅔ c dark brown sugar
1 egg
3 c unbleached flour
½ tsp salt
½ tsp allspice
½ tsp cloves
½ tsp cinnamon
½ tsp ground ginger

Preheat oven to 375°F (350°F convection). Cream butter, egg and sugar using KitchenAid® stand mixer on setting 6. Stir together flour, salt and spices in separate bowl. Gradually
add to creamed mixture, mixing on setting 4 to make smooth dough. Do not chill. Shape dough into small logs and place in Cookie Max™. Using desired disk, press shapes onto ungreased cookie sheet. Bake 8-10 minutes or until lightly browned around edges; remove cookies from
sheet. Cool on rack.
Makes 6-7 dozen cookies

My Notes: The gingerbread spritz dough is a bit stiffer than the classic dough so expect a bit more resistance when pressing the cookies. The resulting cookies are not quite as spicy as other gingerbread cookies.

Glazed Chicken

During the busy holiday season I like to keep the meals rather simple. This past week boneless, skinless chicken breasts were on sale so we took advantage of that. Last night's dinner was a very simple and frugal meal made under 30 minutes. I served the chicken with home canned green beans and baked potatoes topped with a little butter and chopped parsley.

Method: Place 4 boneless, skinless chicken breasts in a medium hot pan. Sear on both sides. Season with lemon pepper or seasoning of your choice. Continue cooking 5 minutes on medium. Pour in 1½ c chicken stock. Bring to a boil. Reduce heat and continue cooking at a simmer 10 minutes. Add a good dash of Worcestershire sauce and about 1/2 tsp browning. Mix a cornstarch slurry. Slowly pour into the liquid in the pan and cook just until thickened. Stir the chicken to coat with the glaze. There will not be a lot of glaze, just enough to give a nice coating with a little extra.


Monday, December 03, 2007

Tilapia & Butter Tart Squares

Well, the best laid plans tend to go astray and so it was this past weekend. We travelled with the intentions of staying at the home of one of our kids Saturday night and then visiting another on Sunday. Mother Nature kicked in and cut our plans short so I didn't get the cooking done at their houses that I had planned. I managed to make raisin bread before grandbaby tuckered me out. What a total sweetheart grandbaby is! The storm hit overnight and by morning with the threat worsening weather we made the decision to head home early. It was a good thing as it took us an hour and half longer to get home due to road conditions.

Tilapia

We eat a fair amount of local fish but also enjoy fish from other sources. Tilapia is a very mild tasting fish to the point that there is almost no taste. Many chefs find this mildness a flaw but for those who want the benefits of eating fish without a strong fish flavour, tilapia is ideal. I find myself siding with the chefs so tilapia is not often served.

The mild flavour of tilapia lends itself well to a variety of seasonings but I wanted to highlight the mildness. I pan fried the tilapia fillets in grapeseed oil and seasoned lightly with lemon pepper. The sides were a long grain/wild rice blend cooked in chicken stock and home canned green beans. The meal was light but filling.


Butter Tart Squares

Anyone who knows me or who reads this blog will know that desserts are not my strong suit. We don't include desserts as a normal part of our dinners. From time to time, I splurge and make a dessert. Tonight's dessert was butter tart squares. Butter tarts are a Canadian treat, a staple of Canadian pioneer cooking. They are of Canadian origin. The ingredients are simple staples found in every pantry. So when I came across this recipe for butter tart squares I had to try it to see how close it came to actual butter tarts.

This picture really doesn't do justice to the squares. The squares are made in two steps and I used the KitchenAid® stand mixer for both. The topping forms a thin crust. Now this dessert is oh so sweet! Anyone with a sweet tooth will be in seventh heaven eating this.

Butter Tart Squares

1 c all-purpose flour
2 tbsp sifted icing sugar
1/3 c butter

2 eggs
1 1/2 c lightly packed brown sugar
1/4 c melted butter
1 tbsp vinegar
1 tsp vanilla
1 c dark raisins
1/2 c chopped nuts

Combine first 3 ingredients until crumbly. Press into a greased 9 inch square pan. Bake at 350 F for 10 to 15 minutes. Remove from oven.

Mix the remaining ingredients well. Place on top of crust and bake for 25 minutes or until set and browned. Place on wire rack to cool. Cut into squares.


Sunday, November 25, 2007

Raisin Bread

I make a lot of yeast breads and while all are enjoyed, raisin bread has to be one of my husband's favourites. I've modified most of my yeast bread recipes to be able to make the dough using the KitchenAid® stand mixer. I find I am getting better results using the stand mixer for all breads. I'm also getting better results because I finally chucked all of my Baker's Secret bakeware and replaced it with Wilton. I honestly got tired of the Baker's Secret non-stick coating flaking off and then having to replace it under normal use. The Wilton bakeware is non-stick but is quite heavy but more important it results in a lovely loaf of bread. Metal loaf pans give better results than silicone loaf pans so do use metal when baking bread.

Raisin Bread

Raisin bread smells heavenly baking, making your mouth water before it is taken from the oven. It is the perfect breakfast and snacking bread. It also makes wonderful toast. Raisin bread really almost falls under the category of comfort foods. We like raisin bread nice and warm with a little butter or cream cheese. A loaf never last long and is one of the first to be requested especially during the colder months. Life is good curled up on the couch, munching on raisin bread while the snow creates a blanket on the ground!

Raisin Bread

1 ⅔ c milk
2 tbsp butter
3 tbsp organic sugar
1 ½ tsp sea salt
⅓ c raisins
1 tsp cinnamon
4 ¼ c unbleached flour
1 ½ tsp instant yeast

Place the dry ingredients except raisins in the stand mixer bowl. Mix on speed 2 for 30 seconds. Add butter to the bowl and mix on speed 2 for 30 seconds. Continue mixing while slowly adding milk. The dough should clean the sides of the bowl. If not add just a little extra flour until the dough cleans the sides of the bowl. Knead on speed 2 for 3 minutes or until the dough is smooth and elastic. Reduce speed to 1 and slowly add in raisins until well mixed. Turn off mixer and remove dough hook. Cover the bowl with plastic wrap and let rise until double. Punch down and form into a loaf. Place in loaf pan and let rise until double. Bake at 205ºC (400ºF) until golden brown and loaf sound hollow when thumped with the back of a spoon. Turn the loaf out onto a baking rack to cool.


Thursday, November 08, 2007

Maple Oatmeal Cookies & Oatmeal Banana Muffins

Today was dull and grey, threatening to either rain or flurry making it an ideal day to experiment in the kitchen. I decided to try out two new recipes, one for cookies and the other for muffins. Oatmeal was the theme. The smells wafting from the kitchen were heavenly!

Maple Oatmeal Cookies

Canadian maple syrup is graded into two classes (Canada #1, Canada #2) that are divided into four colour classes (extra light, light, medium, amber [Ontario amber]). The flavour ranges from very delicate to strong. Canada #2 maple syrup either amber or Ontario amber is best suited for baking or cooking.

Maple syrup gives this oatmeal cookie that little extra something! They are chewy in the middle but firm as they cool. These cookies get the seal of approval from my family.

Maple Oatmeal Cookies
source: Ontario Maple Syrup Producers Association modified by me

1 ½ c organic sugar
½ c shortening
2 eggs
⅓ c pure Maple Syrup
1 ¾ c unbleached flour
1 tsp sea salt
1 tsp baking soda
2 c quick cooking oats
1 c raisins
½ c chopped walnuts

Heat oven to 375ºF (350ºF convection). Combine sugar, shorten, eggs and Maple Syrup in KitchenAid® stand mixer bowl. Mix on setting 4 until well creamed using the flat beater. Combine dry ingredients in separate bowl and mix with a fork. Set the mixer to setting 2 and slowly add the dry ingredients. When mixed, remove the bowl. Drop dough by rounded teaspoonful onto ungreased cookie sheets about 2 inches apart. Bake until light golden brown, 8 to 10 minutes. Remove from cookie sheet and cool.
Yield: about 4 doz cookies

Banana Oatmeal Muffins

What better way to great the morning than fresh homemade muffins? I have a few tried and true family favourites but am always looking for a new muffin to add. Since I was baking with oatmeal it seemed logical to make an oatmeal based muffin.

These tender, scrumptious muffins have a lovely banana flavour. Serve them hot from the oven or re-warm for a nice breakfast treat! The recipe yield was 12 muffins.

Banana Oatmeal Muffins
source: Jean Paré, Company's Coming Muffins & More (1983), Pp. 12., modified by me

1½ c unbleached flour
1 c quick cooking oats
½ c organic sugar
2 tsp baking powder
1 tsp baking soda
½ tsp sea salt
2 eggs
¼ c vegetable oil
¼ c milk
1 c mashed bananas*

Measure the dry ingredients into a mixing bowl. Stir with a fork to mix well. Make a well in the centre. In a small bowl mix the eggs, oil, milk and bananas. Hand whisk. Pour the mixture into the well of the dry ingredients. Stir until just moistened. The batter will be lumpy. Spoon mixture into greased muffin tin or silicone muffin pan 3/4 full. Bake at 400ºF (375ºF convection) [200ºC/190ºC convection] for 20 minutes or until centre tests clean with toothpick.
Yield: 12 muffins

* about 3½ medium very ripe bananas


Monday, November 05, 2007

No Bake Cheesecake, Home Canned Stew Beef & Ham

Well my husband is off to hunt camp and because I made a smaller lasagna and extra venison chili while preparing foods for his trip I didn't have to worry about cooking dinner over the weekend. I had and still have a lot of cooking plans except, yesterday morning I awoke feeling quite under the weather. So it has not been the cooking frenzy start I had planned. I made a no bake cheesecake, one of my kid's favourites yesterday. There's little to it but is a definite tried and true recipe, can't fail recipe. Then I decided to put the new to me All American pressure canner through its paces.

No Bake Cheesecake

Years ago my sister-in-law made a desert my husband and kids raved over. It appeared at every family get together and she was the only one who made it. It was a cheesecake that was rich and creamy topped with blueberries. I finally broke down and asked her for the recipe. It was a no bake recipe that was oh so simple there was no way of making a mistake. Now before you scoff at this, there is a very nice, upper end restaurant we frequent that has this very desert on their menu and it is one of their most requested desserts. I use home canned cherries or other fruit for a topping but honesty it still goes over nicely without any fruit topping.

No Bake Cheesecake

2 c graham cracker crumbs
4 tbsp melted butter
2 - 8 oz packages cream cheese, room temperature
1 c granulated sugar
2 c Cool Whip topping

Pour the graham cracker crumbs into a 9" x 9" x 2" baking dish. Melt the butter and drizzle over the graham cracker crumbs. Mix the butter into the crumbs until well blended. Pack down evenly. Refrigerate 1 hour or until firm. Place cream cheese and sugar in KitchenAid® stand mixer bowl. Blend on speed 3 until well creamed. Blend in Cool Whip on speed 3. Remove bowl from stand mixer. Spoon mixture evenly over the graham cracker crumb crust. Chill 30 minutes. Spoon fruit filling over the cheese mixture. Chill well then cut into squares for serving.
Serves 9

Home Canned Stew Beef and Ham

Home canned meats are wonderful to have on the pantry shelf for quick meal starts. The meat is already cooked so only needs to be used as is as an ingredient for another dish or drained and added cold. As mentioned previously I do not can up a lot of meats but like to have a variety. I was taking my new to me All American pressure canner for its maiden run so decided to can up 5 - 500 ml jars of stew beef (1) and 2 - 500 ml jars of ham (2). Seven wide mouth 500 ml jars gave me a half canner load. The two jars of ham were a test run to see how I liked the results.

Method:
(1) Cut the stew beef into 1 - inch pieces. Place the stew beef along with 1 small chopped onion into a sauce pot. Cover with water. Bring to a boil and cook until the centres of the meat pieces are no longer pink. Spoon into wide mouth 500 ml jars leaving 1 - inch headspace. Add 1 tbsp Worcestershire Sauce and 1 tsp Montreal Steak Spice per jar. Pour cooking liquid over the beef leaving 1 - inch headspace. Wipe rims and adjust two piece lids. Place in pressure canner.
(2) Cut a ham slice 1 - inch thick. Cut across the slice to form 1 - inch cubes. Cover the cubes with water and bring to a boil. Spoon into wide mouth 500 ml jars leaving 1 - inch headspace. Pour cooking liquid over the beef leaving 1 - inch headspace. Wipe rims and adjust two piece lids. Place in pressure canner.
To Process: Process at 10 lb pressure for 75 minutes. Allow pressure canner to depressurize. Remove jars from canner and allow to cool. Check for seal. Wipe jars, label and store.


Friday, November 02, 2007

Dinner Rolls

My husband leaves for hunt camp early Saturday morning. The hunt camp tradition is to bring part of last year's kill to bring luck for this season's hunt. I made a large batch of venison chili yesterday for the camp with enough for us for dinner as well. To go with the chili, I made dinner rolls.

Dinner Rolls

These dinner rolls were a perfect accompaniment to the venison chili. The dinner roll recipe came with my breadmachine but I modified both the ingredients and method. The result is a nice, soft, flavourful dinner roll that goes well with any meal.

Dinner Rolls

1 ¼ c milk
2 tbsp butter
2 tbsp organic sugar
1 ½ tsp sea salt
3 ¼ c unbleached flour
1 ½ tsp instant yeast

Place sugar, salt, flour and yeast in KitchenAid® stand mixer bowl. Mix on speed 2 for about 30 second. Continue mixing on speed 2 and add butter. Slowly pour in milk and continue mixing until dough cleans the side of the bowl. Knead dough on speed 2 for about 3 minutes or until dough is smooth and elastic. Remove dough hook. Cover the bowl with plastic wrap and let rise until double. Divide dough into 9 pieces. Roll the pieces into smooth balls and place on baking sheet. Cover with a tea-towel. Let rise until double. Bake at 375ºF until golden brown.


Tuesday, September 25, 2007

Bagels

The smell of fresh baked bread wafting through the house is one of life's little pleasures. Store bought bread just does not compare. Homemade breads are very frugal to make regardless of how you make the dough and you control the ingredients. I've been making homemade breads ever since we married years ago and still make most of the breads we eat. It always surprises me to hear someone marvel at the taste of my breads followed by the comment that breadmaking is so much work. You would be surprised at how easy making bread is!

Breadmachines and stand mixers take a lot of the work out of kneading the dough and free up valuable time. I have and still occasionally use a Black & Decker All-in-One Plus™ breadmaker bought in the late 1980s. It still works nicely and has been a real workhorse but more and more I was using for making the dough only as we prefer breads baked in the oven. The second problem I ran into with the breadmaker was the limitation of the amount of dough that could be made at one time. Traditional recipes had to be adjusted for the breadmaker as well. This often meant making two or more batches of dough and because they were proofing at different times the oven had to be on for longer periods for the baking. This year I bought a KitchenAid® Professional series stand mixer as a way to eliminate as many single purpose small appliances as possible. I have been testing and converting my favourite breadmachine recipes to use with the stand mixer.

I made bagels yesterday using the recipe (see below) from my breadmachine manual except I used the KitchenAid® stand mixer. The yield was nine large bagels. This recipe could easily be doubled.

I think the biggest change for me was determining when the dough had been kneaded enough. The dough was mixed on Speed 2 until smooth and elastic (1) for a total of about 4 minutes. Then I covered the mixing bowl with plastic wrap and let the dough proof. Once the dough had proofed, I divided it into somewhat equal portions (2) on a sheet of parchment paper to rise. I omitted the step of greasing the top electing instead to cover them with parchment paper then laying a tea towel on top.

What gives bagels their unique texture is boiling them for a short period before baking. According to Breadtime by Susan Jane Cheney it is the shape and method of cooking not the dough that makes a bagel a bagel. Her method is to boil a minute or two on each side in lightly salted water. The instructions for this bagel recipe was to simmer 5 to 6 minutes per side in water with a tbsp of sugar added. Either method will give good results. Before baking the bagels were brushed with an egg yolk and water mixture. The end result (4) was worth waiting for.

Ready to Enjoy

The outside of the bagels is a nice golden brown. I opted to leave them plain as this was a test batch. After brushing on the egg mix, the bagels can be sprinkled with poppy or sesame seeds, diced onion, garlic chips or cheddar cheese if desired. The taste and texture got two thumbs up from my husband and son who basically just inhaled. Five of the nine bagels are already gone so by tonight they will likely all be gone! I will be making a double batch next leaving half plain and topping the other half but I have decided with what. Now I just have to work on forming them a bit better.

Bagels

modified for using a stand mixer by Garden Gnome


1 c water
1 1/2 tsp organic sugar
1 tsp sea salt
3 c unbleached flour
1 tsp instant dry yeast

Combine the sugar, salt, flour and yeast in the mixing bowl. Mix on Speed 2 with spiral dough hook then slowly pour in the water. Continue mixing on Speed 2 until the dough cleans the sides of the bowl adding a bit more water if needed. Knead on Speed 2 for 2 minutes or until the dough is smooth and elastic. Remove the dough hook, cover the bowl with plastic wrap and set in a warm spot free from drafts to proof. When the dough is double in size, remove from bowl and divide into 10 equal portions. Form into round, smooth balls. Using your thumbs make a 1 1/2 inch hole in the center of each ball. Place on parchment paper and cover with parchment paper with a tea towel on top. Allow to rise for 30 minutes or until double. Bring 3 quarts of water and 1 tbsp of organic sugar to a boil. Reduce the temperature to simmer. Simmer 3 to 4 bagels at a time in the water for 5 to 6 minutes per side. Remove with a slotted spoon. Place on greased baking sheet dusted with cornmeal (optional). Brush with egg yolk mixed with a little water. Sprinkle on toppings if desired. Bake at 400ºF (200ºC) 25 to 30 minutes.
Yield: 10 bagels


Saturday, September 08, 2007

Meatballs, Homecanned Meatballs in Sauce and Homecanned Sauce

I'm a bit behind on my tomato schedule this year so hopefully the motivation will strike soon! The fourth hamper of tomatoes was sitting in the kitchen waiting processing yesterday. I decided it would be a good day to make a smooth tomato sauce for canning and using some of that sauce for a homecanned convenience product. A family sized package of lean ground beef provided the inspiration. My husband loves meatball subs so I routinely make up a large batch of meatballs then freeze them. However, the prospect of having ready-to-use meatballs in sauce sitting in the pantry would be even easier for a quick meal. With the decision of what to can settled it was time to set to work.

The sauce (see below) was prepared first and simmering while I made the meatballs. I had the meatballs in sauce processing in the canner just in time for dinner which of course was meatball subs made from another batch of meatballs. After dinner, I processed most of the remaining sauce, cleaned up the kitchen and smiled each time a jar pinged.

Meatballs

When I make meatballs I don't use any fillers or eggs. I want pure lightly seasoned meatballs that let the flavour of the meat shine though giving me a versatile meatball that can be used with a variety of sauces. My method follows. There are no measurements as I just use what I have.

Method:
I start with freshly ground lean ground beef. The KitchenAid food grinder attachment is ideal for this purpose. I mix in a couple of healthy dashes of Worcestershire sauce, light sprinkling of salt and fresh ground pepper. Once mixed I pour in cold milk and mix adding more cold milk until the meat holds together when pinched. The meat is then formed into balls using a meatballer (1). I use a little extra virgin olive oil in a non-stick skillet to brown the meatballs (2) on medium heat turning as needed. Once cooked*(3) the meatballs are ready to enjoy or can be cooled for freezing**.

* for canning - Brown only but do not cook through. Keep hot until ready to fill the jars.
** for freezing - Once cooled, spread the meatballs in a single layer on a cookie sheet. Freeze. Remove from cookie sheet and pack into zipper style freezer bag or vacuum seal into meal sized portions.

Meatball Sub

Meatball subs are inexpensive, quick and easy to make sure to please. This was my husband's meatball sub so he decided against the nice green (upper right) romaine lettuce. His excuse was it might interfere with the full flavour of the meatballs!

Method: Start with a submarine bun. Cut down one side of the top on an angle from end to end. Repeat. A "V" shaped wedge will be formed leaving a "V" shaped well in the bottom. Fill the well with meatballs. Sprinkled on fresh grated Parmesan cheese. Place the wedge on top and enjoy!

Sauce & Meatballs in Sauce

I decided to make a smooth tomato sauce that would do double duty. Again there are no firm measurements only the method so adjust the seasonings to taste. I used approximately 3/4 of a hamper of tomatoes for the sauce. A food mill is essential for making smooth sauces. It makes quick work for easily removing skins and seeds. The sauce can be canned using a boiling water bath (BWB) canner but the meatballs in sauce must be processed using a pressure canner.

Method: Wash the tomatoes then cut in half. Place about 1/4 of the tomatoes into a large stock pot and slowly bring to a boil while stirring to prevent sticking. Continue adding cut tomatoes until all are used. When all the tomatoes are heated through remove from heat. Run then tomatoes in small quantities through the food mill. Return the sauce to the stockpot reserving the skins and seeds for drying (good for tomato powder). Add one finely chopped Spanish onion, 2 finely chopped stalks celery, 2 cloves garlic pressed and 1/2 finely chopped green pepper. Bring to a boil then reduce to a simmer. Seasonings are optional but if using: Stir is Italian seasoning, 1 tbsp brown sugar, 1 tbsp cinnamon, 1 tbsp garlic/onion powder mix, 2 cans (369 ml/13 oz) tomato paste (or same amount homemade) and light dash of salt. Simmer 15 minutes. Adjust seasonings as necessary then simmer for another 15 minutes. The sauce is now ready for canning or freezing.

canned sauce only: Ladle the hot sauce into sterilized mason jars leaving 1/2-inch headspace. Wipe the rims. Adjust two piece lids. Process in a boiling water bath 35 minutes for 500 ml (pints) jars. Remove from canner and allow to cool undisturbed. Check for seal. Label and store.

meatballs in sauce, canned: Pack hot meatballs into 500 ml (pint) jars leaving 1-inch headspace. Ladle hot sauce over the meatballs leaving 1-inch headspace. Wipe the rims. Adjust two piece lids. Process at 10 lb pressure for 75 minutes 500 ml (pint) jars or 90 minutes for 1 L (quart) jars. Allow to depressurize then remove jars to cool. Check for seal. Label and store.

to freeze: Allow sauce to cool then freeze as is in freezer containers. If adding meatballs, allow the meatballs to cool. Stir into the sauce and freeze in freezer containers. For longer storage, pop the frozen sauce or meatballs in sauce out of the container and vacuum seal.


Saturday, May 05, 2007

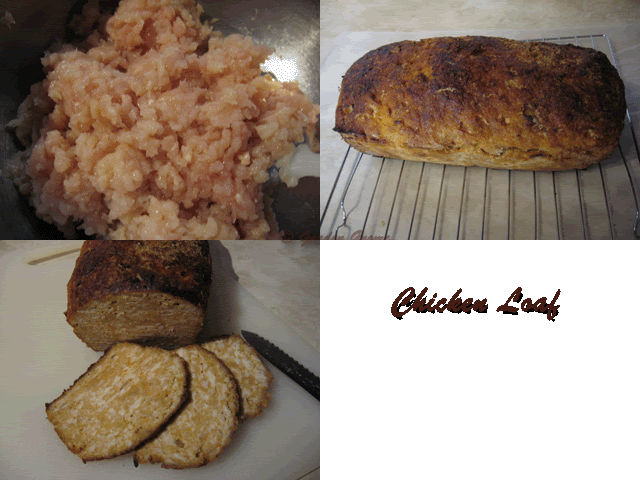
Chicken Loaf

Continuing the chicken theme since chicken breasts are on sale until May 9, part of the second batch of chicken breasts were turned into chicken loaf. There is one recipe in the archives. I took this chicken loaf in a slightly different direction.

Chicken loaf is an easy to make budget stretcher. When cooled and sliced thin, it is perfect for a homemade lunchmeat.

Chicken Loaf

4 large chicken breasts
2 eggs
1 carrot, shredded
1 med onion, chopped fine
1 stalk celery, shredded
3 tbsp Dianna Gourmet Rib & Chicken Sauce
1 tsp honey mustard
dash sea salt
dash fresh ground pepper
3 cups dried bread crumbs

Remove the skin and bone from the chicken breasts. Cut into strips. Grind using the Kitchen Aid® attachment or manual food grinder on fine grind. Whisk eggs and stir into meat. Mix in the vegetables, sauce and mustard, salt and pepper into the meat. Pour in the bread crumbs and mix well. Place mixture into silicone loaf pan. Bake at 350ºF until firm and golden brown on top. Allow to rest for 10 minutes if slicing hot. Cool entirely to slice for lunchmeat.

Chicken Loaf Sandwich

This picture is meant to wet your whistle and get your mouth watering. Chicken loaf is good served on a bed of leaf lettuce and swiss cheese. Top with sliced tomatoes, onions and honey mustard for a deletable sandwich! While this sandwich was made using store bought white bread, it lends itself nicely to homemade 12 grain or sourdough breads.


Saturday, March 24, 2007

Creamy Greens Soup & Sourdough Bread

Soup is an year round favourite, easy to make and inexpensive. As a frugal meal goes, you cannot get much cheaper than a soup made from garden greens and homemade sourdough bread.

Creamy Greens Soup

This recipe was adapted from an episode of Christine Cushing Live on Food Network Canada. I use fresh picked vegetables and herbs where possible for this soup for a nice garden fresh flavour.

Creamy Greens Soup

2 tbsp butter
1 leek, white and light green parts only, chopped
1 medium onion, chopped
2 stalks celery, chopped
2 medium carrots, chopped
1 clove garlic, minced
3 sprigs fresh thyme
2 sprigs fresh parsley
1 bay leaf
4 c chicken stock (use homemade if possible)
2 handfuls fresh spinach (about a half package)
2 handfuls fresh Swiss Chard (about half package)
1/3 c basmati rice
1/3 c heavy cream

garnish: chopped chives, sour cream

Prepare the vegetables. Heat butter on medium heat and stir in leek, onion, celery and carrots. Cook, stirring often about 10 minutes. Add the garlic, thyme, parsley, bay leaf and chicken stock. Bring to a boil then stir in the rice and reduce heat. Simmer for 25 minutes or until rice is tender. Remove the thyme sprigs and remove from heat. Stir in greens until just wilted. Purée the soup in a blender. Return soup to a large, clean pot and stir in the cream. Heat over low heat. Ladle into soup bowls. Garnish with a dab of sour cream and sprinkling of chopped chives.

Garnish: To make the sour cream teardrop, drop about 1/2 tsp of sour cream in the centre of the soup. Insert a toothpick in the centre of the sour cream on a slight angle facing away from your. Draw the toothpick away from you then up.

I've been experimenting with sourdough breads. This recipe used no yeast to help with rising so that means a longer rise time. Sourdough purists will tell you that adding yeast means you do not trust your starter. The rise time can be five hours or more but the taste is worth it. This particular loaf was left overnight before it was finally doubled.

Sourdough Sponge

Sourdough recipes always refer to the sponge. Some will start out having you make the sponge that day but the best sourdough is one that has been left to ferment and age. I know I mentioned how I made the sourdough starter but to save you from going through the archives, I use 1 c of flour and 1 c of water. Stir that together then set it aside. Once the wild yeast has had a chance to multiply, the starter develops a sponge like texture. It is thick and bubbly. This is what you are looking for when using a sourdough starter.

Sourdough Dough

Sourdough at its simplest is starter, flour, salt and sugar. This dough was made using no additional yeast. I can't recall where I got the recipe but I have made a few changes. The important thing to remember when making sourdough bread without additional yeast is to have patience. The rise time can be long so start early in the morning if you want the bread for dinner. Or start the dough so that it can rise overnight. This particular dough was left to rise overnight.

Sourdough Bread

2 c sourdough sponge
2 c unbleached flour
2 tbsp olive oil
4 tsp honey
2 tsp salt
about 1/2 c to 3/4 c water

Place dry ingredients in Kitchen Aid bowl. Mix then attach dough hook. In a separate bowl stir the wet ingredients together with the exception of the water. Set the mixer to setting 2 and slowly pour in the wet ingredients. The dough will be very stiff. Depending on your kitchen temperature and humidity levels you may need to add water to get the dough to the right consistency. Knead 2 minutes. Remove from the bowl and shape into a round loaf. Pour about 1/2 oz olive oil in your hands then rub over the loaf. Set the loaf on an ungreased cookie sheet sprinkled with cornmeal. Let rise until double. Place a cookie sheet filled with water on a lower shelf in the oven. Place the dough above the cookie sheet on another rack. Do not preheat the oven. Bake at 350ºF 30 to 45 minutes or until loaf sounds hollow on the bottom. Allow to cool then store in a paper bag to keep the crust crunchy.

Note: The rise time for this is quite long. That's ok because it is developing flavour as it rises.

Sourdough Bread

Here's the finished loaf fresh from the oven this morning. It has a nice rustic appeal with a deep, rich flavour and pleasant aroma. It is a perfect, low cost bread for any meal but really lends itself well to simpler, down home type meals. The crust has a nice crunch with a typical sourdough bread texture.


Monday, February 26, 2007

Chicken Loaf

There is nothing better than comfort food when the wind is howling bringing freezing rain and snow. Yesterday we were still under the effects of the Colorado Clipper as it made its way northwest. I decided a chicken loaf combined with homegrown peas, pickled beets, oven baked potatoes and Asiago cheese would make a nice comfort meal.

Chicken Loaf

I started with 6 boneless, skinless chicken breasts but you could use other chicken pieces, deboned with skin removed. I ground them twice then proceeded to make the loaf. This is a recipe I created and will likely tweak a bit more.

This firm loaf is moist, tasty and low fat. It slices nicely, just perfect for making sandwiches the next day.

Chicken Loaf

6 boneless, skinless chicken breasts (about 2 lb)
2 tsp poultry seasoning
1 carrot, grated
1 small onion, chopped
1 tsp carrot powder
2 tsp zucchini powder
1 tsp onion powder
1 c dry bread crumbs
1 egg, lightly beaten

Cut the chicken into strips, grind twice with food grinder. Mix in the other ingredients well. Place mixture onto silicone baking sheet or parchment paper on a baking sheet. Form into a loaf. Bake at 350ºF (325ºF convection) for 40 minutes or until golden brown and firm. Remove from oven and let rest 5 minutes before slicing.

My notes: I intended to add shredded zucchini as well but it was in the garage freezer and I didn't feel like going out in the freezing rain. Next time I will add about 1 c drained zucchini and reduce the zucchini powder to 1 tsp. The vegetables keep this loaf moist and tasty.


Saturday, February 24, 2007

Homemade Meatballs

Meatballs are everyone's favourite not only because they are so tasty but because they are very versatile. They can be made with different kinds of meat or poultry so the possibilities are endless. I bought the Kitchen Aid food grinder attachment mainly for grinding chicken, turkey and pork. The availability of these ground meats tend to sporadic here and while we get ground pork when we buy a half pig, there never seems to be enough ground pork. My husband has a poker game today so I decided it would be the perfect time to try out the grinder.

Kitchen Aid Food Grinder Attachment

The food grinder attachment comes with two grinding plates, fine and coarse. It is easy to assemble and comes appart for easy cleaning. The parts are dishwasher safe with the exception of the knife and grinding plates. The wooden food stomper has now been replaced with a combined heavy plastic food stomper wrench that is dishwasher safe as well. An additional food tray can be ordered to provied a convenient surface of additional food. When doing bigger lots it would be quite beneficial. This grinder can also be used for grinding cooked meats, firm vegetables, dried fruits, cheese, and bread for crumbs. The food processor is already starting to sulk!

Grinding meat works best when the meat is cold and cut into long, thin strips. It is best to work with a well sharpened knife. For this ground meat I used a 5 lb shank roast bought from the butchershop. This was the cut recommended for lean ground beef.

Once the roast was cut into strips, I started grinding. My only problem was having to stand on a wide based step stool in order to feed the strips into the hopper. After the first pass through using the coase grinding plate, the meat was again ground using the fine grinding plate.

Fresh Ground Shank Roast

Surprisingly, grinding twice which is recommended did not take much time at all. I think it helped that I've used a manual food strainer for quite some time so the method was basically the same only a lot less work. I will definitely be buying the Kitchen Aid food attachment shortly to replace my manual one.

The ground meat was so fresh looking! I usually make meatballs in large batches then flash freeze to keep separate, package into meal sized bags and vacuum seal. These are always handy for quick meals. Because I will be using the meatballs in various ways, I tend not to season a lot. The meat will later pick-up the flavour of whatever sauce I use. I also do not like using any fillers in my meatballs.

Meatballs
Milk is used as the binder resulting in a very moist, meaty meatball.

5 lb lean ground beef
1 - 2 tbsp Worchestershire sauce
1 tsp onion powder (optional)
1 tsp ground cumin (optional)
milk - about 1 c
grapeseed oil

Start with very cold ground meat. Add seasonings and mix well with your hands. Gradually mix in milk until the meat will hold shape when pressed into a ball about the size of a walnut. Pour about 1 tbsp of grapeseed oil into a large sautee pan and heat. Form meatballs using a meatball former. Carefully add to the pan as they are made. Turn the first ones as browned then removed when browned through. Continue in this manner adding newly made meatballs, flipping and removing until all the meatball mixture is used.

Once all the meatballs are cooked, if freezing, flash freeze them then package. If using right away, proceed with your favourite sauce.

Hawiian Sweet & Sour

I will admit to cheating with this sauce. The meatballs were destined to travel to today's poker party. The host specifically reqesting this particular sauce that he had had before but could not find which foiled my plans for my homemade sweet & sour sauce. I found some at Sam's Club so decided to use that. The sauce is Mr. Yoshida's Hawiian Sweet & Sour. It was just mixed into the meatballs in the crockpot then the cold meatballs were packed into a cooler for travelling. Still my husband declared them quite good even though they were still cold. All he has to do is plug the crockpot in when he gets there and part of their all day snacking. Warning: Poker parties are hazardous to your waistline!


Wednesday, February 21, 2007

White Cake


A simple white cake recipe is always perfect recipe as everything is usually on hand. It is pure and simple pantry cooking! It doesn't require fancy toppings or icings either. We like it with a little fresh whipped cream and berries.

This particular recipe has been a family favourite for years. I've tweaked it to where I have it the way I like. It is a rich cake that stands up nicely to fresh berries in syrup. What is nice about this recipe is it makes a smaller cake or 6 large cup cakes.

White Cake
source: unknown but tried and true

1 1/2 c flour
2 1/2 tsp baking powder
1/2 tsp salt
1/2 c shortening
1 c granulated sugar
1/2 tsp pure vanilla extract
2 eggs
3/4 c milk

Mix the dry ingredients together. In a separate bowl, mixt shortening, sugar and eggs. Add vanilla. Add dry ingredients and milk alternately. Beat until smooth. Pour into an 8" x 8" well greased cake pan. Bake 45 minutes at 350ºF (325ºF convection). Top as desired.

My Notes: This recipe works well using silicone pans.


Tuesday, February 13, 2007

Recipes & Fancied Up Sheppard's Pie

It is cold, icky and we are under a winter storm warning here. The weather turned about 2 pm today and has been getting steadily worse. Right now I can barely see the road. The good news is the gas installer showed up this morning so I was able to get to huge loads of laundry done in half the time the old machines would have taken per load and since they hold almost three times as much the time savings was even greater. My house has been in an uproar with getting this new washer and dryer set up. Last night my husband decided we were eating out and I was just so thankful! I don't do disruptions well. Anyway we had a lovely steak dinner with the fixings and while I normally take the camera for pictures, I was so exhausted that I simply forgot.

A note on any recipe posted here: Any recipe I post has been tweaked by me and is tried and true. In most cases these are family favourites I've used for years. You may have to do a little tweaking yourself as I tend to go lighter on both sugar and salt but the recipes will be fine the way they are written. For some entries you will see the actual recipe as I found it then in my notes what I did to change it. I am getting a fair amount of email requesting certain recipes as well. What might not be apparent from my blog is I make the recipe, take the picture and update the blog all in the same day for about 95% of the entries. For that reason there may be a day like yesterday where the blog is not updated because I didn't do a whole lot of cooking. So be sure to check back as entries are based on the cooking I do.


For tonight's dinner I decided to do a fancied up sheppard's pie. Now some will say this isn't sheppard's pie because it does have lamb but that what we call it so that's how I'm going to present it. This is an easy comfort food, kicked up just a bit and perfect for a snowy, cuddle on the couch day. Oh and this is my own special creation, one that my family loves.

Fancied Up Sheppard's Pie
source: recipe by Garden Gnome

7 med potatoes, peeled and cubed
2 med carrots, peeled and cut into chunks
1/2 c cabbage cut into small chunks
1/2 c cream cheese
1/2 c sour cream
1 tbsp butter
2 lb lean ground beef
4-6 large fresh mushrooms, cleaned and sliced
1/2 small cooking onion, diced
1 c beef stock
1 tbsp cornstarch
1/2 c frozen corn niblets
1/2 c frozen peas
bread crumbs
sprinkling of chopped chives or sliced green onions


Combine potatoes, carrots and cabbage is large pot. Bring to a boil then reduce heat and allow to cook until potatoes and carrots are tender. Drain. Place the vegetables in a Kitchen Aid bowl or mixing bowl. Attach the flat beater. Add butter, sour cream and cream cheese. Mix until just smooth. Set aside. Brown ground beef, drain then stir in mushrooms and onions. Return to heat and allow to cook until the mushrooms are cooked. Make a slurry of the water and corn starch. Stir into the meat mixture and allow to thicken. Pour the meat mixture into a large casserole dish. Top with corn niblets and peas. Spread the potato mixture evenly over the top. Sprinkle on bread crumbs, a small amount of butter if desired and chopped chives. Bake until warmed through.
Serves 8

Garden Gnome
© 2007


Thursday, February 01, 2007

New Kitchen Toys & Sourdough

I'd like to start this entry by thanking Taste of Home for their very flattering comments regarding my cooking blog. This is a real honour for my blog. I have accepted the invitation to include their Meal of the Day search box so please take the time to check them out for recipes and meal ideas. I'd really appreciate it. And to Tast of Home cheers to good cooking!

My husband dragged me shopping yesterday under the pretext of having to buy a new tv for Superbowl Sunday then would put it in our bedroom to replace a smaller model. I'm not even going to go into that issue! The end result was he got the 37" digital LCD tv and I decided to get a couple of kitchen toys since I'll be doing the hosting for the superbowl party. The guys bring snacks but I make the main meal, breads and like to wow them with a few of my snacks. What better way to get the undivided attention of about thirty guys than cooking great food the will love.

One of my new toys is a Kitchen Aid Professional HD mixer. I debated over this purchase for ages and finally said what the heck. My kitchen is spacially challenged so any appliance I can get to do double duty or one that will eliminate one or more appliances is more than welcomed.

I need to buy a new food processor and my handheld mixer needed to be tossed. The breadmachine, while a true workhorse in my kitchen, will likely not last much longer and the last few years it is used to make dough only because I prefer the results of oven baked bread. With this one appliance, the handheld mixer was tossed and the breadmachine has been moved to the backroom. I've checked out the attachments I can get and the one that really looks appealing is the attachment kit that comes with the food grinder. There is also an attachment that would replace the food processor so I am considering that as well. Any attachment I buy will certainly take up a lot less room than the appliance version and since some of the attachments fit right in the bowl for storage, I will be freeing up cupboard space as well.

My other new toy is an Aroma rice maker. My old one was giving up the ghost and believe me as talented as I am with cooking certain things rice is not one of the. We eat a lot of rice so a rice maker is a must!

I have been asked so many times as to how I make sourdough starter. My simple reply is always mix one part water with one part flour. Other starters will add yeast, sugar, milk or any number of a lot of ingredients but this is not traditional starter. The only things you need for a good starter is water, flour and wild yeast. Stir well and set aside until bubbly. Now this picture does not do justice to the bubbly of the starter but it has the consistency of a very thick, foamy milk shake with a lot of bubbles and a nice sour smell. A starter is not ready to use unless you can smell it and it should not be used unless active (bubbling). I used 1 1/2 c of starter for the following loaf and 1/2 c for drying. When your starter is to the right degree of sourness always reserve 1/2 c for drying. This can be used to seed future batches. I ended up taking 2 c of starter from the original so replaced with 1 c flour and 1 c water. Since I really need this starter for Superbowl Sunday, it will be left until early Sunday then fed just before making a couple of loaves. But before that the starter had to be tested. Watch for the recipes made for this big event!


This was my first time using the Kitchen Aid Mixer and I do have to say I'm impressed. This is a small video clip of the dough making process. It was just as fast and efficient as the breadmaker. The nice thing is this appliance can do more than knead dough!


This is the first loaf of bread from the fresh starter. While the crust could be a little darker, for a sour dough french bread it came out just fine. My husband loved coming home to hot bread fresh from the oven. Me, being critical and wanting perfection for Superbowl Sunday, wanted more. The bread essentially came out as it should. However, I would have liked just a bit more of the developement of the sourdough flavour. By Sunday and given the traditional recipes I will use it should be fine. Since this was a test loaf I used an ABM recipe. All I was really interested in was the taste. This recipe does call for the addition of yeast and when making sour dough bread that is almost an insult as it means you do not trust your starter. But this recipe is really fine for getting the taste right before you make a loaf or two using no yeast. I only make the dough in the ABM but this time used the Kitchen Aid mixer. Either way, let the dough rise until doubled, shape then let rise again and bake.

Sour Dough French (ABM)

1 1/2 c sourdough starter
1/2 c water
1 1/2 tsp sugar
1 1/2 tsp salt
3 1/2 c unbleached flour
3 tsp dry yeast
1/4 c cornmeal
1/4 c water

Make the dough in ABM without using the last two ingredients. When dough is ready, shape then place on a cookie sheet sprinkled with the cornmeal. Place in pre-heated 400ºF for 30 minutes. Pour the 1/4 c water into a shallow baking pan and place under the cookie sheet. Bake until golden brown or loaf sounds hollow.

Note: This is a French style sour dough bread so the crust is expected to be hard, crispy and crunchy.

Enjoy!